

Rear Quarter Replacement

Chat away, Classic Porsche related or otherwise

Moderators: hot66, Miggs, 58A - 71E, impmad2000, drummerboytom, Barry, Helen, Viv_Surby, Derek, KS, abm914, Mike Usiskin

Post Reply
coomo
DDK forever
Posts: 688
Joined: Sat Jan 30, 2016 3:36 pm

Rear Quarter Replacement

Post by coomo »

Had a question from an enthusiast over the weekend.He was slightly confused as to the best route to fit a rear quarter panel.As im currently working on Mikes Tangerine 73,It might prove useful
to anyone whos considering taking this on.
Ive seen many variations of where to do the "cut" on this panel.Ive also done a few variations over the years too.
Unless you are a very experienced metal work guy id suggest not to attempt to undue the roof/gutter seam.
There are 3 interjoining seams in there, and its hellish both in terms of actually separating them and refitting.Its likely that you will add some distortion to the outer roof line,which will
in itself cause further issues to get the flow looking right,plus trying to justify the hours involved.Which is probably why even 911 body guys dont do this.
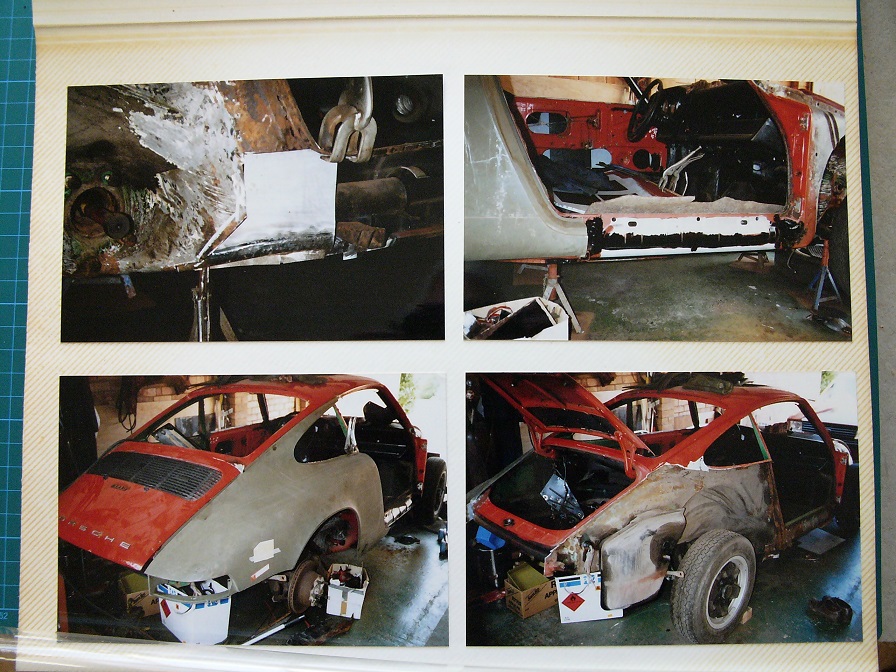
One of the most common "cuts" I seen is above.
Cut middway from rear window apperture and generally finishing around the end of the rain channel flange.
This introduces a few issues that will require far more work in the finishing stages.
Firstly that cut is over 12 inches long.The panel is only about 1mm.There are no folds or edges that offer any resistance to shrinkage.
Most bodyshops use MIG.I can pretty much assure you, that Migging that area will cause the panel to suck in and distort,no matter how patient you are.
Ive been using TIG for 20 plus years,and would still suffer with some degree of shrinkage/warping, even though TIG is far more precise and localised.
So now the panel is warped.Well yes every panel does to some degree.That is usually corrected by dolly/hammer work.
However you cant acess the area with a dolly.Only option now is to either use an electric panel puller to pull it up,or fill it full of filler.
I actually watch a 911 body shop on Youtube do this cut, then had to load another film showing how to correct it.It wasnt pretty.
The rear haunches of a 911 are a mix of flowing swooping lines.I kinda look at bodywork differently,cos I do it.I can generally see when this area has been filled.Its work intensive and tricky
to get the flow back exactly as it was.
The best way (imho) is to cut high and close to the rain channel.Usually 10mm away.
Any heat will run into the rain channel which is far more resistance to warpage.Sure the main panel is a larger area, but heat is kept to a minimum.
Plus of course you get acess right under the inner wing.A lower cut conceals an area which is prone to corrosion that you cant acess.
You can use the rain channel as a guide for a cut line,and get an almost perfect 1mm or so gap to weld into and use panel clamps to keep it tight.
Mikes Car was done this way.Zero distortion.Barely visible weld lines.Just a smidge of lead loading.
Hope this is helpful.


8B333009_4B0E_44F6_ADE9_D39F94DC509E1517070539.jpg
Image
You do not have the required permissions to view the files attached to this post.
sladey
Nurse, I think I need some assistance
Posts: 9373
Joined: Sat Apr 23, 2005 9:08 pm
Location: Nottingham, UK

Re: Rear Quarter Replacement

Post by sladey »

Interesting stuff - thanks for sharing
The simple things you see are all complicated
I look pretty young but I'm just backdated yeah
911hillclimber
Nurse, I think I need some assistance
Posts: 20690
Joined: Mon Mar 10, 2008 6:26 pm
Location: West Midlands

Re: Rear Quarter Replacement

Post by 911hillclimber »

Yes, interesting indeed.
I have done this task just once in 1989 on my 73T.

I took the whole panel off and right along the gutter!
I did this because the Porsche panel was complete with the rear side window and seemed easier to swage/braze the panel than weld the cut where most now cut and weld.

Should add I only had gas welding and occasional MIG and a hired spot welder.
Oh, and only the restoration of 2 MGB's....

You can see where I fought it at the top of the 911's B pillar, just a bit of uneven surface (25mm) under the gutter.

I swaged the gutter over using a home made V mouth tool and some slow and careful hammerwork.
I am no body man for sure.

Image
73T 911 Coupe, road/hillclimber 3.2L
Lola t 492 / 3.2 hillclimb racer
Boxster 987 Gen II 2.9
Strictly
DDK slapper chatter
Posts: 445
Joined: Mon Jan 07, 2008 4:08 pm
Location: Newquay, Cornwall

Re: Rear Quarter Replacement

Post by Strictly »

Thanks for taking the time to write that explanation. Its very helpful. I will be removing my rear quarter panel and have for some time thinking where to cut
Its not urgent so I have the lesuire of time. Thanks to your post you have made my mind up and I can now focus on the plan of being 10mm off the gutter as you have shown and explained
User avatar
hashman
DDK forever
Posts: 716
Joined: Thu Dec 11, 2003 12:46 am
Location: Midlands

Re: Rear Quarter Replacement

Post by hashman »

Thanks, its great to get this info from some one with experience.

Karl
Keep the Outlaw Faith
Post Reply