starting to get some where at last

Porsche 356 Virtual home

Moderators: 58A - 71E, Helen

912uk
Nurse, I think I need some assistance
Posts: 5954
Joined: Wed Nov 12, 2003 11:02 pm

starting to get some where at last

Post by 912uk »

Had a whole day on the Pre A after the photo shoot I thought I better have a go at working on the old girl..
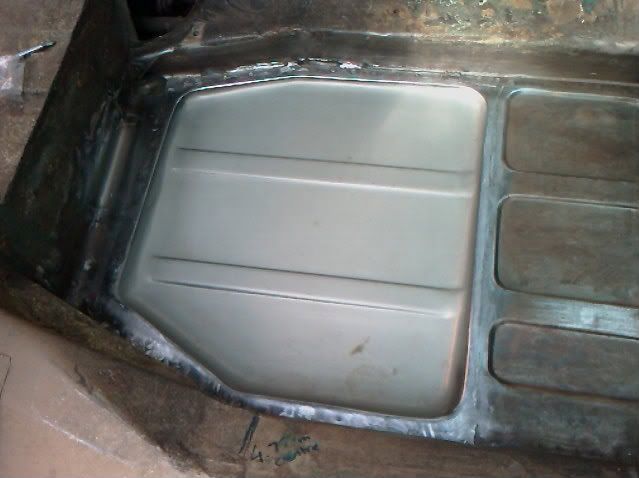
As the floor had been out for nearly 2 years ! ops.. though I better put it all back..

all went well till the end when I took a short cut and ended up cutting my finger with a cutter blade and had two trips to A & E :roll: lots of blood and nasty wounds never mind but like a trooper I carried on once I got back and now the floor is done.. much to lots of moans from other half about resting finger..
Image


Image

very pleased with the floor repair I took a tip from my Roger Bray tour last year I used Self tappers in the corners and few other places this really pulled the metal togeather and made the job very easy. Then remove screws and then plug weld it..

Then I used this 121 stuff from Rust .co.uk Andy and I bought some from the guys stand at Beulie Auto Jumble and it takes a while to go off and has attracted alot of dust but it's very tough!! not sure what's best this stuff or Por 15 chassis stuff!!


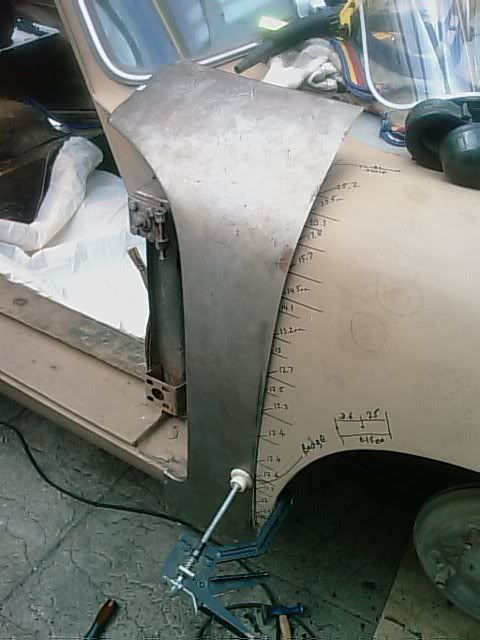
anyway I have questions ref this wing repair

I have marked every where!! made templates all round so I have lots of data to work from but it seams the repair panel is not as perfect as the bit I cut out!!

What's the best way to tackle this job then..

Image

Image

Image

Image

Image

any tips..
rocket280
DDK above all
Posts: 150
Joined: Fri Apr 29, 2005 10:16 pm
Location: watford

Post by rocket280 »

I did this job on mine on both sides. The only thing I will say is that the factory use body solder on the front edge of the door to get the gap perfectly even. If you get the panel on and the gap is not perfect you can re profile the factory solder on the door. So if you make the gap quite tight to start with and then gently file the solder to even it up. Good luck but I'm sure you will be fine.

Image
912uk
Nurse, I think I need some assistance
Posts: 5954
Joined: Wed Nov 12, 2003 11:02 pm

Post by 912uk »

Do you have any more shots I can look at..

I notice you have cut out alot of metal compaired to mine. also you have not cut out that bottom bend ( corner ) I am looking not to do that also as it's yet another area to match up ..

what panel did you use

R Bray or K Konnection?

Mig or tig

I have got both now I am looking to flash up the tig soon.

that's a good idea about shifting it to the right more and making the door match the panel as the factory did. I am little worried the panel does not match the curve of the one I have cut out..

I am looking to cut out more metal so I can get in and remove the bit of surface rust I have seen inside the inner wing..

thanks for the reply

it all helps


also did you butt weld the new panel to the old or did you use a tool to make a recessed edge and then spot weld it ?
rocket280
DDK above all
Posts: 150
Joined: Fri Apr 29, 2005 10:16 pm
Location: watford

Post by rocket280 »

If the bottom corner is ok on yours then I would leave it and finish the repair higher up. I did the complete rocker on mine also which has the corner in it.
The panel on the side I have shown is from kk but the other side I made myself. The one from kk wasn't a perfect fit but I did re profile the door to fit. I butt welded the panel in because I think its easier to hammer and dolly it straight after its welded.
912uk
Nurse, I think I need some assistance
Posts: 5954
Joined: Wed Nov 12, 2003 11:02 pm

Post by 912uk »

Jim Kellog of the 356 resto book suggests to split it, ok I understand that..

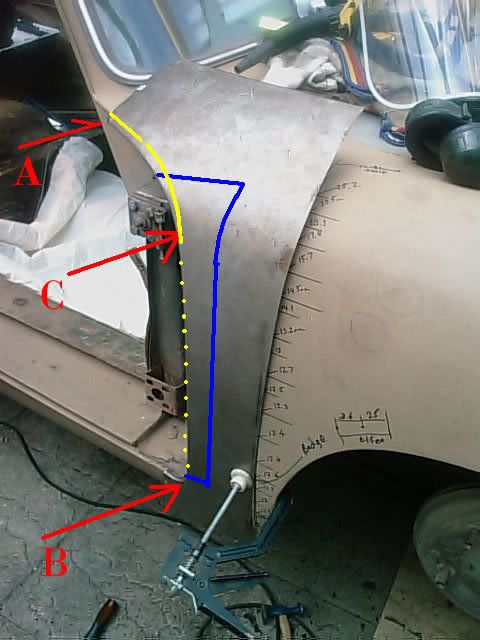
take a look at what I have here in the pic

Image

Note A Arrow

the metal is 1cm ish away from the orginal curve so this is my problem the up right section is not bad but it seams to start at arrow C

The Blue line it about where I have cut out the metal and the yellow line is about where the orginal curve is.

Point B is the lower curve and again the repair section does not seam to follow that curve so I have not cut that low..to try and keep it


LEAD how do I know I am welding to metal and not lead I have and always do wire wheel the area before welding?

Do I cut the repair panel at C as the join? or I was thinking I could heat up ( I have full gas set up ) the area C and try pulling the panel round alittle bit..I will have to cut the top off the section other wise it will resist and then nothing much will happen ?
rocket280
DDK above all
Posts: 150
Joined: Fri Apr 29, 2005 10:16 pm
Location: watford

Post by rocket280 »

1 cm does seem like quite away out. I would try and beat it into shape a bit. once you've cut the repair panel down to size a bit you might find it a little easier to get it closer to the right shape. as for the lead you can clearly see it when you strip the paint back. I have read that early cars like yours tend to have more lead than later cars.
912uk
Nurse, I think I need some assistance
Posts: 5954
Joined: Wed Nov 12, 2003 11:02 pm

Post by 912uk »

Yes I had heard about the lead in the early cars and I have seen a fair bit so far.. lots of masks

As for the repair panel 1cm is alot as you can see on the photo I am alittle shocked it's this much as I did a fair bit of research before I bought them and I am very disapointed more so when I offered them up to the door and they are way off!!!! REALLY not happy..

I am now going to have to cut up the repair panel to make it fit, seams abit pointless to me and more work. Not sure what to do at the mo the more I cut them up the more I feel I need to return them. I hope some one has a solution.

Will re look at this later today. Shame I was rocketing along minus my A&E incident and could almost get the whole pass side welded up!!

then the other side floor and the wing the same

then prep the door gaps and strip ready for prep work..

and PAINT!!!!!!! :shock: :shock:
rocket280
DDK above all
Posts: 150
Joined: Fri Apr 29, 2005 10:16 pm
Location: watford

Post by rocket280 »

To be honest if I were to do the job again I would just make the panel as I did on the other side. The other side did not go up as far. What I did was trace the shape needed, cut the profile in an old oak floorboard. clamped a piece of metal to it then hammered the edge over until I got it to 90 degrees. Then I removed it from the board turned it over and hamered it down until it was almost back on itself. once you get to this point you can bend it to fit the curve of the body. hey presto perfect fitting repair panel. Maybe you could do this if you really can't get the one you've bought to fit right.
912uk
Nurse, I think I need some assistance
Posts: 5954
Joined: Wed Nov 12, 2003 11:02 pm

Post by 912uk »

yes I was thinking I might cut the lower section and then just concentrate on the upper curve then if that is right i could then tig weld a new section to the upper part and make it longer

still abit peeved as I would have thought this section would be almost but not quite right from the start this just seams to be not right from the start hmmm I know the people I bought them from use these them selves. I can't see any other way to make it fit with out cutting and shunting it

Even Jim Kellogg said with what I have in the picture your going to have to cut it up or get another one.. and that's coming from Jim!!!

who wrote this

Image
Barry
Nurse, I think I need some assistance
Posts: 4321
Joined: Tue Aug 24, 2004 8:50 pm
Location: East Sussex

Post by Barry »

O.K. Mark: The first thing to do is get the door back on, so that you have an accurate line to follow.

Measure back from the door's leading edge, say 20mm, and mark it with some dividers (so that you know have a band 20mm wide marked at the front of the door).

If it will still go in, sef-tap the replacement section in the best possible compromise position (self-tap straight into the remaining wing area, plenty of screws to hold it steady, and to re-locate it when you remove it again).

Now, with your dividers set at 20mm plus your doorgap (3mm?), mark from your scribed line on the door, across to the repair section.

This should now give a line on the repair section where the flange needs to be re-worked.

Now, on the bench, and using a flanging hammer (one with a small, curved face), and a block of steel, re-work the flange so that it follows the scribed line. Practise on some scrap if you are unsure.

As for the welding: this is a classic case for the TIG. Once you've got the panel ready, as far as rear-fit is concerned (door-gap), post back, and I'll run through how I would deal with the actual joining part.

HTH :)
DDK Member1243 07741 273865. Home of the RY Austin 7 Trophy's and Austin Single Seat Racers
Graham
DDK forever
Posts: 561
Joined: Sun Aug 01, 2004 12:56 am
Location: Northern tip of dartmoors rocky wilderness

Post by Graham »

Like Barry say's re-fit the door,and make sure its in the right place,as previously said,the front edge on 356 doors can hold a hell of alot of lead,they got the gapping this way,those panels are swines! never had one fit right,I sometimes make them,but as of late the jobs we have had in weve been doing the whole wings or making that panel up to the middle of the wing!
Im a bit out of touch with it because Ive been building motors and doing mechanical work for the last 2 years with only a couple of shells in between that I have done,and the last one needed nothing!
I will speak to Mr Metal tomorrow and see what tricks he has.
1985 MZ Simson/KH 125 Sprint bike
1302s one family owner
1963 AMC 660 Classic
1957 Peugeot TC4 race bike


Sadly gone:
74' 914/4 2.0
68' SWB 911
912uk
Nurse, I think I need some assistance
Posts: 5954
Joined: Wed Nov 12, 2003 11:02 pm

Post by 912uk »

thanks Graham I will call Barry tomorrow night as well

BTW that floor section was nice I have to say nice and thick and follows the orginal nice.. very pleased with that.

Just this wing repair panel.. It seams to follow the line from the bottom to point C and then just go off on a right old tangent :?
912uk
Nurse, I think I need some assistance
Posts: 5954
Joined: Wed Nov 12, 2003 11:02 pm

Post by 912uk »

right I am going back out with new idea's thanks Barry..

will let you know how I get on..

:wink:
Dakota
DDK forever
Posts: 586
Joined: Thu Oct 25, 2007 10:46 pm
Location: SE London under a rusty car

Post by Dakota »

Hi
I have replaced this area and found the repair part to be typical of the breed, that is it fitted and did the job but not without some work, my advice would be to get the car up on some nice high stands so you can get around the area your working on and its important to be able to get a good overall look at what your doing to see if the line of the bit being worked on flows through the car. I would also suggest that before you fit the wing section you kind of finalize the position of the door and sill section I can see the upper hinge is separated you should do this with the bottom part too it will make getting the door on and off a lot quicker and it won't move each time either if you are just shoving the hinge pins in and out. I would also suggest you replace a the whole of the inner wing edge as it looks a bit pitted and will only encourage more rot later on if left it will also be a bit more practice, you might want to try turning the wire feed down and the power up for better pentration and try not to grind too much metal away the little blue areas are where the metal has ended up very thin. The repair part will conform a little better if its return is folded further back on itself to more like its fitted angle, it may help to cut off what you really don't need it will make the job appear much more manageable , as for the use of a joddled edge I would say that down the vertical drop it would stiffen the edge of the existing wing and make tailoring the repair section much easier , you can always remove much of the stepped section once you are happy with the rest of it and it will hardly notice from the inside. lastly don't beat yourself up if it doesn't seem to go right for you to start with this is the sort of job body shops charge good money for .
yours Bill.
I am a person of simple pleasures so if you don't have any simple pleasures to offer me, beer, pizza or Porsche bits etc kindly leave me be, XX.
912uk
Nurse, I think I need some assistance
Posts: 5954
Joined: Wed Nov 12, 2003 11:02 pm

Post by 912uk »

well I have a new problem now..

So this is what we have

can you see the bottom edge on the corner is just proud

Image

Image

here's a shot inside the door you can see I am not too concerned but I will be treating the area and poss media blasting the edges of the door to make sure it's all rust free for me to treat before painting..

Image

Image

Gaps are not to bad a slight amount different here but easy to make up again.

I have been working on the door for a while now to make the best out of the mess I had... getting there shrinking it back bit by bit.. this door was stoved right in before now it's recoverable..

some one got bored in it's LA days and treated her to some 8mm

Image


anyway back to the matter in hand why have a got this proud area I can see from the photo which I couldn't see before the rocker area must be abit out I can bump this back alittle but not alot. this area was caked in bondo and now I know why.

this is currently with two shims at the top and none at the bottom I want to change this as the door just swings open..so if I add the two shims back in at the bottom it will be even more proud..
Post Reply