

Peter, is the purpose of the kill switch to isolate the electrics so keeping the battery from any draining rather than an emergency kill of the car?
I use the same switch with an exposed red key, a hang-over from my motorsport days with the car where the switch was to kill the car in the event of a crash, but it also, now, stops any battery drain.
Wot, not another '79 Targa resto thread
Moderator: Bootsy
-
911hillclimber
- Nurse, I think I need some assistance
- Posts: 20690
- Joined: Mon Mar 10, 2008 6:26 pm
- Location: West Midlands
Re: Wot, not another '79 Targa resto thread
73T 911 Coupe, road/hillclimber 3.2L
Lola t 492 / 3.2 hillclimb racer
Boxster 987 Gen II 2.9
Lola t 492 / 3.2 hillclimb racer
Boxster 987 Gen II 2.9
-
PeterK

- DDK rules my life!
- Posts: 1274
- Joined: Mon Sep 01, 2014 3:04 pm
- Location: GU51 - Fleet, Hampshire, UK
Re: Wot, not another '79 Targa resto thread
This is intended to be my daily, once finished, so not expecting battery drain to be an issue. It's just a safety feature Graham, exactly as per your race or a rally car. In the event of a fire or worse, I can kill the electrics. I am fitting a pull cable where I can reach it when seated in the car. Not intending to have an external pull at this stage, but I have put an extra hole in my bracket ready for a second cable, in case I change my mind later.
If it was just battery drain, I would probably just choose a quick release connection to the battery.
If it was just battery drain, I would probably just choose a quick release connection to the battery.
'79 Targa - restoration now mainly complete & being driven
http://www.ddk-online.com/phpBB2/viewto ... 28&t=59756
and now CIS to EFI
viewtopic.php?t=72921
http://www.ddk-online.com/phpBB2/viewto ... 28&t=59756
and now CIS to EFI
viewtopic.php?t=72921
-
911hillclimber
- Nurse, I think I need some assistance
- Posts: 20690
- Joined: Mon Mar 10, 2008 6:26 pm
- Location: West Midlands
Re: Wot, not another '79 Targa resto thread
Ah, missed the pull wire bit!
73T 911 Coupe, road/hillclimber 3.2L
Lola t 492 / 3.2 hillclimb racer
Boxster 987 Gen II 2.9
Lola t 492 / 3.2 hillclimb racer
Boxster 987 Gen II 2.9
-
PeterK
- DDK rules my life!
- Posts: 1274
- Joined: Mon Sep 01, 2014 3:04 pm
- Location: GU51 - Fleet, Hampshire, UK
Re: Wot, not another '79 Targa resto thread
As I said, no reason not to fit the front wings now, so …..
The new flag crimping tool arrived, so I could complete the battery cut out switch. The pull cable also arrived and was fitted. It takes a bit of a pull to trip the switch, but I guess that if the car’s on fire, I may well find additional strength.
Anyway, the wings. First, take them off, fit the requisite number of clips and apply sticky sealant stuff to the inner wings.

I left the outer paper on while I ensured it was fully pressed home.

Then I made holes for the wing retaining screws to pass through. This prevents the screw ‘picking up’ sealant and generally corkscrewing a huge trail of the sealant. Worked mainly, with a fail on just a couple of screws.
Liberally washing the strip of sticky stuff with white spirits allowed a little bit of slipping and sliding to fit the wings, without the ‘$h1t to a blanket’ suction effect. Anyway, they’re now fitted and seem to line up surprisingly well., all thigs considered.
The fuel filler arrangement was added (everything as far as the tank itself – that’s still uncleaned in the loft).

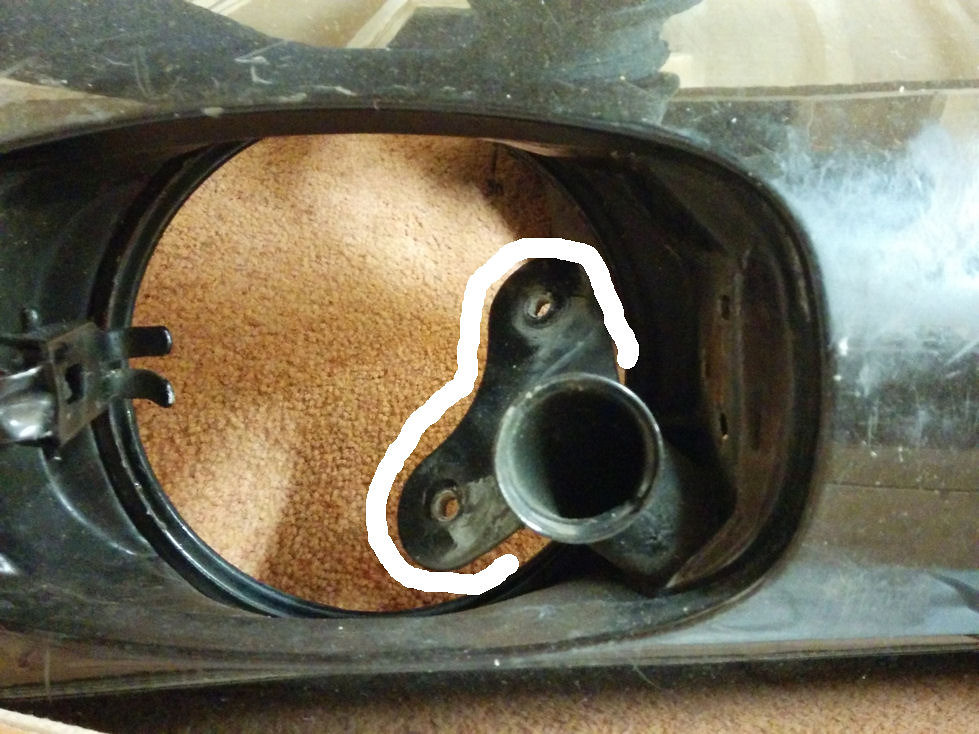
The front wings are from a ’76 I believe (they were in better condition than the ones that I repaired). On my original wing, there was a plate welded to the washer fill tube, that the fuel pipe bolted to. This bracket looks like it was never on the ’76 wing. As everything is now painted, I might just leave it as it is.
Then one of Jonny’s Boxster washer bottle kits was fitted for the (almost) last time.

It was supposed to be the last time, but …..
Jonny recommends replacing the pump, but mine worked fine. As did the level switch. Honest, they did when I bought the second-hand unit ages ago.
Having fully fitted the water tank, neither the pump, nor the level switch worked any longer. Bu$$er. Tank had to come out again and new pump and level switch fitted. Tank refitted - hopefully for the last time.
Although the photo above showed the fuel filler area without flap, it was fitted and aligned and the flap release connected. I then had to take it off, as it needs final spraying (no way that I could find it when I painted the wings). Unfortunately some silly b@$t@rd had fitted a Boxster washer bottle in the way of the bolts. With a few extensions, a little cursing and a lot of luck, I did eventually manage to reach them without removing the washer tank (again).
Time for the front bumper. The car came to me with low profile, not the correct for ’79 periscope, headlamp washer jets. I had bought new jets, but they were slightly different to those that came off, requiring 4 slots to be made to receive the (I assume) orienting/locating bumps. This is the time that I realised that I needed some 10mm diameter tubing. I had just bought 0.5m for the drain tubes on the hi-power aircon blower – now I needed a further metre (and a 10-6mm reducer). More delay (and more shopping).
There was nothing preventing it, so I fitted the front valance and the aircon condenser.

This was a mistake – see later.
I had a replacement seal for the gearbox – to go on the selector rod.

It fought me, but it is definitely a case of ‘I’ve started, so I’ll finish’. Having mullered the existing one, I had no choice but to persevere (and maybe utter a few naughty words). I finally won in extra time. Was starting to get worried about going to penalties.
I’ve got a replacement seal for the spigot shaft seal. Having removed the 2 counter-sunk screws I couldn’t remove the outer sleeve, so refitted the screws and put the seal in my spares box.
New 10mm tube arrived, so washer jets were connected and front bumper fitted. Next were the indicators. One had a broken fixing screw, so I drifted them all out and replaced with new set screws.

On went the front bumper strip and the end pieces and the front end is starting to look proper.

This is the point that I realised that it was a mistake to have fitted the front valance earlier. Whilst the driver’s side was fine, with the condenser and drier in place, there was no way to get my hand in to fit and tighten the nuts holding the rubber end pieces. It’s now sitting on the side again, this time awaiting the rubber lip being fitted.
I fitted the pump and small water tank for the headlight washers, but nothing happened when I pulled the wiper/washer switch. The pump ran when I powered it directly, the relay worked when I powered that (well, earthed it actually), but it turned out that the wiper/washer switch wasn't playing ball. Off came the steering wheel, the covering and the switch, then after much pondering and fiddling, it now works.
I’ve wired the headlights using ceramic connectors, they all work, but I’ll probably delay fitting the lights until after final colour sanding.
I’ve been into the garage on several occasions, intending to make new spreader / clamps / thingies to fix the rubber lip to the front valance. Every time I managed to find something more interesting to do, but they need making.
So what did I do this time - I got distracted and made some brackets to hold the horns. Then I did make a start. I cut some metal strips but they just laughed at my bender, so as punishment, I beat them in the vice. I drilled a hole and welded a bolt into each of them.

They’re currently half painted, so should be good to go by the end of tomorrow.
The new flag crimping tool arrived, so I could complete the battery cut out switch. The pull cable also arrived and was fitted. It takes a bit of a pull to trip the switch, but I guess that if the car’s on fire, I may well find additional strength.
Anyway, the wings. First, take them off, fit the requisite number of clips and apply sticky sealant stuff to the inner wings.
I left the outer paper on while I ensured it was fully pressed home.
Then I made holes for the wing retaining screws to pass through. This prevents the screw ‘picking up’ sealant and generally corkscrewing a huge trail of the sealant. Worked mainly, with a fail on just a couple of screws.
Liberally washing the strip of sticky stuff with white spirits allowed a little bit of slipping and sliding to fit the wings, without the ‘$h1t to a blanket’ suction effect. Anyway, they’re now fitted and seem to line up surprisingly well., all thigs considered.
The fuel filler arrangement was added (everything as far as the tank itself – that’s still uncleaned in the loft).
The front wings are from a ’76 I believe (they were in better condition than the ones that I repaired). On my original wing, there was a plate welded to the washer fill tube, that the fuel pipe bolted to. This bracket looks like it was never on the ’76 wing. As everything is now painted, I might just leave it as it is.
Then one of Jonny’s Boxster washer bottle kits was fitted for the (almost) last time.
It was supposed to be the last time, but …..
Jonny recommends replacing the pump, but mine worked fine. As did the level switch. Honest, they did when I bought the second-hand unit ages ago.
Having fully fitted the water tank, neither the pump, nor the level switch worked any longer. Bu$$er. Tank had to come out again and new pump and level switch fitted. Tank refitted - hopefully for the last time.
Although the photo above showed the fuel filler area without flap, it was fitted and aligned and the flap release connected. I then had to take it off, as it needs final spraying (no way that I could find it when I painted the wings). Unfortunately some silly b@$t@rd had fitted a Boxster washer bottle in the way of the bolts. With a few extensions, a little cursing and a lot of luck, I did eventually manage to reach them without removing the washer tank (again).
Time for the front bumper. The car came to me with low profile, not the correct for ’79 periscope, headlamp washer jets. I had bought new jets, but they were slightly different to those that came off, requiring 4 slots to be made to receive the (I assume) orienting/locating bumps. This is the time that I realised that I needed some 10mm diameter tubing. I had just bought 0.5m for the drain tubes on the hi-power aircon blower – now I needed a further metre (and a 10-6mm reducer). More delay (and more shopping).
There was nothing preventing it, so I fitted the front valance and the aircon condenser.
This was a mistake – see later.
I had a replacement seal for the gearbox – to go on the selector rod.
It fought me, but it is definitely a case of ‘I’ve started, so I’ll finish’. Having mullered the existing one, I had no choice but to persevere (and maybe utter a few naughty words). I finally won in extra time. Was starting to get worried about going to penalties.
I’ve got a replacement seal for the spigot shaft seal. Having removed the 2 counter-sunk screws I couldn’t remove the outer sleeve, so refitted the screws and put the seal in my spares box.
New 10mm tube arrived, so washer jets were connected and front bumper fitted. Next were the indicators. One had a broken fixing screw, so I drifted them all out and replaced with new set screws.
On went the front bumper strip and the end pieces and the front end is starting to look proper.
This is the point that I realised that it was a mistake to have fitted the front valance earlier. Whilst the driver’s side was fine, with the condenser and drier in place, there was no way to get my hand in to fit and tighten the nuts holding the rubber end pieces. It’s now sitting on the side again, this time awaiting the rubber lip being fitted.
I fitted the pump and small water tank for the headlight washers, but nothing happened when I pulled the wiper/washer switch. The pump ran when I powered it directly, the relay worked when I powered that (well, earthed it actually), but it turned out that the wiper/washer switch wasn't playing ball. Off came the steering wheel, the covering and the switch, then after much pondering and fiddling, it now works.
I’ve wired the headlights using ceramic connectors, they all work, but I’ll probably delay fitting the lights until after final colour sanding.
I’ve been into the garage on several occasions, intending to make new spreader / clamps / thingies to fix the rubber lip to the front valance. Every time I managed to find something more interesting to do, but they need making.
So what did I do this time - I got distracted and made some brackets to hold the horns. Then I did make a start. I cut some metal strips but they just laughed at my bender, so as punishment, I beat them in the vice. I drilled a hole and welded a bolt into each of them.
They’re currently half painted, so should be good to go by the end of tomorrow.
'79 Targa - restoration now mainly complete & being driven
http://www.ddk-online.com/phpBB2/viewto ... 28&t=59756
and now CIS to EFI
viewtopic.php?t=72921
http://www.ddk-online.com/phpBB2/viewto ... 28&t=59756
and now CIS to EFI
viewtopic.php?t=72921
-
Gary71
- Nurse, I think I need some assistance
- Posts: 10730
- Joined: Wed Mar 31, 2004 1:27 pm
- Location: Cheshire
- Contact:
Re: Wot, not another '79 Targa resto thread
Great to see the car coming back together.
It’s bad enough remembering what order to assemble it with a standard car, once you throw a few (sensible) upgrades in there it’s takes three times as long!
It’s bad enough remembering what order to assemble it with a standard car, once you throw a few (sensible) upgrades in there it’s takes three times as long!
-
PeterK
- DDK rules my life!
- Posts: 1274
- Joined: Mon Sep 01, 2014 3:04 pm
- Location: GU51 - Fleet, Hampshire, UK
Re: Wot, not another '79 Targa resto thread
Then when you add in senility ......... 
'79 Targa - restoration now mainly complete & being driven
http://www.ddk-online.com/phpBB2/viewto ... 28&t=59756
and now CIS to EFI
viewtopic.php?t=72921
http://www.ddk-online.com/phpBB2/viewto ... 28&t=59756
and now CIS to EFI
viewtopic.php?t=72921
-
911hillclimber
- Nurse, I think I need some assistance
- Posts: 20690
- Joined: Mon Mar 10, 2008 6:26 pm
- Location: West Midlands
Re: Wot, not another '79 Targa resto thread
Getting to the end of the body at last, always a good place to be.
Surprisingly complicated build up compared to the pre impact cars I'm used to.
Getting old is easy, just takes longer, it's when you start to fossilise when things are tough, like getting up off the floor!
Surprisingly complicated build up compared to the pre impact cars I'm used to.
Getting old is easy, just takes longer, it's when you start to fossilise when things are tough, like getting up off the floor!
73T 911 Coupe, road/hillclimber 3.2L
Lola t 492 / 3.2 hillclimb racer
Boxster 987 Gen II 2.9
Lola t 492 / 3.2 hillclimb racer
Boxster 987 Gen II 2.9
-
rich73
- DDK slapper chatter
- Posts: 318
- Joined: Wed Feb 18, 2015 10:37 pm
Re: Wot, not another '79 Targa resto thread
Wow, must be great to be working with shiny bits.
There there's defiantly lot move stuff in an IB. I was amazed now little there was in my 1970 car compared to my IB, even though I've simplified simplified by IB is much as possible, A/C Removal, backdated heat, Intensive washer bottle only.
There there's defiantly lot move stuff in an IB. I was amazed now little there was in my 1970 car compared to my IB, even though I've simplified simplified by IB is much as possible, A/C Removal, backdated heat, Intensive washer bottle only.
-
AndrewSlater

- I luv DDK!
- Posts: 995
- Joined: Wed Nov 30, 2011 3:35 pm
Re: Wot, not another '79 Targa resto thread
With regard to the wing and the fuel filler bracket.
My '74 car had no bracket but the later wing I got did - so I had to remove it to backdate it.
Keep up the good work - will be on the road soon!
My '74 car had no bracket but the later wing I got did - so I had to remove it to backdate it.
Keep up the good work - will be on the road soon!
1966 Porsche 912 Slate Grey, red interior - first owner owned for 41 years
1974 Porsche 911 2.7 (The Manhattan project) viewtopic.php?f=28&t=51455
1973 VW 914 1.7 Olympic Blue - ( gone to a good home )
1974 Porsche 911 2.7 (The Manhattan project) viewtopic.php?f=28&t=51455
1973 VW 914 1.7 Olympic Blue - ( gone to a good home )
-
PeterK
- DDK rules my life!
- Posts: 1274
- Joined: Mon Sep 01, 2014 3:04 pm
- Location: GU51 - Fleet, Hampshire, UK
Re: Wot, not another '79 Targa resto thread
Thanks - thought that was probably the case. Might cut the bracket off my old wing and keep it in case I feel the need to fit it to the car (unlikely)
'79 Targa - restoration now mainly complete & being driven
http://www.ddk-online.com/phpBB2/viewto ... 28&t=59756
and now CIS to EFI
viewtopic.php?t=72921
http://www.ddk-online.com/phpBB2/viewto ... 28&t=59756
and now CIS to EFI
viewtopic.php?t=72921
-
PeterK
- DDK rules my life!
- Posts: 1274
- Joined: Mon Sep 01, 2014 3:04 pm
- Location: GU51 - Fleet, Hampshire, UK
Re: Wot, not another '79 Targa resto thread
… and painted they became.
There are supposed to be 2 bolts on each end of the rubber spoiler lip, to attach to the end of the valence. Unfortunately there had pulled out, so with nothing to lose, I tried fixing new bolts with epoxy glue.


The valence had to come off again to facilitate the trial fitting of the aircon condenser. Having worked out how & where everything would go, including having to drill one extra hole through the inner wing for the aircon pipework, the condenser had to be removed and be the last thing added (otherwise I would not be able to reach the various winglet nuts).
So, with spoiler lip afixed

… the front end could go back together

The pipework for the aircon was fitted up during the above activity

And the condenser finally fitted

Just in case anyone blows the photo up and notices, I still have one pipe connection to the condenser to clamp.
None of the suspension bolts are tight at the moment. I’ve ordered a camber gauge, so once that arrives, I’ll get things torqued. Not looking forward to tightening the ball joint nut at the bottom of the struts – probably should have fitted and torqued them in the vice before fitting the struts. I have the correct castellated socket, but when I use a jack underneath to apply pressure and stop it slipping off, the car just rises up (no fuel tank fitted currently).
I can make a start on cleaning and stripping the petrol tank, and bleeding the brakes. Hopefully the weather will continue to improve and I can paint and fit the mirrors, torsion tube covers fuel flap, etc. Oh, and the targa hoop.
I thought that I had a glass fitter coming, but he’s gone very quiet over the past two weeks. Maybe he doesn’t want to fit a targa rear screen and 964 front and his quote of £500 was intended to scare me away
There are supposed to be 2 bolts on each end of the rubber spoiler lip, to attach to the end of the valence. Unfortunately there had pulled out, so with nothing to lose, I tried fixing new bolts with epoxy glue.
The valence had to come off again to facilitate the trial fitting of the aircon condenser. Having worked out how & where everything would go, including having to drill one extra hole through the inner wing for the aircon pipework, the condenser had to be removed and be the last thing added (otherwise I would not be able to reach the various winglet nuts).
So, with spoiler lip afixed
… the front end could go back together
The pipework for the aircon was fitted up during the above activity
And the condenser finally fitted
Just in case anyone blows the photo up and notices, I still have one pipe connection to the condenser to clamp.
None of the suspension bolts are tight at the moment. I’ve ordered a camber gauge, so once that arrives, I’ll get things torqued. Not looking forward to tightening the ball joint nut at the bottom of the struts – probably should have fitted and torqued them in the vice before fitting the struts. I have the correct castellated socket, but when I use a jack underneath to apply pressure and stop it slipping off, the car just rises up (no fuel tank fitted currently).
I can make a start on cleaning and stripping the petrol tank, and bleeding the brakes. Hopefully the weather will continue to improve and I can paint and fit the mirrors, torsion tube covers fuel flap, etc. Oh, and the targa hoop.
I thought that I had a glass fitter coming, but he’s gone very quiet over the past two weeks. Maybe he doesn’t want to fit a targa rear screen and 964 front and his quote of £500 was intended to scare me away
'79 Targa - restoration now mainly complete & being driven
http://www.ddk-online.com/phpBB2/viewto ... 28&t=59756
and now CIS to EFI
viewtopic.php?t=72921
http://www.ddk-online.com/phpBB2/viewto ... 28&t=59756
and now CIS to EFI
viewtopic.php?t=72921
-
PeterK
- DDK rules my life!
- Posts: 1274
- Joined: Mon Sep 01, 2014 3:04 pm
- Location: GU51 - Fleet, Hampshire, UK
Re: Wot, not another '79 Targa resto thread
A quick bit of aircon completion, and I’m happy(ier) now that the front wheel clears the condenser. Final pipe clips added.
During the crawling around underneath to apply seam sealer to any through-body grommets, I found that the screen washer tank is leaking from the pipe connection. Tried new pipe and new clips without success. Might be safer to get a replacement water tank. We’ll see.
Manned up and tackled the front strut ball joints. It was a real mare of a job, with the socket slipping off even when using trolley jack. Life got better once I realised that the outer edge of the lower arm was slightly dented, so the socket wasn’t properly seated. I ‘readjusted’ the lower arm and all worked fine. Sods Law that the strut I started with was the one with the issue. T’other side lower arm was fine.

By raising the trolley jack to ‘compress the spring’ until the body was just about to be lifted, the trolley jack held the torque wrench in place. I’m a bit of a wimp now, so had to use a bit of scaffold tube as an added lever. Top tip – don’t lie on a creeper when you do this, or you end up whizzing across the floor.
Track rod ends and rear hubs were torqued and split pins added to all. Tightened front hub bearings and torque the pinch bolt on the collar.
Today I tackled bleeding the brakes (with the pressure bleeder). First fill the reservoir with fluid and attach the bleeder. I was checking what spanners would be needed for the bleed nipples and noticed a small leak already.

Top tip No. 2 – there’s a three-way union – it helps if you actually tighten all three pipes.
There’s an overflow pipe from the top of the reservoir – which looked like it was just a drain, so ignore it. Then pressurise the bleeder. Gurgle, gurgle, $h1t.

The overflow is not for the ‘drip tray’ bit on top of the reservoir – it is actually a vent port. Top tip No. 3 – clamp / seal the tube. Then throw kitty litter around the floor.
Brakes bled of air but pedal moved a lot. Pumped up the brakes, then rebled them all. Now fine.
I then moved onto the side window alignment. Bit of a gap between the top of the frame and glass and the targa toof. More adjustment to follow. Had to do some more shopping, as when I climbed out of the car, the inner door pull handle caught in the top of my boot. It (the door pull handle) is no more.
During the crawling around underneath to apply seam sealer to any through-body grommets, I found that the screen washer tank is leaking from the pipe connection. Tried new pipe and new clips without success. Might be safer to get a replacement water tank. We’ll see.
Manned up and tackled the front strut ball joints. It was a real mare of a job, with the socket slipping off even when using trolley jack. Life got better once I realised that the outer edge of the lower arm was slightly dented, so the socket wasn’t properly seated. I ‘readjusted’ the lower arm and all worked fine. Sods Law that the strut I started with was the one with the issue. T’other side lower arm was fine.
By raising the trolley jack to ‘compress the spring’ until the body was just about to be lifted, the trolley jack held the torque wrench in place. I’m a bit of a wimp now, so had to use a bit of scaffold tube as an added lever. Top tip – don’t lie on a creeper when you do this, or you end up whizzing across the floor.
Track rod ends and rear hubs were torqued and split pins added to all. Tightened front hub bearings and torque the pinch bolt on the collar.
Today I tackled bleeding the brakes (with the pressure bleeder). First fill the reservoir with fluid and attach the bleeder. I was checking what spanners would be needed for the bleed nipples and noticed a small leak already.
Top tip No. 2 – there’s a three-way union – it helps if you actually tighten all three pipes.
There’s an overflow pipe from the top of the reservoir – which looked like it was just a drain, so ignore it. Then pressurise the bleeder. Gurgle, gurgle, $h1t.
The overflow is not for the ‘drip tray’ bit on top of the reservoir – it is actually a vent port. Top tip No. 3 – clamp / seal the tube. Then throw kitty litter around the floor.
Brakes bled of air but pedal moved a lot. Pumped up the brakes, then rebled them all. Now fine.
I then moved onto the side window alignment. Bit of a gap between the top of the frame and glass and the targa toof. More adjustment to follow. Had to do some more shopping, as when I climbed out of the car, the inner door pull handle caught in the top of my boot. It (the door pull handle) is no more.
'79 Targa - restoration now mainly complete & being driven
http://www.ddk-online.com/phpBB2/viewto ... 28&t=59756
and now CIS to EFI
viewtopic.php?t=72921
http://www.ddk-online.com/phpBB2/viewto ... 28&t=59756
and now CIS to EFI
viewtopic.php?t=72921
-
The Garage Bitch
- DDK Fanatic
- Posts: 63
- Joined: Thu Feb 07, 2019 4:37 pm
Re: Wot, not another '79 Targa resto thread
Chuckled at the mental image of you channelling your inner clay pigeon
"PULL"
"PULL"
-
rhd racer
- Me and DDK sitting in a tree! KISSING
- Posts: 2545
- Joined: Wed Jun 23, 2004 9:47 pm
- Location: Nottinghamshire
Re: Wot, not another '79 Targa resto thread
You should have checked the brake rebuild section of my thread Peter and you would have saved yourself the problem, cos I did exactly the same! Clamping it with molies works just fine. It pours out under pressure!!
93 964 C2
99 Boxster 2.5 > 3.4 hill climber
71 914/6 3.0 - gone
'You see Paul, hill climbing is like making love to a beautiful woman. You get your motor running, check your fluids, hang on tight and WHOA..30 seconds later it's all over!' Swiss Tony
99 Boxster 2.5 > 3.4 hill climber
71 914/6 3.0 - gone
'You see Paul, hill climbing is like making love to a beautiful woman. You get your motor running, check your fluids, hang on tight and WHOA..30 seconds later it's all over!' Swiss Tony
-
PeterK
- DDK rules my life!
- Posts: 1274
- Joined: Mon Sep 01, 2014 3:04 pm
- Location: GU51 - Fleet, Hampshire, UK
Re: Wot, not another '79 Targa resto thread
I did remember the comment, so I deliberately looked at the reservoir, but when I 'saw' that the drain was only an overflow ........ Oh well, floor's cleaner now
'79 Targa - restoration now mainly complete & being driven
http://www.ddk-online.com/phpBB2/viewto ... 28&t=59756
and now CIS to EFI
viewtopic.php?t=72921
http://www.ddk-online.com/phpBB2/viewto ... 28&t=59756
and now CIS to EFI
viewtopic.php?t=72921