Wot, not another '79 Targa resto thread

Ongoing and archived Porsche (and other marques) restoration threads from DDK members

Moderator: Bootsy

Post Reply
911hillclimber
Nurse, I think I need some assistance
Posts: 20690
Joined: Mon Mar 10, 2008 6:26 pm
Location: West Midlands

Re: Wot, not another '79 Targa resto thread

Post by 911hillclimber »

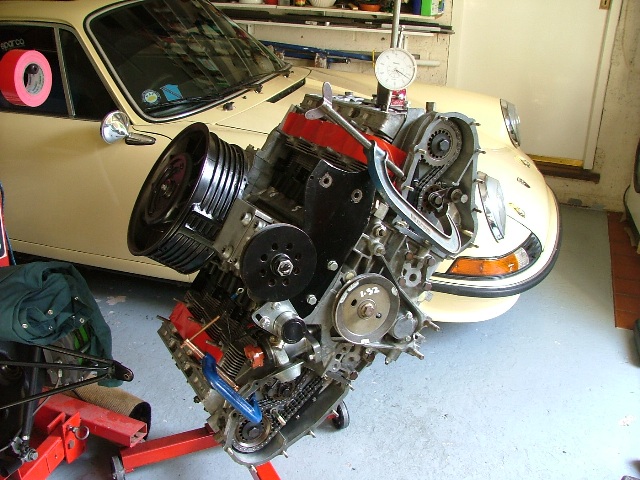
My first was a 2.4E engine, complete, in 2 big boxes bought from Bob Watson. He had cleaned it roughly and vouched for the crank and the valve guides then down to me.

I built it up in a solid week over Xmas 1993 and converted my 911 to RHD the week after! I took the engine back to Bob's for the cam timing where I watched eagerly to see it done by a pro.
Ran that lovely engine for 3 years and sold it to a DDK'r for £1000 before DDK existed.

The other 3 rebuilds have been 3.2's which are easier in some ways (cam nut and induction etc) but have all worked well.

Quite soon I will be doing the 3.2 that replaced that 2.4E/S that is in my 911 which has done 140K miles untouched bar an oil change every 12 months/service (DIY of course) and runs great.

You need to get special tools to do the cams (mine cost £30), 2 torque wrenches for the high and low torques required, the fancy tappet feeler gauge, and iirc a good 32mm A/F spanner for the oil 'under the sump' pipe though I have a good old adjustable for that.
Oh, and of course an engine stand that will rotate the engine which makes the tasks easier by miles.

If you have none of this, about £120 all in.
It helps if your wife understands the 'car-tinkering-thing' which mine certainly does... :drunken:

Image
73T 911 Coupe, road/hillclimber 3.2L
Lola t 492 / 3.2 hillclimb racer
Boxster 987 Gen II 2.9
deano
I luv DDK!
Posts: 773
Joined: Wed Jul 22, 2020 11:34 am

Re: Wot, not another '79 Targa resto thread

Post by deano »

911hillclimber wrote:
I built it up in a solid week over Xmas 1993 and converted my 911 to RHD the week after!
Thanks for sharing. Sounds like you're both very handy and very fearless :lol:

I had planned on having 'someone' rebuild my engine, and recently talked to someone who knows about these things at perhaps the most reputable place in the country, and he asked me why. I told him it smoked a lot on startup but cleared once driven, and I suggested it might need 'new valve guides' to get the conversation going. He told me the smoking was completely normal and suggested that I should 'just drive it'.

Fairy snuff :lol:

Actually though, after sitting for 5 years with no fuel tank, I got it ready to start again a few weeks ago and it fired right up on the first turn of the key.. and idled smoothly. No smoke... for a few minutes until it started to warm up.. then plenty of white smoke. I suppose it just needs a good run and maybe a fine tune....

Would the yellow car in the picture have been at the NEC Classic Car show in the early 90's - I remember pouring over one the same colour..?
Dean
1973T Targa MFI 334 met blu- under restoration https://www.ddk-online.com/phpBB2/viewt ... 28&t=67060
1980 924 Turbo, blu/grn tartan - restored
911hillclimber
Nurse, I think I need some assistance
Posts: 20690
Joined: Mon Mar 10, 2008 6:26 pm
Location: West Midlands

Re: Wot, not another '79 Targa resto thread

Post by 911hillclimber »

Ah...A Good Italian Service, cured many a car. 10/10 to the specialist to refuse the re-build.

Yes, my 911 was a regular stand belle at the November NEC shows, I was my motor club's Organiser for our stand, quite an effort and cost, but really good weekend on the stand for many years.
We stopped about 15 years ago due to spiralling costs.
I fancy doing the same again but at Race Retro.

White smoke can be caused by too much oil in the sump, check it is between max/min when good and hot.
73T 911 Coupe, road/hillclimber 3.2L
Lola t 492 / 3.2 hillclimb racer
Boxster 987 Gen II 2.9
User avatar
PeterK
DDK rules my life!
Posts: 1274
Joined: Mon Sep 01, 2014 3:04 pm
Location: GU51 - Fleet, Hampshire, UK

Re: Wot, not another '79 Targa resto thread

Post by PeterK »

With cam carriers suitably cleansed, I fitted new bungs to the ends of the cam oil squirter tubes (but didn’t think to take a photo, although I did GoPro the fitting).

After rings were fitted to No.1 piston and inserted into its cylinder, a quick check (well 2 hours including repeating and cleaning up afterwards)
Image
….. revealed that the piston dome volume is 42.2cc, just as the Wossner online info suggested. Hey, but at least I know it’s right.

Knowing how easily the rings can break made fitting up all of my pistons not a truly stress-free time. Then I had the opportunity to beat them into the cylinders, hoping not to break a ring.
Image

Next deck height measurement. I am still waiting for my new set of cylinder base gaskets to arrive from Porsche Guildford, so reused a couple of my old ones (0.5mm). Cylinders 1 & 4 were bolted on (including pistons naturally), and deck clearance checked. My DTI is a 0-1mm unit, and the clearance was bigger – it measured 1.1-1.2mm with my vernier calipers, and thankfully both sides are very close.
Image

If the CE rings compressed fully, then my CR would be in the range of 10.5-10.7, so allowing for a little CE ring not being compressed, by CR should be safe for super unleaded fuel. I’ve still got the piston to valve clearance to check, but feeling comfortable that it will be fine.
'79 Targa - restoration now mainly complete & being driven
http://www.ddk-online.com/phpBB2/viewto ... 28&t=59756

and now CIS to EFI
viewtopic.php?t=72921
Roy M
DDK Newbie
Posts: 1
Joined: Wed Jul 27, 2011 12:48 pm
Location: Carlisle

Re: Wot, not another '79 Targa resto thread

Post by Roy M »

I know you've gone for new bolts but you may find this interesting:

https://www.boltscience.com/pages/a-cas ... tening.pdf

Apologies if already posted

Roy
Roy
User avatar
PeterK
DDK rules my life!
Posts: 1274
Joined: Mon Sep 01, 2014 3:04 pm
Location: GU51 - Fleet, Hampshire, UK

Re: Wot, not another '79 Targa resto thread

Post by PeterK »

Thank you, that was very interesting. It would appear that I could have loosened and retightened my bolts, but also, the angle of turn is a more consistent way to tighten the bolts anyway.


Anyone want a set of stronger rod bolts :lol:
'79 Targa - restoration now mainly complete & being driven
http://www.ddk-online.com/phpBB2/viewto ... 28&t=59756

and now CIS to EFI
viewtopic.php?t=72921
User avatar
Darren65
Nurse, I think I need some assistance
Posts: 8161
Joined: Mon Dec 13, 2010 10:55 pm
Location: North Wiltshire
Contact:

Re: Wot, not another '79 Targa resto thread

Post by Darren65 »

Ready for CLM Peter? :drunken:
User avatar
PeterK
DDK rules my life!
Posts: 1274
Joined: Mon Sep 01, 2014 3:04 pm
Location: GU51 - Fleet, Hampshire, UK

Re: Wot, not another '79 Targa resto thread

Post by PeterK »

Not in any doubt Darren

Just not sure which one :lol:

I’ve still got 6 months to finish it & run it in.


I’ve been waiting on solder to check valve to piston clearance, so started colour sanding. Stage 1 completed but now need to wait for replacement compounding & polishing pads - they don’t last long! I’ve currently got interior bits all over the garage floor, trying to remember where they all go. Sadly it looks like I need to remake some of the vinyl trim pieces. Also trying to figure out the order they need to be refitted. Seems like sound proofing then carpets, followed by vinyl trim then interior cards (rear seat sides, etc).

My new door seals look very different to what I had before - anyone know if there are different styles / options for a ’79 Targa ?
'79 Targa - restoration now mainly complete & being driven
http://www.ddk-online.com/phpBB2/viewto ... 28&t=59756

and now CIS to EFI
viewtopic.php?t=72921
User avatar
PeterK
DDK rules my life!
Posts: 1274
Joined: Mon Sep 01, 2014 3:04 pm
Location: GU51 - Fleet, Hampshire, UK

Re: Wot, not another '79 Targa resto thread

Post by PeterK »

I get a couple of hours most days to go and play, but often not much seems to be completed. However, time for a brief status update. The solder finally arrived, but only today - took about 10 days and not sure that it is the right type.... I wanted cored solder that I could push the core out of, to give me an easily squashable piece of solder to put on the top of the piston. The solder that arrived looks fairly solid, and I'm not sure how comfortable I'll be trying to turn the engine over until it hits <scared emoji>

My replacement compounding foams have also arrived, but by the time they did, I had moved on and was playing with seals. The door seals that I now have are shown as a replacement for the type I originally had. We'll see. Anyway, having discovered that the 'tubes' that the targa top pins fit into on the targa hoop are not permanent fixtures (must have gone walkabout during heat treatment/stripping), I am now over a further £250 poorer. Silentblocs & seals on order from my local OPC. I then spent ages trying to find the fittings for the front of the targa roof fitment - only to realise that I had all the bits and the connections are a bit more agricultural than I thought. The only bit that is 'an extra' is a couple of small rubber blocks. The bad news is they are NLA, although the good news is that I found my originals, nicely labelled in a plastic bag (although until I knew what I was looking for, my description was not completely useful).

The main decorative leather covering for the front inside of the targa hoop area is past it’s best. Cue more spending, scrim foam ordered and arrived yesterday. I’ll also need to remake the B-post coverings. Thankfully, the more complex front screen covering is presentable.

I moved focus to the door capping / window felts. I was struggling to get the outer felts into position with the glass installed. Noticing that the speakers were still hanging loose after my last play in that area, I got distracted and pushed the driver’s speaker back in. I’ve added the plastic waterproof speaker covers from the 3.2 (they cover the rear of the speaker), and noticed that they were impacting on the bottom of the window motor. More accurately, they were impacting on the terminals, so I just bent them slightly away. Mistake, 1 broke off.

Try to fix in situ, make a complete b4lls up of the exercise and now had a window motor that no longer worked. Bu$$er. Remove window, remove window frame, remove mechanism, strip motor, find broken rivet (about 25mm long) that holds the terminal in place (or not anymore), not find any on-line, use M5 bolt trimmed to length (when trying to get washer and nut onto end of bolt while adjacent to motor magnet, curse the bl00dy magnet frequently), finally reassemble motor, test motor, smile, refit motor to mechanism, test motor, smile. Reassemble window mechanism into door, add door frame and glass, test, smile again, go and get cup of tea.

On a more positive note, I did think to fit the window scraper felt while the glass was out.


Having been stalled on engine, then colour sanding and finally the seals, I dragged my carpets from the loft space. I have my very rough original carpets, a brown set from Jonny’s SC to use as templates, and a little used black set acquired a short while ago. I laid my new ones on the floor, put my old ones over the top and the brown ones on top of these. That let me see what I had, and more importantly anything that was missing.
Image

I need to use the original piece from above the rear seats.

So, first a partial layer of heavy anti-drumming mat (I did do both sides, honest)
Image

Then foam sound deadening
Image

Followed by ‘lay out the carpet pieces and try and work out what fits where and in what order'
Image


Part way through I added one of my original rear seats plus a ‘new’ one. When I bought them I thought that they were almost black.
Image
So, decision time coming soon – firstly do I stick with my original rear seats (think a definite yes) and secondly, do I use the ‘new’ blue Porsche / Recaro front seats or my black leather Boxster seats.

So bringing us up to date, this is where we are now, with carpets fitted, but heat controller & centre console just loosely in place.
Image

I need to fit the sill trims after the door seals are in and also to decide whether my original rear seat carpet coverings are good enough, or whether I should strip it off and use the new carpet pieces I have. Jury is out, although leaning towards the former currently.

I might also have to ‘play’ around the throttle pedal. With the 10mm foam sound deadening, plus the 2 layers of carpet in the footwell, the throttle pedal is contacted. If the engine was in I could see whether the return springs are man enough.

'79 Targa - restoration now mainly complete & being driven
http://www.ddk-online.com/phpBB2/viewto ... 28&t=59756

and now CIS to EFI
viewtopic.php?t=72921
User avatar
PeterK
DDK rules my life!
Posts: 1274
Joined: Mon Sep 01, 2014 3:04 pm
Location: GU51 - Fleet, Hampshire, UK

Re: Wot, not another '79 Targa resto thread

Post by PeterK »

Think that I should have completed the trim before the carpets, but hey ho …. Just need to unpick a bit and squeeze the trim underneath.
The trim that fits on the front underside of the targa hoop, here
Image
was shabby, so I cut out some vinyl
Image

I tried to get the packing pieces and scrim in the right place
Image
but I’ve now pulled it apart. I think that a better & more accurate way is to lightly fix the packing pieces, cover with scrim (& trim), then cover with vinyl (and trim).

The same thought will be applied to the B-post lower covers
Image
with the foam added to the B-posts, then the scrim glued to that and finally the vinyl over it all.

I fitted my new silentblocs to the targa hoop (they take the targa roof rear locating pins). They initially looked to be too big in diameter, but I realised that in the paint stripping heat treatment, the rubber had burned away, the locating ‘tubes’ had dropped out, but the outer part of the silentblocs were still in place in the targa hoop. I drifted them out (rearwards) having marked their orientation, and drifted the new ones in, then chiselled the rears to hold them in place (factory approach).
Image

Thanks to BigG, I have confirmed that my rubber seals get glued directly onto the metal, keeping any moisture away from the inside of the targa hoop.

There’s a small cover plate that fits outside of the weatherstrip in the centre locating point, but not at the outer corners. Thanks to ChrisT, I have confirmed that the 2 holes each side of the locating ‘tube’ receive what looks like large plastic self-tappers. I already have those, so just waiting on the centre locating piece and cover plate to arrive. Then I can trim the targa bar.

I’ve decided not to use the Porsche SC seat set that I bought, as the blue is too bright, so they will be for sale. Instead I will stay with Boxster seats, so a quick set of modifications to the runners and a trial fit
Image

I also trial fitted the targa top. I’ve done this now to ensure that it fitted before I strip it down and recover it. Then if it doesn’t fit, I know that it is in the rebuild, not that something else is wrong (only change one thing at a time !).
Image
Image

In a moment of rashness, I also fixed the carpet, where it restricted the throttle pedal,. I also took out the gear shifter – the lever ‘twisted around’ in use (couldn’t get 5th gear when I first bought the project). I stripped the lever out, cleaned the broken epoxy and applied a couple of tack welds. Nice and ‘not twisty’ now.


That’s the good bits. The less good was trying to assembly the engine, now that my solder has finally arrived. Feeling brave / stupid / confident that there will be enough clearance, so I won’t need to remove them again (just lift the cylinders up to apply some sealant to the base rings), I decided to fit the pistons properly (add circlips to the wrist / gudgeon pins).

Piston 1 took a bit of tapping to get the second circlip to sit in its groove. Piston 2 wasn’t so obliging. Lee at Octane had warned me of the issues he had, and his subsequent need to get the overly long pins ground down slightly. I’ve checked the measurements 3 different ways and will need to get 55.25mm long pins reduced to 55mm. It will need a specialist grinder to reduce the hardened pins, and through Ray at Northway, I got introduced to Modern and Classic Engine Services in Bracknell, who say that they can help. Currently hoping to visit MCES on Friday.

Got so many little jobs on the go, all being hindered / paused waiting for small issuettes to be resolved, but maybe I can see the light at the end of the tunnel (just hope it's not a sodding big train coming fast my way)
'79 Targa - restoration now mainly complete & being driven
http://www.ddk-online.com/phpBB2/viewto ... 28&t=59756

and now CIS to EFI
viewtopic.php?t=72921
Gary71
Nurse, I think I need some assistance
Posts: 10730
Joined: Wed Mar 31, 2004 1:27 pm
Location: Cheshire
Contact:

Re: Wot, not another '79 Targa resto thread

Post by Gary71 »

Looking great Peter, amazing how a few bits of carpet can suddenly transform a shell :)
deano
I luv DDK!
Posts: 773
Joined: Wed Jul 22, 2020 11:34 am

Re: Wot, not another '79 Targa resto thread

Post by deano »

Just managed to plough through all of this thread - phew! Really impressed, thanks for sharing.

My next job is to remove and make some minor repairs to the rear wings, B-posts, inner wings and replace kidneys, just like you did except I need to repair a short section on the top section that Targa glass sits on too. My cut will start from the top centre of the rear arches and angle up towards the rear of the car to capture that rotten area at the top. My plan is to leave the B-post attached to the rear wing section and remove them together, and repair them while still joined together - I'm sure its going to be fun removing them without damaging them - I hope I don't fluff it up :lol:

I'm curious if you have a plan for the foam seals that sit between the roll hoop and its cover, and come down on both sides of where the louvres are on the cover - just a generic closed-cell sticky foam, or do you know if we can still get the real thing?

Keep up the great work ! :cheers:
Dean
1973T Targa MFI 334 met blu- under restoration https://www.ddk-online.com/phpBB2/viewt ... 28&t=67060
1980 924 Turbo, blu/grn tartan - restored
User avatar
PeterK
DDK rules my life!
Posts: 1274
Joined: Mon Sep 01, 2014 3:04 pm
Location: GU51 - Fleet, Hampshire, UK

Re: Wot, not another '79 Targa resto thread

Post by PeterK »

deano wrote:Just managed to plough through all of this thread - phew! Really impressed, thanks for sharing.
Thanks
deano wrote:I'm curious if you have a plan for the foam seals that sit between the roll hoop and its cover, and come down on both sides of where the louvres are on the cover - just a generic closed-cell sticky foam, or do you know if we can still get the real thing?
Assuming that's on the top side of the hoop, under the (black on mine) stainless hoop cover. I have the original piece (or most of it) and it appears only to be an anti-rattle sort of filling. I couldn't find it on the PET (parts diagrams), so I've just bought some 25mm wide, closed cell, single-sided adhesive foam.
'79 Targa - restoration now mainly complete & being driven
http://www.ddk-online.com/phpBB2/viewto ... 28&t=59756

and now CIS to EFI
viewtopic.php?t=72921
User avatar
PeterK
DDK rules my life!
Posts: 1274
Joined: Mon Sep 01, 2014 3:04 pm
Location: GU51 - Fleet, Hampshire, UK

Re: Wot, not another '79 Targa resto thread

Post by PeterK »

… and Friday came and the wrist pins shrunk. Now all 55mm long.

Pistons and cylinders were added. I might have made a slight cock-up on occasion – such as putting the circlips in the wrong side of a couple of pistons :oops: , but it is rather obvious when you try to fit them. Remove fitted circlip, check wrist pins still slides through piston, add circlip to ‘t’other end and back to the engine.
Image

Despite covering (so I thought) all of the entrances to the engine with cling film, I only managed to drop one circlip into the engine, but found and retrieved it quickly. Only one launched itself across the garage, but it pinged on something right by me, I saw it and no loss / no foul. A pin in a couple of the pistons needed a bit of a bigger tap to ensure that the circlip was properly home, but I didn’t move on until I was happy that they were ‘in the groove’.
I also (in full disclosure), managed to forget to fit my cylinder retaining tube to cylinder No.2 before rotating the crank to fit piston No.3. Of course the piston came sufficiently out of the cylinder to let some rings show, so had to remove the circlip, then the piston and cylinder again, use the ring compressor to refit piston fully into cylinder, refit piston to conrod and refit circlip. Like I wanted more practice ! :cry: .

Having got all P&Cs fitted, I added some solder on the outer edges of pistons 1 & 4, in line with the wrist pins, fitted the cylinders and torqued their heads.
Image
A quick rotate round and heads removed again. Solder was squashed, but measured as sufficient clearance. Result :bounce: .

Added more solder (and also some blutack – didn’t have any plasticine) to pistons 1 & 3
Image

Time for cylinder heads, cam carriers and check that camshafts rotated freely.
Image

Starting to look a lot like an engine now.


So where are we now – well, timing chain case, sprockets, etc all fitted on left-side and ready for timing. Before anyone notices, I've used old nuts and washers for this trial fit, and also no gaskets.
Image

Time for tea, so second side will hopefully get buttoned on tomorrow, followed by sprocket alignment check and maybe timing setting. I need rockers in for that and my plan is to add rockers just to Cyl 1, set timing, rotate engine, remove rockers from Cyl 1. The repeat with Cyl 4. Then I get to remove it all again to check the amount on ‘squish’ in my solder and whether my piston valve clearances are OK. I’m very confident that all will be well and that I have ‘wasted’ time doing this, but I’d rather be safe than sorry.
'79 Targa - restoration now mainly complete & being driven
http://www.ddk-online.com/phpBB2/viewto ... 28&t=59756

and now CIS to EFI
viewtopic.php?t=72921
User avatar
PeterK
DDK rules my life!
Posts: 1274
Joined: Mon Sep 01, 2014 3:04 pm
Location: GU51 - Fleet, Hampshire, UK

Re: Wot, not another '79 Targa resto thread

Post by PeterK »

Well, it didn’t all happen tomorrow’, but progress has been made.
The right side timing chain chest got installed, but then sprocket alignment and ‘family interruptions’ kinda got in the way. I know that I didn’t need to worry about sprocket alignment when only doing the piston to valve clearance checks, but I reasoned that if I needed more / different shims, then knowing sooner would be preferable, even though Xmas would interrupt the supply chain anyway. As it happens, I don't need any more or different shims, all was fine.

Then came cam timing.
Image
P.S. - big box in the back of the photo is my heated front windscreen that has just arrived. Just need a competent windscreen fitter, preferably one who has fitted a 964 screen into an earlier car and has also fitted a targa rear screen. Any suggestions ??

With 964 cams, my current thinking is to use 1.4mm lift at Z1 to advance the timing and add more low down power, albeit at the expense of top end bhp. That said, I do keep changing my mind. Anyway, to avoid a decision, or rather to keep my options open, I decided to do two piston to valve clearance checks, with cam timing of both 1.5 and 1.1. Well, actually I only did one measurement check, but I did time the cams at both 1.5 and 1.1mm, then rotated the crank a few times on each setting. The solder on top of the pistons would be compressed, and as long as it was still within spec, then I would know I am safe retarding or advancing the cams from the standard 964 setting of 1.26mm at Z1.

So, Cyl 1 rockers added and set, cam timing set, crank rotated, cam timing reset, crank rotated, Cyl 1 rockers removed and Cyl 4 rockers added and set, cam timing set, crank rotated, cam timing reset and crank rotated. Phew.

Then (reversing that age-old saying) disassembly is simply the reverse of assembly (but without the measuring).
Image

I forgot to take a photo of the squished solder and Blutack, so you’ll have to visualise it. However, the Blutack gave thickness reading at least 0.5mm more than the solder, so I guess that it compressed and relaxed, and I wouldn’t recommend its use as a measuring medium.

The solder on the inlet valves indicated at least 1.8-1.9mm against a minimum (Wossner guidance) of 1.5mm and outlet valves indicated at least 2.1-2.2mm against 2.0mm guidance. Result. Although I had confidence that all would be well after the earlier headspace measurements had been satisfactory, it hasn’t taken too long to ratify, and I now have peace of mind that although the engine may still grenade itself, it won’t be because of limited piston to valve clearance :lol:

Merry Xmas all :reindeer: :santa: , and may your 2021 be less restrictive than 2020
'79 Targa - restoration now mainly complete & being driven
http://www.ddk-online.com/phpBB2/viewto ... 28&t=59756

and now CIS to EFI
viewtopic.php?t=72921
Post Reply