

But I’d agree, I’d be happy with the outcome
2.4E From IKEA to Blut Orange
Moderator: Bootsy
-
visualfx
- I luv DDK!
- Posts: 756
- Joined: Sun Mar 07, 2010 6:59 pm
- Location: Newdigate Surrey
- Contact:
Re: 2.4E From IKEA to Blut Orange
Only if the assistant hasn’t suffered sun stroke removing the bonnet three times in that heat today.
But I’d agree, I’d be happy with the outcome
But I’d agree, I’d be happy with the outcome
-
911hillclimber
- Nurse, I think I need some assistance
- Posts: 20620
- Joined: Mon Mar 10, 2008 6:26 pm
- Location: West Midlands
Re: 2.4E From IKEA to Blut Orange
I don't think I've seen anybody else replace that huge heavy sound deadening moulding in a restoration before!
I took mine out in 89 and still have it in the loft.
Great progress if you did all that in a day.
Made me laugh at the special driver for those stupid wing/scuttle bolts, absolute pigs unless you have 'X file' fingers...
I have a similar ground-down 1/4" drive extension that just gets through.
Great progress. I'm sure I last saw this car at Bob's in 1990.
73T 911 Coupe, road/hillclimber 3.2L
Lola t 492 / 3.2 hillclimb racer
Boxster 987 Gen II 2.9
Lola t 492 / 3.2 hillclimb racer
Boxster 987 Gen II 2.9
-
MT
- DDK rules my life!
- Posts: 1247
- Joined: Wed Nov 10, 2010 5:42 pm
- Location: Gatwick
Re: 2.4E From IKEA to Blut Orange
Morning Graham,911hillclimber wrote:I don't think I've seen anybody else replace that huge heavy sound deadening moulding in a restoration before!
Great progress if you did all that in a day.
I'm trying to return the car to close to its original Kardex spec, and to make it as useable on a regular basis as possible - hence the re-addition of rear window wiper, heated screen, and power windows. Also I've found that the Doctors car is just a bit too noisy for my wife to want to travel far in it, so if I want to use this one more for joint outings I need to get the cruising sound level down a bit. Not very 'racy' I know. Perhaps I should brand it a 'Heavyweight' spec and change my ID to Heavyweight911? ( perhaps this would infringe Andy's copyright?
Did it all in a day? I don't think so! I know Mr. Seume keeps alluding to my pace of progress, but there were several full days of effort involved, and lots of faffing........
'Creativity is the product of time wasted' Albert Einstein
1972 RHD 2.4E (ex Bob Watson racer - now in original Tangerine)
1966 LHD swb (Doctors car - now with Mrs. Ferrari in Madrid)
1966 TR4A (now sold and replaced by 1990 944 turbo)
1966 S2a Landrover
1972 RHD 2.4E (ex Bob Watson racer - now in original Tangerine)
1966 LHD swb (Doctors car - now with Mrs. Ferrari in Madrid)
1966 TR4A (now sold and replaced by 1990 944 turbo)
1966 S2a Landrover
-
911hillclimber
- Nurse, I think I need some assistance
- Posts: 20620
- Joined: Mon Mar 10, 2008 6:26 pm
- Location: West Midlands
Re: 2.4E From IKEA to Blut Orange
Returning an old race car back to 'comfort' level/'wife level' is an exercise I'm going through myself right now but with the car still in regular use.
It is not easy, and I'm not sure it will actually make much real difference, but the roll cage gets in the way, the very stiff suspension jarrrrss, and the suspension geo is far from road friendly.
I have a long way to go to soften it off and part of that plan was to put that big sound deadening moulding back in.
I'm not actually sure after owning mine since 1988 that a 911 suits my outlook any more!
Keep going!
73T 911 Coupe, road/hillclimber 3.2L
Lola t 492 / 3.2 hillclimb racer
Boxster 987 Gen II 2.9
Lola t 492 / 3.2 hillclimb racer
Boxster 987 Gen II 2.9
-
neilbardsley
- Nurse, I think I need some assistance
- Posts: 8619
- Joined: Mon Apr 16, 2012 4:31 pm
Re: 2.4E From IKEA to Blut Orange
I dropped in at MT's on Saturday. What a change from the shell in his barn to how it looks now. Great paint and a lovely interior. I think he has the passager door to finish, mirrors on and engine in! I must admit I didn't think I would like it was much as his 66 911 because electronic sun roofs and rear wipers are all too modern for me but in the flesh it's very nice.
Sorry no photos but I'm sure MT will do that.
Sorry no photos but I'm sure MT will do that.
“A REMINDER. I would be grateful if those members who have borrowed bits from me in emergencies (e.g starter motor, oil cooler, etc) would return them and/or contact me”. – Chris Turner RIP
-
MT
- DDK rules my life!
- Posts: 1247
- Joined: Wed Nov 10, 2010 5:42 pm
- Location: Gatwick
Re: 2.4E From IKEA to Blut Orange
Well I suppose I'd better ...... but if you're waiting to see the electronic sun roof, you'll be disappointed!neilbardsley wrote:I dropped in at MT's on Saturday. What a change from the shell in his barn to how it looks now. Great paint and a lovely interior. I think he has the passager door to finish, mirrors on and engine in! I must admit I didn't think I would like it was much as his 66 911 because electronic sun roofs and rear wipers are all too modern for me but in the flesh it's very nice.
Sorry no photos but I'm sure MT will do that.
Anyway after a lengthy visit to our place in France and a lot of other travelling about some progress has been made on the Tangerine Dream.
First off my thanks to John Milburn (johnm) for getting my replacement paint tag stamped properly. I got this tag from Ake Olssen as I said earlier and he helpfully supplies the small twist-nail rivets that hold the tag in place (I use a spot of superglue as well) It has a dirty finger mark in the photo on the '9', but looks great in the flesh.

Then on to the headlights. I had boxed up these when removed and mentally had them down as 'clean and refit' given the car was RHD. Mistake. On opening the box I find the lenses are a) plastic and b) LHD.

So onto German e bay and a pair of RHD NOS Bosch lenses from 'lampendoktor'. 80€ shipped. Dismantle, clean, polish, test and fit. Still cannot get them on with the new headlight seals, so they are just in place for testing for now.


Now a bit of interior. Carpets finished off, and new D'eser sports seats fitted along with Jonathon Parr's (jtparr) nicely recovered steering wheel, my recently arrived DDK team cocomats, and period seat belts re-equiped with new webbing with the nice orange centre thread courtesy of Dave O'Connor (stretch).


Get in for a little test of the driving position .... oh b*gger, head hits the roof, and seating position seems very high. Out with the seat and a bit of inspection reveals there are some spacers between the runners and the seat base. A little consultation on here and it seems it is ok to remove them with a bit of a 'tweak' to the slider release. So out they came, seat back in. Still a little high but satisfactory as the expectation is the seat will 'sag' with my fat arse on it after a short while

and there's more...
'Creativity is the product of time wasted' Albert Einstein
1972 RHD 2.4E (ex Bob Watson racer - now in original Tangerine)
1966 LHD swb (Doctors car - now with Mrs. Ferrari in Madrid)
1966 TR4A (now sold and replaced by 1990 944 turbo)
1966 S2a Landrover
1972 RHD 2.4E (ex Bob Watson racer - now in original Tangerine)
1966 LHD swb (Doctors car - now with Mrs. Ferrari in Madrid)
1966 TR4A (now sold and replaced by 1990 944 turbo)
1966 S2a Landrover
-
MT
- DDK rules my life!
- Posts: 1247
- Joined: Wed Nov 10, 2010 5:42 pm
- Location: Gatwick
Re: 2.4E From IKEA to Blut Orange
So then on to test the electrics. Used the same system as last time - circuit by circuit with a switch and a fuse between the +ve battery terminal and the 'downstream side' of each fuse (with all the other fuses out). This way you can put power only to, say, the power windows and test everything downstream of the fuse on the main board. Works well, and again highlighted a couple of issues that I needed to address - one of which could have caused an issue had I just powered up the full system at once. I found I had wired up the blower wrongly - my plug that goes into the base of the blower had long gone (as they often do it seems from my inspection of others) so I just insulated each pin independently, but that of course means you can get the position wrong. Also found one of the connectors on a rear light had come adrift and the wiper switch bulkhead plug had come loose. Apart from that all seems ok. Power windows, sunroof and rear wiper systems all work as they should. Haven't figured out an easy way to tell if the two-stage heated screen works yet!

Also decided to invest in one of these, and Odyssey PC1200T dry cell battery. I use Optima on the swb, the landrover and the TR, but there isn't an Optima the right size and shape for the lwb battery box. I also plan to only fit one.

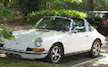
Anyway with the electrics looking good and some bits arrived from Porsche I could finish off the panels. First time for AMR 900L to ride again

Not ready to roll just yet, but quite a contrast from last time AMR hit the tarmac


And then the front


Reg plate on tomorrow.
And there's more ....

Also decided to invest in one of these, and Odyssey PC1200T dry cell battery. I use Optima on the swb, the landrover and the TR, but there isn't an Optima the right size and shape for the lwb battery box. I also plan to only fit one.

Anyway with the electrics looking good and some bits arrived from Porsche I could finish off the panels. First time for AMR 900L to ride again

Not ready to roll just yet, but quite a contrast from last time AMR hit the tarmac


And then the front


Reg plate on tomorrow.
And there's more ....
'Creativity is the product of time wasted' Albert Einstein
1972 RHD 2.4E (ex Bob Watson racer - now in original Tangerine)
1966 LHD swb (Doctors car - now with Mrs. Ferrari in Madrid)
1966 TR4A (now sold and replaced by 1990 944 turbo)
1966 S2a Landrover
1972 RHD 2.4E (ex Bob Watson racer - now in original Tangerine)
1966 LHD swb (Doctors car - now with Mrs. Ferrari in Madrid)
1966 TR4A (now sold and replaced by 1990 944 turbo)
1966 S2a Landrover
-
squirdan
- DDK rules my life!
- Posts: 1381
- Joined: Fri Jul 30, 2010 4:30 pm
- Location: london
Re: 2.4E From IKEA to Blut Orange
Looking great...kicking myself for not buying the damned thing now I can see how good it looks! Well done sir
Megane R26R
Discovery Sport
Defender 110
BMW R9T
Trek Superfly
but sadly no Porsches any more
Discovery Sport
Defender 110
BMW R9T
Trek Superfly
but sadly no Porsches any more
-
MT
- DDK rules my life!
- Posts: 1247
- Joined: Wed Nov 10, 2010 5:42 pm
- Location: Gatwick
Re: 2.4E From IKEA to Blut Orange
And then on to the (frustrating as it turned out) fitting of the door panel and pockets.
I made up two replacement door panels using a ropey old one I had as a template. 3mm MDF, 3mm scrim foam and some of Garry's best vinyl. some strips of foam and a vapour barrier (old plastic bag) on the back.


With the power windows checked and some new door panel clips fitted, I first covered the holes in the door with more plastic and tape. For the large lower hole I thought it a good idea to have it double, with the inner layer fitted to go into the inside of the door to shed any water back into the door panel and not into the back of the door pocket. I read this somewhere here or 911S. Using the fold in the edge of a thick black plastic sack as the top edge I cut a piece like so (the punches are so you can see the different shape of the inner layer).

Then on the door

Fitting the door handle (I'm going with a 'handle' on both sides as I have good both LH and RH passenger handles) and the front pocket was easy. Bear in mind these are new repro pockets (Lakewell).

Fitting the rear pocket was a right PITA. First off the fibre glass moulding and trim for the pocket are not that good a profile, especially down in the corner where the rear pocket meets the map pocket.

In order to get the rear pocket to 'hinge' without getting jammed on the map pocket edge I had to shorten the aluminium trim and cut back the black flocked fibre-glass both along the upper and LH edge as you look at the photo. Thankfully the aluminium trim is just attached wit the small screw in the photo so this wasn't too tricky. Lots of on/off/on/off. In the end I got the pocket to open and close ok (used porsche bungee cord - the one sent by Lakewell is much weaker and thinner). End result is only just acceptable to me. These repro pockets were 840€ a set, so a lot less than OE, but still a lot of fettling required for an expensive reproduction in my view. I'd pay the extra next time I think

That's all for now, folks........ Looney Tunes will be back next week with 'Engine Games'
Last edited by MT on Wed Sep 11, 2013 9:50 am, edited 1 time in total.
'Creativity is the product of time wasted' Albert Einstein
1972 RHD 2.4E (ex Bob Watson racer - now in original Tangerine)
1966 LHD swb (Doctors car - now with Mrs. Ferrari in Madrid)
1966 TR4A (now sold and replaced by 1990 944 turbo)
1966 S2a Landrover
1972 RHD 2.4E (ex Bob Watson racer - now in original Tangerine)
1966 LHD swb (Doctors car - now with Mrs. Ferrari in Madrid)
1966 TR4A (now sold and replaced by 1990 944 turbo)
1966 S2a Landrover
-
hot66

- Moderator
- Posts: 19194
- Joined: Tue Nov 11, 2003 4:17 pm
- Location: North Yorkshire
Re: 2.4E From IKEA to Blut Orange
Car is looking great 
James
1973 911 2.4S
1993 964 C2
2010 987 Spyder
1963 Honda C100 Supercub
Its not how fast you go, but how you go fast
1973 911 2.4S
1993 964 C2
2010 987 Spyder
1963 Honda C100 Supercub
Its not how fast you go, but how you go fast
-
Darren65

- Nurse, I think I need some assistance
- Posts: 8161
- Joined: Mon Dec 13, 2010 10:55 pm
- Location: North Wiltshire
- Contact:
Re: 2.4E From IKEA to Blut Orange
Looking very nice indeed
Darren
72T 2.5... http://ddk-online.com/phpBB2/viewtopic.php?f=10&t=56183
73 2.4E ... http://ddk-online.com/phpBB2/viewtopic.php?f=10&t=44242
77 Carrera 3.0...to 74 3.0RS ... http://ddk-online.com/phpBB2/viewtopic.php?f=28&t=63389
72T 2.5... http://ddk-online.com/phpBB2/viewtopic.php?f=10&t=56183
73 2.4E ... http://ddk-online.com/phpBB2/viewtopic.php?f=10&t=44242
77 Carrera 3.0...to 74 3.0RS ... http://ddk-online.com/phpBB2/viewtopic.php?f=28&t=63389
-
MT
- DDK rules my life!
- Posts: 1247
- Joined: Wed Nov 10, 2010 5:42 pm
- Location: Gatwick
Re: 2.4E From IKEA to Blut Orange
Thanks for the comments, but from now on it all gets a bit ..... well ..... dirty....
So for those of you upset at the sight of anything other than clean, plated, powder-coated engine being assembled in surgically clean environments, please look away now.
Engine Games - Part 1 Preparation for installation (part 1)
First job was to reinstall the refurbished distributor fitted with Pertronix that had been checked by Neil Bainbridge on his magic roundabout. Advance curve to spec. Timing mark on the pulley to Z1, then off with the valve covers to find if No. 1 is at TDC. Of course not .... 50:50 chance my arse.

Anyway round the pulley once more and in with the dizzy shaft so the rotor arm lines up with the mark on the distributor body. Should be good enough to get us running. Also checked the photo from dismantling (below) and the clamp bolt is at the same point in the adjustment slot on the base.

In with the new spark plugs (NGK B7ES as recommended on here) - not too tight to allow easier crank rotation. Taking off the lower valve covers I find that at some point the later (better, bigger, higher, stronger) turbo covers had been fitted. Good.

Then to check the valve clearances and a touch of Zanussi (for those who can't remember their slogan some years ago was 'the appliance of science') Rather than faff about with the old 'bent feeler gauge down a hole' party trick that I found distinctly tedious on the swb, I have persuaded a fellow DDK colleague to 'invest' in some neat engine tools from Stromski Racing in the States. First up is the 'valve lash' adjustment tool. Basically an adjustable T mount for your dial gauge that bolts onto the valve cover mounting studs and allows you to very accurately measure the valve clearance at TDC.
First mount so the dial gauge pin is square on the flat top of the adjustment screw (and not in the slot), tighten and zero with the rocker pushed down onto the cam

then pull the rocker up as far as possible. Repeat several times to ensure a consistent reading

Most of the upper valves were 0.1 to 0.12, but a couple were 0.18 to 0.22, and one was 0.47 and another 0.56. So she would certainly have rattled a bit without this check and adjust. Got them all to 0.10 to 0.12. (spec is 0.10mm)

Covers back on and torqued to spec, plug leads refitted.
Went to refit the ring gear, clutch and pressure plate with new bolts but then found the clutch alignment tool I borrowed was for a 901 and a 915 is different (bigger diameter) B*gger - will have to see if I can get a universal tool to work or wait until the 915 one arrives.
to be continued....
'Creativity is the product of time wasted' Albert Einstein
1972 RHD 2.4E (ex Bob Watson racer - now in original Tangerine)
1966 LHD swb (Doctors car - now with Mrs. Ferrari in Madrid)
1966 TR4A (now sold and replaced by 1990 944 turbo)
1966 S2a Landrover
1972 RHD 2.4E (ex Bob Watson racer - now in original Tangerine)
1966 LHD swb (Doctors car - now with Mrs. Ferrari in Madrid)
1966 TR4A (now sold and replaced by 1990 944 turbo)
1966 S2a Landrover
-
jb
- Me and DDK sitting in a tree! KISSING
- Posts: 2554
- Joined: Thu Jul 13, 2006 10:34 pm
- Location: London
Re: 2.4E From IKEA to Blut Orange
That is a fabulous idea.
Is the gauge part of the tool or do you have to buy that separately?
It is not obvious in the picture on their site
Is the gauge part of the tool or do you have to buy that separately?
It is not obvious in the picture on their site
#1370
-
210bhp
- Nurse, I think I need some assistance
- Posts: 8237
- Joined: Sat Feb 28, 2004 12:28 am
- Location: Scotland
Re: 2.4E From IKEA to Blut Orange
You can do the clearances with just the lower covers off.
Regards
Mike
Regards
Mike
_____________________________
73 RS (Sold)
67 S
Mint T (Sold)
996 Turbo (Sold)
73 2.4E (home after 25 years) and Sold again
73T targa (signal yellow project)
1953 Vauxhall Velox
914/6
1963 356B
https://www.mybespokeroom.com/
73 RS (Sold)
67 S
Mint T (Sold)
996 Turbo (Sold)
73 2.4E (home after 25 years) and Sold again
73T targa (signal yellow project)
1953 Vauxhall Velox
914/6
1963 356B
https://www.mybespokeroom.com/
-
911hillclimber
- Nurse, I think I need some assistance
- Posts: 20620
- Joined: Mon Mar 10, 2008 6:26 pm
- Location: West Midlands
Re: 2.4E From IKEA to Blut Orange
Evocative shots of Bob's old race car. Remember it well in his little workshop next to the Bakery.
How things change..
The feeler gauge thing is not too bad with the engine on a stand?
Car front looks nice without plate and badge.
Great thread!
How things change..
The feeler gauge thing is not too bad with the engine on a stand?
Car front looks nice without plate and badge.
Great thread!
73T 911 Coupe, road/hillclimber 3.2L
Lola t 492 / 3.2 hillclimb racer
Boxster 987 Gen II 2.9
Lola t 492 / 3.2 hillclimb racer
Boxster 987 Gen II 2.9