

Looks great! Who did the conversion for you?pht9 wrote:
Birth of a rally car
Moderator: Bootsy
-
Mike
- Nurse, I think I need some assistance
- Posts: 5129
- Joined: Wed May 25, 2005 12:39 pm
- Location: Hampshire


-
pht9
- DDK forever
- Posts: 636
- Joined: Sun Sep 19, 2010 7:49 am
- Location: north west
- Contact:
thanks Mike, I guess we share the same OCD about attention to detail 
after much deliberation and research, I decided to entrust Gus Pfister at Pacific FI in the USA, as he is old school, knows the correct RSR spec, and has the equipment and facilities to prepare and build in-house.
I have quite a lot of work to complete until the engine is built and running, I will certainly share this experience as it develops.
after much deliberation and research, I decided to entrust Gus Pfister at Pacific FI in the USA, as he is old school, knows the correct RSR spec, and has the equipment and facilities to prepare and build in-house.
I have quite a lot of work to complete until the engine is built and running, I will certainly share this experience as it develops.
-
pht9
- DDK forever
- Posts: 636
- Joined: Sun Sep 19, 2010 7:49 am
- Location: north west
- Contact:
We are considering having the RSR pump housings recast in magnesium, I have been in discussions with a UK based engineer that is currently assessing the parts required and if it proves feasible, then we will commence production of the housings in the near futureMike wrote:Looks great! Who did the conversion for you?pht9 wrote:
-
murph2309
- Put a fork in me, I'm done!
- Posts: 1563
- Joined: Tue Apr 24, 2007 8:38 pm
- Location: London
Happened across this on a thread on early911registry - thought you might like a look. - Interesting pump brace at the back too.
R

R
1971 2.2 S Targa viewtopic.php?f=28&t=37364
1978 3.0 SC Coupe
1970 VW Type 2 viewtopic.php?f=43&t=62339&p
1978 3.0 SC Coupe
1970 VW Type 2 viewtopic.php?f=43&t=62339&p
-
pht9
- DDK forever
- Posts: 636
- Joined: Sun Sep 19, 2010 7:49 am
- Location: north west
- Contact:
-
pht9
- DDK forever
- Posts: 636
- Joined: Sun Sep 19, 2010 7:49 am
- Location: north west
- Contact:
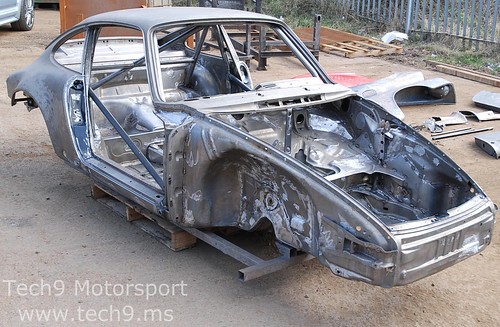
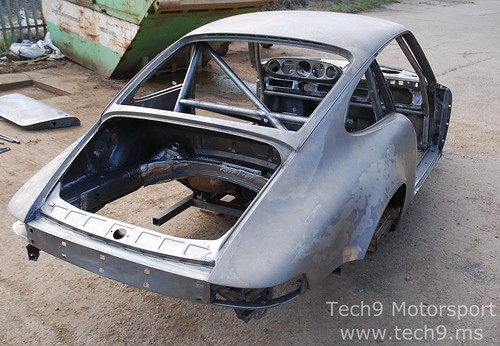
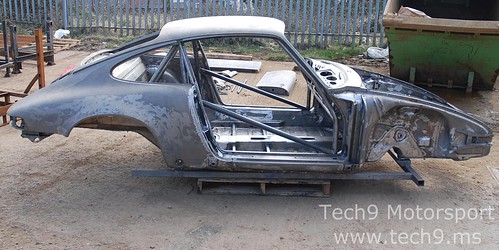
With all the chassis modifications completed, the shell is delivered back to SPL to complete the treatment process.
After the initial dipping process was conducted earlier in the year, there is obviously a few weeks delay, whilst all the fabrication is completed. During this time, a small amount of surface corrosion can form, so a very important aspect of the bodyshell treatment, is the following stage.
The chassis returns for a 'quick-dip', then it is processed through the e-coat plant.
This ensures that the surface preparation is at its best, and gives the e-coat a fully prepared surface in which to adhere, and prevent further corrosion.
It is a good chance for the e-coat to penetrate the box section areas of the chassis, and also the rollcage itself, as fill and drainage holes are located strategically throughout the chassis to ensure full coverage.
Here are some pictures of the chassis awaiting the process
[
After the initial dipping process was conducted earlier in the year, there is obviously a few weeks delay, whilst all the fabrication is completed. During this time, a small amount of surface corrosion can form, so a very important aspect of the bodyshell treatment, is the following stage.
The chassis returns for a 'quick-dip', then it is processed through the e-coat plant.
This ensures that the surface preparation is at its best, and gives the e-coat a fully prepared surface in which to adhere, and prevent further corrosion.
It is a good chance for the e-coat to penetrate the box section areas of the chassis, and also the rollcage itself, as fill and drainage holes are located strategically throughout the chassis to ensure full coverage.
Here are some pictures of the chassis awaiting the process
[
-
pht9
- DDK forever
- Posts: 636
- Joined: Sun Sep 19, 2010 7:49 am
- Location: north west
- Contact:
A bit more progress !
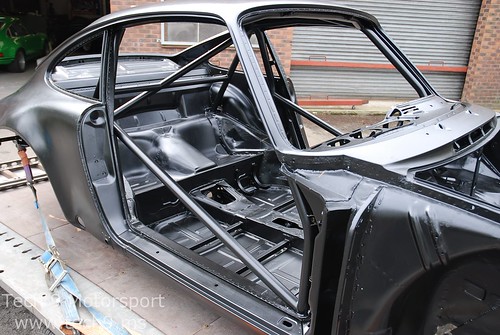
The chassis has returned from a redip and e-coating. It looks incredible, like turning back the clock to 1978 when the chassis was first produced. I am very happy with the current results, and we should have a really good base now for the final preparation into paint.
There were a few very small areas not covered by the e-coat process, due to air locks as the shell is dipped, but these were minor, and we covered them immediately with some epoxy two pack primer to protect, if you look carefully at the pictures you can see some small patches.
Thanks for looking
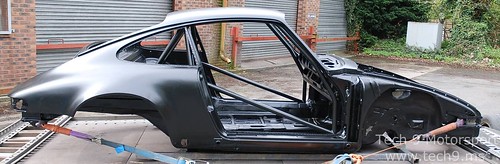
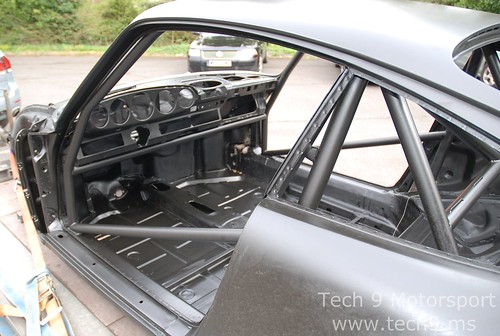
The chassis has returned from a redip and e-coating. It looks incredible, like turning back the clock to 1978 when the chassis was first produced. I am very happy with the current results, and we should have a really good base now for the final preparation into paint.
There were a few very small areas not covered by the e-coat process, due to air locks as the shell is dipped, but these were minor, and we covered them immediately with some epoxy two pack primer to protect, if you look carefully at the pictures you can see some small patches.
Thanks for looking
-
pht9
- DDK forever
- Posts: 636
- Joined: Sun Sep 19, 2010 7:49 am
- Location: north west
- Contact:
915 gearbox - rally specification
Whilst the chassis is in the paintshop, time to catch up and work on other aspects of the rally build - the gearbox
Here are the components that we will use for the rebuild


We stripped the gearbox and found all typical wear of synchro's, but also the main bearings were loose in the final drive housing and had been shuffling. This is not uncommon for a 915 gearbox, but when it is to be prepared for the future punishment that it will incur, no compromise can be accepted.
I decided to ship the case to Hayden at WEVO in the US. They have a neat solution for this problem, that involves inserting a machined steel plate into the casing. They also change the specification of the input shaft bearing to the turbo specification, again to enhance durability. Part number for this bearing is 930 302 391 00 - for reference
Here is a picture of the modified casing, showing the steel insert

We will use the original ZF LSD, that will be rebuilt with new plates to achieve the desired pre-load

The ratios that will be used are listed in the homologation papers, we will re-use 1st gear, and 3rd gear will move to 4th, so new ratios for 2nd gear (16:35), 3rd (20:32) and 5th (26:26)

and to keep it all cool, we will run an RSR style cooling pump with external cooler

Here are the components that we will use for the rebuild
We stripped the gearbox and found all typical wear of synchro's, but also the main bearings were loose in the final drive housing and had been shuffling. This is not uncommon for a 915 gearbox, but when it is to be prepared for the future punishment that it will incur, no compromise can be accepted.
I decided to ship the case to Hayden at WEVO in the US. They have a neat solution for this problem, that involves inserting a machined steel plate into the casing. They also change the specification of the input shaft bearing to the turbo specification, again to enhance durability. Part number for this bearing is 930 302 391 00 - for reference
Here is a picture of the modified casing, showing the steel insert
We will use the original ZF LSD, that will be rebuilt with new plates to achieve the desired pre-load
The ratios that will be used are listed in the homologation papers, we will re-use 1st gear, and 3rd gear will move to 4th, so new ratios for 2nd gear (16:35), 3rd (20:32) and 5th (26:26)
and to keep it all cool, we will run an RSR style cooling pump with external cooler
-
pht9
- DDK forever
- Posts: 636
- Joined: Sun Sep 19, 2010 7:49 am
- Location: north west
- Contact:
bit of an update, as the project currently stands
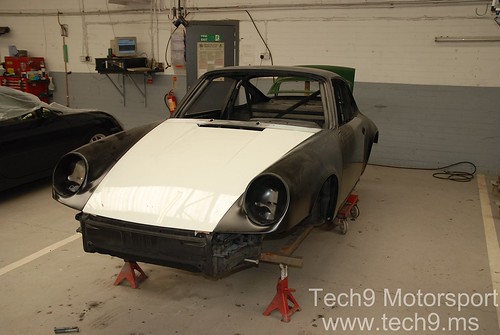
The chassis is now fully prepared ready for painting. Its taken a while to finalise some of the detail work on the chassis prior to paint (as it always does !). I wasn't happy with the rear quarters, the left one had had quite a serious repair, and the right side would have needed lots of filler on the lower edges to get the lines right. I want to start (sure it wont stay like that for long !) with a car as lightweight as possible, within the homologation regs, so I didn't want lumps of bodyfiller in the panels, whilst it is at this stage. So, a pair of new rear quarters were fitted, this also gave chance to work on the kidney bowl area, which was in pretty good condition, but allowed access to improve the strength and rigidity in that area, and leading into the inner sill.
The outer sills were also replaced, and we faced the same issue that only 964 sills are available, so the indentations were welded up to give the sills the correct final profile


New door skins were fitted to the shells, again as each door would have needed quite a bit of filler to perfect.

......and as all other outer panels had been replaced, why not stop at the front wings, that had corroded below the headlamp bowls, so a new pair fitted. An interesting observation on the front wings (new from Porsche OE parts), are the patches on them, were the e-coating has not adhered due to air entrapment, the same as the chassis had when it was dipped !

Final job, again took a bit of time to perfect. I will run the original RUF SCR front lower valance, that has a central oil cooler - akin to an RSR.
The front slam panel is quite tight behind the cooler, so any air that passes through it hits the panel, and will reduce the efficiency of the cooler. The RSR models overcame this by building into the front panel, a duct to allow the air to pass through the cooler, and exit at the floor. I class this as an important aspect of the vehicles dynamics. My experience with the later cars has shown me that the modern GT3 models have the same principle with a duct and an exit in the top of the front bumper ahead of the bonnet, which creates a large percentage of the frontal downforce. So care and attention was made to try and recreate the 'period' RSR look, yet ensure the efficiency with the valance and cooler that I will use.


So......finally it is ready for paint...watch this space - I have chosen a colour that will certainly spark debate

The chassis is now fully prepared ready for painting. Its taken a while to finalise some of the detail work on the chassis prior to paint (as it always does !). I wasn't happy with the rear quarters, the left one had had quite a serious repair, and the right side would have needed lots of filler on the lower edges to get the lines right. I want to start (sure it wont stay like that for long !) with a car as lightweight as possible, within the homologation regs, so I didn't want lumps of bodyfiller in the panels, whilst it is at this stage. So, a pair of new rear quarters were fitted, this also gave chance to work on the kidney bowl area, which was in pretty good condition, but allowed access to improve the strength and rigidity in that area, and leading into the inner sill.
The outer sills were also replaced, and we faced the same issue that only 964 sills are available, so the indentations were welded up to give the sills the correct final profile
New door skins were fitted to the shells, again as each door would have needed quite a bit of filler to perfect.
......and as all other outer panels had been replaced, why not stop at the front wings, that had corroded below the headlamp bowls, so a new pair fitted. An interesting observation on the front wings (new from Porsche OE parts), are the patches on them, were the e-coating has not adhered due to air entrapment, the same as the chassis had when it was dipped !
Final job, again took a bit of time to perfect. I will run the original RUF SCR front lower valance, that has a central oil cooler - akin to an RSR.
The front slam panel is quite tight behind the cooler, so any air that passes through it hits the panel, and will reduce the efficiency of the cooler. The RSR models overcame this by building into the front panel, a duct to allow the air to pass through the cooler, and exit at the floor. I class this as an important aspect of the vehicles dynamics. My experience with the later cars has shown me that the modern GT3 models have the same principle with a duct and an exit in the top of the front bumper ahead of the bonnet, which creates a large percentage of the frontal downforce. So care and attention was made to try and recreate the 'period' RSR look, yet ensure the efficiency with the valance and cooler that I will use.
So......finally it is ready for paint...watch this space - I have chosen a colour that will certainly spark debate
-
pht9
- DDK forever
- Posts: 636
- Joined: Sun Sep 19, 2010 7:49 am
- Location: north west
- Contact:


-
911hillclimber
- Nurse, I think I need some assistance
- Posts: 20694
- Joined: Mon Mar 10, 2008 6:26 pm
- Location: West Midlands

-
obrut
- DDK Seasoned Poster
- Posts: 32
- Joined: Sun Nov 04, 2007 10:21 pm
-
pht9
- DDK forever
- Posts: 636
- Joined: Sun Sep 19, 2010 7:49 am
- Location: north west
- Contact:
I guess that the area could be improved but I wanted to prepare the chassis and cage in 'true period' specification. App K allows an extra diagonal bar, but this also makes access difficult. I am 6' 3" and am used to getting in and out of modern cars with cross brace door bars, and its not easy.obrut wrote:My 2c - add more cage, especially in the door openings.
You're building a quickish car and tarmac rallies are about as dangerous as it gets, mainly due to the trees...
Loads of fun though - I've done 12 at last count.
Ps. If you get the chance, have a go in Targa Tasmania.
-
Nick Moss
- Nurse, I think I need some assistance
- Posts: 9424
- Joined: Sat Nov 08, 2003 6:59 pm
- Location: East Sussex
- Contact:
