

Hi Barry, you sir are a master craftsman!
One question, do you mig or tig weld?
911 2.2E restoration
Moderator: Bootsy
-
Barry
- Nurse, I think I need some assistance
- Posts: 4322
- Joined: Tue Aug 24, 2004 8:50 pm
- Location: East Sussex
Both: I use the MIG for putting whole / part panels onto structural areas of a car, and any area that either I can't get at to tap up (planish / beat flat), or are tricky to get to.
I use the TIG for areas that are to be planished, and for making up panels from two or more sub-structures. A good example of an area to be planished would be if you were putting on a new front of a rear wing. I'd have used the MIG for the sills, used the TIG for the new wing front, and after it was all planished up and spot on, I'd then use the MIG to put in the B-post and tie it all together.
I always say I'd be lost without the MIG within a few hours, but only miss the TIG after a few days. Wouldn't want to be without either now of course, but managed for many years (pre-911 days) without the TIG.
I use the TIG for areas that are to be planished, and for making up panels from two or more sub-structures. A good example of an area to be planished would be if you were putting on a new front of a rear wing. I'd have used the MIG for the sills, used the TIG for the new wing front, and after it was all planished up and spot on, I'd then use the MIG to put in the B-post and tie it all together.
I always say I'd be lost without the MIG within a few hours, but only miss the TIG after a few days. Wouldn't want to be without either now of course, but managed for many years (pre-911 days) without the TIG.
DDK Member1243 07741 273865. Home of the RY Austin 7 Trophy's and Austin Single Seat Racers
-
911hillclimber
- Nurse, I think I need some assistance
- Posts: 20690
- Joined: Mon Mar 10, 2008 6:26 pm
- Location: West Midlands
-
DeRRis
- DDK slapper chatter
- Posts: 478
- Joined: Mon Nov 22, 2010 9:48 pm
- Location: Uddel The Netherlands
I hope I'm not hijacking this threadBarry wrote:Both: I use the MIG for putting whole / part panels onto structural areas of a car, and any area that either I can't get at to tap up (planish / beat flat), or are tricky to get to.
I use the TIG for areas that are to be planished, and for making up panels from two or more sub-structures. A good example of an area to be planished would be if you were putting on a new front of a rear wing. I'd have used the MIG for the sills, used the TIG for the new wing front, and after it was all planished up and spot on, I'd then use the MIG to put in the B-post and tie it all together.
I always say I'd be lost without the MIG within a few hours, but only miss the TIG after a few days. Wouldn't want to be without either now of course, but managed for many years (pre-911 days) without the TIG.

With the mig I'm always battling with the heat, I'm thinking about buying a tig so that it won't be as much of a problem on panels.
Regards Dennis
Dennis
1972 Porsche 911 T/E
1986 Porsche 911 Carrera
1976 Lancia Beta Monte Carlo
1973 Benelli 650 Tornado S2
1972 Porsche 911 T/E
1986 Porsche 911 Carrera
1976 Lancia Beta Monte Carlo
1973 Benelli 650 Tornado S2
-
johnM
- I need to get out more!
- Posts: 3398
- Joined: Mon Apr 03, 2006 10:27 pm
- Location: Lake District
Thanks for the kind comments I and I am sure Barry, appreciates them.
Hopefully I will have some more pics to post today. While Barry has been busy beavering away on the shell I have been slowly going through the bits left over in my garage. I have spent a suprising amount of time going over the wiring loom. The loom was gubby and had been repaired and modified over the years. It also had quite a bit of overspray on some of it. I have cleaned repaired and resleaved and re-taped the loom. All in all it is looking much better.
Kind Regards
Hopefully I will have some more pics to post today. While Barry has been busy beavering away on the shell I have been slowly going through the bits left over in my garage. I have spent a suprising amount of time going over the wiring loom. The loom was gubby and had been repaired and modified over the years. It also had quite a bit of overspray on some of it. I have cleaned repaired and resleaved and re-taped the loom. All in all it is looking much better.
Kind Regards
John
1970 2.2E Coupe.
2004 996 GT3 mkII
2015 Skoda Octavia VRS TSI DSG.
2021 Toyota GR Yaris Circuit Pack
1970 2.2E Coupe.
2004 996 GT3 mkII
2015 Skoda Octavia VRS TSI DSG.
2021 Toyota GR Yaris Circuit Pack
-
johnM
- I need to get out more!
- Posts: 3398
- Joined: Mon Apr 03, 2006 10:27 pm
- Location: Lake District
Barry has been busy the last week or so with the offside torsion tube area. This area has 3 (I think) layers and was quite rotten. It had been repaired previously but this time it was going to be done properly.
First he mocked up the outer layer.

Barry decided to remove the whole outer skin and make a kit of parts to repair the offending areas.


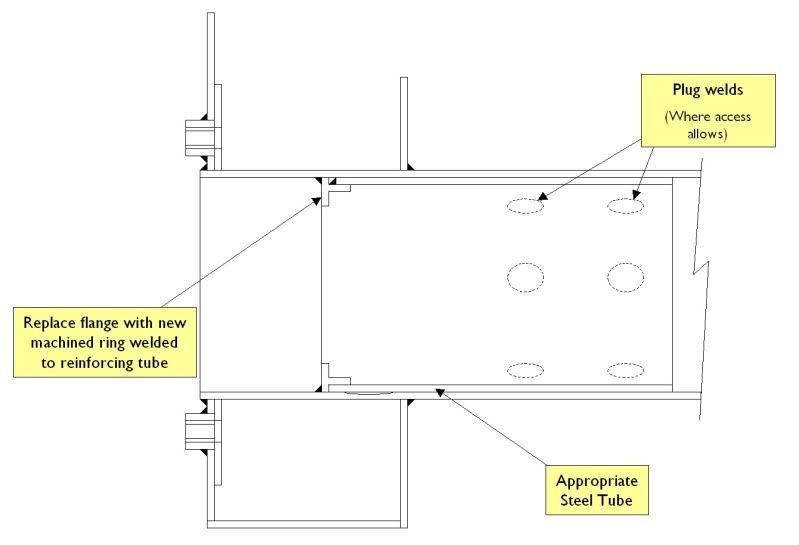
As you can see the torsion tube end that the spring plate rubber bearing sits in was not attached at all to the tube, in fact the tube end had been replaced by cutting the middle out of the spring plate cover.

A tube end was then machined out of some material and an insert was fitted into the tube.


This end slid over the tube and it was plug welded and then welded around the entire end. Don’t think it will drop off.


At this time the rear bulkhead repair was also fitted.

And a repair to the seat bottom.


Once this was done Barry fitted the rear layer of the torsion area, a new antiroll bar mount will be fitted to this.

The reinforcing layer was then made and fitted in. The jig even fits


So all that’s left is the outer layer to fit.
First he mocked up the outer layer.
Barry decided to remove the whole outer skin and make a kit of parts to repair the offending areas.
As you can see the torsion tube end that the spring plate rubber bearing sits in was not attached at all to the tube, in fact the tube end had been replaced by cutting the middle out of the spring plate cover.
A tube end was then machined out of some material and an insert was fitted into the tube.
This end slid over the tube and it was plug welded and then welded around the entire end. Don’t think it will drop off.
At this time the rear bulkhead repair was also fitted.
And a repair to the seat bottom.
Once this was done Barry fitted the rear layer of the torsion area, a new antiroll bar mount will be fitted to this.
The reinforcing layer was then made and fitted in. The jig even fits
So all that’s left is the outer layer to fit.
John
1970 2.2E Coupe.
2004 996 GT3 mkII
2015 Skoda Octavia VRS TSI DSG.
2021 Toyota GR Yaris Circuit Pack
1970 2.2E Coupe.
2004 996 GT3 mkII
2015 Skoda Octavia VRS TSI DSG.
2021 Toyota GR Yaris Circuit Pack
-
Gary71
- Nurse, I think I need some assistance
- Posts: 10719
- Joined: Wed Mar 31, 2004 1:27 pm
- Location: Cheshire
- Contact:
-
911hillclimber
- Nurse, I think I need some assistance
- Posts: 20690
- Joined: Mon Mar 10, 2008 6:26 pm
- Location: West Midlands

-
911hillclimber
- Nurse, I think I need some assistance
- Posts: 20690
- Joined: Mon Mar 10, 2008 6:26 pm
- Location: West Midlands
-
johnM
- I need to get out more!
- Posts: 3398
- Joined: Mon Apr 03, 2006 10:27 pm
- Location: Lake District
Bold indeed I think this area was a little worse than we first envisaged. Poor Barry is busy with my car during the days the special at the weekends and little projects in the evening and fitting the odd course in-between. I just keep sending the red bull down (other power drinks available)
John
1970 2.2E Coupe.
2004 996 GT3 mkII
2015 Skoda Octavia VRS TSI DSG.
2021 Toyota GR Yaris Circuit Pack
1970 2.2E Coupe.
2004 996 GT3 mkII
2015 Skoda Octavia VRS TSI DSG.
2021 Toyota GR Yaris Circuit Pack
-
Nige

- Nurse, I think I need some assistance
- Posts: 6685
- Joined: Wed Nov 26, 2003 9:11 pm
- Location: Denby, Derbyshire
-
Barry
- Nurse, I think I need some assistance
- Posts: 4322
- Joined: Tue Aug 24, 2004 8:50 pm
- Location: East Sussex
Thanks for the kind words chaps  .
.
Just returned from another flying visit to Eckold.U.K. in Coventry (a one day course on hammerforming this time). Was going to a show at the NEC tomorrow, but decided that I would treat it as a catch-up day instead.
(Gary) The tube repair presented something of a dilemma. Clearly the outer 1 1/2 inches or so of the tube ends have been lost. Once inside of that area though, the tube is near perfect, as is the inner layer of the chassis leg (where the tube passes) next to the engine bay. If we had gone for a new tube end from 2mm walled tube, held in with a sleeve, the existing tube and inner chassis leg layer would have had to have been chopped away to give enough overlap of the any inner sleeve whilst still allowing the correct depth for the backstop.
Therefore these tube repair sections (both turned up, and indeed one is seen through the other in the above picture) seemed to be a good, strong and compact solution to the issue. I also have a little tool for the flypress for making the pressed steel tube backstop, and modified a pair of these to fit at the correct depth in the repair piece.
BTW, it was only when the original torsion tube repairs were removed from the car, that their orginal purpose was revealed. If it wasn't for the fact they weren't attached to the tube at all (and indeed, the offside one has signs of fret / polish marks where it was resting in the main torsion tube), they would have been quite a cleaver solution. Right wall thickness, correct backstop etc. Oh well.
Coming week's task is to duplicate the above repairs for the other side, and perhaps think about fitting the new rear floor (finally), and zipping up the remaining structure (middle sill included) on the offside, which would be a nice milestone to tick off.
Would like to ramp this project up a notch over the next few weeks, English Wheels and various courses have absorbed more than enough of John's project time recently, and it would be good to see some larger chunks pulled back together .
.Just returned from another flying visit to Eckold.U.K. in Coventry (a one day course on hammerforming this time). Was going to a show at the NEC tomorrow, but decided that I would treat it as a catch-up day instead.
(Gary) The tube repair presented something of a dilemma. Clearly the outer 1 1/2 inches or so of the tube ends have been lost. Once inside of that area though, the tube is near perfect, as is the inner layer of the chassis leg (where the tube passes) next to the engine bay. If we had gone for a new tube end from 2mm walled tube, held in with a sleeve, the existing tube and inner chassis leg layer would have had to have been chopped away to give enough overlap of the any inner sleeve whilst still allowing the correct depth for the backstop.
Therefore these tube repair sections (both turned up, and indeed one is seen through the other in the above picture) seemed to be a good, strong and compact solution to the issue. I also have a little tool for the flypress for making the pressed steel tube backstop, and modified a pair of these to fit at the correct depth in the repair piece.
BTW, it was only when the original torsion tube repairs were removed from the car, that their orginal purpose was revealed. If it wasn't for the fact they weren't attached to the tube at all (and indeed, the offside one has signs of fret / polish marks where it was resting in the main torsion tube), they would have been quite a cleaver solution. Right wall thickness, correct backstop etc. Oh well.
Coming week's task is to duplicate the above repairs for the other side, and perhaps think about fitting the new rear floor (finally), and zipping up the remaining structure (middle sill included) on the offside, which would be a nice milestone to tick off.
Would like to ramp this project up a notch over the next few weeks, English Wheels and various courses have absorbed more than enough of John's project time recently, and it would be good to see some larger chunks pulled back together
.DDK Member1243 07741 273865. Home of the RY Austin 7 Trophy's and Austin Single Seat Racers