

This has made me dig out my old photo albums of the car in '88, and what a mess it was too.
My '72 911T
Moderator: Bootsy
-
911hillclimber
- Nurse, I think I need some assistance
- Posts: 20629
- Joined: Mon Mar 10, 2008 6:26 pm
- Location: West Midlands
-
Gary71
- Nurse, I think I need some assistance
- Posts: 10705
- Joined: Wed Mar 31, 2004 1:27 pm
- Location: Cheshire
- Contact:
More painfully slow progress, just not getting the time at present.
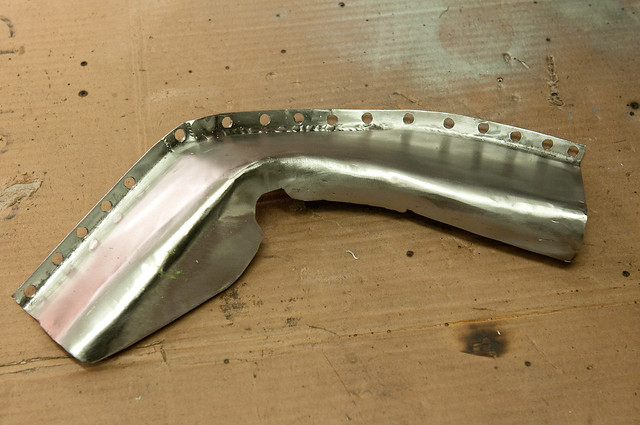
So, another snatched hour the other night and the start of the closing panels.

Must try harder to put some time in on this or it will never get done!
Once complete, and joined to the front section I'll make separately, this panel will be cut in flush to the surroundings and butt welded.
I've also added a joggle to the lowest point on the flange to act as a drain hole.
Once I've made this outer I'll make the inner reinforcing to match before welding it all up.
So, another snatched hour the other night and the start of the closing panels.
Must try harder to put some time in on this or it will never get done!
Once complete, and joined to the front section I'll make separately, this panel will be cut in flush to the surroundings and butt welded.
I've also added a joggle to the lowest point on the flange to act as a drain hole.
Once I've made this outer I'll make the inner reinforcing to match before welding it all up.
-
Gary71
- Nurse, I think I need some assistance
- Posts: 10705
- Joined: Wed Mar 31, 2004 1:27 pm
- Location: Cheshire
- Contact:

-
Barry
- Nurse, I think I need some assistance
- Posts: 4322
- Joined: Tue Aug 24, 2004 8:50 pm
- Location: East Sussex
Getting there Gary  .
.
I guess the best bit of advice I can give with this type of area is to divide the outer radius into two: so you have the horizontal part (with flange) with half of the radius to it's outside edge, heading upwards, and the vertical part dropping down with it's own half-radius sweeping inwards.
Use self-gripping pliers (Mole / Vise grips) to hold the lower areas in place (flange to flange), and self-tappers for the upper. File down one of the edges smooth, and have that overlapping the un-filed one. Scribe all of the way along, plus a couple of vertical register marks going at 90d to the join.
After that you can remove these parts from the car and weld / dress them on the bench. Et voila, one 'pressing'. Well, that's the idea anyway.
BTW, it's generally accepted that for non-powered work, the biggest flange that you can really shrink or stretch is about 3/4 inch. After that the metal is getting so thick / thin / stressed, it's better to divide that area somehow.
I guess what this means, is that when you are creating some of these shapes, it's difficult because it's difficult . To put it another way, it's not particularly that someone is doing it wrong, and therefore struggling, it's just that even when you do it right it's still blinking tough
  .
.
Anyway, a lot of this comes down to:
1) Where you place the joins, so that you don't have a situation where you're putting a load of shrink / stretch into one part, and next to none in the next.
2) How heavily and rigidly (is that a word?) you can hold the work (i.e. so all of your energy is going into moving the metal, and not bouncing your vice / workbench / dolly etc around). Also how big / heavy the blows are. The difference between using a light vice on a light bench with a small hammer, compared to a massive vice on a solid bench with a large (but correctly profiled) hammer is quite incredible. Literally chalk and cheese.
I guess the best bit of advice I can give with this type of area is to divide the outer radius into two: so you have the horizontal part (with flange) with half of the radius to it's outside edge, heading upwards, and the vertical part dropping down with it's own half-radius sweeping inwards.
Use self-gripping pliers (Mole / Vise grips) to hold the lower areas in place (flange to flange), and self-tappers for the upper. File down one of the edges smooth, and have that overlapping the un-filed one. Scribe all of the way along, plus a couple of vertical register marks going at 90d to the join.
After that you can remove these parts from the car and weld / dress them on the bench. Et voila, one 'pressing'. Well, that's the idea anyway.
BTW, it's generally accepted that for non-powered work, the biggest flange that you can really shrink or stretch is about 3/4 inch. After that the metal is getting so thick / thin / stressed, it's better to divide that area somehow.
I guess what this means, is that when you are creating some of these shapes, it's difficult because it's difficult
Anyway, a lot of this comes down to:
1) Where you place the joins, so that you don't have a situation where you're putting a load of shrink / stretch into one part, and next to none in the next.
2) How heavily and rigidly (is that a word?) you can hold the work (i.e. so all of your energy is going into moving the metal, and not bouncing your vice / workbench / dolly etc around). Also how big / heavy the blows are. The difference between using a light vice on a light bench with a small hammer, compared to a massive vice on a solid bench with a large (but correctly profiled) hammer is quite incredible. Literally chalk and cheese.
Last edited by Barry on Wed Dec 15, 2010 11:45 pm, edited 2 times in total.
DDK Member1243 07741 273865. Home of the RY Austin 7 Trophy's and Austin Single Seat Racers
-
Barry
- Nurse, I think I need some assistance
- Posts: 4322
- Joined: Tue Aug 24, 2004 8:50 pm
- Location: East Sussex
-
Gary71
- Nurse, I think I need some assistance
- Posts: 10705
- Joined: Wed Mar 31, 2004 1:27 pm
- Location: Cheshire
- Contact:
Hi Barry 'How to' is fine by me!
To make it hard for myself I have pretty much pushed the whole radius from the bottom up, then this upturned flange needs about 20 mm added to the top to complete the join back into the inner wing on the forward part. To be honest this is mainly because I cut out the template with plenty of spare, made the lower flange first then started to chase the metal up around the corner. There just happened to be enough metal to make the whole radius
Does this area 'buldge' out slightly from the front lower weldnut before coing back under horizontally? It looks like it should, although that doesn't really make sense! All my original reference was lost first time around!
You know when you are hitting it wrong trying to shape it as the hammer bounces back and the metal 'twangs' rather than a satisfying 'thud' as all off your energy sinks into the sheet.
Luckily I have big bench, big hammer and big vice!
Back on it tonight, and a full day tomorrow, so I hope to finish it then!
-
Barry
- Nurse, I think I need some assistance
- Posts: 4322
- Joined: Tue Aug 24, 2004 8:50 pm
- Location: East Sussex
That's exactly it!Gary71 wrote:You know when you are hitting it wrong trying to shape it as the hammer bounces back and the metal 'twangs' rather than a satisfying 'thud' as all off your energy sinks into the sheet.
I'll try to grab a picture of the current car today, and pop it up later, so you can confirm you're on the right track, but yes, it does bulge out where you describe
DDK Member1243 07741 273865. Home of the RY Austin 7 Trophy's and Austin Single Seat Racers
-
Gary71
- Nurse, I think I need some assistance
- Posts: 10705
- Joined: Wed Mar 31, 2004 1:27 pm
- Location: Cheshire
- Contact:
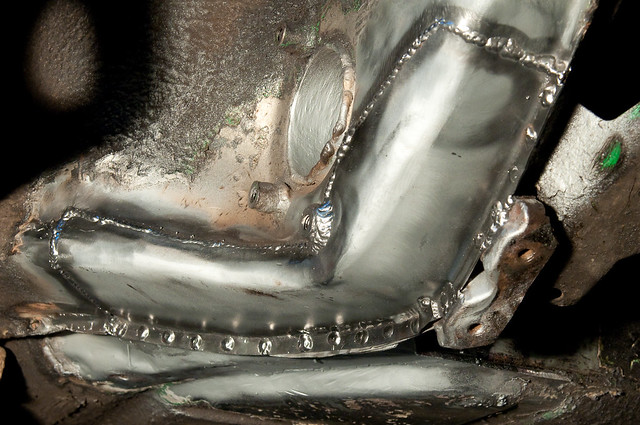
Now finished the panel!
Those pressed bits you can buy look good value now
Final trial fit.

Now all painted up inside and out and drying off overnight before final welding tomorrow.
I need to make the bush backstop flange for inside the torsion tube and then get back to the jobs I should have been doing this winter...
Those pressed bits you can buy look good value now
Final trial fit.
Now all painted up inside and out and drying off overnight before final welding tomorrow.
I need to make the bush backstop flange for inside the torsion tube and then get back to the jobs I should have been doing this winter...
-
johnM
- I need to get out more!
- Posts: 3398
- Joined: Mon Apr 03, 2006 10:27 pm
- Location: Lake District
Gary that looks like a really good repair. It looks like a difficult area to repair and going by the attempt somebody made on my car you have done significantly better, well done and keep the pictures coming.
Kind regards
Kind regards
John
1970 2.2E Coupe.
2004 996 GT3 mkII
2015 Skoda Octavia VRS TSI DSG.
2021 Toyota GR Yaris Circuit Pack
1970 2.2E Coupe.
2004 996 GT3 mkII
2015 Skoda Octavia VRS TSI DSG.
2021 Toyota GR Yaris Circuit Pack
-
Gary71
- Nurse, I think I need some assistance
- Posts: 10705
- Joined: Wed Mar 31, 2004 1:27 pm
- Location: Cheshire
- Contact:
-
Gary71
- Nurse, I think I need some assistance
- Posts: 10705
- Joined: Wed Mar 31, 2004 1:27 pm
- Location: Cheshire
- Contact:
-
defianty
- Put a fork in me, I'm done!
- Posts: 1717
- Joined: Sat Aug 05, 2006 7:02 pm
- Location: Rochford, Essex
-
Gary71
- Nurse, I think I need some assistance
- Posts: 10705
- Joined: Wed Mar 31, 2004 1:27 pm
- Location: Cheshire
- Contact:
Thanks to both, however...
I've just realised the flange I made to support the back of the bush (and have already welded in...) is to small an ID to clear the trailing arm!
Whilst only the torsion bar has to go through it, the end of the trailing arm spline is awfully close to the end of the bush and as the bush deflects it needs to pass slightly through it or it will make lovely clunking noises.
So somehow I've got to get that out again...
-
sladey
- Nurse, I think I need some assistance
- Posts: 9330
- Joined: Sat Apr 23, 2005 9:08 pm
- Location: Nottingham, UK