Ode to Alan and Barry.. or a 72E Restoration

Ongoing and archived Porsche (and other marques) restoration threads from DDK members

Moderator: Bootsy

User avatar
silver911
Married to the DDK
Posts: 255
Joined: Thu Nov 13, 2003 7:14 am
Location: London

Ode to Alan and Barry.. or a 72E Restoration

Post by silver911 »

Well... finally had a bit of time to get some pics sorted and some words written on the restoration of my 72E....

First a bit of history....

I've had this car for ten years now....and in that time it's given me some good times and some serious fun. I picked it up in Paris in the summer of 1997, having driven it all of about 25 miles previously, in the pouring rain around the airport and headed off to the south of France with naff all in terms of spares or back up....

Now this was not my first 72E.. I had run one for a few years in the US and so was 'fairly' comfortable with treating her as a regular, reliable touring car....

Several thousand miles later we returned and since then its been back down there and back, again with zero trouble. She has been fairly well maintained..by farmers near Oxford, since her return from overseas. but time marches on and for the price I paid I knew that I was facing some serious work in the future.

I had figured on 6 or 7 years of comfortable motoring before the tin worm raised its ugly head.

At 'home'....
Image
A fair 'ten-yarder'....
Image
Slight paint tone differences...and door rust.
Image
Somewhat worn
Image
And why she needed work...
Image
And more...
Image

I knew that some serious work was needed and turned to my local specialist restorer to get a quote. It was steep and to be honest for a while it was touch and go on whether to keep her or not...

Due to more pressing concerns..like starting a family, the issue of who to get to do the work was parked somewhat.

For a while JP and I spent many a 'working lunch' talking about a) his SC to Carrera transition and
b) my E, sitting in the garage, waiting for cash and what to do with it.

But, after seeing what Barry had managed on JP's car see this thread....http://www.ddk-online.com/phpBB2/viewtopic.php?t=12123.

Now I've worked with JP for a number of years and he is a 'perfectionist'.. to put it politely. Seeing the work being done and hearing JP's comments was a convincing case.

So I spoke to Barry and pretty soon I had a top team on the case...Barry and Alan were going to do a serious double act on this car.....
User avatar
silver911
Married to the DDK
Posts: 255
Joined: Thu Nov 13, 2003 7:14 am
Location: London

Post by silver911 »

In short order Alan was up ready to take her away and get a start....
Image

Leaving home.
Image


Now this was the first time that Alan had seen the car. The plan was for Alan to strip the car back to the basic tub (but wired) and then ship her off to Barry to do the bodywork. Whilst this was underway Alan would take the components and restore them. We had already mapped out a budget and a time frame.

The challenge was to see how close we were to reality.

But first a strip down to really see really what was what...
Image
Image
Image

Alan was pretty happy with what he found. Except for the usual suspect areas that we had high lighted. The windscreen corners were in need to work.
Image
The B posts were also a know issue....

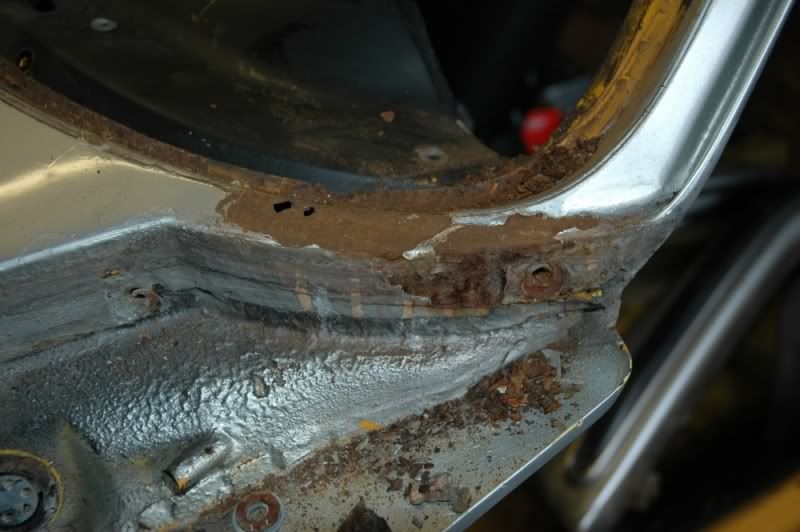
But more fun was the extent of the rust caused by water ingress from a dried out rear screen seal. From the outside...
Image
Image

Up close and personal it looked pretty bad...
Image

And until it was blasted we wouldn't know how bad it really would be...
Image

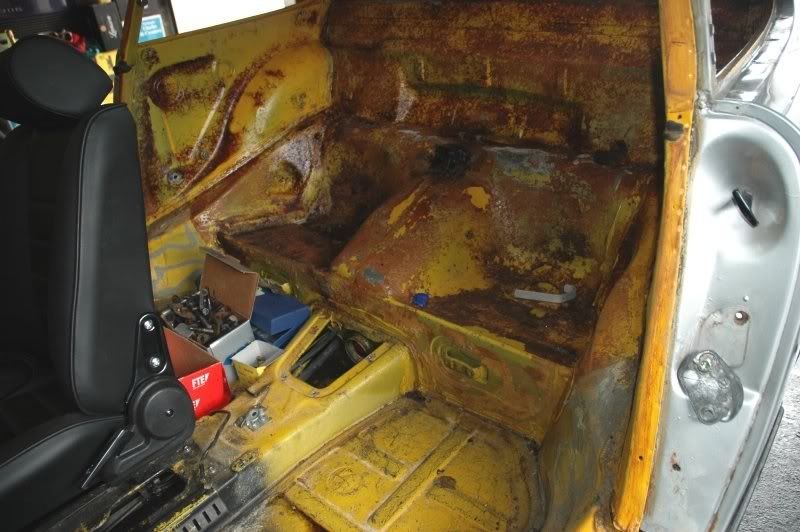
Interestingly we discovered some rust damage within the rear seat area...the joys of water tracking from the rear shelf across and down the wiring loom and settling at the next suitable spot and heyho..a nice hole.
Image

She was originally yellow.. pretty obvious really..and the final colour choice was up in the air...at least for the time being..

In the meantime some big ticket items were already sorted...
The leaking oil tank..
Image

Replaced by a NOS one.. (I think Alan was particularly excited about this one)...
Image

It is however e thing of beauty and desire...
Image

The engine, rebuilt in 1996 by a Dassault Falcon Jet mechanic (PO) in France with a list of parts as long as your arm and updated since then with Carrera tensioners (purists abstain) was dropped, ready to be stripped for some cosmetic work..
Image

Alan organised a media blasting prior to it being shipped off to Barry's workshop...
Image

With a pair of new (to me) doors to replace the rotten ones...
Image

Things were looking good so far...
User avatar
silver911
Married to the DDK
Posts: 255
Joined: Thu Nov 13, 2003 7:14 am
Location: London

After Blasting

Post by silver911 »

The blasting made it easier to see what was the true extent of the rust damage.

Front screen corner.
Image
We might get away with patching this rather than cutting in a new corner panel.

Small blister reveals a hole.
Image

And the rear parcel shelf...
Image
There'll be more on this as Barry gets to grip with repairing this panel.
Image

The passenger side battery box reveals a hidden repair...
Image

Overall both Alan and Barry were pleasantly surprised at how solid the tub was..and so was I.

Now it was Barry's turn to have the tub to do his part of the process...
Image
User avatar
silver911
Married to the DDK
Posts: 255
Joined: Thu Nov 13, 2003 7:14 am
Location: London

Post by silver911 »

Barry lost no time in getting the tub onto his jig....
Image

Just to check if it was straight...
Image

As I had had a meeting with a wall in the past..
Image

Which was repaired by an Approved Porsche repair shop way back when.
Image

Once up and fitted Barry was confident that the tub was straight and that the 'misses' on the jig were restricted to local areas where a combination of planned repairs and straightening would bring it all back into line.


Here removal of the underseal revealed a bent panel inboard of the left hand battery box (the side that hit the wall).
Image

The suspension location points were not affected by the damage, but it was worth trying to 'iron-out' the wrinkles and see if they hid more rust or damage.
Image

The list of small jobs was always a long one and with the shell blasted we could see what they actually were going to take to fix..like the battery box.
Image

And of course the sills. I had anticipated that both outer sills were going to need replacement as well as the B posts. It was a pretty rational bet that if the base of the Bpost was rusted thro then the sill below was going to be history and if it was the case on one side then the other would not be far behind.

Initially we thought that the sill may be repairable. But a combination of rust anf a rather long crease down its length made us go towards a new sill (993 part) as the most cost effective repair.
Image

The B post we knew was going to be replaced so its was another factor in the decision. The rear wing was also not exactly aligned correctly.
Image
We would take the opportunity of the cutting to try to get this a bit straighter and remove the filler..
Image
User avatar
hot66
Moderator
Posts: 19219
Joined: Tue Nov 11, 2003 4:17 pm
Location: North Yorkshire

Post by hot66 »

I think this is such an exciting time, when the car has just been stripped & the bodywork is starting. The knowledge that you will have a 100% spot on body work is such a good feeling :)


What shade of yellow was it originally & are you going to return the car to stock?
James

1973 911 2.4S
1993 964 C2
2010 987 Spyder

1963 Honda C100 Supercub

Its not how fast you go, but how you go fast ;)
User avatar
silver911
Married to the DDK
Posts: 255
Joined: Thu Nov 13, 2003 7:14 am
Location: London

Post by silver911 »

Yellow....

When I purchased the car one of criteria was its colour...as well as how sound it was....

So I went to France to get the right combination...

And even tho I knew it was a repainted car there were also other issues...
Image
Which included this interior (from a 25th Anniversary 1975MY 911S) which to my mind was more attractive than an all black one.

During the strip down with Alan we saw the real extent of the respray and the basic soundness of the tub....
Image

This also shows what is probably the original spray pattern to cover the seat rails etc when it was built...

Plus the real colour...Signal Yellow 114 I believe..
Image

Alan was also excited to see the original spraying internally.. he said he had not previously seen it this clearly.
Image

But in spite of all that... I'm still going to keep it silver.
I know, I know its not stock.. but the interior is not.. and going back in time is always going to mean new seats and doors cards...so it would not be 'original'..

Plus I have a indication that the car was only yellow for few years...I think it changed to silver in the late 70s, early 80s at the latest...

So which colour really represents the car best.. its factory colours or the ones it has worn the longest? I tend toward silver and as its the colour I really want is going to be repainted silver...
defianty
Put a fork in me, I'm done!
Posts: 1717
Joined: Sat Aug 05, 2006 7:02 pm
Location: Rochford, Essex

Post by defianty »

I'm sure I'm not the only one who loves these restoration threads. Good luck with it all. Looking forward to seeing some more of Barry's masterful metal work. Keep the updates coming. :)
Stephen

1973 914 3.0 GT Build Progress
1974 TR6

914 Rear Alignment Shims
jtparr
DDK 1st, 2nd and 3rd for me!
Posts: 2365
Joined: Mon May 24, 2004 10:54 pm
Location: london/surrey

Post by jtparr »

cool

not before time but glad its finally happening

certainly in safe hands

keep it coming

Jp
User avatar
silver911
Married to the DDK
Posts: 255
Joined: Thu Nov 13, 2003 7:14 am
Location: London

Post by silver911 »

JP,

Indeed......and the race is still on....can you fix your engine issues before mine is roadworthy again..... :wink:

Back to the story....

Whilst Barry was busy taking more and more underseal off to discover the extent of the damage, Alan was gathering up all the removed parts...
Image

And getting them off to the painting and plating guys as needed.

He was also on the look out for a new LHD dash top...mine had suffered from the usual crack and also water damage from the leaking front screen corner....and this is what he found...
Image

Don't even ask the price...I'm too afraid to...Its not an exact version... from what we know its NOS and its the version Porsche offered later on as its replacement...note the speaker grille is not the detachable type but it does have the correct perforations.
More conventionally standard body work pieces were procured..
Image

ready for the return of the repaired and painted body shell.
User avatar
silver911
Married to the DDK
Posts: 255
Joined: Thu Nov 13, 2003 7:14 am
Location: London

Post by silver911 »

In Barry's workshop things were moving on rapidly.

The initial inspection had offered hope that the nearside (driver's) sill was still OK, even if the B post was gone. But as Barry cut away more of the B post it was clear that a new sill was needed.

We can see here that the sill itself was not in the best condition and would need work.
A long dent in the sill would need to be pulled and filled...
Image

In addition there were various bumps and dents.
Image

Cutting more away revealed the extent of the rust problem. It also revealed a dented kidney bowl... and here another mystery begins.
Image

From the condition of the rest of the rear wing and the welds, Barry does not think that the rear wing has been replaced, nor that a section has been cut out and replaced...so how did that dent appear? How did it get there? The wing before cutting, some filler but nothing too serious.
Image

We'll probably never know...my guess is that it was either there from the beginning (anyone know if Porsche let that sort of damage out of the factory in 1972?) or somebody did some very serious work on the car.. and to a very high (factory) standard.

But it didn't stop the sill coming off in double quick time.
Image

To reveal, thankfully a pretty sound inner sill and a sound jacking point.
Image

This cleaned up very nicely and revealed that the base of the A pillar was also sound.
Image
User avatar
silver911
Married to the DDK
Posts: 255
Joined: Thu Nov 13, 2003 7:14 am
Location: London

Post by silver911 »

The new sill arrived the next day and Barry set to work fixing it in place. Once it has received a serious coat of liquid zinc...a Wurth paint I believe.
Image

Offered up for fit it shows how sound the basic tub remains.
Image

Another view.
Image

And with the new B post panel in place.
Image

Image

With the (new to me) door in place.
Image

Now we get to the serious part.....
Barry's metal working skills.

He had to make a 'patch panel' to replace the metal cut out to 'release' the sill.

Hand-made....
Image

And not one for resting Barry fitted it straight away.
Image

Some grinding artistry was the next stage.
Image

And it takes a very skilled and patient craftsman to produce this result.
Image

Once its finally fettled, leaded, primed and painted it will perfect.
Image
User avatar
Bootsy
Site admin and the Boss
Posts: 25712
Joined: Sat Nov 08, 2003 6:09 pm
Location: Norwich
Contact:

Post by Bootsy »

Great thread. Barry, you're one skilled young man!
1972 911T | 1994 993 Carrera | 1999 986 Boxster |

Vintage Heuer, Omega, Zenith and other vintage watches - http://www.heuerheritage.co.uk
User avatar
silver911
Married to the DDK
Posts: 255
Joined: Thu Nov 13, 2003 7:14 am
Location: London

Post by silver911 »

Back at Alan's workshop some parts had returned looking much happier. The quality of the work is just great...

Even if it looks as if somebody has half inched the car itself....
Image

The rear end.
Image

front end...
Image

And from in front.
Image

Alan turned his efforts to the engine...outside only but it looks good.
Image
User avatar
silver911
Married to the DDK
Posts: 255
Joined: Thu Nov 13, 2003 7:14 am
Location: London

Post by silver911 »

When Barry first set the car onto the jig he noticed a couple of areas where the it was not sitting properly...notably the front left hand (driver's )side. We knew already that work had been done here and this jig work confirmed some vertical misalignment, but very little horizontal differences.

Barry, ever the 'perfectionist' was keen to see how much of that distortion we could remove to return the tolerances to spec...

In order to do so Barry needed to be able to apply some serious force to the tub to bring it back into line. This brute force route would have posed other problems that we wanted to avoid. So looking laterally Barry reason if we could not use brute force perhaps we could selectively 'weaken' the affected area and then use much less force to correct and then re-strengthen the area.

This made a lot of sense as there was damage inboard of the battery box, this is what it looked like before.
Image

So the buckled area was removed.
Image

Any rust and deformity locally was addressed whilst the double skinning was open.
Image

And the distortion was removed by judicious application of the right forces in the right direction...
Image

The panel.. after having Barry work his magic on it was welded back into place
Image
leaving nobody any the wiser..

The area below the battery box was next. It too had suffered from meeting an immobile object and needed attention.
Image

Which it did and the result is very impressive.
Image

Early on in the process I had to make a call as to what I wanted this car for...and to be honest its was easy... I'm not into 'rivet-counting' and if there are signs of use and mods as needed then that's what it i, I want to be able to drive this car and not get too precious about it. That said as Alan and Barry worked on it, it became clear that is was pretty sound and very original. It therefore made sens to aim to keep as much of the original car as possible, repairing and not replacing when reasonable to do so...

Case in point the rear bumpers... battered and bashed.. but not rusty..and repairing them would be less costly than getting new ones..
Image
abzadams
DDK rules my life!
Posts: 1023
Joined: Tue Nov 15, 2005 12:54 pm
Location: Glasgow

Post by abzadams »

this is a great thread, please keep us upto date.
Rich

Sepia 72 2.5T/E (gone)
2004 996 Turbo
Post Reply