

The XK
Moderator: Bootsy
-
Ian Donkin
- DDK rules my life!
- Posts: 1306
- Joined: Wed Sep 29, 2004 9:07 pm
- Location: A Southern Northerner
Re: The XK
Very nice indeed.
2006 RHD 997 Carrera (but DDK remains in my heart - also now no longer)
1972 LHD 2.4T with '73 2.4T CIS motor - gone to a new DDK home
1994 RHD 993 Carrera - gone!
1968 LHD 911L - was the Wife's but now in new hands
#1252
1972 LHD 2.4T with '73 2.4T CIS motor - gone to a new DDK home
1994 RHD 993 Carrera - gone!
1968 LHD 911L - was the Wife's but now in new hands
#1252
-
jury
- I used to have a life, then came DDK
- Posts: 3536
- Joined: Mon Apr 16, 2007 9:06 pm
- Location: Portland, Oregon, USA
Re: The XK
Tally Bally ho Mr Parr, that looks amazing !! Black wheels are a nice touch 
# 465
1967 912 Polo Red
1968 912/11 RAL 7001 ' MOD ROD '
1990 964 C2 Velvet Red
1991 VW Vanagon GL (SOLD - Vanagone)
2017 Coleman CT200U
“It’s not where you’re from, it's where you’re at”
1967 912 Polo Red
1968 912/11 RAL 7001 ' MOD ROD '
1990 964 C2 Velvet Red
1991 VW Vanagon GL (SOLD - Vanagone)
2017 Coleman CT200U
“It’s not where you’re from, it's where you’re at”
-
964RS
- Nurse, I think I need some assistance
- Posts: 6558
- Joined: Sun Sep 02, 2007 9:53 pm
- Location: Midlands
- Contact:
Re: The XK
I do like black wheels on a colouful car! Very Nice
----------------------------------------------------
Jason
https://www.SweepingHand.co.uk
Rolex & Omega Watch Purchases & Sales

Jason
https://www.SweepingHand.co.uk
Rolex & Omega Watch Purchases & Sales

-
jtparr
- DDK 1st, 2nd and 3rd for me!
- Posts: 2365
- Joined: Mon May 24, 2004 10:54 pm
- Location: london/surrey
Re: The XK
Part 29
Headlining
The headlining was a task I will always own up to having postponed as long as I possibly could…..chiefly because I had never done a stretched headlining before and I really did not know what the technique was/is to do it….no amount of internet searching showed me the process….just the usual start…and the lo and behold it’s done….hymmm…not exactly helpful
I fact it’s really simple….but needs experience on how to stretch the material to avoid ripples….with impact adhesive there isn’t much on the way of a second attempt…..(not quite no possibility….but its tricky to pull apart shall we say)
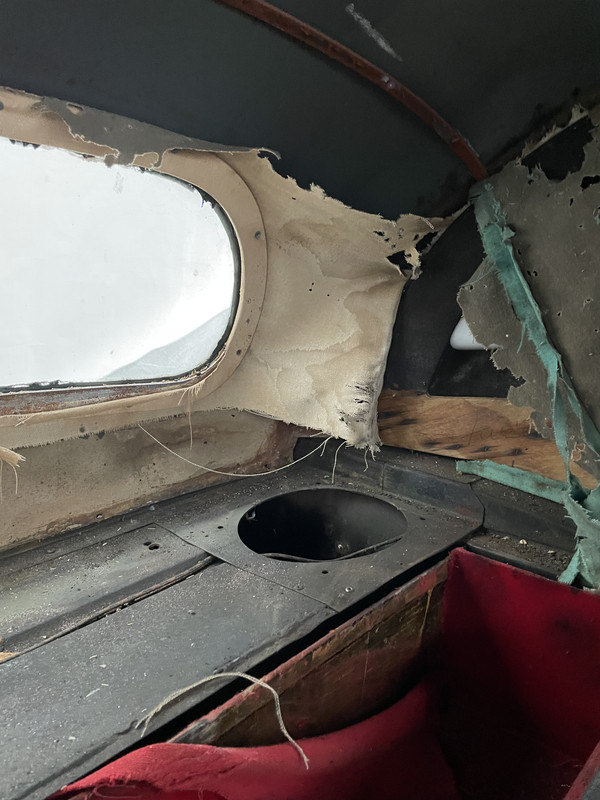
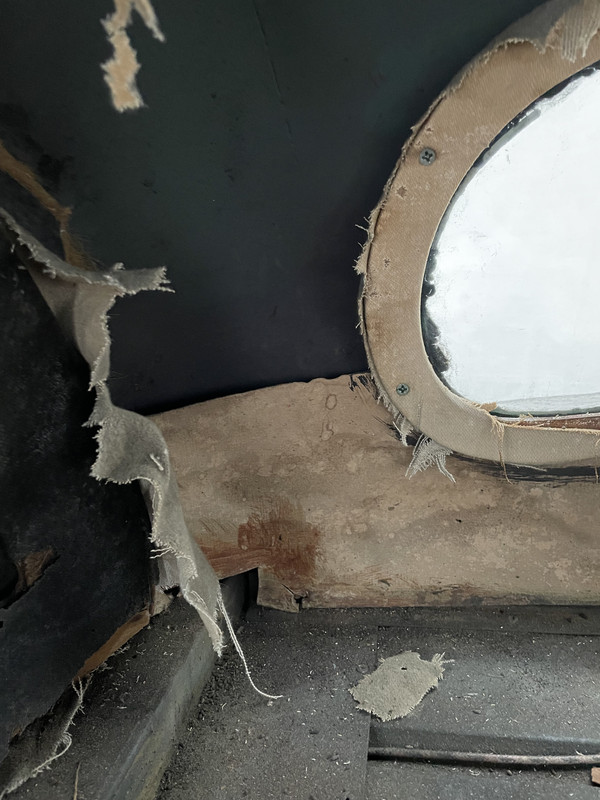
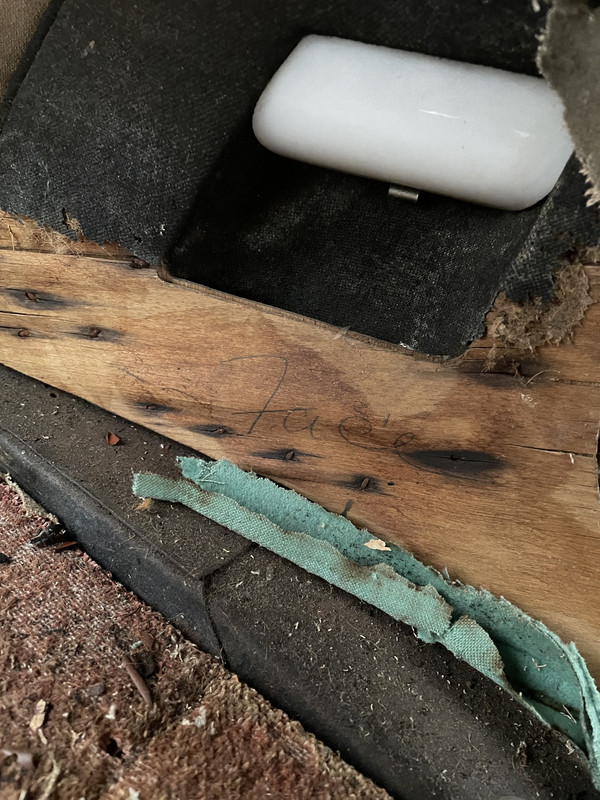
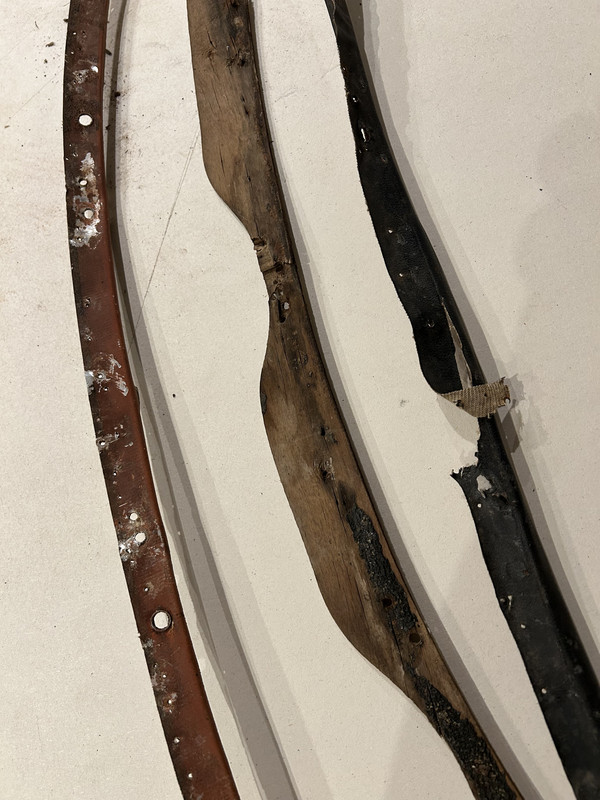
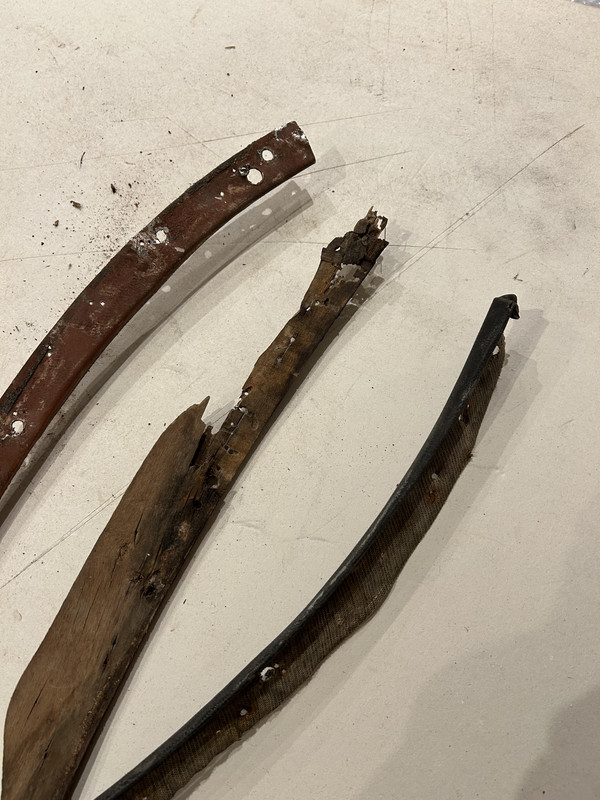
This was what I uncovered when stripping the car…a lot of damaged plywood and rusty locating tabs
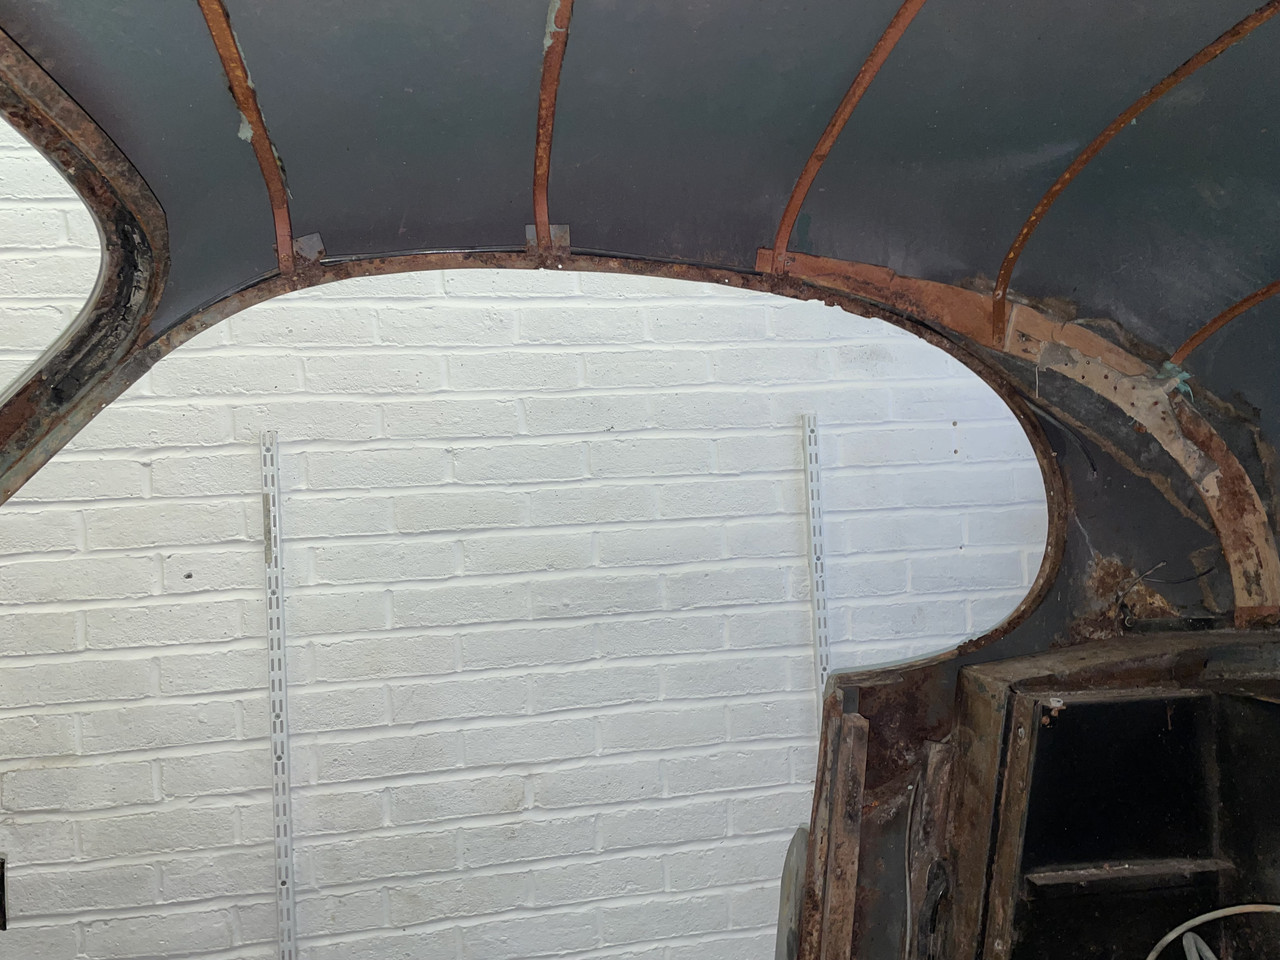
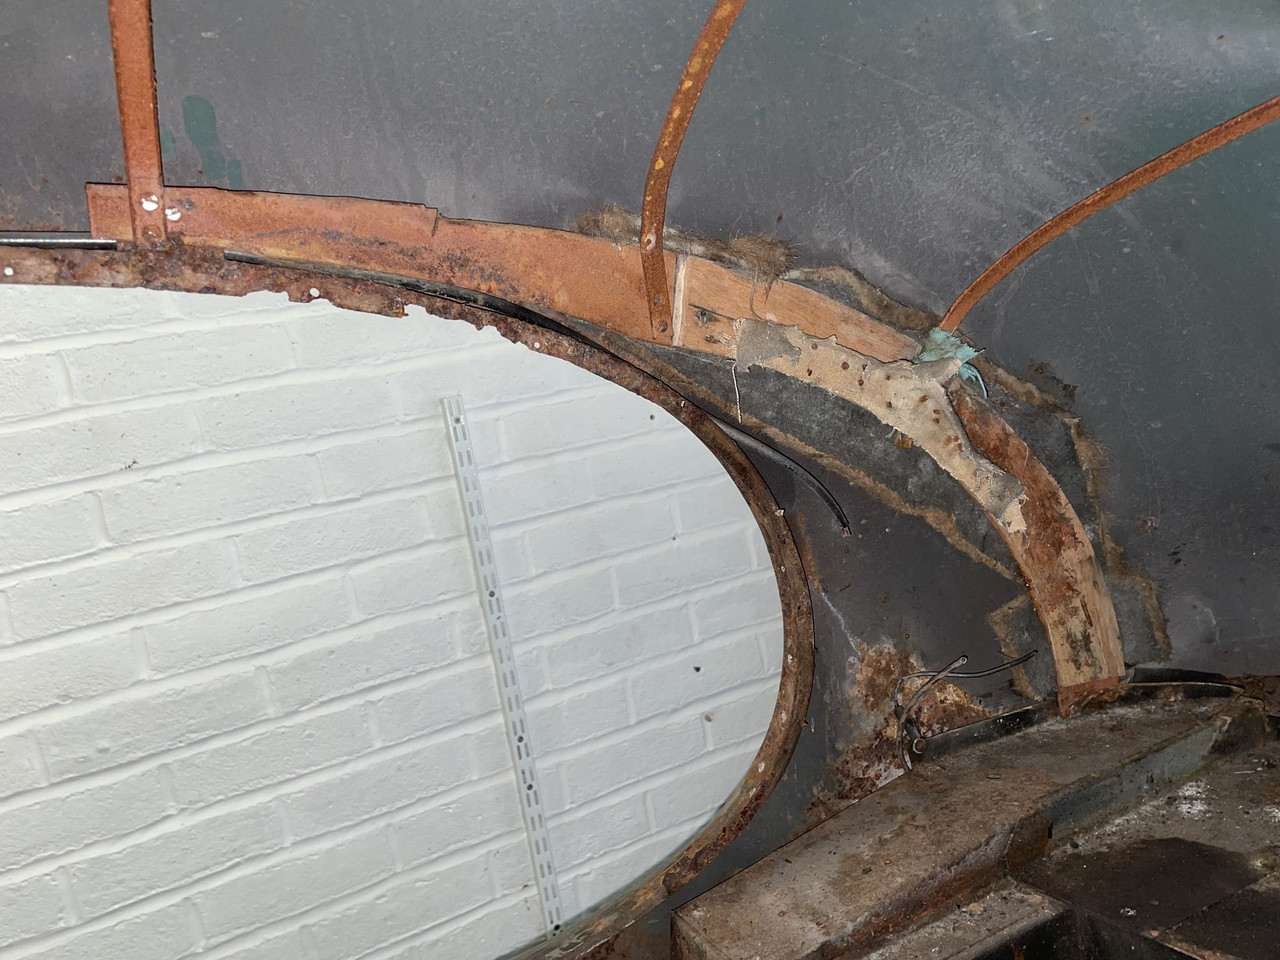
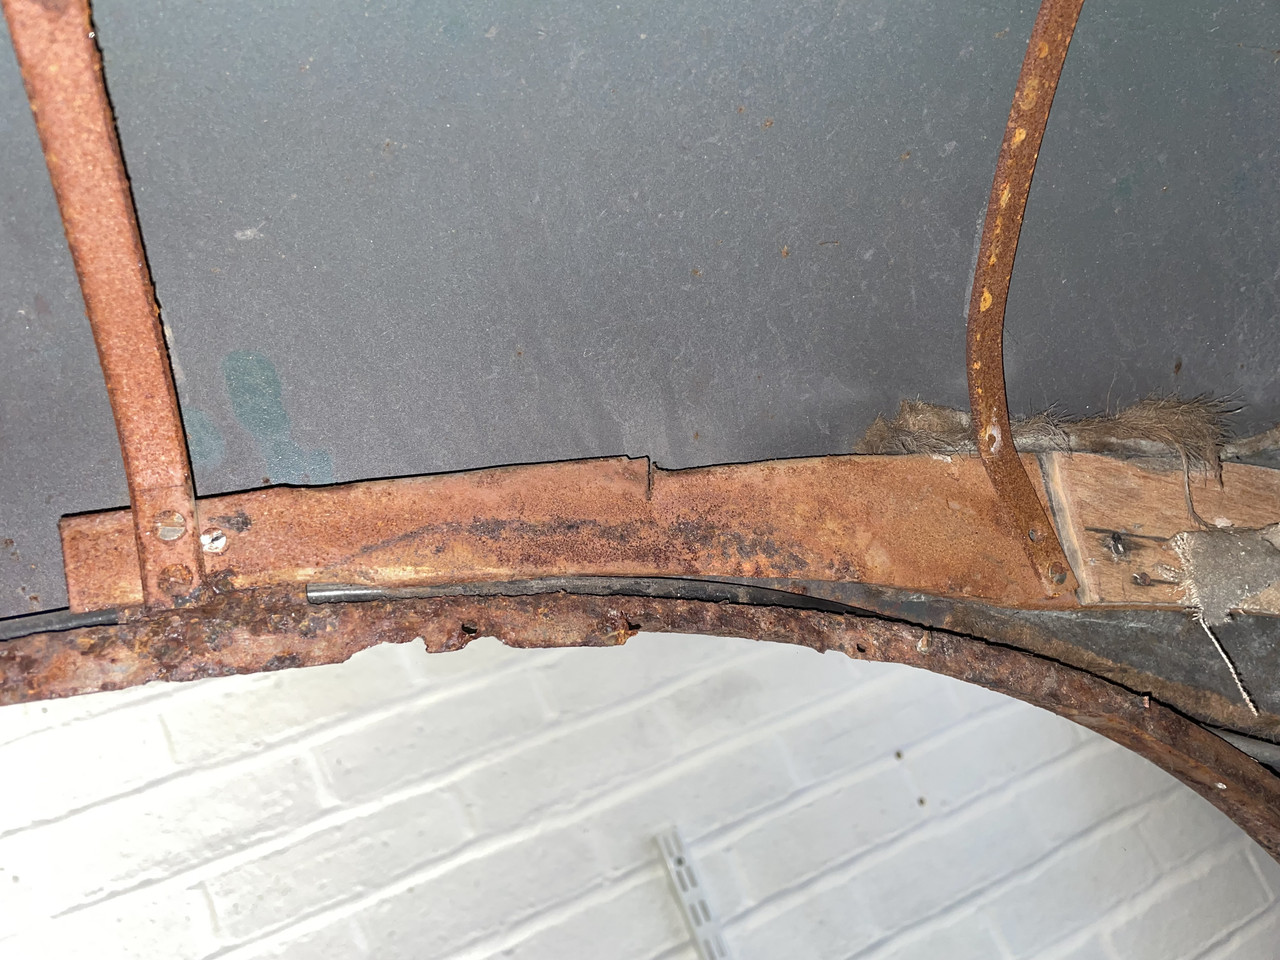
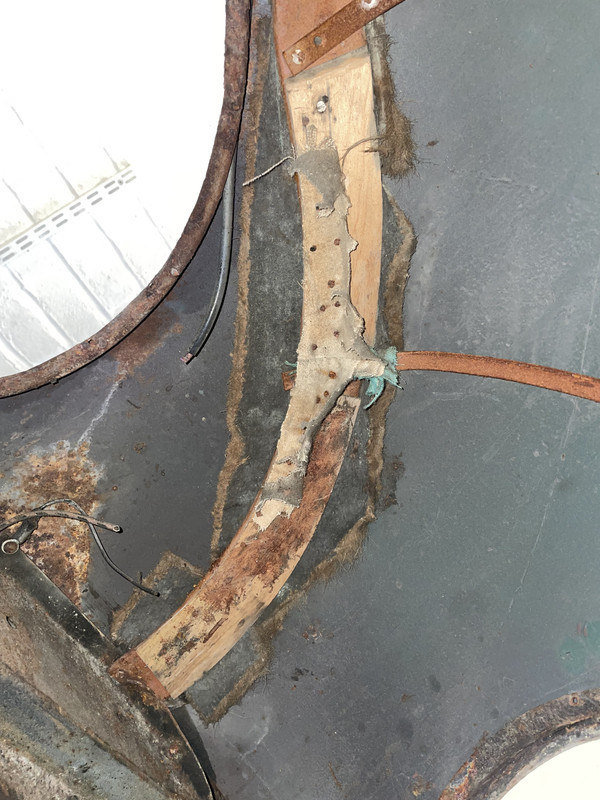
When it came to reinstating the hoops I obviously had the reference pictures of where the original hoops were fixed onto tabs to the body, but the roof edge around the doors was so rusty and had to be replaced in their entirety along both sides that the exact screw hole points were tricky to establish ….I would know better if I did another car, but as ever these journeys we all undertake are ones of discovery and hindsight is a dreadful phenomena
In simple terms the middle hoop is rigidly fixed and the outer pair of hoops to both front ands rear pivot on their mounting point….so as long as they are spaced reasonably accurately the smooth finish is achieved by an ability to stretch the fabric by the pivot action….but to then also pull sideways is a must as wrinkles can still occur
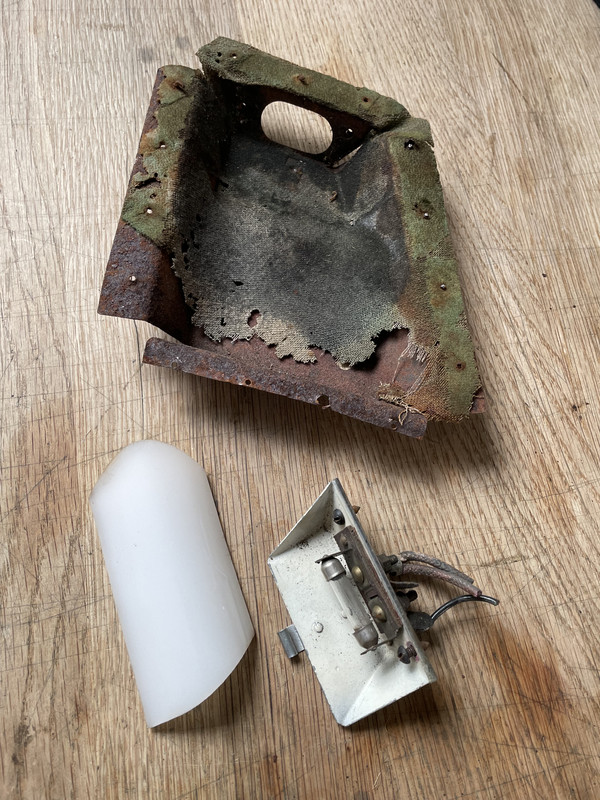
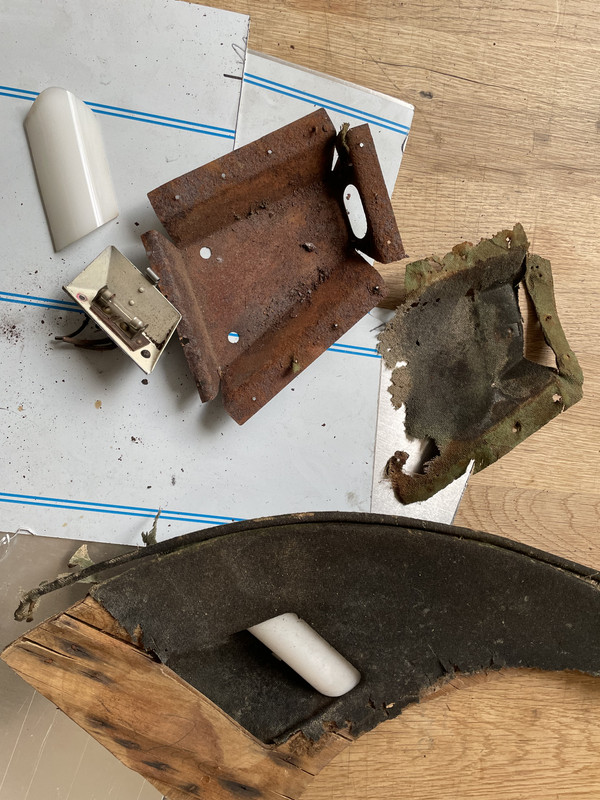
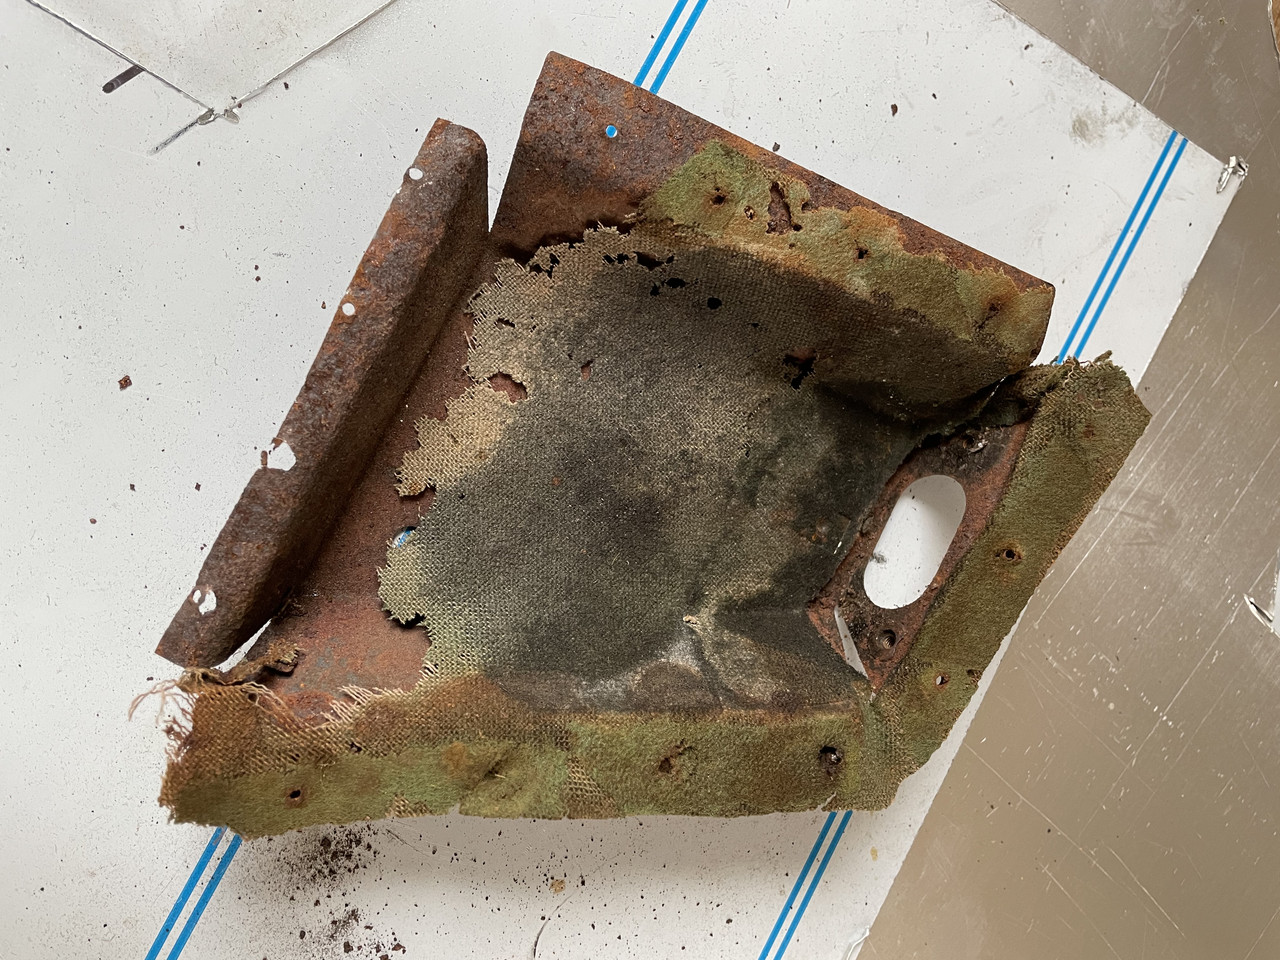
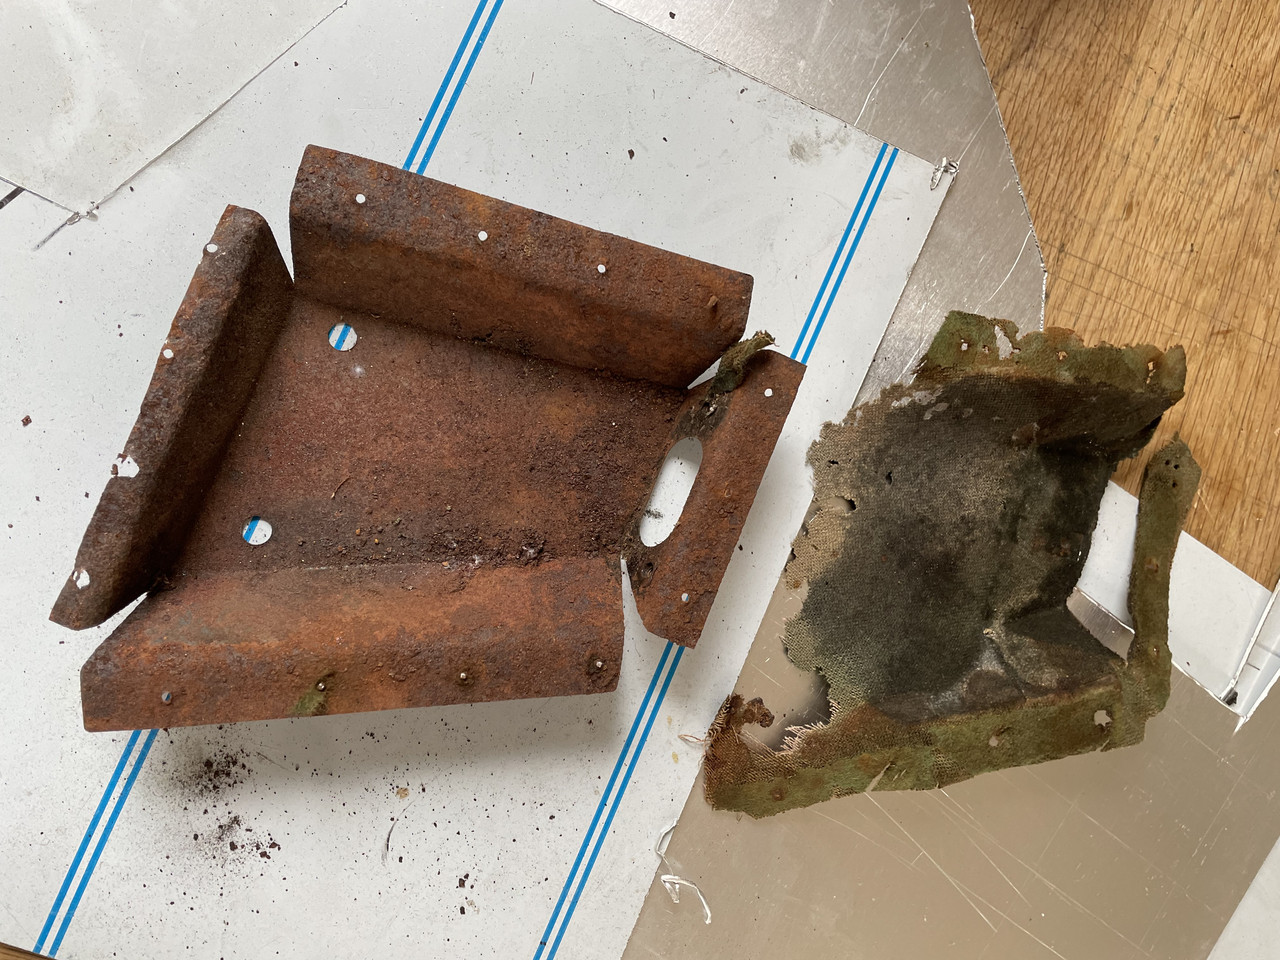
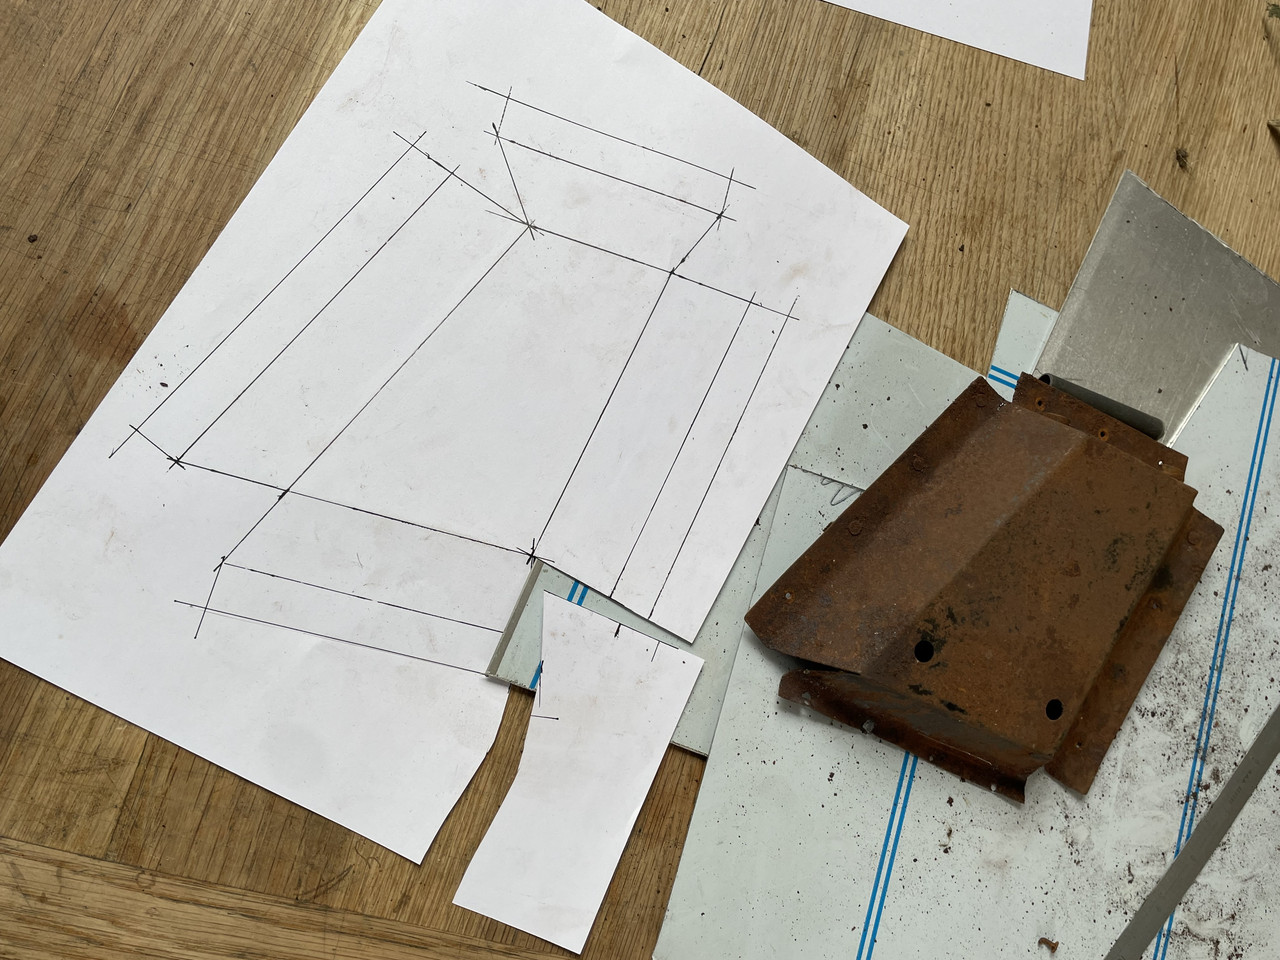
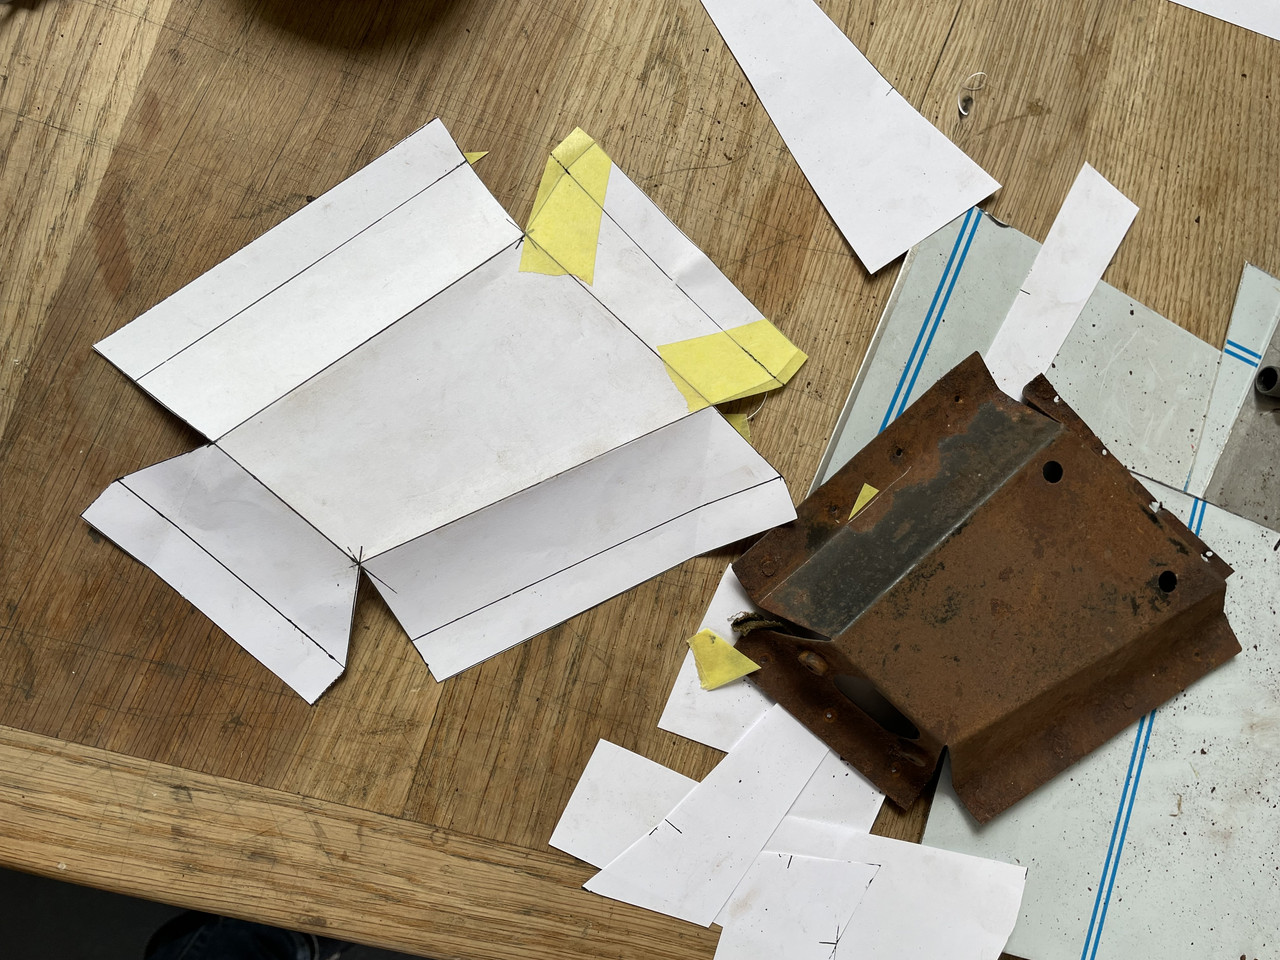
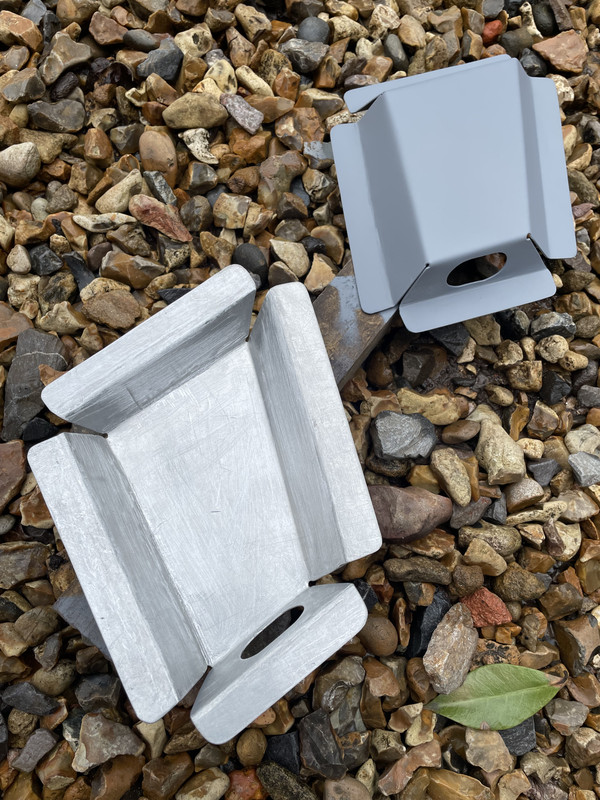
Continuing the rusty and worn out theme the C pillar area has a curved profile panel that contains the interior lights….this is can be seen was completely rotten, so with the aid of our favourite CAD technology a replacement was made and then transferred to sheet aluminium, primarily because I have plenty and its simple enough to bend…prior to painting and recovering with the same felt material…and ready to incorporate the lovely light assemblies which really just needed a decent clean
I also made up a new version of the Curved panel in plywood and also made new tack strips that screwed to the curved steel banana profile…
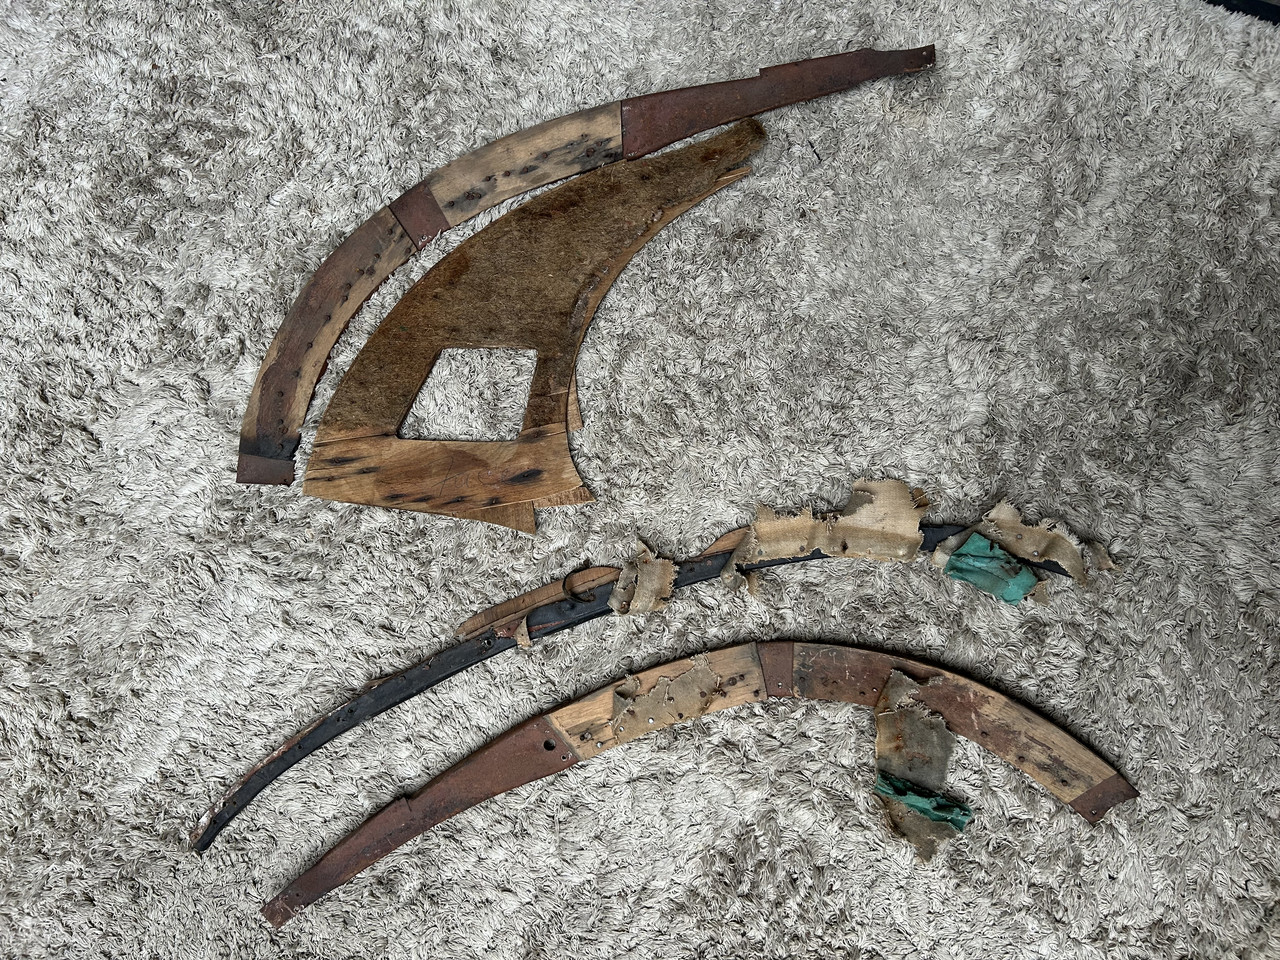
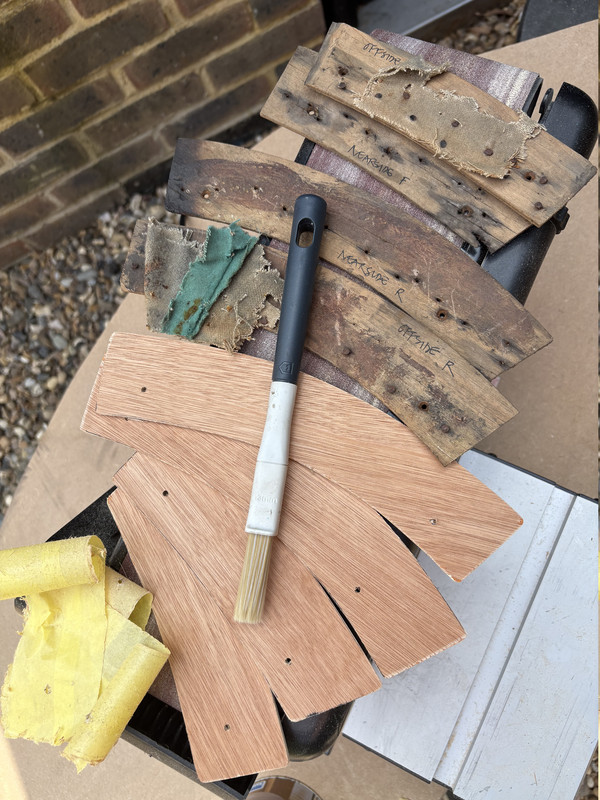
Which I also varnished to prolong their future life
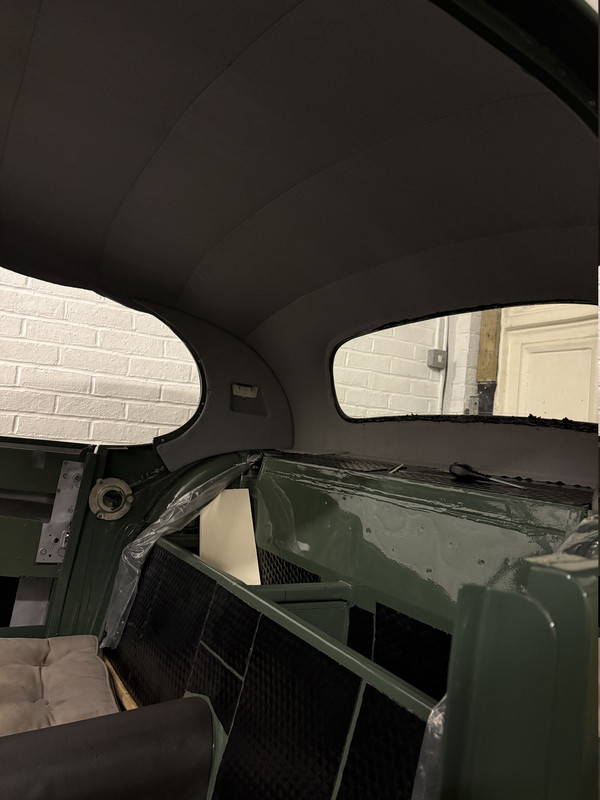
I would give myself 9.5 out of 10…there are 2 minor wrinkles that I have not managed to resolve….perhaps I could also try the old trick of a wall paper steam stripper machine which is supposed to be a trick off the trade….lets see
Thanks for reading
J
Headlining
The headlining was a task I will always own up to having postponed as long as I possibly could…..chiefly because I had never done a stretched headlining before and I really did not know what the technique was/is to do it….no amount of internet searching showed me the process….just the usual start…and the lo and behold it’s done….hymmm…not exactly helpful
I fact it’s really simple….but needs experience on how to stretch the material to avoid ripples….with impact adhesive there isn’t much on the way of a second attempt…..(not quite no possibility….but its tricky to pull apart shall we say)
This was what I uncovered when stripping the car…a lot of damaged plywood and rusty locating tabs
When it came to reinstating the hoops I obviously had the reference pictures of where the original hoops were fixed onto tabs to the body, but the roof edge around the doors was so rusty and had to be replaced in their entirety along both sides that the exact screw hole points were tricky to establish ….I would know better if I did another car, but as ever these journeys we all undertake are ones of discovery and hindsight is a dreadful phenomena
In simple terms the middle hoop is rigidly fixed and the outer pair of hoops to both front ands rear pivot on their mounting point….so as long as they are spaced reasonably accurately the smooth finish is achieved by an ability to stretch the fabric by the pivot action….but to then also pull sideways is a must as wrinkles can still occur
Continuing the rusty and worn out theme the C pillar area has a curved profile panel that contains the interior lights….this is can be seen was completely rotten, so with the aid of our favourite CAD technology a replacement was made and then transferred to sheet aluminium, primarily because I have plenty and its simple enough to bend…prior to painting and recovering with the same felt material…and ready to incorporate the lovely light assemblies which really just needed a decent clean
I also made up a new version of the Curved panel in plywood and also made new tack strips that screwed to the curved steel banana profile…
Which I also varnished to prolong their future life
I would give myself 9.5 out of 10…there are 2 minor wrinkles that I have not managed to resolve….perhaps I could also try the old trick of a wall paper steam stripper machine which is supposed to be a trick off the trade….lets see
Thanks for reading
J
1974 2.7 Carrera
(full restoration. now as an RS Touring)
1963 3.8 E Type
( 11 years in the making…………………….)
1952. XK120…the next one ……….……..)
(full restoration. now as an RS Touring)
1963 3.8 E Type
( 11 years in the making…………………….)
1952. XK120…the next one ……….……..)
-
Gary71
- Nurse, I think I need some assistance
- Posts: 10719
- Joined: Wed Mar 31, 2004 1:27 pm
- Location: Cheshire
- Contact:
Re: The XK
Looks great JP  That last photo doesn’t capture the hours of work and swearing!
That last photo doesn’t capture the hours of work and swearing!-
hot66

- Moderator
- Posts: 19219
- Joined: Tue Nov 11, 2003 4:17 pm
- Location: North Yorkshire
Re: The XK
Looking good JP
James
1973 911 2.4S
1993 964 C2
2010 987 Spyder
1963 Honda C100 Supercub
Its not how fast you go, but how you go fast
1973 911 2.4S
1993 964 C2
2010 987 Spyder
1963 Honda C100 Supercub
Its not how fast you go, but how you go fast
-
sladey
- Nurse, I think I need some assistance
- Posts: 9371
- Joined: Sat Apr 23, 2005 9:08 pm
- Location: Nottingham, UK
Re: The XK
Nice work JP. I got Ian to do my headlining on the 911. I seem to remember 2000 bulldog clips being involved
The simple things you see are all complicated
I look pretty young but I'm just backdated yeah
I look pretty young but I'm just backdated yeah
-
jtparr
- DDK 1st, 2nd and 3rd for me!
- Posts: 2365
- Joined: Mon May 24, 2004 10:54 pm
- Location: london/surrey
Re: The XK
I really should have taken more photos….bulldog clips were used…but just to get the felt used to being stretched initially….then starting at the front I had to ultimately bit the bullet and undo all the clips having marked a line on the top side where the window aperture was…so i could the apply contact adhesive outboard of the line…and onto the body….then starting in the middle I began to stick in place….pretty much had to get it right first time….rinse and repeat all round…rear window next then sides last of all
In truth I did have to pull some of the felt off in places just to get the last few wrinkles out….how they did this at pace back in the day as they would have been on piece work is impressive to imagine…wish there we films to show it….
In truth I did have to pull some of the felt off in places just to get the last few wrinkles out….how they did this at pace back in the day as they would have been on piece work is impressive to imagine…wish there we films to show it….
1974 2.7 Carrera
(full restoration. now as an RS Touring)
1963 3.8 E Type
( 11 years in the making…………………….)
1952. XK120…the next one ……….……..)
(full restoration. now as an RS Touring)
1963 3.8 E Type
( 11 years in the making…………………….)
1952. XK120…the next one ……….……..)
-
911hillclimber
- Nurse, I think I need some assistance
- Posts: 20688
- Joined: Mon Mar 10, 2008 6:26 pm
- Location: West Midlands
Re: The XK
I used to visit the Jaguar factory in Browns Lane in the mid 80 working on the new XJ40.
The way to the Engineering Office and test areas was through/past the trimming shop, a 1000 ladies and sewing machines zipping out panels of cloth and leather, quite an aroma!
Having seen the cars coming together that lot on the shop floor could do anything FAST, a trait I think of the low cost production talent in the building.
If you designed anything that was slow to assemble you were cursed.
The way to the Engineering Office and test areas was through/past the trimming shop, a 1000 ladies and sewing machines zipping out panels of cloth and leather, quite an aroma!
Having seen the cars coming together that lot on the shop floor could do anything FAST, a trait I think of the low cost production talent in the building.
If you designed anything that was slow to assemble you were cursed.
73T 911 Coupe, road/hillclimber 3.2L
Lola t 492 / 3.2 hillclimb racer
Boxster 987 Gen II 2.9
Lola t 492 / 3.2 hillclimb racer
Boxster 987 Gen II 2.9
-
jtparr
- DDK 1st, 2nd and 3rd for me!
- Posts: 2365
- Joined: Mon May 24, 2004 10:54 pm
- Location: london/surrey
Re: The XK
Part 30
Cant rails
Having made the decision to not use a veneered dash…there was then the question of how to finish the cant rails…on the E Type these were/are wrapped in vinyl…which with a black dash…seemed eminently possible to repeat for this car…however in the spirit of mission creep I then found myself wanting to improve upon the multi part original design
Why there are so many small sections of aluminium and veneered timber was and still is a mystery….was it simply the cost of a single large veneered section being too difficult to produce…?….however by the time I got to the end of remaking my own I had another theory…namely that the cars are hand built and the multi part approach gave jaguar an opportunity to make adjustments on the production line for variations in the build
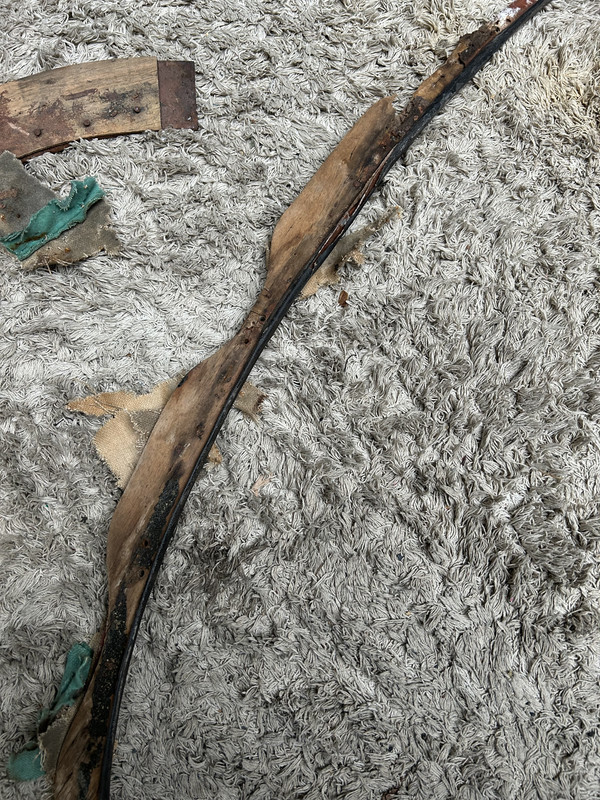
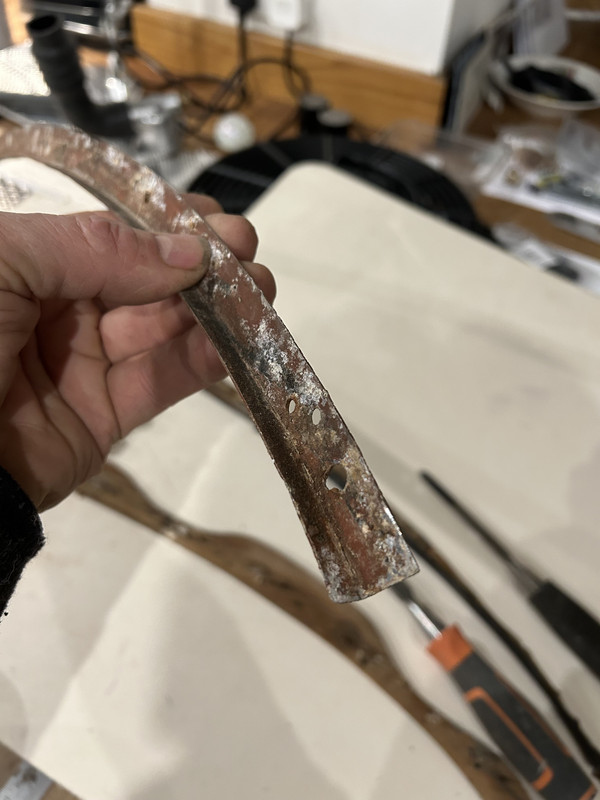
Whether that is true or not I guess I will never know, but it could explain the fact…
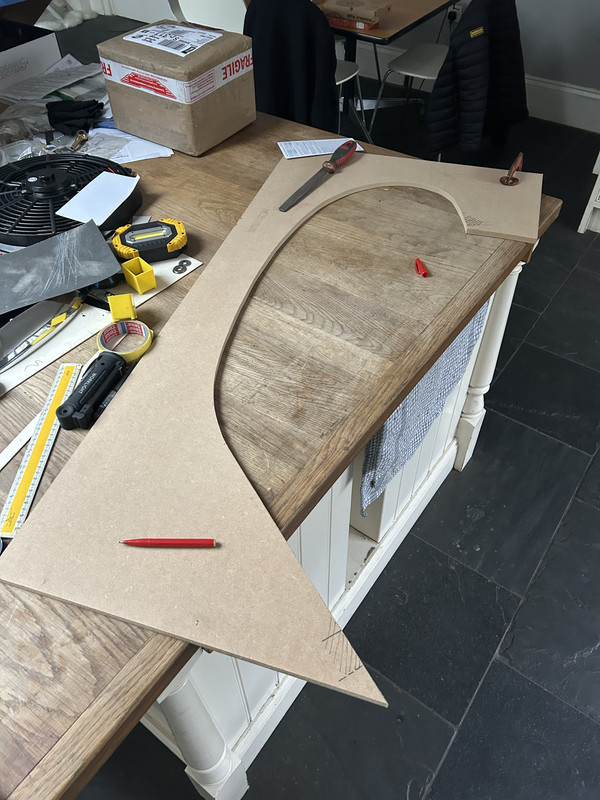
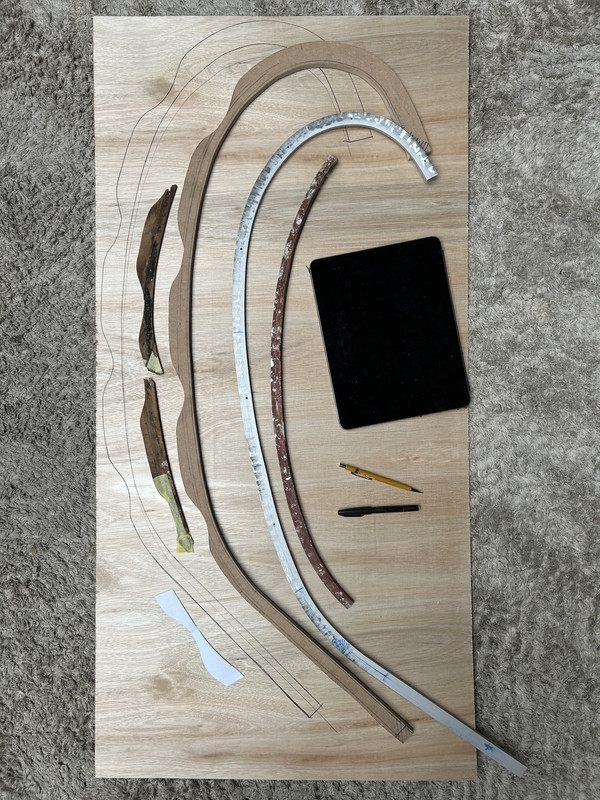
First off I needed to make a template as a constant base reference form, so I didn’t need to continually compare the extrusions to the car as i shaped them…once both were made to this shape I was then able to fine tune the profile as true to form each side was slightly different …..
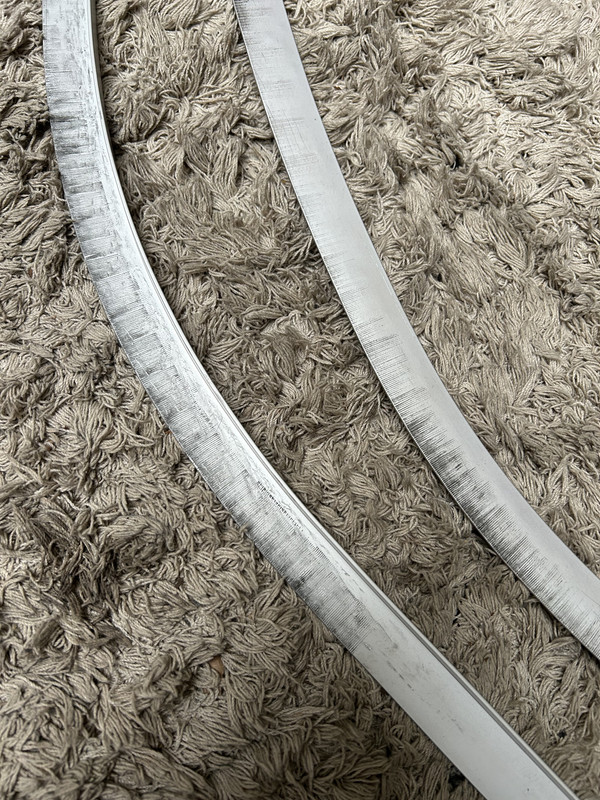
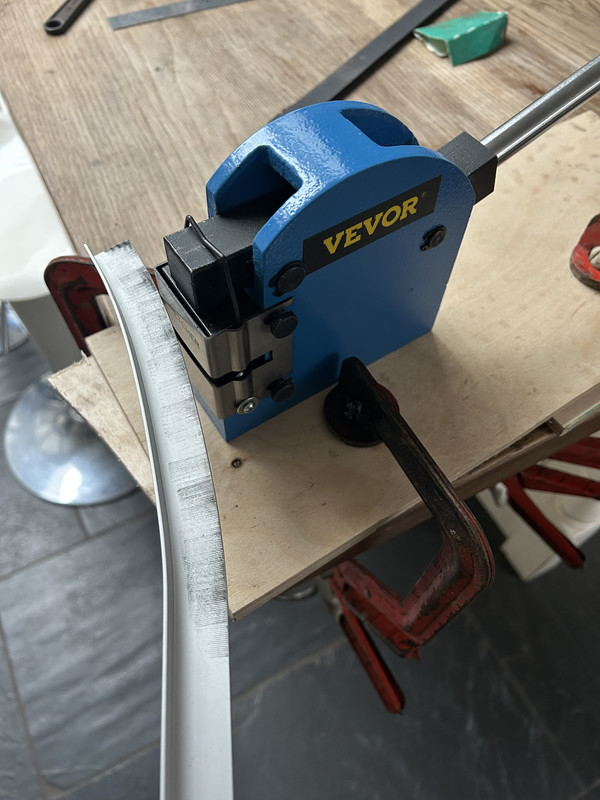
For me however the cant rails could not remain a multi part assembly…the original collection of folded aluminium trims were about as crude as one could imagine so I elected to buy standard 10 x 20mm aluminium extrusions and invested in a shrinker/stretcher kit….(a fun exercise…but need to be careful on the tight curves as it is not difficult to over stretch the aluminium and split it….also watch how the metals curves out of plane…do the stretching in sections and tap it back flat as you go….if it gets out of shape too much it becomes tricky to re-flatten….)
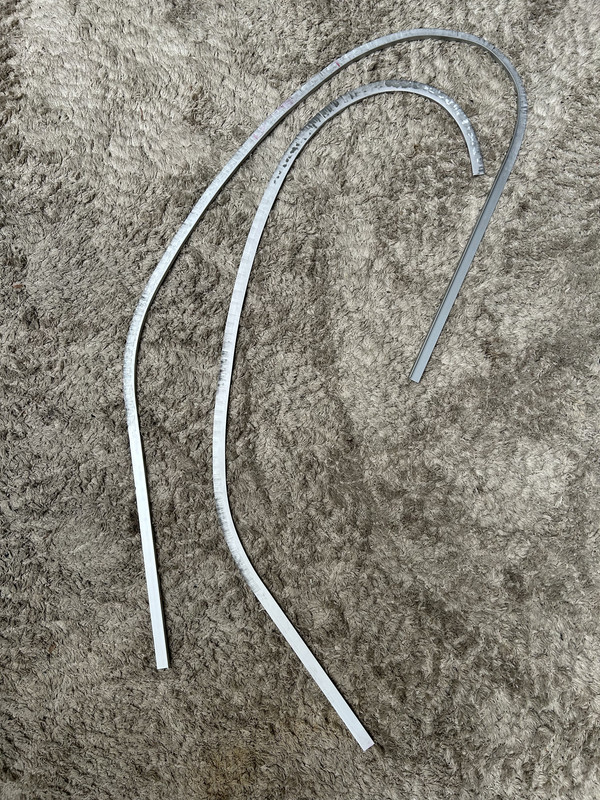
I also decided to change the finish of the aluminium trims.
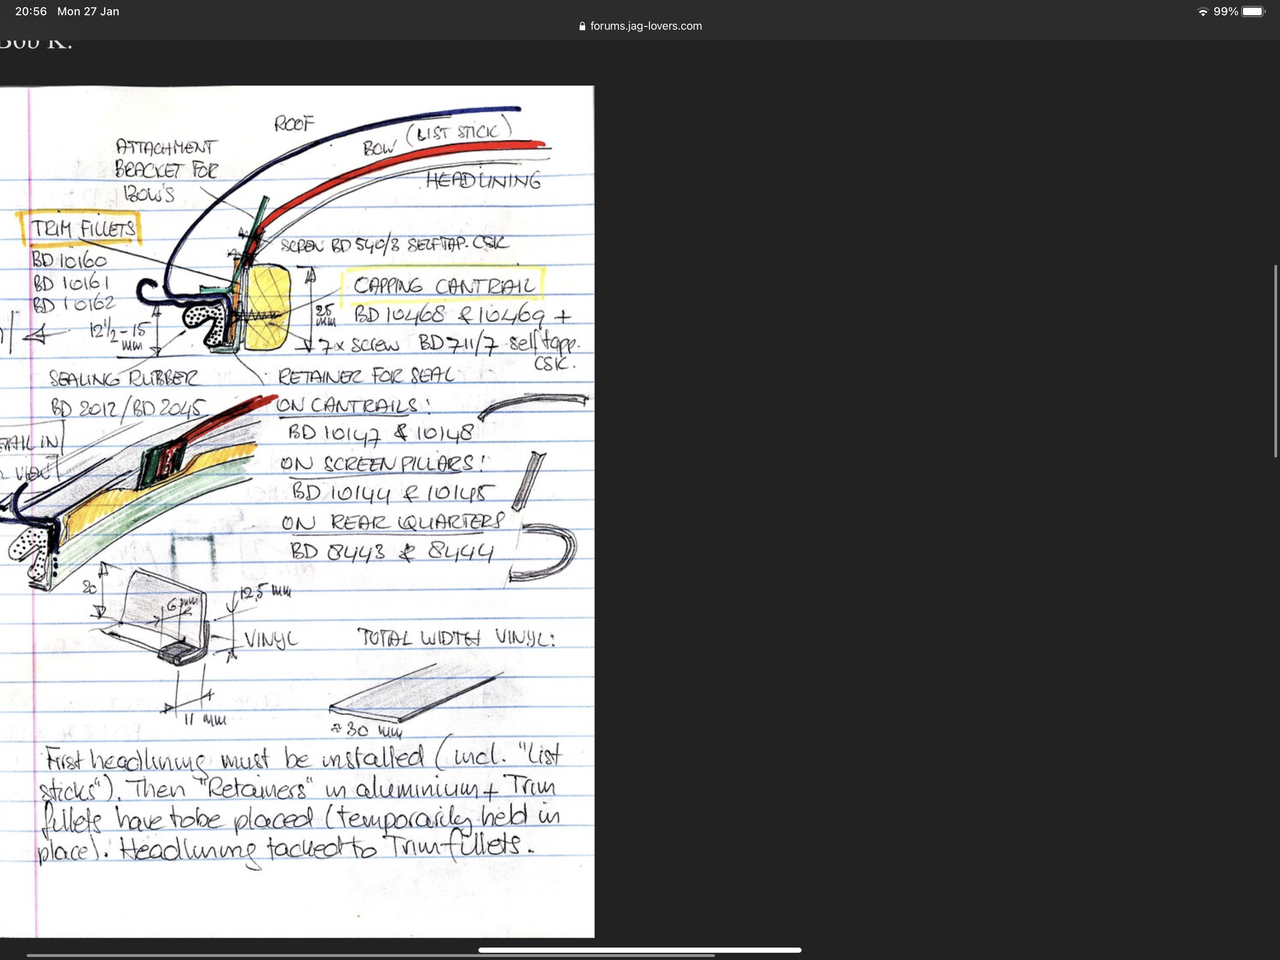
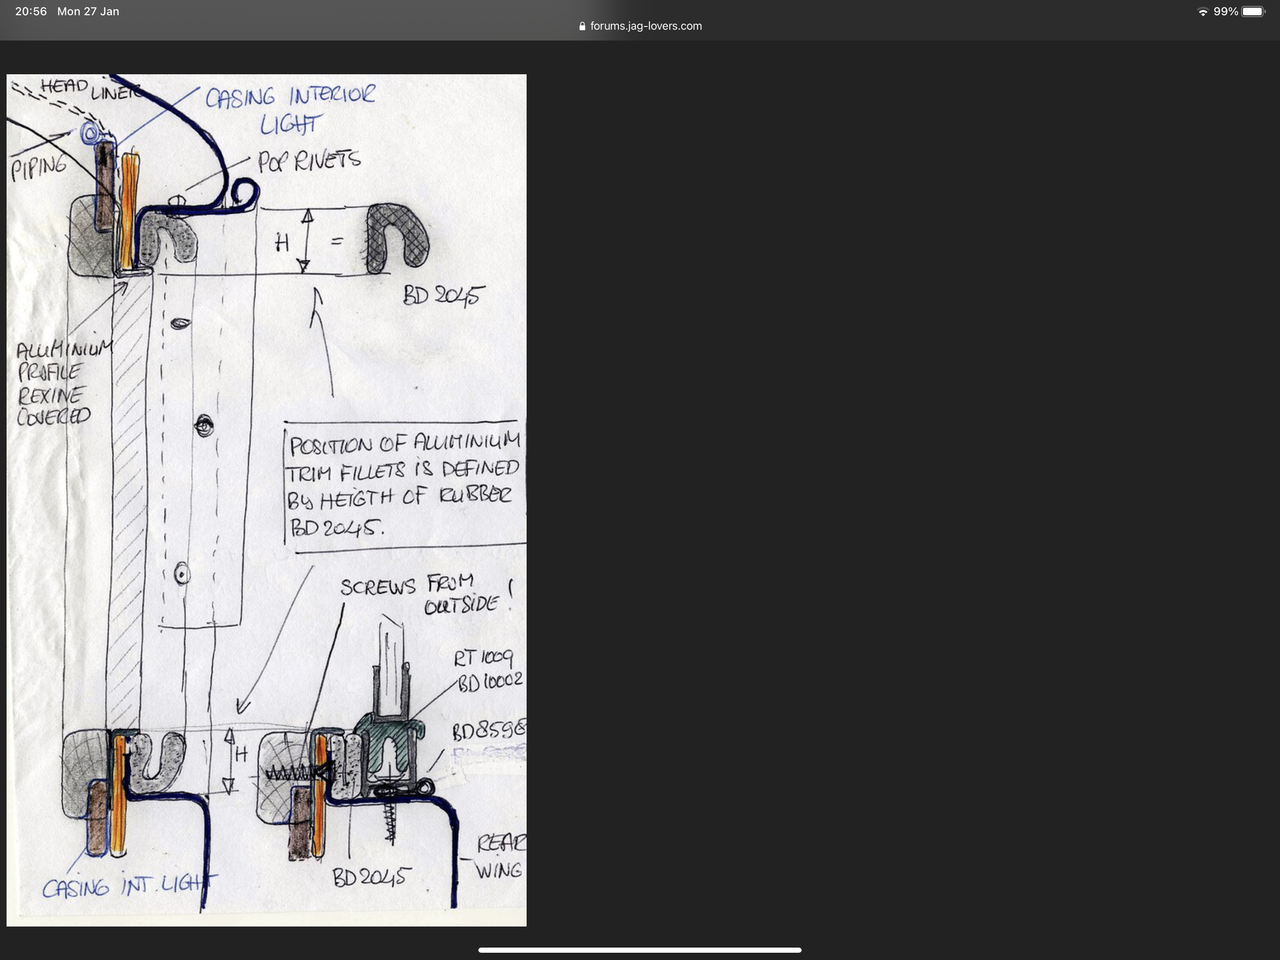
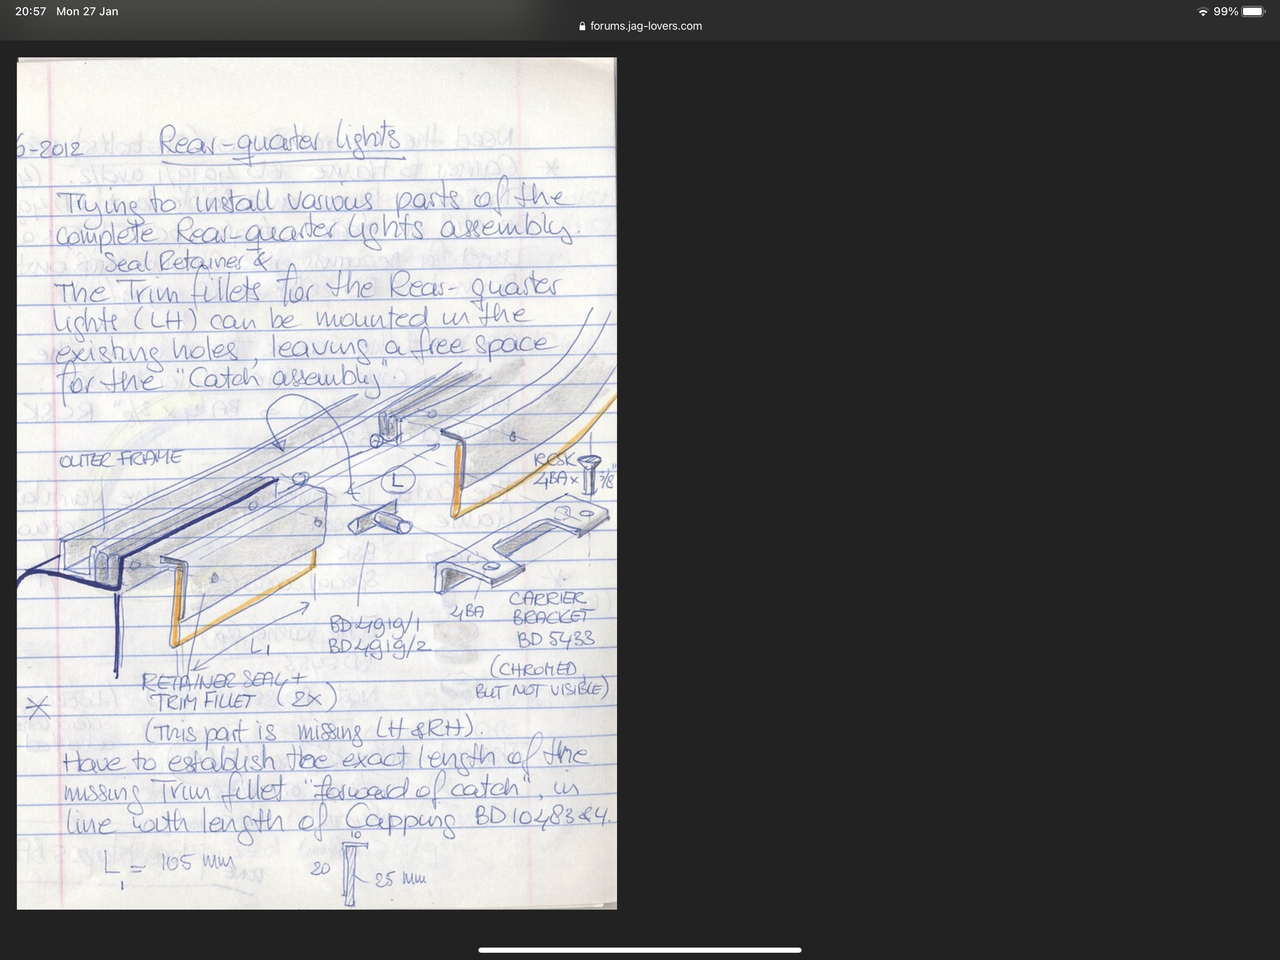
If you look closely at these sketches from another XK owner the multi part assembly is self evident, but also the fact that the aluminium was originally covered in Rexine…which is NLA but is almost a very thin type of vinyl….always done in black in period so it was not body colour specific. I wasn’t too impressed with that so I etched primed and top coated in green so the whole edge assembly is a single calmer attitude towards colour…and a far superior and cleaner continuous edge
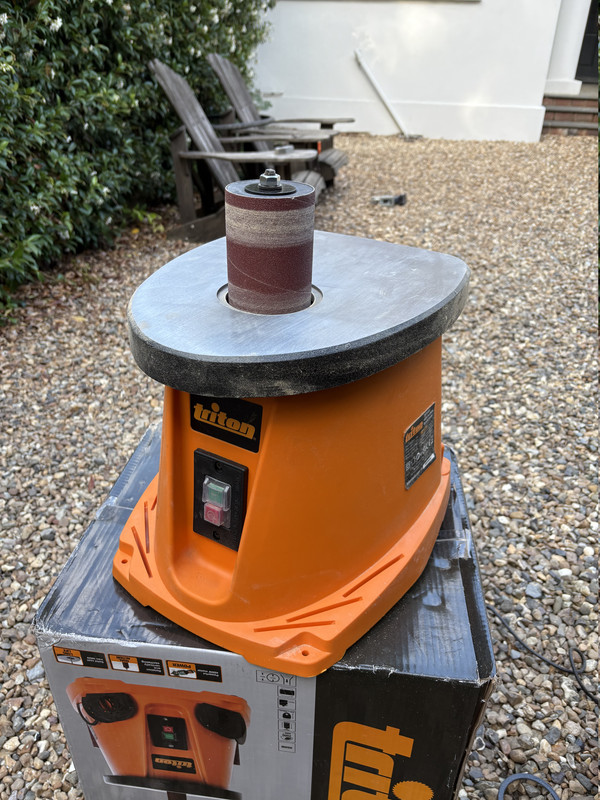
With the aluminium formed I then duplicated the inner curve onto 9mm MDF by copying the aluminium profile and then freehand I marked a 25mm offset width which I cut close to before finally shaping by eye on the belt/disc sander I also invested in
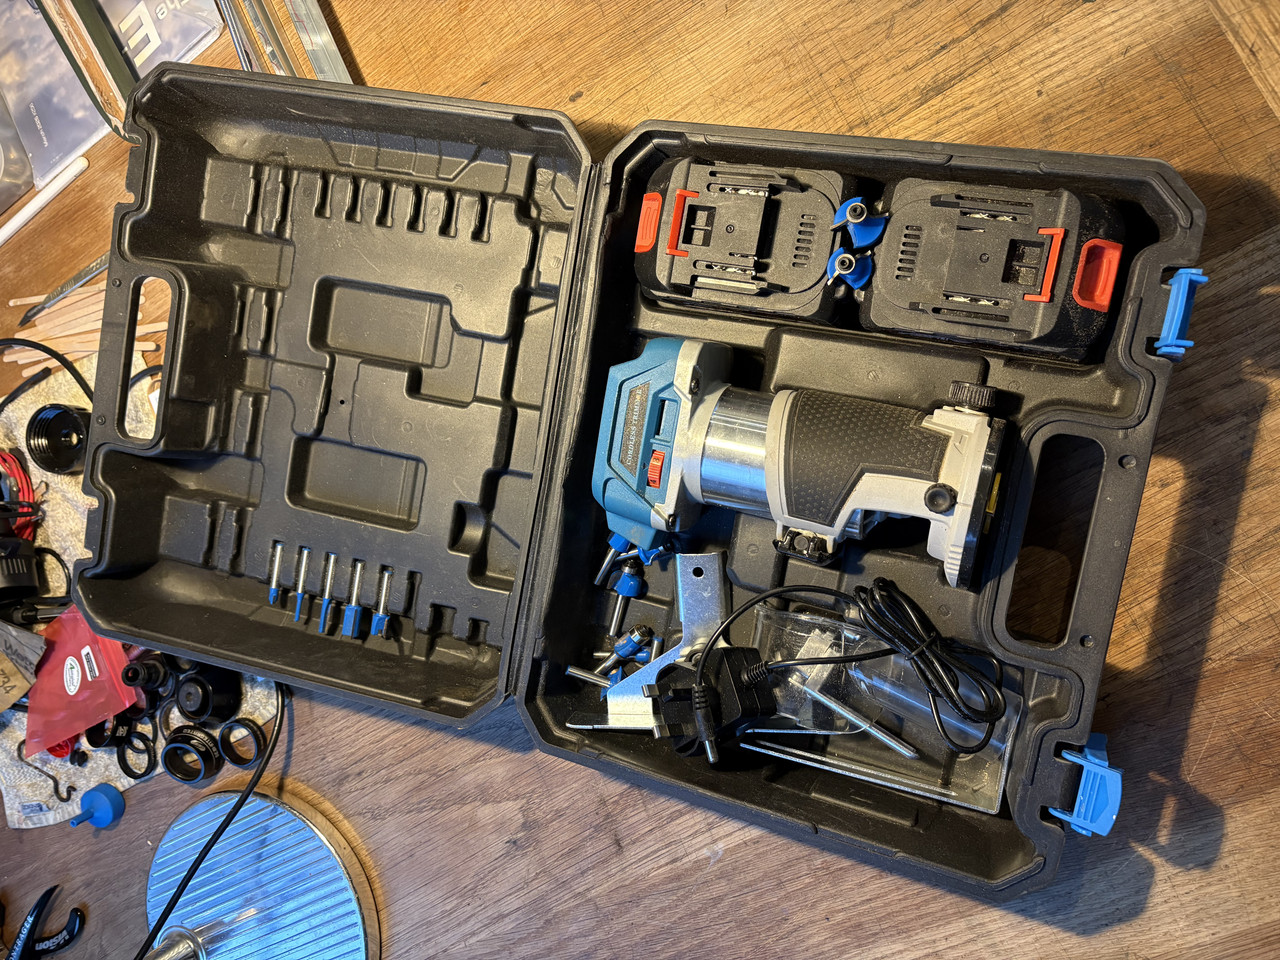
Once this profile was completed I then chamfered the outer edges with the final investment….a mini router kit
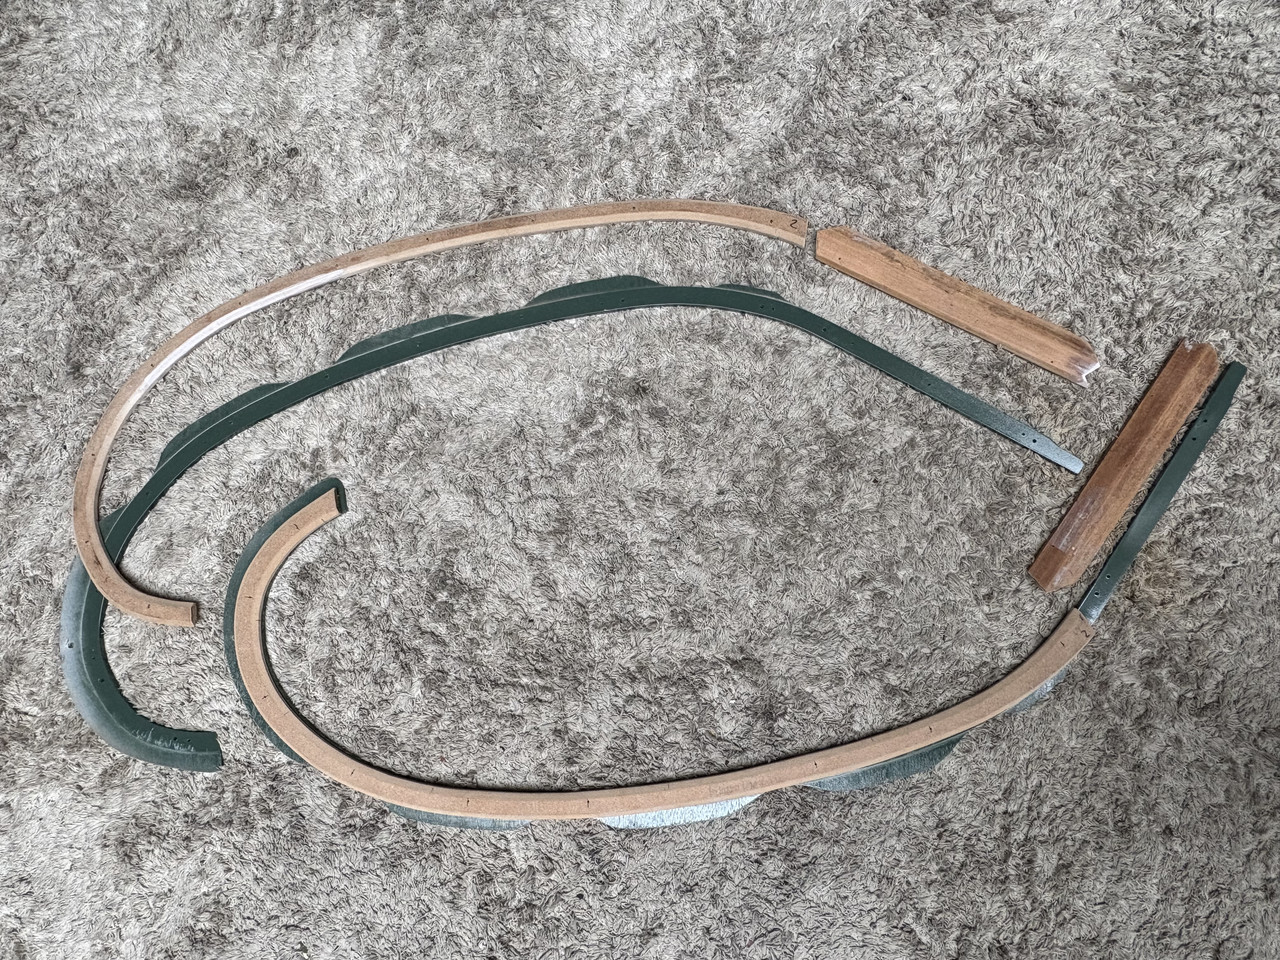
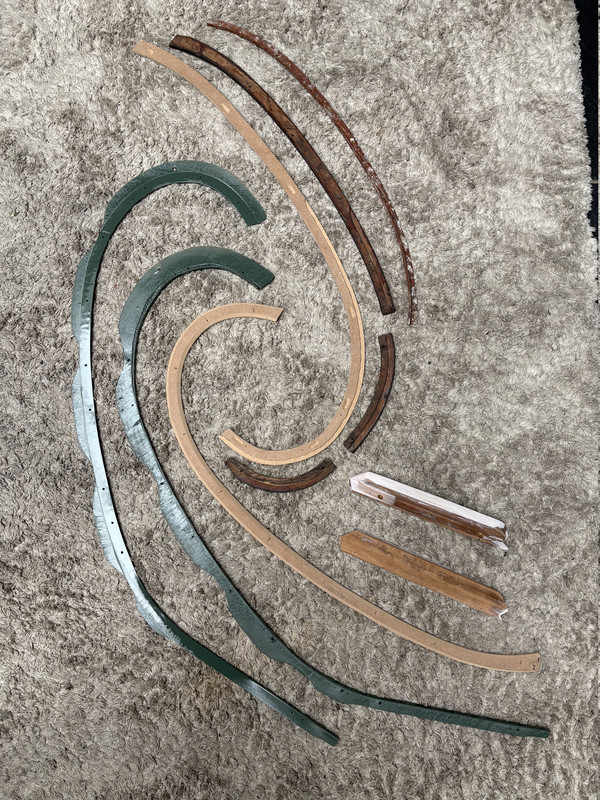
And then covered in vinyl….not an easy task to stretch around a curving form…….
The cant rails also continue down the A pillar/edge of the windscreen…the timber was in decent condition, but didn’t fit as well as I thought possible, so naturally I had to modify it…..car body filler….what a wonderful product
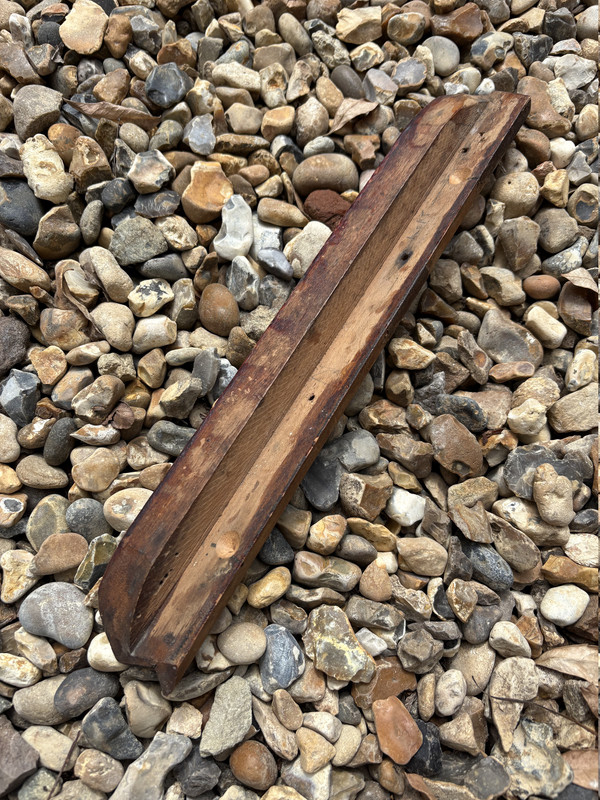
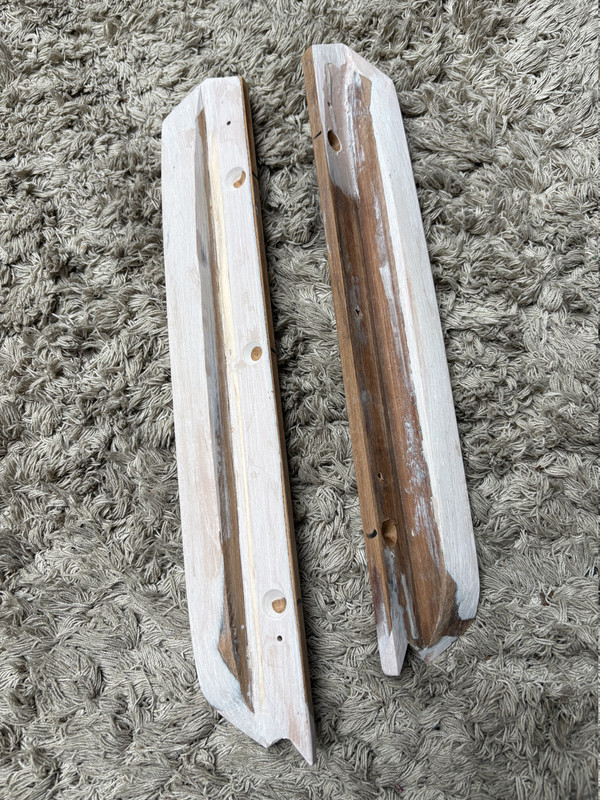
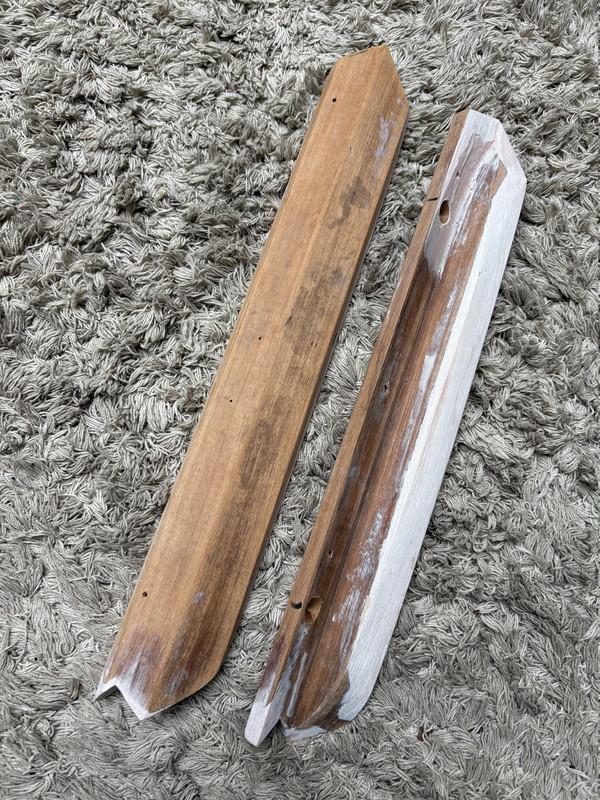
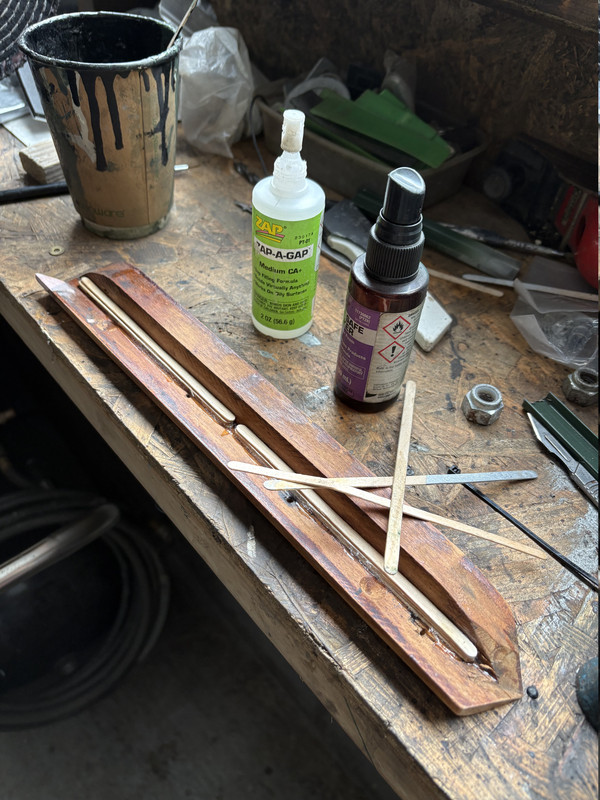
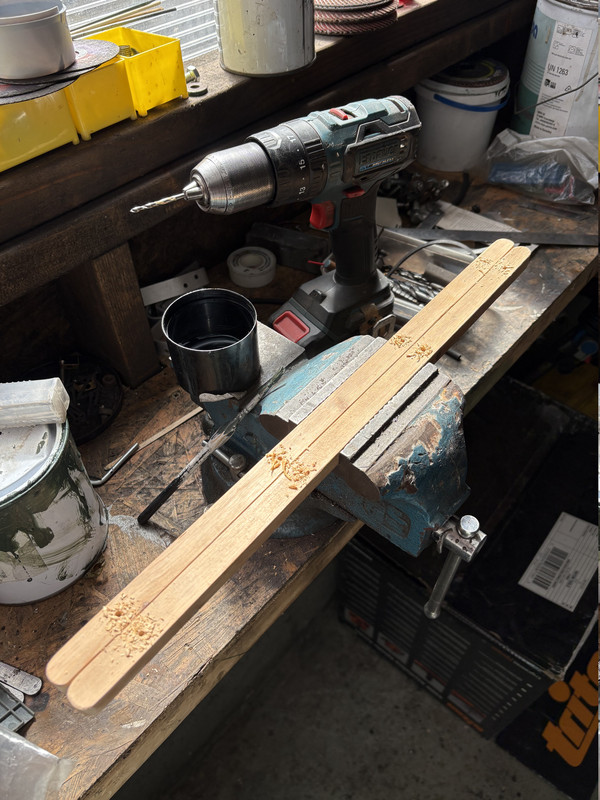
In this picture I am using super glue to bond these pre made timber sticks (from the cafe in my office) to alter the angle of the back face of the timber profile….this gave me the correct depth which I then infilled with body filler to suit
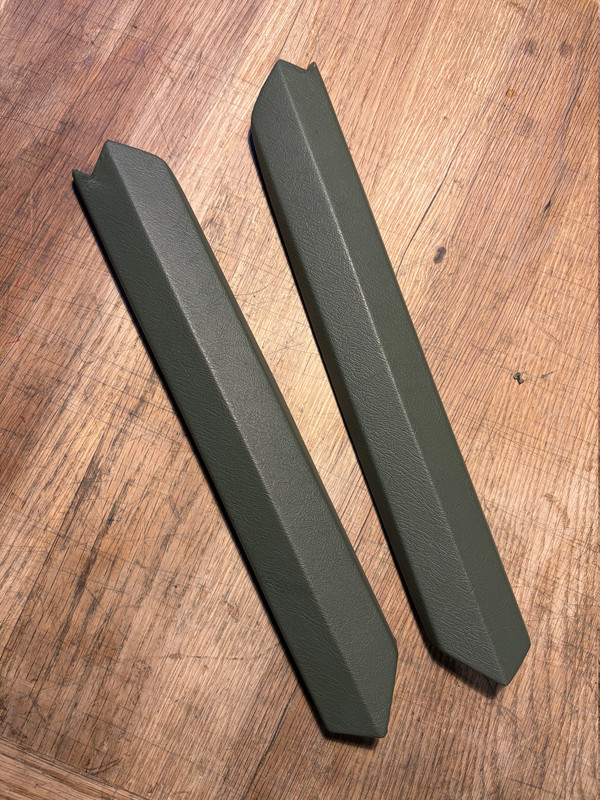
I also increased the curvature of the edge of the panel so it more closely followed the shape of the windscreen when viewed from outside..in this photos hopefully you can see the difference between the straight and curved edges
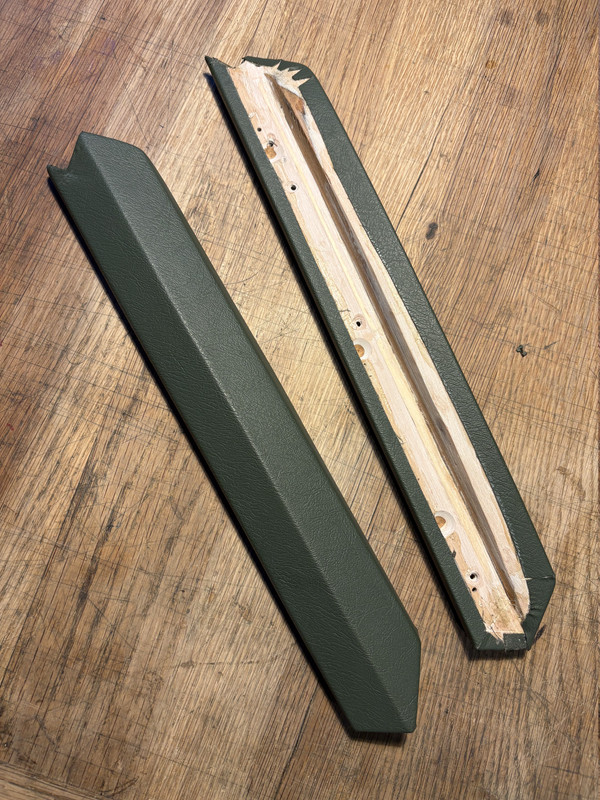
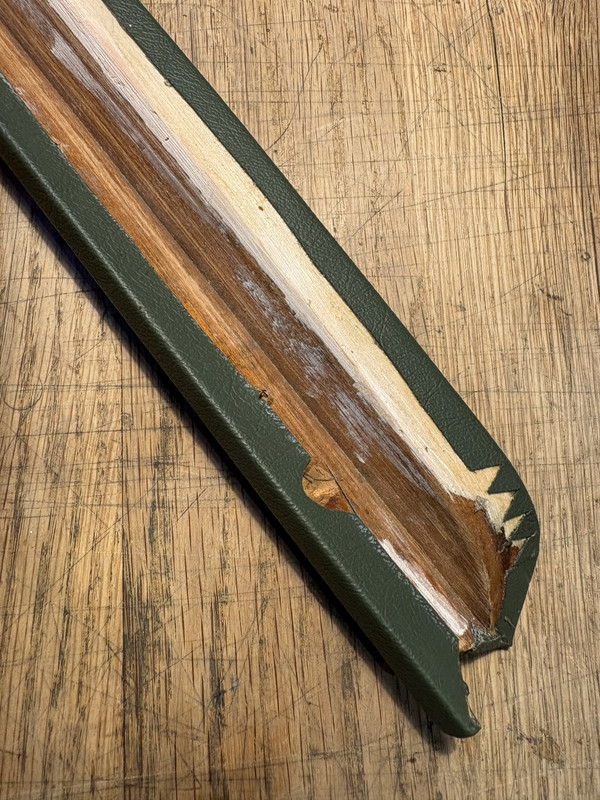
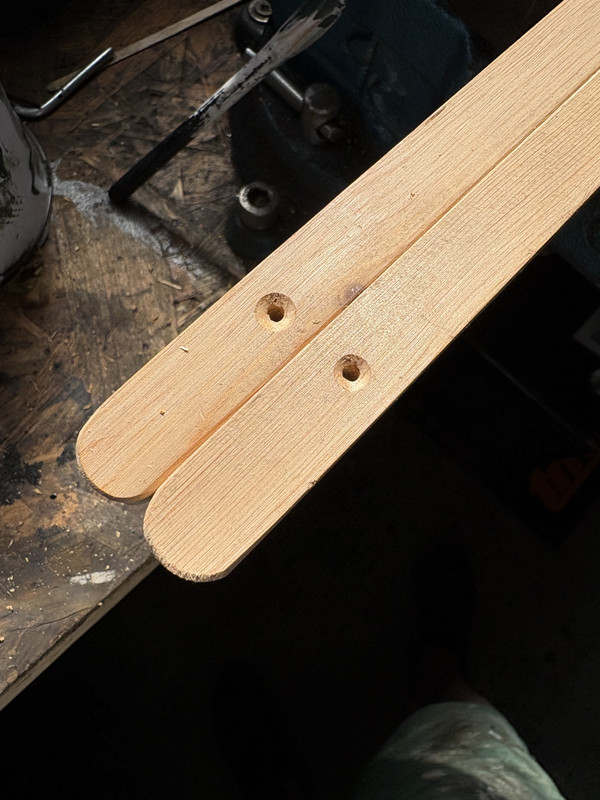
All of these sections are fixed with tiny screws (stainless in my case) from the outside, through a flange in the bodywork…drilling these on a painted car was not much fun as the danger of scuffing the paint with the drill was ever present
I will post more pictures of the completed works later on in the build……
Cant rails
Having made the decision to not use a veneered dash…there was then the question of how to finish the cant rails…on the E Type these were/are wrapped in vinyl…which with a black dash…seemed eminently possible to repeat for this car…however in the spirit of mission creep I then found myself wanting to improve upon the multi part original design
Why there are so many small sections of aluminium and veneered timber was and still is a mystery….was it simply the cost of a single large veneered section being too difficult to produce…?….however by the time I got to the end of remaking my own I had another theory…namely that the cars are hand built and the multi part approach gave jaguar an opportunity to make adjustments on the production line for variations in the build
Whether that is true or not I guess I will never know, but it could explain the fact…
First off I needed to make a template as a constant base reference form, so I didn’t need to continually compare the extrusions to the car as i shaped them…once both were made to this shape I was then able to fine tune the profile as true to form each side was slightly different …..
For me however the cant rails could not remain a multi part assembly…the original collection of folded aluminium trims were about as crude as one could imagine so I elected to buy standard 10 x 20mm aluminium extrusions and invested in a shrinker/stretcher kit….(a fun exercise…but need to be careful on the tight curves as it is not difficult to over stretch the aluminium and split it….also watch how the metals curves out of plane…do the stretching in sections and tap it back flat as you go….if it gets out of shape too much it becomes tricky to re-flatten….)
I also decided to change the finish of the aluminium trims.
If you look closely at these sketches from another XK owner the multi part assembly is self evident, but also the fact that the aluminium was originally covered in Rexine…which is NLA but is almost a very thin type of vinyl….always done in black in period so it was not body colour specific. I wasn’t too impressed with that so I etched primed and top coated in green so the whole edge assembly is a single calmer attitude towards colour…and a far superior and cleaner continuous edge
With the aluminium formed I then duplicated the inner curve onto 9mm MDF by copying the aluminium profile and then freehand I marked a 25mm offset width which I cut close to before finally shaping by eye on the belt/disc sander I also invested in
Once this profile was completed I then chamfered the outer edges with the final investment….a mini router kit
And then covered in vinyl….not an easy task to stretch around a curving form…….
The cant rails also continue down the A pillar/edge of the windscreen…the timber was in decent condition, but didn’t fit as well as I thought possible, so naturally I had to modify it…..car body filler….what a wonderful product
In this picture I am using super glue to bond these pre made timber sticks (from the cafe in my office) to alter the angle of the back face of the timber profile….this gave me the correct depth which I then infilled with body filler to suit
I also increased the curvature of the edge of the panel so it more closely followed the shape of the windscreen when viewed from outside..in this photos hopefully you can see the difference between the straight and curved edges
All of these sections are fixed with tiny screws (stainless in my case) from the outside, through a flange in the bodywork…drilling these on a painted car was not much fun as the danger of scuffing the paint with the drill was ever present
I will post more pictures of the completed works later on in the build……
1974 2.7 Carrera
(full restoration. now as an RS Touring)
1963 3.8 E Type
( 11 years in the making…………………….)
1952. XK120…the next one ……….……..)
(full restoration. now as an RS Touring)
1963 3.8 E Type
( 11 years in the making…………………….)
1952. XK120…the next one ……….……..)
-
Lightweight_911
- Nurse, I think I need some assistance
- Posts: 17995
- Joined: Wed Nov 12, 2003 10:48 pm
- Location: Worcs/W Mids border
Re: The XK
.
Very impressive work Jonathan ...
.
Very impressive work Jonathan ...
.
Andy
“Adding power makes you faster on the straights;
- subtracting weight makes you faster everywhere”
“Adding power makes you faster on the straights;
- subtracting weight makes you faster everywhere”
-
jtparr
- DDK 1st, 2nd and 3rd for me!
- Posts: 2365
- Joined: Mon May 24, 2004 10:54 pm
- Location: london/surrey
Re: The XK
Part 31
Interior panels
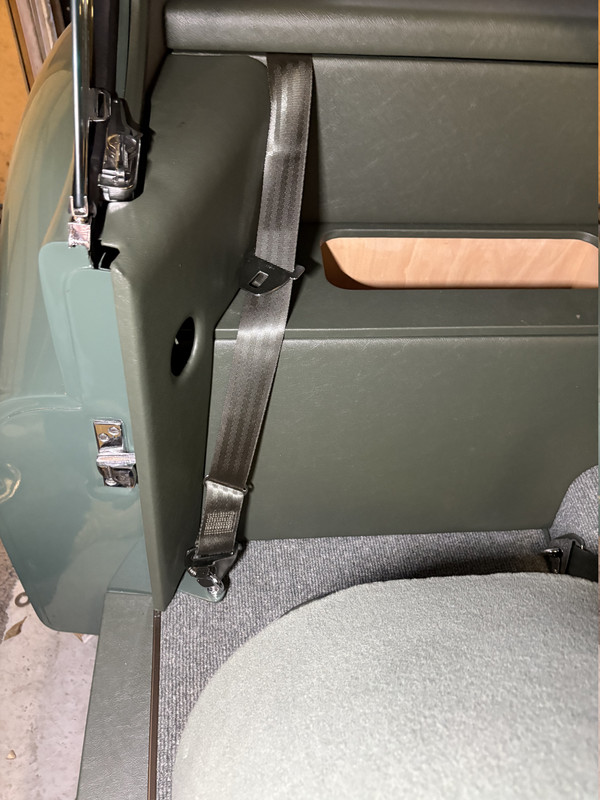
Armed with all that experience it was time to tackle the panels behind the seats…all of which had to be bespoke as we had changed the bulkhead structure…..9mm plywood is your best friend in this respect….after card templates were made….and after I had got my head around how to secure them into place, as I wanted to avoid any visible screw fixings as much as possible
The original trim on the car relied on tacking strips of timber that were initially screwed into the bodywork, then allowing trim panels to be screwed into them, so I elected to use a similar sub-structure, fixed with stainless screws but also glued into place with Sikaflex…that should stop any flexing and squeeking later on
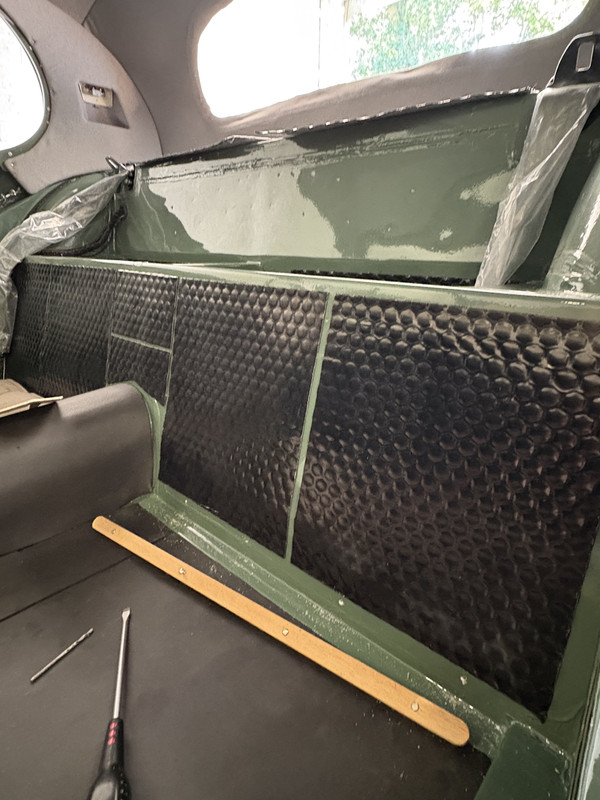
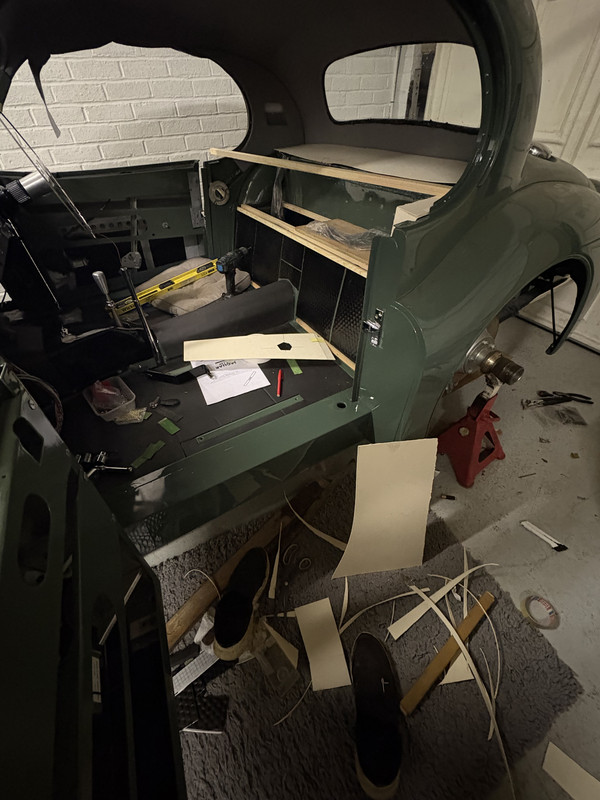
But not before I applied a decent layer of sound proofing…with my usual OCD approach to neat panels, although this will all be entirely covered from view…
The rear panels were relatively simple, probably the only tricky moment was how to create the rounded ends of the rectangular cut-outs I needed, to give access to the storage units I made….a benefit of the redesigned bulkhead that we undertook
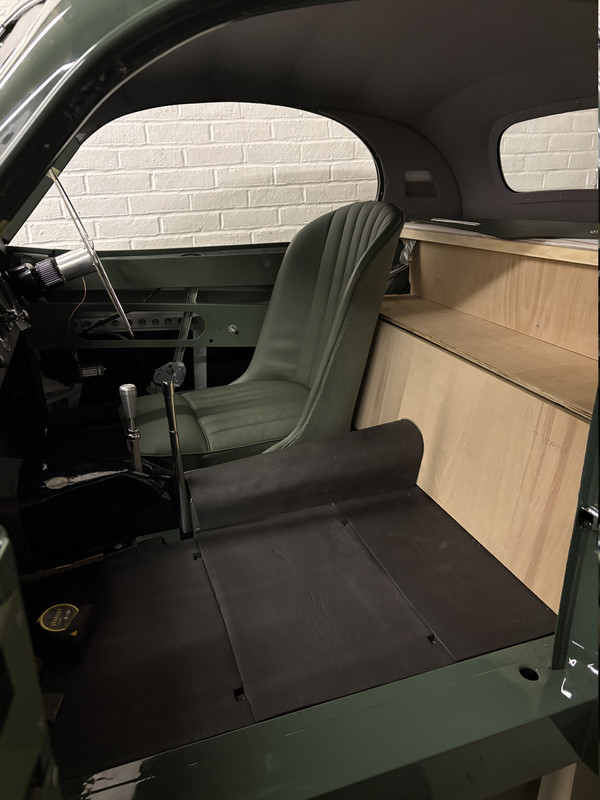
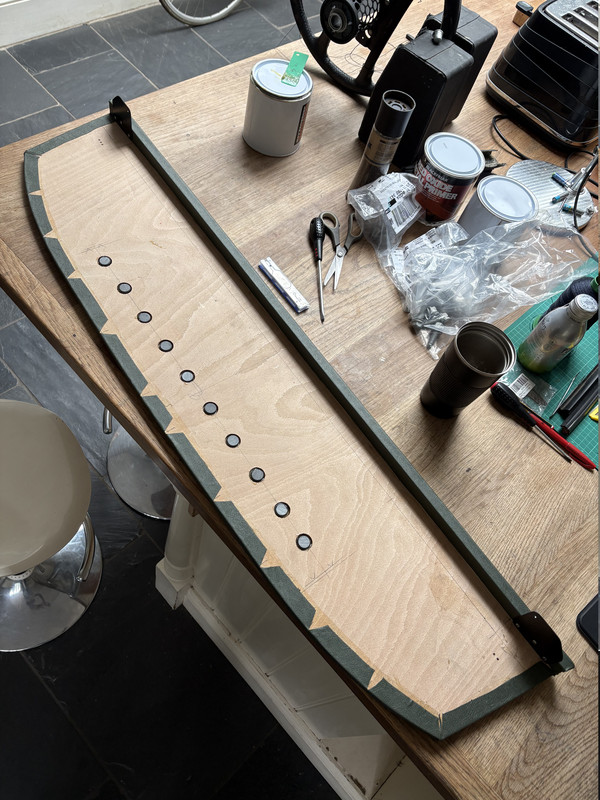
Bring into play that last power tool…the cylindrical sander….lovely bit of kit….that took care of the ends and the router plus a guiding straight edge sorted the straight lines
Again covering in vinyl was tricky…principally the challenge of stretching vinyl around an internal circular edge….the vinyl had little give in it so slow persuasion was needed….as I type this I still have to make to plywood infills, which I intend to recycle a section of one of the original ply panels as it has the original body number in red crayon
In contrast, although not straightforward the door panels were simpler…I elected to make these rather than buy them so I could refine their fit….in the pursuit of perfect door gaps I was pretty sure the actual shape of the inner door panels had changed slightly….so no point in buying pre made ones….and anyway they would be hardboard so much thicker….time to mock them up and make from aluminium….which also allowed me to create a solution to avoid visible screw fixings which was the norm back in the day
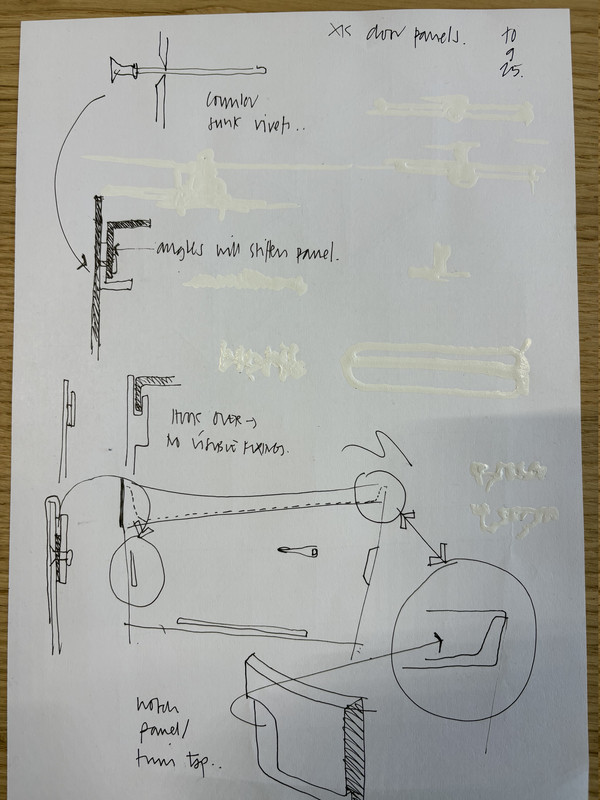
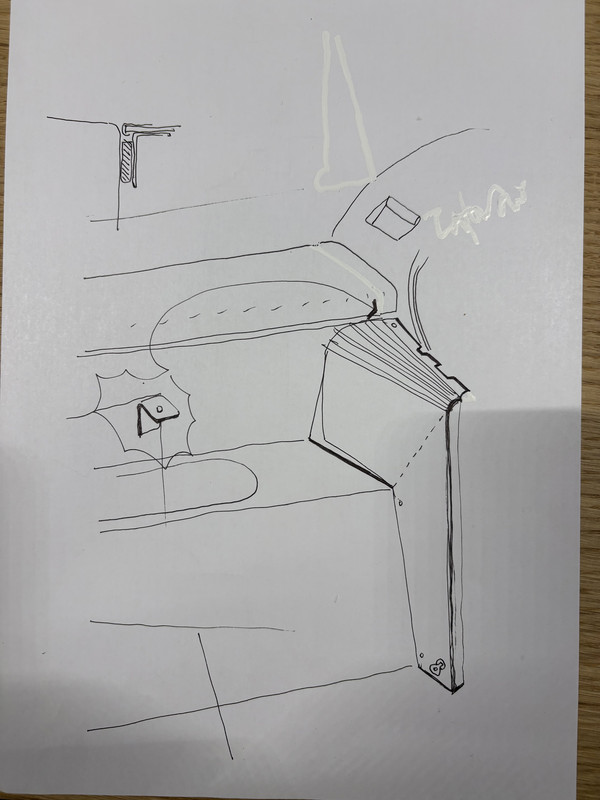
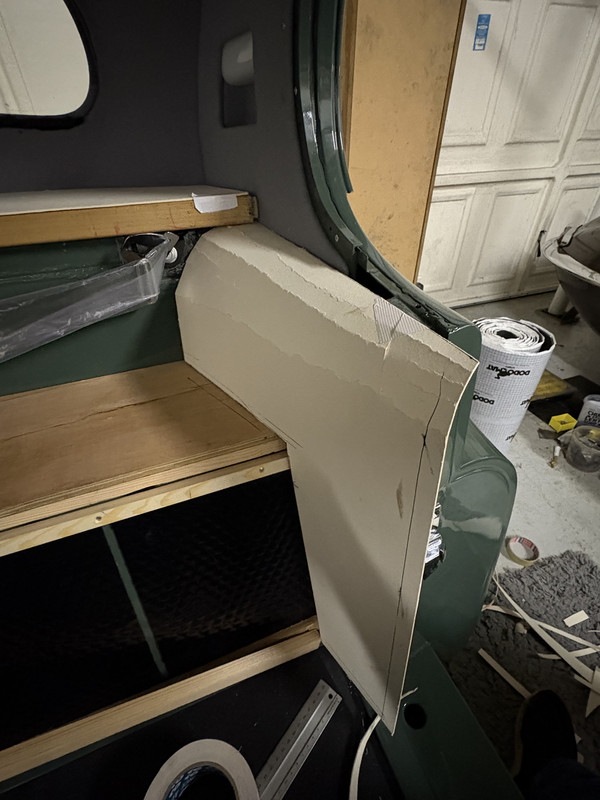
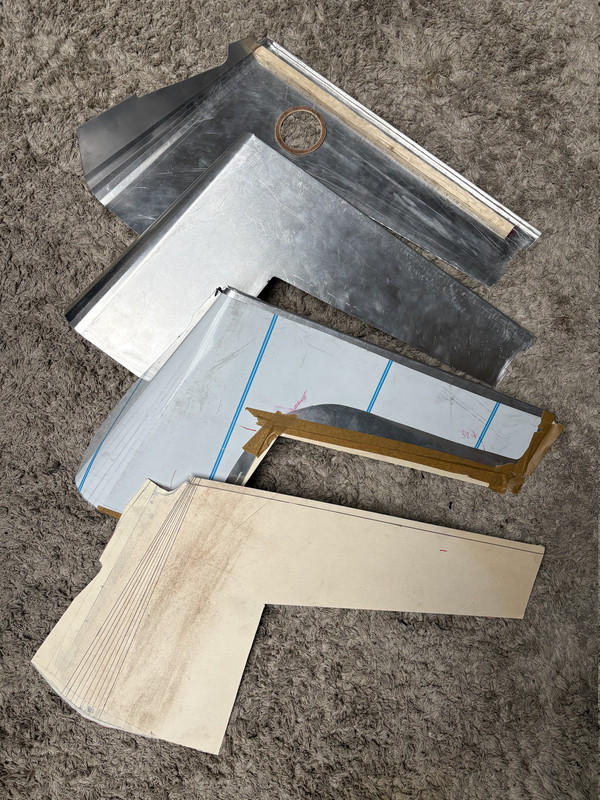
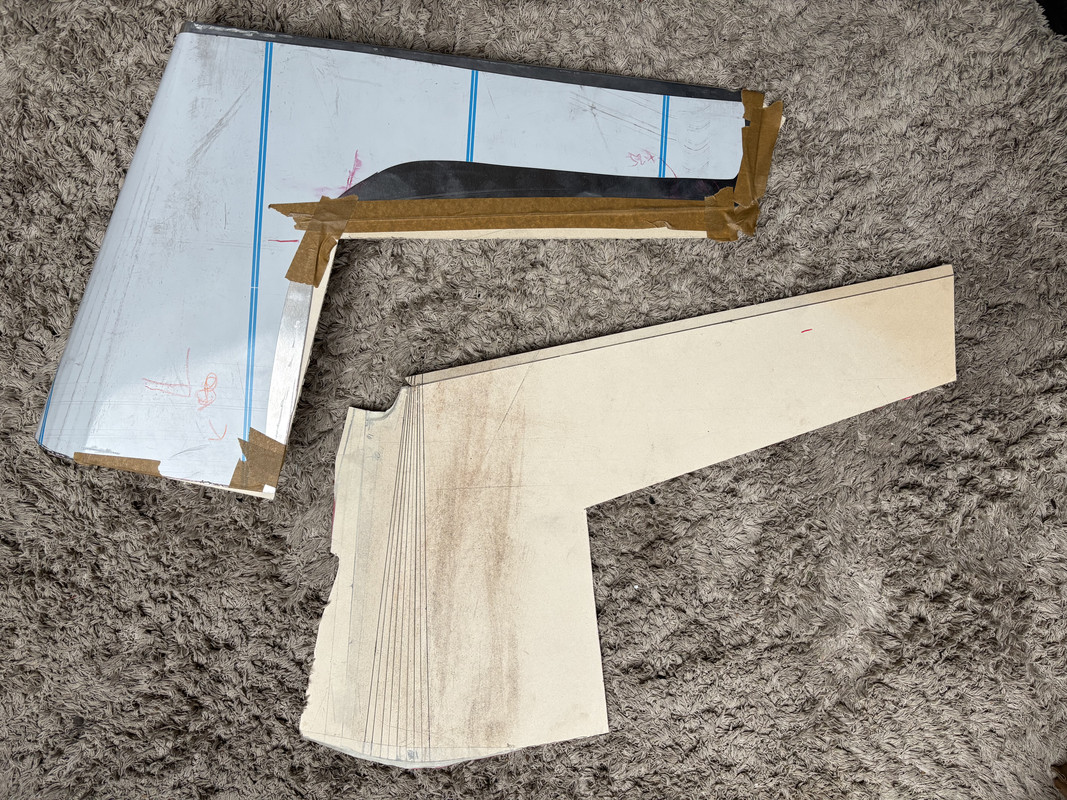
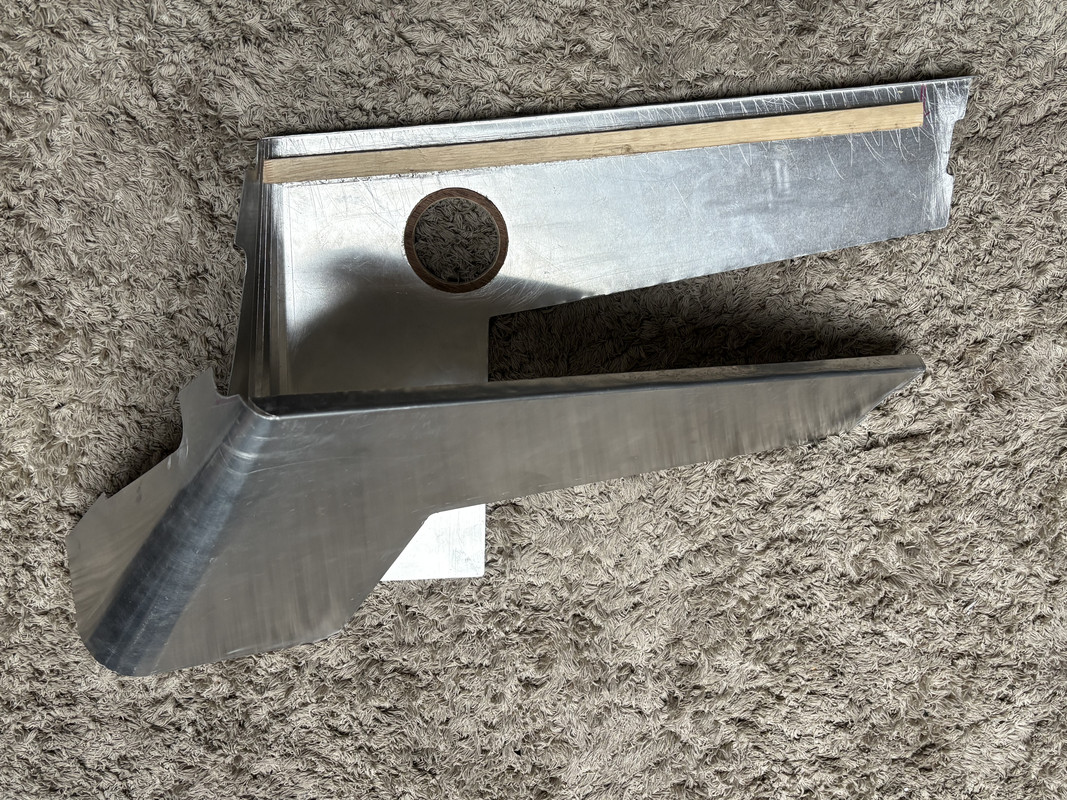
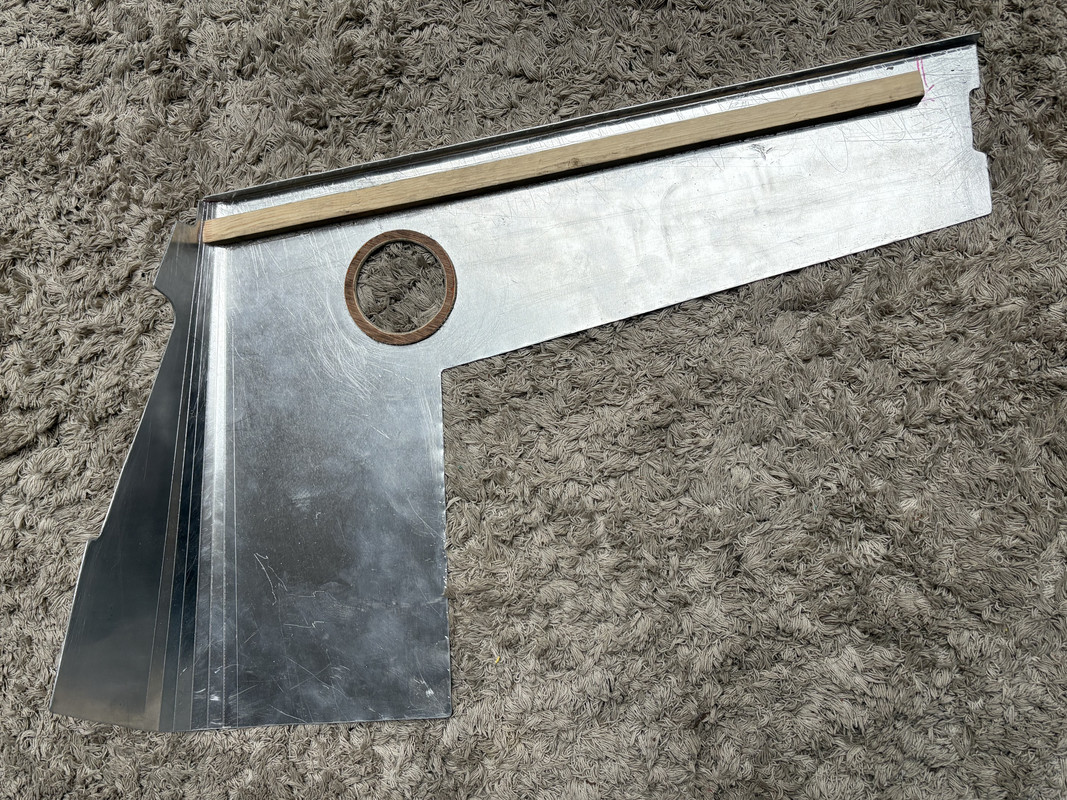
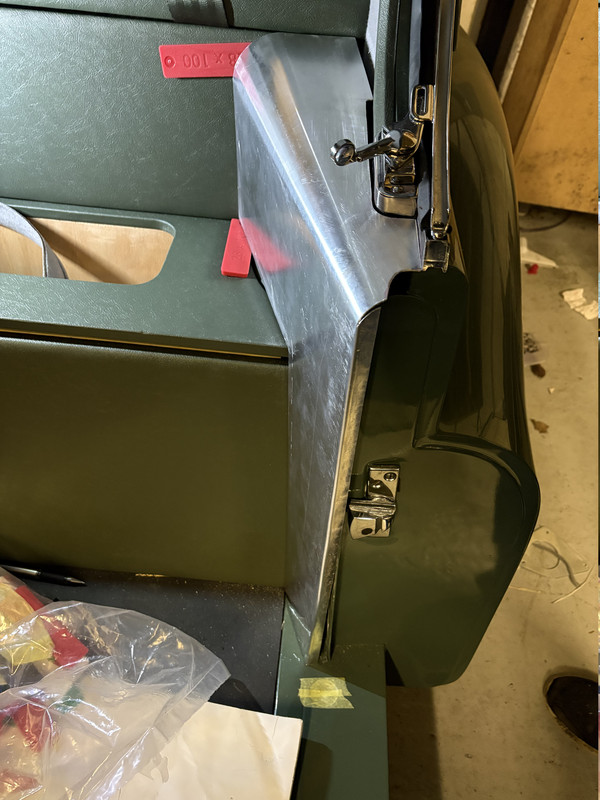
Last piece of the puzzle was the side panels to cover the door shuts at the base of the B post. I felt that this form was something that had to have an element of curvature to it, as a simple folded panel would be too crude…so having settled on the principle of the design in a sketch drawing it was out with the card to begin the mocking up process…which seemed to have promise…just needing me to solve the small task of how to fabricate this conical curved top surface……time for a further investment……a mini folder
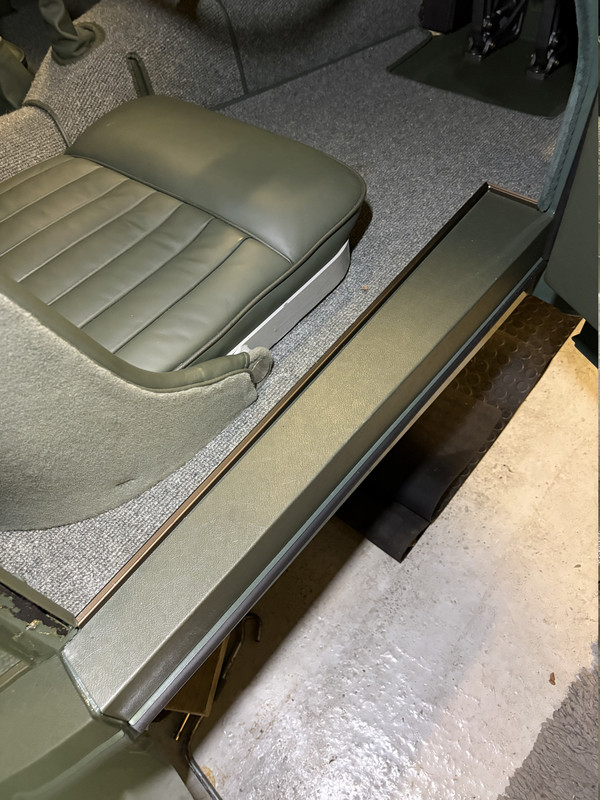
Trouble with all this focus on the interior is that mission creep is ever present…..I didn’t like the way in which carpet in the original XK120’s was trimmed around the cills , and that their exposed top surface was left as painted body colour….which over time was bound to be scratched and scuffed. I had seen cars with stainless cill cover trims but they look too brash and draw attention to themselves….this is bad enough on a silver car ….on my car it would be awful……
So what to do…..
Out with the folder….wrap in vinyl ….
And then to finish off the carpet edge I sourced some dark olive green anodised edge trims…these were then mitred and screwed/bonded into place over the vinyl….allowing the carpet to tuck in neatly
Oh…and the carpet itself….hymmm….wasn’t terribly keen on the soft Wilton look of standard carpets…and have always admired the square weave patterns of a Porsche 356 and a Mercedes Pagoda….so suede green was sourced….it is twice the price of standard carpet…but absolutely worth it….
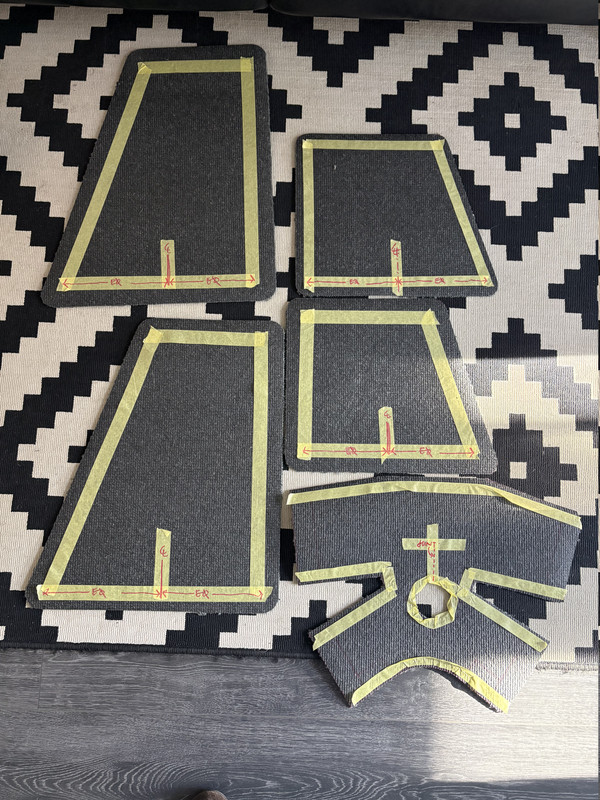
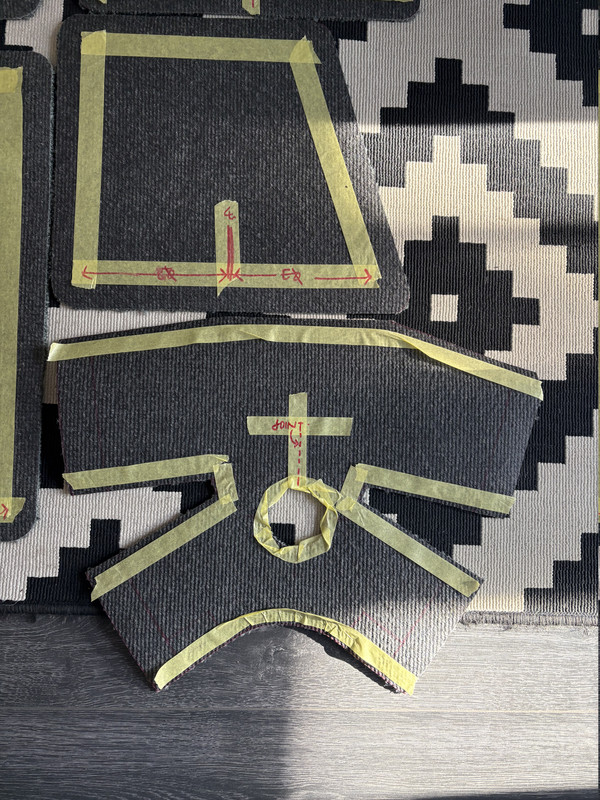
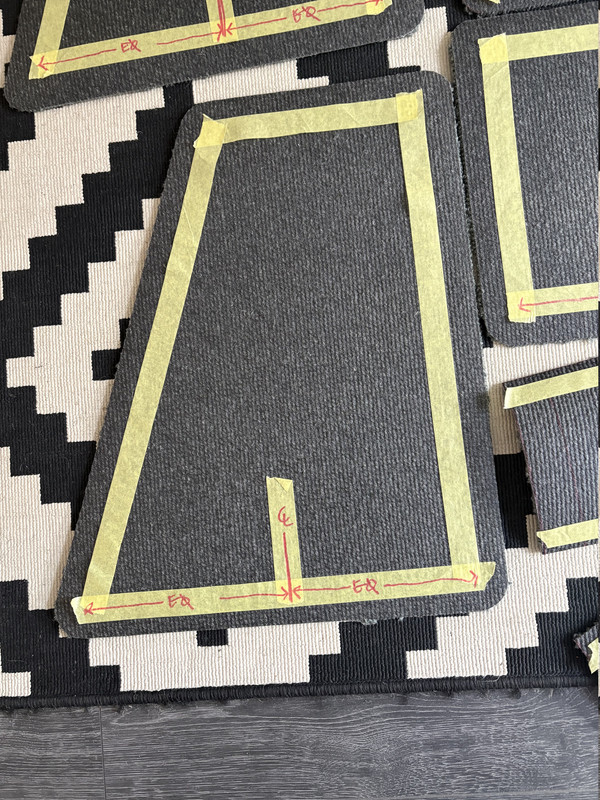
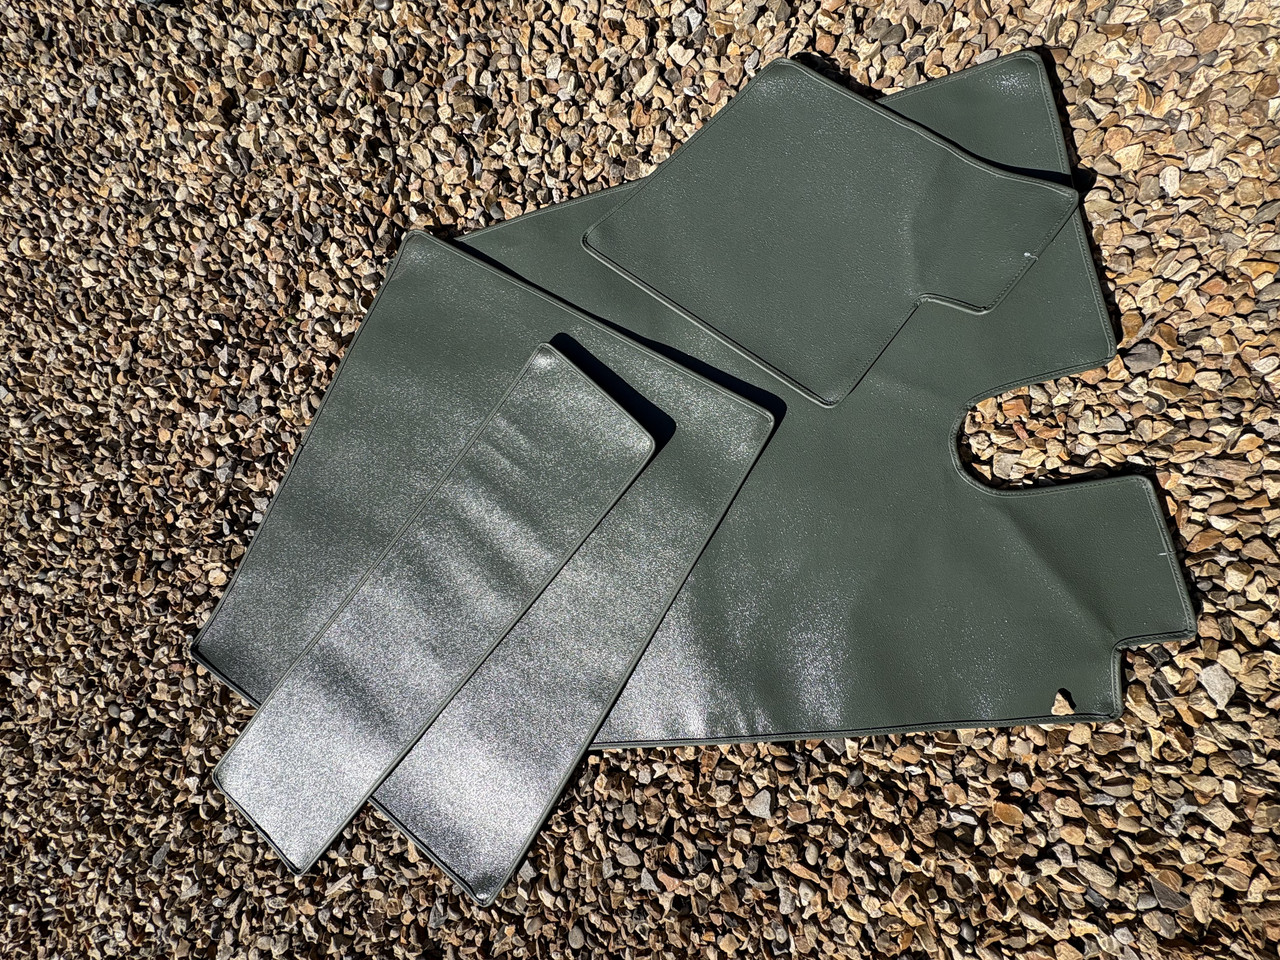
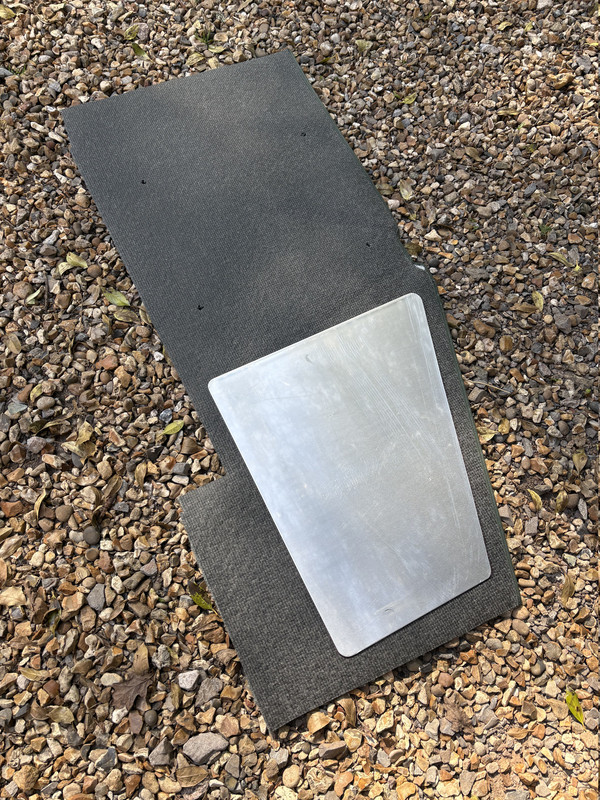
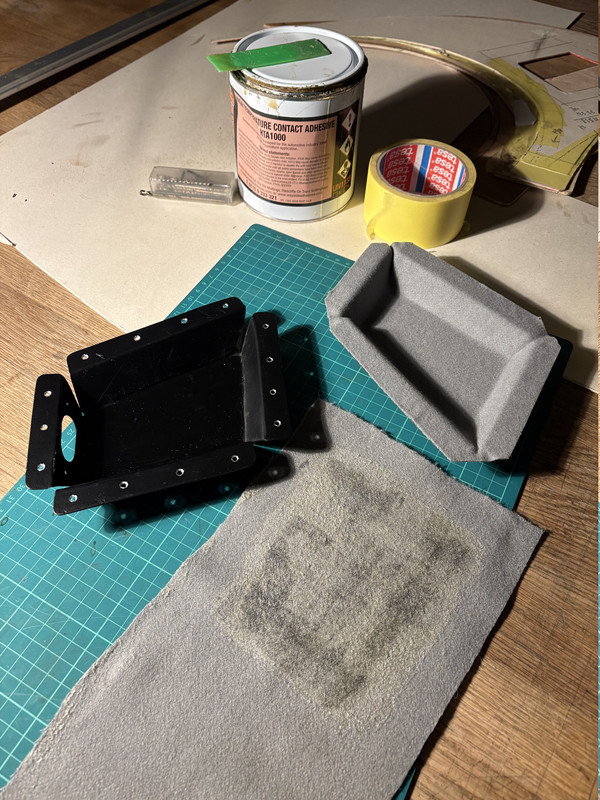
Last exercise was to make patterns and then cut the carpet into a set for edge binding….which whilst I could probably do myself I don’t yet have an industrial quality sewing machine…..and Graham at GB trim knows exactly how to do these tricky things…..the yellow masking tape was the instruction for where to add the edge binding…and the red marks were where I wanted the joint lines in the edge trim to be located
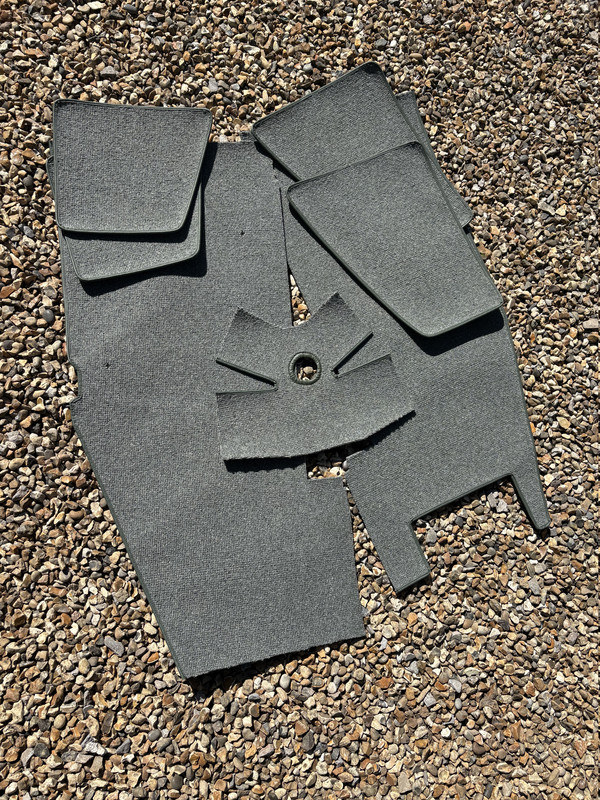
And lovely they did look when delivered…..including a hidden profilled sheet of 3mm aluminium bonded to reinforce the foam sound deadening below..
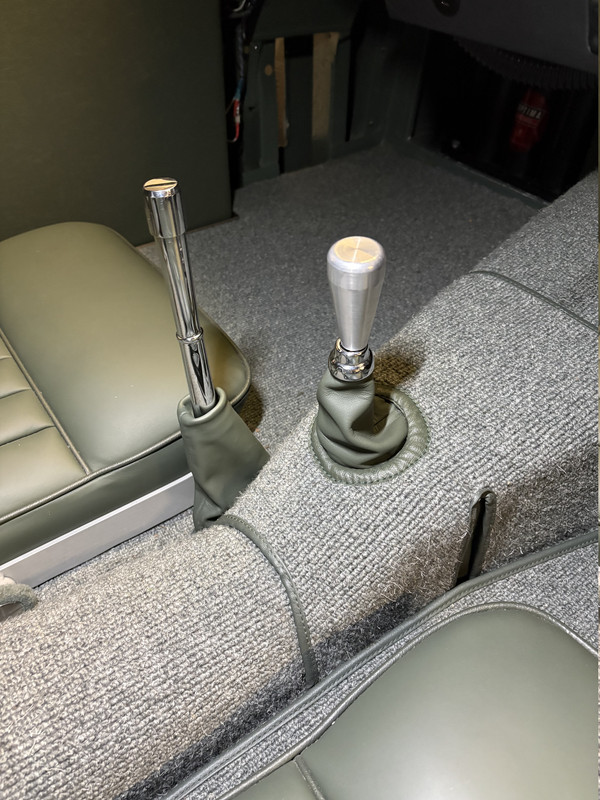
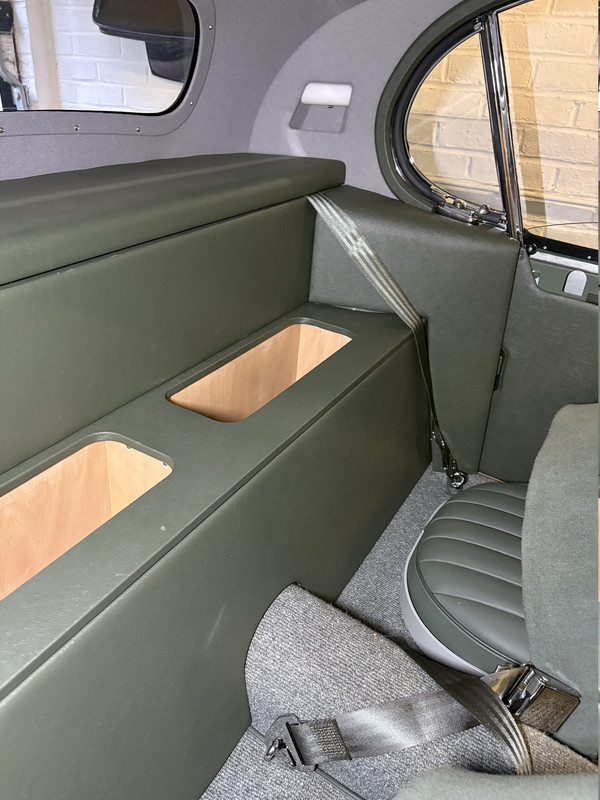
And even better when installed…..
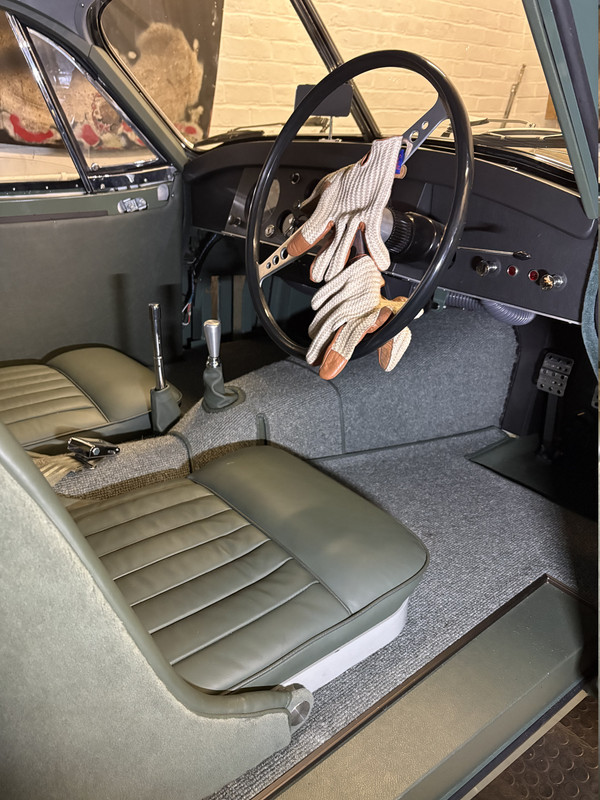
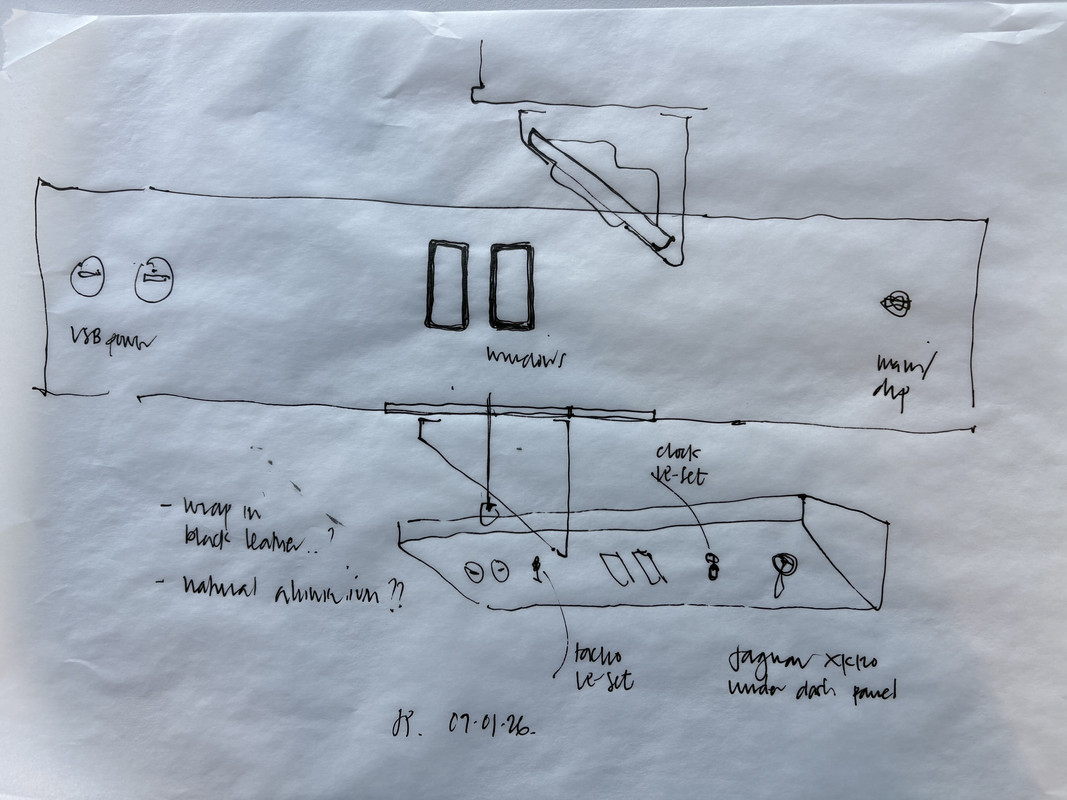
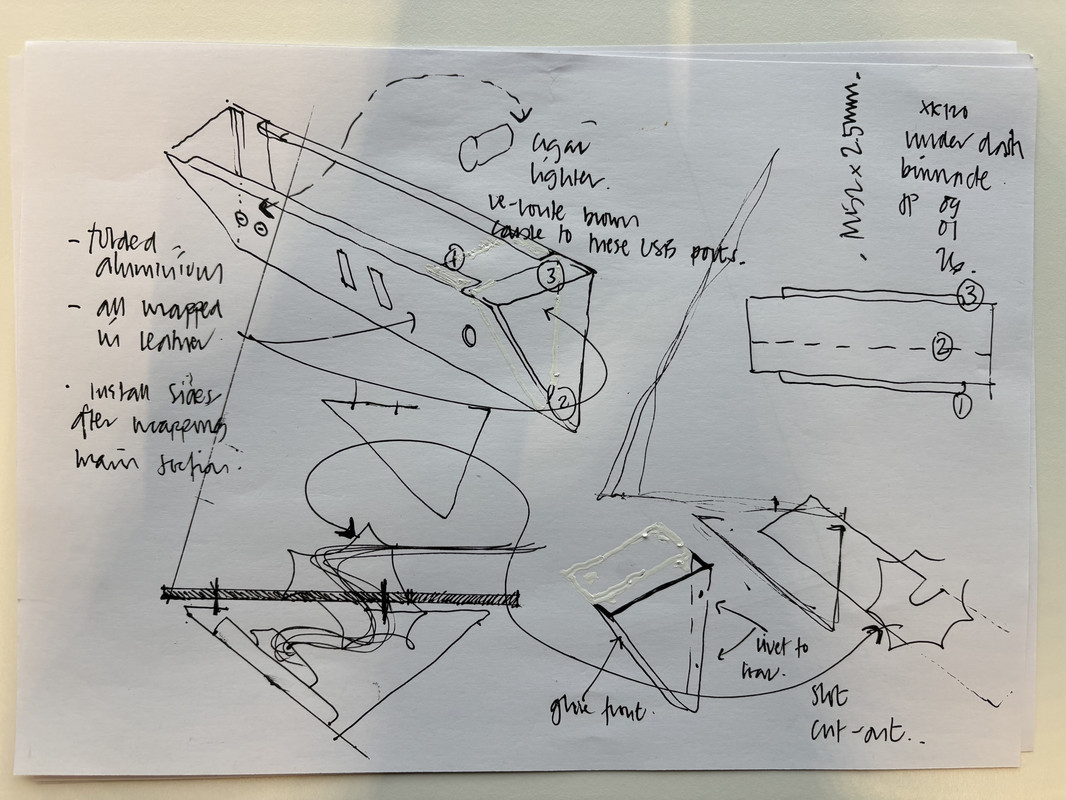
And then to finally resolve how to incorporate the window switches….dip/main beam and a USB charger I made a bespoke under dash console….wrapped in black leather…
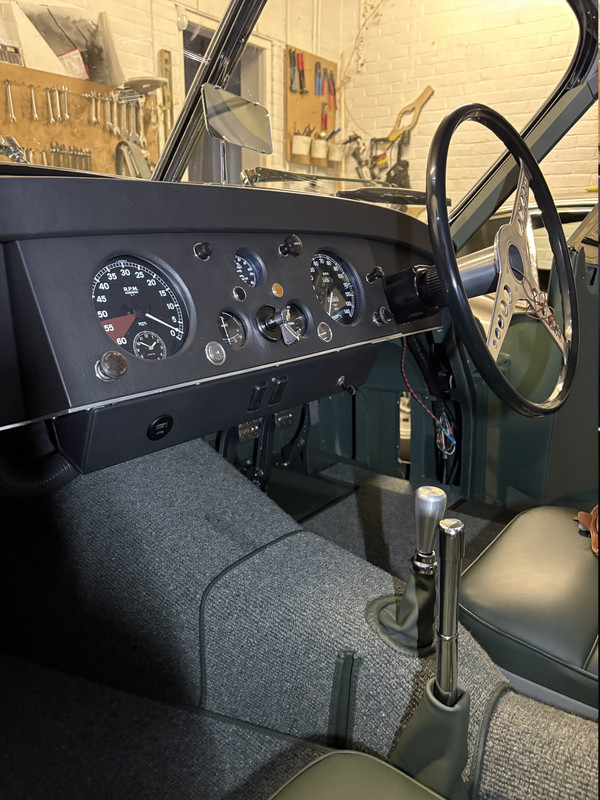
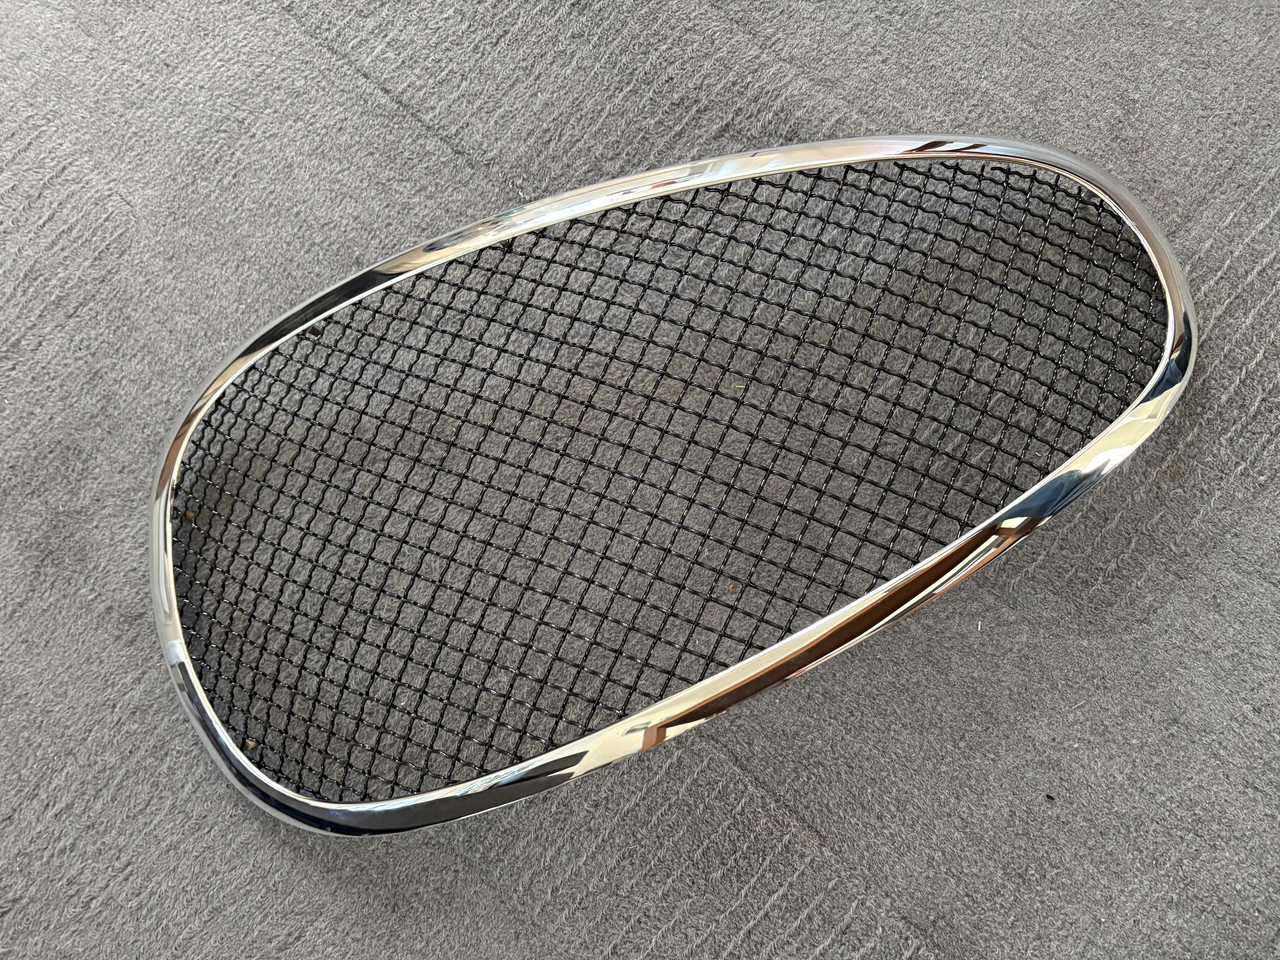
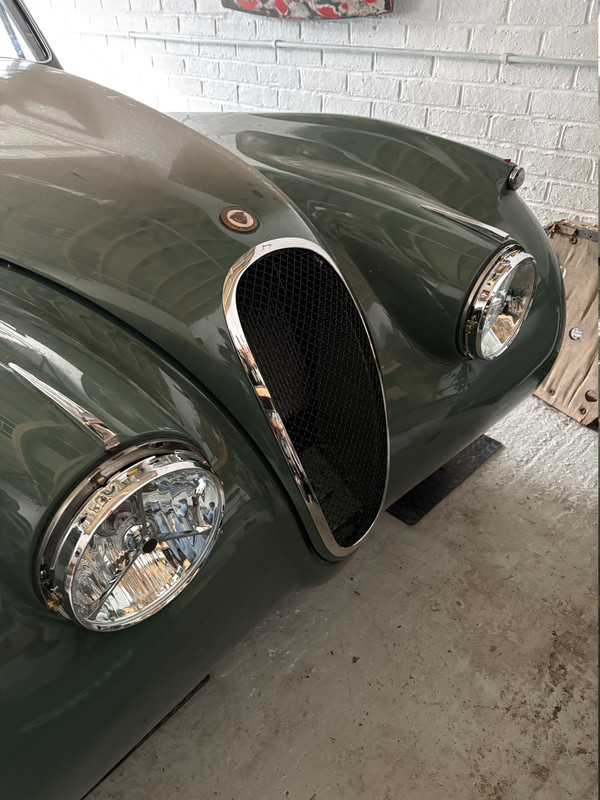
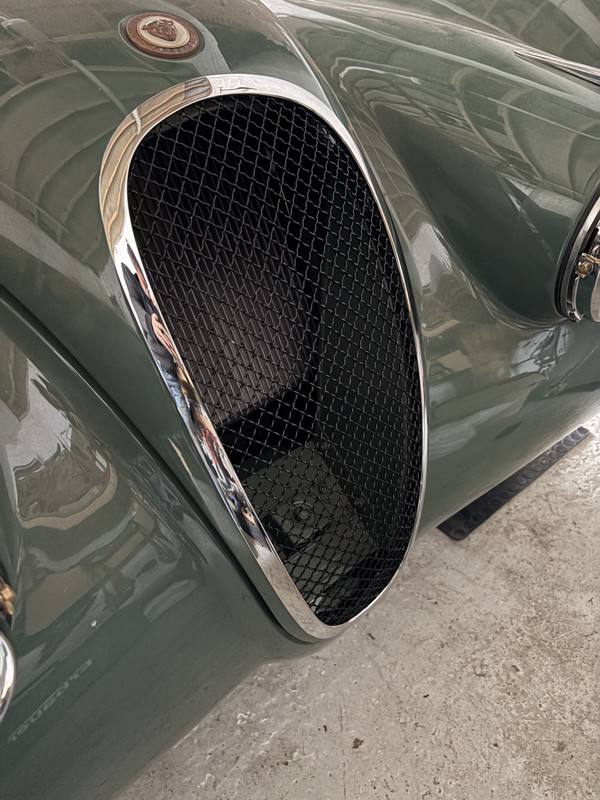
So too was the bespoke grille….my car was missing a few of the vertical slats for the front grille so it seemed an ideal opportunity to refine with a mesh grille….brass. Curved in a former that barry shaped on the English shell and then soldered by me prior to etching prime and gloss black top coat….lovely when sitting in the re-chromed brass surround
So…I guess I should bite that bullet….stop procrastinating….and go for a drive……..let’s see what that reveals….
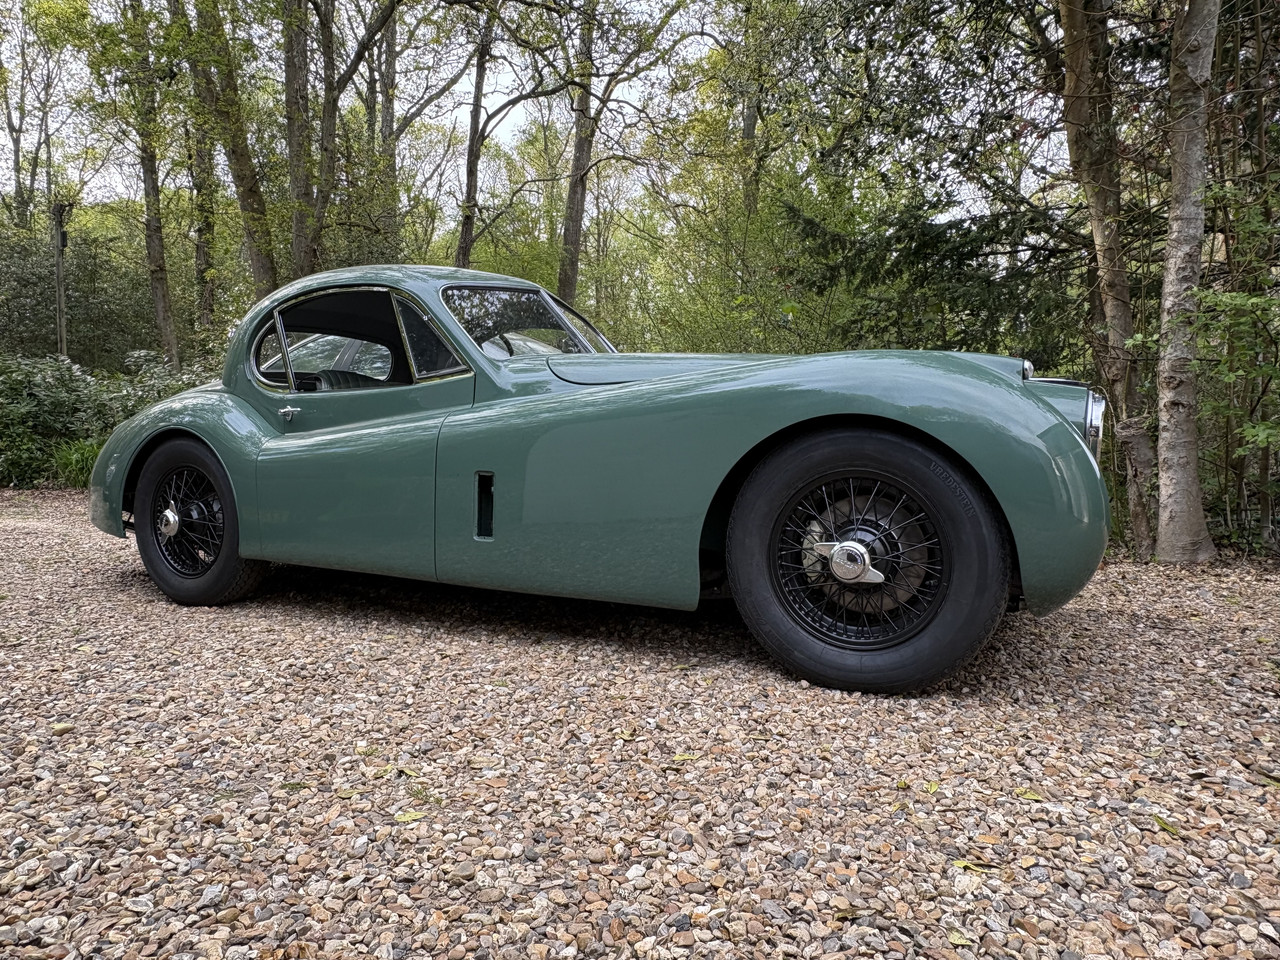
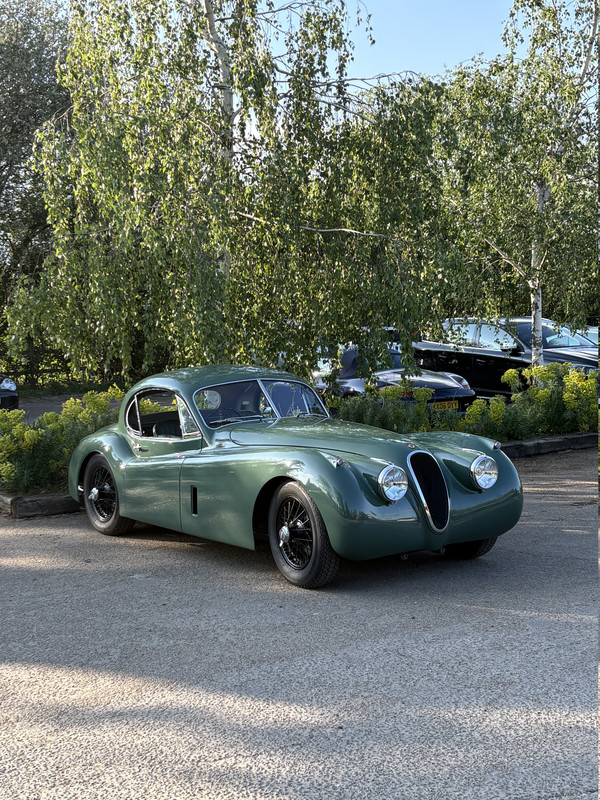
Thanks for reading….
Interior panels
Armed with all that experience it was time to tackle the panels behind the seats…all of which had to be bespoke as we had changed the bulkhead structure…..9mm plywood is your best friend in this respect….after card templates were made….and after I had got my head around how to secure them into place, as I wanted to avoid any visible screw fixings as much as possible
The original trim on the car relied on tacking strips of timber that were initially screwed into the bodywork, then allowing trim panels to be screwed into them, so I elected to use a similar sub-structure, fixed with stainless screws but also glued into place with Sikaflex…that should stop any flexing and squeeking later on
But not before I applied a decent layer of sound proofing…with my usual OCD approach to neat panels, although this will all be entirely covered from view…
The rear panels were relatively simple, probably the only tricky moment was how to create the rounded ends of the rectangular cut-outs I needed, to give access to the storage units I made….a benefit of the redesigned bulkhead that we undertook
Bring into play that last power tool…the cylindrical sander….lovely bit of kit….that took care of the ends and the router plus a guiding straight edge sorted the straight lines
Again covering in vinyl was tricky…principally the challenge of stretching vinyl around an internal circular edge….the vinyl had little give in it so slow persuasion was needed….as I type this I still have to make to plywood infills, which I intend to recycle a section of one of the original ply panels as it has the original body number in red crayon
In contrast, although not straightforward the door panels were simpler…I elected to make these rather than buy them so I could refine their fit….in the pursuit of perfect door gaps I was pretty sure the actual shape of the inner door panels had changed slightly….so no point in buying pre made ones….and anyway they would be hardboard so much thicker….time to mock them up and make from aluminium….which also allowed me to create a solution to avoid visible screw fixings which was the norm back in the day
Last piece of the puzzle was the side panels to cover the door shuts at the base of the B post. I felt that this form was something that had to have an element of curvature to it, as a simple folded panel would be too crude…so having settled on the principle of the design in a sketch drawing it was out with the card to begin the mocking up process…which seemed to have promise…just needing me to solve the small task of how to fabricate this conical curved top surface……time for a further investment……a mini folder
Trouble with all this focus on the interior is that mission creep is ever present…..I didn’t like the way in which carpet in the original XK120’s was trimmed around the cills , and that their exposed top surface was left as painted body colour….which over time was bound to be scratched and scuffed. I had seen cars with stainless cill cover trims but they look too brash and draw attention to themselves….this is bad enough on a silver car ….on my car it would be awful……
So what to do…..
Out with the folder….wrap in vinyl ….
And then to finish off the carpet edge I sourced some dark olive green anodised edge trims…these were then mitred and screwed/bonded into place over the vinyl….allowing the carpet to tuck in neatly
Oh…and the carpet itself….hymmm….wasn’t terribly keen on the soft Wilton look of standard carpets…and have always admired the square weave patterns of a Porsche 356 and a Mercedes Pagoda….so suede green was sourced….it is twice the price of standard carpet…but absolutely worth it….
Last exercise was to make patterns and then cut the carpet into a set for edge binding….which whilst I could probably do myself I don’t yet have an industrial quality sewing machine…..and Graham at GB trim knows exactly how to do these tricky things…..the yellow masking tape was the instruction for where to add the edge binding…and the red marks were where I wanted the joint lines in the edge trim to be located
And lovely they did look when delivered…..including a hidden profilled sheet of 3mm aluminium bonded to reinforce the foam sound deadening below..
And even better when installed…..
And then to finally resolve how to incorporate the window switches….dip/main beam and a USB charger I made a bespoke under dash console….wrapped in black leather…
So too was the bespoke grille….my car was missing a few of the vertical slats for the front grille so it seemed an ideal opportunity to refine with a mesh grille….brass. Curved in a former that barry shaped on the English shell and then soldered by me prior to etching prime and gloss black top coat….lovely when sitting in the re-chromed brass surround
So…I guess I should bite that bullet….stop procrastinating….and go for a drive……..let’s see what that reveals….
Thanks for reading….
1974 2.7 Carrera
(full restoration. now as an RS Touring)
1963 3.8 E Type
( 11 years in the making…………………….)
1952. XK120…the next one ……….……..)
(full restoration. now as an RS Touring)
1963 3.8 E Type
( 11 years in the making…………………….)
1952. XK120…the next one ……….……..)
-
rhd racer
- Me and DDK sitting in a tree! KISSING
- Posts: 2535
- Joined: Wed Jun 23, 2004 9:47 pm
- Location: Nottinghamshire
Re: The XK
That looks fabulous - amazing attention to detail. Love the cill covers
Sent from my iPhone using Tapatalk
Sent from my iPhone using Tapatalk
93 964 C2
99 Boxster 2.5 > 3.4 hill climber
71 914/6 3.0 - gone
'You see Paul, hill climbing is like making love to a beautiful woman. You get your motor running, check your fluids, hang on tight and WHOA..30 seconds later it's all over!' Swiss Tony
99 Boxster 2.5 > 3.4 hill climber
71 914/6 3.0 - gone
'You see Paul, hill climbing is like making love to a beautiful woman. You get your motor running, check your fluids, hang on tight and WHOA..30 seconds later it's all over!' Swiss Tony
-
911hillclimber
- Nurse, I think I need some assistance
- Posts: 20688
- Joined: Mon Mar 10, 2008 6:26 pm
- Location: West Midlands
Re: The XK
Love that carpet, great move.
It is a special car indeed.
It is a special car indeed.
73T 911 Coupe, road/hillclimber 3.2L
Lola t 492 / 3.2 hillclimb racer
Boxster 987 Gen II 2.9
Lola t 492 / 3.2 hillclimb racer
Boxster 987 Gen II 2.9
-
KS

- Nurse, I think I need some assistance
- Posts: 15759
- Joined: Fri May 07, 2004 3:12 pm
- Location: Cornwall
Re: The XK
Wow, just wow! Congratulations Jonathan. Amazing work!