congratulation!
"Le Belgique" ST build.
Moderator: Bootsy
-
_Baudett
- DDK Fanatic
- Posts: 80
- Joined: Fri Nov 11, 2016 9:54 pm
Re: "Le Belgique" ST build.
great restoration What I liked the most was seeing the inside printed in black. I would not know if it is a factory job.
congratulation!

congratulation!
Baudett
-
chud
- DDK above all
- Posts: 192
- Joined: Thu Sep 28, 2017 8:29 pm
- Location: Dorset
Re: "Le Belgique" ST build.
Nice - wish my loom looked like that, at present it looks and feels like a dead tree.
'66 912
'75 Mazda RX3
'80 Mazda RX7
‘57 Oval Beetle
instagram tymboooo
'75 Mazda RX3
'80 Mazda RX7
‘57 Oval Beetle
instagram tymboooo
- Darren65
- Nurse, I think I need some assistance
- Posts: 8161
- Joined: Mon Dec 13, 2010 10:55 pm
- Location: North Wiltshire
- Contact:
Re: "Le Belgique" ST build.
How's the best ST build in Britain coming along?
Darren
72T 2.5... http://ddk-online.com/phpBB2/viewtopic.php?f=10&t=56183
73 2.4E ... http://ddk-online.com/phpBB2/viewtopic.php?f=10&t=44242
77 Carrera 3.0...to 74 3.0RS ... http://ddk-online.com/phpBB2/viewtopic.php?f=28&t=63389
72T 2.5... http://ddk-online.com/phpBB2/viewtopic.php?f=10&t=56183
73 2.4E ... http://ddk-online.com/phpBB2/viewtopic.php?f=10&t=44242
77 Carrera 3.0...to 74 3.0RS ... http://ddk-online.com/phpBB2/viewtopic.php?f=28&t=63389
-
stretch
- Me and DDK sitting in a tree! KISSING
- Posts: 2915
- Joined: Thu May 21, 2009 2:54 pm
- Location: Kent
Re: "Le Belgique" ST build.
70T barn find...... to ST.
1998 C2 996 Kettle
1998 C2 996 Kettle
- Darren65
- Nurse, I think I need some assistance
- Posts: 8161
- Joined: Mon Dec 13, 2010 10:55 pm
- Location: North Wiltshire
- Contact:
Re: "Le Belgique" ST build.
....just in case you forgot where your thread was Dave!stretch wrote:Not mine Darren..! Coming along nicely thanks.
I must update the thread soon.
Darren
72T 2.5... http://ddk-online.com/phpBB2/viewtopic.php?f=10&t=56183
73 2.4E ... http://ddk-online.com/phpBB2/viewtopic.php?f=10&t=44242
77 Carrera 3.0...to 74 3.0RS ... http://ddk-online.com/phpBB2/viewtopic.php?f=28&t=63389
72T 2.5... http://ddk-online.com/phpBB2/viewtopic.php?f=10&t=56183
73 2.4E ... http://ddk-online.com/phpBB2/viewtopic.php?f=10&t=44242
77 Carrera 3.0...to 74 3.0RS ... http://ddk-online.com/phpBB2/viewtopic.php?f=28&t=63389
-
stretch
- Me and DDK sitting in a tree! KISSING
- Posts: 2915
- Joined: Thu May 21, 2009 2:54 pm
- Location: Kent
Re: "Le Belgique" ST build.
About time I updated this thread….!
Once the car was on it's slave wheels it was time to get on with the refurbishment of all the other parts that needed to go back on this project.
Those with a good memory will remember "Swampy" the RHD 2.2S that provided lot's of the expensive parts that are shared with the ST cars. The oil system was one of the major parts that was fairly complete but would need going through. I started by removing the freshly painted front wing to gain access to fit the oil cooler and front oil lines. Brass lines required nothing more than a good clan and paint. Flexible Cohline cooler hoses were re-hosed using new Cohline rubber and the original date stamped aluminum fittings. Big thanks to Brad Davis for the assembly tips..!
After buying 3 leaking original Behr coolers deemed "good" I decided to build a custom made cooler based on the look of the 911 R cooler. One of my leaking originals was used as a template for the mounting tabs. Original protective shroud was restored with new rubber and rivets. Everything up front ready to re-fit.
Dave
IMG_2956 by stretch1985, on Flickr

20180130_081129 by
stretch1985, on Flickr
20180130_081144 by stretch1985, on Flickr
20180518_122921 (1) by stretch1985, on Flickr
Once the car was on it's slave wheels it was time to get on with the refurbishment of all the other parts that needed to go back on this project.
Those with a good memory will remember "Swampy" the RHD 2.2S that provided lot's of the expensive parts that are shared with the ST cars. The oil system was one of the major parts that was fairly complete but would need going through. I started by removing the freshly painted front wing to gain access to fit the oil cooler and front oil lines. Brass lines required nothing more than a good clan and paint. Flexible Cohline cooler hoses were re-hosed using new Cohline rubber and the original date stamped aluminum fittings. Big thanks to Brad Davis for the assembly tips..!
After buying 3 leaking original Behr coolers deemed "good" I decided to build a custom made cooler based on the look of the 911 R cooler. One of my leaking originals was used as a template for the mounting tabs. Original protective shroud was restored with new rubber and rivets. Everything up front ready to re-fit.
Dave
IMG_2956 by stretch1985, on Flickr
20180130_081129 by
stretch1985, on Flickr
20180130_081144 by stretch1985, on Flickr
20180518_122921 (1) by stretch1985, on Flickr70T barn find...... to ST.
1998 C2 996 Kettle
1998 C2 996 Kettle
-
stretch
- Me and DDK sitting in a tree! KISSING
- Posts: 2915
- Joined: Thu May 21, 2009 2:54 pm
- Location: Kent
Re: "Le Belgique" ST build.
Next job was the oil tank and the S oil filter console. To be honest I wasn't to confident in the tank being leak free once I dug it out from storage. However, it turned out to be leak free so of it went to be ultrasonic cleaned.
20171207_175017 by stretch1985, on Flickr
20180410_142743 by stretch1985, on Flickr
Next job, clean strip and re-hose all the oil console Cohline hoses. Experienced at this now…!
All hard lines were re-plated and with a freshly painted console the oil system was finished and ready to fit.
20171218_163111 by stretch1985, on Flickr
20171220_163111 by stretch1985, on Flickr
20180416_162914 (1) by stretch1985, on Flickr
The ST and other factory race cars used an oil catch tank located in the system to catch excess oil build up. The short wheel based 911 SWF branded washer bottle was the factory choice for this application. Another quirky and probably the hardest ST part to find is the Aeroquip Red cap fitted to this catch tank. This was also sourced from Brad Davis. Thanks for the gift Brad. Oil system finished and installed.
20180424_181527 by stretch1985, on Flickr
Factory instructions for fitting of the oil catch tank.
23808308.oiltanksketch by stretch1985, on Flickr
Dave
20171207_175017 by stretch1985, on Flickr
20180410_142743 by stretch1985, on FlickrNext job, clean strip and re-hose all the oil console Cohline hoses. Experienced at this now…!
All hard lines were re-plated and with a freshly painted console the oil system was finished and ready to fit.
20171218_163111 by stretch1985, on Flickr
20171220_163111 by stretch1985, on Flickr
20180416_162914 (1) by stretch1985, on FlickrThe ST and other factory race cars used an oil catch tank located in the system to catch excess oil build up. The short wheel based 911 SWF branded washer bottle was the factory choice for this application. Another quirky and probably the hardest ST part to find is the Aeroquip Red cap fitted to this catch tank. This was also sourced from Brad Davis. Thanks for the gift Brad. Oil system finished and installed.
20180424_181527 by stretch1985, on FlickrFactory instructions for fitting of the oil catch tank.
23808308.oiltanksketch by stretch1985, on FlickrDave
70T barn find...... to ST.
1998 C2 996 Kettle
1998 C2 996 Kettle
-
MarkIII
- DDK rules my life!
- Posts: 1040
- Joined: Tue Apr 03, 2012 10:16 pm
Re: "Le Belgique" ST build.
Hey Dave
Great update Dave, lits of helpful tips there for my build.
Come on post the next installment could do with boxing day reading material.......
Great update Dave, lits of helpful tips there for my build.
Come on post the next installment could do with boxing day reading material.......
-
stretch
- Me and DDK sitting in a tree! KISSING
- Posts: 2915
- Joined: Thu May 21, 2009 2:54 pm
- Location: Kent
Re: "Le Belgique" ST build.
Seasons greetings Mark.
Whilst I had an empty engine bay it made sense to restore and fit the fuel filter console. The locating holes on the inner panel were moved further forward during the metalwork stage. This is done to accommodate a longer electrical control board as this will now need to accept two CDI boxes for the ST twin plug ignition system. Twin coils also installed.
New filter and re-plated fittings and this was ready to install.
20180225_110901 by stretch1985, on Flickr
20180414_111447 by stretch1985, on Flickr
Whilst I had an empty engine bay it made sense to restore and fit the fuel filter console. The locating holes on the inner panel were moved further forward during the metalwork stage. This is done to accommodate a longer electrical control board as this will now need to accept two CDI boxes for the ST twin plug ignition system. Twin coils also installed.
New filter and re-plated fittings and this was ready to install.
20180225_110901 by stretch1985, on Flickr
20180414_111447 by stretch1985, on Flickr70T barn find...... to ST.
1998 C2 996 Kettle
1998 C2 996 Kettle
-
stretch
- Me and DDK sitting in a tree! KISSING
- Posts: 2915
- Joined: Thu May 21, 2009 2:54 pm
- Location: Kent
Re: "Le Belgique" ST build.
Next job in the engine bay was to restore the components that would be fitted to the longer aluminum control board. Most of these parts would not be used, but I wanted to install them for a factory look. Only parts missing from the board are the two CDI boxes. I opted to have Jonny Hart's CDI + modern components installed in my original Bosch boxes. These would be fitted at a later date.
Once installed the engine bay was pretty much complete apart from the bit in the middle.
20180403_110220 by stretch1985, on Flickr
20180421_153502 (1) by stretch1985, on Flickr
Once installed the engine bay was pretty much complete apart from the bit in the middle.
20180403_110220 by stretch1985, on Flickr
20180421_153502 (1) by stretch1985, on Flickr70T barn find...... to ST.
1998 C2 996 Kettle
1998 C2 996 Kettle
- yoda
- I need to get out more!
- Posts: 3294
- Joined: Fri Apr 14, 2006 6:01 am
- Location: London
-
stretch
- Me and DDK sitting in a tree! KISSING
- Posts: 2915
- Joined: Thu May 21, 2009 2:54 pm
- Location: Kent
Re: "Le Belgique" ST build.
Next up was the Dash and all the components in the cockpit. Finding a true barn find meant that most of the dash parts were in great original condition. ST deletion items are, no ashtray, radio, glove box door, these were duly deleted. I used an original piece of basket weave material from a door panel to match in with my new radio delete panel. Very pleased with the match. On to the Gauges. Being coloured blind I didn't hold out much hope of wiring in the gauges. A blown up laminated
Colour schematic the size of a 50" inch TV didn't help either…!
Kersten took up the challenge to wire up all the gauges. Once wired up she was well chuffed when everything worked
Thanks Kersten.
Bosch pull switches were also installed to the under dash to isolate the twin CDI boxes.
20171122_180049 (1) by stretch1985, on Flickr
20171201_173149 by stretch1985, on Flickr
20180808_153224 by stretch1985, on Flickr
20190109_150633 by stretch1985, on Flickr
Colour schematic the size of a 50" inch TV didn't help either…!
Kersten took up the challenge to wire up all the gauges. Once wired up she was well chuffed when everything worked
Thanks Kersten.
Bosch pull switches were also installed to the under dash to isolate the twin CDI boxes.
20171122_180049 (1) by stretch1985, on Flickr
20171201_173149 by stretch1985, on Flickr
20180808_153224 by stretch1985, on Flickr
20190109_150633 by stretch1985, on Flickr70T barn find...... to ST.
1998 C2 996 Kettle
1998 C2 996 Kettle
-
stretch
- Me and DDK sitting in a tree! KISSING
- Posts: 2915
- Joined: Thu May 21, 2009 2:54 pm
- Location: Kent
Re: "Le Belgique" ST build.
Before electrical testing of the dash controls could resume I would need to strip and restore the original snail horns. These were full of all sorts of debris and rust.
Once stripped new screws and paper gaskets were fitted. All working and fit for purpose.
20171212_153747 by stretch1985, on Flickr
20171212_170812 by stretch1985, on Flickr
20180208_122851 by stretch1985, on Flickr
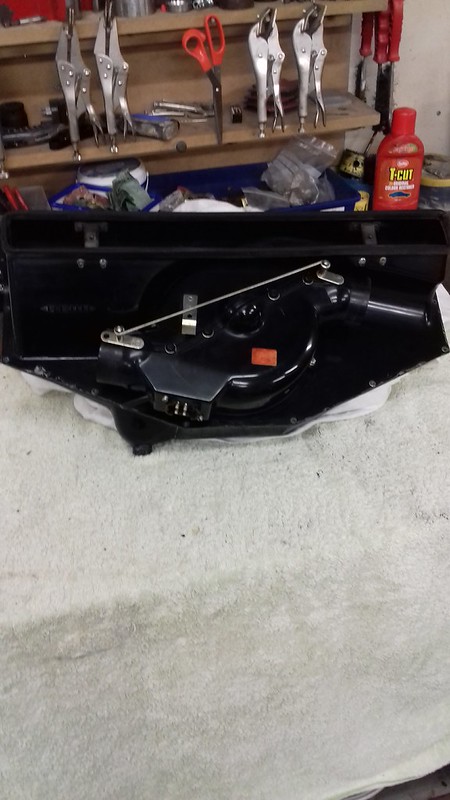
Once access to the rear of the dash was finished with, I could get on with installing the heater blower air box. As there is no cardboard cover fitted in the ST cars this would need to be looking it's best. Despite not having heat i stripped and restored the box which included plating and making new flapper plate gaskets.
20171201_122659 by stretch1985, on Flickr
20171201_172941 by stretch1985, on Flickr
20180119_110140 by stretch1985, on Flickr
Once stripped new screws and paper gaskets were fitted. All working and fit for purpose.
20171212_153747 by stretch1985, on Flickr
20171212_170812 by stretch1985, on Flickr
20180208_122851 by stretch1985, on FlickrOnce access to the rear of the dash was finished with, I could get on with installing the heater blower air box. As there is no cardboard cover fitted in the ST cars this would need to be looking it's best. Despite not having heat i stripped and restored the box which included plating and making new flapper plate gaskets.
20171201_122659 by stretch1985, on Flickr
20171201_172941 by stretch1985, on Flickr
20180119_110140 by stretch1985, on Flickr70T barn find...... to ST.
1998 C2 996 Kettle
1998 C2 996 Kettle
-
stretch
- Me and DDK sitting in a tree! KISSING
- Posts: 2915
- Joined: Thu May 21, 2009 2:54 pm
- Location: Kent
Re: "Le Belgique" ST build.
Time to finish the fuel system up front :
I decided to apply a little bit of protection to the underside of the 100 litre centre fill fuel tank. I applied several coats of gravitex stone guard using a mini gloss roller so that it didn't have a textured finish. Rubber edge trim was installed to the hood to prevent edge damage whilst filling with fuel. This trim is present on many original ST cars.
Fuel delivery would be via two MFI fuel pumps that piggy back each other. These were mounted on the bulkhead in period. Hosing up the two pumps was a very time consuming job…!

20180513_141744 by stretch1985, on Flickr
20180221_152214 by stretch1985, on Flickr
20190313_164926 by stretch1985, on Flickr
IMG-20190307-WA0003 by stretch1985, on Flickr
IMG-20190313-WA0002 by stretch1985, on Flickr
I decided to apply a little bit of protection to the underside of the 100 litre centre fill fuel tank. I applied several coats of gravitex stone guard using a mini gloss roller so that it didn't have a textured finish. Rubber edge trim was installed to the hood to prevent edge damage whilst filling with fuel. This trim is present on many original ST cars.
Fuel delivery would be via two MFI fuel pumps that piggy back each other. These were mounted on the bulkhead in period. Hosing up the two pumps was a very time consuming job…!
20180513_141744 by stretch1985, on Flickr
20180221_152214 by stretch1985, on Flickr
20190313_164926 by stretch1985, on Flickr
IMG-20190307-WA0003 by stretch1985, on Flickr
IMG-20190313-WA0002 by stretch1985, on Flickr70T barn find...... to ST.
1998 C2 996 Kettle
1998 C2 996 Kettle
-
911hillclimber
- Nurse, I think I need some assistance
- Posts: 20708
- Joined: Mon Mar 10, 2008 6:26 pm
- Location: West Midlands
Re: "Le Belgique" ST build.
Fabulous. 
73T 911 Coupe, road/hillclimber 3.2L
Lola t 492 / 3.2 hillclimb racer
Boxster 987 Gen II 2.9
Lola t 492 / 3.2 hillclimb racer
Boxster 987 Gen II 2.9