

914 2.0 > 3.0 GT Conversion
Moderator: Bootsy
-
Gary71
- Nurse, I think I need some assistance
- Posts: 10320
- Joined: Wed Mar 31, 2004 1:27 pm
- Location: Cheshire
- Contact:
Re: 914 2.0 > 3.0 GT Conversion
Such a great feeling to hear that noise! What’s the estimate for driving it...?
-
rhd racer
- DDK 1st, 2nd and 3rd for me!
- Posts: 2063
- Joined: Wed Jun 23, 2004 9:47 pm
- Location: Nottinghamshire
Re: 914 2.0 > 3.0 GT Conversion
Sweet! Excellent news, well done Stephen
93 964 C2
99 Boxster 2.5 > 2.7 hill climber
71 914/6 3.0 - gone
'You see Paul, hill climbing is like making love to a beautiful woman. You get your motor running, check your fluids, hang on tight and WHOA..30 seconds later it's all over!' Swiss Tony
99 Boxster 2.5 > 2.7 hill climber
71 914/6 3.0 - gone
'You see Paul, hill climbing is like making love to a beautiful woman. You get your motor running, check your fluids, hang on tight and WHOA..30 seconds later it's all over!' Swiss Tony
-
defianty
- Put a fork in me, I'm done!
- Posts: 1717
- Joined: Sat Aug 05, 2006 7:02 pm
- Location: Rochford, Essex
Re: 914 2.0 > 3.0 GT Conversion
Thanks again guys.
So weather depending, and the forecast currently looks awful for the next 10 days, I should be out for a drive maybe next weekend.
Very little to do now Gary. Just a couple of things stopping me. I need to modify/fabricate a rear shift rod, I have everything I need so other that waiting for paint to dry it's only a few hours work. Other than that I need to work out why the throttle is so stiff - has to be something to do with the linkage but I've not been able to work it out yet.Gary71 wrote:Such a great feeling to hear that noise! What’s the estimate for driving it...?
So weather depending, and the forecast currently looks awful for the next 10 days, I should be out for a drive maybe next weekend.
Re: 914 2.0 > 3.0 GT Conversion
Great job, well done
Porsche 964 1993
Porsche 944 1986 - sold
Porsche 914 1972
Porsche 944 1986 - sold
Porsche 914 1972
-
sladey
- Nurse, I think I need some assistance
- Posts: 8804
- Joined: Sat Apr 23, 2005 9:08 pm
- Location: Nottingham, UK
Re: 914 2.0 > 3.0 GT Conversion
awesome - nice one Stephen
The simple things you see are all complicated
I look pretty young but I'm just backdated yeah
I look pretty young but I'm just backdated yeah
-
middlefour1
- DDK rules my life!
- Posts: 1080
- Joined: Thu Nov 20, 2003 8:14 am
- Location: Northamptonshire...but only just!!
Re: 914 2.0 > 3.0 GT Conversion
Great work Stephen, well done!!
Steve
1970 Silver 914 - Gone but never forgotten........
#1200
1970 Silver 914 - Gone but never forgotten........
#1200
-
theorangeperil
- DDK forever
- Posts: 650
- Joined: Sat Nov 15, 2003 9:51 pm
- Location: London
Re: 914 2.0 > 3.0 GT Conversion
awesome!
Peter
'69 911T UK RHD enjoying since 2002
'86 924S - Gone but not forgotten. Porsche's best kept secret...
'04 911 40th Anniversary now gone
'11 911 GTS manual of course...
'69 911T UK RHD enjoying since 2002
'86 924S - Gone but not forgotten. Porsche's best kept secret...
'04 911 40th Anniversary now gone
'11 911 GTS manual of course...
-
defianty
- Put a fork in me, I'm done!
- Posts: 1717
- Joined: Sat Aug 05, 2006 7:02 pm
- Location: Rochford, Essex
Re: 914 2.0 > 3.0 GT Conversion
Well it hasn't moved far under its own power yet. 
To start with I had a lot of trouble setting up the throttle linkage. At this point I've got around it with a makeshift solution, that to be honest works perfectly, but it's far from the factory setup so that's something I'll revisit at a later stage.
With the engine in the last piece I needed to fabricate was a new rear shift rod. I got lucky a few month ago and swapped a part for tailshift straight rod. Along with my original 4-cylinder bent rod I set about cutting them up and making a compatible straight rod that wouldn't fail the block and heat exchangers.
Original 4-cylinder bent sideshift rod top, early tailshift rear rod bottom.

I won't document the process as it's been done many times before and partly because I forgot to take any photos
Here's the finished article.

With the rod completed it should have just been a case adjusting the shifter and go out for a test drive. Sadly it didn't end up that way and after hours of trying to find all the gears I came to the conclusion that I need to adjust the clutch more. However that wasn't going to happen as there was no adjustment left.
So it's time to add a washer under the pivot ball of the clutch arm. Hopefully a simple fix, but it obviously means removing the gearbox.
This is where I am now as of this morning. I managed to rip both cv gaskets so I need to pick up a couple before I get it all back together which should hopefully be later next week.
That's not a tiny gearbox, it's just a stupidly larger jack!

Still have my fingers crossed a can get a few shakedown miles done this year as well as a rolling road tuning session.
To start with I had a lot of trouble setting up the throttle linkage. At this point I've got around it with a makeshift solution, that to be honest works perfectly, but it's far from the factory setup so that's something I'll revisit at a later stage.
With the engine in the last piece I needed to fabricate was a new rear shift rod. I got lucky a few month ago and swapped a part for tailshift straight rod. Along with my original 4-cylinder bent rod I set about cutting them up and making a compatible straight rod that wouldn't fail the block and heat exchangers.
Original 4-cylinder bent sideshift rod top, early tailshift rear rod bottom.
I won't document the process as it's been done many times before and partly because I forgot to take any photos
Here's the finished article.
With the rod completed it should have just been a case adjusting the shifter and go out for a test drive. Sadly it didn't end up that way and after hours of trying to find all the gears I came to the conclusion that I need to adjust the clutch more. However that wasn't going to happen as there was no adjustment left.
So it's time to add a washer under the pivot ball of the clutch arm. Hopefully a simple fix, but it obviously means removing the gearbox.
This is where I am now as of this morning. I managed to rip both cv gaskets so I need to pick up a couple before I get it all back together which should hopefully be later next week.
That's not a tiny gearbox, it's just a stupidly larger jack!
Still have my fingers crossed a can get a few shakedown miles done this year as well as a rolling road tuning session.
-
sladey
- Nurse, I think I need some assistance
- Posts: 8804
- Joined: Sat Apr 23, 2005 9:08 pm
- Location: Nottingham, UK
Re: 914 2.0 > 3.0 GT Conversion
Stick with it Stephen - nearly there
The simple things you see are all complicated
I look pretty young but I'm just backdated yeah
I look pretty young but I'm just backdated yeah
-
Gary71
- Nurse, I think I need some assistance
- Posts: 10320
- Joined: Wed Mar 31, 2004 1:27 pm
- Location: Cheshire
- Contact:
Re: 914 2.0 > 3.0 GT Conversion
Keep going, those little teething issues are sent to try us!
-
jtparr
- DDK 1st, 2nd and 3rd for me!
- Posts: 2244
- Joined: Mon May 24, 2004 10:54 pm
- Location: london/surrey
Re: 914 2.0 > 3.0 GT Conversion
Just a few small challenges....nothing in comparison to what you have achieved...
1974 2.7 Carrera
(full restoration. now as an RS Touring)
1963 3.8 E Type
( 11 years in the making…………………….)
1952. XK120…the next one ……….……..)
(full restoration. now as an RS Touring)
1963 3.8 E Type
( 11 years in the making…………………….)
1952. XK120…the next one ……….……..)
-
defianty
- Put a fork in me, I'm done!
- Posts: 1717
- Joined: Sat Aug 05, 2006 7:02 pm
- Location: Rochford, Essex
Re: 914 2.0 > 3.0 GT Conversion
Another month of tinkering and I'm no further sadly. In fact right now I'm further away than I've been in a while.
So far I've managed about 40 miles in the car and none of them have been very enjoyable. Getting the engine to start initially wasn't too difficult but since then it continued to run worse and worse and starting got more and more difficult to the point where it wouldn't start.
The first thing I changed out was the starter motor. I was using my original 0.7Kw unit from the four cylinder and as you can imagine it struggled. I swapped that out for a 2.0Kw High Torque unit and that was a huge help. But each time I went for a quick drive the engine performed different to the previous drive.
I knew the timing was correct, or at least close enough, tappets were perfect and the spark was good, so that just really left fuel.
Last night I pulled the tops of the carbs off and on one bank one of the pump jets was blocked and the other bank two were blocked!
This afternoon I did this...

As you can see they're a bit dirty.
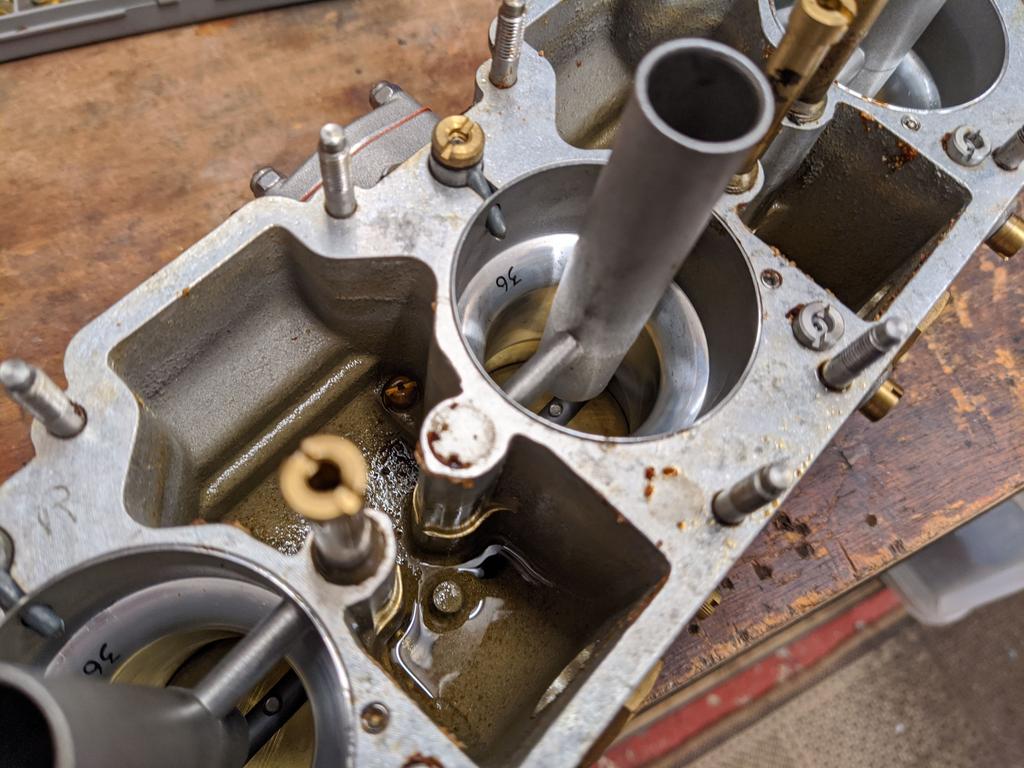
I guess sitting in a box for three years with remnants of fuel in hasn't done them any favours.
On the bright side I get to learn how to clean a rebuild a set of PMO's
If anyone's got an good sources of information on how to do this please let me know.
So far I've managed about 40 miles in the car and none of them have been very enjoyable. Getting the engine to start initially wasn't too difficult but since then it continued to run worse and worse and starting got more and more difficult to the point where it wouldn't start.
The first thing I changed out was the starter motor. I was using my original 0.7Kw unit from the four cylinder and as you can imagine it struggled. I swapped that out for a 2.0Kw High Torque unit and that was a huge help. But each time I went for a quick drive the engine performed different to the previous drive.
I knew the timing was correct, or at least close enough, tappets were perfect and the spark was good, so that just really left fuel.
Last night I pulled the tops of the carbs off and on one bank one of the pump jets was blocked and the other bank two were blocked!
This afternoon I did this...
As you can see they're a bit dirty.
I guess sitting in a box for three years with remnants of fuel in hasn't done them any favours.
On the bright side I get to learn how to clean a rebuild a set of PMO's
If anyone's got an good sources of information on how to do this please let me know.
-
jtparr
- DDK 1st, 2nd and 3rd for me!
- Posts: 2244
- Joined: Mon May 24, 2004 10:54 pm
- Location: london/surrey
Re: 914 2.0 > 3.0 GT Conversion
Dare I say a good application of carb cleaner...?...that’s how I cleaned up the SU’s on the Jag....
1974 2.7 Carrera
(full restoration. now as an RS Touring)
1963 3.8 E Type
( 11 years in the making…………………….)
1952. XK120…the next one ……….……..)
(full restoration. now as an RS Touring)
1963 3.8 E Type
( 11 years in the making…………………….)
1952. XK120…the next one ……….……..)
-
911hillclimber
- Nurse, I think I need some assistance
- Posts: 19003
- Joined: Mon Mar 10, 2008 6:26 pm
- Location: West Midlands
Re: 914 2.0 > 3.0 GT Conversion
PMOs are fabulous carbs, had mine for years.
The throttle spindles run in sealed ball bearings and carb cleaner can penetrate those seals, so be careful.
You can open the fuel drillings by removing blanking screws and run fluids and pipe cleaner brushes etc.
Take a look on the PMO web site, there are several tutorials to tune them, might be some info to clean them?
Google and You tube worth a look too.
73T 911 Coupe, road/hillclimber 3.2L
Lola t 492 / 3.2 hillclimb racer
Boxster 987 Gen II 2.9
Lola t 492 / 3.2 hillclimb racer
Boxster 987 Gen II 2.9
-
defianty
- Put a fork in me, I'm done!
- Posts: 1717
- Joined: Sat Aug 05, 2006 7:02 pm
- Location: Rochford, Essex
Re: 914 2.0 > 3.0 GT Conversion
So I stripped down the carbs and gave them a thorough clean. One litre of carb cleaner later and a few replacement gaskets they look much better and hopefully will perform as good as they look.
Taking the carbs off it was plain to see I didn't do the best job in repainting the engine shroud. It had seen a lot of abuse over the years and seen a lot of paint. To be honest I just didn't use the right paint. So whilst I had the opportunity I thought it best to replace it. After failing to get a reply from a couple of vendors and not being able to find a suitable secondhand replacement I thought I'd see what I could do to breathe some life into what I had.
Here you can see the paint bubbling and peeling off.

So it was introduced to a can of paint stripper. The top coat of black paint shrivelling away in seconds revealing the next layer of paint and also under that what looks like a layer of white.
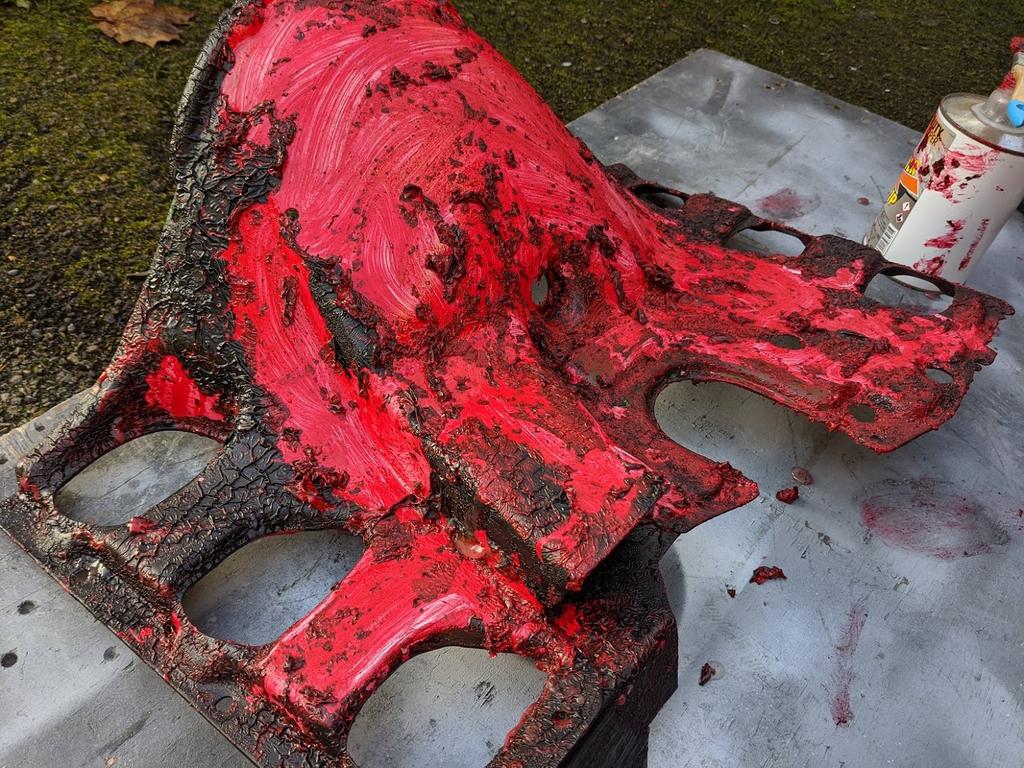
And under the white another layer of red!

And finally under that the green shroud.
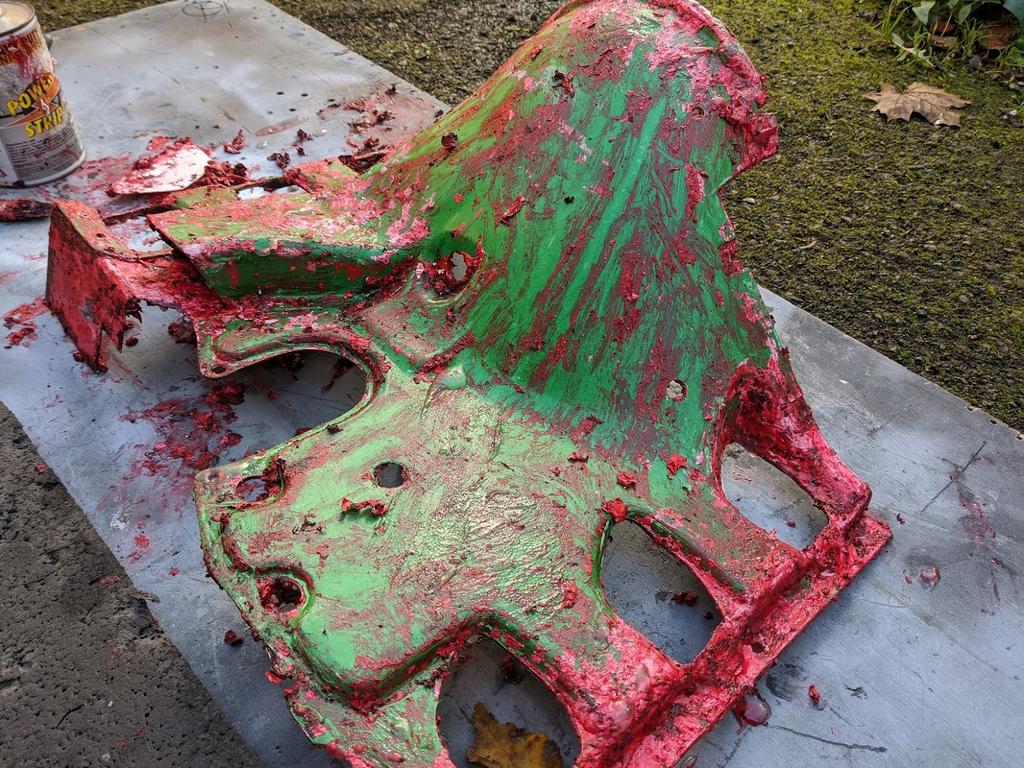
At this stage I ran out of paint stripper but I was close so the rest was sanded off.

The shroud looked rather tired, the usual marks from the HT leads worn in and I wondered if I'd simply be able to sand them all out.
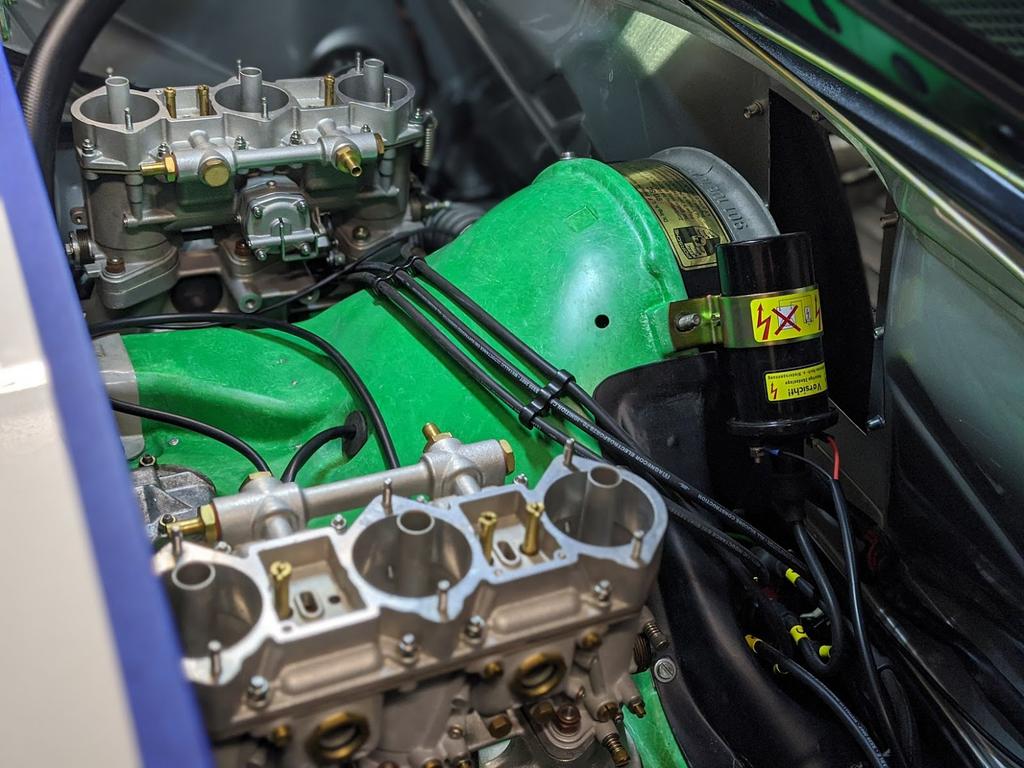
So slowly through different grades of sandpaper it started to come back to life.


And then I concentrated on a patch to make sure I wasn't wasting my time. Sanding up to 2000 grit and then compound polish. It was only at this stage I thought I was on to something.

Lots of effort later.

I know it's not the right colour for the engine or the car even but I'm quite fond of it and for once it only cost me my time so I'm happy with that.
Hopefully I get it running again tomorrow.
Taking the carbs off it was plain to see I didn't do the best job in repainting the engine shroud. It had seen a lot of abuse over the years and seen a lot of paint. To be honest I just didn't use the right paint. So whilst I had the opportunity I thought it best to replace it. After failing to get a reply from a couple of vendors and not being able to find a suitable secondhand replacement I thought I'd see what I could do to breathe some life into what I had.
Here you can see the paint bubbling and peeling off.
So it was introduced to a can of paint stripper. The top coat of black paint shrivelling away in seconds revealing the next layer of paint and also under that what looks like a layer of white.
And under the white another layer of red!
And finally under that the green shroud.
At this stage I ran out of paint stripper but I was close so the rest was sanded off.
The shroud looked rather tired, the usual marks from the HT leads worn in and I wondered if I'd simply be able to sand them all out.
So slowly through different grades of sandpaper it started to come back to life.
And then I concentrated on a patch to make sure I wasn't wasting my time. Sanding up to 2000 grit and then compound polish. It was only at this stage I thought I was on to something.
Lots of effort later.
I know it's not the right colour for the engine or the car even but I'm quite fond of it and for once it only cost me my time so I'm happy with that.
Hopefully I get it running again tomorrow.