

really interesting read. Did the case need any machining or was it all true?
I was wondering James, are you quite confident mechanically through playing with cars over the years or does your job involve technical ability?
1971 2.2E engine rebuild
Moderators: hot66, impmad2000, Barry, Viv_Surby, Derek, Mike Usiskin
-
fourteener
- DDK rules my life!
- Posts: 1318
- Joined: Mon Aug 15, 2005 6:46 pm
- Location: staffs
-
58A - 71E
- Put a fork in me, I'm done!
- Posts: 1842
- Joined: Tue Nov 28, 2006 1:49 pm
- Location: Yorkshire
Hi Timimpmad2000 wrote:Looks great, I've got to say that the clean mating of the two case halves does worry me a bit. Which case sealant did you use ?
Cheers
Tim
This one, although I know the loctite 574 is very popular

I removed all the studs out of the case to help with the cleaning and applied loctite threadlock when reinstalling
Last edited by 58A - 71E on Tue Mar 25, 2008 8:26 pm, edited 1 time in total.
James
'58 356A 1600n
'71 911E 2,2
#0335
'58 356A 1600n
'71 911E 2,2
#0335
-
58A - 71E
- Put a fork in me, I'm done!
- Posts: 1842
- Joined: Tue Nov 28, 2006 1:49 pm
- Location: Yorkshire
-
58A - 71E
- Put a fork in me, I'm done!
- Posts: 1842
- Joined: Tue Nov 28, 2006 1:49 pm
- Location: Yorkshire
My technical ability is a bit more of the 'personal' rather than mechanical kind (see my profile as to what I do!)fourteener wrote:I was wondering James, are you quite confident mechanically through playing with cars over the years or does your job involve technical ability?
My 'confidence'
 has been acquired from internet fora such as this and Pelican, reading plenty of books, but most of all meeting people like John Milburn (johnM) and Mike Bainbridge, without their knowledge and help I wouldnt have known where to start
James
'58 356A 1600n
'71 911E 2,2
#0335
'58 356A 1600n
'71 911E 2,2
#0335
-
58A - 71E
- Put a fork in me, I'm done!
- Posts: 1842
- Joined: Tue Nov 28, 2006 1:49 pm
- Location: Yorkshire
Well I was hoping that the barrels could be lapped onto the heads today but, as the saying goes – best laid plans and all that - it looks like the head faces will need to be machined to get a good seal between the heads and the barrels 
It wasn’t a wasted day at all though, in fact got quite a bit done. Firstly, the new valve guides have been fitted and were honed out for the new valves

The valve seats were then cut

and the new valves ground in
the head inlet ports were then bored out from E spec 32mm openings to S spec 36mm, (the throttle bodies will be the same) but the exhausts were left the same


Just need to tidy them up with the dremel once they come back from the machine shop, then they can be lapped to the cylinders and built up.
It wasn’t a wasted day at all though, in fact got quite a bit done.
Firstly, the new valve guides have been fitted and were honed out for the new valves The valve seats were then cut
and the new valves ground in
the head inlet ports were then bored out from E spec 32mm openings to S spec 36mm, (the throttle bodies will be the same) but the exhausts were left the same
Just need to tidy them up with the dremel once they come back from the machine shop, then they can be lapped to the cylinders and built up.
James
'58 356A 1600n
'71 911E 2,2
#0335
'58 356A 1600n
'71 911E 2,2
#0335
-
58A - 71E
- Put a fork in me, I'm done!
- Posts: 1842
- Joined: Tue Nov 28, 2006 1:49 pm
- Location: Yorkshire
Also cleaned out the cam spray bars after drilling, tapping and removing the plugs (John’s thread has some really good pics of how to do this)
The way I would describe them is that they were a bit like sclerosed (furry) arteries with a fur about 2mm thick in them of sludge, no solids, just fur, they cleaned out ok though with a rifle bore brush


then reinstalled them in the correct way to the cam towers by ensuring the large hole along the bar lines up with the cam bearing and the squirters are orientated 1 up 2 down and installed new plugs into the freshly cleaned towers

more to follow once the heads are machined...
The way I would describe them is that they were a bit like sclerosed (furry) arteries with a fur about 2mm thick in them of sludge, no solids, just fur, they cleaned out ok though with a rifle bore brush
then reinstalled them in the correct way to the cam towers by ensuring the large hole along the bar lines up with the cam bearing and the squirters are orientated 1 up 2 down and installed new plugs into the freshly cleaned towers
more to follow once the heads are machined...
James
'58 356A 1600n
'71 911E 2,2
#0335
'58 356A 1600n
'71 911E 2,2
#0335
-
hot66

- Moderator
- Posts: 19237
- Joined: Tue Nov 11, 2003 4:17 pm
- Location: North Yorkshire
-
58A - 71E
- Put a fork in me, I'm done!
- Posts: 1842
- Joined: Tue Nov 28, 2006 1:49 pm
- Location: Yorkshire
Part 4 – Long Block
Well I haven’t posted on this for a few days but things have been moving on –
When I first tried to lap the barrels to the heads I couldn’t get a good seal between them – so the heads were sent off for the faces to be machined, however, they still wouldn’t lap as well as hoped and it was apparent that the brand new Mahle barrels were not absolutely true. So these were then faced at the machine shop

Then lapped again, this time nice even lap marks were seen (these photos shows the head with the valves already installed and a piston in the barrel, these were done later)


Then the heads and barrels were numbered to ensure the matched pairs didn’t get mixed up
Then a good clean to get rid of the lapping compound and any remains of valve grinding paste and the valves were then shimmed into the heads – I forgot to take a picture of the Porsche tool, but John has one of it on his thread (borrowed here)

I ended up with loads of spare shims from what was originally in the heads – I don’t think they had been done correctly previously (the case has never been split but there were a couple of invoices in the car's history file showing head work) as there were at least 6 under every valve!
Anyway, the heads end up looking like this


Well I haven’t posted on this for a few days but things have been moving on –
When I first tried to lap the barrels to the heads I couldn’t get a good seal between them – so the heads were sent off for the faces to be machined, however, they still wouldn’t lap as well as hoped and it was apparent that the brand new Mahle barrels were not absolutely true. So these were then faced at the machine shop
Then lapped again, this time nice even lap marks were seen (these photos shows the head with the valves already installed and a piston in the barrel, these were done later)
Then the heads and barrels were numbered to ensure the matched pairs didn’t get mixed up
Then a good clean to get rid of the lapping compound and any remains of valve grinding paste and the valves were then shimmed into the heads – I forgot to take a picture of the Porsche tool, but John has one of it on his thread (borrowed here)
I ended up with loads of spare shims from what was originally in the heads – I don’t think they had been done correctly previously (the case has never been split but there were a couple of invoices in the car's history file showing head work) as there were at least 6 under every valve!
Anyway, the heads end up looking like this
James
'58 356A 1600n
'71 911E 2,2
#0335
'58 356A 1600n
'71 911E 2,2
#0335
-
58A - 71E
- Put a fork in me, I'm done!
- Posts: 1842
- Joined: Tue Nov 28, 2006 1:49 pm
- Location: Yorkshire
Here they all are with their corresponding barrels (forget the numbering system - that's John's apprentice  )
)
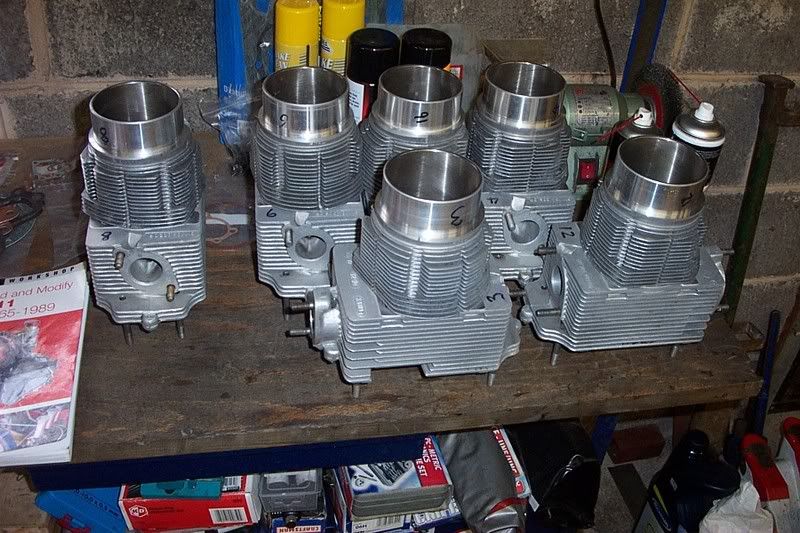
Next I decided to install the pistons into the barrels on the bench, rather than connecting them to the rods first and sliding the barrels over them whilst on the stand

Then it was time to measure the deck height.
Given that I had to have both the heads and the barrels machined this was not a step I wanted to skip. The Dempsey book suggests using acid core solder for high domed pistons, well I didn’t have any so instead used that well known precision measuring device – a wax earplug! I cut 2 slivers off and positioned on the horizontal axis of the piston and attached a head on number 1 cylinder, initially without any base gaskets installed. The wax worked really well and kept its shape without sticking to everything. The average measurement was 0.8mm. So I then installed 2x0.25mm copper gaskets and rechecked. Sure enough the clearance was now 1.3mm. I believe this should be enough. I also checked the deck height on cylinder number 4. The average this time was 0.85mm, so 0.05mm difference. Unfortunately my gasket set only contains 6x and I now need 12, so I could only do one side until the others arrive.
First side installed with base gaskets

I modified my tinware (details outlined in the Dempsey book) but basically it means cutting out about an inch of material and then had it powder coated

)Next I decided to install the pistons into the barrels on the bench, rather than connecting them to the rods first and sliding the barrels over them whilst on the stand
Then it was time to measure the deck height.
Given that I had to have both the heads and the barrels machined this was not a step I wanted to skip. The Dempsey book suggests using acid core solder for high domed pistons, well I didn’t have any so instead used that well known precision measuring device – a wax earplug! I cut 2 slivers off and positioned on the horizontal axis of the piston and attached a head on number 1 cylinder, initially without any base gaskets installed. The wax worked really well and kept its shape without sticking to everything. The average measurement was 0.8mm. So I then installed 2x0.25mm copper gaskets and rechecked. Sure enough the clearance was now 1.3mm. I believe this should be enough. I also checked the deck height on cylinder number 4. The average this time was 0.85mm, so 0.05mm difference. Unfortunately my gasket set only contains 6x and I now need 12, so I could only do one side until the others arrive.
First side installed with base gaskets
I modified my tinware (details outlined in the Dempsey book) but basically it means cutting out about an inch of material and then had it powder coated
James
'58 356A 1600n
'71 911E 2,2
#0335
'58 356A 1600n
'71 911E 2,2
#0335
-
58A - 71E
- Put a fork in me, I'm done!
- Posts: 1842
- Joined: Tue Nov 28, 2006 1:49 pm
- Location: Yorkshire
Then installed onto the barrels

Then the heads were attached and the oil return tubes

Then the cam tower was centred on and the heads torqued up on initial settings. After a while the heads were torqued to full setting and the cam tower was attached

Then the cam was inserted to ensure that it turned freely

and it does!
right, better get cracking now as I have booked in with Bob Watson for a week on Friday
Then the heads were attached and the oil return tubes
Then the cam tower was centred on and the heads torqued up on initial settings. After a while the heads were torqued to full setting and the cam tower was attached
Then the cam was inserted to ensure that it turned freely
and it does!
right, better get cracking now as I have booked in with Bob Watson for a week on Friday
James
'58 356A 1600n
'71 911E 2,2
#0335
'58 356A 1600n
'71 911E 2,2
#0335

-
58A - 71E
- Put a fork in me, I'm done!
- Posts: 1842
- Joined: Tue Nov 28, 2006 1:49 pm
- Location: Yorkshire
Well the base gaskets arrived this week so I’ve thrown a few more bits on
Got the right side pistons and barrels on – I didn’t mention previously, but all the connecting rods were weighed before installation as well as the pistons (including their pins) and matched out to get as near as possible to the same weight. In the end there was less than 1g difference between all 6 sets, which at an average weight of 1158g wasn’t too bad going really i.e. less than 0.09% difference
Then attached the heads and cam tower as per the left side and checked to see if the cam rotated ok – it did too
So then attached the timing chain housings

and the engine was starting to look a bit more than just a collection of expensive parts
To check the alignment of the cam pulleys and intermediate gear I decided to purchase the Stomski measuring tool that is advertised on Pelican parts. Having previously attempted to do this with an engineers rule and trying to keep it straight across the case I needed an easier way to do it. So here is what one looks like

OK it ain’t cheap, but, it made the job a sh*t load easier than last time and it is a really nice piece of kit.
I needed to adjust the number of shims from what I had before (1 less in the right side) and just a quick note to others that may use the Dempsey book as a guide – there is a typo in that section Re when to add or subtract measurements
Got the right side pistons and barrels on – I didn’t mention previously, but all the connecting rods were weighed before installation as well as the pistons (including their pins) and matched out to get as near as possible to the same weight. In the end there was less than 1g difference between all 6 sets, which at an average weight of 1158g wasn’t too bad going really i.e. less than 0.09% difference
Then attached the heads and cam tower as per the left side and checked to see if the cam rotated ok – it did too
So then attached the timing chain housings
and the engine was starting to look a bit more than just a collection of expensive parts
To check the alignment of the cam pulleys and intermediate gear I decided to purchase the Stomski measuring tool that is advertised on Pelican parts. Having previously attempted to do this with an engineers rule and trying to keep it straight across the case I needed an easier way to do it. So here is what one looks like
OK it ain’t cheap, but, it made the job a sh*t load easier than last time and it is a really nice piece of kit.
I needed to adjust the number of shims from what I had before (1 less in the right side) and just a quick note to others that may use the Dempsey book as a guide – there is a typo in that section Re when to add or subtract measurements
James
'58 356A 1600n
'71 911E 2,2
#0335
'58 356A 1600n
'71 911E 2,2
#0335
-
58A - 71E
- Put a fork in me, I'm done!
- Posts: 1842
- Joined: Tue Nov 28, 2006 1:49 pm
- Location: Yorkshire
Then I attached the rocker gear on cyls 1 & 4. I have bought the RSR rocker shaft seals as added insurance against any leaks – here are 2 next to the shafts with them already installed. There is a difference of opinion seemingly here about whether to install dry or prelube as per the Dempsey book, I decided to instal dry after reading advice from Competition Engineering on Pelican.

Then it was that wonderful job of timing the cams
First the left (I also purchased the Stomski tensioners to do the job with) with 0.1mm clearance on the rocker I set my dial gauge with 10mm preload and then rotated the crank. I had 2.59mm travel at TDC instead of 3.15 which I needed for an E cam. So using a less expensive tool this time (a spark plug!) I removed the pin and set the cam to 3.15mm travel after checking the backlash

Then the right – this time the initial travel on the cam was 1.09mm, so a bit further to adjust this time and tried again. I had more of an issue with the backlash this side as it went out of range 3.0 – 3.3mm so had to reposition the pin, then tried again. Eventually got it to 3.15mm the same as the left.

I found that I could not do this without someone helping me and it probably took a good 2 hours just to do the timing, joy of joys
Right, back to it…
Then it was that wonderful job of timing the cams
First the left (I also purchased the Stomski tensioners to do the job with) with 0.1mm clearance on the rocker I set my dial gauge with 10mm preload and then rotated the crank. I had 2.59mm travel at TDC instead of 3.15 which I needed for an E cam. So using a less expensive tool this time (a spark plug!) I removed the pin and set the cam to 3.15mm travel after checking the backlash
Then the right – this time the initial travel on the cam was 1.09mm, so a bit further to adjust this time and tried again. I had more of an issue with the backlash this side as it went out of range 3.0 – 3.3mm so had to reposition the pin, then tried again. Eventually got it to 3.15mm the same as the left.
I found that I could not do this without someone helping me and it probably took a good 2 hours just to do the timing, joy of joys
Right, back to it…
James
'58 356A 1600n
'71 911E 2,2
#0335
'58 356A 1600n
'71 911E 2,2
#0335