Restoring my first 914

For all you Porsche 914 fanatics!

Moderators: drummerboytom, MdR

Darren C
DDK rules my life!
Posts: 1397
Joined: Sat Dec 27, 2014 9:43 am
Location: Chichester UK

Re: Restoring my first 914

Post by Darren C »

Ditto, to what's been said.
Many thanks Kev for the sound advice.
Yes I did clean up the lower contacts and the pin/connections in the moulded plug. Mines a 74 car so has only one side of the diaphragm in use (the ignition retard side) closest to the dizzy. I did check free movement of the plate (thats how I came across the screw jamming issue) but only by hand force. I have some new vac hose on order (original all perished, rock hard, cracked and useless). I've ordered a metre (shortest length they'd sell me) so before I cut and attach it I was going to test it. One of the strings in my bow is that I'm a qualified A/C engineer (its a long story) so I already have an adapter made up for my A/C vac pump and gauge rig. No mouth to mouth required here. :wink: The plan is to test it when the hose arrives and I can vac it out, and do a vacuum holding test to see if the diaphragm has any pin holes that you simply wouldn't see by just sucking on the tube.
Thanks again for the great advice Kev, I'm tending to lean to the wiring loom theory as simply lifting it up this evening the insulation is cracking and breaking on the cables, they are baked solid. Truly a harsh unforgiving Desert Sun, the sun damage I'm finding is just astounding.
After all the car has spent its whole life just a few miles from Death Valley. :shock:
@classiccarguru1
Darren C
DDK rules my life!
Posts: 1397
Joined: Sat Dec 27, 2014 9:43 am
Location: Chichester UK

Re: Restoring my first 914

Post by Darren C »

The last few evenings I have been working on the FI wiring loom. Its baked rock hard and I think I’m going to have to look for another one. Every time you move or pick it up you can hear the cable PVC sheath and insulation snapping. :cry: I’m considering buying a reel of white cable and making one by transferring the plugs and stuff over.

Having finished everything else in the engine bay now, I decided to take the fuel tank out. Kev, recommended replacing the fuel hoses on the bottom of it. Boy was he right.
I took the cover plate off under the car and reaching through the hole underneath “snap” the hose broke clean in two. Baked rock hard. No need to struggle with the pipe clamps I could simply lift it out, no pipes attached!
Once out I took this picture…Both hoses snapped into about 4 pieces each, these weren’t cut.

Image

I then noticed that the “T” shaped drain tubes from the vent box were shattered and lying in pieces beneath the tank, all brittle again. Good job I found both these issues as come the first time out in the rain, the water would have just filled up the boot.
Adding this to my list of things to do, I began to vacuum up even more sand from inside the boot that had built up 2” deep under the fuel tank. Plus a whole load of California Spider nests :shock:

Once out it was clear that there was zero rust under there so I was very pleased. Next I turned my attention to the Master Cylinder. The reservoir was empty! So obviously there’s a leak somewhere from the car standing. Everything looked dry under the car, so at the moment it’s a bit of a mystery.

I took off the old Master Cylinder and cleaned the bulkhead before fitting my nice new shiny ATE one. Kev again helped me out here with a short length of new blue hose to go on the bottom of the reservoir. It is very important to get the right hose here as brake fluid will dissolve normal hose.

I refitted all the brake pipes with new copper washers on the banjo pipe, and had a right old run around with the two tubes that push in from the reservoir. Jeez they don’t half make it tight to get in there!
I finally ran out of light again and think in the morning I’ll check those pipes again, as I’m not convinced they’re pushed in far enough. I don’t plan on refilling with fluid until all the hoses on each corner are changed and I’ve checked all callipers are free.
@classiccarguru1
myatt1972
DDK rules my life!
Posts: 1445
Joined: Sun Apr 18, 2010 9:03 pm
Location: Staffordshire Moorlands

Re: Restoring my first 914

Post by myatt1972 »

Amazing that those fuel hoses don't look that bad but can snap like a carrot.
Thanks for the updates Darren.
Keith...

73 911e sporto
73 914 2.0l
86 928s S2
85 Mazda Rx7 (TWR)
85 Mazda Rx7
The Bonser fork truck
Volvo V40 T4 (200bhp workhorse)
Darren C
DDK rules my life!
Posts: 1397
Joined: Sat Dec 27, 2014 9:43 am
Location: Chichester UK

Re: Restoring my first 914

Post by Darren C »

I got up at first light this morning and got under the car to take off the new master cylinder, convinced the reservoir tubes weren’t located properly.
I took out the rubber grommet from the master cylinder carefully and put it on the end of the reservoir tube. It was a very tight fit and located with a reassuring silent snap that you could feel between your fingers. The end of the tube has a flare and this needs to pass completely through the grommet to locate properly. I marked the pipe with a marker pen to indicate the fully located position and removed the grommet and repeated on the second pipe.
With the reservoir removed I lightly greased the outside of the plastic tubes so they would slide easy in the bodywork bulkhead, got under the car and pulled them through a good 18”.
Only then could I wrestle them with a little fluid to lubricate the grommet into correct location in the Master Cylinder. With the pipes greased on the outside they slid easily back up into the car while I manoeuvred the Master Cylinder back into place and refitted it.
Next with reservoir off I gave it a good clean out to remove 40 + years of grime and then noticed the filler cap had a vertical crack in it. Most probably from the PO over tightening it. So that’s another thing to add to the list!

After putting it all back together I cleaned out the air inlet box drains. What is it with California cars and pine needles? The bloomin thing was full up with needles and sand. (It’s my second Californian car and my first was full of pine needles too)
Anyhow, once cleaned up I fitted my new drain hose and fed it correctly through the hole in the very bottom of the car. Fortunately it was the same hose and wire hose clips as used on the engine bay funnels so I had over 2m left spare and a bag of clips to use.
Next I gave it all a good second clean then turned my attention to the Fuel tank.

I fitted new hose to the pipes in the car with stainless hose clips and even managed to find some new unused fuel hose in my shed at 9.5mm that was just long enough to fit.

I took off the expansion tank and gave everything a good clean up. Again all the vent/breather 4mm hoses just snapped off when you touched them, so I’ll have to buy another metre on Monday. The metal plate around the filler cap with the 8 x M5 bolts was a bit scabby, so I stripped and sanded it down, painted it and its hanging on a wire currently over my hall radiator!
Next I shone a torch inside the tank and saw bits of an old level sender gasket down in there, so after a bit of a large cocktail shaking exercise I managed to get all the bits out. (Must have been changed by PO at some time as the sender has a new one on it)
Another shine with the torch and….hold on a minute, that doesn’t look good.
The Fuel pump suction pipe copper mesh suction strainer looked like someone had reached inside the tank and painted it with underseal???
I quickly whipped it out for a look and found this.

Image

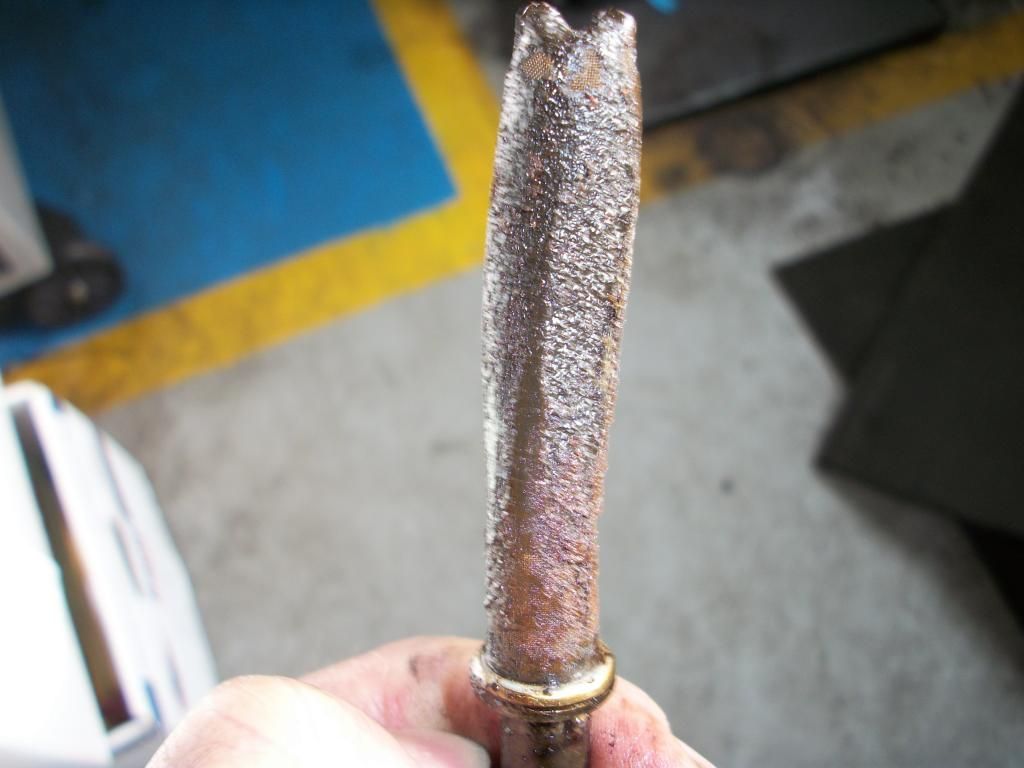
Completely blocked with Sh*te!

This was bizarre as the tank inside looked very clean, just the strainer seemed to be covered. Presumably since it’s the pump suction it just drew 40 years of muck onto it.
Any how, it needed a good soak in cellulose thinners to soften it, followed by a very soft paint brush to lightly agitate it to clean it all off. Finally a wash through from inside out to clean it all off.
I wonder how it ever managed to suck fuel in that state? How many of you have checked yours?
I then refitted it to the tank and finished cleaning off all the spiders webs and sand with a damp cloth.
When I lifted the tank out a couple of the felt pads fell out, so these were cleaned and glued back in with the remains of the glue I got for the rear bulkhead soundproofing.
The tank had a rub mark on it, above the passengers feet, on the vertical plane, and another rub mark on the car, so I got some new felt pad and glued a bit there too.
Finally I cleaned up the clamps and blocks, gave it all a damn good WD40 under there (since there was no rust I didn’t want any starting) and dropped the tank back in place.
I had to knock off early to collect my son from town, so used this point in the work as a natural break.
@classiccarguru1
Darren C
DDK rules my life!
Posts: 1397
Joined: Sat Dec 27, 2014 9:43 am
Location: Chichester UK

Re: Restoring my first 914

Post by Darren C »

This week’s been a bit manic at work so far and its only Tuesday. I’ve had an 8 hour commute to Paignton in Devon which requires a 4am start! :(
But nevertheless I managed to put a second coat of paint on the fuel expansion tank securing ring, and a final coat of fuel resistant lacquer tonight (for those few occasions at the petrol station when the fuel pump doesn’t cut out soon enough or the angle causes flood back in the filler neck). I used an engine enamel black paint which should be fuel resistant, the lacquer is belt & braces.
Tonight in my bloomin cold shed I did a bit of tin bashing on the cover plate that I took off to access the master cylinder. There were a few scrapes and dents in it from contact with road debris over the years. I got it reasonably presentable and hope to drop it off at the powder coaters for a bead blast and re paint. Just need to source some new lip seal to go on it afterwards.
I called the local Porsche centre yesterday in my lunch break and ordered a new cap to replace the hairline cracked one on the brake reservoir. Still available and only a shade over £6! I also ordered a new seal as I’m not sure if it comes with the cap or not. The guy was ok about it and said if the cap has a seal then he’ll hang onto the extra one. I’ll let you know tomorrow as it should be in then.
As always I’m building up a series of parts for the next weekends assembly (in daylight) and traced some small fuel breather pipe for the fuel expansion tank too.
The first tube I got over the counter and some stuff I had from old in my shed turned out to be the correct id but too large od. The problem is that where the pipe connects to the filler neck (just under the cap) it has to pass through the moulded plastic tank and the hole is only about 8mm. Most standard vacuum or fuel hose this size is just over 9mm so it wont fit through. I tracked a supplier on line tonight and ordered a metre with correct id and an od at 7.5mm so it should fit and pretty much be the same as the Porsche original. £2.59p another result and a bargain too. :)
@classiccarguru1
shandyhaggis
DDK rules my life!
Posts: 1013
Joined: Tue Jan 11, 2011 4:25 pm
Location: Staffs UK

Re: Restoring my first 914

Post by shandyhaggis »

Hi Darren

re:-
I took off the old Master Cylinder and cleaned the bulkhead before fitting my nice new shiny ATE one. Kev again helped me out here with a short length of new blue hose to go on the bottom of the reservoir. It is very important to get the right hose here as brake fluid will dissolve normal hose.

would you mind sharing with me the hose you used please? I need to replace everything from the reservoir to the master cylinder, blue hose, plastic pipes etc....

thanks

Andrew
1976 914 2.0 (Orange now without Brown flecks)
2016 BMW X3 3.0d
2020 Globe Car 640 Summit
Darren C
DDK rules my life!
Posts: 1397
Joined: Sat Dec 27, 2014 9:43 am
Location: Chichester UK

Re: Restoring my first 914

Post by Darren C »

Hi Andrew,

I got the blue hose from Kevin (he bought it direct form Porsche but they only sell by the metre so had plenty spare), but whilst I waited for it to arrive in the post I tracked some down at VW Heritage, the website said it was blue but now changed to black (superseded), but it arrived after Kevin's and was still blue. It is as you say critical to use the right hose here.
I re-used the nylon tubes as they were in good order. You can still buy this if yours are damaged from any specialists such as Hyphose on the southcoast. The issue I think you'll have is heating it up to fit the metal ends back into it.
You could quite safely get 2m of the blue hose and pipe clip it straight onto the metal ends if needs be and do away with the nylon, or equally buy some metal brake pipe of the same diameter, make the flares on the master cylinder end and run that all the way in place of the nylon up to the last 2" in blue hose.
Both options would do.
@classiccarguru1
shandyhaggis
DDK rules my life!
Posts: 1013
Joined: Tue Jan 11, 2011 4:25 pm
Location: Staffs UK

Re: Restoring my first 914

Post by shandyhaggis »

Thanks Darren

I did think about both of those options. I wasn't sure if using blue pipe all the way down would have an impact on the feed of the fluid in someway to the master cylinder ie would the pipe expand more than the plastic pipe, probably not by the sounds of it as its only a feed and probably not under pressure. If thats the case then Ill just use the blue hose I think.

thanks again.

Andrew
1976 914 2.0 (Orange now without Brown flecks)
2016 BMW X3 3.0d
2020 Globe Car 640 Summit
Darren C
DDK rules my life!
Posts: 1397
Joined: Sat Dec 27, 2014 9:43 am
Location: Chichester UK

Re: Restoring my first 914

Post by Darren C »

No problem Andrew, glad to help.

Tonight I got a small amount done. Tracked down some new seal for the cover plate under the car that conceals the steering rack and master cylinder. I actually had 2 metres in one of my other sheds, left over from a previous restoration. It came from Woolies and is called "mudflap seal" if anyone needs any. (From Woolies that is, not me, I only have a metre left now, not quite enough for another car)
It's within 5mm or so the same width overall as the original (a bit wider on the flappy bit) but is a nice match. I cut it to length this evening using my original sun baked seal as a guide.
The cover plate should be ready tomorrow afternoon from the powder coaters and I'm looking forwards to seeing how it came out, considering the tin bashing it needed to straighten it up.

I also had another good set of advice from Kev re where to buy new brake discs so ordered a full set this evening with new front wheel bearing kits from Berlyn Services. They should be with me next week.

I already have the new brake hoses to fit, which hopefully I can get done this weekend to go with the new Master Cylinder; well that's the plan anyway :wink:
@classiccarguru1
Darren C
DDK rules my life!
Posts: 1397
Joined: Sat Dec 27, 2014 9:43 am
Location: Chichester UK

Re: Restoring my first 914

Post by Darren C »

Today started off promising…….

I refitted the fuel expansion tank and took my two petrol cans down the local station and put £15 of fuel in the car. No leaks so far!
I then decided to change all 4 rubber brake hoses. The rear ones are great fun trying to get at the top union, and just pulling off the retaining clip was a struggle. Theres not enough room to swing a spanner under there. Anyway with a little time and patience I got both hoses off. I gave it a good clean and waxoiled all around the area before fitting nice new hoses with new retaining clips.
The fronts got the same treatment. On opening the box and taking out the new front hoses I saw they had two short sleeves around them about an inch in from each end to stop them rubbing. I’m not a fan of this design as the fronts have to sit in an “S” shape and the sleeves make the bends tighter. We’ll have to see how they go.
Next I took off all 4 brake callipers. Since the cars been sitting many years and there was no fluid left in the system I don’t want to mess around or compromise on the brakes. There going off for a complete refurb on Monday. However during removal, there was a right mixed bag of pad retaining pins and clips. One pin and one spring clip completely missing on different callipers. The PO must have just fitted what he could find rather than going for a complete set. I’ll have to track these items down with some nice new pads too before they go back on.
The discs to are looking a little sorry for themselves, but I knew that before I bought the car so no surprises there. I hope to get them changed over next weekend.

After a productive morning this afternoon I released whole load of Gremlins :evil:

For the first time I put the battery on the car……
I’d tested a few odd items off the car with jump leads and meters but never put the terminals onto the battery until this afternoon.
So this is what I now have to contend with:

1. Constant VERY loud buzzing/tick from the time clock in the centre console (so loud I thought the fan was on high)
2. As soon as the battery is on the Hazard relay ticks and centre top red light in gauge flashes (not the direction arrows). NO lights flash front or rear of the car and the Hazard switch is pushed in OFF. Pull the switch out and the ticking relay stops, no lights then either???
3. Ignition on, turn indicator to right (arm up) Oil and generator light flash. Relay ticks and no lights on outside of car?
4. Turn indicator left (arm down) and nothing at all.
5. NO power to relay board in engine bay with ignition on or off?
6. Brake lights stuck on permanently

Checked all fuses ok.

One consolation is that the horn works and the headlights pop up and down, and I have only one side light on RH front.

To be fair since I started work on this little car, it’s fought me all along. With the battery connected today all I could do was laugh and laugh some more at the blessed thing. :lol:
Anyone had a similar incidence with the Hazard lights/indicators?
@classiccarguru1
914 KEV
DDK rules my life!
Posts: 1166
Joined: Fri Jul 31, 2009 2:40 pm
Location: Surrey

Re: Restoring my first 914

Post by 914 KEV »

Darren C wrote:I then decided to change all 4 rubber brake hoses. The fronts got the same treatment. On opening the box and taking out the new front hoses I saw they had two short sleeves around them about an inch in from each end to stop them rubbing. I’m not a fan of this design as the fronts have to sit in an “S” shape and the sleeves make the bends tighter. We’ll have to see how they go.

After a productive morning this afternoon I released whole load of Gremlins :evil:

For the first time I put the battery on the car……
I’d tested a few odd items off the car with jump leads and meters but never put the terminals onto the battery until this afternoon.
So this is what I now have to contend with:

1. Constant VERY loud buzzing/tick from the time clock in the centre console (so loud I thought the fan was on high)
2. As soon as the battery is on the Hazard relay ticks and centre top red light in gauge flashes (not the direction arrows). NO lights flash front or rear of the car and the Hazard switch is pushed in OFF. Pull the switch out and the ticking relay stops, no lights then either???
3. Ignition on, turn indicator to right (arm up) Oil and generator light flash. Relay ticks and no lights on outside of car?
4. Turn indicator left (arm down) and nothing at all.
5. NO power to relay board in engine bay with ignition on or off?
6. Brake lights stuck on permanently

Checked all fuses ok.

One consolation is that the horn works and the headlights pop up and down, and I have only one side light on RH front.

To be fair since I started work on this little car, it’s fought me all along. With the battery connected today all I could do was laugh and laugh some more at the blessed thing. :lol:
Anyone had a similar incidence with the Hazard lights/indicators?
Glad to hear you are making progress Darren.
All these slight problems are quite normal on a 914 that has been sitting around unused for a long time!

I always remove the two rubber bits on the front brake hoses before fitting the front hose to the car by scoring with a sharp knife half way through then they split when a screw driver is placed between the hose and the rubber.

The large red flashing light is to indicate that the hand brake is on, this is normal. :lol:

If there is a buzzing, it could be the seat belt warning buzzer relay under the passenger seat. Note that on the 73-76 US cars these were fitted and if the seat belt was not worn the car will not start!
'Click Clunk' do you now have power to the solenoid. :wink:
If the buzzer relay is removed, you will need to fit a link wire between the two Yellow wires.
Also check the relays mounted to the back of the fuse holder panel.

The brake pedal does have a tendency of sticking due to leaking brake master cylinder and rusting up as this area can get damp! When they are not used for a long time and this will cause the brake light to be on all the lime.
When you press the brake pedal does it spring back up?

On the indicators and side lights check that all the bulbs are good also check that the contacts are clean and corrosion free and that the earth connections are good on the units as well the earthing points to the body.
914 Daily driver since 1990
Darren C
DDK rules my life!
Posts: 1397
Joined: Sat Dec 27, 2014 9:43 am
Location: Chichester UK

Re: Restoring my first 914

Post by Darren C »

914 KEV wrote:
Glad to hear you are making progress Darren.

Progress :lol: is that what this is... :wink:

All these slight problems are quite normal on a 914 that has been sitting around unused for a long time!

I always remove the two rubber bits on the front brake hoses before fitting the front hose to the car by scoring with a sharp knife half way through then they split when a screw driver is placed between the hose and the rubber.

Yeah I was kinda thinking of doing that, but hoping someone had done it before and it was ok. Thanks I'll definately cut off the two rubber sleeves.

The large red flashing light is to indicate that the hand brake is on, this is normal. :lol:

If there is a buzzing, it could be the seat belt warning buzzer relay under the passenger seat.

No, the noise is coming from the time clock, it's not the buzzer. :shock:

Note that on the 73-76 US cars these were fitted and if the seat belt was not worn the car will not start!
'Click Clunk' do you now have power to the solenoid. :wink:

The car does turn over. Brand New starter motor sounds like a flat battery :( But 13V, new battery and even tried a jump lead between earth terminal and engine block to see if it was a bad earth, but no avail...."rurr.......................rurr..........click................rurr" Surely the new starter cant be duff?? Engine turns over freely with a spanner on the alternator pulley, so its not that????
Still no power to relay board so still no fuel pump with ignition on?

If the buzzer relay is removed, you will need to fit a link wire between the two Yellow wires.
Also check the relays mounted to the back of the fuse holder panel.

The brake pedal does have a tendency of sticking due to leaking brake master cylinder and rusting up as this area can get damp! When they are not used for a long time and this will cause the brake light to be on all the lime.
When you press the brake pedal does it spring back up?

Floppy free 1mm free play in pushrod to master cylinder, good spring return. Must be the switch.

On the indicators and side lights check that all the bulbs are good also check that the contacts are clean and corrosion free and that the earth connections are good on the units as well the earthing points to the body.

Will do, Knowing my luck the PO took all the bulbs out as the car was so so cheap :lol: .
@classiccarguru1
Darren C
DDK rules my life!
Posts: 1397
Joined: Sat Dec 27, 2014 9:43 am
Location: Chichester UK

Re: Restoring my first 914

Post by Darren C »

Well, there was some progress today.

I took the old brake pads down to the local motor factors in my lunch break and tracked a new front and rear set. ( I think the guy said the rears cross ref to a Talbot Samba :? ) Will find out tomorrow when I pick them up.

Just need to find new retaining pins and clips now.

The calipers got sent off special delivery/tracked/insured etc for refurb.
13.5kg in one box and the CHEAPEST the Post office could do was £42 :shock: I was a little gob smacked as I could have used less fuel in my Volvo to take them to Cheshire in person :evil:
"It's the weight and insurance" the guy said.

"So I have to pay to cover your incompetence if YOU lose them and if the maximum H & S weight to lift per person is 25Kg, why do I have to pay more when its only 13Kg?"

Fell on deaf ears, but I felt better after the release :wink:

Hopefully they'll get there in one piece, after the postie kicked them around the office when I'd left, following his lack of humour to my quip. :roll: (hope he stubbed his toe though)

https://www.youtube.com/watch?v=2Q6_9A90cUk
@classiccarguru1
914 KEV
DDK rules my life!
Posts: 1166
Joined: Fri Jul 31, 2009 2:40 pm
Location: Surrey

Re: Restoring my first 914

Post by 914 KEV »

Darren C wrote:Floppy free 1mm free play in pushrod to master cylinder, good spring return. Must be the switch.
The brake light switch is probably working fine; it is just that the switch arm has come off the push rod washer when you removed and replaced the brake master cylinder.
914 Daily driver since 1990
Darren C
DDK rules my life!
Posts: 1397
Joined: Sat Dec 27, 2014 9:43 am
Location: Chichester UK

Re: Restoring my first 914

Post by Darren C »

Thanks Kev,

You are truly the font of all 914 knowledge. I'll take a look at that this weekend. Presume I have to take the Rubic's floor panel off from behind the pedals to access it?
@classiccarguru1
Post Reply