Page 7 of 14
Re: 2.4T engine rebuild
Posted: Thu Nov 19, 2015 10:32 am
by AndrewSlater
Yes I would have hoped they were charging me for the time and not trying to recover the full cost of the tool also.
Lets hope I'm not buying the milling machine to reface the crankcase

For future reference - I notice some sellers claim the 89mm flex hone can be used on 90mm cylinders as the tools are oversized - so as long as it is the Aluminium Oxide variant it could be used on 90mm Nikasil cylinders.
http://www.ebay.co.uk/itm/3-1-2-Nikasil ... Sw14xWN4Ux
One final point - could I ask where you sourced your SSIs from? Something I will need further down the line.
Hope the rebuild is going well
Andrew
Re: 2.4T engine rebuild
Posted: Thu Nov 19, 2015 2:57 pm
by Gary71
Hi Andrew, My hone is 120 grit silicon carbide so you are more than willing to try it. Let me know your address via pm and I'll put it in the post. I used WD40 as a lubricant on both hone and bore prior to use.
I sourced the SSIs from Mecatechnic in France via their website.
No progress recently, work seems to be getting in the way of the rebuild!
Re: 2.4T engine rebuild
Posted: Fri Nov 20, 2015 12:37 pm
by AndrewSlater
Thanks for the offer Gary - I've already given the go ahead to my workshop - so am already taken care of.
Just useful for future reference that the 89mm ones can potentially be used on 90mm cylinders although not sure if silicon carbide is correct for Nikasil or Alusil.
£900+ seems to be the best price I can find a set of SSis for so Mecatechnic seem to be one of the best priced suppliers - thanks for the info.
Are you intending disassembling and cleaning the spray bars in your cam carriers as part of your rebuild?
Its one of the jobs I was hoping to do myself - looking for some top tips.
Hope you get some time on the rebuild soon
Andrew
Re: 2.4T engine rebuild
Posted: Fri Nov 20, 2015 3:11 pm
by Gary71
Considering the wear on my cams then yes I intend to do the spray bars. I've yet to look into it properly but I remember JohnM doing it on his rebuild thread so I have to check that.
Re: 2.4T engine rebuild
Posted: Sat Nov 28, 2015 4:00 pm
by Gary71
Let's see how this works out...

If I'm still married in about a hour I'll consider it a success

Re: 2.4T engine rebuild
Posted: Sat Nov 28, 2015 6:13 pm
by 911hillclimber
You MUST be kidding?
Are you out of A&E yet Gary?
She will get about 99.99% of what you have = you will be left with the washer and the cam carriers.
I would never dare (if I had a dish washer that is)
Re: 2.4T engine rebuild
Posted: Sat Nov 28, 2015 6:40 pm
by Gary71
Came out pretty well, the slightly acrid smell in the kitchen somehow went unnoticed and carriers are now back in the garage looking much better!
They aren't actually clean though, but it gives you a head start on the process.
Re: 2.4T engine rebuild
Posted: Sun Nov 29, 2015 8:30 pm
by AndrewSlater
My wife says I rarely load or empty the dishwasher but I do both when she's out

Re: 2.4T engine rebuild
Posted: Sun Nov 29, 2015 8:59 pm
by Gary71
Good man! I've not done the heads yet... There are too many plates in there at the moment!
Re: 2.4T engine rebuild
Posted: Sun Nov 29, 2015 9:04 pm
by bjmullan
Snap

Re: 2.4T engine rebuild
Posted: Sun Nov 29, 2015 10:12 pm
by myatt1972
And doing the ironing Brendan ! Now that is impressive
Re: 2.4T engine rebuild
Posted: Sun Nov 29, 2015 10:42 pm
by 911hillclimber
Does the dish washer get a finish like this:

Re: 2.4T engine rebuild
Posted: Mon Nov 30, 2015 12:34 pm
by Gary71
Not even close! I think the dishwasher should be used before and after the blasting!
Re: 2.4T engine rebuild
Posted: Tue Jan 05, 2016 7:54 pm
by Gary71
At my current rate of progress I think I'll be regretting mocking Brendan taking years to put his engine back together...
Forced purchase of a new washing machine has just blown any hint of budget I needed to get things going again so I've started a couple of smaller jobs.
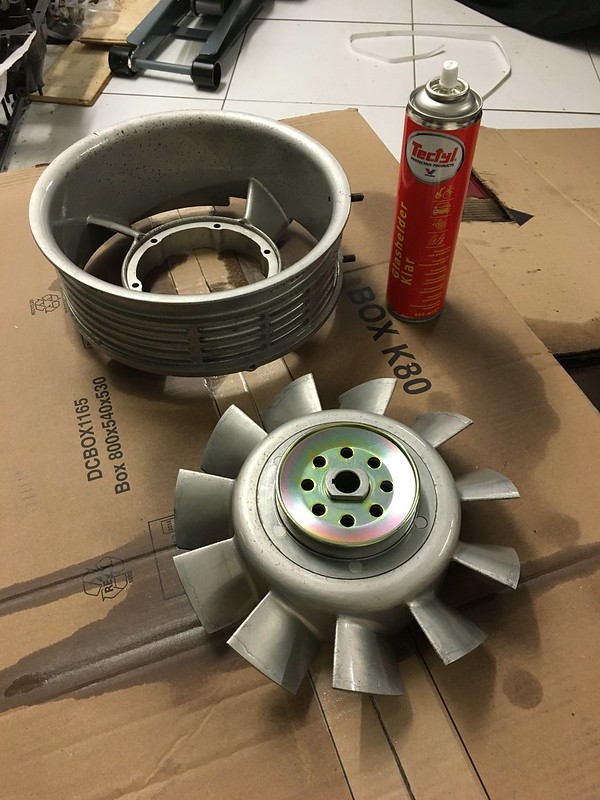
Number one is sorting out the tatty fan:

Currently badly silver painted and covered in grime from various leaking seals.
I've just dropped it off with my local metal finishing company to be vapour blasted prior to application of Tectyl. The pulley is being done in zinc plate. My other thread about the finish generated a variety of opinions including cromate. Together with period photos and reading what Darren has been up to recently has led to purchase of a tin of this:
Valvoline TECTYL Glashelder Klar
Which is a clear rust preventative that dries clear, unlike the other Tectyl Darren used that went a bit too brown/green.
Everything I read about cromate and seeing fans done recently they all end up dark grey, not what I'm after.
No idea how it will come out so I'll report back in a week or so!
Re: 2.4T engine rebuild
Posted: Fri Jan 08, 2016 5:03 pm
by Gary71
So the metal finishers work a bit faster than me! Picked it up this afternoon and sprayed it up (together with everything within 6ft...) in Tectyl clear coat.
Newly plated pulley just balanced on to see how it would look. I think the rest of the engine bits that need it will be going back there for plating as it's spot on.
Currently drying off much like a satin varnish, looks good. Unfortunately the blasting has neatly revealed all the pitting from corrosion that had been hiding under thick paint, but it's very authentic now!