Page 7 of 15
Re: 66 LHD 'Doctors Car' restoration begins
Posted: Tue Oct 04, 2011 6:30 am
by 911hillclimber
Original design less the top and bottom drain slots?
Compared to the rest this is easy for you!
I envey you the roll over cradles, so much better for the final result.
Great thread.
Re: 66 LHD 'Doctors Car' restoration begins
Posted: Fri Oct 07, 2011 11:02 pm
by MT
Well stiffened up the sinews and summoned up the blood and all that Henry V crap (it was Henry V wasn't it - school Shakespeare was such a long time ago) - and then bottled it - as you will see,
I had found a repair section for my LH rear wing on my travels so I scribed and cut it to fit (using my carefully kept measurements from the original wing.

Was intending to TIG weld it but after failing to even make good tack welds I bottled it and went back to the MIG I know and love. I did get more distortion than ideal, and couldn't planish the weld as much as I would have liked, but by only doing an inch or so at a time and moving around a lot, and being patient (difficult!) I think I kept the distortion manageable. You will note the carefully cut length of wood to preserve the wing spacing - see later.

a bit of grinding

and a bit of filler

and a check down the hole

and some self etch primer to keep it in order until painting

and a x check of dimensions before

and after (remember it's now upside down!)

Seems ok ....... just 5 more bits on the rear wings to go ....
Re: 66 LHD 'Doctors Car' restoration begins
Posted: Sat Oct 08, 2011 9:18 am
by Northy
This is an excellent thread - keep the updates coming!
Re: 66 LHD 'Doctors Car' restoration begins
Posted: Sat Oct 08, 2011 6:06 pm
by MT
After much alcohol (well it was Friday night) and a little toilet contemplation I have devised my solution to the rear quarter seat belt mount 'rustawayquick' design. Despite having almost 'as new' rear inner wings the seat belt mounts look like this

So I wanted something that will support the original mounting, but will not let in water/mud etc. So I went for the following - a hole in some 1.6mm plate that the mounting is first welded too, then a piece of tubing just long enough that when I fit a thick washer over the end if the mounting it will support it


Weld it all up - first coating the inside and adding some sealant to be sure it will be water/airtight.

At a minimum it will take three times as long to rust away..... although the car will fail its concours perfection test unless I cover it in underseal. The LHS was a bit tricky because the engine lid release tube goes right where you'd like to cut the old mounting out - so if anyone is doing this replacement be careful before you get too aggressive with the hacksaw/snips/nibbler. Now the mounting is threaded for an M8 bolt and I think the standard seatbelt mounting is M10, so I will either have to drill it out and tap to M10, or use a sleeve with the original M8 bolt. Any MoT expert out there want to comment on the acceptability of the latter?
Oh, and I forgot to mention I am still looking for the equivalent piece to the red oxide section I fitted in the LH rear wing above for the RHS, If anyone has a piece that will cover the same area please make contact. Thanks.
Re: 66 LHD 'Doctors Car' restoration begins
Posted: Sun Oct 09, 2011 6:07 pm
by MT
Decided to have a go at replacing the rotted away battery tray, washer pump mount and washer bottle mount. Got a couple of excellent original pics from Early 911S registry and used them, and the bits that survived intact to scale what I was missing.
So first I made the battery tray and clamp mounting.

Then added the rotted feet from the original washer pump bracket
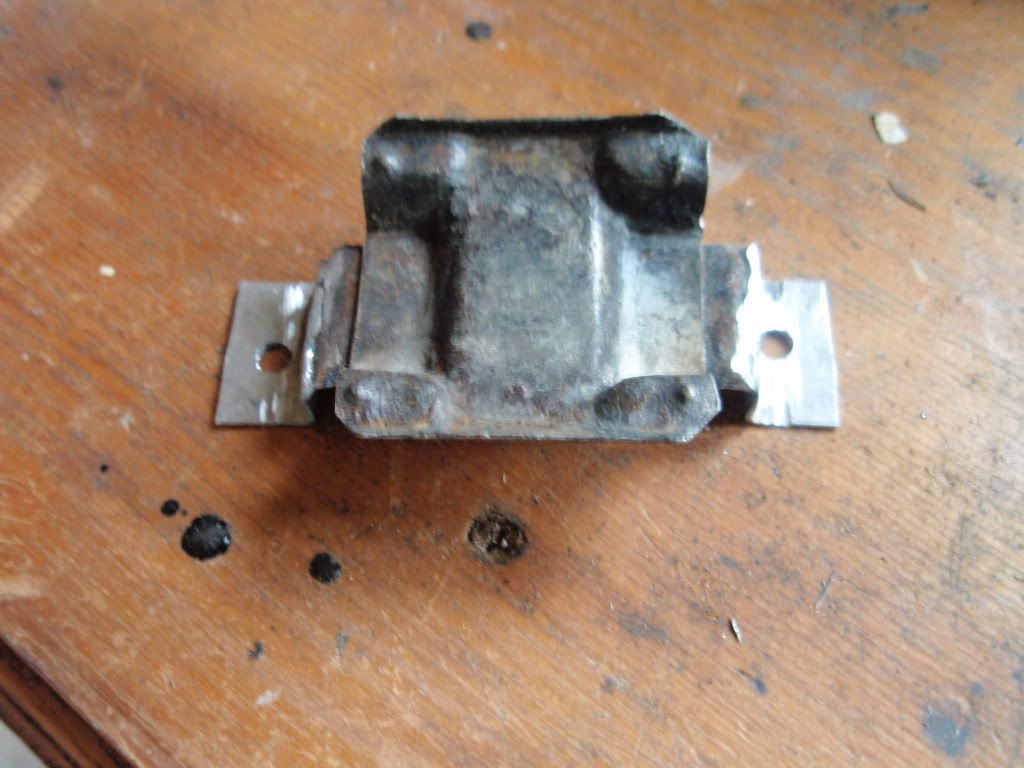
then welded them in place along with the washer bottle mount that I saved from the original .... and coated in POR-15 ... as you do
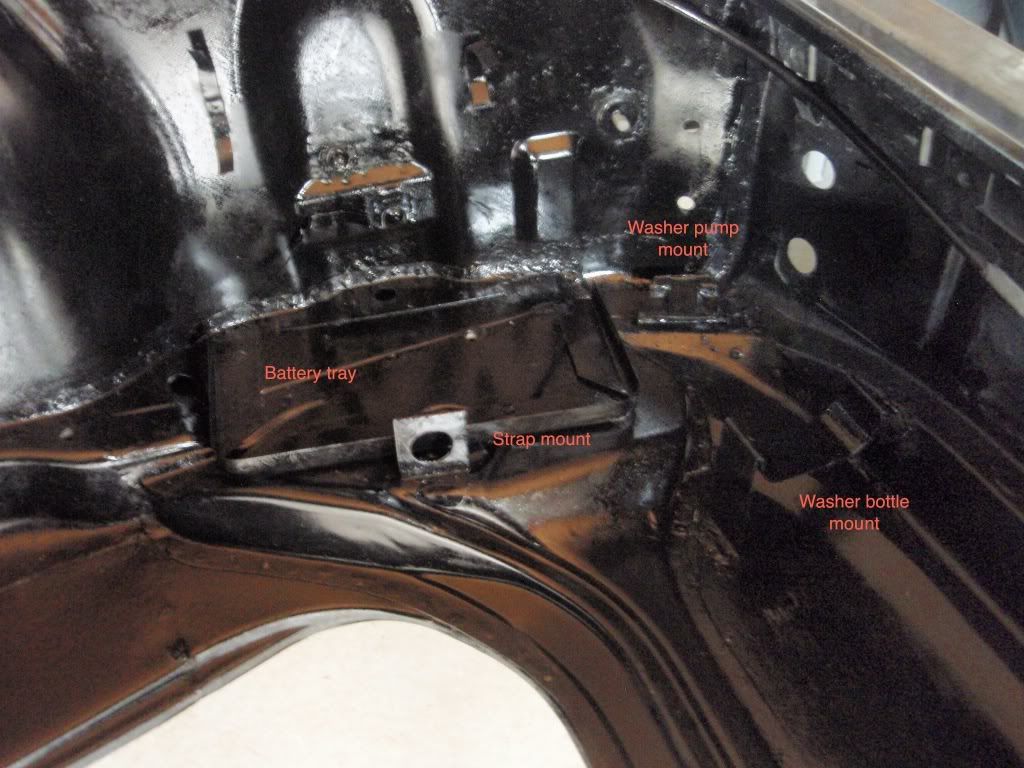
Looks good and compares well with the original photo I thought - although the early tank support brackets clearly had a flat front next to the washer pump.
Gave myself the rest of the day off - despite being an atheist....
Re: 66 LHD 'Doctors Car' restoration begins
Posted: Sun Oct 09, 2011 6:20 pm
by Darren65
Very creative - nice work

Darren
Re: 66 LHD 'Doctors Car' restoration begins
Posted: Mon Oct 10, 2011 7:41 pm
by MT
More summoned blood and stiffened sinews and I measured, cut, welded and filled the two light boxes I acquired off e-bay and my own repair side panels.
RH after welding and grinding - with my datum lines and measurements to the light box top edge
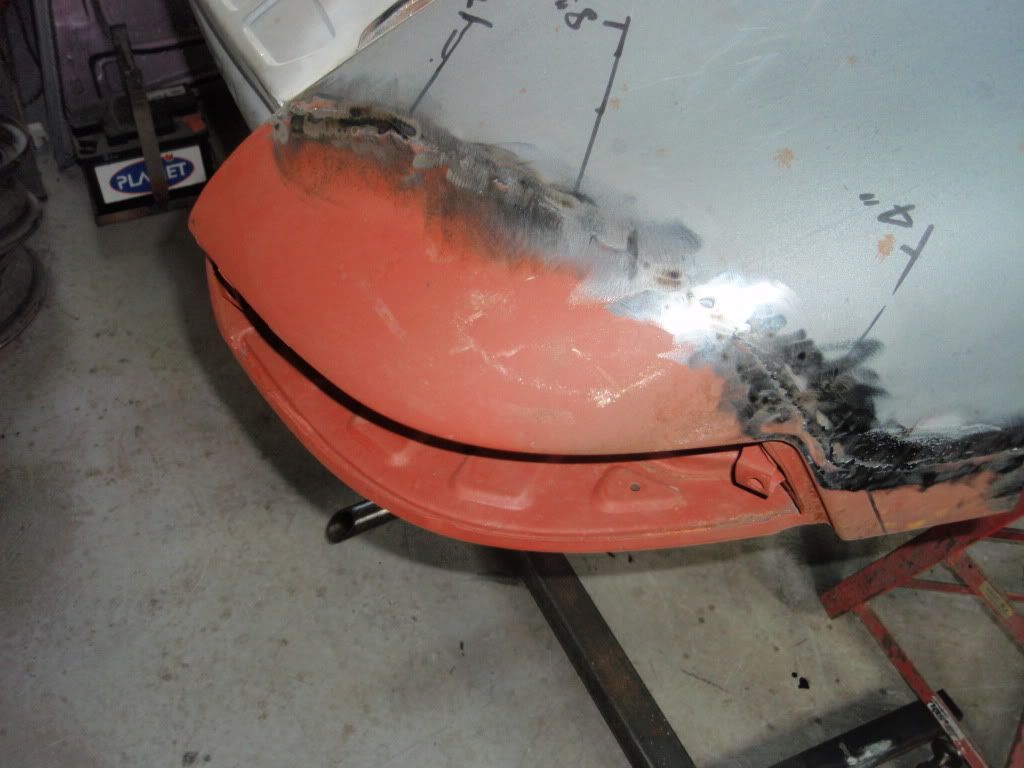
LH after all the above and filler - I was surprised the area (not much depth) that I had to cover with filler to get a smooth profile. Obviously there was some heat distortion from the welding but it wasn't that bad - it just seemed like the profile of the original wing and the replacements were slightly different - both were SWB.

Did get quite a lot of distortion on the side repair - again the filler is less than 1mm thick, but it still needed to cover a large area to get a really flat surface.

Off in search of some bits tomorrow - hopefully including the RH torsion bar hole portion of the rear wing. Once I've done that there are only a few minor repairs, and the POR-15/tie-coat primer to do before she can go off to the local paint shop.
Mick
Re: 66 LHD 'Doctors Car' restoration begins
Posted: Wed Oct 12, 2011 7:52 pm
by MT
Today's challenges....
First a repair to the top of the LH front wing support - after cleaning it looked like this

I managed to get a piece from another car that made the repair much simpler - sorry for poor photo as I had to use my phone

Then to the LH B post as this side has had the rear wing repair - first I made a repair piece. It is as well that I went with Garry to Chesterton Coachworks yesterday so see how the pros do it because I wasn't aware of the little step at the base where the tread ends. I had already started making the repair section so I had to bash a step into it. Came out ok I think

A bit of bashing swearing welding and grinding

... On with the door, check all is ok, off with door .....
and a bit of filler and primer

On with the door with my patent special design door pins to check the gap again

Not Chesterton standard I agree, but still not bad for a first timer suppose I say so myself.
This side now is starting to look like a car again

..... it's all going too well ..... what have I missed????
Re: 66 LHD 'Doctors Car' restoration begins
Posted: Wed Oct 12, 2011 8:14 pm
by johnM
Looks great to me very impressive.

Re: 66 LHD 'Doctors Car' restoration begins
Posted: Wed Oct 12, 2011 8:25 pm
by MT
Thanks John.
I'm watching your progress with great interest too. I'm going to be painting it in it's original Light Ivory (same as yours?) I note from your recent posts that you have left the underside/under wings in black (as I plan to do). Have you done the same inside in the areas covered by carpet, and painted the dash/under bonnet in satin black - per original as I understand? Most of the restorations covered seem to paint the entire shell in body colour - which seems not only a waste of very expensive paint, but unoriginal (correct me if I'm wrong, please), and less effective than modern rust preventative/encapsulating treatments now available for these areas.
I'd be interested in your thinking, and your plans for the areas I've mentioned. Thanks
Re: 66 LHD 'Doctors Car' restoration begins
Posted: Wed Oct 12, 2011 8:54 pm
by visualfx
From the angle I looked at the progress this evening I’d say you’re not that far of Chesterton
Excellent work
Re: 66 LHD 'Doctors Car' restoration begins
Posted: Wed Oct 12, 2011 9:19 pm
by johnM
Re: 66 LHD 'Doctors Car' restoration begins
Posted: Wed Oct 12, 2011 9:46 pm
by Darren65
I think John is selling himself a little short when he mentions keeping his in the 'same spirit as the factory' - my understanding is that his car is pretty much 'exactly' as it's meant to be and definitely a standard to aspire to
Your car looks like it's heading in much the same direction

Great work, wish I had your skills.
Re: 66 LHD 'Doctors Car' restoration begins
Posted: Wed Oct 12, 2011 9:51 pm
by johnM
Darren65 wrote:I think John is selling himself a little short when he mentions keeping his in the 'same spirit as the factory' - my understanding is that his car is pretty much 'exactly' as it's meant to be and definitely a standard to aspire to
Your car looks like it's heading in much the same direction
Great work, wish I had your skills.
That's very kind Darren.
Drop me a line if you want to pop round in the next week or two.
Kind regards
Re: 66 LHD 'Doctors Car' restoration begins
Posted: Sun Oct 16, 2011 3:44 am
by Rich Lambert
Nice work. It's cool to watch a car come back from the brink.