

Hi All
I was wondering why the back end was not made up off the car, in that egg box kind of way, and then cut away to go over the existing structure rather than trying to work around things, and what advantage does the mdf give over the wire form method Barry was previously using?
Okrasa Special
-
Pandora
- Married to the DDK
- Posts: 229
- Joined: Sat Feb 07, 2009 10:17 pm
- Location: Edinburgh
Re: Okrasa Special
Hi Dingbat,
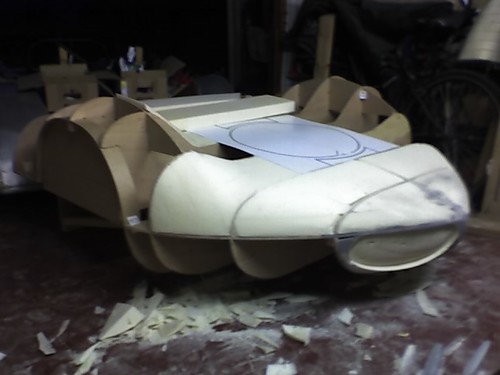
The buck is built up on the car because it's the only way you can be sure it's going to fit around all of the fixed bits like chassis, roof, wheels etc, and if it were to be built up off the car it would be a big job to keep it rigid when you tried to fit it to the car later to check it.
It will be built up with sections as you describe, as shown in the rough sketch. Such egg crate bucks are often built up on ther own, off the chassis, but that is if you are doing the whole car. On this job we are tying it into the wire frame at the front, so it has to be on the car.
The other benefit / necessity here is that the way we have done it we KNOW it is symetrical and built up off the cars centre lines, as we (Barry) welded tabs onto the chassis to fix it in place. doing it off the car and then trying to mount the panels onto the chassis would make this symetry very VERY hard.
As to the benefits over the wire method? well, Steve and barry have done a great job on the front with the wire, so clearly it has it's uses and benefits.
However, the main benefit of the tape and MDF system is that I (as a designer) have control of the shapes, where as using wire, as I think Barry and Steve will confirm, that the wire tends to set it's own shape. This can be very helpfull for long sweeping curves, but can be a hindreance if it doesn't want to go where you want it - where you force it into shape you often get an awkward curve. We designers like to be in control of the shapes, not the other way around! It also makes symetry much easier.
So all in all, the system we are using on the rear is more controlable, but depends on someone planning / designing it all in advance (though it can still change as it evolves) rather than a shape 'evolving' as the job progreses as was the case with the front. If it evolves into something you don't like you kind of have to start again.
The important thing is that both Steve and Barry wanted the design process to be a 'journey' (isn't everything these days?) and the way it has worked out, they have had experience of a range of tecniques as the car has progresed! Maybe we should do the tail panel in styling wax?
That's my take on the benefits, but Steve and Barry might be wishing they'd stuck with wire, or maybe that they'd done the front as we are doing the back? The main thing is that we end up with a shape Steve is happy with and Barry knows exactly (well, mostly!) what he is working too.
Many ways to skin a cat etc.
The buck is built up on the car because it's the only way you can be sure it's going to fit around all of the fixed bits like chassis, roof, wheels etc, and if it were to be built up off the car it would be a big job to keep it rigid when you tried to fit it to the car later to check it.
It will be built up with sections as you describe, as shown in the rough sketch. Such egg crate bucks are often built up on ther own, off the chassis, but that is if you are doing the whole car. On this job we are tying it into the wire frame at the front, so it has to be on the car.
The other benefit / necessity here is that the way we have done it we KNOW it is symetrical and built up off the cars centre lines, as we (Barry) welded tabs onto the chassis to fix it in place. doing it off the car and then trying to mount the panels onto the chassis would make this symetry very VERY hard.
As to the benefits over the wire method? well, Steve and barry have done a great job on the front with the wire, so clearly it has it's uses and benefits.
However, the main benefit of the tape and MDF system is that I (as a designer) have control of the shapes, where as using wire, as I think Barry and Steve will confirm, that the wire tends to set it's own shape. This can be very helpfull for long sweeping curves, but can be a hindreance if it doesn't want to go where you want it - where you force it into shape you often get an awkward curve. We designers like to be in control of the shapes, not the other way around! It also makes symetry much easier.
So all in all, the system we are using on the rear is more controlable, but depends on someone planning / designing it all in advance (though it can still change as it evolves) rather than a shape 'evolving' as the job progreses as was the case with the front. If it evolves into something you don't like you kind of have to start again.
The important thing is that both Steve and Barry wanted the design process to be a 'journey' (isn't everything these days?) and the way it has worked out, they have had experience of a range of tecniques as the car has progresed! Maybe we should do the tail panel in styling wax?
That's my take on the benefits, but Steve and Barry might be wishing they'd stuck with wire, or maybe that they'd done the front as we are doing the back? The main thing is that we end up with a shape Steve is happy with and Barry knows exactly (well, mostly!) what he is working too.
Many ways to skin a cat etc.
-
steve wright
- DDK rules my life!
- Posts: 1036
- Joined: Mon Aug 02, 2004 12:17 pm
Re: Okrasa Special
Spot on Al 
'53 356 Pre-A (a box of bits!)
'54 Okrasa/Porsche/VW special
'58 356A Super (GS-spec)
'65 Razoredge Ghia
'66 Westfalia Camper
'70 911S (2.3 ST Le-Mans spec engine)
http://www.pushrod.org
http://www.classicporschemag.co.uk
'54 Okrasa/Porsche/VW special
'58 356A Super (GS-spec)
'65 Razoredge Ghia
'66 Westfalia Camper
'70 911S (2.3 ST Le-Mans spec engine)
http://www.pushrod.org
http://www.classicporschemag.co.uk
-
Barry
- Nurse, I think I need some assistance
- Posts: 4321
- Joined: Tue Aug 24, 2004 8:50 pm
- Location: East Sussex
Re: Okrasa Special
It's an very interesting debating point, and having seen Al's approach, I think my current thoughts are as follows:
In retrospect the wire did have the advantage that you can make curvy shapes around an existing chassis. To a certain extent it lends itself quite well to someone like me (or Steve) who has a vague idea what we're trying to do, but no dimensions and no drawing ability at all: as I've said many times, I'm no designer, and have absolutely no drawing ability or feel whatsoever. On the other hand, I've been a practical type since I restored my first lawnmower when I was a primary school. As we had Macaulay's (brilliant, and I still think that) rendering, it seemed natural at first just to try to reproduce that in wire, as the curves seemed easy to form at the time.
As it looked as though we were heading the right way, it seemed sensible to carry on in the same manner. This is where the shortcomings of the wire started to show: alterations have a habit of destroying previous attempts. It's also very hard to measure what you are doing, and you have to 'surface' the thing (cover with paper or whatever), to really get an idea of how the shape is developing. Finally, whilst it very quickly gives you something to look at (rough shape that looks quite credible), it's very hard indeed to make all of the wires flow in all directions absolutely perfectly: even slightly perfectly in fact. You've not really got much to run your hands over to check the shape, very different from Al's method below, which will provide a complete surface in all directions.
It's also really very hard to reproduce as well, and taking dimensions from it in order to build the egg-box buck is very tedious. I still think the wire has a place, in particular if you were doing some custom work on an existing car / panel, and lets not forget that some coachbuilders use this as their principle shape design and buck building technique.
Moving on to Al's method: I'd not considered (or heard of) this half-hard (MDF), half foam method before. Unlike the wire above, I guess you do at least need a rough idea of where you're starting out from, if only because you want to inner MDF structure to get pretty close to the final dimension if possible. Nevertheless, in retrospect, that is one thing we did have.
This method clearly is going to give huge advantages in almost every direction: it's very sturdy (rock solid in fact), easy to measure, easy to alter without destroying all previous work. It's also much more fine-tuneable (as you're rasping / sanding the shapes), self surfacing, can be filled and painted for a 100% test, and thinking about it, there's no reason why details such as lights etc can't be let into the foam if appropriate.
Once the shape is arrived at, the same inner structure can be used for the actual buck, just with the addition of stations where-ever they are needed (more where there's lots of shape, less where there's less).
I'm strongly leaning towards Al's method, and can very much understand how the next stages are to be carried out, and how that leads in to arriving at a building-buck.
The only thing I would say, is that although using wire will have cost us some time (with the benefit of hindsight), by far the greatest issue was simply not knowing where we were heading design-wise. From the first time we wheeled the car out in the open, we've not been in a good place from the point of view of knowing where to head. Although we knew it was wrong, we would merely be throwing guesses in to try to resolve the problem. Each 'guess' could take several weeks of saturdays to try, and we must have tried five versions of the rear at least. All of the time I've been worried that the roof might be the issue, particularly when I started to realise that there were very few 'sleek' looking cars with that style of roof, that went that wide over the car's footprint. This is clearly not a good niggle to have at the back of your mind: that whatever we achieved, perhaps there was some fundamental issue that we'd simply been missing all of the time that said simply, the car couldn't work.
I must underline though, that I still love Macaulay's rendering and work, and any deficiencies in the interpretation are entirely down to me. If we end up with a design that is visibly close to Macaulay's, I'll be chuffed to bits.He was extremely generous with his time and ideas, and it's probably fair to say that had he not come with with those very early renderings (let alone the final one), neither of us would have been as inspired and motivated as we have. To come up with the design he did when looking at the bare car was amazing. It's very easy now, having looked at various attempts and modifications, to accept the current shape as the norm. To take a step back in time, and try to visualise a brand new design from cold, given the appearance of the car back then is really something else.
I digress, Steve and I have put a lot into this car (100's of hours so far in my case), and from my point of view, there seemed little point shoving more time at the thing until we found someone with design experience to have a look and either confirm our worst fears, or better, show us a way forwards. To have Al 'on board' has been brilliant, and I can't wait for the next stages to pan out. Personally I can now see a way forward, and this buck method will I'm sure, be a real advance over both the wire, and a standard egg-crate jig (such as the bonnet and wing ones had had previously done, which may or may not be used, depending on what comes out of the rear).
Sorry, rather a long reply, but sort of gets my thoughts up to date and up on the forum, so please forgive me .
.
In retrospect the wire did have the advantage that you can make curvy shapes around an existing chassis. To a certain extent it lends itself quite well to someone like me (or Steve) who has a vague idea what we're trying to do, but no dimensions and no drawing ability at all: as I've said many times, I'm no designer, and have absolutely no drawing ability or feel whatsoever. On the other hand, I've been a practical type since I restored my first lawnmower when I was a primary school. As we had Macaulay's (brilliant, and I still think that) rendering, it seemed natural at first just to try to reproduce that in wire, as the curves seemed easy to form at the time.
As it looked as though we were heading the right way, it seemed sensible to carry on in the same manner. This is where the shortcomings of the wire started to show: alterations have a habit of destroying previous attempts. It's also very hard to measure what you are doing, and you have to 'surface' the thing (cover with paper or whatever), to really get an idea of how the shape is developing. Finally, whilst it very quickly gives you something to look at (rough shape that looks quite credible), it's very hard indeed to make all of the wires flow in all directions absolutely perfectly: even slightly perfectly in fact. You've not really got much to run your hands over to check the shape, very different from Al's method below, which will provide a complete surface in all directions.
It's also really very hard to reproduce as well, and taking dimensions from it in order to build the egg-box buck is very tedious. I still think the wire has a place, in particular if you were doing some custom work on an existing car / panel, and lets not forget that some coachbuilders use this as their principle shape design and buck building technique.
Moving on to Al's method: I'd not considered (or heard of) this half-hard (MDF), half foam method before. Unlike the wire above, I guess you do at least need a rough idea of where you're starting out from, if only because you want to inner MDF structure to get pretty close to the final dimension if possible. Nevertheless, in retrospect, that is one thing we did have.
This method clearly is going to give huge advantages in almost every direction: it's very sturdy (rock solid in fact), easy to measure, easy to alter without destroying all previous work. It's also much more fine-tuneable (as you're rasping / sanding the shapes), self surfacing, can be filled and painted for a 100% test, and thinking about it, there's no reason why details such as lights etc can't be let into the foam if appropriate.
Once the shape is arrived at, the same inner structure can be used for the actual buck, just with the addition of stations where-ever they are needed (more where there's lots of shape, less where there's less).
I'm strongly leaning towards Al's method, and can very much understand how the next stages are to be carried out, and how that leads in to arriving at a building-buck.
The only thing I would say, is that although using wire will have cost us some time (with the benefit of hindsight), by far the greatest issue was simply not knowing where we were heading design-wise. From the first time we wheeled the car out in the open, we've not been in a good place from the point of view of knowing where to head. Although we knew it was wrong, we would merely be throwing guesses in to try to resolve the problem. Each 'guess' could take several weeks of saturdays to try, and we must have tried five versions of the rear at least. All of the time I've been worried that the roof might be the issue, particularly when I started to realise that there were very few 'sleek' looking cars with that style of roof, that went that wide over the car's footprint. This is clearly not a good niggle to have at the back of your mind: that whatever we achieved, perhaps there was some fundamental issue that we'd simply been missing all of the time that said simply, the car couldn't work.
I must underline though, that I still love Macaulay's rendering and work, and any deficiencies in the interpretation are entirely down to me. If we end up with a design that is visibly close to Macaulay's, I'll be chuffed to bits.He was extremely generous with his time and ideas, and it's probably fair to say that had he not come with with those very early renderings (let alone the final one), neither of us would have been as inspired and motivated as we have. To come up with the design he did when looking at the bare car was amazing. It's very easy now, having looked at various attempts and modifications, to accept the current shape as the norm. To take a step back in time, and try to visualise a brand new design from cold, given the appearance of the car back then is really something else.
I digress, Steve and I have put a lot into this car (100's of hours so far in my case), and from my point of view, there seemed little point shoving more time at the thing until we found someone with design experience to have a look and either confirm our worst fears, or better, show us a way forwards. To have Al 'on board' has been brilliant, and I can't wait for the next stages to pan out. Personally I can now see a way forward, and this buck method will I'm sure, be a real advance over both the wire, and a standard egg-crate jig (such as the bonnet and wing ones had had previously done, which may or may not be used, depending on what comes out of the rear).
Sorry, rather a long reply, but sort of gets my thoughts up to date and up on the forum, so please forgive me
.DDK Member1243 07741 273865. Home of the RY Austin 7 Trophy's and Austin Single Seat Racers
-
Pandora
- Married to the DDK
- Posts: 229
- Joined: Sat Feb 07, 2009 10:17 pm
- Location: Edinburgh
Re: Okrasa Special
I think it's important to remember that the method I have proposed is not perhaps the norm for an alloy bodied car, as my background is in GRP where you build a full size buck to pull the moulds off. An alloy car will generally go from sketches to models (scale) then on to the egg crate stage.
Given that Steve and Barry have half a car already, I'm familiar with my own methods, and well, it just sort of panned out this way, what we are doing seems to be a method which works for this project - Steve and Barry will see the finished shape / form from all angles and can push it outside etc before committing to it in the metal, which will be a real help. less uncertainty at this stage is good, and as Barry says, something of a relief, I think
I did think the other day "oh yeah, I was going to build some models......." ah well, it seems to be going OK!
Still, I recon that not long after I send down some sections and Steve gets them cut out (using his newly developed affinity with the jig saw) and screwed on, Barry will be thinking "sod the foam, I'll just wheel out a couple of wee panels, just to have a look before Al can come down and start covering the workshop in foam dust" And for that reason too, this method is ideal - we are actually creating the basis of the egg crate for the alloy work, baut then going beyond that to build up the surface, but still with the opportunity to strip it back to the egg crate again (albeit we'll need stronger sheet for the final stage)
I just hope my 3D version does justice to the renderings on the workshop wall, which I must admit I hadn't seen until I arrived, they seem to have dissapeared from earlier in the thread.
Al
Given that Steve and Barry have half a car already, I'm familiar with my own methods, and well, it just sort of panned out this way, what we are doing seems to be a method which works for this project - Steve and Barry will see the finished shape / form from all angles and can push it outside etc before committing to it in the metal, which will be a real help. less uncertainty at this stage is good, and as Barry says, something of a relief, I think
I did think the other day "oh yeah, I was going to build some models......." ah well, it seems to be going OK!
Still, I recon that not long after I send down some sections and Steve gets them cut out (using his newly developed affinity with the jig saw) and screwed on, Barry will be thinking "sod the foam, I'll just wheel out a couple of wee panels, just to have a look before Al can come down and start covering the workshop in foam dust" And for that reason too, this method is ideal - we are actually creating the basis of the egg crate for the alloy work, baut then going beyond that to build up the surface, but still with the opportunity to strip it back to the egg crate again (albeit we'll need stronger sheet for the final stage)
I just hope my 3D version does justice to the renderings on the workshop wall, which I must admit I hadn't seen until I arrived, they seem to have dissapeared from earlier in the thread.
Al
-
Barry
- Nurse, I think I need some assistance
- Posts: 4321
- Joined: Tue Aug 24, 2004 8:50 pm
- Location: East Sussex
Re: Okrasa Special
For my part, I rather like the idea of carving out the shape in foam: having painted quite a few cars in my time, I quite enjoy filler-work, so familiar with long-boards and the like. Really looking forward to seeing how 'natural' it feels to be forming the shape this way.
DDK Member1243 07741 273865. Home of the RY Austin 7 Trophy's and Austin Single Seat Racers
-
Pandora
- Married to the DDK
- Posts: 229
- Joined: Sat Feb 07, 2009 10:17 pm
- Location: Edinburgh
Re: Okrasa Special
On the subject of carving: Not sure if it'll be on you tube, but many years ago there was a documentary on 'Seymore Powell Industrial Design' which followed these 2 'of the UKs leading industrial designers' (i.e.leaders in self promotion) through various projects. Particularly memorable was Seymore (Richard) , or Powell (Dick), I forget which, but anyway, the one who looks like Clarrissa Dickson-Wright, smearing some sort of wet blue moulding clay on the capacious boosum of a model when they set about removing the scourge of the underwire from bras as it is apparently the main cause of injury to the UK's washing machines. But I digress......
In another episode the other one, the one in the salmon pink corduroy trousers (and who I think is the brother or brother in law of Richard Branston Pickle) was designing a motorbike, so they filmed him in an empty white studio with a huge block of polystyrene and an electric kitchen knife. He spent a lot of time stroking his chin and looking thoughtfull before uttering a phrase which still makes me wince / giggle recalling thehorror of it's pretentiousness:"hmmm,You see, the perfect shape is in there, I just have to find it and bring it out" and with that he wiped the turkey fat off his mum's carving knife and got fired in. cue a couple of action shots followed by a slow panning shot over a finely crafted motorbike made of foam.......
That must be why he is a rich successfull designer and I'm not. Ah well. No one has asked him to help with the Okrasa special.
We ( me, my fellow paternmakers, and my ex-Porsche /BMW / Ford designer boss) always refered to it as 'the fatty and a******e show' The jokes about them being 'that couple of Dicks off the telly' were just too easy.
The point of my raising this deeply engrained hatred is that it is possible to actually carve an entire project , almost as a sculpture, but I do think it would need a pretty fancy 3D scanner to get anything useful from it, unless you were working in GRP. In which case symetry would remain a problem. It is how scale models are generally done though, almost as a 3D sketch.
Interestingly, Seymore / Powell then showed a shot of some bloke on a then super duper high tech CAD system working on a Computer model of what his boss had apparently just hewn from foam next door.......
That digression aside, I can reasure you Barry, it is a very enjoyable process shaping the curves by hand in the foam. It's so much easier than filler or soft wood to shape. The nearest I can describe is that it's like making a big sandcastle when the sand is at just the right moisture - it works very quickly and you have a real feel for it as it develops. You'll enjoy it, I can tell you.
Hot Clay modeling might actually be even more enjoyable, but sadly we don't have the facilities for that and the clay is ferociously expensive.
So, foam it is!
Al
Al
In another episode the other one, the one in the salmon pink corduroy trousers (and who I think is the brother or brother in law of Richard Branston Pickle) was designing a motorbike, so they filmed him in an empty white studio with a huge block of polystyrene and an electric kitchen knife. He spent a lot of time stroking his chin and looking thoughtfull before uttering a phrase which still makes me wince / giggle recalling thehorror of it's pretentiousness:"hmmm,You see, the perfect shape is in there, I just have to find it and bring it out" and with that he wiped the turkey fat off his mum's carving knife and got fired in. cue a couple of action shots followed by a slow panning shot over a finely crafted motorbike made of foam.......
That must be why he is a rich successfull designer and I'm not. Ah well. No one has asked him to help with the Okrasa special.
We ( me, my fellow paternmakers, and my ex-Porsche /BMW / Ford designer boss) always refered to it as 'the fatty and a******e show' The jokes about them being 'that couple of Dicks off the telly' were just too easy.
The point of my raising this deeply engrained hatred is that it is possible to actually carve an entire project , almost as a sculpture, but I do think it would need a pretty fancy 3D scanner to get anything useful from it, unless you were working in GRP. In which case symetry would remain a problem. It is how scale models are generally done though, almost as a 3D sketch.
Interestingly, Seymore / Powell then showed a shot of some bloke on a then super duper high tech CAD system working on a Computer model of what his boss had apparently just hewn from foam next door.......
That digression aside, I can reasure you Barry, it is a very enjoyable process shaping the curves by hand in the foam. It's so much easier than filler or soft wood to shape. The nearest I can describe is that it's like making a big sandcastle when the sand is at just the right moisture - it works very quickly and you have a real feel for it as it develops. You'll enjoy it, I can tell you.
Hot Clay modeling might actually be even more enjoyable, but sadly we don't have the facilities for that and the clay is ferociously expensive.
So, foam it is!
Al
Al
-
Bruce M
- Me and DDK sitting in a tree! KISSING
- Posts: 2910
- Joined: Fri Aug 27, 2004 1:07 pm
Re: Okrasa Special
What type of foam do you use?
-
Pandora
- Married to the DDK
- Posts: 229
- Joined: Sat Feb 07, 2009 10:17 pm
- Location: Edinburgh
Re: Okrasa Special
Polyeurthane open cell foam, as used to make surfboard cores. You buy it in sheets of various thicknesses, usually 2" or 4" to fill the 100mm / 4" sections in the buck.
The main benefit is that, as noted above, it shapes really nicely and quickly with a carving knife, a woodworking rasp, files and sandpaper to a good smooth, even finish. It can be screwed together reasonably securely with course wood screws, and to the buck, and when you are happy with it you can joint the pieces together with a thin layer of body filler.
When using it as a mould patern you can skim th esurface with bodyfiller and it doesn't react. You can also use filler to build up internal radiuses and fillets (such as between the Kamm tail spoiler and the rear deck / wings on the Okrasa.
Here is a link to the type of stuff I use (which I was meant to send to Steve anyway)
http://www.ecfibreglasssupplies.co.uk/p ... -50mm.aspx
Al
The main benefit is that, as noted above, it shapes really nicely and quickly with a carving knife, a woodworking rasp, files and sandpaper to a good smooth, even finish. It can be screwed together reasonably securely with course wood screws, and to the buck, and when you are happy with it you can joint the pieces together with a thin layer of body filler.
When using it as a mould patern you can skim th esurface with bodyfiller and it doesn't react. You can also use filler to build up internal radiuses and fillets (such as between the Kamm tail spoiler and the rear deck / wings on the Okrasa.
Here is a link to the type of stuff I use (which I was meant to send to Steve anyway)
http://www.ecfibreglasssupplies.co.uk/p ... -50mm.aspx
Al
-
Pandora
- Married to the DDK
- Posts: 229
- Joined: Sat Feb 07, 2009 10:17 pm
- Location: Edinburgh
Re: Okrasa Special
In case anyone hasn't been with the thread from here I joined in, here is an example of what I'm describing, an old work in progress,the body being the front buck of my old sportsracer 'Pandora'

07-05-07_1614
13-05-07_2145
The reason it wasn't on a central 'box' to lend it rigidity was simply that I was trying to restore the car and build the buck in a single garage, and there wasn't the space.
I won't try that again! Oh no, wait a moment......... Yup, done it again! just ordered the MDF to crack on with some work on the body of the clubmans car - Steve, you are an inspiration!
Al
07-05-07_1614
13-05-07_2145
The reason it wasn't on a central 'box' to lend it rigidity was simply that I was trying to restore the car and build the buck in a single garage, and there wasn't the space.
I won't try that again! Oh no, wait a moment......... Yup, done it again! just ordered the MDF to crack on with some work on the body of the clubmans car - Steve, you are an inspiration!
Al
-
sladey
- Nurse, I think I need some assistance
- Posts: 9395
- Joined: Sat Apr 23, 2005 9:08 pm
- Location: Nottingham, UK
Re: Okrasa Special
Absolutely fascinating stuff!
The simple things you see are all complicated
I look pretty young but I'm just backdated yeah
I look pretty young but I'm just backdated yeah
-
steve wright
- DDK rules my life!
- Posts: 1036
- Joined: Mon Aug 02, 2004 12:17 pm
Re: Okrasa Special
I'll make sure I find a couple of models with capacious boosums, along with making the tea, for the next design session
'53 356 Pre-A (a box of bits!)
'54 Okrasa/Porsche/VW special
'58 356A Super (GS-spec)
'65 Razoredge Ghia
'66 Westfalia Camper
'70 911S (2.3 ST Le-Mans spec engine)
http://www.pushrod.org
http://www.classicporschemag.co.uk
'54 Okrasa/Porsche/VW special
'58 356A Super (GS-spec)
'65 Razoredge Ghia
'66 Westfalia Camper
'70 911S (2.3 ST Le-Mans spec engine)
http://www.pushrod.org
http://www.classicporschemag.co.uk
-
911hillclimber
- Nurse, I think I need some assistance
- Posts: 20722
- Joined: Mon Mar 10, 2008 6:26 pm
- Location: West Midlands
Re: Okrasa Special
Pandora:
Thanks for that link, very useful for something I have in mind.
I'm sure a foam approach will be good for the rear of this car and strong enough for Barry to form against off the wheel.
Lots of pics please of the process.
Thanks for that link, very useful for something I have in mind.
I'm sure a foam approach will be good for the rear of this car and strong enough for Barry to form against off the wheel.
Lots of pics please of the process.
73T 911 Coupe, road/hillclimber 3.2L
Lola t 492 / 3.2 hillclimb racer
Boxster 987 Gen II 2.9
Lola t 492 / 3.2 hillclimb racer
Boxster 987 Gen II 2.9
-
Barry
- Nurse, I think I need some assistance
- Posts: 4321
- Joined: Tue Aug 24, 2004 8:50 pm
- Location: East Sussex
Re: Okrasa Special
Yes pleasesteve wright wrote:I'll make sure I find a couple of models with capacious boosums, along with making the tea, for the next design session
 .
.Al: how did you arive at the shapes for the buck on Pandora, as I guess the foam in this case was being used to bridge the openings rather than helping to derive the actual overall shape?
Thanks for the above, can't wait to give it a try: hadn't thought of using a carving (or bread?) knife for the initial shaping either.
One thing's for sure, the project has certainly had a dollop of zing put back in, just what the doctor ordered!
DDK Member1243 07741 273865. Home of the RY Austin 7 Trophy's and Austin Single Seat Racers
-
Barry
- Nurse, I think I need some assistance
- Posts: 4321
- Joined: Tue Aug 24, 2004 8:50 pm
- Location: East Sussex
Re: Okrasa Special
I think that the idea is (if I've got this right), Steve will take some more measurements for Al at the current stage. Al hopefully will then produce some interim station (rib) drawings for Steve (or me) to cut out in MDF. As I understand it, then we'll have another session up there with foam fitted in-between the stations. With the final shape derived, the foam can be cut where-ever I fancy a station, drawn around, and this added to the buck in MDF.911hillclimber wrote:Pandora:
Thanks for that link, very useful for something I have in mind.
I'm sure a foam approach will be good for the rear of this car and strong enough for Barry to form against off the wheel.
Lots of pics please of the process.
This then returns us to a MDF buck, into which I can cut inspection holes. This then allows me to look at the underside of a panel to see how it's fitting.
There is a wheeling method where you do sit down your freshly wheeled panel over an existing one (as a way of duplicating), but this relies on metal to metal contact to mark the underside of the new panel where the low points are, i.e. shine or rub marks show areas that need a little more wheeling. Earlier on in the process you can obviously simply overlay the panel over the orginal (or foam in this case) and rock it around, wheeling until it stops rocking. The drawback of this method is that if you over-wheel it, you have no way of checking if it's barely clearing the master, or whether it's miles off, but touching around the perimeter.
Therefore, one way or another, you need to be able to take a good look underneath the panel, ideally at every point it touches a station, and that then tells you how much, and where to wheel. With this in mind, I don't think you'd be able to use anything 'solid', other than in the above example.
I did do a series of pictures to illustrate this, but have a horrible feeling I deleted them before they were uploaded
.DDK Member1243 07741 273865. Home of the RY Austin 7 Trophy's and Austin Single Seat Racers