Page 5 of 10

Re: '72 911T Restoration

Posted: Thu Feb 21, 2013 9:14 am
by sladey
Barry wrote:The main use for the nylon is for the hammer-forming: the two sections ahead of the battery boxes are hammer-formed from one piece of metal, and have no welds in them either. The metal is just floated down over the (primitive) hammerform. Same process for the parcelshelf corner. Note in the above photo, the only parts of the parcelshelf repair section that are fully formed are the areas I knew I would use. That's why it looks a bit 'soft' in some of the more central (middle of car) areas. Basically I get the best shape I can with the nylon, and then go in with various steel tools, all ground to different radii. These are used to chase into all of the detail: there is a formal name for this final finishing process, but it's slipped my mind: it'll come back to me as soon as the P.C.'s switched off :roll: .
Thanks for that Barry - so are you saying you've got a metal hammerform and use the nylon to drift the metal most of the way into that hammerform shape and then finish it off with metal drifts/dollies to get the final crispness?

Interesting stuff

Re: '72 911T Restoration

Posted: Thu Feb 21, 2013 12:18 pm
by Madrat
Onto the next layer.....according to Barry this was pretty tricky to get right as a reverse curve is required for the heater tube to lie in. In addition, the reverse curve has to change to a regular flange at the base, and everthing has to line up, there's a lot going on.

Image


Image


Completed rear half in, plus the new base for the inner wing. This was formed from one part, and goes right from the new inner sill, right the way back.

Image


Image


Image


Image


Rear of the new floor edge just showing through here!

Image


Nice accurate fit, which pays off later when being welded up.

Image

Re: '72 911T Restoration

Posted: Thu Feb 21, 2013 12:33 pm
by Madrat
Old floor out on the other side and same trick used with the edge markers...

Image


Markers in use as new floor goes in.

Image


Image


New floor edge in.

Image


Image


Image


Heater tube in.

Image


And all back together, complete with new inner sill, rear inner wing repaired and generally fettled up.

Image


Image

Re: '72 911T Restoration

Posted: Thu Feb 21, 2013 12:48 pm
by murph2309
Bloody hell. What an immense update. That car has seen some serious moments....and the re-build is just amazing.

Hats off - again - to Barry and to you rich for taking this on!

Another survivor....

R

Re: '72 911T Restoration

Posted: Thu Feb 21, 2013 1:32 pm
by haasad
I'm completely blown away by this thread, the comments on craftsman ship and outright skill are spot on.

andy

Re: '72 911T Restoration

Posted: Thu Feb 21, 2013 1:47 pm
by Madrat
Yes.....I am very lucky to have Barry working on this project and am chuffed to bits with the quality of his work and attention to detail.

The latest batch of photos take us up to about the beginning of February this year and I am looking forward to the latest instalment from Mr Carter which I will post up as soon as they come through.

Cheers

Re: '72 911T Restoration

Posted: Thu Feb 21, 2013 5:10 pm
by Darren65
I reckon Barry must be pretty chuffed with himself with this one.......and deservedly so! :P

Re: '72 911T Restoration

Posted: Thu Feb 28, 2013 7:33 pm
by Barry
sladey wrote:
Barry wrote:The main use for the nylon is for the hammer-forming: the two sections ahead of the battery boxes are hammer-formed from one piece of metal, and have no welds in them either. The metal is just floated down over the (primitive) hammerform. Same process for the parcelshelf corner. Note in the above photo, the only parts of the parcelshelf repair section that are fully formed are the areas I knew I would use. That's why it looks a bit 'soft' in some of the more central (middle of car) areas. Basically I get the best shape I can with the nylon, and then go in with various steel tools, all ground to different radii. These are used to chase into all of the detail: there is a formal name for this final finishing process, but it's slipped my mind: it'll come back to me as soon as the P.C.'s switched off :roll: .
Thanks for that Barry - so are you saying you've got a metal hammerform and use the nylon to drift the metal most of the way into that hammerform shape and then finish it off with metal drifts/dollies to get the final crispness?

Interesting stuff

Sorry for the slow reply: haven't been on DDK for a week or so!

Yes Mark, that's exactly it.

Another tool made today: quite possibily the saddest yet. I'll post pics up after Richard has had them tomorrow.

Just out of interest, during the last year or so I came to realise that it was ridiculous to keep free-forming a lot of these detail parts. Free-forming is fine for one or two-offs, but it takes ages, is hard on the hands and isn't very repeatable. Therefore I ordered up a few chunks of 6 and 10mm steel plate, and now each time I reach something that I'd normally freeform, I stop 'production', and make up whatever tool I think will do the job. Each one is the same: they take ages, it's very messy and you're not sure it'll work at the end either. As some of them might take two, three or four days to make, and the project sits there waiting, it's a fair investment / gamble.

As it happens, I've only had one not work out, and that was the front inner wing top: it's took three days to make and was a complete failure, and ended up at the scrapyard. I now form it completely differently, and although the process is evolving, it's a work-around that is O.K. for now. The others have been very good though, although I do go back and revisit some of them if a refinement occurs to me, or I think I can get something more accurate.

Overall though, once the mess and hassle of making them is forgotton, they are a delight to use, and very satisfying: much more than free-handing stuff. The lovely thing with hammerforming is that it's so repeatable: if you make ten of something, they'll all be the same.

The downside is that it's a killer on the hands: you have to really give the metal some serious welly to get it to flow, and with, say, the front inner wing repairs, each one represents a good hour and a half of pounding. Your wrists ache for hours. Still, next stage is an electric-hydraulic press ....

Thanks for all of the comments BTW, more welcome than deserved I suspect :) . Thread has hit a slower period as I've been dealing with the dash ends, A-pillars and the pedal-box areas: all rather slow and fiddly!

Re: '72 911T Restoration

Posted: Thu Feb 28, 2013 8:13 pm
by DEEMAN
All so fascinating and such a wonderful result. I also applaud (I guess like everyone else) the actual photographic record you put into these threads as well . It makes me think that you are a non-smoker but HAVE to do something whilst you contemplate the next move. Everything is so informative.
Bet there are a fair few folk out there turning in their graves thinking of what they did then - and seeing what you do now.

Its really coming together now, can't wait to see the next instalment.


Ian


___________________________

1965 RHD 911
2001 3.2 Boxster

Re: '72 911T Restoration

Posted: Fri Mar 01, 2013 8:37 am
by sladey
Barry wrote:
Yes Mark, that's exactly it.

Another tool made today: quite possibily the saddest yet. I'll post pics up after Richard has had them tomorrow.

Just out of interest, during the last year or so I came to realise that it was ridiculous to keep free-forming a lot of these detail parts. Free-forming is fine for one or two-offs, but it takes ages, is hard on the hands and isn't very repeatable. Therefore I ordered up a few chunks of 6 and 10mm steel plate, and now each time I reach something that I'd normally freeform, I stop 'production', and make up whatever tool I think will do the job. Each one is the same: they take ages, it's very messy and you're not sure it'll work at the end either. As some of them might take two, three or four days to make, and the project sits there waiting, it's a fair investment / gamble.
Thanks Barry

Similarities with my own work. It used to take 20 minutes to fill out a local search. 20 years ago I spent 4 days copying the data into a word processing document and adding in data fields that would automatically populate - from then on it took about 20 seconds.

Fast forward to today and I'm in my 8th week of developing a link to the land registry so hundreds of pieces of data can populate our systems with one click and also be analysed and worked upon with a second click. My job is basically constantly making digital hammer-forms :)

Re: '72 911T Restoration

Posted: Thu Mar 21, 2013 9:37 pm
by Darren65
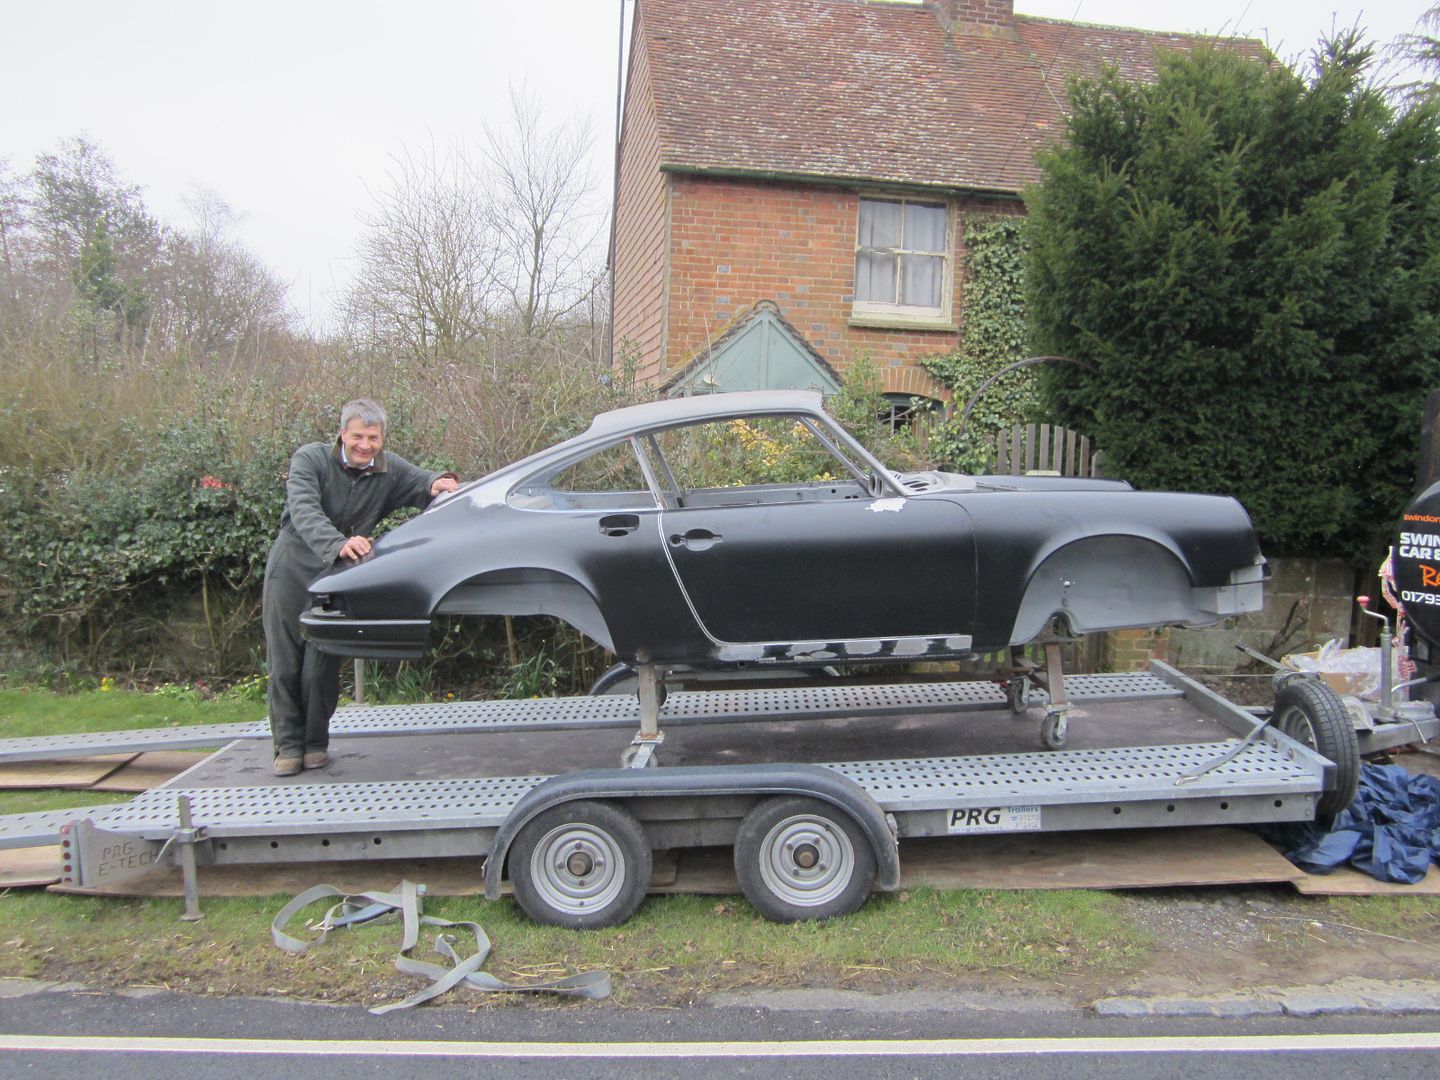
They say time is a healer…….and so is Barry Carter! :notworthy:

Well and truly touched by the blessed hand of 'Carter' - Simply stunning! 8) ……

Image

Re: '72 911T Restoration

Posted: Mon Apr 15, 2013 12:44 pm
by Madrat
Thanks for posting up the traditional 'collection from Barry' photo Darren!

Here are a few images of how Barry reached this point since my last update.......

The fabricated oil pipes were brazed into the previous fabrication and blasted clean post-brazing. This was later welded into the rear inner wing (pictures to follow later).

Image


Image


The scuttle ends were marked off using masking tape and verniers as the height here is critical to mounting the bonnet and front wing so that they sit well together.

Barry then removed each element and fabricated a kit of parts as he went.


Image


Image

Image


Image


Image


Image


Image


Image

Re: '72 911T Restoration

Posted: Mon Apr 15, 2013 12:54 pm
by Madrat
This is the other side front screen repair. The only difference was that this one needed more done to the rear of the A-piller (where the door seal goes). This, along with the rest was fabricated here.


Image


Image


Image


Image


Image


Image


Image


Image


Image


Image

Re: '72 911T Restoration

Posted: Mon Apr 15, 2013 1:04 pm
by Madrat
Next stage was to get the car on the spit to finish off the floor edge joins, tackle the pedalbox area, and deal with all of the remaining underneath tidying up.

Image


Image


Image


Image


Image


Image


Still a few areas to cover off!!!....


Image

Re: '72 911T Restoration

Posted: Mon Apr 15, 2013 9:49 pm
by Darren65
I know there's still quite a bit of fantastic detail work to show……….let's have a look at those sills! :wink: