Page 36 of 53
Re: 356 Speedster Flat6 outlaw build
Posted: Sat Aug 18, 2018 5:10 pm
by greg356a
The latest updates;
Front and rear bumper fitted with a 5 mm gap profiled to the body shape.
Hardtop fits

- I have moved the inner grp lip 20 mm inwards to allow the fitting of a large gasket between the hardtop and the body. I have ordered a pair of Jeep hood catches which are a toggle clamp with a adjusting screw for reducing the gap this will secure at the rear. Front will be standard speedster toggle clamps.
The plan is to fit a Paris beetle ragtop into the hardtop. The small 71cm x 68cm should fit and provide plenty of fresh air and waterproof. Obviously no security. I think it would be wise to mould in some webs to provide additional strength before I cut the hole out.
At the front of the hardtop to windscreen I am going to extend the roof down to the door and create a lip. The intention is to fill the gap between the curve of the windscreen and the flat edge of the side glass. Hopefully this will make is waterproof. The hardtop will be on most of the time.
I got some VW polo window winder mechs off eBay to use. They maybe too large to fit but will keeping trying/ investigating. As with everything they don't fit straight in but I can probs modify. As they use pulleys and wire the action is smooth and easy compared to a beetle.
I also fettled the drivers door gap with mix and match 0.5, 1, 2 mm hinge packers. This is a long process which I have already done several times. You think its right and then a few weeks later you think I can make that fit better.
[url=
https://flic.kr/p/27sf2Cy]

[url=
https://flic.kr/p/27sf2o5]

[url=
https://flic.kr/p/297C3PA]

[url=
https://flic.kr/p/27sf26m]

[url=
https://flic.kr/p/297C3oA]

[url=
https://flic.kr/p/27sf1Ro]

[url=
https://flic.kr/p/297C32d]

Re: 356 Speedster Flat6 outlaw build
Posted: Tue Aug 28, 2018 5:19 pm
by greg356a
As mentioned the engine has not really been running as it should, seems to be down to the carb settings. I have managed to get hold of various size jets and chokes for the Zenith 40 tin carbs. The plan is to book the car in for a session on a rolling road. I have fitted: Venturi = Chokes 30, Main jet = 135, Air jet = 180, Idle jet = 55.
With some research on various sites/ forums it seems to be recommended Zeniths running the original CIS cam = Chokes 32, Main jet = 145, Air jet = 180, Idle jet = 55. Whilst on the rolling road hope they can take advantage of the best Mix and Match Options; Chokes 32 and 34, Main jet 145, Air jet 145,
Idle jets 60 – 65 to get the most power and drive-ability.
The latest project involves adding GRP front A posts to allow wind up door glass to give weather protection. So with a basic plan of make a shape out of clay, take a mould and then create a GRP moulding. This is not really something I have done before so just a case of suck and see really
Clay shapes. They took a week to dry even with my hair dryer and then I sanded the surface to give a flat and smooth surface,
 IMG_1982
 IMG_1983
I used brown packing tape as a release agent. Applied two coats of white gel coat and multiple layers of 400g chopped strand mat;
 IMG_1986
Which gave me these moulds
 IMG_2002
 IMG_2001
Once I have the mould I sanded and polished the rough edges out and coated with a mould release agent. I then used more gel coat, 3 layers of 400 g woven roving materiel and multiple layers of 400g chopped strand mat.
 IMG_2006
 IMG_2005
Still lots of sanding/ shaping etc
 IMG_2010
 IMG_2011
Anyway, as a first attempt I think with some sanding and filler I should get a finished A post that looks good and provides a good seal around the glass. Maybe not text book moulding but hey its all about learning new skills.
Need to work out how to fix the A post to either the frame or scuttle. Unfortunately finding some Porsche hardtop clamps is difficult. I have sourced some great toggle clamps from dare I say front hood of a Jeep. These are well made and adjustable and cheap.
Re: 356 Speedster Flat6 outlaw build
Posted: Thu Aug 30, 2018 3:35 pm
by greg356a
Re: 356 Speedster Flat6 outlaw build
Posted: Sat Sep 01, 2018 8:23 am
by mdmax72
Hi Greg,
Just curious so don’t shoot me

, isn’t the hard top sat to far forward?? Or have you deliberately set it this way to help with the sealing aspect.
The weather strips are difficult to source at a reasonable price. I’m sure l got mine from the NEC classic car show, £40 for 2 inner and 2 outer. I’m sure they were from the Woolies stand but looking at there web page l can’t find either.
Re: 356 Speedster Flat6 outlaw build
Posted: Sat Sep 01, 2018 12:16 pm
by greg356a
Hi Rich,
You observation is right it does sit a little too far forward. I had to move the back lip of the hardtop where it fits around the rear scuttle forward by 25 mm just to get the top to fit. Obviously you cant move the windscreen forward. I believe I can still trim maybe 5 mm off the front around the screen. Yes this will also help with allowing space for a decent gasket. Its always a compromise of form over - screen angle, position and fit. I need to bond the inner screen hoop to the inside of the hardtop which may allow a little more cleaning back.
Still not been able to find any cheap trim/ gaskets. I must have spent over 20 hours on the internet with no luck. Hopefully something will come up soon.
Booked the rolling road in from the 10th September, will be taking it on the trailer, so fingers crossed I will be able to enjoy the drive back!
Re: 356 Speedster Flat6 outlaw build
Posted: Sun Sep 02, 2018 4:59 pm
by mdmax72
Morning Greg
So am l right in thinking you brought it forward to aid your newly designed pillars lining up.?
From my experience of doing my pillars, your pillars need to come back more in order to catch the glass. Look at the differences below. If you use the door gap as a reference point it will come clear what l mean. There is no way you can get the glass frame and glass to sit more forward to the screen posts.


Hope this helps.
Re: 356 Speedster Flat6 outlaw build
Posted: Sun Sep 02, 2018 5:33 pm
by greg356a
Picture might be a little deceiving I have 25 mm from the edge of the door. I can also add an offset bubble gasket which will give up to another 10 to 15 mm. Gary always said that the glass should come up inside edge of the front of the door so as to get it as close as possible to the front edge. Whilst I think the front will be ok, the back is a totally different problem. The side glass angle looks like it stands proud of the rear quarter light by 20 mm. I am sure fat gaskets will fill the gap, not sure how pretty they will look. I was thinking of changing the rear 1/4 window so that rather than it being a vertical line that I would follow a more curved shape, maybe help to mask the line a little. No sure yet. I will try to find a pic to add.
 Speedyhardtop
You can just see how the side window exist at the front
 26356918986_a763bbaa8a_k
I got a set of MX5 winder regulators which are smaller than the VW Polo and the handle can be position anywhere within an arc. These are not ideal as the track is slightly curved which maybe a problem with flat glass. Also the porsche handle does not fit. But it is a very good well made regulator with plenty of travel.
 IMG_2044
 r
Re: 356 Speedster Flat6 outlaw build
Posted: Sun Sep 02, 2018 6:00 pm
by mdmax72
No problem, just thought I’d mention it now rather than later just in case you hadn’t got it in mind.
I’ll sit back a watch the progress.
Re: 356 Speedster Flat6 outlaw build
Posted: Sun Sep 02, 2018 7:14 pm
by greg356a
Thanks for the heads up. I must admit this is all taxing my abilities to think and design in 3d angles!
Re: 356 Speedster Flat6 outlaw build
Posted: Wed Sep 05, 2018 1:05 pm
by mdmax72
Here you go Greg.
These are what l got from Woolies. Not on there web page so if they are what your after i’d call them.


Re: 356 Speedster Flat6 outlaw build
Posted: Wed Sep 05, 2018 2:30 pm
by greg356a
Thanks Rich,
Really useful, do you have any close-up pics of the gaskets in position? Struggling to see how you fixed them?
Re: 356 Speedster Flat6 outlaw build
Posted: Wed Sep 05, 2018 3:50 pm
by greg356a
I had been working on a bits and pieces solution, but hopefully can use your idea once I understand how its fixed down.
 Window seal gasket inner and outer
The idea was to use some 2mm thick stainless strip and bolt to the car with M4 bolts. I can also get a plastic chrome 8mm x 3mm dome strip to stick over the outer gasket which may give a more traditional look. Obviously the speedster never had windows!
Could use this on the inside instead of the seagull gasket shown above. This would be very easy just to push over the grp edge. Not sure if it would clash with the door capping or not.
 inner seal
Re: 356 Speedster Flat6 outlaw build
Posted: Thu Sep 06, 2018 9:56 am
by mdmax72
Greg
Here’s how l fixed the seals. At work so can’t take a picture, although the drawing below should explain.
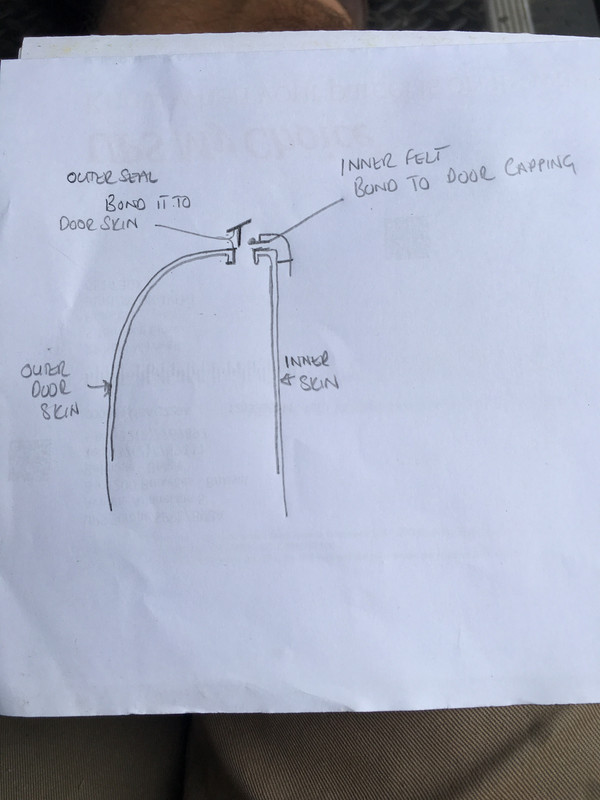
Re: 356 Speedster Flat6 outlaw build
Posted: Fri Sep 07, 2018 1:30 pm
by greg356a
Hi Rich
Thanks for the update. I was trying to avoid using any adhesive so as not to damage any paint if I need to remove the trims.
I have notice on your sketch that you show a return lip in the grp where the glass passes through. Is this something added or do Chisel provide. With SPC I will have to cut a slot leaving just a flat edge which is the source of some of my issue.
Re: 356 Speedster Flat6 outlaw build
Posted: Fri Sep 07, 2018 7:56 pm
by mdmax72
I understand what your saying although if you bond the inner felt trim to the door capping you’ll have more than enough space to do any maintenance once removed.
The edge you mention

l don’t have either. Why l put it in the drawing l don’t know. I would say my fibreglass skin is thick but it could help the outer skin from any deflection once you cut your channel out.
I think your best bet would be to remove the outer skin for Access to help design and install you set up. Something l should of done but struggled on regardless.
Just a thought, if you were to bond an aluminium L section down the length of the door with the upstand coming up out of the door, this would give it rigidity and you could use a Austin mini door weather strip to fix to. Those trims have a chrome strip with a rubber seal attached. And they are cheap and removable without bonding. Wouldn’t look out of place either.


