

jtparr wrote: ↑Tue Sep 09, 2025 9:07 pm Part 25
Finally…….
Just build it……
Sounds simple and straight forward doesn’t it…..hymmmmm….as I have been discovering and reminded during the last year….as it is almost 12 months since the painted shell returned to me….months of looking forward to weekends of pure car building….supplemented by week day evenings of more of the same….spoilt only by the seemingly constant feeling that this car is fighting me every single part of the journey
I can safely say that there has not been a single component that has not ended me to make adjustments….or worse still realising access for the next component means I have too take things apart as their sequence of building is prescriptive …but not at all apparent…….and all this whilst for the major part being in the cab which is tiny and restricted in terms of access….I should have kept count….1,000….2,000 times I have been in and out…or underneath needing another tool….dropping an impossible awkward screw or nut into a crevice…or just under the car…scraping knuckles…elbows…head…knees along the way
If there is a Zen attitude towards this process I must have unknowingly adopted it….sure…3 counts of loosing it….cursing the thing as a simple task was thwarted by some predicable ill fitting reproduction component or impossibly demanding access…..…how did jaguar ever make any money…the entire car is built in-situ…..
However………at the end of every weekend I have only wished it were longer and I could continue…its a very slow process I am finding out…but I am truly looking forward to seeing it complete…and driving it…it’s like a female that you can’t get enough of…who is demanding and unpredictable at the same time…but you know its the right thing to spend all you’re time with…
The colour has now fully grown on me….anyone and everyone who sees the car in the flesh or on photos says they love the colour….what a great colour……so I guess they must be right….
So where did I start…..?…..and how did I continue….. and how do I want to tell the story….previous threads have been the normal chronological sequence of gradual assembly….but with this one it will be more a series of individual parts of the car….as each one has if maybe small….an individual story
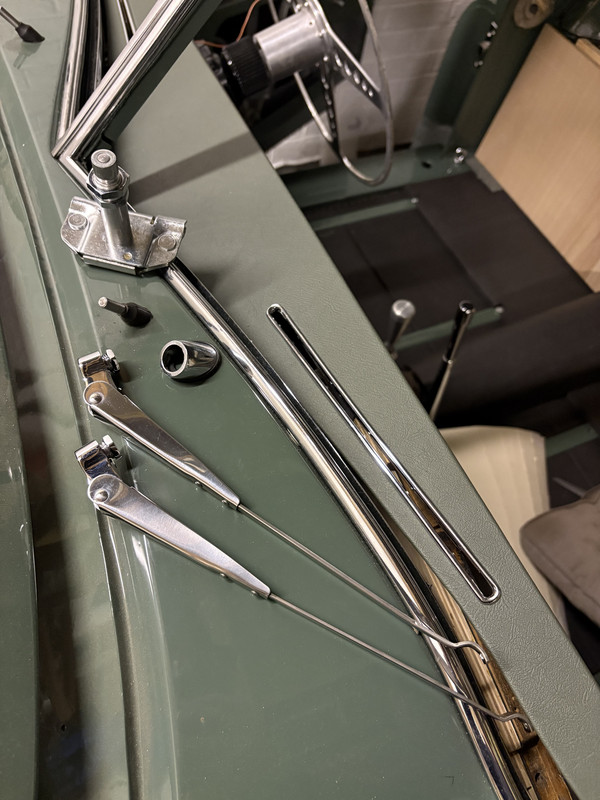
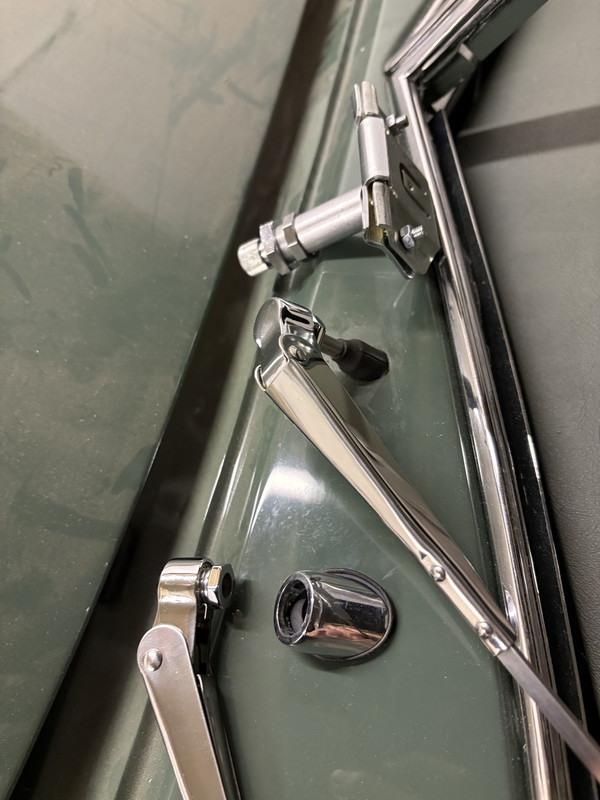
Windscreen Wiper
Seemingly as every car I have built does….the windscreen wiper assembly…..and the first case of me realising that when you modify a car you encounter unforeseen obstacles….as I upgraded the single speed motor that the XK120 came with to a modern 2 speed device…which as a kit from Guy Broad came with upgraded spindle mounts…new copper tube guides and a new push/pull cable
The problems were threefold….
The external spindles are a much more contemporary design….not the beautifully slim original type…sure they grip the wiper blades more effectively having the detail….but they are bigger than the original openings…so the original formed gasket would no longer work…
The new motor is bigger and was only supplied with a cheap U shaped clamp which looked dreadful….so out with the metalworking tools to add metal to the original bracket so it looked more original and less of an afterthought
The original serrated inner pull/push mechanism had a specially shaped end terminal to lock into the original motor…so this had to be modified so it would fit into the new motor…but the copper pipes supplied with were to act as guides were no longer useful….as I wasn’t using the newly supplied spindles….
So the end result is original pull/push cable…plus housing…original external spindles and a new motor…noted to self…try not to be so eager to buy upgrades for the sake of it
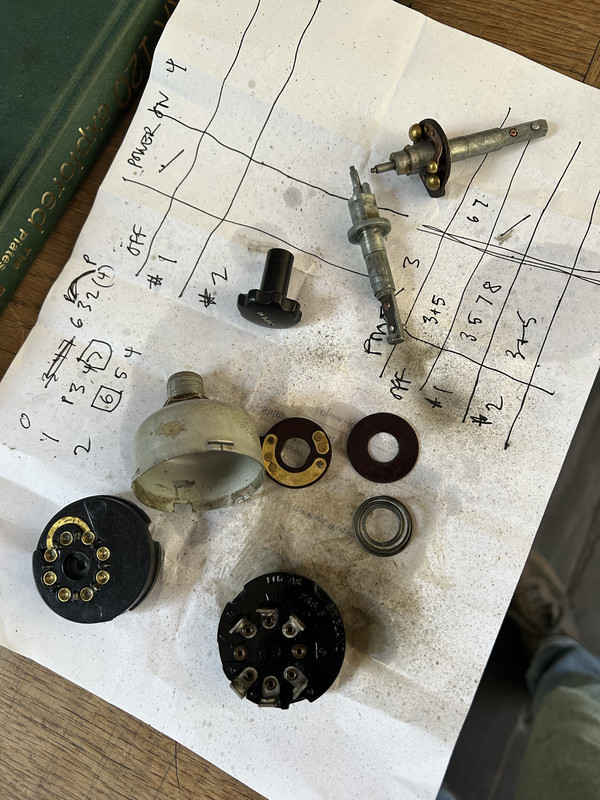
As for the wiring to 2 speed that was another test of patience….new switches are a crazy price, and anyway I wanted to keep as many of the old dials/switches and so on…so I can canabalised a couple of second hand Lucas switches and with the assistance of a small fabricated jumper cable I was able to modify my original switch (with donor innards) to give 2 positions for power…..I was especially proud of myself that day as it was driving me potty trying to work out which terminals received power in what combination..the jumper cable was such a simple solution…
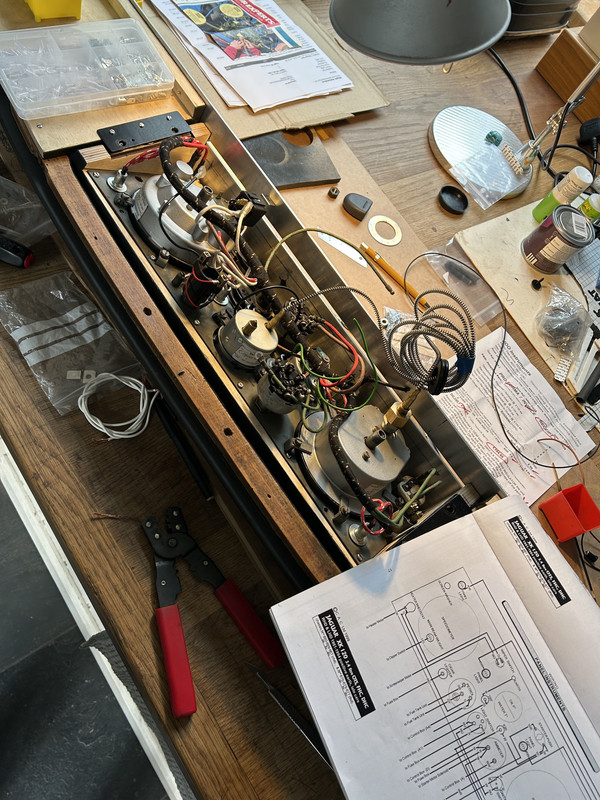
So what could have been a few hours work developed into days of work…..if I conservatively said it took 4 times longer….that gives you an idea of the typical rate of progress generally for all of this fitting out which was to ensue…..perhaps this picture might help that message to sink home….this is about one of the may times i was attempting to fit wiring onto and into the dash…(more on that subject next….)..tedious and trying are the understatement of the millennia….
…and how did I continue….well in a randomly organised sequence of impulsive decisions….otherwise known as doing what I felt most inclined to do at any time I felt the impulse
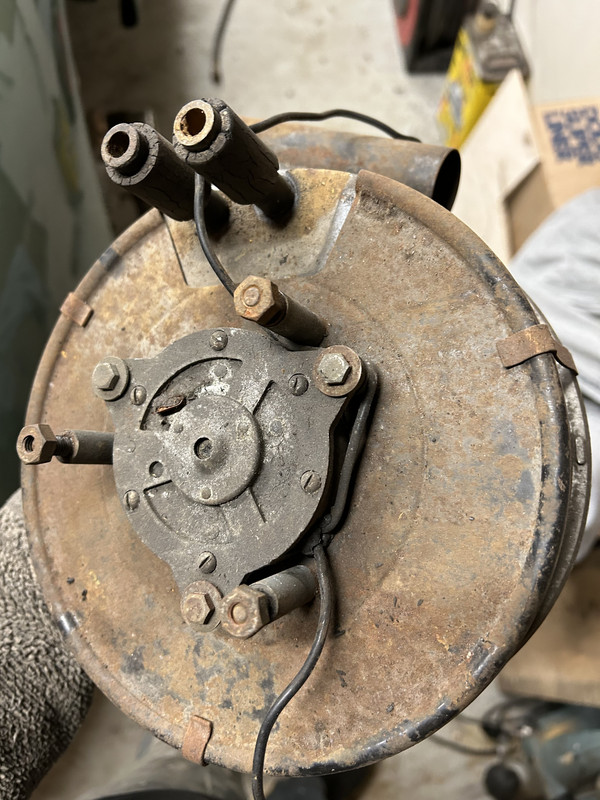
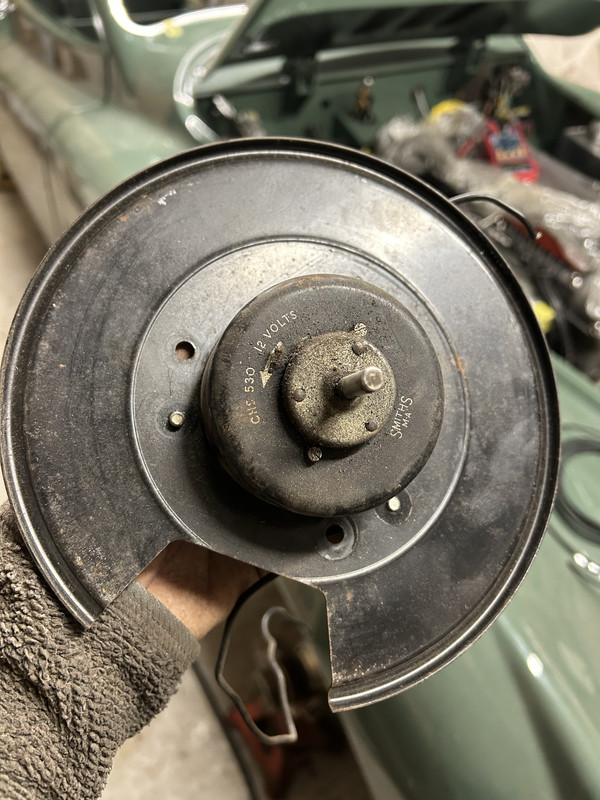
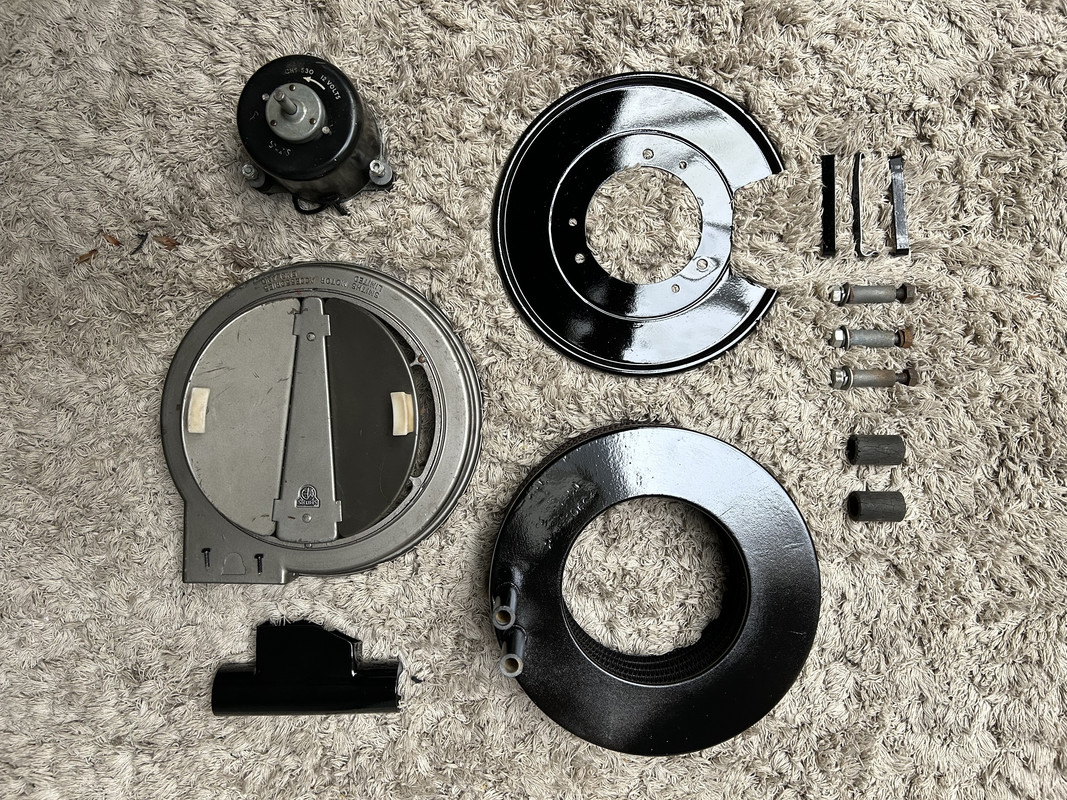
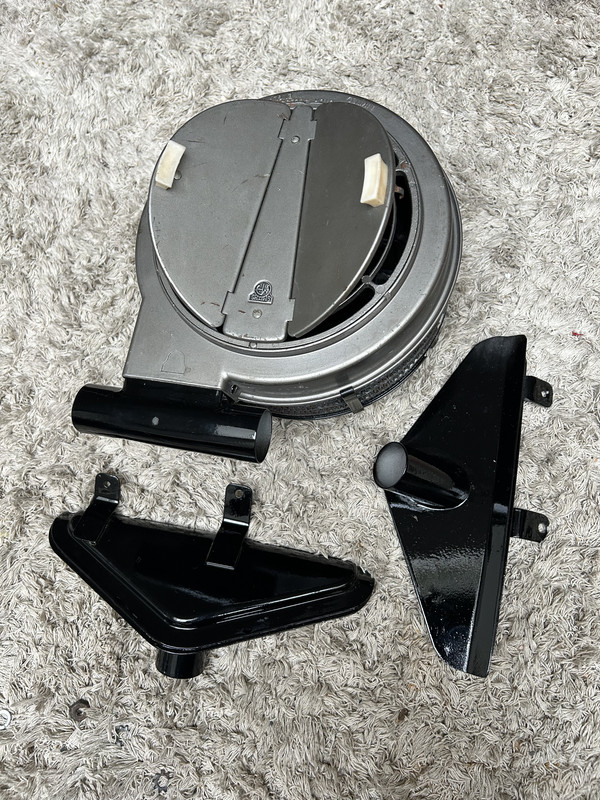
Heater
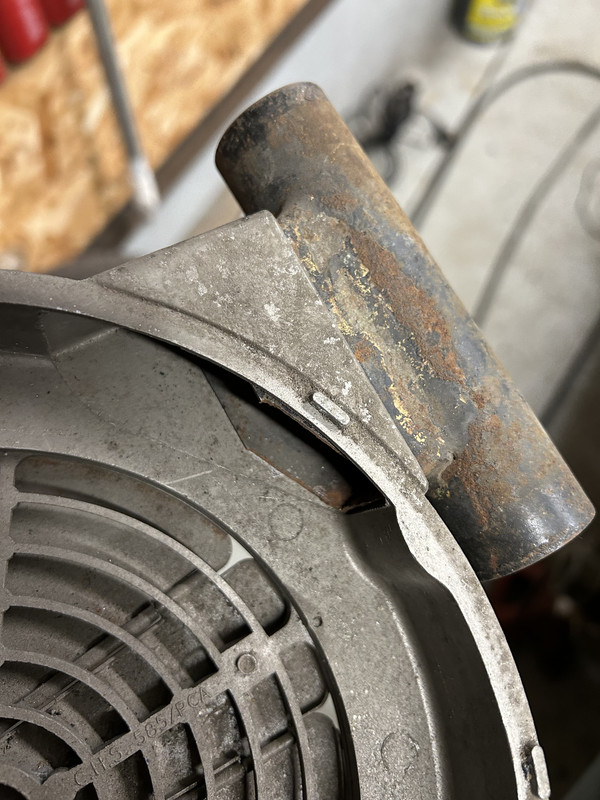
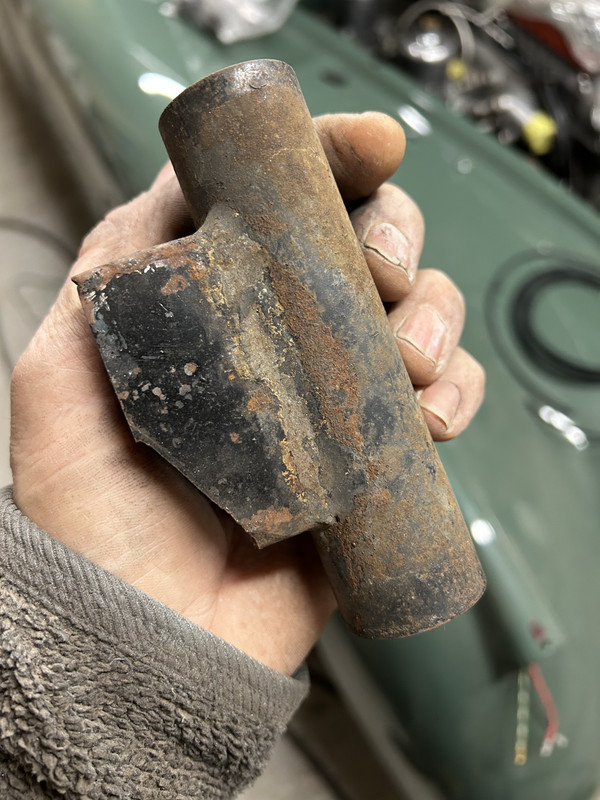
The heater on a vintage Jaguar is probably one of the most useless and least relevant components in the car…..why you may ask…and so I will tell you
250kg of cast iron, aluminium and various pieces of rapidly rotating straight 6 machinery anywhere between 800 and 5,500 rpm in harmony with an antique 4 speed Moss box generates enough heat to melt as small polar ice cap…so the idea the driver needs to increase that upward creation of temperature is bordering on insanity…however the circular heater is a lovely looking piece of vintage kit so I had to respond accordingly and improve it….
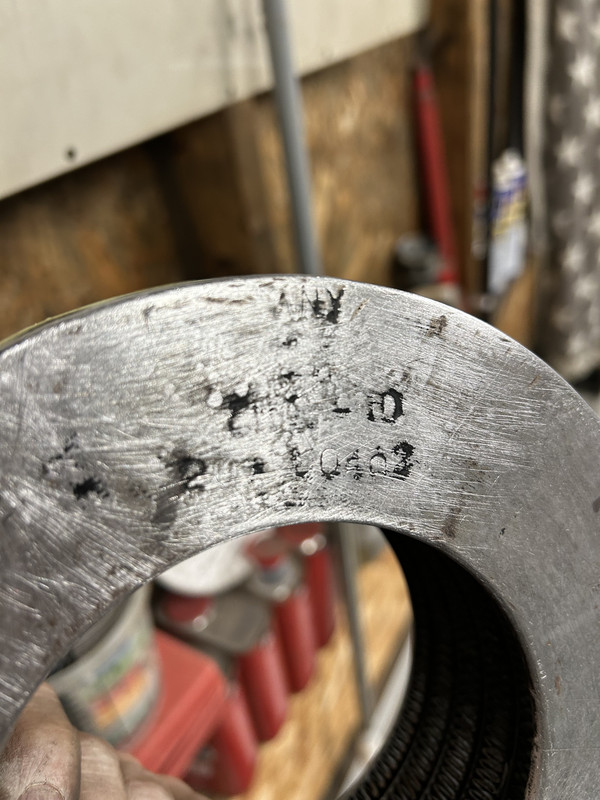
And whilst cleaning it up I came across a collection of markings….interesting but never did quite establish what they were…..
The perfectly workmanlike brazing of components is quite fit for purpose…but was not fit for my eyes…despite the fact that once installed it is totally impossible to notice….furthermore my efforts to improve quality had absolutely zero influence on airflow….
Made me feel better though…..
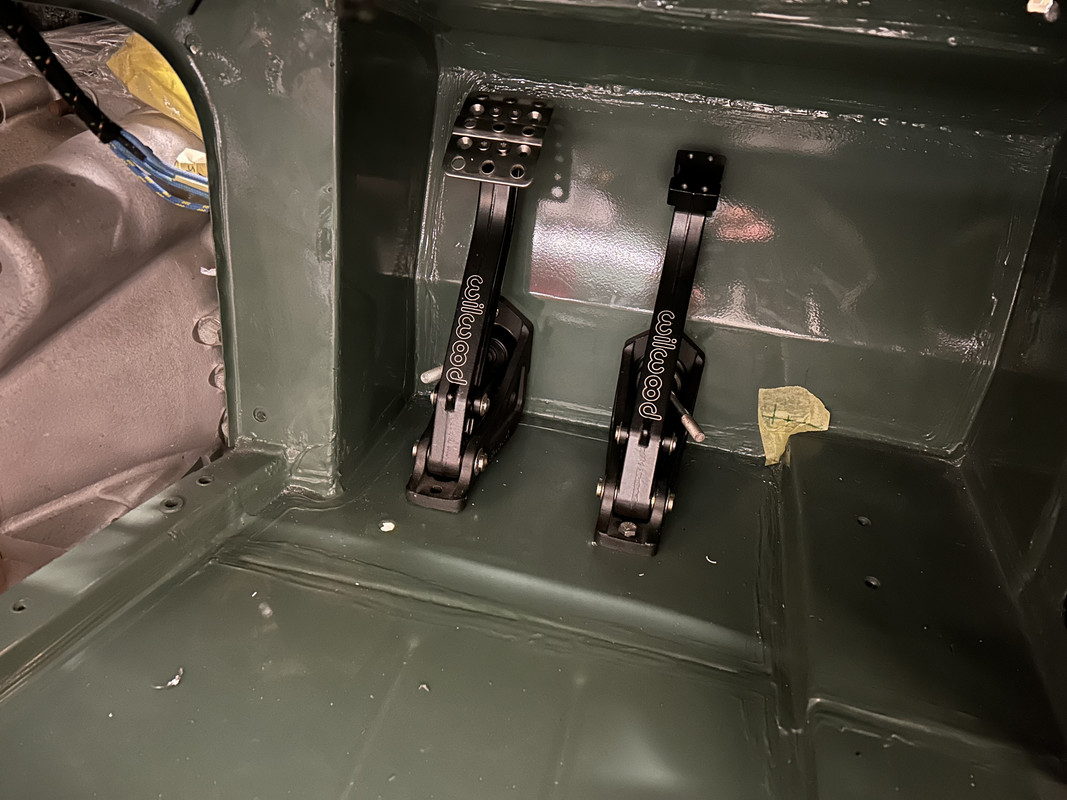
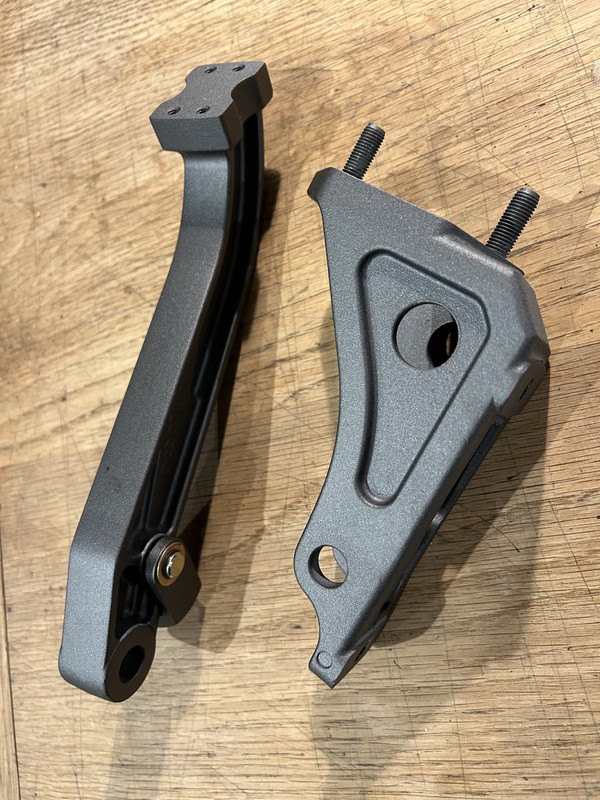
Pedals
In order to attempt some degree of control over the forward direction of travel I decided very early on in the build that the original Heath Robinson affair known as the pedal assembly needed a fundamental re-think….so a modern pedal box assembly from Willwood was sourced….except this is my car….and a Jaguar at that….so the idea that a third party could have its brand identity included in this build was terminated instantly….as were the less than perfect seam mould marks on the pedal levers…..and whilst at it I altered the colour from a dull satin black to a more pleasing dull anthracite
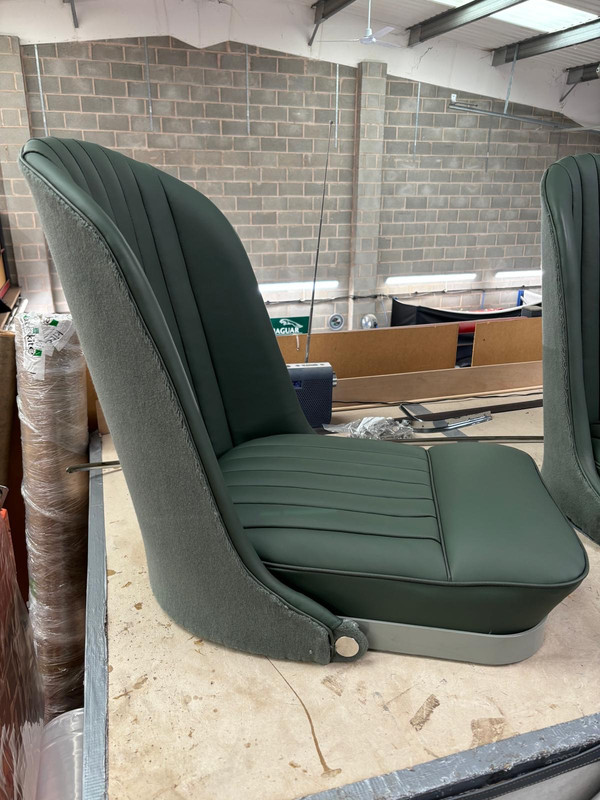
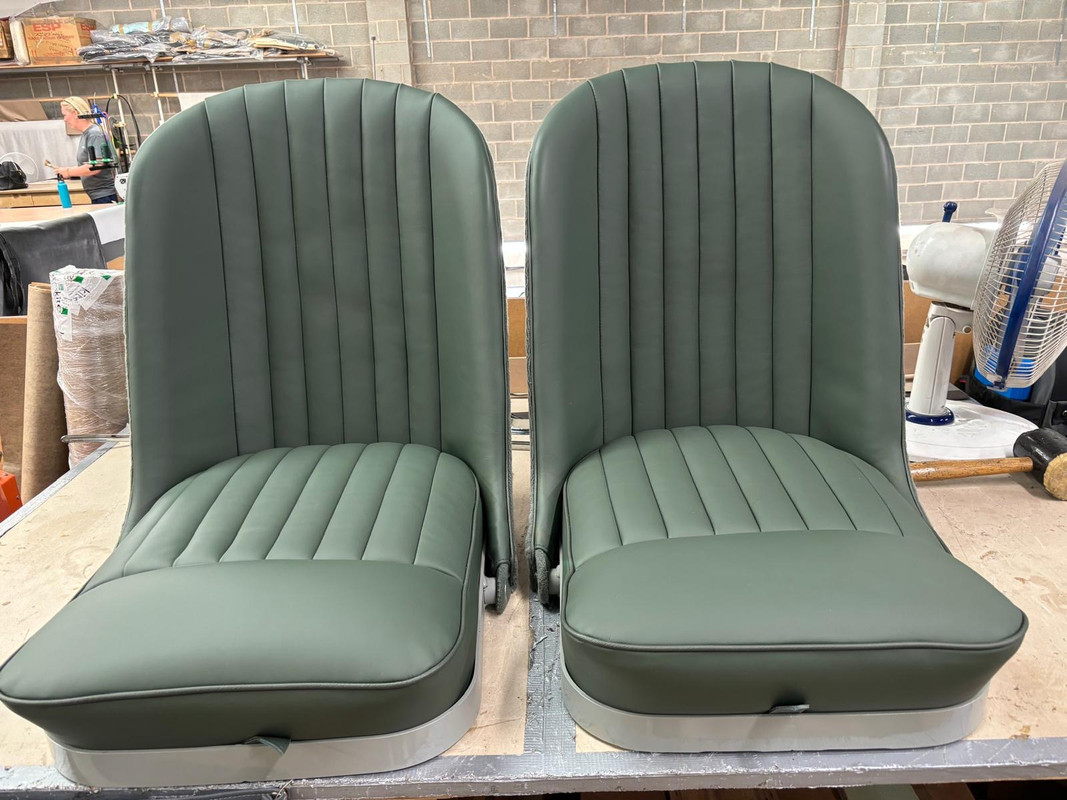
Seats
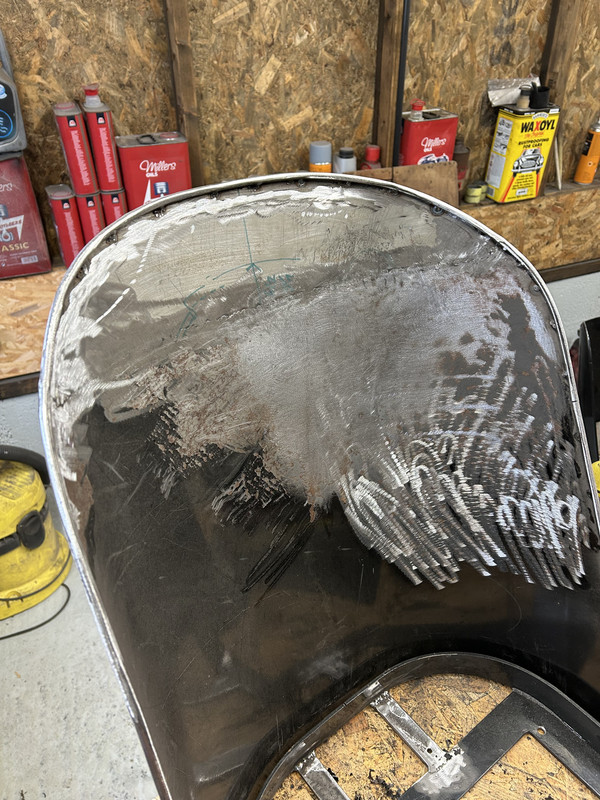
And lastly in this trilogy of overindulgence there was the pair of human supports…otherwise known as seats…..
On the basis that this was meant to be a gentleman’s driver of the period…then the soft bench like offering…beautiful yet more resembling of a sumptuous sofa had to be improved upon
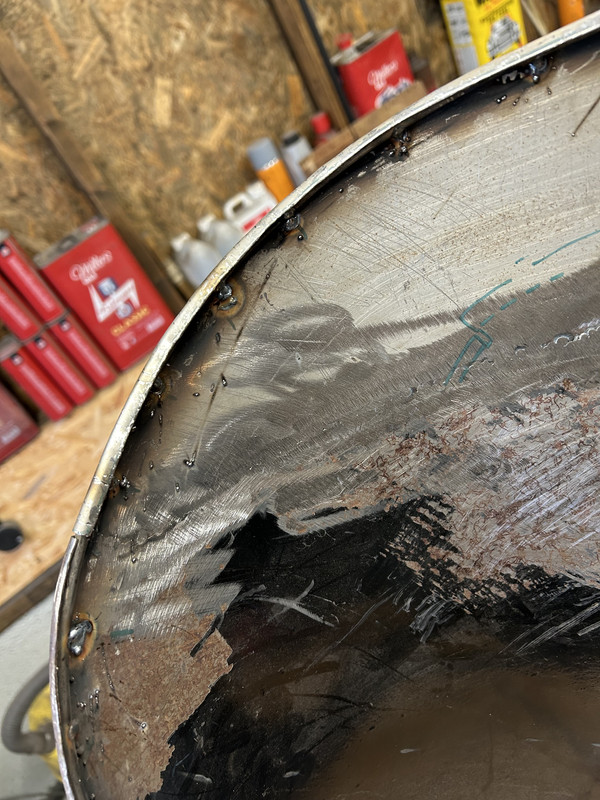
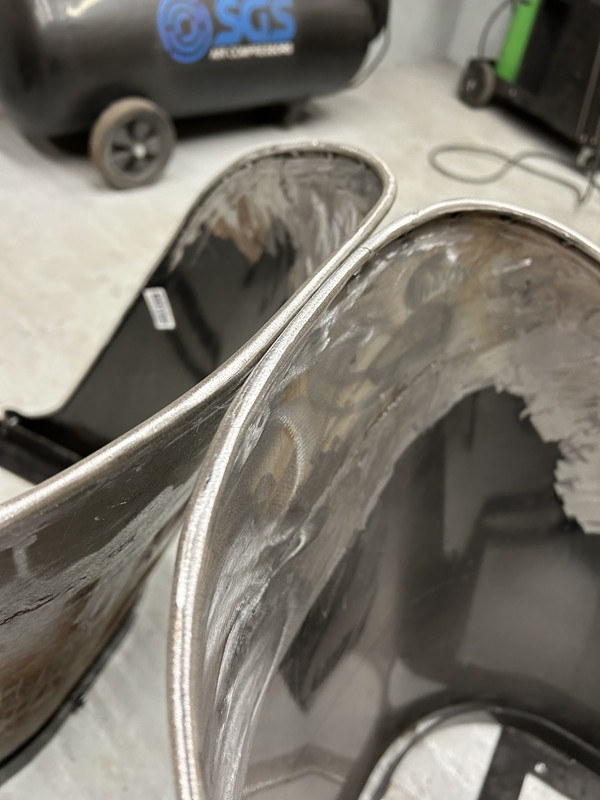
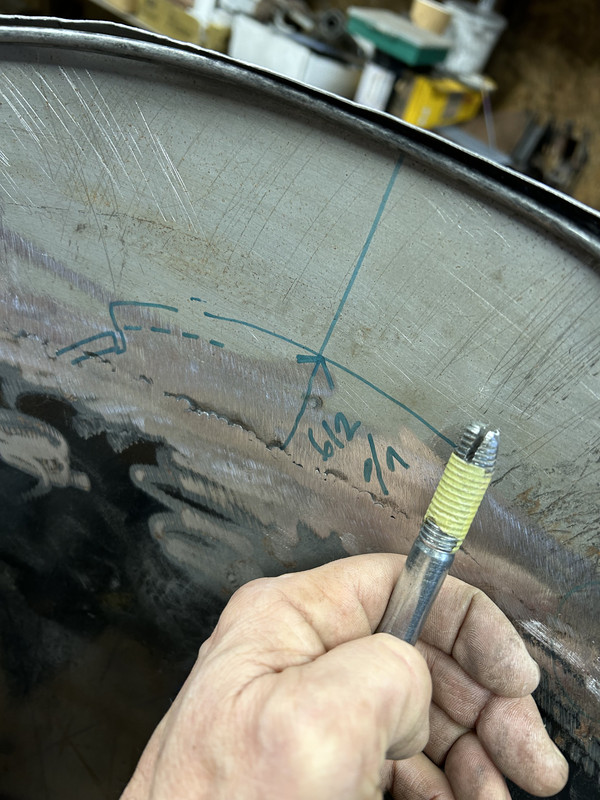
Bucket seat are easily available , however I didn’t like the shapes of the seat backs….the true buckets seats available had a pleasing curved upper silhouette..but the forward tilting ones did not….and I wanted a tilting seat….so I would be able to access the carefully crafted storage compartments behind the seats….so I was left with no choice….
Modify….
Which was a relatively simple affair and allowed me to create the profile I truly wanted….but that’s then came at a cost as the subsequent trimming became fully bespoke…requiring a bespoke pattern to be made…which required me to invest a deal more finance….
Such…dear reader is the price of individuality……….
These images show the difference in the profile…original in black in the first picture….which was a trial to get a matching shape for both seats…..but with the aid of a specially crafted tool allowed me to replicate the original rolled wire edge…
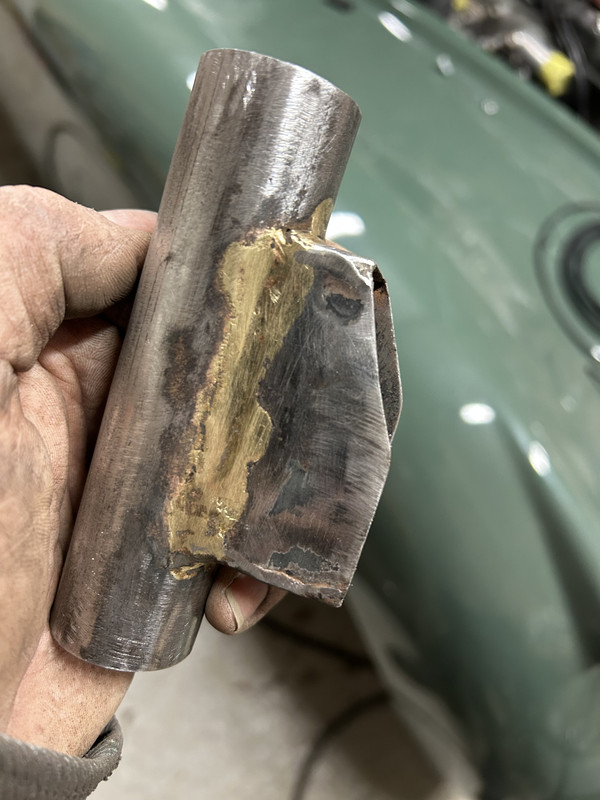
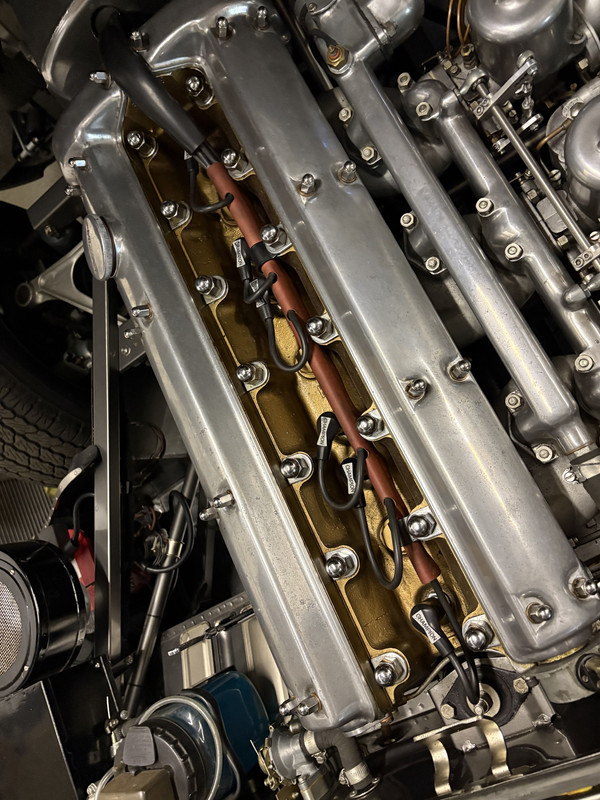
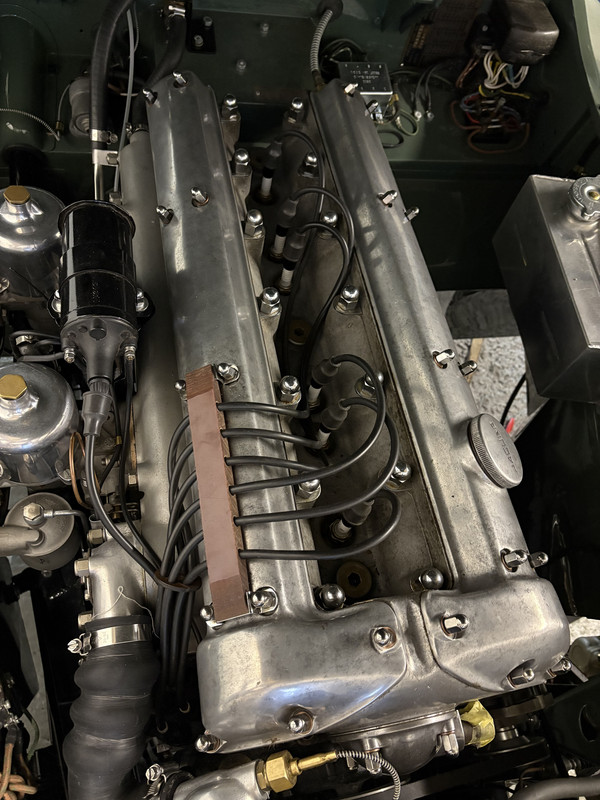
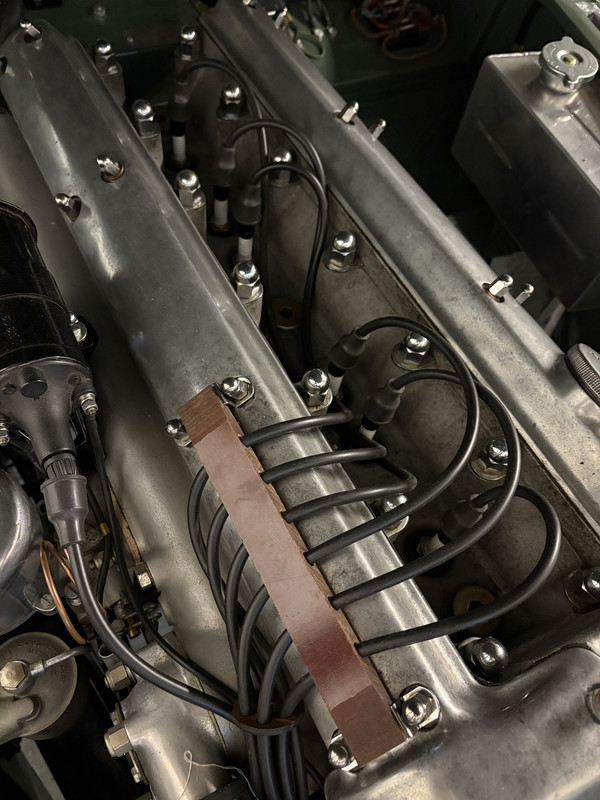
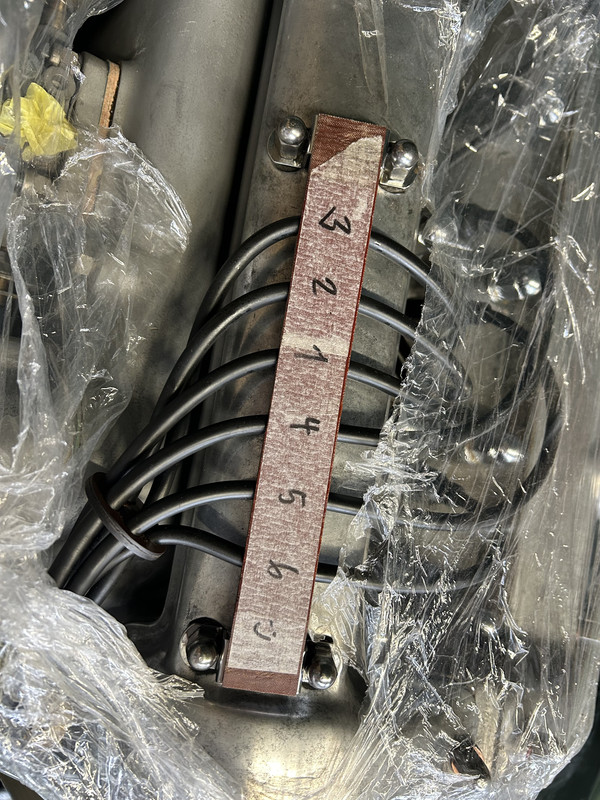
Oh….and one more piece of indulgence….the HT leads on an E Type run through a formed piece of coloured boasted….more substantial than pure cardboard…sometimes called millboard I believe…..I was the ported to use this…but the spacing of the cylinder head bolts is different on the 3.4 litre…so I bought this…..
But of course then there is the question of how to distribute the HT leads….this resulted in a curious arrangement perhaps…but it did then arrange the leads perfectly in the valley of the head…..
Thanks for reading…..
The XK
Moderator: Bootsy
-
jtparr
- DDK 1st, 2nd and 3rd for me!
- Posts: 2356
- Joined: Mon May 24, 2004 10:54 pm
- Location: london/surrey
Re: The XK


1974 2.7 Carrera
(full restoration. now as an RS Touring)
1963 3.8 E Type
( 11 years in the making…………………….)
1952. XK120…the next one ……….……..)
(full restoration. now as an RS Touring)
1963 3.8 E Type
( 11 years in the making…………………….)
1952. XK120…the next one ……….……..)
-
jtparr
- DDK 1st, 2nd and 3rd for me!
- Posts: 2356
- Joined: Mon May 24, 2004 10:54 pm
- Location: london/surrey
Re: The XK
Sorry…double post…first one had 2 typos…..
1974 2.7 Carrera
(full restoration. now as an RS Touring)
1963 3.8 E Type
( 11 years in the making…………………….)
1952. XK120…the next one ……….……..)
(full restoration. now as an RS Touring)
1963 3.8 E Type
( 11 years in the making…………………….)
1952. XK120…the next one ……….……..)
-
jtparr
- DDK 1st, 2nd and 3rd for me!
- Posts: 2356
- Joined: Mon May 24, 2004 10:54 pm
- Location: london/surrey
Re: The XK
Actually I have spotted others…!…dyslexia…or spell prompt……who knows…. 
1974 2.7 Carrera
(full restoration. now as an RS Touring)
1963 3.8 E Type
( 11 years in the making…………………….)
1952. XK120…the next one ……….……..)
(full restoration. now as an RS Touring)
1963 3.8 E Type
( 11 years in the making…………………….)
1952. XK120…the next one ……….……..)
-
911hillclimber
- Nurse, I think I need some assistance
- Posts: 20620
- Joined: Mon Mar 10, 2008 6:26 pm
- Location: West Midlands
Re: The XK
Wheeew!
I feel for you.
Every special I've built has been a fight, the first 3 years of the LOLA was torture, and several times a big skip for it seemed a great idea.
But, of course, you have to keep going and the result will be so nice.
Great report, I'm sure we have missed the progress reports of old, so please to see you are still moving forward!
'Onwards and Upwards' as the old phrase goes.
73T 911 Coupe, road/hillclimber 3.2L
Lola t 492 / 3.2 hillclimb racer
Boxster 987 Gen II 2.9
Lola t 492 / 3.2 hillclimb racer
Boxster 987 Gen II 2.9
-
hot66

- Moderator
- Posts: 19194
- Joined: Tue Nov 11, 2003 4:17 pm
- Location: North Yorkshire
Re: The XK
That heater is similar to the one I had in my landrover series2a
James
1973 911 2.4S
1993 964 C2
2010 987 Spyder
1963 Honda C100 Supercub
Its not how fast you go, but how you go fast
1973 911 2.4S
1993 964 C2
2010 987 Spyder
1963 Honda C100 Supercub
Its not how fast you go, but how you go fast
-
neilbardsley
- Nurse, I think I need some assistance
- Posts: 8619
- Joined: Mon Apr 16, 2012 4:31 pm
Re: The XK
What wonderful detail but yes very frustrating. The block for the ignition lead looks like it's made from the same material as I used for carb spacers. To keep the carbs cool.
Have you seen Ian's latest video?
https://youtu.be/i8cEV9_wJWU?si=NUHx30gR_bo8RqM4
Sent from my 22011119UY using Tapatalk
Have you seen Ian's latest video?
https://youtu.be/i8cEV9_wJWU?si=NUHx30gR_bo8RqM4
Sent from my 22011119UY using Tapatalk
“A REMINDER. I would be grateful if those members who have borrowed bits from me in emergencies (e.g starter motor, oil cooler, etc) would return them and/or contact me”. – Chris Turner RIP
-
sladey
- Nurse, I think I need some assistance
- Posts: 9320
- Joined: Sat Apr 23, 2005 9:08 pm
- Location: Nottingham, UK
Re: The XK
Great stuff JP - thanks for sharing
The simple things you see are all complicated
I look pretty young but I'm just backdated yeah
I look pretty young but I'm just backdated yeah
-
jtparr
- DDK 1st, 2nd and 3rd for me!
- Posts: 2356
- Joined: Mon May 24, 2004 10:54 pm
- Location: london/surrey
Re: The XK
Am planning to watch it later tonight…..
1974 2.7 Carrera
(full restoration. now as an RS Touring)
1963 3.8 E Type
( 11 years in the making…………………….)
1952. XK120…the next one ……….……..)
(full restoration. now as an RS Touring)
1963 3.8 E Type
( 11 years in the making…………………….)
1952. XK120…the next one ……….……..)
-
jtparr
- DDK 1st, 2nd and 3rd for me!
- Posts: 2356
- Joined: Mon May 24, 2004 10:54 pm
- Location: london/surrey
Re: The XK
Part 26
Cooling
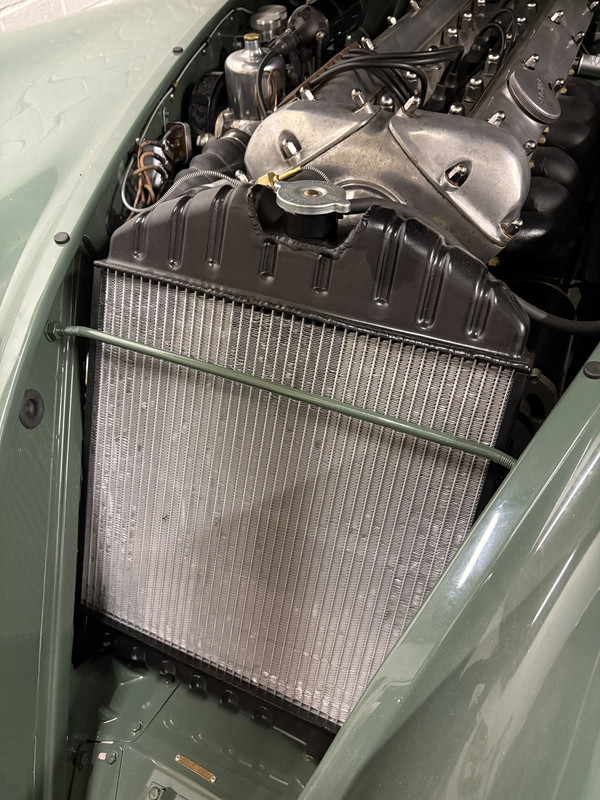
The shenanigans of upgrading the steering to rack and pinion have been described earlier….but the full story of the radiator is worth a few pictures…..
For some reason….when i bought an XK140 radiator…to supposedly drop into the engine compartment as part of the upgrade….well mine didn’t fit….just too tall….and arguably too wide…..bit of a mystery there…but hey ho…how difficult can this be
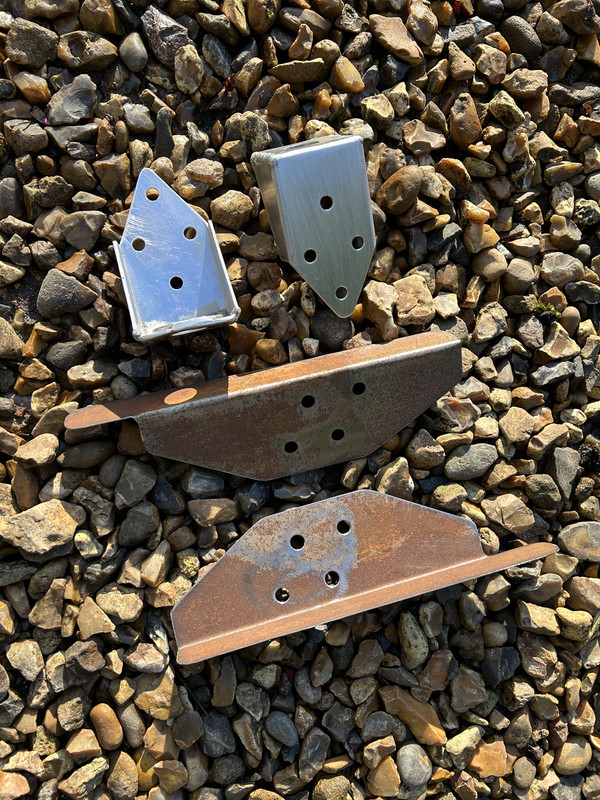
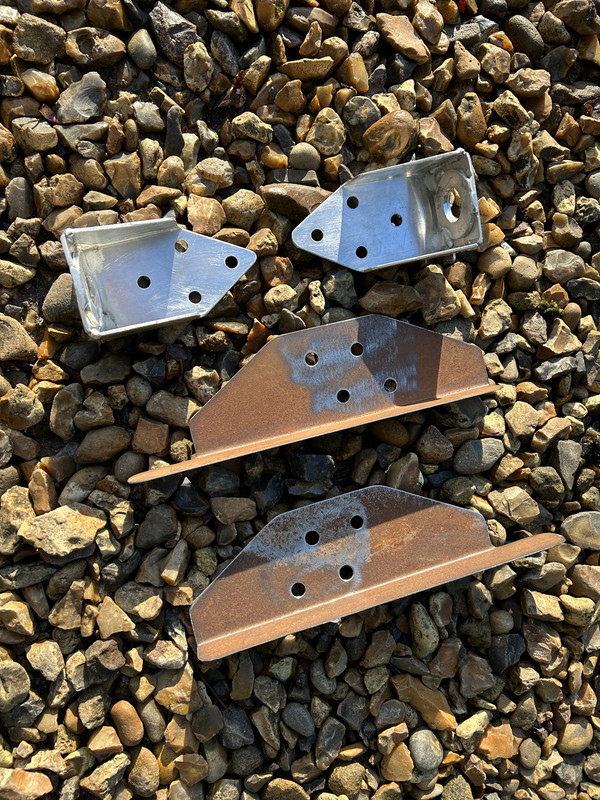
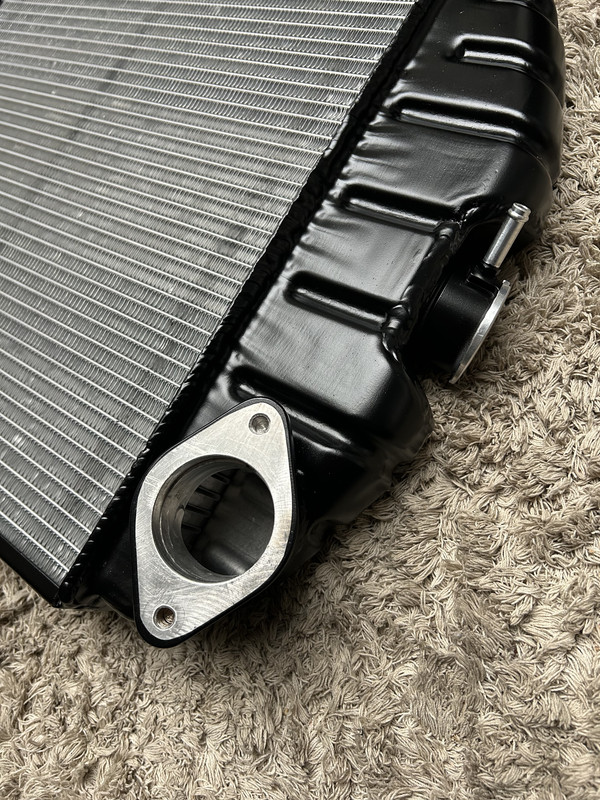
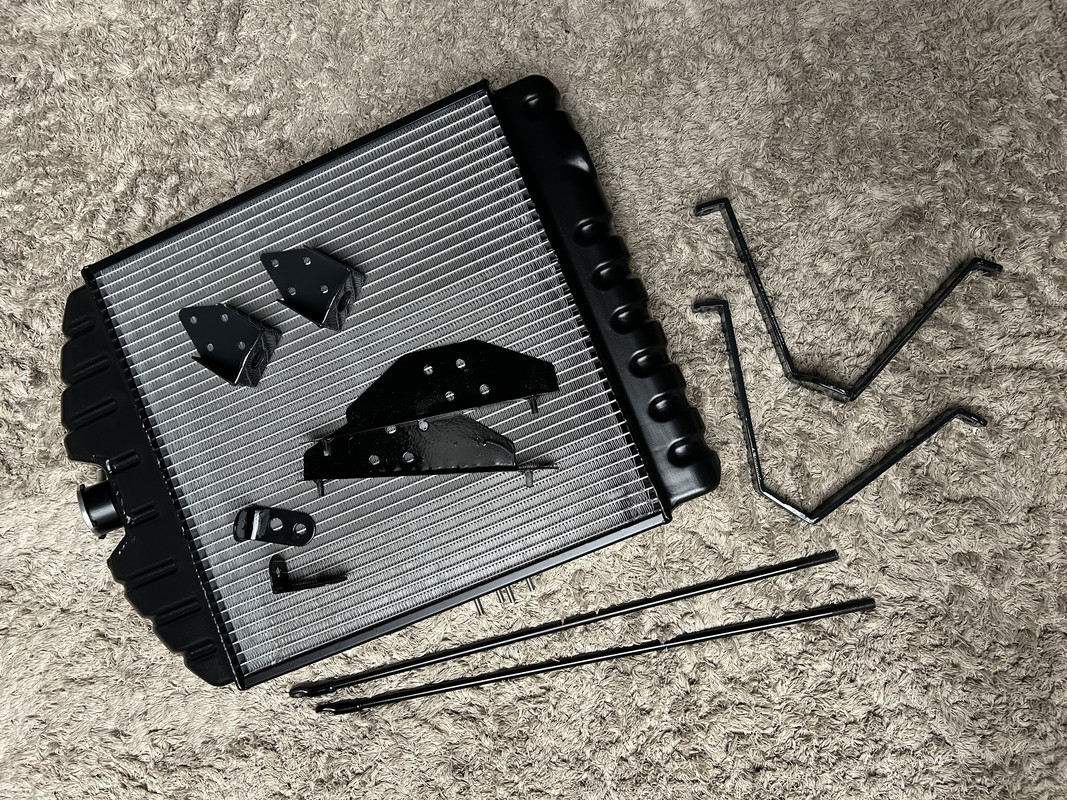
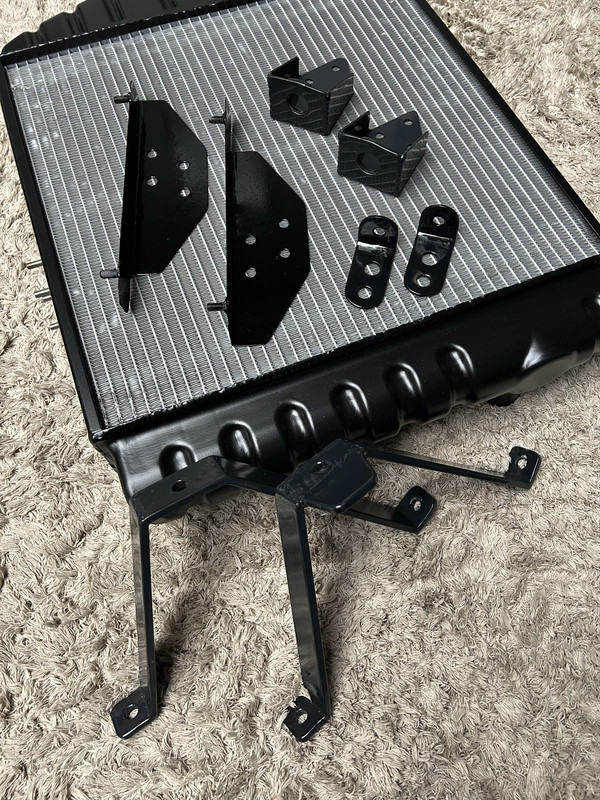
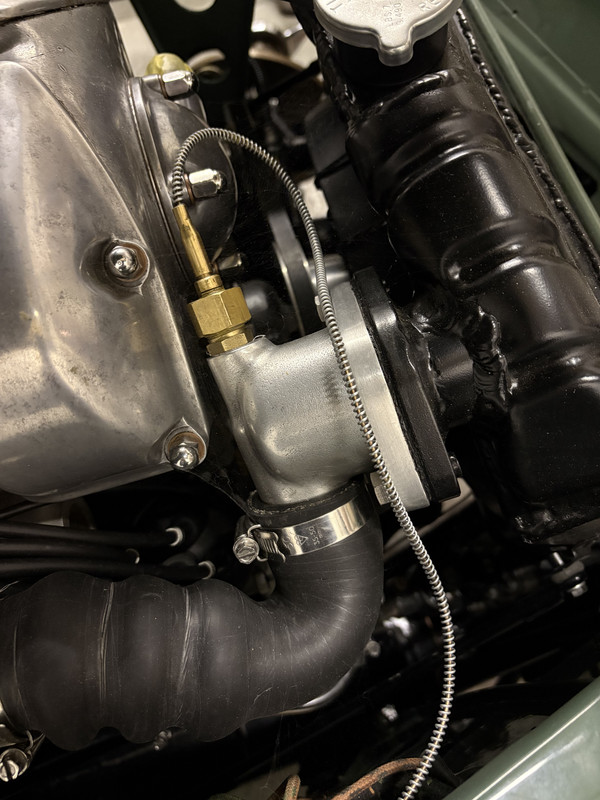
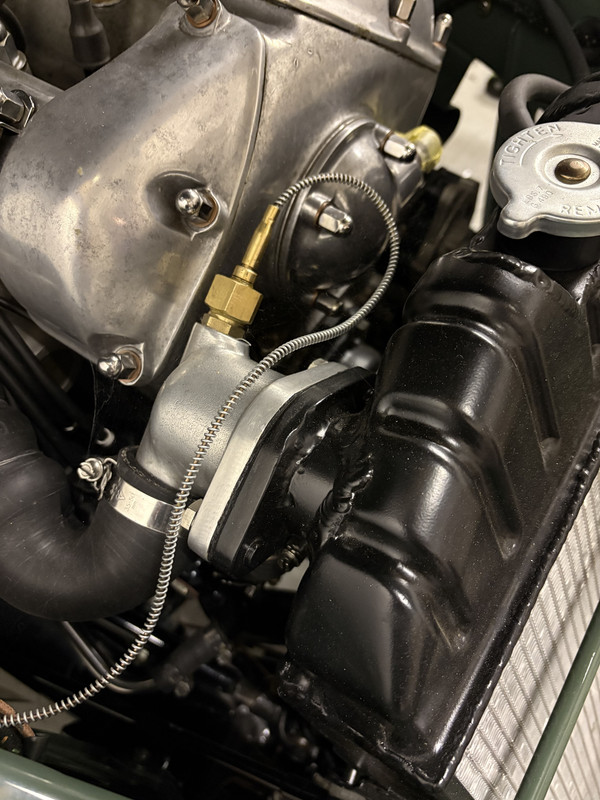
I did some comparisons and took measurements with how I thought this initial radiator should be modified and contacted NAR who are established suppliers of bespoke radiators, who agreed it best to supply the modified article only lightly tacked together..not only did I have to work out how to support the radiator…on side brackets that had to be at a bespoke height relative to the radiator core…but the inclined angle of the radiator meant that upper inlet housing needed to be angled precisely
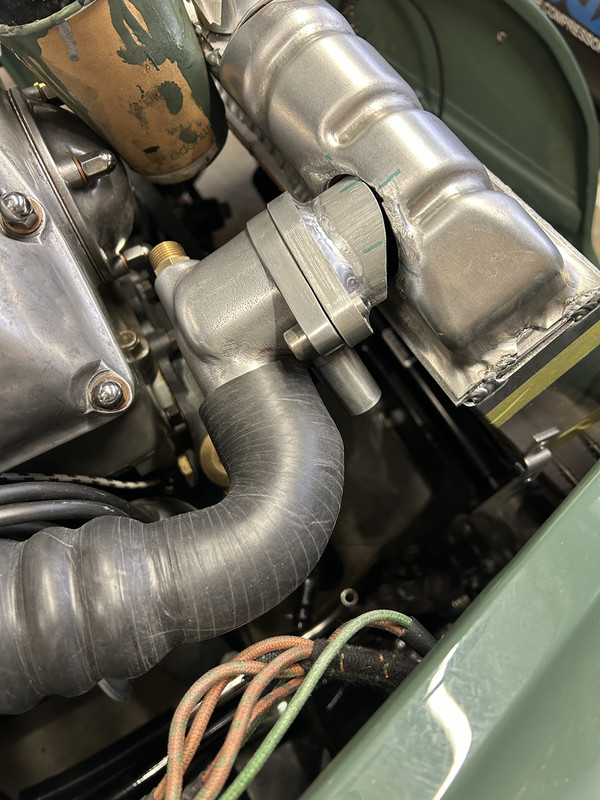
So….in theory not difficult at all…except that it involved trial and error….adding and subtracting bits of metal along the way and needing me to make bespoke mounting brackets not only for the radiator itself but also to hold the upgraded fan I intended to fit…which despite careful measuring ….fouled the steering rack first time round…..and even when I reworked the brackets it soon became apparent that the fan had to be put into the engine bay loosely….followed by the radiator….and then could only be fixed to the radiator once the radiator was bolted into place….after which all the hoses could be attached….
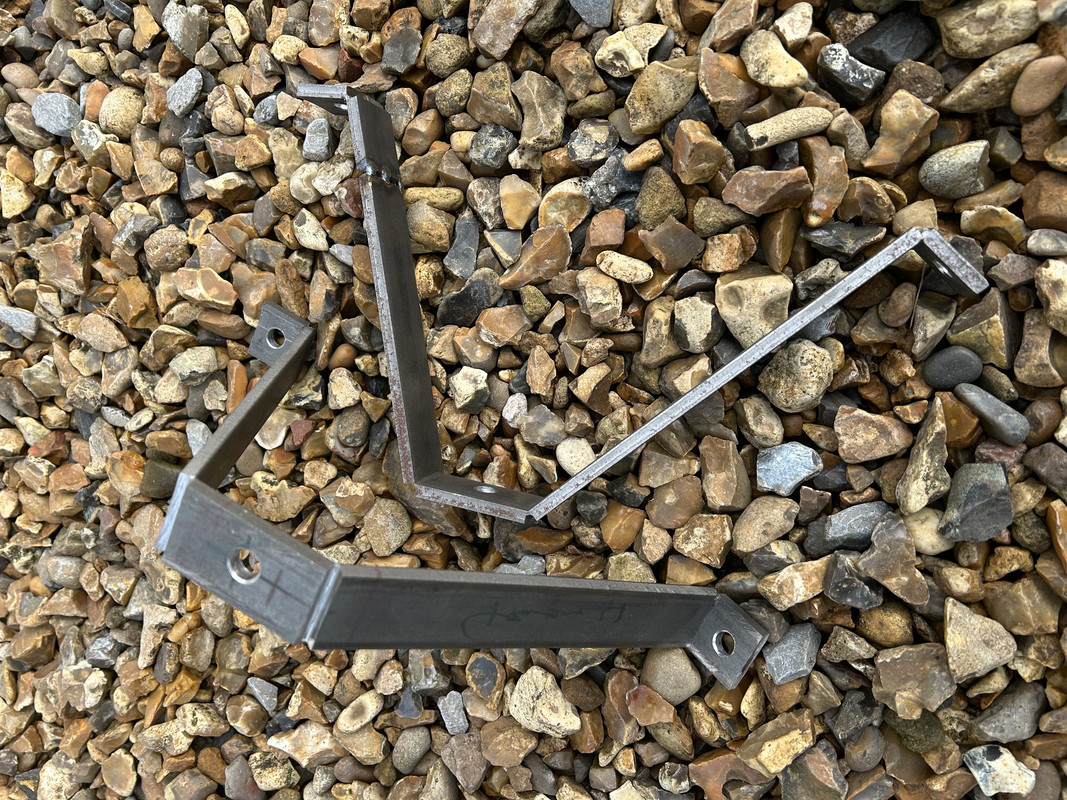
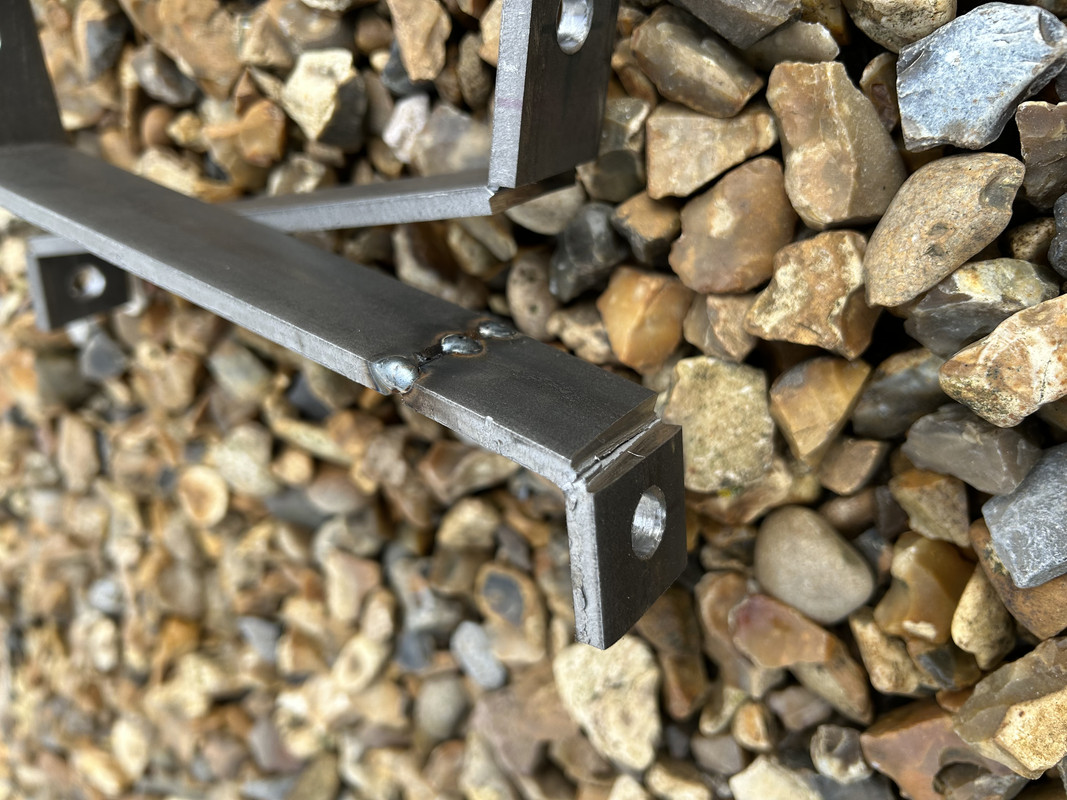
sounds simple…but not straightforward….and needed me to source a selection of stainless hoses of the right diameter so as to avoid too much excess once tightened…originally they would have been a different desing but they are NLA and I wanted a full teaching set….at least they did say MADE IN ENGLAND on them…..and naturally the pan head single screw slots are all aligned the same
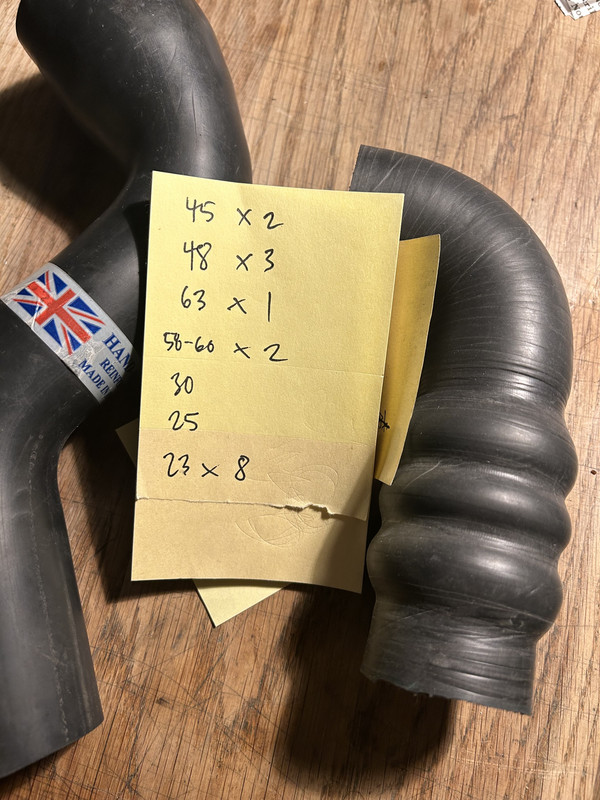
It is also very very tight in that front part of the engine bay….and as I write this I have no idea whether the movement of the engine under acceleration and braking will foul anything as in places I have just around 6-8mm of clearance
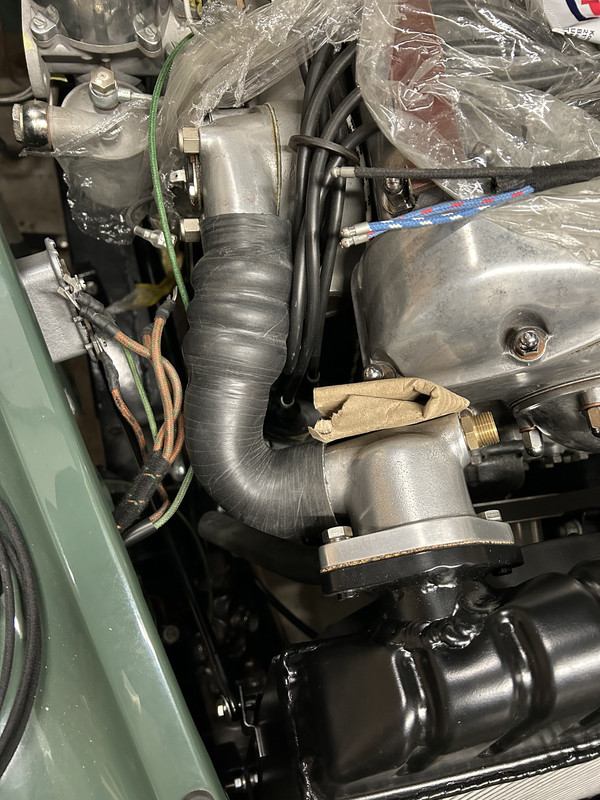
Anyway……careful masking of the natural aluminium finish of the fins and core, prior to etch prime and gloss black 2K to the shroud concluded in a very pleasing final result
More soon
Cooling
The shenanigans of upgrading the steering to rack and pinion have been described earlier….but the full story of the radiator is worth a few pictures…..
For some reason….when i bought an XK140 radiator…to supposedly drop into the engine compartment as part of the upgrade….well mine didn’t fit….just too tall….and arguably too wide…..bit of a mystery there…but hey ho…how difficult can this be
I did some comparisons and took measurements with how I thought this initial radiator should be modified and contacted NAR who are established suppliers of bespoke radiators, who agreed it best to supply the modified article only lightly tacked together..not only did I have to work out how to support the radiator…on side brackets that had to be at a bespoke height relative to the radiator core…but the inclined angle of the radiator meant that upper inlet housing needed to be angled precisely
So….in theory not difficult at all…except that it involved trial and error….adding and subtracting bits of metal along the way and needing me to make bespoke mounting brackets not only for the radiator itself but also to hold the upgraded fan I intended to fit…which despite careful measuring ….fouled the steering rack first time round…..and even when I reworked the brackets it soon became apparent that the fan had to be put into the engine bay loosely….followed by the radiator….and then could only be fixed to the radiator once the radiator was bolted into place….after which all the hoses could be attached….
sounds simple…but not straightforward….and needed me to source a selection of stainless hoses of the right diameter so as to avoid too much excess once tightened…originally they would have been a different desing but they are NLA and I wanted a full teaching set….at least they did say MADE IN ENGLAND on them…..and naturally the pan head single screw slots are all aligned the same
It is also very very tight in that front part of the engine bay….and as I write this I have no idea whether the movement of the engine under acceleration and braking will foul anything as in places I have just around 6-8mm of clearance
Anyway……careful masking of the natural aluminium finish of the fins and core, prior to etch prime and gloss black 2K to the shroud concluded in a very pleasing final result
More soon
1974 2.7 Carrera
(full restoration. now as an RS Touring)
1963 3.8 E Type
( 11 years in the making…………………….)
1952. XK120…the next one ……….……..)
(full restoration. now as an RS Touring)
1963 3.8 E Type
( 11 years in the making…………………….)
1952. XK120…the next one ……….……..)
-
jtparr
- DDK 1st, 2nd and 3rd for me!
- Posts: 2356
- Joined: Mon May 24, 2004 10:54 pm
- Location: london/surrey
Re: The XK
Part 27
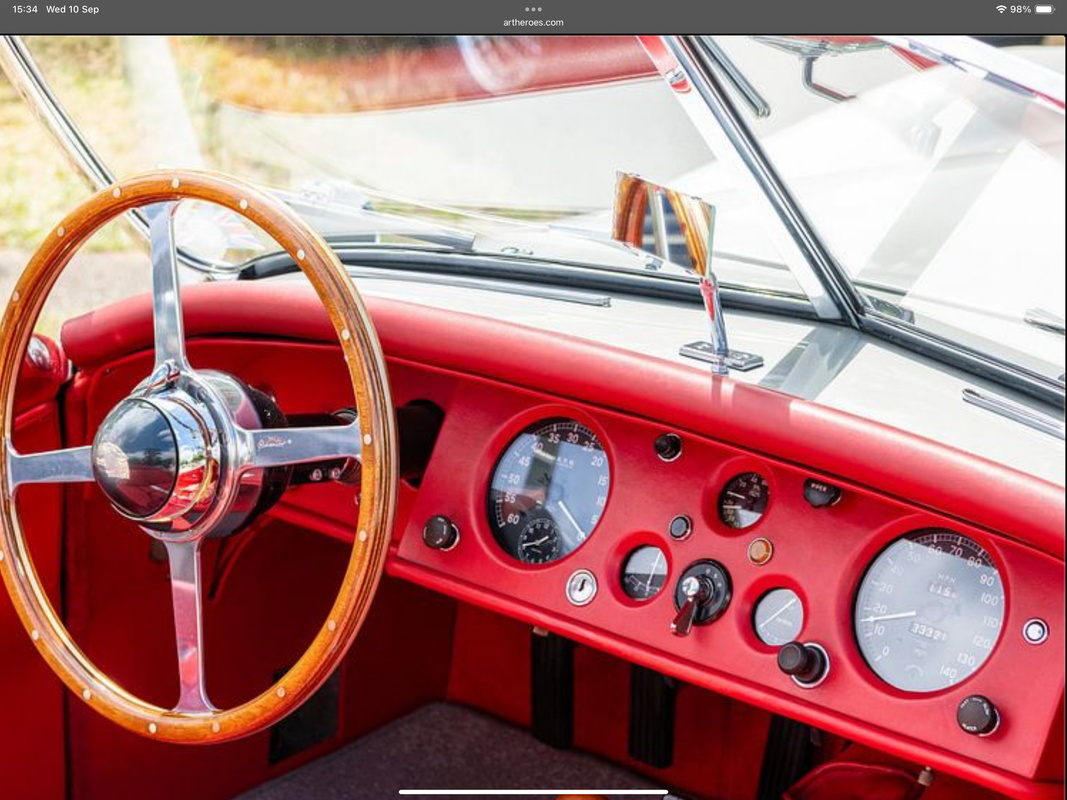
The dash
Ah yes……..the dash….hymmmm……well…there wasn’t exactly much of mine that was able to be restored…so I had free rein to decide the outcome
So…..as I mentioned before apart from the not being in love with the golf club aesthetic, there were 4 others details about the original coupe dash that I had an issue with….
Glove box design
Steering column opening
Radio console design
Ashtray integration
The glove box is a classic throwback to 1930’s / 1940’s style of furniture design with a panel set proud of its surroundings and a sculpted handle…..it serves a purpose…but is fussy in execution
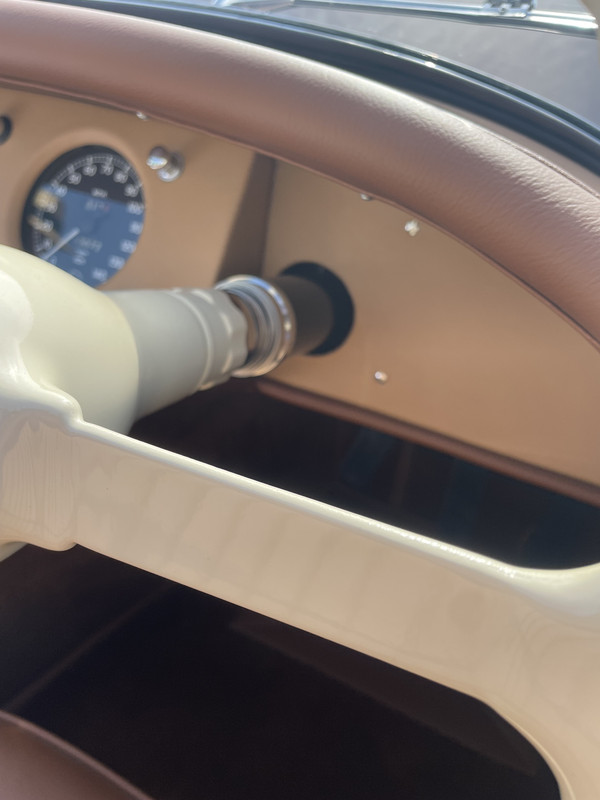
The steering column is located in an open ended notch in the dash (required specifically as the shell with dash included was lowered onto the chassis in production. Not only did I dislike this open ended shape but I didn’t build my car that way….so there is no need to replicate this detail
The radio consol adds visual weight to the overall dash, at odds with the sleek overall profile of the car…and I have no intention of fitting a radio….if I have music at all in the car it will be a Bluetooth moment dispensing with the need for any visible equipment
I ceased smoking years ago and the ash try design is nothing short of crude in comparison to the rest of the car, so that was an easy delete
Another way of explaining all this is to simply state I prefer the look of the early pre-production dash….and the actual dash included in the production version of the roadsters….much calmer in execution…
I was slightly troubled by the fact that I was removing one of the key features of the coupes….namely the walnut….as the open cars were the only ones to have vinyl….but my dash is now totally bespoke….and I also wanted to have single section cant rails….not the 3 part original design so that’s a double need for bespoke veneer services…..and anyway….
I just couldn’t change my attitude to golf…..
So that left me with the simple need to build and cover my own dash……
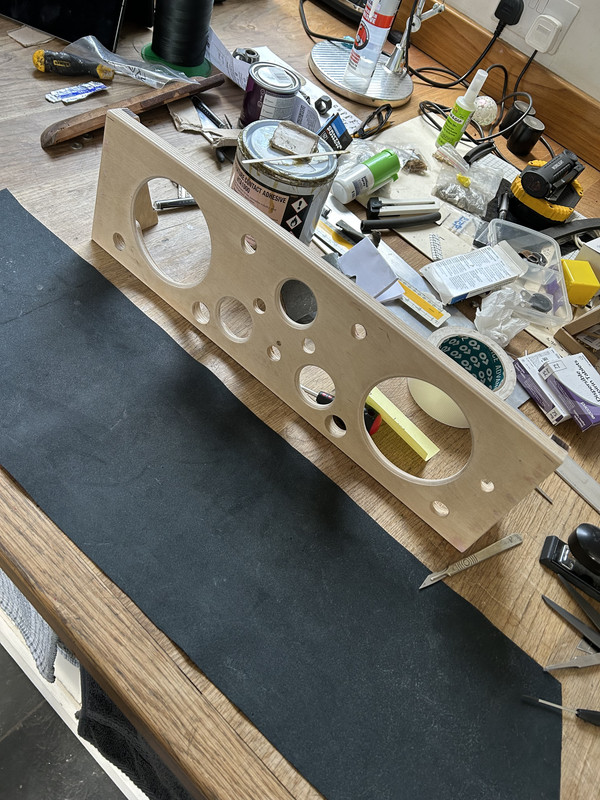
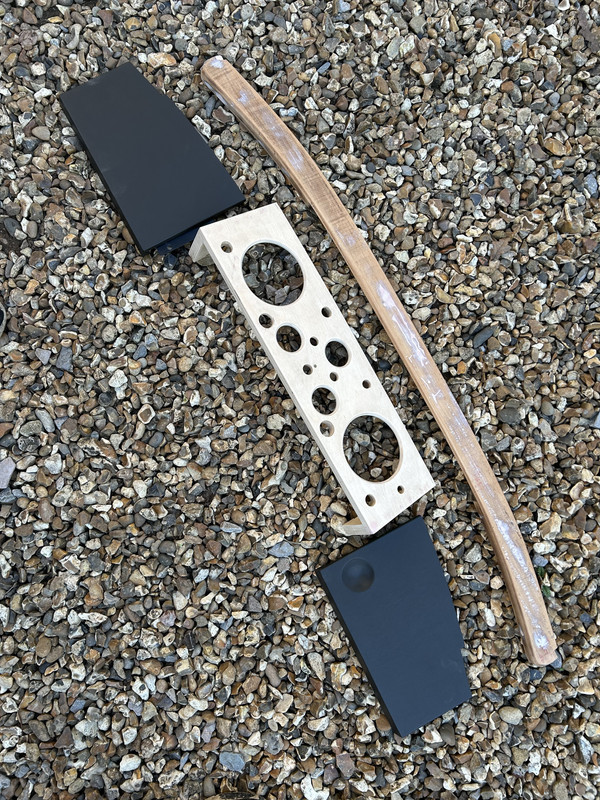
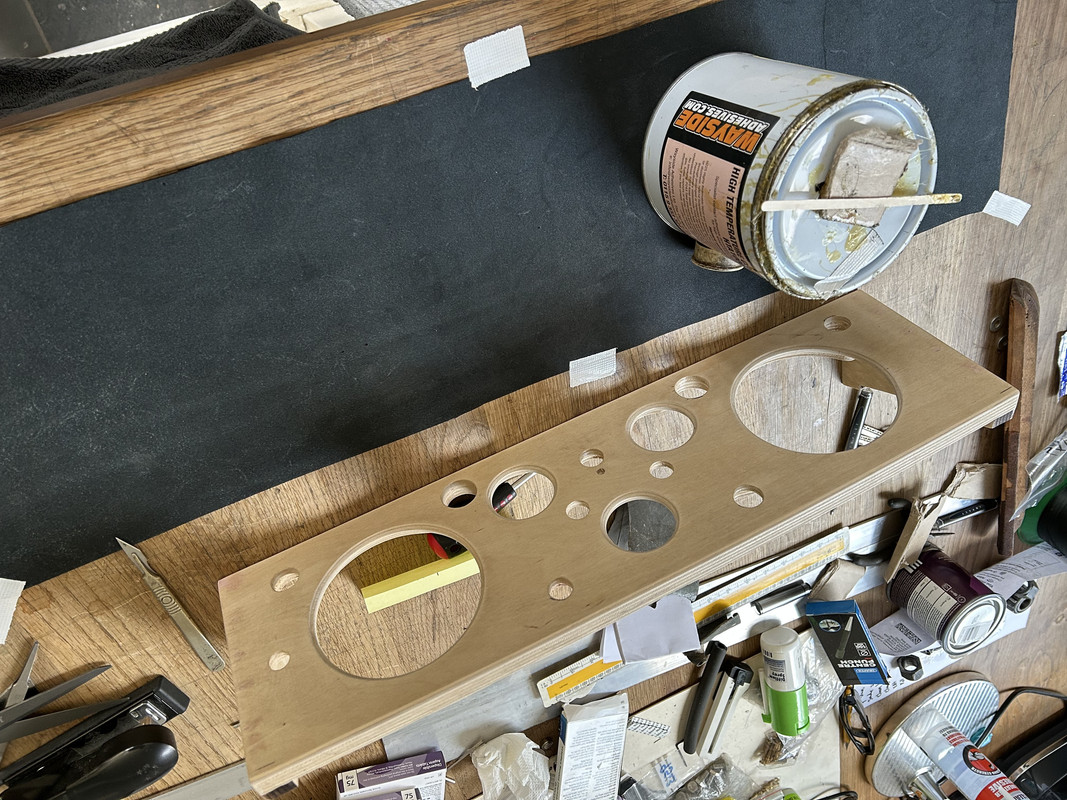
Thankfully the central part of the dash is readily available, so I bought one normally used on a roadster, and together with the curved top rail from the original dash was luckily still perfectly serviceable….marred only by a small number of woodworm it was able to be repaired using body filler
This meant I only (!) had to work out where the steering column would penetrate the dash front…then cut the plywood to suit….
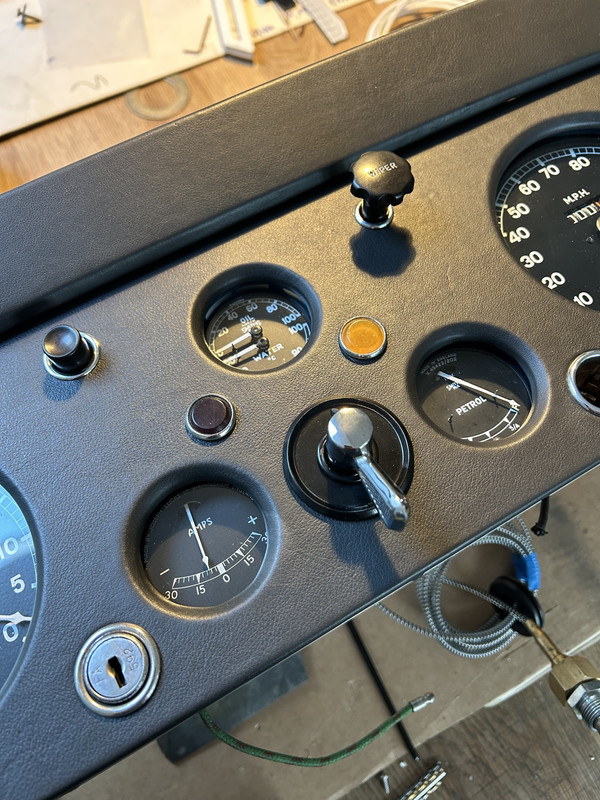
Covering in vinyl somehow seemed cheap however…plus…and its a big plus, stretching vinyl around and into the 3 small instrument dial openings was impossible I thought…assuming I would keep the lovely bevelled edge detail around the instruments….a detail I have to say I was passionate to keep as it is so much more refined that seeing the bezels of a dial…as with the E Type and indeed the 911
To ease that challenge I used the fine grain Nappa leather I have for my steering wheels….but then sent it away to be professionally skived….reducing its thickness to 0.6mm…I figured not only would this allow me to get a super smooth and flat finish to the leather on the plywood….but it would help me stretch the leather into the 2” holes and form a continuous return edge
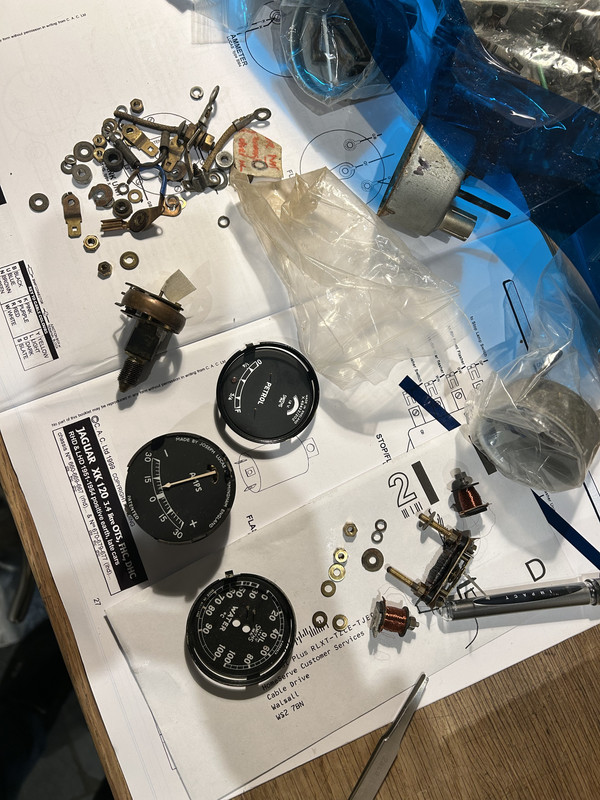
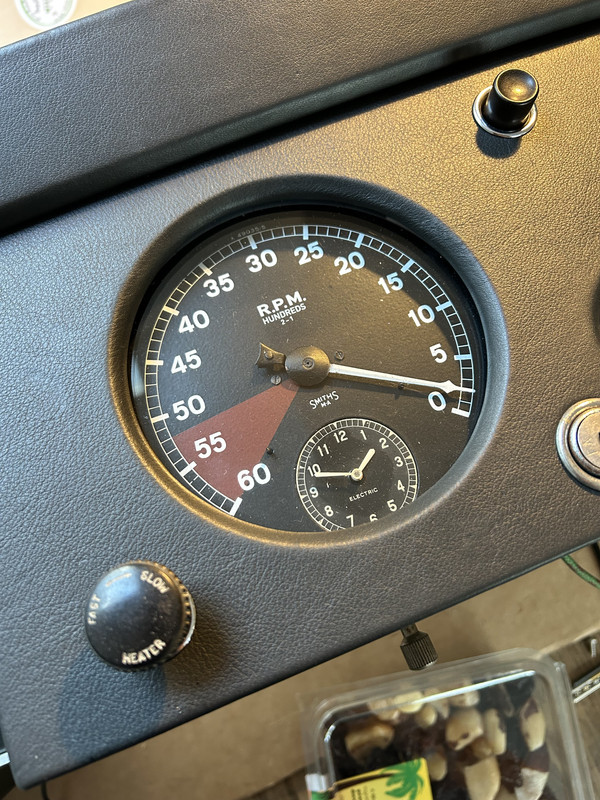
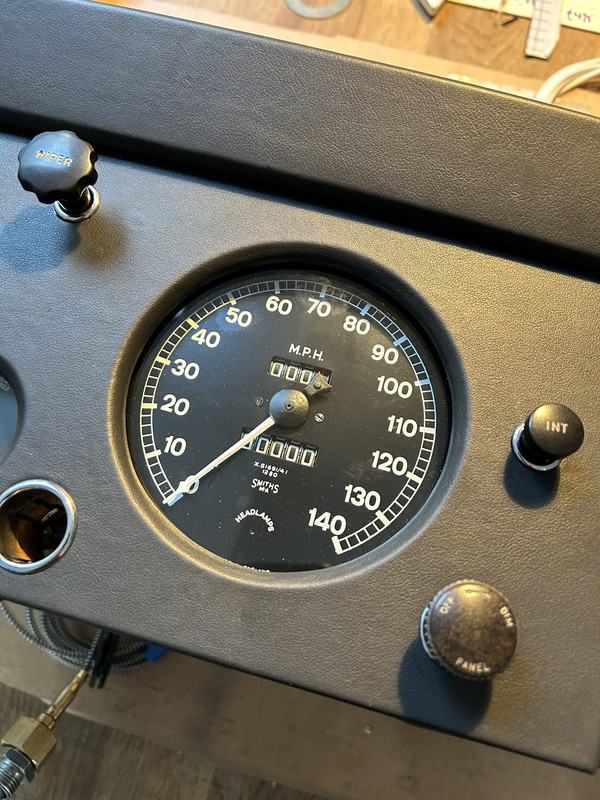
Assembly after covering was pretty fiddly..the instruments had to be adjusted to line up perfectly vertical…once refurbished or restored…I managed to save and restore the Amps and fuel gauge but the oil/water temperature gauge had to be replaced as the inbuilt temperature sensors which connect to the radiator can’t easily be dismantled and its integral into he dial housing….its a perfect copy sand I had kept the original in case I managed to figure out how thus could be done some time in the future
But I was able to restore all the original dash knobs and indicating lights which creates a lobverly balance of new and old….
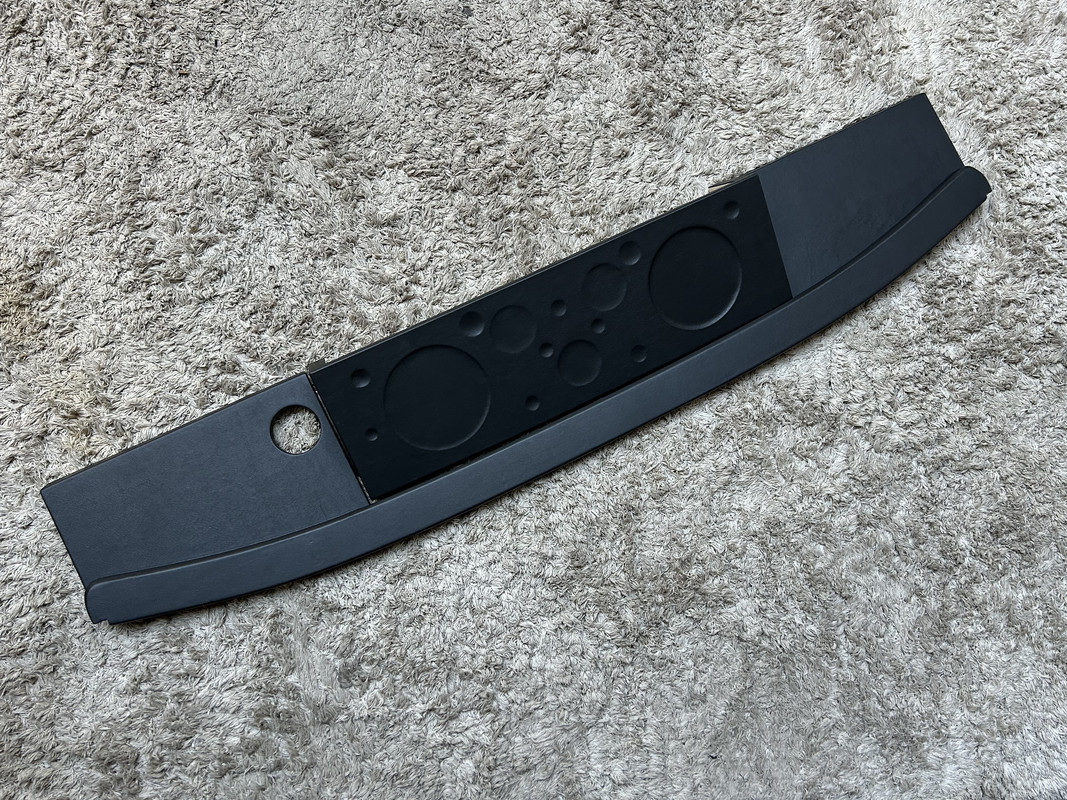
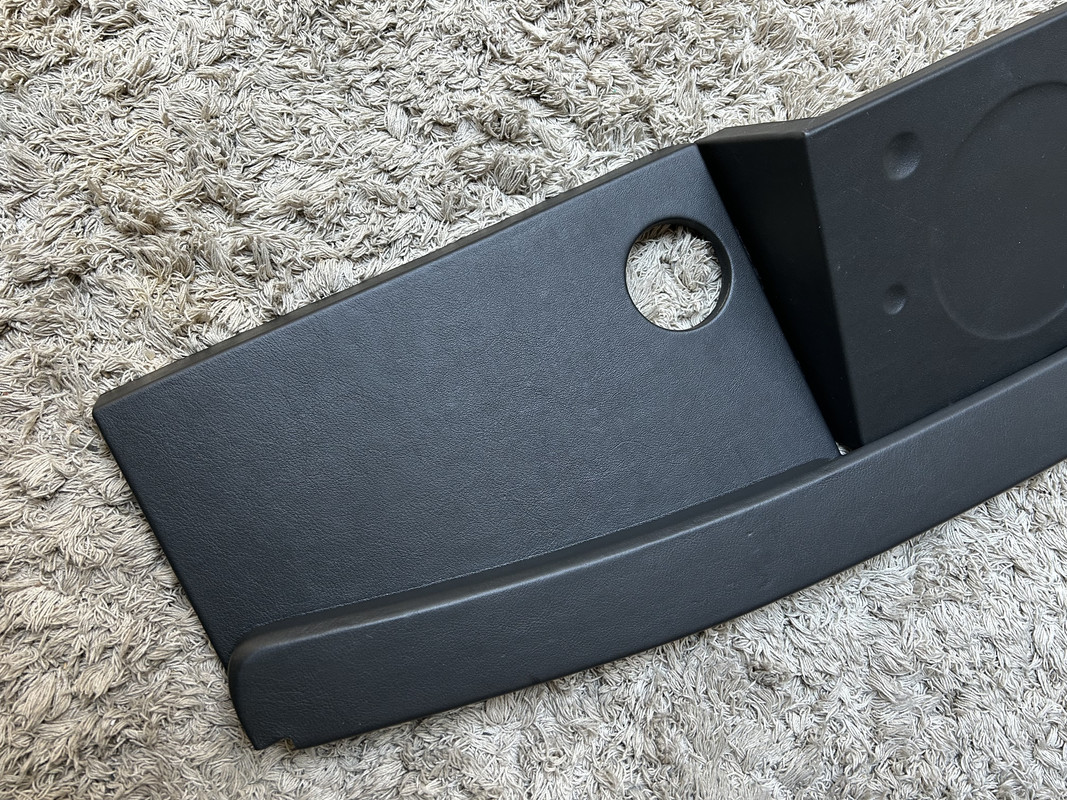
I do love the finished article….to which I added a single accent for the interior….a 3mm aluminium trim which protects the lower edges and helps tie all the wooden pieces together….and compliments the fine chrome escutcheons around the small switches….
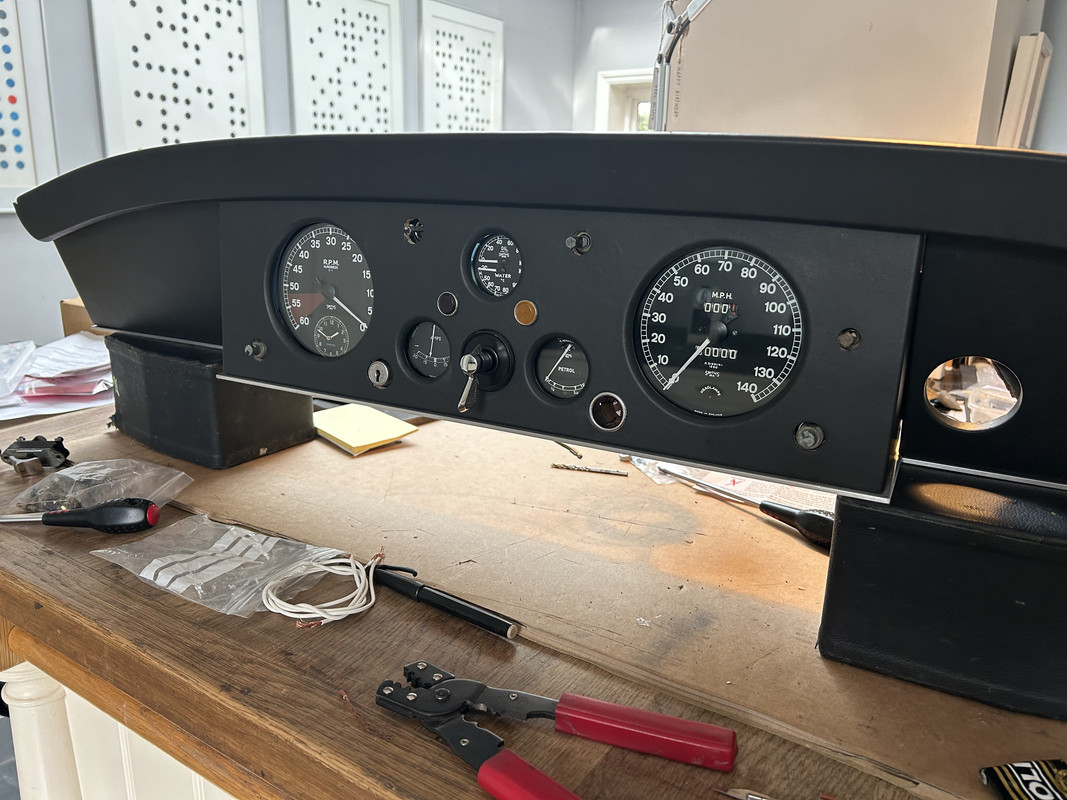
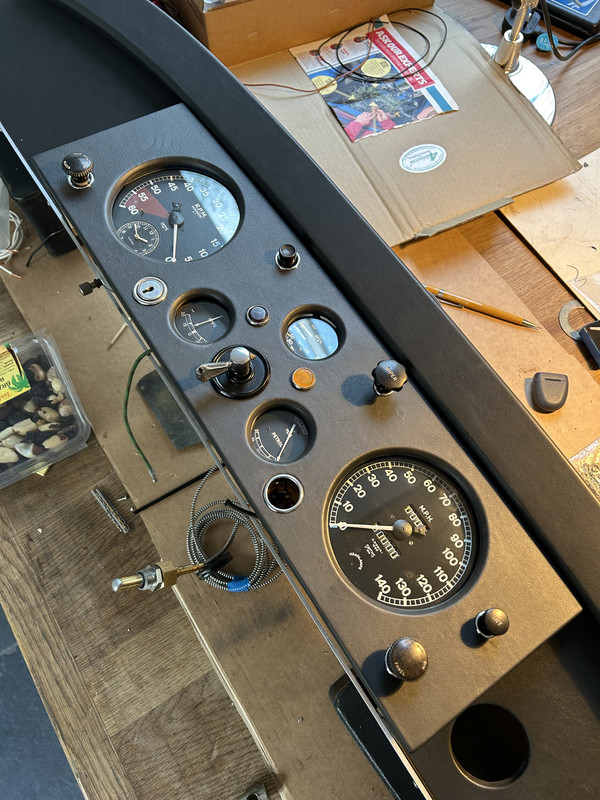
Those escutcheons were a pain to insert however….the unwelcome phenomenon of reproduction parts rearing its head once again…..try marrying an original steel backing plate onto which all the dials are mounted into a newly made and machined piece of plywood….with 14 holes pre cut…that needed to be set out within 0.5mm of accuracy ….hymm…what’s could possibly go wrong…
Well it did….so i had to manually cut these openings with a scalpel and continually test fit the assembled and wired dial panel…lets just say more than once…..then I had to bond the chrome escutcheons into these elongated holes with Araldite….with the switches in place….with a cocktail stick….and not drop any glue onto the surrounding leather whatsoever as it would be impossible to remove whilst trying not to disturb the dash wiring loom
Well I managed it…but that was no fun whatsoever….
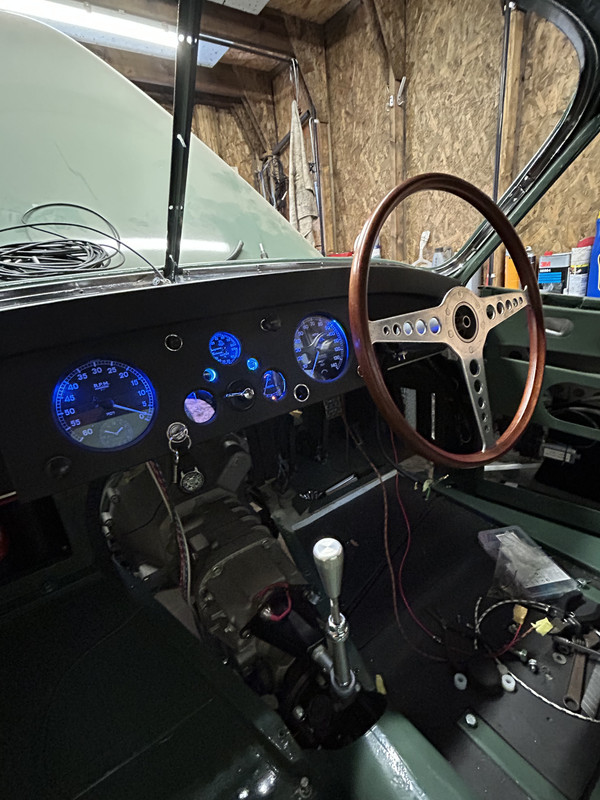
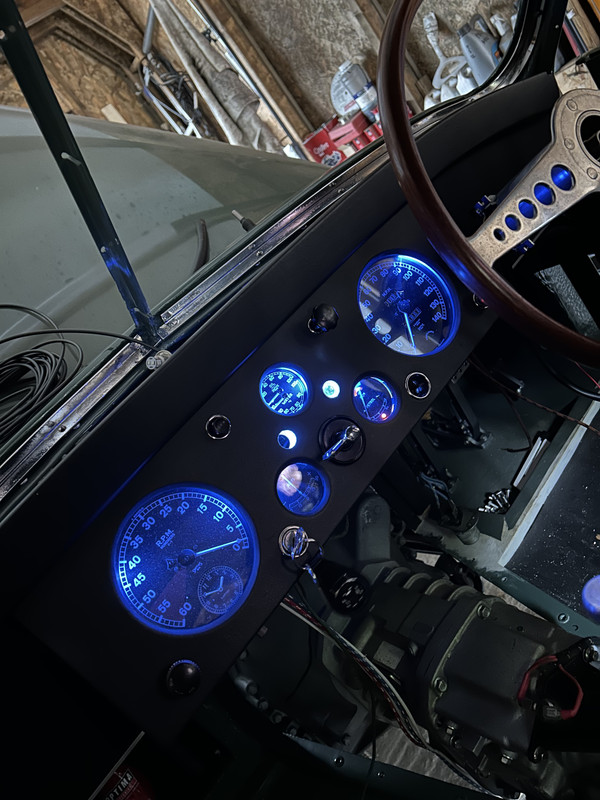
Looks handsome though I think, and contrasts well with the green trim and pale grey headlining…..plus the fun bit if being able to power up the dash whilst testing the instruments was a lovely moment….dials were blue in period….just the same as my early E type
Thanks for reading folks……more in a while….
The dash
Ah yes……..the dash….hymmmm……well…there wasn’t exactly much of mine that was able to be restored…so I had free rein to decide the outcome
So…..as I mentioned before apart from the not being in love with the golf club aesthetic, there were 4 others details about the original coupe dash that I had an issue with….
Glove box design
Steering column opening
Radio console design
Ashtray integration
The glove box is a classic throwback to 1930’s / 1940’s style of furniture design with a panel set proud of its surroundings and a sculpted handle…..it serves a purpose…but is fussy in execution
The steering column is located in an open ended notch in the dash (required specifically as the shell with dash included was lowered onto the chassis in production. Not only did I dislike this open ended shape but I didn’t build my car that way….so there is no need to replicate this detail
The radio consol adds visual weight to the overall dash, at odds with the sleek overall profile of the car…and I have no intention of fitting a radio….if I have music at all in the car it will be a Bluetooth moment dispensing with the need for any visible equipment
I ceased smoking years ago and the ash try design is nothing short of crude in comparison to the rest of the car, so that was an easy delete
Another way of explaining all this is to simply state I prefer the look of the early pre-production dash….and the actual dash included in the production version of the roadsters….much calmer in execution…
I was slightly troubled by the fact that I was removing one of the key features of the coupes….namely the walnut….as the open cars were the only ones to have vinyl….but my dash is now totally bespoke….and I also wanted to have single section cant rails….not the 3 part original design so that’s a double need for bespoke veneer services…..and anyway….
I just couldn’t change my attitude to golf…..
So that left me with the simple need to build and cover my own dash……
Thankfully the central part of the dash is readily available, so I bought one normally used on a roadster, and together with the curved top rail from the original dash was luckily still perfectly serviceable….marred only by a small number of woodworm it was able to be repaired using body filler
This meant I only (!) had to work out where the steering column would penetrate the dash front…then cut the plywood to suit….
Covering in vinyl somehow seemed cheap however…plus…and its a big plus, stretching vinyl around and into the 3 small instrument dial openings was impossible I thought…assuming I would keep the lovely bevelled edge detail around the instruments….a detail I have to say I was passionate to keep as it is so much more refined that seeing the bezels of a dial…as with the E Type and indeed the 911
To ease that challenge I used the fine grain Nappa leather I have for my steering wheels….but then sent it away to be professionally skived….reducing its thickness to 0.6mm…I figured not only would this allow me to get a super smooth and flat finish to the leather on the plywood….but it would help me stretch the leather into the 2” holes and form a continuous return edge
Assembly after covering was pretty fiddly..the instruments had to be adjusted to line up perfectly vertical…once refurbished or restored…I managed to save and restore the Amps and fuel gauge but the oil/water temperature gauge had to be replaced as the inbuilt temperature sensors which connect to the radiator can’t easily be dismantled and its integral into he dial housing….its a perfect copy sand I had kept the original in case I managed to figure out how thus could be done some time in the future
But I was able to restore all the original dash knobs and indicating lights which creates a lobverly balance of new and old….
I do love the finished article….to which I added a single accent for the interior….a 3mm aluminium trim which protects the lower edges and helps tie all the wooden pieces together….and compliments the fine chrome escutcheons around the small switches….
Those escutcheons were a pain to insert however….the unwelcome phenomenon of reproduction parts rearing its head once again…..try marrying an original steel backing plate onto which all the dials are mounted into a newly made and machined piece of plywood….with 14 holes pre cut…that needed to be set out within 0.5mm of accuracy ….hymm…what’s could possibly go wrong…
Well it did….so i had to manually cut these openings with a scalpel and continually test fit the assembled and wired dial panel…lets just say more than once…..then I had to bond the chrome escutcheons into these elongated holes with Araldite….with the switches in place….with a cocktail stick….and not drop any glue onto the surrounding leather whatsoever as it would be impossible to remove whilst trying not to disturb the dash wiring loom
Well I managed it…but that was no fun whatsoever….
Looks handsome though I think, and contrasts well with the green trim and pale grey headlining…..plus the fun bit if being able to power up the dash whilst testing the instruments was a lovely moment….dials were blue in period….just the same as my early E type
Thanks for reading folks……more in a while….
1974 2.7 Carrera
(full restoration. now as an RS Touring)
1963 3.8 E Type
( 11 years in the making…………………….)
1952. XK120…the next one ……….……..)
(full restoration. now as an RS Touring)
1963 3.8 E Type
( 11 years in the making…………………….)
1952. XK120…the next one ……….……..)
-
911hillclimber
- Nurse, I think I need some assistance
- Posts: 20620
- Joined: Mon Mar 10, 2008 6:26 pm
- Location: West Midlands
Re: The XK
Spot-on!
73T 911 Coupe, road/hillclimber 3.2L
Lola t 492 / 3.2 hillclimb racer
Boxster 987 Gen II 2.9
Lola t 492 / 3.2 hillclimb racer
Boxster 987 Gen II 2.9
-
rhd racer
- Me and DDK sitting in a tree! KISSING
- Posts: 2514
- Joined: Wed Jun 23, 2004 9:47 pm
- Location: Nottinghamshire
Re: The XK
Looks fantastic - much better than the walnut, great job
Sent from my iPhone using Tapatalk
Sent from my iPhone using Tapatalk
93 964 C2
99 Boxster 2.5 > 3.4 hill climber
71 914/6 3.0 - gone
'You see Paul, hill climbing is like making love to a beautiful woman. You get your motor running, check your fluids, hang on tight and WHOA..30 seconds later it's all over!' Swiss Tony
99 Boxster 2.5 > 3.4 hill climber
71 914/6 3.0 - gone
'You see Paul, hill climbing is like making love to a beautiful woman. You get your motor running, check your fluids, hang on tight and WHOA..30 seconds later it's all over!' Swiss Tony
-
anglophone1
- I need to get out more!
- Posts: 3134
- Joined: Tue Mar 23, 2010 1:35 pm
- Location: West Cork,Ireland
Re: The XK
Fantastic Jonathan- better than original!!
c
c
Clive
West Cork, Ireland
RGruppe #814
1978 SC/1984 3.2 Outlaw -Jaffa 911
1973 914 - on Webers - historic rally car- Tango 914
1977 924 2.0 on Webers street legal race car - Martini 924
1975 911/Flachbau 930 clone- too cool for school!
West Cork, Ireland
RGruppe #814
1978 SC/1984 3.2 Outlaw -Jaffa 911
1973 914 - on Webers - historic rally car- Tango 914
1977 924 2.0 on Webers street legal race car - Martini 924
1975 911/Flachbau 930 clone- too cool for school!
-
Lightweight_911
- Nurse, I think I need some assistance
- Posts: 17954
- Joined: Wed Nov 12, 2003 10:48 pm
- Location: Worcs/W Mids border
Re: The XK
.
That's a huge improvement on the original - looks wonderful & worth all the effort.
Are you going to use that E-Type steering wheel or was that just a test fit ?
.
That's a huge improvement on the original - looks wonderful & worth all the effort.
Are you going to use that E-Type steering wheel or was that just a test fit ?
.
Andy
“Adding power makes you faster on the straights;
- subtracting weight makes you faster everywhere”
“Adding power makes you faster on the straights;
- subtracting weight makes you faster everywhere”
-
sladey
- Nurse, I think I need some assistance
- Posts: 9320
- Joined: Sat Apr 23, 2005 9:08 pm
- Location: Nottingham, UK
The XK
Looks fantastic JP and wonderful to hear of the struggles you went through to get there - thanks for sharing
If you do keep the E type wheel I think it looks great in there
If you do keep the E type wheel I think it looks great in there
The simple things you see are all complicated
I look pretty young but I'm just backdated yeah
I look pretty young but I'm just backdated yeah