Page 11 of 141
Posted: Tue Jan 25, 2011 10:38 pm
by Gary71
The good thing about putting it back together is that you only have to heat the bearing inner race slightly for it to drop freely over the shaft. You just can't (or I can't anyway!) heat it well enough for the differential expansion to help take it off.

Posted: Fri Feb 25, 2011 2:46 pm
by Gary71
Engine and gearbox are now all back together with Turbo rockers to try and keep some of the oil on the inside!

Inspired by Alan's stunning work on the Webers I thought I would apply just an element of that to my Zeniths through vapour blasting and ultrasonic cleaning.
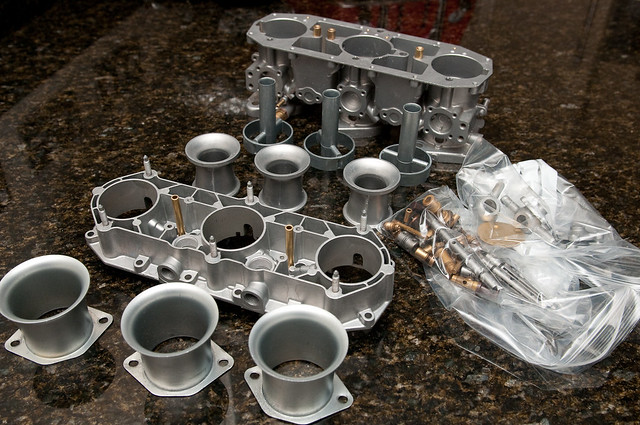
They certainly look the part and hopefully the new sealed bearings and the ultrasonic cleaning will make them run better.
Now to put them back together!
I've also obtained some 3.5" spacing strut housings:

...and had some very elderly 3.2 calipers brought back to life by Classiccar:

And also purchased from one of our suppliers the bulkhead materials used on the current Range Rover to knock a dB or two from the interior noise:

I still have to finished the radio and seal the fuel tank so will be busy for a few evenings yet!
Posted: Fri Feb 25, 2011 4:17 pm
by Gary71
This is the plan for the carb spindle bearings:
I'm only sealing the end bearing by the throttle quadrant as it is the only one that shows any movement. The other reason is the bearing seals inevitably add some sticktion to the shafts and I didn't want to introduce more problems than I solved. I tested the idea on an old set first before committing!

I removed the bushes from my old spares bin set of Zeniths and a friend machined them down to suit the size of the new roller bearing.

I wanted to maintain the machined surface inside the throat so the tricky bit was putting them back in lined up to get one surface again! After a couple of goes it was sorted.
I used a bearing sealant on the outer surface to hold it in place then pulled the roller bearing with a bolt.


Posted: Fri Feb 25, 2011 4:20 pm
by Mick Cliff
Gary71 wrote:....Turbo rockers to try and keep some of the oil on the inside!
Of course you know the body will go rusty again now
Posted: Fri Feb 25, 2011 10:28 pm
by Gary71
Don't worry, I'm sure the oil will still find it's way out somehow!
Posted: Fri Feb 25, 2011 11:42 pm
by Barry
Top stuff Gary: the carbs look very pretty

.
Posted: Sun Mar 06, 2011 8:37 pm
by Gary71
Carbs are finished except for some butterfly retaining screws:

Period Blaupunkt now installed with it's new face plate. I just need to create a bracket to hold it properly back to the bulkhead.

I've done the engine bay sound installation and finally fitted the rear damper bushes that showed up 4 months after I ordered them from Bilstein! Then they didn't fit...

After ten minutes on my drill based lathe (!) and some careful work with a stanley knife the OD now matched that of the tube on the damper.
Next job is to finish the radio wiring for this then get back on with swapping the front struts/brakes for the 3.2 items.
Posted: Sun Mar 06, 2011 8:41 pm
by johnM
Looking good Gary
Hardly hi tech but here is what I did.

Kind Regards
Posted: Sun Mar 06, 2011 8:43 pm
by Gary71
Exactly what I'm planning John!
Posted: Tue Mar 15, 2011 6:51 pm
by Gary71
The radio install is now complete so it's back to greasy bits!
All fuel lines replaced with decent Goodyear hose to replace the cracked motor factor rubbish:

Then onto the front suspension...
Whilst stripping the strut the brake line on the RHS didn't survive being undone from the hose, so that prompted replacement. With true 'while you are there' mentally I spent last night making up new lines for the whole car. I still need to do the tunnel one as by 11:00pm I'd lost enthusiasm for that fight!
I spent a couple of hours on Friday trying to make a decent flare with a Sealey tool I borrowed from a friend. What a waste of time!

There is no way I'd put that on my car. So I borrowed the proper job tool from work yesterday and the difference in quality was clear!

Sealey nasty v Sykes Pikavant pro
Can you tell which is which?

Tonight I'll be carrying on with stripping the front suspension and trying to get that pesky ball joint out the bottom of the strut!
Posted: Fri Mar 18, 2011 2:42 pm
by Gary71
Well despite my best efforts the ball joint remained firmly embedded into the strut
Blow torch, PlusGas, and a fork splitter just wouldn't shift it. If I had hit it any harder then I would have bent something...
So plan B was sacrifice the ball joints (which were of unknown heritage anyway) but that means tackling that horrid looking castle nut underneath.
After a tentative hit didn't shift it I decided to make a tool from a steel plate and four M6 bolts. Whilst I wasn't expecting much it worked!

Now awaiting parts again for the suspension and I can't put the engine back in until I've done the central brake pipe so I've (almost!) run of excuses to get on with the fuel tank internal refinishing.
New fuel and brake pipes in place:

New sound deadening panel:

Posted: Fri Mar 18, 2011 2:46 pm
by sladey
Hi Gary - I've got the proper tool for tightening the balljoint thing up if you want to borrow it. Apparently it's no use for undoing it because it gets mullered
Posted: Fri Mar 18, 2011 2:48 pm
by Gary71
sladey wrote: it's no use for undoing it because it gets mullered
Not much use as a tool then
Yes I'd like to borrow it, if it's OK to put it in the post I'll pm my address.
Thanks
Posted: Wed Mar 30, 2011 10:43 pm
by Gary71
Back in the hole and fired it up tonight, albeit briefly as an integral garage and starting a dormant 911 with two kids asleep upstairs may not go down well...
I then had to stop as the garage was full of smoke
The joys of classic motoring

MOT is booked for Friday week so I've now got a deadline.

3.2 brakes are now done. Thanks to Sladey for loan of the ball joint tool

Still plenty to do though!
Posted: Thu Mar 31, 2011 8:40 am
by markm
Wow, looking good.