Page 10 of 30

Re: 964 C2 - Rolling Resto

Posted: Tue Sep 17, 2019 9:21 pm
by rhd racer
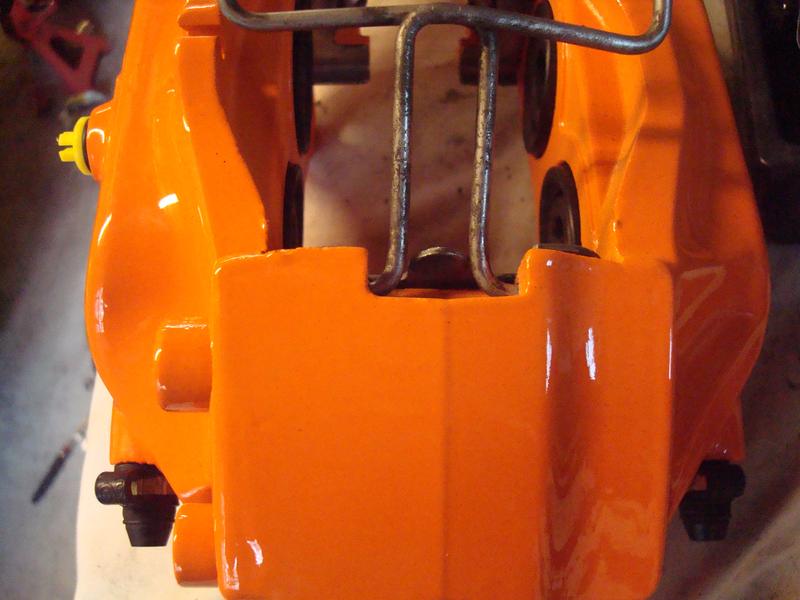
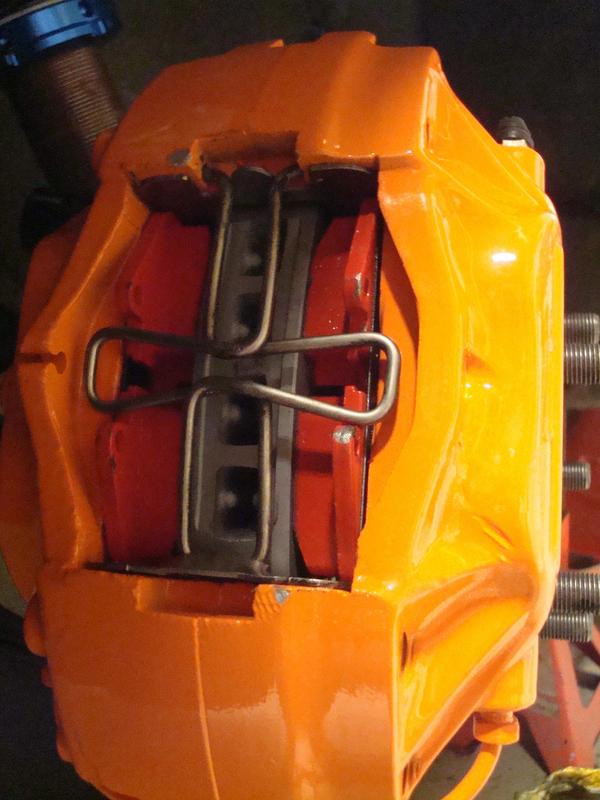
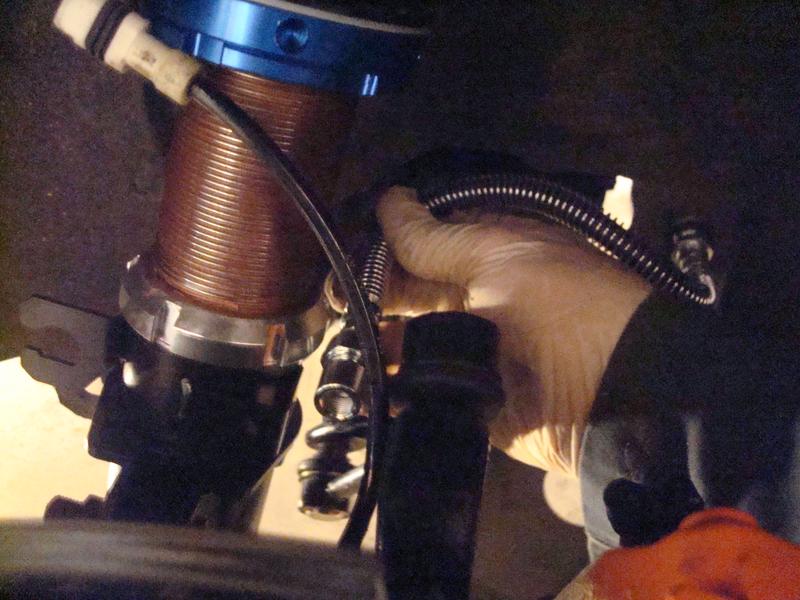
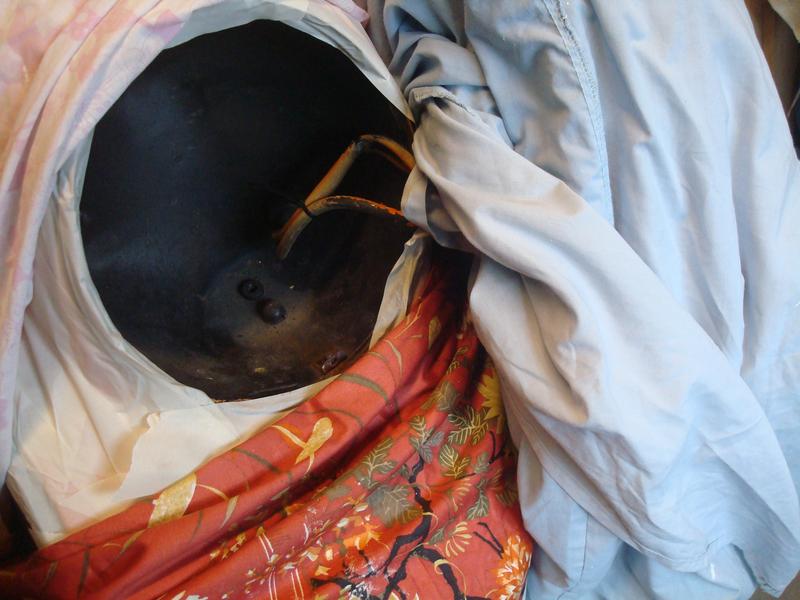
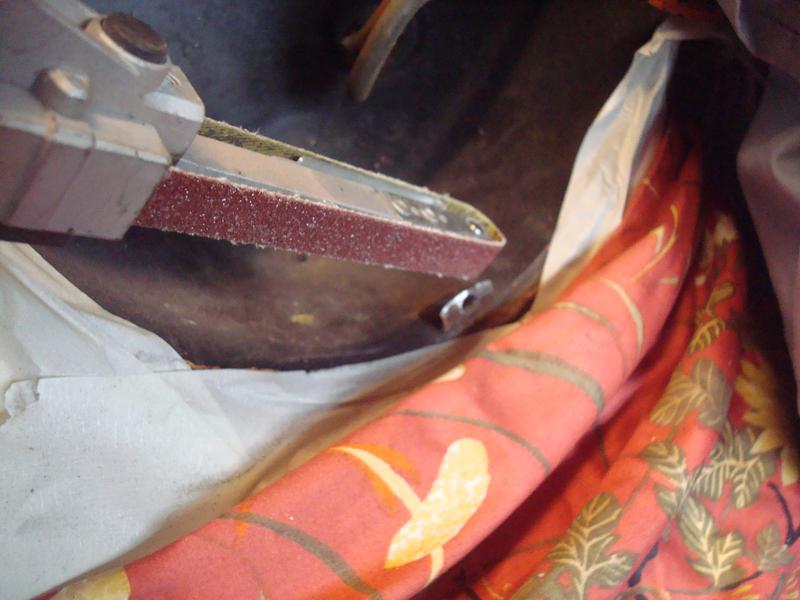
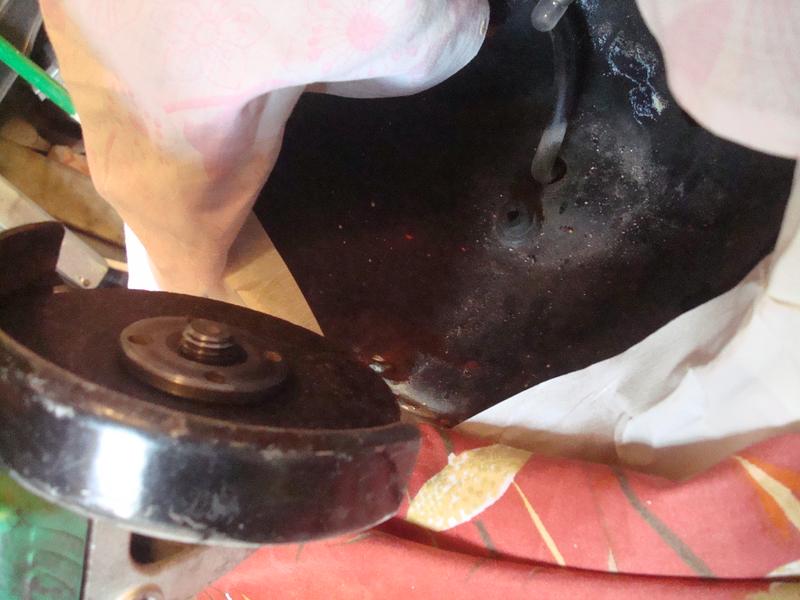
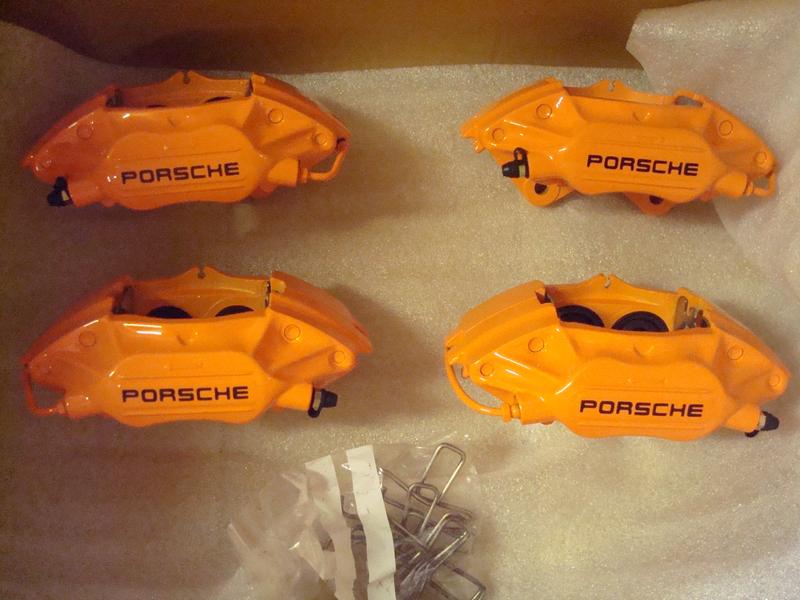
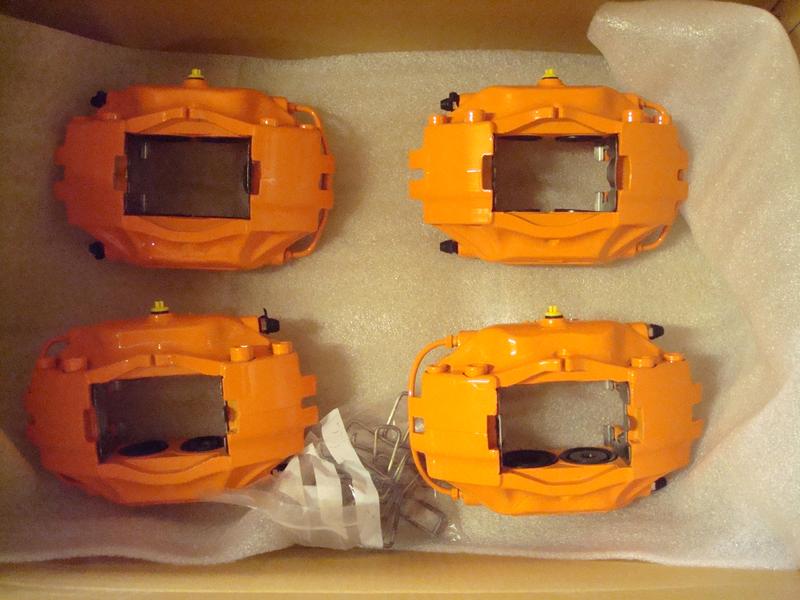
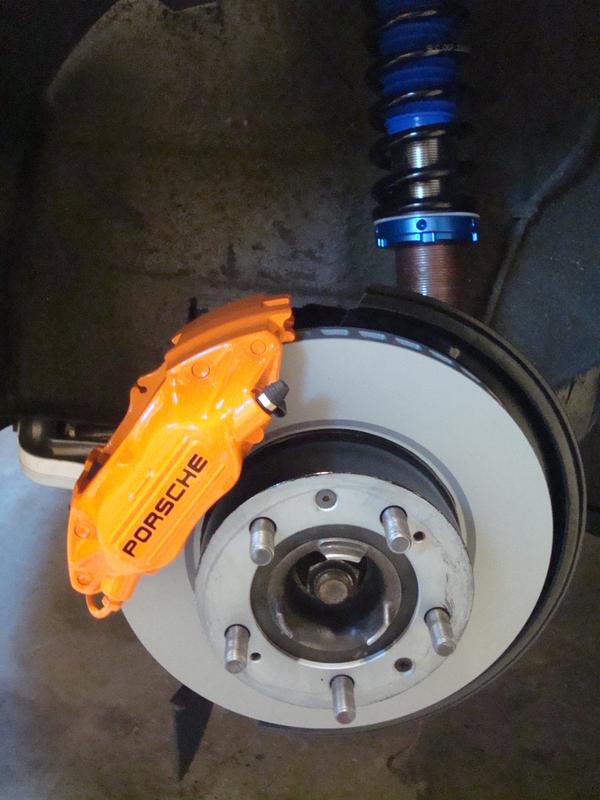
So today was the day I have been waiting for - caliper day.

It was worth the wait, I am pleased....

Image

Image

At the start of the thread I mused over the colour of the car. It definately needs a rear wing replacement and some paint, but not yet and certainly not over the year of not driving my not-so-rolling resto....

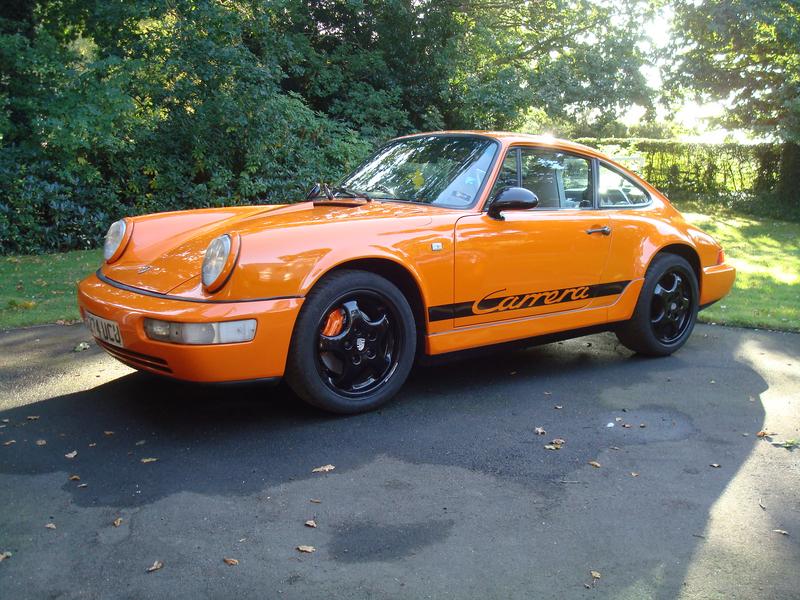
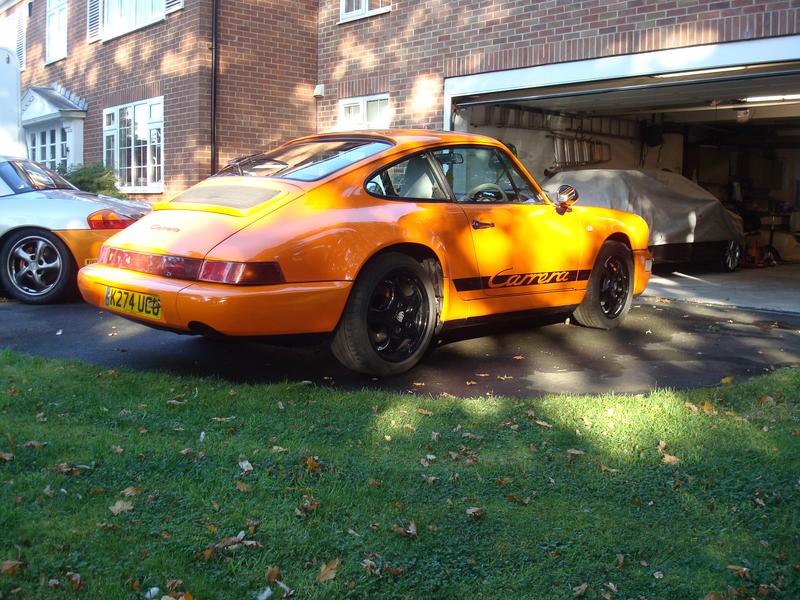
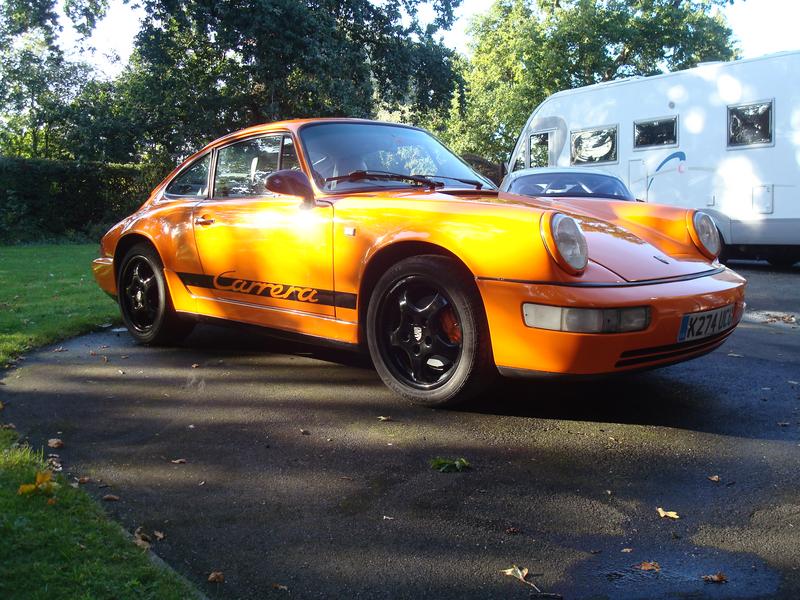
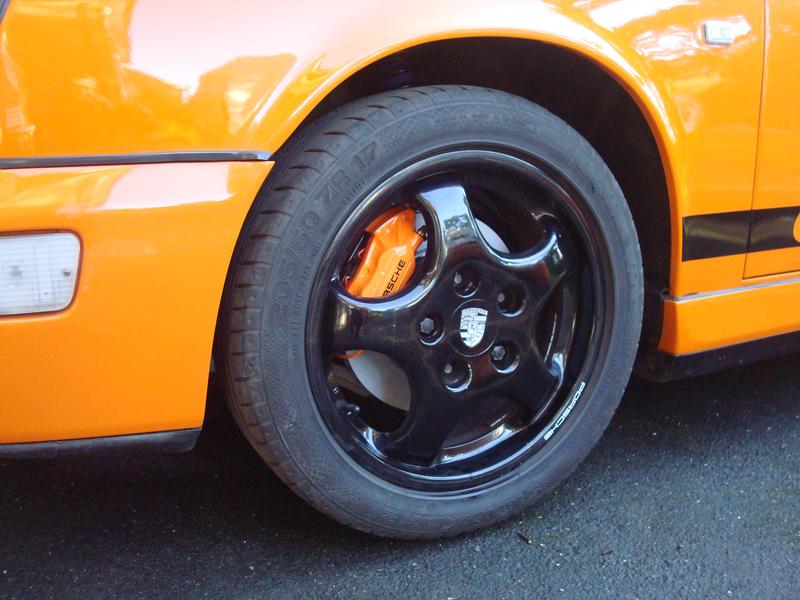
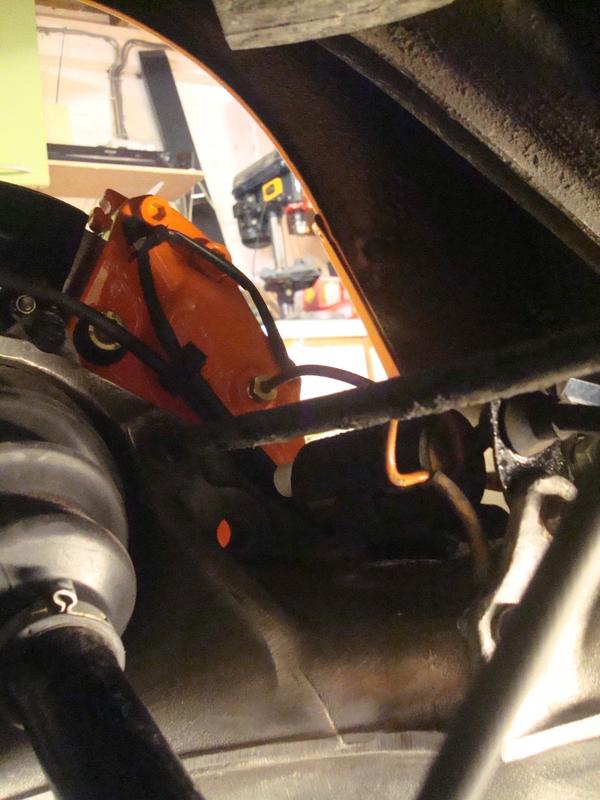
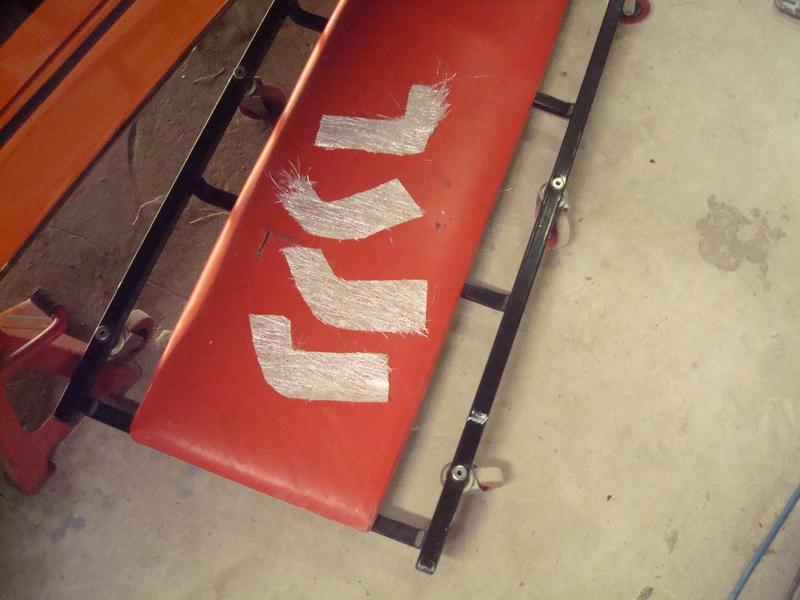
So I like orange, it has been a feature of the 3 Porsches I've owned, and I like this for now. But I also like the original blue....so I am leaving my options open. I remember one of the first PS Auto Art cars was metallic blue with orange accents and I liked the contrast a lot, so am thinking maybe calipers, fan and windscreen sun strip or something. For now, they tie in just nicely with the current orange and black hue, and lighten up the arches behind those horrid black wheels. I have form with orange calipers too....

Image

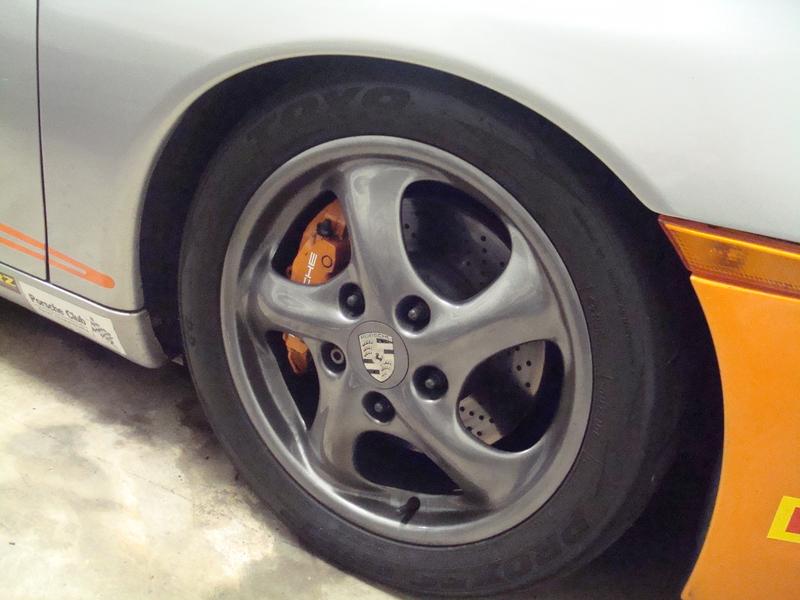
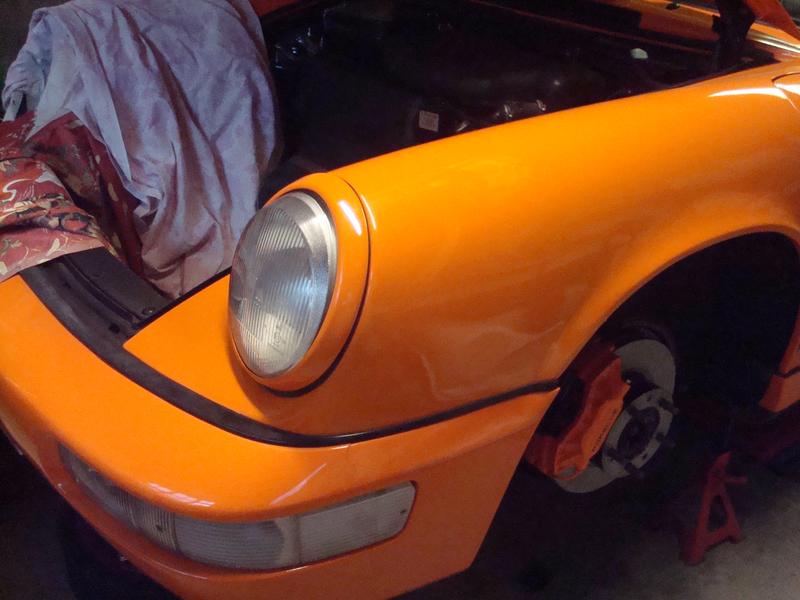
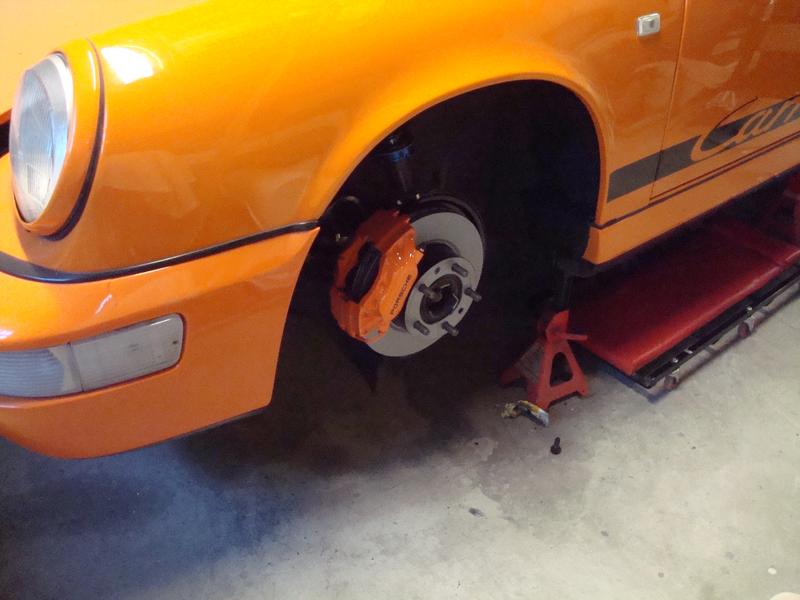
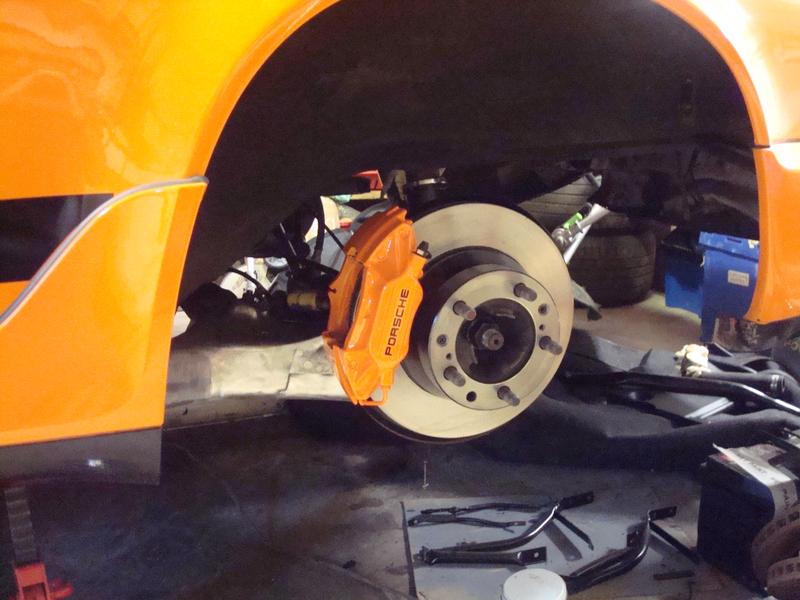
On the car, just lightly bolted up it suddenly looks like it is moving forwards....

Image

Image

Image

Re: 964 C2 - Rolling Resto

Posted: Thu Oct 10, 2019 7:49 pm
by rhd racer
Time to catch up on the last few weeks...

I wanted to get the car rolling so I could see what the suspension settings were like, and to give myself a bit of motivation to keep going. The plan being to get the brake pads fitted, brakes bled and then get it out on the drive for a clean. Simple jobs seem to bite me on the bum though, and the brake pad retaining clips were impossible to get in. I could not work out why, I could get them in but they just wouldn't fold down and pinch into place. And using the force I needed to get them anywhere near was carrying a big risk of chipping them. I cleaned out the mounting holes, there was a bit of paint in there, but not seemingly much. I took to shaving off a mm or so per side of each, and then this clearanced them just enough to fit square. You can see below that in being a bit on the skew, it would stop them locating over the rounded brake pad guide plate you can see between them - they need to be perfectly square and a bit more open to do this without extraordinary force....

Image

Now clearanced - and I then also squared off the angle of the open ends which opened them up a bit to clear the guide plate and made them fit much better

Image

And success at last - note the chip from all the messing about. Luckily I got touch up with the orange caliper paint from the Boxster

Image

For other reasons I can't quite explain, the pads were really difficult to fit, despite all the pistons being fully retracted. It was clearly just a tolerances thing, new discs, pads etc but I got there eventually.

So, onto the flexi hoses, and it dawned on me that a few things were going wrong.

Image

Image

Either the pipes were too long or.....the struts were on the wrong side. It was the latter. A lesson in taking disassembly photos. It didn't end there either, I put the front wheels on to do a clearance test and there was an awful knock from the steering on one lock. A good shove and it cleared - closer inspection revealed that the ARB drop links had got mixed up and the left one did not clearance th hub as it rotated around the bottom ball joint. Happy days.

Then, trying to turn the wheels made a horrid noise. This was the air deflector on the lower control arms which are sided too - who knew! So, I gave up for the evening, and swapped it all over the next night..... :oops:

Re: 964 C2 - Rolling Resto

Posted: Thu Oct 10, 2019 7:58 pm
by rhd racer
Once done, we had probably the last really good weekend of the year, so I got it out for a clean before bleeding the brakes. Really pleased with the overall look, and the caliper colour choice

Image

Image

Image

Image

I measured the suspension at rest in the same state as it was before - the front sitting 10mm higher than it was before with the same strut length due to the new springs being much firmer, so that would be job number 1.

Re: 964 C2 - Rolling Resto

Posted: Thu Oct 10, 2019 8:21 pm
by rhd racer
I'm pleased to say my theory on the ride height adjustment proved correct; with the adjustors locked, I could undo the lower strut mount lock and effectively wind the whole unit down into the stub axle. This maintained the preload that I set earlier. So down 40mm should get me to something near RS height at std - 30mm. I will leave that until the engine is back in and can see how it looks.

So back to the brakes. Two of the original pipes were manufactured with some plastic protection moulded around them to stop chaffing on the body; 1. on the NSF as the pipe goes around the longitudinal suspension mounting beam, and 2. above the rear T-piece, above the gearbox. I addressed these by getting some small fuel pipe and slitting down the middle. Not OE, but a sensible compromise.

Image

Image

This latter one was tricky to fit and I needed to undo the mount and a pipe slightly to get it in place. This would come back to haunt me later...

Then finally putting all the locating clips in place - new hardware, some needed cutting slightly into a V to locate nicely, and new locating claw clips in place too.

Image

Image

Image

Re: 964 C2 - Rolling Resto

Posted: Thu Oct 10, 2019 8:31 pm
by rhd racer
Ready for bleeding, I made a stop for the clutch pedal so the new clutch slave cylinder did not blow itself apart....

Image

My wife ducked out of her favourite job, but my youngest, having a commercial edge to her, was keen to earn some pocket money, and what a job she did!

Image

I was expecting to have lots of issues given every joint was new, and the ABS pump having been rebuilt, but actually it built up pressure with no air really quickly. Then I looked under the car....

Image

That will be the joint I loosened to add the protection for the pipe above the gearbox then - sure enough, a full turn from tight.

Another quick bleed and then a check of every joint revealed two more issues. One small weep on a rear flexi to hard line that just needed nipping up, and a slightly more difficult one on one of the front bulkhead joints

Image

This took a bit of help from the good lady to hold the spanner under the bonnet whilst I did up from underneath but fixed it in the end. Another quick bleed and the pedal feels great.

Image

Re: 964 C2 - Rolling Resto

Posted: Thu Oct 10, 2019 8:44 pm
by rhd racer
Next on the list is to fix something that has been annoying since collecting the car - a very poorly fitted headlight

Image

The first problem was the wrong / very rusted fixing which needed a T20 socket to bite the rusted allen head

Image

Image

Even this proved problematic as the outer screw fixing the headlight ring was seized into the headlight fixing screw, so it all came out together. Not easy with a FUBAR'd outer.

Image

You can see the poor fitting of the light with the rim off

Image

And there was the small matter of drilling the old seized screw out to separate it..

Image

But luckily was prepared with some new ones

Image

Re: 964 C2 - Rolling Resto

Posted: Thu Oct 10, 2019 9:00 pm
by rhd racer
With the headlight removed I looked at the mounting tab to see if I could tell why it was fitting so poorly. It was clear that an M5 nut had been welded onto the tab by means of repair in the past

Image

Worse still, it was no longer M5, more M5.5 and the fixing screw I had just removed just pushed through it, the headlight therefore previously been held on by gravity only then....

My plan was to cut the nut off carefully and use a blind fixing tab. So I tested the theory on the bench and it appears that threaded bolts are not compatible with these at all, and it damaged the thread - luckily I used the old one. Back to square 1 then...

Image

I decided that the only thing to do was to very carefully cut the old nut off and weld in a new one. The problems are clearly getting a cutting disc in there, cleaning up and welding so close to the paintwork. So I masked up a bit and set to work

Image

Image

Image

Then cleaned it up ready to weld

Image

And a couple of mig spots later

Image

A lick of paint

Image

And then I was ready to fit the light again, although all was not well. After reading up, it appears that cars which have been painted tend to have issues with headlamps because of the paint build up around the headlamp bucket. I had to mask up again, and scrape it all off with a screwdriver and blade, then reform the lip over and over again until it fitted nicely. I reckon it took about 2 hours until I was happy with the fitment. Then a very light dusting of paint to keep the weather off, and a refit to ensure it still fitted.

Image

Image

Image

Re: 964 C2 - Rolling Resto

Posted: Thu Oct 10, 2019 9:14 pm
by rhd racer
The other headlight fitted fine but I could see it had a different fixing, and again it was non standard. In fact, it was worth a bit it was M6 even before I took it apart.

And I did take it apart, despite the perfect fitting, because I suffer from 'relentless curiosity' and a bit of 'perfectionism', which is fine when you are writing you annual appraisal but sodding annoying when you are rebuilding a rusty old car :lol:

Sure enough, it was M6, and not a 2 part item, just the one bolt securing headlamp and rim

Image

Image

With the headlamp unit out, what I found was even more perplexing.....

Image

And a bit of rust killing treatment painted on to prolong the life of the front wings until the respray...

Image

Yes, that is the horn! I can only think that previously the same seizing of the headlamp screws had happened or more likely the M% nut weld had failed, so there was no way of removing the headlamp, and someone cut the bucket open to get to the back of it...and then decided not to bother repairing the access door :roll:

The only advantage of the long securing screw meant that the tab that an M^ nut had been welded to was leaning forwards and therefore much easier to cut off and weld a replacement M5 on. After repairing, I simply bent the tab back to the correct angle.

Image

Image

Now am just waiting for a new headlamp seal to arrive before refitting. Luckily this one fits better as standard, and for some reason requires no paint shaving around the bezel.

I will resolve the headlamp bucket issue with a day of fibreglassing which I have planned soon...

Re: 964 C2 - Rolling Resto

Posted: Fri Oct 11, 2019 5:59 pm
by sladey
Nice work - those headlamp fittings are a pain in the arse - been there a few times now

Re: 964 C2 - Rolling Resto

Posted: Tue Oct 22, 2019 7:54 pm
by rhd racer
sladey wrote:Nice work - those headlamp fittings are a pain in the arse - been there a few times now
Thanks Mark - they are indeed, like most jobs I am finding!!

So just to wrap up the horror of the OS headlamp

Image

The view from the back

Image

My plan was to put some cable ties in to give just a little strength, and then reform on both sides with fibreglass. Given both wings will need replacing when the repaint is done, it is a temporary repair to stop a load of crud and water getting in the back of the light and causing more problems...

Image

Which I then completed and painted. All good, as I had already checked that the headlight fitted without the same drama I had on the NS, so no scraping of paint off the rim.

So with the new rubber arrived, I thought I would do a 5 minute lunchtime job and stop the car winking only to find why the bucket was cut out in the first place - it appears it must have early wings on it (presumably) as they cannot accommodate the later lights with the light warm air circulator to stop them steaming up. Brilliant. Cut it all out and start again, creating an indent, and then re-fibreglass

Image

It doesn't come out especially well in the pic, but basically it needed a good inch of extra clearance on the one side to refit the headlamp.

Re: 964 C2 - Rolling Resto

Posted: Tue Oct 22, 2019 8:03 pm
by DustyM
rhd racer wrote: with the light warm air circulator to stop them steaming up.
With the what?

I think you'll find that is the vacuum servo that allows you to adjust the beam height. You should have a switch to set the headlamp level next to the main headlight switch on the dash.

Although your idea of its function would probably be more useful :)

Re: 964 C2 - Rolling Resto

Posted: Tue Oct 22, 2019 8:04 pm
by rhd racer
Next up is a repair to the NS sill panel / skirt. These are / have always been flapping in the wind, literally. Not a single fixing south of the orange paint. More of that later.

On the nearside, there was a huge chunk of the skirt snapped off, so it needed something forming to give me a fixing point. I could have formed something out of steel and welded it in, but it is super thin and I wanted to fix in situ without disturbing the hidden (and only) fixing on the top edge by the rubber seal. So whilst a little Heath Robinson, the plan was to form a couple of aluminium strips cut from a sheet, form a rough shape, rivet them on to bridge the hole (about 6 inches in length) then fibreglass, fill and paint. Apart from trying to fibreglass upside down which is always a challenge, and best done it turns out over several evenings one layer at a time, all was good.

Image

Image

Image

Image

Image

It is now painted (only hand painted as underneath and not visible) but again, this is a practical repair rather than a proper restoration repair that will stay forever. With the panel off the car at the time of repaint I will assess if a better repair is required, or more likely source a replacement panel.

Re: 964 C2 - Rolling Resto

Posted: Tue Oct 22, 2019 8:05 pm
by rhd racer
DustyM wrote:
rhd racer wrote: with the light warm air circulator to stop them steaming up.
With the what?

I think you'll find that is the vacuum servo that allows you to adjust the beam height. You should have a switch to set the headlamp level next to the main headlight switch on the dash.

Although your idea of its function would probably be more useful :)
Every day is a school day, thanks Jon! :lol:

Re: 964 C2 - Rolling Resto

Posted: Tue Oct 22, 2019 8:25 pm
by rhd racer
The next job was to find a solution to fixing the skirts, because the original fixings had all broken off - some completely, like this

Image

the rest half way down leaving a stump of a thread that was no use for anything.

There should be a sort of self tapper thread hanging from the floor pan, which one of the M6 plastic shoulders nuts secures them to the body. These nuts are used on the Boxster, so I bought a load of them. But what to fix it to?

A friend of mine said his rivnut gun could be adapted to fit those inserts, but no amount of interwebbing came up with any kind of solution, so I made my own. I already have a rivnut gun, they are brilliant, but I did not really want to insert little bolts - I wanted something a bit closer to stock, and then I came across hanger bolts...

Image

Usually used in furniture, the ones I settled for are M5 x 30mm and work perfectly. I had no fixings at all for the front suspension / master cylinder cover, so again I ground off all the stumps of the old broken fixings, centre punched, drilled a 7.5mm hole and inserted M5 rivnuts, ready to accept the hanger bolts. Job done, they look OE and work perfectly

Re: 964 C2 - Rolling Resto

Posted: Tue Oct 22, 2019 9:02 pm
by rhd racer
Next up was the front undertray. Angus pointed out on his appraisal that there wasn't one, and after spending so much time cleaning everything up under there I looked into getting one. They looked a bit heavy at £180 odd, so I found one with damage for less than half that on ebay. Operation fix.

The problem with the one I had was that the front 'ear' had snapped off, and without it air would get underneath and after a while probably snap the thing in half. So again I tried to do an economical repair that would get it usable without spending days on it. Fibreglass was the obvious material to use (I have loads in stock after moulding the dash for the 914) but I didn't want to spend days making a mould. So I thought about how I could cheat....

The first step was to cut out the shape in card, a bit larger than required

Image

Offered up, I wanted the finished panel to look like this

Image

So now I had to figure a way of creating my non-mould. I traced the template out on a block of 6 by 1

Image

Then cut the shape out with a fine cutting disc

Image

I then marked where the fixing hole needed to be, and used a chisel to notch out the shape from the missing section (effectively the top hat nuts all fit in a rounded recess)

Image

Then made it 3D but tapping some stainless strips I had kicking about into the recess I had cut, effectively making a crude mould

Image

Then with some sock shaped matting at the ready

Image

I wiped neat Fairy Liquid into my 'mould' as release agent, and then ran in some resin, pre-wet the cut matting and laid two into the mould. I then attached the panel in the right place and screw it into the mould, so that the underside matting adhered under some pressure, then laid two layers on the top. I noticed that the matting was setting into the recess I had made in the mould, so found my chisel balanced in the recess worked a treat for forming the shape

Image

And you know what, it worked...

Image

A few hours later, I simply removed the screw and lifted it out of Mssrs Heath & Robinson's mould.

Image

Image


Image

Image

Image

I am pretty pleased to be honest for what I consider to be a pretty crude repair. These pics are all pre final fill, and with just 10 mins work from this it looks pretty much spot on. It is now painted black and trial fitted and it is perfect. I will take a further pick later to show the finished job