Page 10 of 43
Posted: Mon Jan 17, 2011 11:18 pm
by 58A - 71E

oh and another one
Bloody hell John - I'm just replaying some spirited driving near the sage of the lake's place, glad we didnt hit any big potholes!
Cant imagine the difference this will make to the ride comfort when its not flapping about

Week 3
Posted: Fri Feb 04, 2011 12:35 pm
by johnM
Week 3, Barry sent these pictures last week but I was offshore so unable to post, so we should have 2 updates today

Barry has been busy with the rear half of the floor. At first we hoped that just floor edges would be needed but on closer inspection we decided that a rear half floor was going to be the best option. Floors are not available from Porsche so Roger Bray came up trumps with a pattern part. You can buy floor edges, front floor halves rear floor half or left side right side halves. The pattern parts take a little bit of adjustment to get a good fit.


The first fit showed that the flange between the floor and the centre sill was a little out.


But after a little fettling.


Their had been an old repair to the offside inner sill below the seat mount. Barry has cut this out and fabricated a new sill bottom. A new panel was also made for the hole in the rear bulkhead, this will be put in later as Barry can use the large window to work the torsion tube area.


The floor and sills have not been welded in just yet, this is because Barry wants to make sure the shell has no issues in other areas before welding in the new parts. Doing this would strengthen up the shell and make it more problematic to sort.
Parts are screwed together with self tappers to hold them firm. It looks as if we need a little patch for the chassis leg.
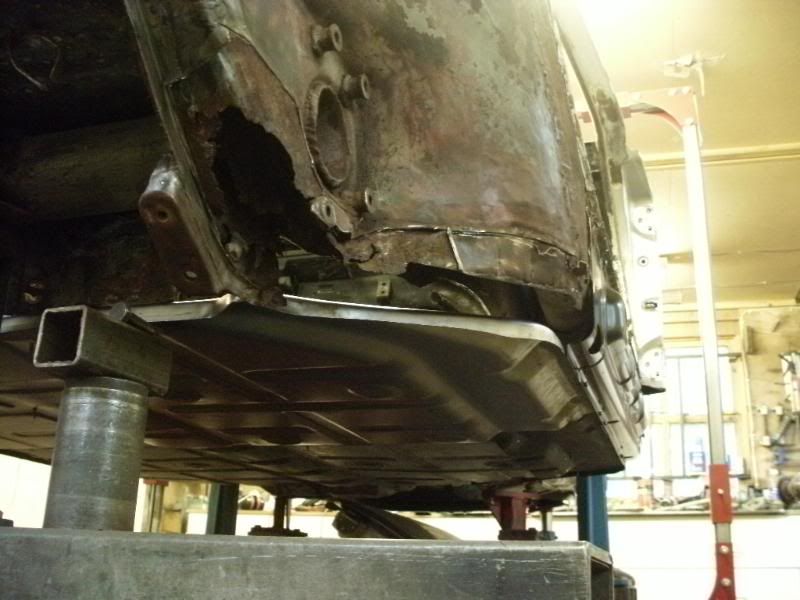
The fronts not much better. A new inner wing will be made for here.

Kind Regards
Week 4
Posted: Sat Feb 05, 2011 3:35 pm
by johnM
Posted: Sat Feb 05, 2011 4:14 pm
by impmad2000
Fantastic to see it like new again
To be honest I think Barry has one set of photos that he just re-dates ! I have a set that are SO similar its untrue !! It just fills you with so much confidence to know just how good it will be when you get it back.
Exciting stuff to see.
Tim
Posted: Sat Feb 05, 2011 5:08 pm
by Gary71
It's a good job Barry has a jig or finding a solid reference point would be a challenge!
Great work as usual.
Bet you can't wait to get it back John.
Posted: Sat Feb 05, 2011 5:31 pm
by johnM
Thanks for that, yes very exciting to see it improving rather than unearthing more issues. I bet its not been that solid for a good decade or so. Plenty of wax oil and it should stop that way.

Posted: Sat Feb 05, 2011 5:32 pm
by Barry
impmad2000 wrote:To be honest I think Barry has one set of photos that he just re-dates !
Damn, that's the last time I try that one

.
It's certainly becoming a common repair area.
Interestingly, and I forgot to mention this to John, but the very top of the front inner wing had had all of the rust pits and holes filled. There were little bobbles of filler pocking through the removed section. Once again though, none of them had blown back through. Amazing how a lot of these filler 'repairs' show zero evidence of being there before seeing the other side. Especially when you think how sensitive filler is to not being sealed from behind usually.
Hoping to have a good run this coming week, as things are settling back in the usual routine having been a bit frantic from before Christmas. Enjoying first two proper two day weekend for what seems a very long time at the moment
.
Posted: Sun Feb 06, 2011 8:47 pm
by TheEasyLife
impmad2000 wrote:To be honest I think Barry has one set of photos that he just re-dates !
I have a set of those too and they do look very very similar..
John, your car will be awesome when finished. A rebuilt engine and rustfree bodywork that will be good for another 40 years. Sounds familiar...
Keep the pics coming.
James
Posted: Mon Feb 07, 2011 11:45 pm
by 210bhp
Inspiration for you John

Regards
Mike
Posted: Tue Feb 08, 2011 6:11 pm
by 911hillclimber
That IS nice!
8's and 9's?
Posted: Tue Feb 08, 2011 6:19 pm
by Mick Cliff
210bhp wrote:Inspiration for you John
Don't know about John, but that's certainly inspired me
Must get one

Thanks Mike
Posted: Tue Feb 08, 2011 7:20 pm
by johnM
Mike you should stop posting pics like that
RS flares on a narrow body is very very
Posted: Tue Feb 08, 2011 8:20 pm
by 210bhp
johnM wrote:Mike you should stop posting pics like that
RS flares on a narrow body is very very
It was now or never
Regards
Mike
Posted: Wed Feb 09, 2011 8:26 am
by 210bhp
And without flares

Regards
Mike
Posted: Wed Feb 09, 2011 5:59 pm
by mycar
210bhp wrote:Inspiration for you John
Regards
Mike
Ooof that`s nice. RS flares on a SWB, I have a new favourite 911.
I hear there`s a place in Wales that`ll fit you a pair of those with a spatula.
Might pop down at the weekend..
Mike.


