Page 9 of 16
Re: Rebuild update
Posted: Thu Dec 15, 2016 12:14 pm
by 914 KEV
shandyhaggis wrote:has anyone had any issues with the dimmer relay?
I take it you mean the High / Low Beam relay.

Do you have four wires and the old relay had four terminals while the new relay has five terminals?
If this is the case, a bridging wire needs to be attached across pin 56 & 30 to make it work.
Re: Rebuild update
Posted: Thu Dec 15, 2016 2:24 pm
by shandyhaggis
Hi Kev
yes thats right, no idea why I referred to it as a dimmer relay. It might be on the wiring dia like that. Not sure.. But yes is a new 5 terminal relay. Ive added an extra supply to pin 30 and it has worked before. I think bridging would have the same effect but I will give it a go.
It seems to work sporadically, ie when I pull the lever enough times the cam clicks over and it functions. Otherwise the relay clicks and it presses the cam but the cam sticks in place and nothing happens.
thanks
Andrew
Re: Rebuild update
Posted: Thu Dec 15, 2016 4:23 pm
by shandyhaggis
Just spoken to VW Heritage
Even though I bought the relay in 2012 they are kindly sending me another one, I cant ask for more than that!
Re: Rebuild update
Posted: Fri Jan 13, 2017 9:16 am
by shandyhaggis
Good morning all
and Happy New Year. Its been cold in the garage and Im clearly less hardy than most. So instead of progressing fitting fuel pumps, petrol tank and lying on the floor. I got my roof painted.

The pic doesnt show the final result with the rubbers etc. Fitting was a bit of a pain, I found that distance between the corner of drivers side of the window frame top to the back of the roll bar was 5mm less that the passenger side so with the rubbers on the roof catch wouldnt fit. I did read you can bend the frame out but I didnt want to try it so I just adjusted the roof runner and rubber a tad and it fits lovely. The windows needed some adjustment to get them to sit flush with the roof rubber, I cant say its perfect but Im guessing its probably fitting correctly by old car standards.
Anyway that job done I also fitted the frame padding at the front and the visors...

Quite happy with that at the mo. Waiting for warmer weather and its not going to be today:-)
Re: Rebuild update
Posted: Fri Jan 13, 2017 9:21 am
by shandyhaggis
I forgot quick question... are the caliper bleed nipples front and back the same? The PET says not and I have to say Ive not taken them out to have a look
thanks
Re: Rebuild update
Posted: Fri Jan 13, 2017 11:14 am
by LouisCurtis
I also haven't checked my old ones but I ordered the 2 different types.
Both were available from OPC
Both are M7
The rear ones (901.352.977.10) are 30mm long and have a dull silver (Anodized?) finish, they also come with the proper ATE rubber cap.
The front ones (113.615.273A) are 34mm long and have a Yellow Zinc finish and do not come with rubber cap.
(These are also available from VW Heritage etc)
I was on the PMB website recently and noticed they only sell one kind of bleed nipple so the chances are they are interchangeable. I wonder if it's just another one of those "scavenging from the VW/Porsche parts bins" things...
Hope that helps
P.s. Car is looking great by the way!!!
Re: Rebuild update
Posted: Sat Jan 14, 2017 10:17 am
by shandyhaggis
Thank you, it does help. I looked at the PET and noted 2 different types but wasn't sure like you if the same would fit front and back. Ill have a crawl under the car when I get the urge to cold and miserable for 10 mins and have a fiddle
Re: Rebuild update
Posted: Sat Jan 14, 2017 6:31 pm
by Mr Pharmacist
I did buy both types and I seem to recall putting the wrong one in the wrong caliper when it came to reassembly. I'm sure it'll be obvious if you do get them the wrong way round
Re: Rebuild update
Posted: Mon Apr 17, 2017 1:39 pm
by shandyhaggis
Afternoon folks and Happy Easter!,
Its been a while again, apols for that, had a mother of a chest infection that kept me out of the garage for 2 months.
Good news is that when I got back in there, and charged my battery I found the replacement relay was.... faulty as well. I dug the other fualty one out and found I must have double ordered as lurking away in my electric bits box was another one. This one works! Interestingly it has a VW Passat part number and reference. Must have used them on Passats at some point.
Yesterday I managed to get my son to help me with the petrol tank, putting back is def a 2 man job.
The fuel pump I managed to mount on a couple of rubber mounts fixed to the metal holder that fits on to the body in front of the tank, a metal strip, a couple of bits of rubber matting and a couple of very large jubilee clips held everything in place. The rest of the rubber pipe was good quality modern stuff designed to cope with new new impending fuel changes. Ive gone for a single from the tank to the pump and a single with inline filter from pump to a single pipe in the centre tunnel. The centre tunnel pipe I did with copper line and popped a slightly bulbed end on it to help keep the rubber in place.

The tank slotted in nicely. We were both amazed at the simplicity of the 2 rubber/plastic tank holders and the over strap. Really simple, easy to remove if required and holds the tank in place really well. I removed the other gubbins from the original set up like the expansion tank. My expansion tank was in really poor condition and I didnt have the charcoal mechanism either so it would have been an uphill battle to keep original.

Next job I think is to make sure my centre tunnel fuel line is nicely secured to the inside of the tunnel, I dont want it vibrating of chaffing anything. Ive locked it in place with tie wraps at the moment. Ill have to think of something better.
After that I think I will brave bleading the brakes, I jsut need to make sure Ive got the right pads in first and give them a goo d check over as I put the callipers and lines on a few months ago. then may be connecting the handbrake. hey I might be able to put the wheels back on then:-) My wife will be pleased!
Cheers all
Andrew
Re: Rebuild update
Posted: Mon Apr 17, 2017 2:39 pm
by defianty
Coming along nicely Andrew, good work.
Re: Rebuild update
Posted: Mon Apr 17, 2017 3:22 pm
by Mr Pharmacist
Looking good Andrew!
It looks like got haven't got and front anti roll bar installed? It will transform the handling if you do get one fitted (blatant plug for the one I have for sale currently
)
Re: Rebuild update
Posted: Tue Apr 18, 2017 10:05 am
by Nicktune
You might want to swap the plastic inline fitler you've fitted for somthing a bit better I use the vw t25/ golf Mk 2 one nice size and easy to get
Re: Rebuild update
Posted: Tue May 09, 2017 11:48 am
by shandyhaggis
Mr Pharmacist wrote:Looking good Andrew!
It looks like got haven't got and front anti roll bar installed? It will transform the handling if you do get one fitted (blatant plug for the one I have for sale currently
)
Hi Stuart,
not sure if I need one, I guess it depends on how I drive it. Im making the assumption it will drive eventually:-) . Can you pm me the details? I think you mentioned you had a spare steel wheel as well? or did I make that up:-)
cheers
Andrew
Re: Rebuild update
Posted: Tue May 09, 2017 11:49 am
by shandyhaggis
Nicktune wrote:You might want to swap the plastic inline fitler you've fitted for somthing a bit better I use the vw t25/ golf Mk 2 one nice size and easy to get
Thanks Nick
that makes sense, the filter came with the fuel pump so I just stuck it on. Ill get a VW one as you say their cheep enough
Thanks
Andrew
Re: Rebuild update
Posted: Tue May 09, 2017 6:43 pm
by 914 KEV
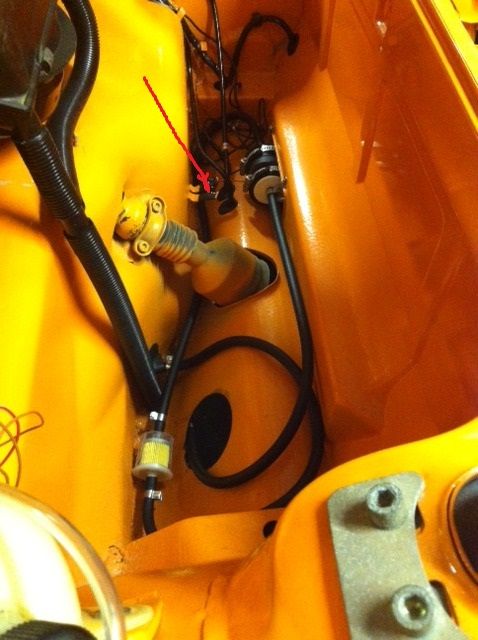
Arrow points to the original mounting position for the fuel filter on the 75-76 model year which is accessible from the front boot area by removing the 4 screws that hold the fuel pump mount in place and pulling out of the way to get to the fuel filter; which is a lot easier than excessing it from under the 914.


