Page 8 of 41
Re: 914 2.0 > 3.0 GT Conversion
Posted: Fri Oct 06, 2017 8:55 am
by chief
Okay, so talk about diving in there eh sunshine!!!
Man alive is it a fun task scraping off all that underseal! Getting into the back of the door jamb is just a nightmare....!
Looking really professional and the arches look great. I see you still have a few wrinkles from the manufacturing process. Now you're this good, get the dolly and hammer out!
Fantastic effort, bloomin well done

Re: 914 2.0 > 3.0 GT Conversion
Posted: Wed Oct 11, 2017 5:36 pm
by defianty
Since the last update I've been discovering more rot. I knew there was a bit but as usual it was a little worse than I imagined. Isn't it always. Most of it had been there a long while and had been disguised with filler and painted over. This time I was doing it properly.
First was the front trunk seal channel another notorious area.
This is the bottom left corner above the headlight.


Looks a little odd finished but it matches the other side perfectly.

Re: 914 2.0 > 3.0 GT Conversion
Posted: Wed Oct 11, 2017 5:37 pm
by defianty
This was totally hidden under high build and paint. Almost the entire length was heavily pitted.

Just surface rust fortunately - cleaned up and treated before being recovered.

New channel fabricated and tacked in.

Finished - nice new metal.

Re: 914 2.0 > 3.0 GT Conversion
Posted: Wed Oct 11, 2017 5:37 pm
by defianty
Next job was on the the windscreen aperture. I wasn't looking forward to this one and I was going to need to buy a Shrinker/Stretcher. As per usual spent a bit of time researching how I was going to make this part. When the Shrinker/Stretcher arrived I couldn't wait to have a go. Initially I used it to put a slight bend in the long trunk channel above and in seconds I had the perfect bend.
So now to make a replacement part for this. You can't beat jumping in at the deep end


This was my first attempt and I was rather pleased with the result.

Nice and clean underneath fortunately.

Ready to stick in on

Getting there.

Finished


Really happy with how that turned out. The other corner needs some attention so that will receive the same treatment.
I'm off the see the media blasters and painter tomorrow to discuss my requirements and dates. I'm hoping to have the car painted in the beginning of the new year. Still lots to do though before that happens.
Re: 914 2.0 > 3.0 GT Conversion
Posted: Wed Oct 11, 2017 8:03 pm
by KAS.750
Super work on this especially that screen aperture repair.

Re: 914 2.0 > 3.0 GT Conversion
Posted: Thu Nov 16, 2017 7:35 pm
by defianty
Re: 914 2.0 > 3.0 GT Conversion
Posted: Thu Nov 16, 2017 7:36 pm
by defianty
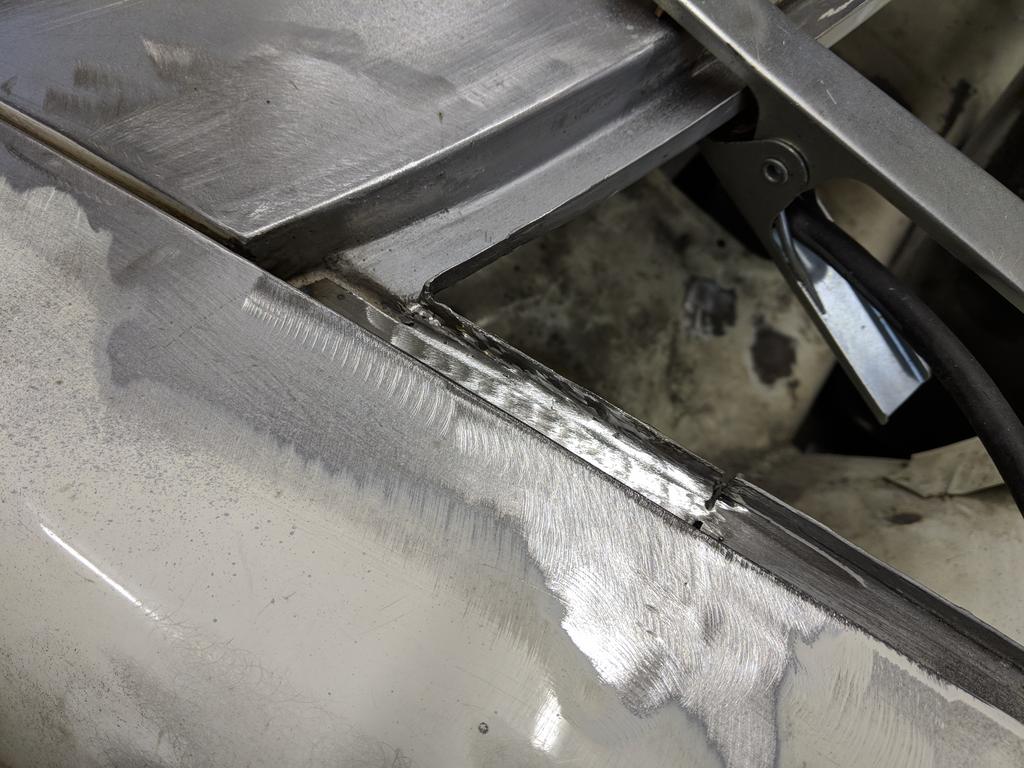
The last piece of the bonnet gutter to repair was again another time consuming job. I've spent days now just making small repair pieces
Trying to cut out the rot - Lots of seam sealer on the underside.

All the offending metal cut out and a coat of weld-thru primer applied.

One of the two repair pieces in place before welding.

Piece one finished and more primer applied

Last piece in and almost complete.
Re: 914 2.0 > 3.0 GT Conversion
Posted: Thu Nov 16, 2017 7:36 pm
by defianty
With the oil cooler shroud taking place of the spare wheel well I sourced a collapsible spare tyre and set about mounting it upright.

After a few cardboard prototypes I made this bracket to attach the spare.

Welded in place it uses the original spare wheel hold down to attach the wheel and leave about half an inch gap under the tyre.

Spare in place.

If I was going for more of a race style GT replica I'd have called this complete, but I had in my mind to utilise the original floor board to make two storage compartments. As well as the oil cooler the fuel pump is also going there so I like the idea of a cleaner storage area above. I'd seen this done before on a GT replica at the Nurburgring, just my approach would be a bit different.
Again after a few ideas I settled with a support bar for the top of the oil cooler shroud and a couple of brackets.

Brackets welded in. The hole in the top are filled with grommets, giving the board something to rest on.

Oil Shroud support bar painted and in place. The two open grommets allow for pegs on the base of the board to slot in place and stop it from moving about.

Floor board in place. Eventually this will be recovered in Perlon as per the original.
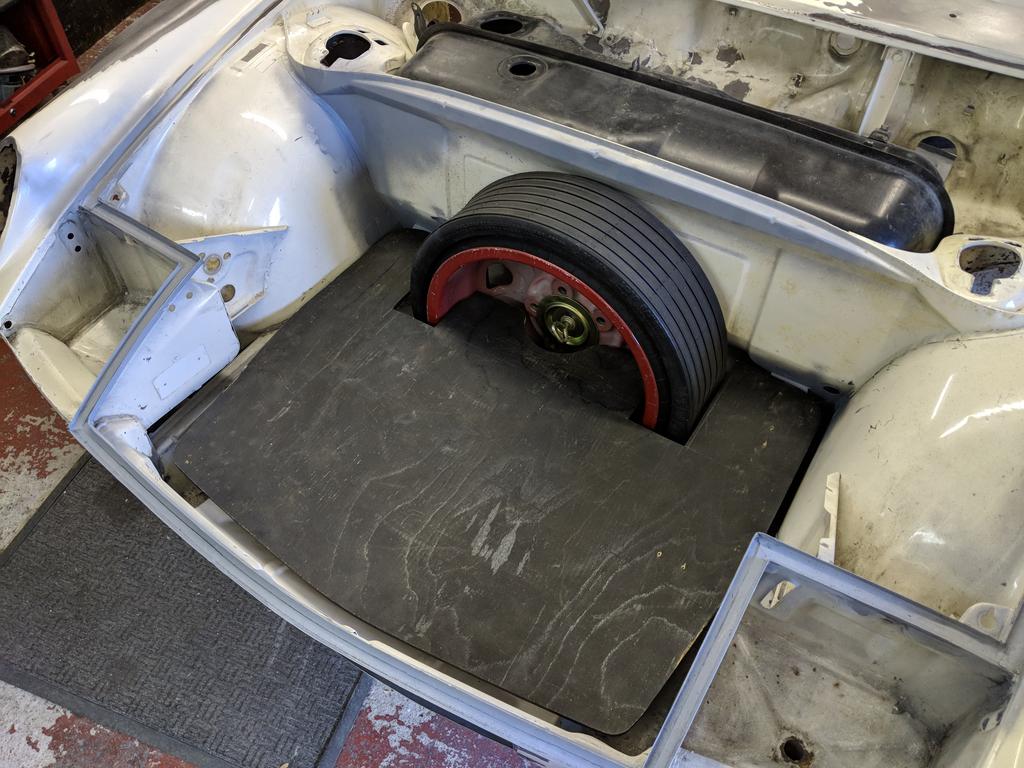
With the oil cooler shroud in place the wiring loom will now run across the top of the shroud. The tyre board is short enough not to interfere with it but I wanted a solution to tie the loom in place. Copying the style of all of the wiring loom metal tabs welded on the body I made these to both hold the top of the shroud in place and bend around around loom.

Re: 914 2.0 > 3.0 GT Conversion
Posted: Thu Nov 16, 2017 7:36 pm
by defianty
With that done it was time to install another flare, this time however I took a slightly different approach.
Here's the flare attached to the car with screws, I'd previously trimmed off most of the original arch on the wing. This time instead of drawing around it and trimming the original wing I was going to cut this wing with the flare in place leaving tabs where the screws were.

You can just about see where I've left a piece of metal near the screw.

All cut show a few of the tabs.

I could now place a few spot welds here and there and cut the tabs off when I got to that part.

The resulting fit was much better than the other side and I'll be using this approach on the rears.


With that flare attached and finished the front of the car was done. With that I put the front bumper and valance back on to test fit again and I also cut the front bumper for more airflow.

Now I need to find someone to re chrome the front bumper and potentially weld up the holes in it too.
I've now started on the rear again now and will post another update in a few days when that starts to take shape.
Re: 914 2.0 > 3.0 GT Conversion
Posted: Thu Nov 16, 2017 8:22 pm
by jtparr
Well done Stephen...lovely work....
Re: 914 2.0 > 3.0 GT Conversion
Posted: Thu Nov 16, 2017 8:30 pm
by jury
Re: 914 2.0 > 3.0 GT Conversion
Posted: Thu Nov 16, 2017 8:41 pm
by stretch
Top class work. Enjoying this one.
Re: 914 2.0 > 3.0 GT Conversion
Posted: Thu Nov 16, 2017 8:55 pm
by chief
Okay Stephen I'm going with your 'Whilst I'm in there' list is sooooooo much bigger than mine!
Looking good though, brilliant skills sunshine...
Re: 914 2.0 > 3.0 GT Conversion
Posted: Thu Nov 16, 2017 9:01 pm
by KAS.750
Nice work on this.

Re: 914 2.0 > 3.0 GT Conversion
Posted: Thu Nov 16, 2017 9:11 pm
by LMR
Great work!


