Wot, not another '79 Targa resto thread

Ongoing and archived Porsche (and other marques) restoration threads from DDK members

Moderator: Bootsy

Post Reply
911hillclimber
Nurse, I think I need some assistance
Posts: 20694
Joined: Mon Mar 10, 2008 6:26 pm
Location: West Midlands

Re: Wot, not another '79 Targa resto thread

Post by 911hillclimber »

£500 paint job! Love it.

in '89 I cellulosed my 911 for £65.
In 2019 I had the same car, self prep, in 2K for £1300 but by a small 3 man accident repair shop locally. I think he go his sums wrong but he loved the car.

Great going Peter, suddenly you will be bolting together and detailing endlessly rather than rubbing down and sweeping up endlessly.

Soon have a lot more time with SWMBO. My own Boss is a big fan of yours! :lol:
73T 911 Coupe, road/hillclimber 3.2L
Lola t 492 / 3.2 hillclimb racer
Boxster 987 Gen II 2.9
User avatar
PeterK
DDK rules my life!
Posts: 1274
Joined: Mon Sep 01, 2014 3:04 pm
Location: GU51 - Fleet, Hampshire, UK

Re: Wot, not another '79 Targa resto thread

Post by PeterK »

Time for the bumpers to receive more love.
First they were acid cleaned, rinsed, washed and then dried, followed by panel wipe to make sure they were dry.
Then, as I couldn’t find any way to be able to satisfactorily suspend the bumpers and paint both inside and outside at a single go, they were placed on the stand for painting.

They were firstly epoxy primed internally
Image

…and then the next day, on the outsides
Image


The Targa (might call her Beluga, as she’s white, with a whale tail – what thinks you all ?) was raised back onto the dollies, so that I could spin her around in the garage ready to repaint the rear wing. Hopefully I can make sufficient room to paint the front wings at the same time.

So, front and rear wings repainted
Image
Image

Then using my ‘underside white’ a quick touch up of the paint inside the front wings where the stand had previously scuffed them in a couple of spots and a good splash on the inside of the bumpers.
Image

While I was getting ready, I compared the ‘underside’ and ‘top-coat’ whites today (same paint code from the same supplier, but different batches, so I’ve kept them separate), and while wet, they actually look the same colour under the LED baton lights in the garage. I’ll check them outside when they’ve dried, but this could be useful if I run low on top-coat.

Then onto the outside of the bumpers, and primer filler. It takes a complete day for each stage of this painting malarkey – get everything ready, spray a couple of coats and then watch paint dry for the rest of the day. Don’t touch anything, do not access the garage ‘cos you’ll bump into a panel that isn’t dry, leave fingerprints, or knock it off its stand etc, etc – wonder how I know that 
Image

A quick flatten off and ready for top-coat (along with the front bumperettes & torsion bar cover plates).
Image

I also gave the inside of the front bumperettes a quick splosh of stone chip, just in case you were worrying that I had forgotten. Raining today, so waiting for a brighter day tomorrow before top-coats.


So a slightly brighter day and once more into the garage dear readers. Splish, splash, splosh and we have
Image
Much less cr4p in the paint this time, although I did end up with a few tiny drips off the underside of the wheel arch lip, so rectification needed later, when the paint has hardened.

Wait another day for the paint to dry and move them to behind the sofa (I think that SWMBO has noticed now – getting worried that she hasn’t said anything). Then roll up all of the plastic sheets and tidy away some of the painting cr4p
Image
Image

There is soooo much dust everywhere, despite the sheets. The filter over the exhaust fan is thick again, and needs replacing – my last one. They look blocked so quickly, although not much dust comes off them when shaken. I used 3 during the priming and topcoating process !

Looking forward to fully removing (oh naughty, I split my infinitive there – a manager early in my career will be turning in his grave) the plastic sheets, but as I have wet colour sanded panels but not compounded and polished yet, there is still opportunity for me to mess things up and need to repaint. If I remove the plastic now, Murphy’s Law will ensure that I need to repaint something, so playing safe and leaving the sheeting there for now.


I need to splash some satin black on my recently acquired headlight beauty rings, but need to make them fit first. I was worried about too much paint build-up getting in the way, but checking while doing my flatting before top-coats, the headlights have just enough clearance. My issue is that the rings don’t / won’t stay on. When I clip them on at the top, there’s not much holding on and when they’re pinned at the bolt position, just a slight tap and the top springs off. Unless someone has a magic cure, I think that I’ll try bending the lip of the rings more, to give more/ better purchase. The two rings are definitely slightly different shapes from one another, so hopefully I can use the headlights as a former and shape the rings to best fit.


Otherwise nothing that springs to mind remains to be painted now, except for the targa cover (satin black over stainless) & the fuel tank, which needs to be stripped and cleaned first. If there is anything else that needs painting, I guess that it will become clear when I start reassembly.


Not sure what to do next - back onto the wiring, fit some rubber trims ????. The sensible thing is to compound the colour sanded panels, ensure I don't need more painting and then fit them up, although I'm a bit bored of sanding at the moment. Might start with the front scuttle - if/when I get that shiny I can finally fit the wiper motor and Jonny's hi-powered blower. This is the only 'changed' bit of the aircon system, with everything being additional, so that is going in during the re-assembly stage.


In other news, the bottom end is away for balancing, so nothing then to prevent me trial assembling the engine. I need to get some of the gasket/spacer rings that fit under the cylinders, but I won't know what I need until I check my clearances. When I say nothing to prevent me trial assembling, obviously that is apart from the dust and sh1t in the garage - that definitely must be cleaned before I think about engine bits. The engine will wait until social distancing is more relaxed, as I have a few guests wanting to watch and help.

'79 Targa - restoration now mainly complete & being driven
http://www.ddk-online.com/phpBB2/viewto ... 28&t=59756

and now CIS to EFI
viewtopic.php?t=72921
911hillclimber
Nurse, I think I need some assistance
Posts: 20694
Joined: Mon Mar 10, 2008 6:26 pm
Location: West Midlands

Re: Wot, not another '79 Targa resto thread

Post by 911hillclimber »

I had big issues with the headlamp retaining lip on the top of my new Dansk wings, fitted perfectly on the Porsche original wings of course.
You need to have them very secure. I thought I had fixed them but a good pull on them with nails behind the rim and they popped off really easy.
a simple road run would have them all over the paint or the road in bits.

Have you satin blacked the spots in the interior/dash?

I think most do the loom clean/resurrection after a shell build as it is the first bit to go in, under dash next, suspension, brakes.
Fuel lines down the tunnel if removed and all the cables, tank and pump.

Engine/box/exhaust and clutch, leave the drive shafts off. Test everything on the drive train. If good, do the drive shafts up.

A good engine gasket set will come with the soft copper cylinder base seals and they are all the same thickness as the cylinders should be all the same height class, the factory had different height markings so a matched set are used and the heads/cam housings are flat, should not need to shim anything.

Summer of Great Joy for you popping it all back together! :)

The old vacuum cleaner is needed to de-dust the garage, good luck with that one, maybe a job for The Boss? :blackeye:

Grit blasting in the garage is FAR worse than paint dust I assure you.
73T 911 Coupe, road/hillclimber 3.2L
Lola t 492 / 3.2 hillclimb racer
Boxster 987 Gen II 2.9
User avatar
PeterK
DDK rules my life!
Posts: 1274
Joined: Mon Sep 01, 2014 3:04 pm
Location: GU51 - Fleet, Hampshire, UK

Re: Wot, not another '79 Targa resto thread

Post by PeterK »

I think I'll pass on suggesting to SWMBO that she cleans the garage - that would definitely not be good for my health :lol:


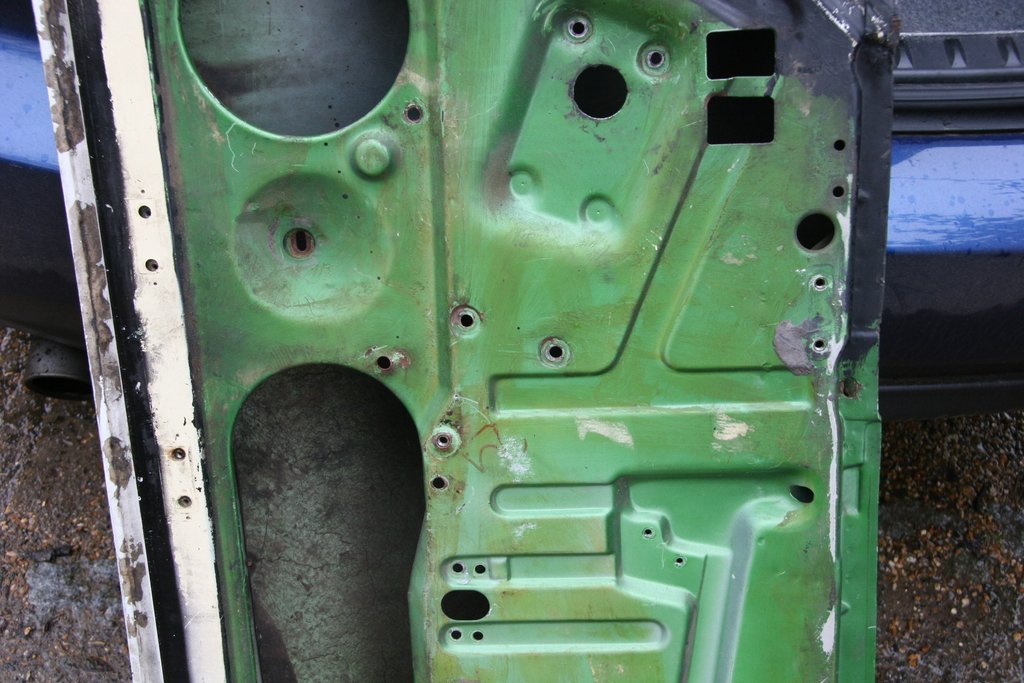
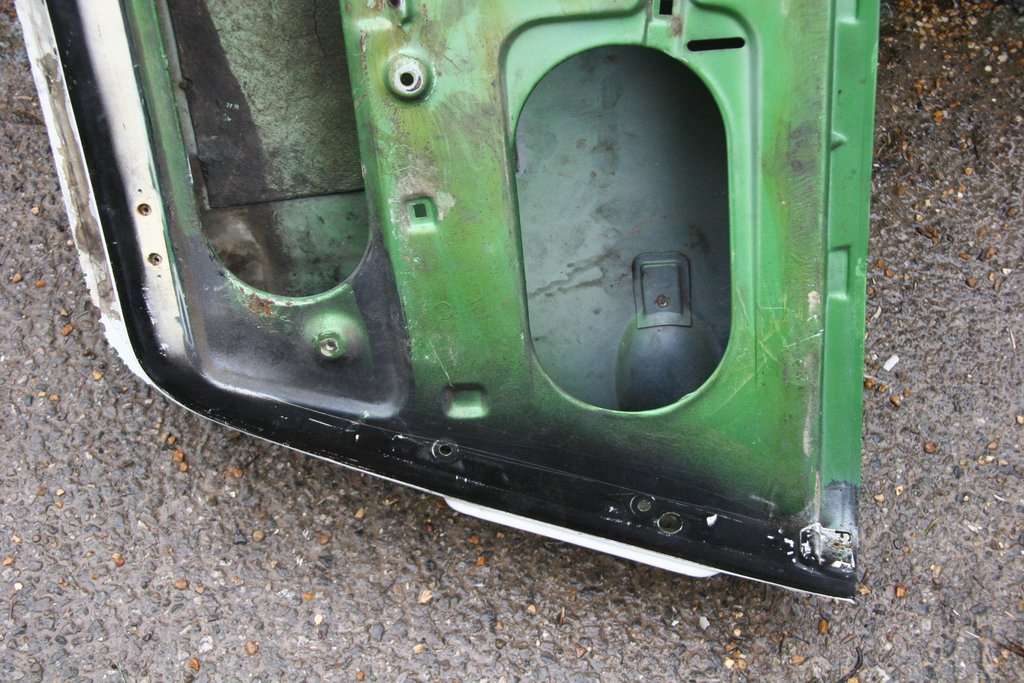
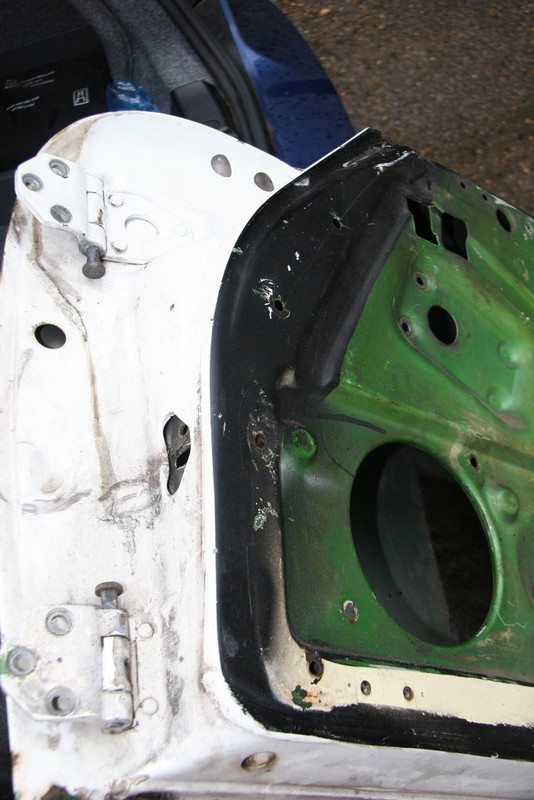
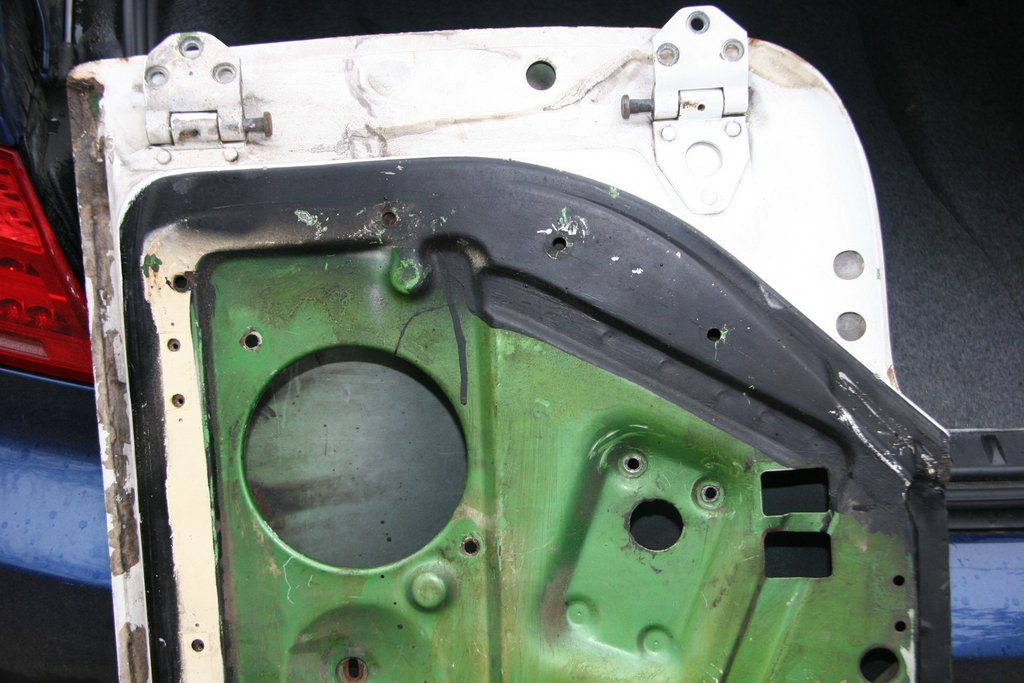
I've satin blacked the interior - except I forgot the centre seat belt mount point between the rear seats and I haven't done the inside of the doors yet. I'm not sure where to black - specifically, where does the black stop in relation to the outside edge of the door ?

As I did too much sailing (is there such a thing) and missed my summer painting window last year, the suspension and brakes are already done (just need fluid & bleed for the brakes), looms & fuel lines are run and gauges are in. Got some strange lights on the dash when I did a quick play, so do need to sort those. I had an indicator light showing in the dash when it shouldn't, etc., so probably at least a couple of mis-placed light wires. The oil level gauge also went to max full when the ignition was turned on, so something going to earth somewhere.


I have a full gasket set, but not opened to see base gaskets. Was unsure whether I would need thicker ones, having had the heads skimmed slightly to remove evidence of blow-by caused by a couple of broken head studs. I plan to trial assemble without base gaskets (or including 0.25mm if they're in the gasket set) and measure valve to piston clearances to determine actual base gasket thickness needed.

Once I'm passed the paint polish, then it is all downhill (hahahaha)
'79 Targa - restoration now mainly complete & being driven
http://www.ddk-online.com/phpBB2/viewto ... 28&t=59756

and now CIS to EFI
viewtopic.php?t=72921
Phill

Re: Wot, not another '79 Targa resto thread

Post by Phill »

Moby, as in Dick.

Yay, engine build parrrrtteeeeeeee...........
User avatar
PeterK
DDK rules my life!
Posts: 1274
Joined: Mon Sep 01, 2014 3:04 pm
Location: GU51 - Fleet, Hampshire, UK

Re: Wot, not another '79 Targa resto thread

Post by PeterK »

Thought of that but there’s an IBer called Moby Dick that lives within 10 miles of me, so that’s taken.
'79 Targa - restoration now mainly complete & being driven
http://www.ddk-online.com/phpBB2/viewto ... 28&t=59756

and now CIS to EFI
viewtopic.php?t=72921
User avatar
PeterK
DDK rules my life!
Posts: 1274
Joined: Mon Sep 01, 2014 3:04 pm
Location: GU51 - Fleet, Hampshire, UK

Re: Wot, not another '79 Targa resto thread

Post by PeterK »

Took a couple of days off for family time, but had to face up to colour sanding and compounding, so made a start with the front scuttle. I had previously wet hand-sanded the dust away, using 2500 wet & dry, or 1500 then 2500 for any bigger spots. Today I started by protecting the edges with blue tape
Image
…. and had a go at compounding.

Using G3 compound, my 3” DA pneumatic polisher didn’t touch anything and the 3” pneumatic die grinder just put deeper scratches in the surface. The 150mm pneumatic hand sander with 2500 grit just made things go black. To clear things up I finally used my 150mm sander with 1500grit to get rid of the marks left by the 75mm jobby, followed by the 2500 grit, then used my mega electrickery mopping machine. Not too shabby in the end.
Image

It was quite stressful having to use the mega mopping machine above the windscreen area, but it was still the only thing that gave a decent result. Next will come the major removed panels, with front and rear wings waiting a while longer for their paint to fully harden.
'79 Targa - restoration now mainly complete & being driven
http://www.ddk-online.com/phpBB2/viewto ... 28&t=59756

and now CIS to EFI
viewtopic.php?t=72921
Phill

Re: Wot, not another '79 Targa resto thread

Post by Phill »

Looks very lovely, good job.
User avatar
PeterK
DDK rules my life!
Posts: 1274
Joined: Mon Sep 01, 2014 3:04 pm
Location: GU51 - Fleet, Hampshire, UK

Re: Wot, not another '79 Targa resto thread

Post by PeterK »

Not happy with the mopping at the moment.
I’ve polished the engine lid and started on the froot lid, but I am struggling to polish the flattened paint without causing more small scratches. Looking online for alternative cutting compounds, I notice that many specify only a limited shelf life for cutting compounds and polishes, maybe 1-2 years. Mine is over 5 years old, so maybe (part of) my issue is there.

Moved onto electrics again while I sulk and await new compound (trying 3M products this time). Gave the front fuse box a check-over. I found the use of the ‘spare red/black’ wire – it was the power feed to the speedo. Also realised that I was missing a link wire from fuse 16 to 11/12, so added that in. One fuse does not have any wires coming out of it – 1 is supposed to be black to the tempostat and the other a blue/green to the brake switch, although I have yellow/green wire running to the pressure switches on the brake booster – may be an issue with different years and USA / Euro configurations. More investigation needed.

I’ve sorted the gauges showing full as soon as the ignition is turned on – they’re meant to do that if no senders are connected. I assumed that they would indicate zero, moving to maximum when earthed, but they actually do the reverse. While hunting, I discovered that I had wrongly wired my washer bottle level sensor to the fuel gauge, rather than the fuel low-level light, so corrected that. I’m copying Jonny here – if the fuel light shines, but I have fuel, then the washer bottle water level is low.


My car came with a powered driver’s mirror and manual passenger. I a previous life it appears to have had a replacement passenger door, which was a LHD (judging by the poorly welded original mirror holes and roughly drilled new holes that I found earlier in my resto work). It also had an electric mirror, although the clutch is toast (shorted out). I have a replacement mirror coming and had hoped that I could also get the correct cross car loom. Unfortunately it is so intricately cable tied into its car that I needed a PlanB. A replacement loom is loadsa dosh, mucho spendy, and even reproductions of the correct 6-way connectors at Euro15 for each part and I would need 4 parts. So, onto Plan C. As it was pointed out to me, as I am not building a concours car, I don’t need to use the Porsche specific connectors. The actual loom is not that complicated, and for about £10, I bought the correct colour cables and connectors (1 off 8 way & 1 off 6 way). The Porsche changeover switch is just shy of £20, so a quick browse of fleabay and my £2.50 switch is on its way as well.

I cut the old 3-way connector (standard single side mirror option) from the end of the car loom and wired it into my new 8 way connector (only need 7 way, but as 6 is too small so 8 way it is then), along with the cross-car wires. Add a nice bit of cable tubing / wrappy thing, route it with the other cross-car looms and it almost looks like it should be there. Wires to the changeover switch from both sides disappear through the dash using the door switch grommets and meet just under the steering wheel. Still waiting for the switch to finalise position, but just above my left knee seems favourite at the moment – plenty of clear space above for fitting the switch and connecting the wires.

Passenger side
Image

Driver’s side
Image

Just needs mirrors now, but they'll need doors fitted first of course :lol:


Ran the speaker wires front and rear and wired up the radio connector (I’ve gone for one of the Continental / VDO - DAB / Bluetooth / all singing / all dancing / no CD jobbies). All new wires belled out nicely.
Image

The car is safely in the garage, I didn’t connect the DAB aerial (little point inside the garage) and there is no ‘normal aerial fitted, so although the radio turns on, all I could identify was that the speakers make white noise, so the assumption is that all is well here.

Need to finally fix the heater control unit into place (which needs the blower box fitted first, which in turn needs the wipers fitted beforehand) before I can finish the radio 'box thingy' in properly.


Off for tea now, and a good read of the wiring for the alarm system- it's a Sigma 30 system which is supposed to be installed professionally, but that's never stopped me before :? I'm adding central locking and a microwave detector (it's a targa after all). Please excuse me if I'm less than open in public about where I put it and how I wire it in :lol:
'79 Targa - restoration now mainly complete & being driven
http://www.ddk-online.com/phpBB2/viewto ... 28&t=59756

and now CIS to EFI
viewtopic.php?t=72921
DustyM
I need to get out more!
Posts: 3198
Joined: Tue Apr 21, 2009 4:12 pm
Location: Middle England

Re: Wot, not another '79 Targa resto thread

Post by DustyM »

G3 is a strong cutting compound, not a finishing compound. Use the G3 to get rid of the sanding marks then a finer compound (and associated mop head) to remove the swirl marks left by the G3.
Make sure the mop head is damp and don't use too much compound
User avatar
PeterK
DDK rules my life!
Posts: 1274
Joined: Mon Sep 01, 2014 3:04 pm
Location: GU51 - Fleet, Hampshire, UK

Re: Wot, not another '79 Targa resto thread

Post by PeterK »

Thanks John
I was trying to get rid of the 2500grit scratches, so definitely cutting rather than polishing. I wet the mop head and was spraying the panel but in hindsight, the compound wasn’t ‘smearing’ like I remember, and certainly wasn’t getting rid of the sanding marks.
I may have not sanded enough, with the deeper scratches being hidden by the muck from sanding, despite me wiping the surface before compounding. The cleaning after compounding may have made them visible and I just assumed they were from the compounding efforts.

I’ll resand with 2500grit, clean better & inspect properly before trying the 3M fast cut and polishing stages.

Every day is a learning opportunity, even if I’m just learning that I should take up tiddlywinks :lol: I’ll get there
'79 Targa - restoration now mainly complete & being driven
http://www.ddk-online.com/phpBB2/viewto ... 28&t=59756

and now CIS to EFI
viewtopic.php?t=72921
DustyM
I need to get out more!
Posts: 3198
Joined: Tue Apr 21, 2009 4:12 pm
Location: Middle England

Re: Wot, not another '79 Targa resto thread

Post by DustyM »

We no longer use G3 as we found it too harsh. We use the 3M system starting with Fast Cut Extreme, after using 3M Trizact 3000 discs on a DA
User avatar
PeterK
DDK rules my life!
Posts: 1274
Joined: Mon Sep 01, 2014 3:04 pm
Location: GU51 - Fleet, Hampshire, UK

Re: Wot, not another '79 Targa resto thread

Post by PeterK »

I thought about Trizact but wasn’t sure how much they would improve on the 2500. How long do they last (how many would I need to do a complete car)?
'79 Targa - restoration now mainly complete & being driven
http://www.ddk-online.com/phpBB2/viewto ... 28&t=59756

and now CIS to EFI
viewtopic.php?t=72921
Dougieboy1
I luv DDK!
Posts: 885
Joined: Mon Jan 04, 2016 7:27 pm
Location: Definitely round here somewhere

Re: Wot, not another '79 Targa resto thread

Post by Dougieboy1 »

Peter,

maybe these photos help - this is how my door looked when i took it off. The original green on the inside, repainted white on the outside and closing faces. The black i think was reapplied over the white respray but it gives a fairly good indication of where the black goes. I used it as a guide for my pain[t] plan.

Image

Image

Image

Image

Keep up the excellent work!!
1972 911S
1944 VW Schwimmwagen (originally a Porsche typ128, eventually VW166)
A bunch of other crap (according to my wife)
User avatar
PeterK
DDK rules my life!
Posts: 1274
Joined: Mon Sep 01, 2014 3:04 pm
Location: GU51 - Fleet, Hampshire, UK

Re: Wot, not another '79 Targa resto thread

Post by PeterK »

Thanks, most useful - especially the last photo
'79 Targa - restoration now mainly complete & being driven
http://www.ddk-online.com/phpBB2/viewto ... 28&t=59756

and now CIS to EFI
viewtopic.php?t=72921
Post Reply