

That is great work indeed. And a good reminder never to try anything like that myself!
Keep it up.
964 C2 - Rolling Resto
Moderator: Bootsy
-
yoda

- I need to get out more!
- Posts: 3283
- Joined: Fri Apr 14, 2006 6:01 am
- Location: London
Re: 964 C2 - Rolling Resto
The force is strong in this one ......
-
sladey
- Nurse, I think I need some assistance
- Posts: 9333
- Joined: Sat Apr 23, 2005 9:08 pm
- Location: Nottingham, UK
Re: 964 C2 - Rolling Resto
Thanks for the update - great to read that detail.
The simple things you see are all complicated
I look pretty young but I'm just backdated yeah
I look pretty young but I'm just backdated yeah
-
rhd racer
- Me and DDK sitting in a tree! KISSING
- Posts: 2515
- Joined: Wed Jun 23, 2004 9:47 pm
- Location: Nottinghamshire
Re: 964 C2 - Rolling Resto
Thanks for the kind comments. Rather than put people off doing jobs themselves, I am trying to show that anything is possible with a basic garage set up and some good old problem solving (more of that on the front suspension!). My wife came into the garage half way through this job, saw my blackened face with dirt and me wince as I sat up off the crawler and she said 'I can't believe you do this for a hobby, you're mad!' The simple truth is I have a stressful job and a young family - doing this is just totally different and a set of challenges you don't get day to day. I like solving problems, getting over hurdles, finding a way and not giving in. Even though most of the jobs suck!!!
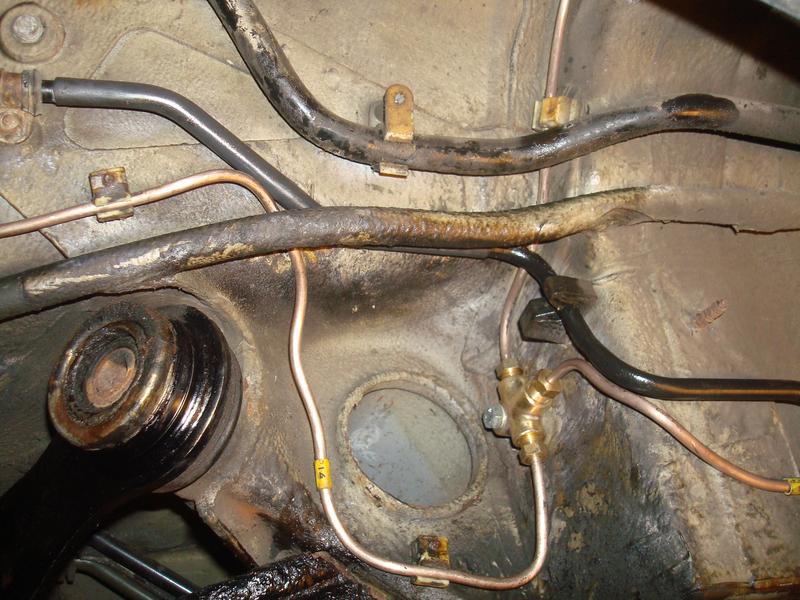
Whilst under there I thought I should replace the clutch hydraulic line. On a 964, as you will see in the photos, the clutch line travels down the centre tunnel to a straight connector, and then underneath the gearbox nosecone before following a similar route as the last brake line.
By underneath the nosecone, I really do mean under, and therefore when you remove the engine and box you need to get it balanced absolutely perfectly, so that the nose points up in the air and clears the line, before you pull it back and out on a jack. It's quite an art, and Angus has it perfected.
What it means is the line is a) at risk of getting clouted, bent etc b) a low point on the car and also susceptible to corrosion. So my intention was to replace this pipe only, and selected what I thought was it for £22 from D911. When it turned up, imagine my surprise to have a 1.5m box handed to me by the postman.......
So I had ordered the long central tunnel line, which, as it turns out is perfect, but hey, there is no point being this deep and not changing it - but I needed to get the right line. So having made one epic fail, I called OPC Nottingham and Kevin said it was no problem and only cost £22. Alarm bells rang and he, having put through the order already, had to call Reading and clarify the PET. It seems we had both made the same mistake, so neither of us are idiots after all!
The correct pipe is much shorter, more complex in shape, but £70 seems a bit rude as it is the one most likely to be replaced. Hey-ho, I collected it the next day - see below ready for fitting
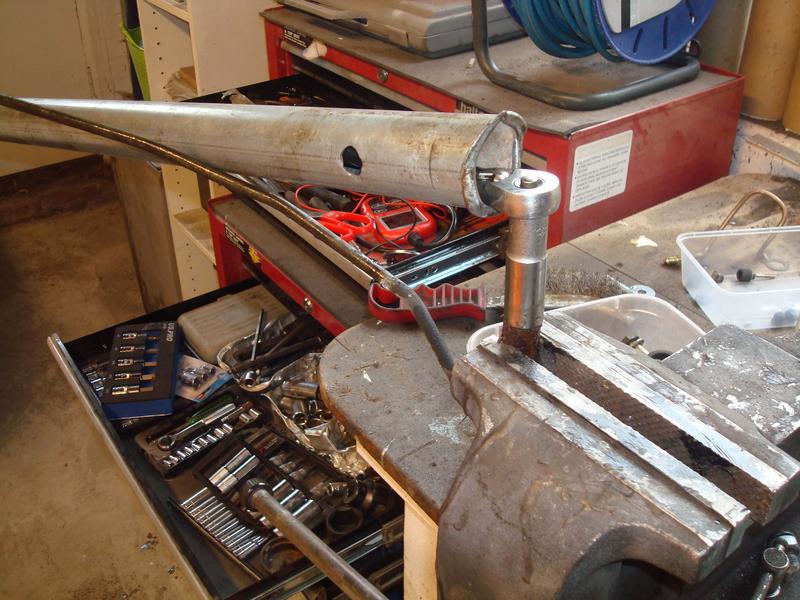
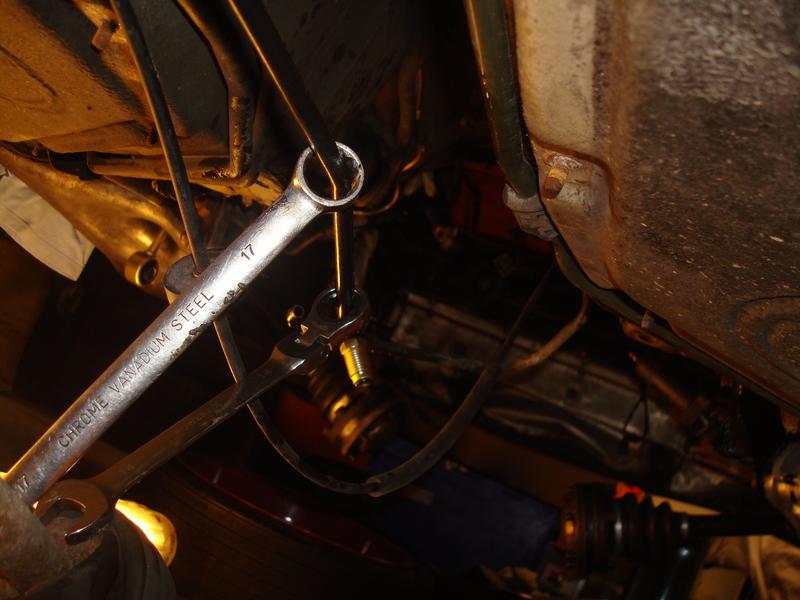
So with two lines to replace and a new slave cylinder, the obvious place to start was the straight connector, thus taking the weight off the main line. A quick go at the connector (which is 17mm, the line being 14mm or so, so much larger than a brake line and steel to steel) revealed that it was as tight as the proverbial gnat's chuff...so back to cutting it at the union and doing on the bench with a socket. Hack saw and splattering of brake fluid in the ear followed
So in the vice I expected it to undo, but it didn't and needed a 3ft extension bar to shift it. Nice. Another job that would not have been possible with the box in then....
You can see how rusted it was from these
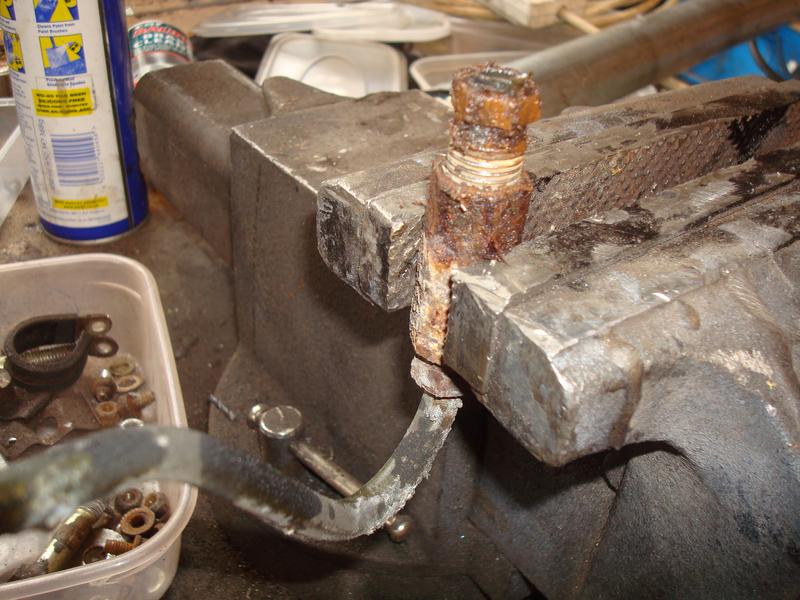
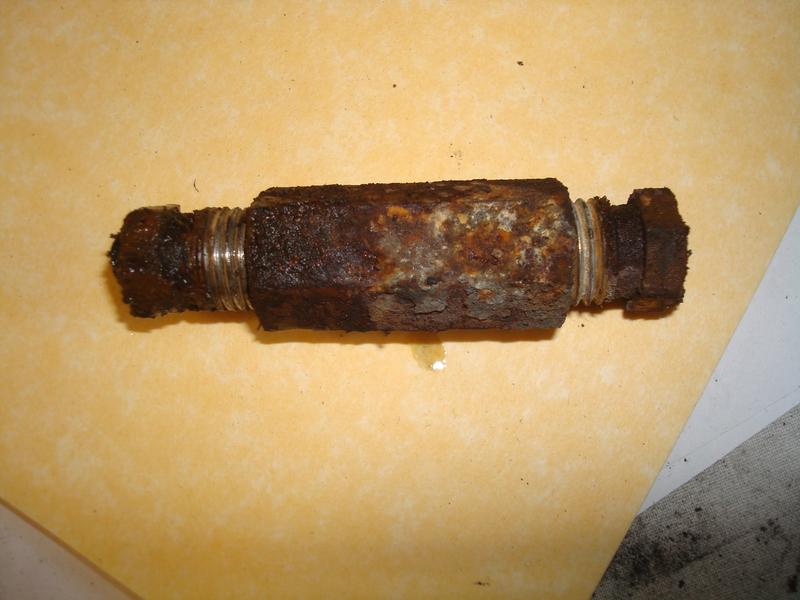
So a quick spray of paint after a clean up to protect it ready for re-use, and it could dry whilst I removed the main line, which would be easy as protected in the tunnel right? Let's just say it had plenty of drying time
The problem with the front connection is that it is hidden above some other pipes which cannot be undone, so there is no spanner room. It also was very tight from a quick recce, so the only thing to do was cut off the pipe and get a 17mm ring spanner on the large straight connector (same arrangement as the rear) and then a 14mm socket on the small one, with a lever bar on it. Success, it shifted...
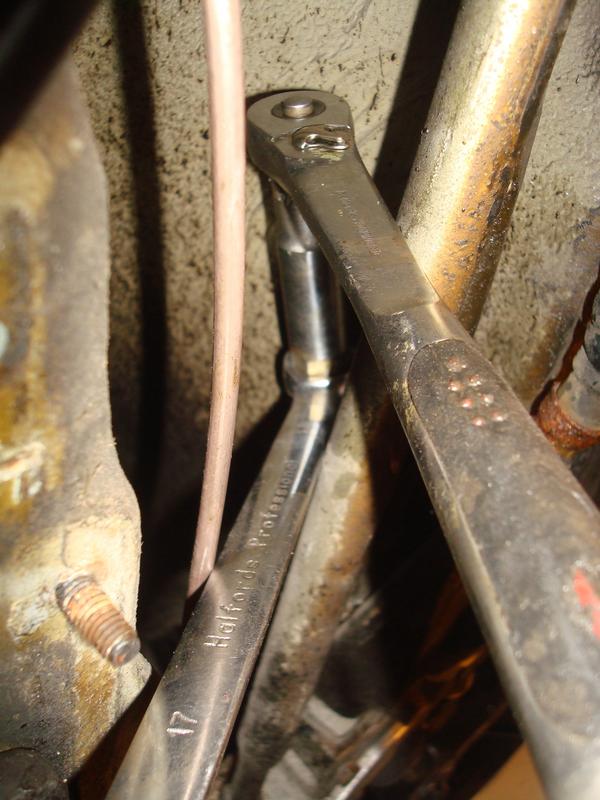
So, the easy bit would be fitting the new one....again, wrong! Sure the new threads made it easier to initially fit, but getting the spanners on to tighten it was a nightmare. This time I was restricted to open ended spanners because the whole line was in situ and I could not get enough purchase on it. Or was I restricted?
I came up with an adult game of Buzzwire, you know the game with the steady hand holding a wand and moving it around a complex wire shape...17mm ring first, from the rear of the car to the front, then 14mm ratchet spanner over the rearward connection then beyond to the front. Take off, reverse so it is doing up and not undoing, and success...!

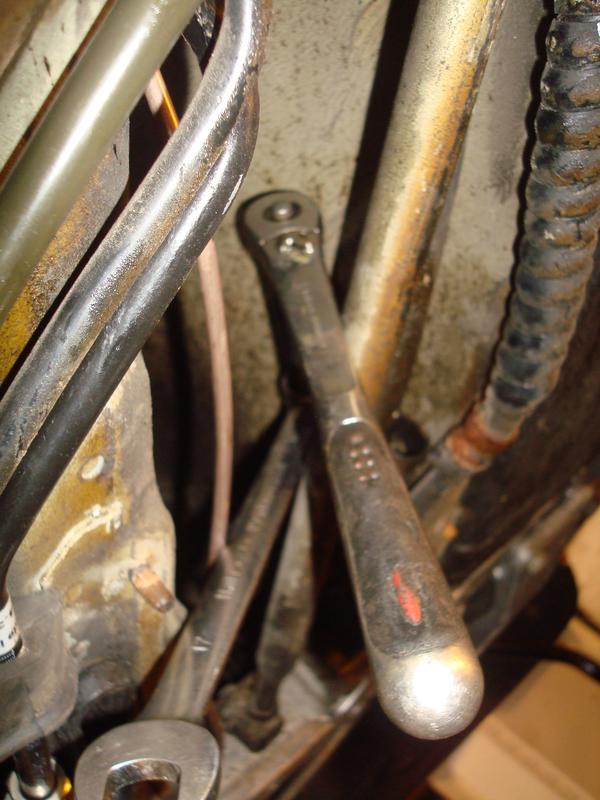
Slide spanners off, move to the rear of the car and then repeat, as the orientation was wrong. Doh! Like I say, one of those jobs....
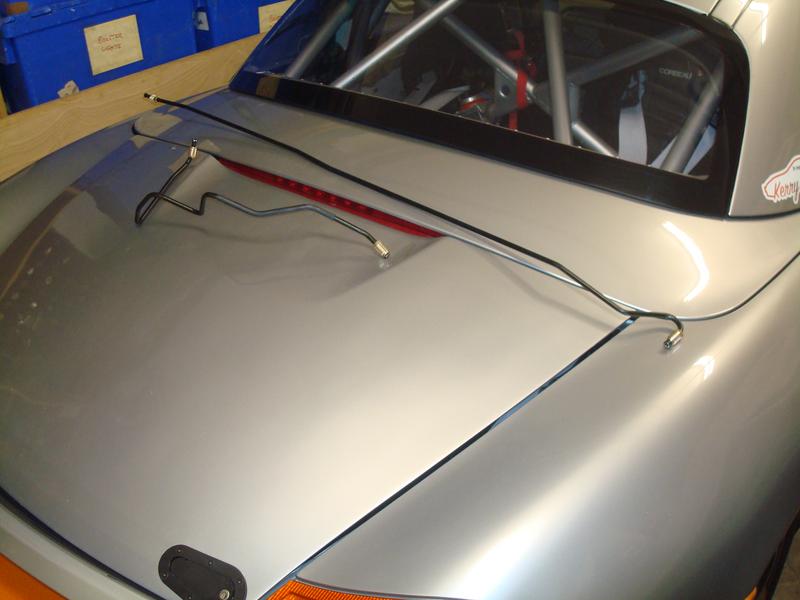
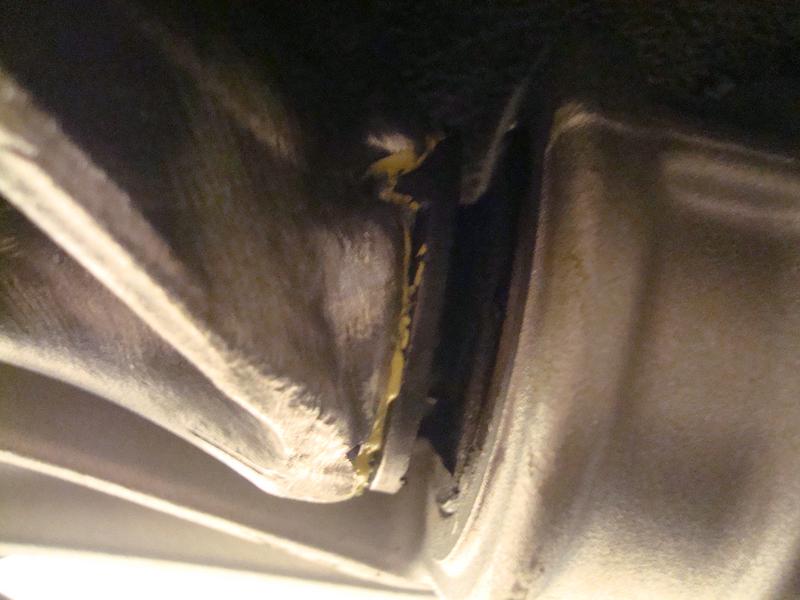
Getting the rear line in place was no walk in the park either. It fits behind the handbrake cable hard lines, and it needs carefully manipulating to get here....
And then connecting up with the fully dried straight connector!!! Here you can see just how exposed the line is....
Whilst under there I thought I should replace the clutch hydraulic line. On a 964, as you will see in the photos, the clutch line travels down the centre tunnel to a straight connector, and then underneath the gearbox nosecone before following a similar route as the last brake line.
By underneath the nosecone, I really do mean under, and therefore when you remove the engine and box you need to get it balanced absolutely perfectly, so that the nose points up in the air and clears the line, before you pull it back and out on a jack. It's quite an art, and Angus has it perfected.
What it means is the line is a) at risk of getting clouted, bent etc b) a low point on the car and also susceptible to corrosion. So my intention was to replace this pipe only, and selected what I thought was it for £22 from D911. When it turned up, imagine my surprise to have a 1.5m box handed to me by the postman.......
So I had ordered the long central tunnel line, which, as it turns out is perfect, but hey, there is no point being this deep and not changing it - but I needed to get the right line. So having made one epic fail, I called OPC Nottingham and Kevin said it was no problem and only cost £22. Alarm bells rang and he, having put through the order already, had to call Reading and clarify the PET. It seems we had both made the same mistake, so neither of us are idiots after all!
The correct pipe is much shorter, more complex in shape, but £70 seems a bit rude as it is the one most likely to be replaced. Hey-ho, I collected it the next day - see below ready for fitting
So with two lines to replace and a new slave cylinder, the obvious place to start was the straight connector, thus taking the weight off the main line. A quick go at the connector (which is 17mm, the line being 14mm or so, so much larger than a brake line and steel to steel) revealed that it was as tight as the proverbial gnat's chuff...so back to cutting it at the union and doing on the bench with a socket. Hack saw and splattering of brake fluid in the ear followed
So in the vice I expected it to undo, but it didn't and needed a 3ft extension bar to shift it. Nice. Another job that would not have been possible with the box in then....
You can see how rusted it was from these
So a quick spray of paint after a clean up to protect it ready for re-use, and it could dry whilst I removed the main line, which would be easy as protected in the tunnel right? Let's just say it had plenty of drying time
The problem with the front connection is that it is hidden above some other pipes which cannot be undone, so there is no spanner room. It also was very tight from a quick recce, so the only thing to do was cut off the pipe and get a 17mm ring spanner on the large straight connector (same arrangement as the rear) and then a 14mm socket on the small one, with a lever bar on it. Success, it shifted...
So, the easy bit would be fitting the new one....again, wrong! Sure the new threads made it easier to initially fit, but getting the spanners on to tighten it was a nightmare. This time I was restricted to open ended spanners because the whole line was in situ and I could not get enough purchase on it. Or was I restricted?
I came up with an adult game of Buzzwire, you know the game with the steady hand holding a wand and moving it around a complex wire shape...17mm ring first, from the rear of the car to the front, then 14mm ratchet spanner over the rearward connection then beyond to the front. Take off, reverse so it is doing up and not undoing, and success...!
Slide spanners off, move to the rear of the car and then repeat, as the orientation was wrong. Doh! Like I say, one of those jobs....
Getting the rear line in place was no walk in the park either. It fits behind the handbrake cable hard lines, and it needs carefully manipulating to get here....
And then connecting up with the fully dried straight connector!!! Here you can see just how exposed the line is....
93 964 C2
99 Boxster 2.5 > 3.4 hill climber
71 914/6 3.0 - gone
'You see Paul, hill climbing is like making love to a beautiful woman. You get your motor running, check your fluids, hang on tight and WHOA..30 seconds later it's all over!' Swiss Tony
99 Boxster 2.5 > 3.4 hill climber
71 914/6 3.0 - gone
'You see Paul, hill climbing is like making love to a beautiful woman. You get your motor running, check your fluids, hang on tight and WHOA..30 seconds later it's all over!' Swiss Tony
-
rhd racer
- Me and DDK sitting in a tree! KISSING
- Posts: 2515
- Joined: Wed Jun 23, 2004 9:47 pm
- Location: Nottinghamshire
Re: 964 C2 - Rolling Resto
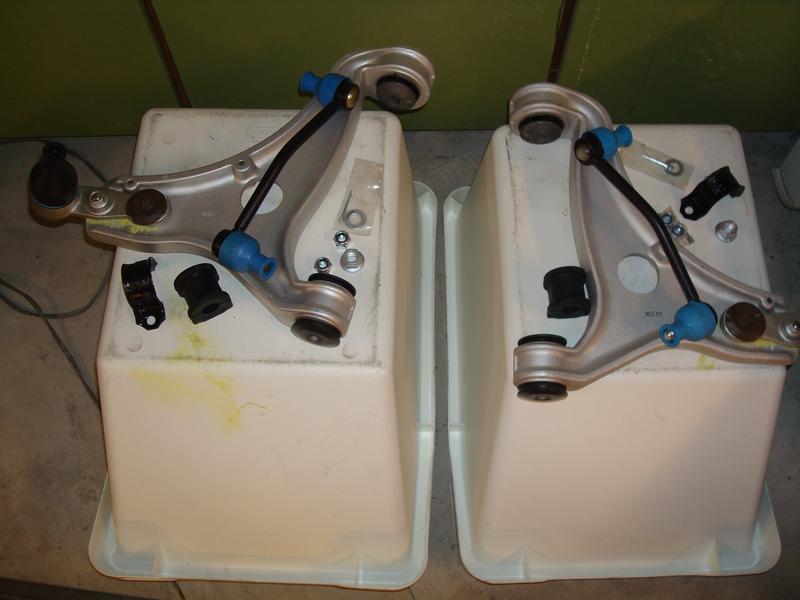
So tonight I managed to grab a couple of hours and make a start on the front suspension - this has been a long time coming.
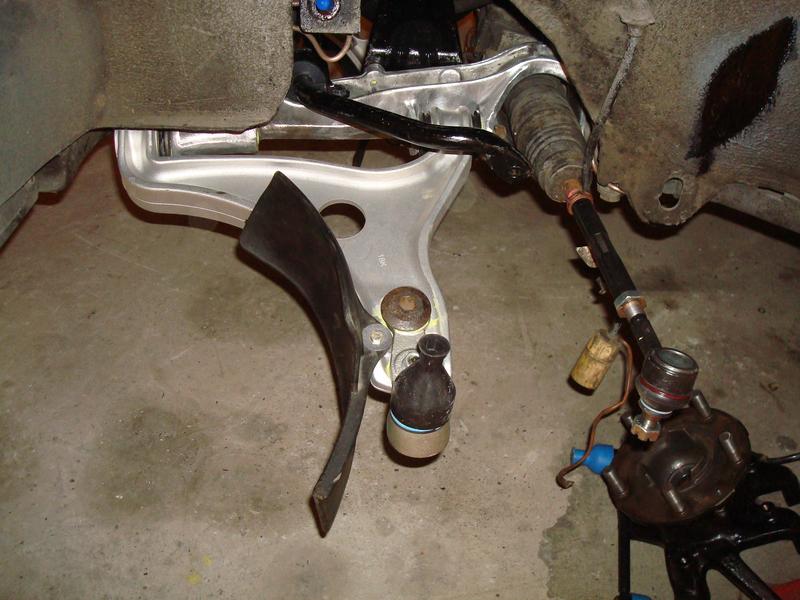
I started doing a dry fit of everything to the lower control arms.
The below show the extent of the adjustment afforded by the bolts I cleaned up earlier, that operate like a cam

I then liberally coated everything in Duralac - the least I can do after complaining about them not doing this at the factory
And then gathered everything for reassembly as several items are sided...
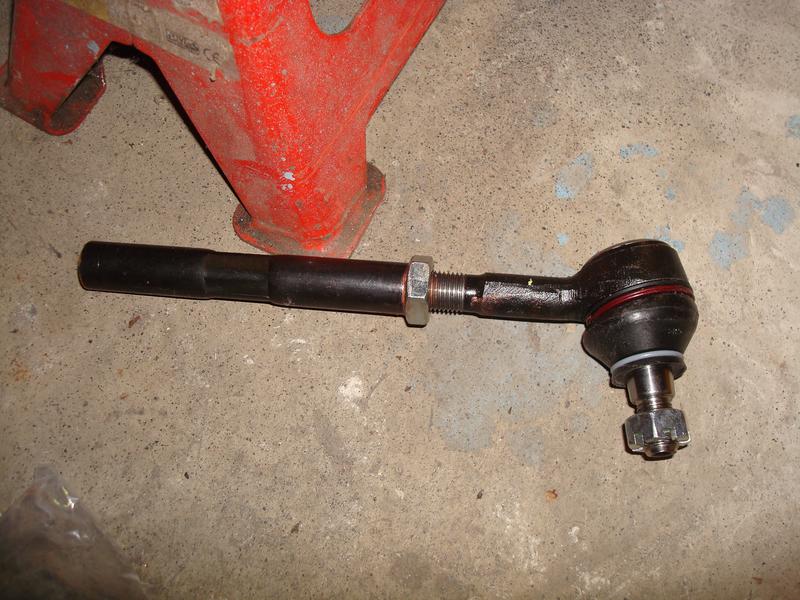
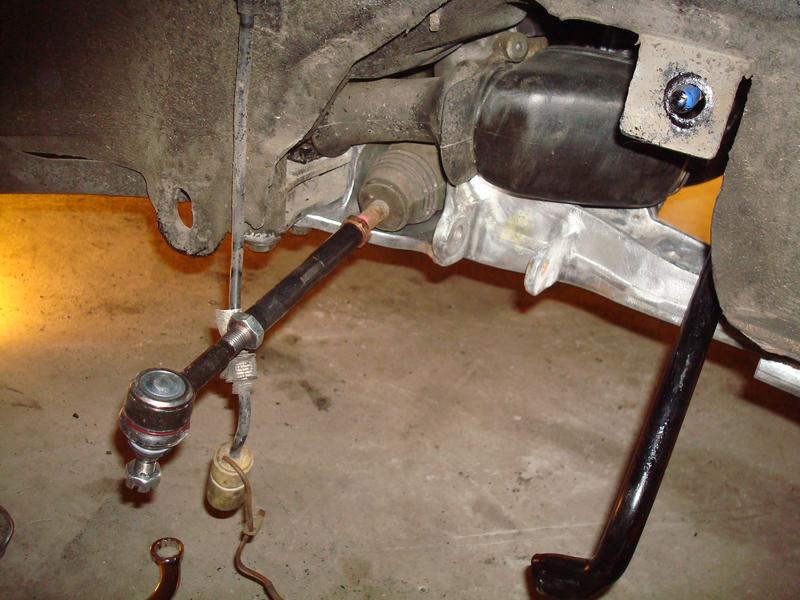
Now before fitting up, I thought I had better do the track rods & ends. With hindsight, I should have dismantled these whilst all together, as undoing something this tight when floating in the breeze is no walk in the park...
Before I started, I matched the lengths of the existing sides with the new ones, assembled with loads of copper slip. This would at least get things pointing in roughly the right direction to make moving the car about easier...
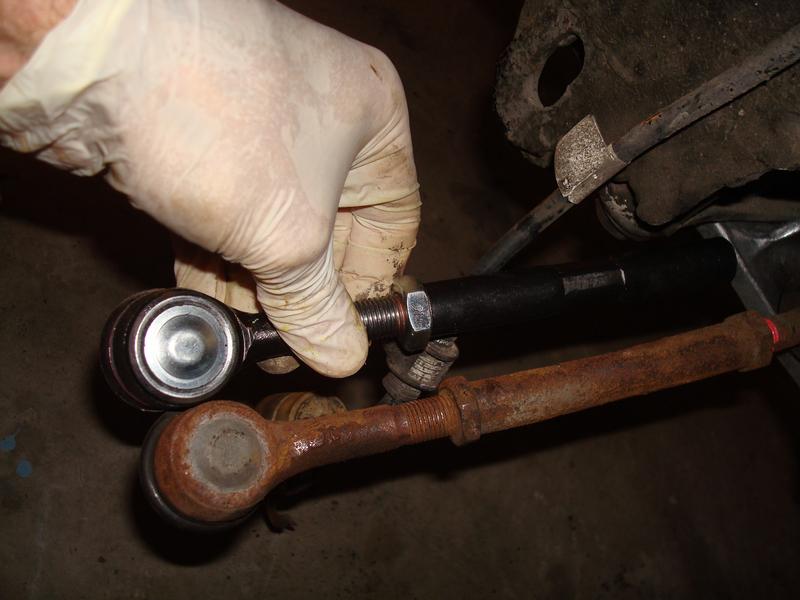
However, I managed to get the outers off, allowing me to get a ring spanner over the inners. I then marked the inners with some bolt paint, so I could see where they needed to be. In truth, I only backed them off half a turn before removing the rod, so this was a step beyond what was needed...
Undoing the inners was a challenge. The N/s not so bad, the O/s a nightmare. I mentioned earlier about a solution, and sometimes being a one man operative requires further ingenuity....
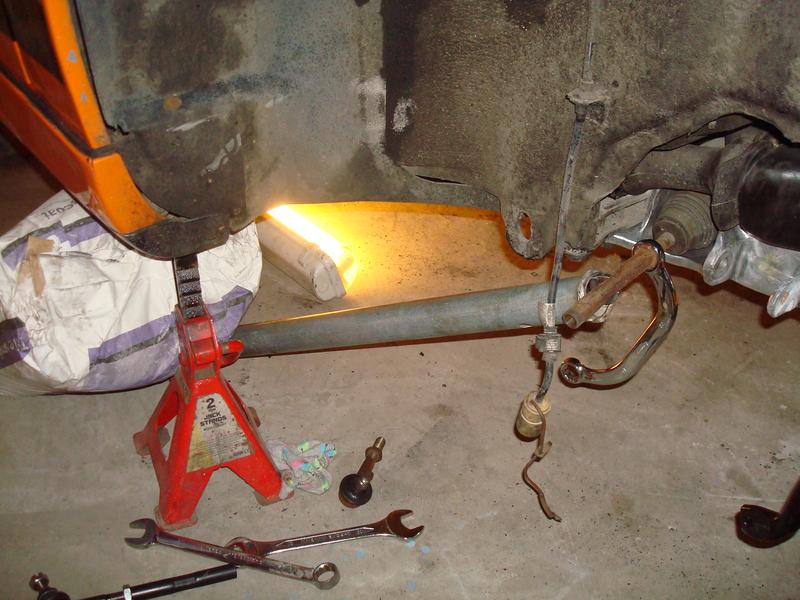
Yes, that really is a 25k bag of bonding plaster on my lever bar, leaving me to heave on the spanner
Still, it worked, and all completed ready for the next step...
I started doing a dry fit of everything to the lower control arms.
The below show the extent of the adjustment afforded by the bolts I cleaned up earlier, that operate like a cam
I then liberally coated everything in Duralac - the least I can do after complaining about them not doing this at the factory
And then gathered everything for reassembly as several items are sided...
Now before fitting up, I thought I had better do the track rods & ends. With hindsight, I should have dismantled these whilst all together, as undoing something this tight when floating in the breeze is no walk in the park...
Before I started, I matched the lengths of the existing sides with the new ones, assembled with loads of copper slip. This would at least get things pointing in roughly the right direction to make moving the car about easier...
However, I managed to get the outers off, allowing me to get a ring spanner over the inners. I then marked the inners with some bolt paint, so I could see where they needed to be. In truth, I only backed them off half a turn before removing the rod, so this was a step beyond what was needed...
Undoing the inners was a challenge. The N/s not so bad, the O/s a nightmare. I mentioned earlier about a solution, and sometimes being a one man operative requires further ingenuity....
Yes, that really is a 25k bag of bonding plaster on my lever bar, leaving me to heave on the spanner
Still, it worked, and all completed ready for the next step...
93 964 C2
99 Boxster 2.5 > 3.4 hill climber
71 914/6 3.0 - gone
'You see Paul, hill climbing is like making love to a beautiful woman. You get your motor running, check your fluids, hang on tight and WHOA..30 seconds later it's all over!' Swiss Tony
99 Boxster 2.5 > 3.4 hill climber
71 914/6 3.0 - gone
'You see Paul, hill climbing is like making love to a beautiful woman. You get your motor running, check your fluids, hang on tight and WHOA..30 seconds later it's all over!' Swiss Tony
-
defianty
- Put a fork in me, I'm done!
- Posts: 1717
- Joined: Sat Aug 05, 2006 7:02 pm
- Location: Rochford, Essex
Re: 964 C2 - Rolling Resto
Great work Wayne. Good to see some progress on the car.
-
sladey
- Nurse, I think I need some assistance
- Posts: 9333
- Joined: Sat Apr 23, 2005 9:08 pm
- Location: Nottingham, UK
Re: 964 C2 - Rolling Resto
I like the bag of plaster idea. A long lever is a glorious thing isn't it? Used one undoing my thermostat last year
The simple things you see are all complicated
I look pretty young but I'm just backdated yeah
I look pretty young but I'm just backdated yeah
-
rhd racer
- Me and DDK sitting in a tree! KISSING
- Posts: 2515
- Joined: Wed Jun 23, 2004 9:47 pm
- Location: Nottinghamshire
Re: 964 C2 - Rolling Resto
That it is.sladey wrote:I like the bag of plaster idea. A long lever is a glorious thing isn't it? Used one undoing my thermostat last year
Hiding under the plaster was middle Bertha. She has little Bertha (a 12" jack handle) and Big Bertha (a 6ft scaffold pole) for company!
Slow night tonight, but front ARB secured and front wishbones on. Lots of working out as I took it apart what seems like months ago and I had to piece it all together! Pics to follow
93 964 C2
99 Boxster 2.5 > 3.4 hill climber
71 914/6 3.0 - gone
'You see Paul, hill climbing is like making love to a beautiful woman. You get your motor running, check your fluids, hang on tight and WHOA..30 seconds later it's all over!' Swiss Tony
99 Boxster 2.5 > 3.4 hill climber
71 914/6 3.0 - gone
'You see Paul, hill climbing is like making love to a beautiful woman. You get your motor running, check your fluids, hang on tight and WHOA..30 seconds later it's all over!' Swiss Tony
-
rhd racer
- Me and DDK sitting in a tree! KISSING
- Posts: 2515
- Joined: Wed Jun 23, 2004 9:47 pm
- Location: Nottinghamshire
Re: 964 C2 - Rolling Resto
So, back from hols and hope to get back out there in the next week and complete the front end. Below is where I got to before going away;
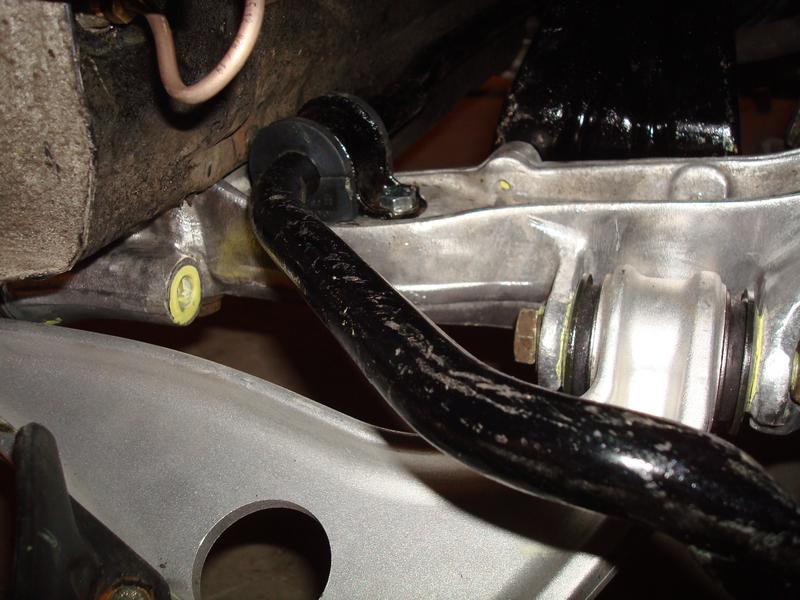
Dry fit of front wishbones, now with the rubber air deflectors fitted (new bolts and duralac to prevent them corroding again)
Then, as well as coating the bolts in duralac, I painted a bit on the rotating ends too. I will redo this, as I ordered some new bolts from the local OPC as I wasn't entirely happy re-using them given the load they are under (plus I obviously had to purchase new front bolts anyway as these were the ones I cut-off!)
I then disassembled the front struts and liberally coated the threads in copper slip....
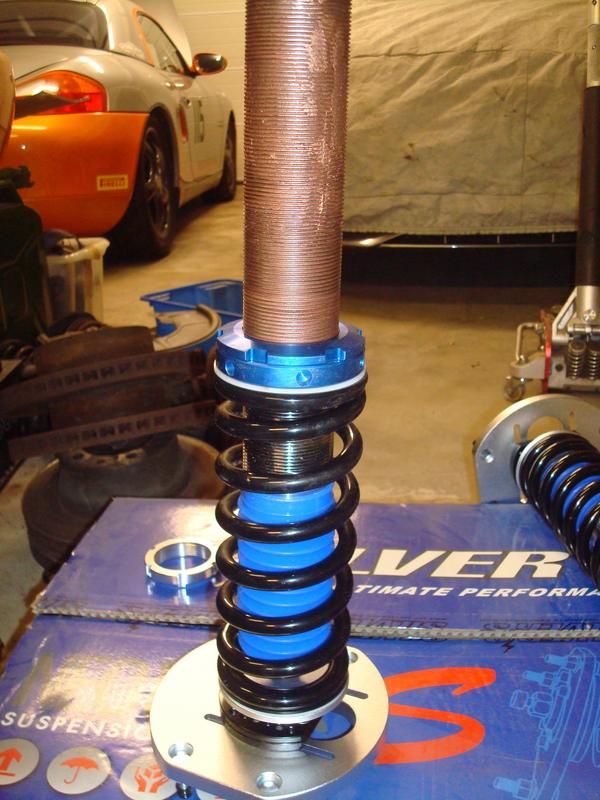
Then set the pre-load to 5mm as per the rears (the depth of the C spanner). I have figure that to change the ride height and maintain the preload I will be able to jack the car up and wind the entire platform into the threaded strut bottom using the locked spring retainers. That's the theory, and why I stripped to ensure all free and lubed...
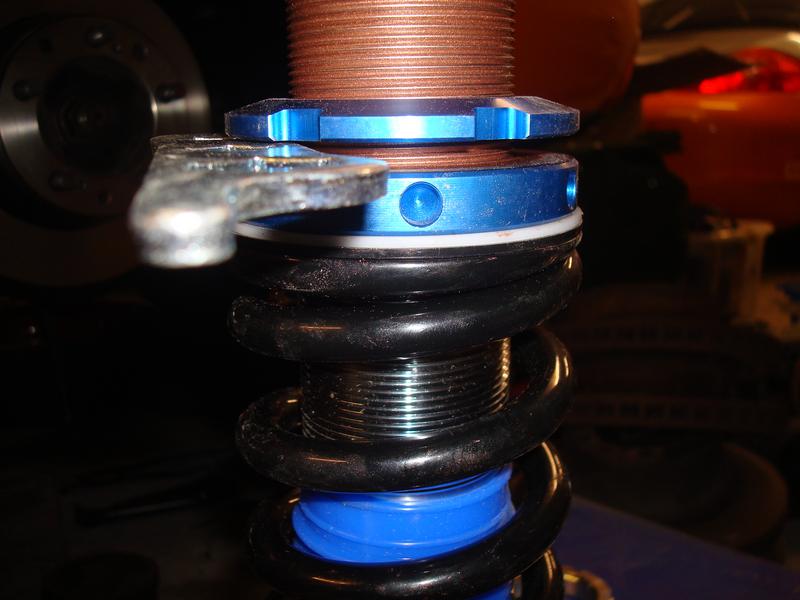
Then I set the length to -40mm of the standard ones as a starting point. This will probably be slightly higher in practice, as I would expect the stiffer, newer springs to have no sag of the originals. It at least gives me a starting point, and there is loads of thread in the bottom of the strut (in fact far more than the minimum marker provided by the hole in the rears).
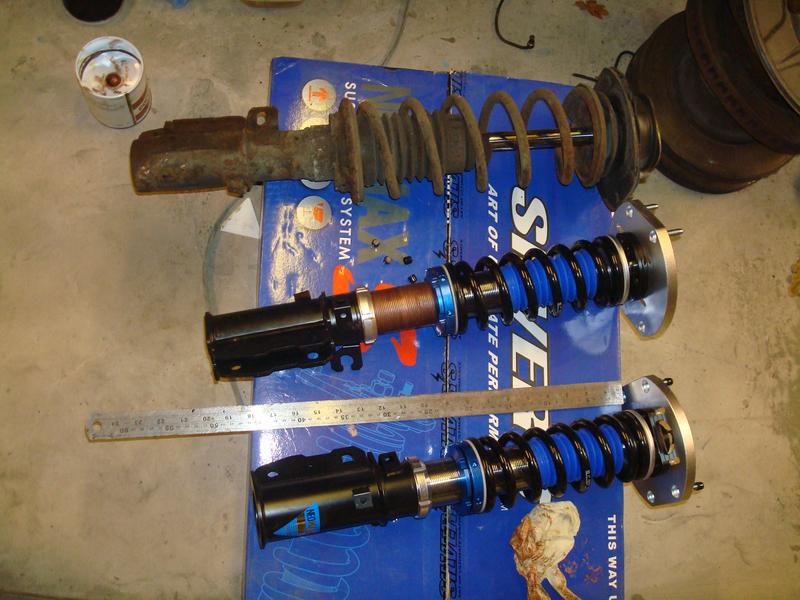
Then finally time to hang on the car
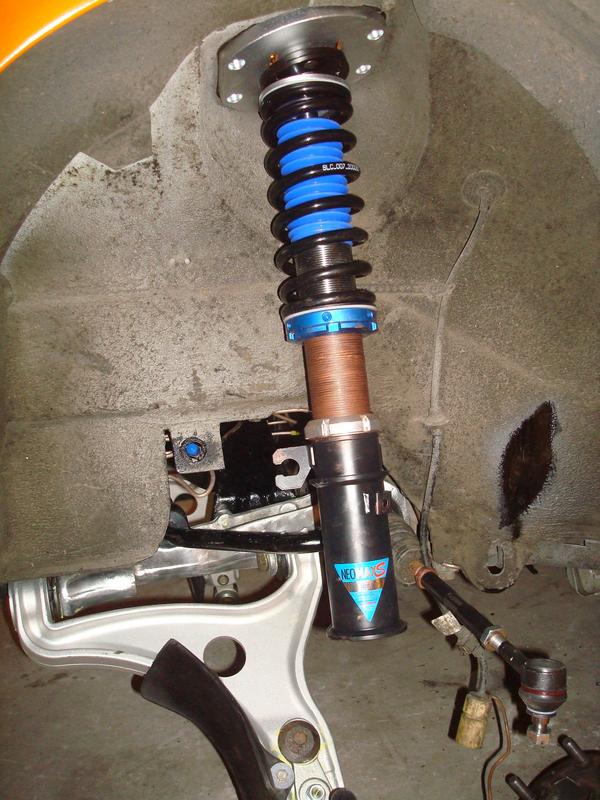
And repeat on the other side
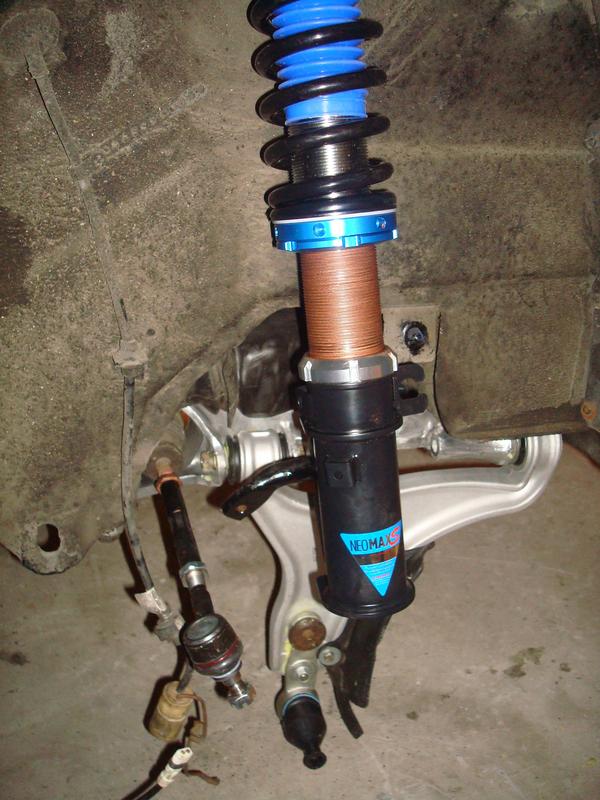
The hubs are all rebuilt ready with new bearings, so it should be straight forward from here....
Dry fit of front wishbones, now with the rubber air deflectors fitted (new bolts and duralac to prevent them corroding again)
Then, as well as coating the bolts in duralac, I painted a bit on the rotating ends too. I will redo this, as I ordered some new bolts from the local OPC as I wasn't entirely happy re-using them given the load they are under (plus I obviously had to purchase new front bolts anyway as these were the ones I cut-off!)
I then disassembled the front struts and liberally coated the threads in copper slip....
Then set the pre-load to 5mm as per the rears (the depth of the C spanner). I have figure that to change the ride height and maintain the preload I will be able to jack the car up and wind the entire platform into the threaded strut bottom using the locked spring retainers. That's the theory, and why I stripped to ensure all free and lubed...
Then I set the length to -40mm of the standard ones as a starting point. This will probably be slightly higher in practice, as I would expect the stiffer, newer springs to have no sag of the originals. It at least gives me a starting point, and there is loads of thread in the bottom of the strut (in fact far more than the minimum marker provided by the hole in the rears).
Then finally time to hang on the car
And repeat on the other side
The hubs are all rebuilt ready with new bearings, so it should be straight forward from here....
93 964 C2
99 Boxster 2.5 > 3.4 hill climber
71 914/6 3.0 - gone
'You see Paul, hill climbing is like making love to a beautiful woman. You get your motor running, check your fluids, hang on tight and WHOA..30 seconds later it's all over!' Swiss Tony
99 Boxster 2.5 > 3.4 hill climber
71 914/6 3.0 - gone
'You see Paul, hill climbing is like making love to a beautiful woman. You get your motor running, check your fluids, hang on tight and WHOA..30 seconds later it's all over!' Swiss Tony
-
Dammit
- DDK Newbie
- Posts: 17
- Joined: Tue Feb 28, 2017 7:05 pm
Re: 964 C2 - Rolling Resto
Loving the updates - could I ask where you got the bumpers and wing mirrors of the Boxster wrapped? Presuming that it's a wrap of course. Also, what colour is the wrap?
-
rhd racer
- Me and DDK sitting in a tree! KISSING
- Posts: 2515
- Joined: Wed Jun 23, 2004 9:47 pm
- Location: Nottinghamshire
Re: 964 C2 - Rolling Resto
No problem at all - off topic water cooled alert!Dammit wrote:Loving the updates - could I ask where you got the bumpers and wing mirrors of the Boxster wrapped? Presuming that it's a wrap of course. Also, what colour is the wrap?
Actually, they are all painted. The short story is, I bought this on e-Bay for a grand. No thought went into it, I only saw it with 18 mins to go, but it was too cheap to ignore. And I had been thinking about retiring the 914 because it's value, both emotionally and financially, was too high to risk competing.

It had a knocky engine that needed replacing, but hey it was a grand! Anyhow, when looking for an engine I was advised by Angus to buy a written off car and part it out. So I bought this as a Cat C for 2k, unseen at a Co-Part auction
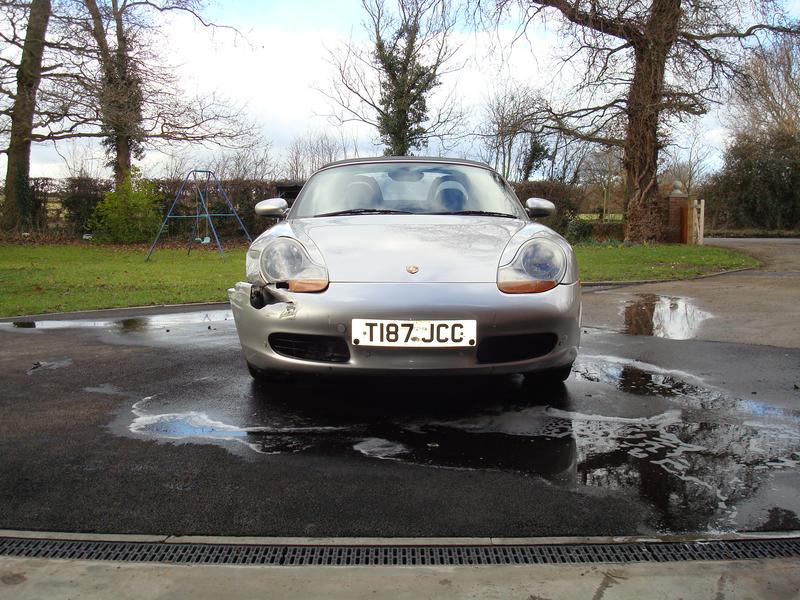
Then when looking at it (with a £7k repair bill on file you can see why it was written off), it was so straight that instead of taking the engine out, I decided to repair it with the bits from the orange one. It had also just had the head gaskets replaced and a top end rebuild at the cost of £5k - a great buy! And lucky I did, the orange car was a horrible cut and shut, with the front end from another car very crudely welded on. Close shave...
So whilst mocking up, I thought the colour scheme looked cool (I have a history with orange)
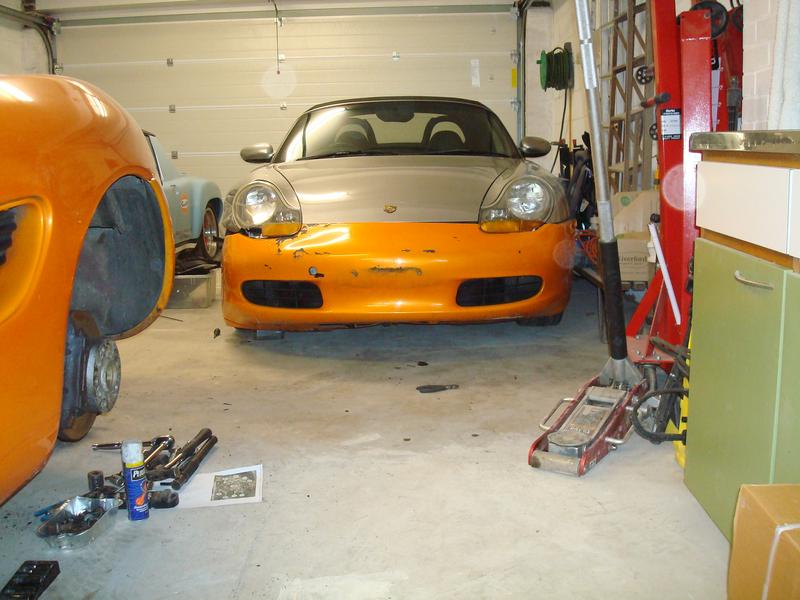
So it became the colour scheme. And then with a bit of further development ...
It became this..
The short answer is Ford Focus RS Orange - a pearl colour. I used the bumpers, mirrors and side intakes off the other car then had a local graphics company tie it all together with the remaining graphics. These were done in flat orange but are far enough away from the pearl on the car to work. Hope that helps
93 964 C2
99 Boxster 2.5 > 3.4 hill climber
71 914/6 3.0 - gone
'You see Paul, hill climbing is like making love to a beautiful woman. You get your motor running, check your fluids, hang on tight and WHOA..30 seconds later it's all over!' Swiss Tony
99 Boxster 2.5 > 3.4 hill climber
71 914/6 3.0 - gone
'You see Paul, hill climbing is like making love to a beautiful woman. You get your motor running, check your fluids, hang on tight and WHOA..30 seconds later it's all over!' Swiss Tony
-
Dammit
- DDK Newbie
- Posts: 17
- Joined: Tue Feb 28, 2017 7:05 pm
Re: 964 C2 - Rolling Resto
A comprehensive answer, thanks!
I like the look - and it's the bumper and wing mirrors that take the majority of punishment from stones, flying insects etc, hence my thinking of wrapping them.
Is there a specific Porsche bright orange- maybe Signal Orange?
Here's what I'd like to jazz up a little:

I like the look - and it's the bumper and wing mirrors that take the majority of punishment from stones, flying insects etc, hence my thinking of wrapping them.
Is there a specific Porsche bright orange- maybe Signal Orange?
Here's what I'd like to jazz up a little:
-
911hillclimber
- Nurse, I think I need some assistance
- Posts: 20629
- Joined: Mon Mar 10, 2008 6:26 pm
- Location: West Midlands
Re: 964 C2 - Rolling Resto
Lot of 964 luv on ddk, great cars and you are doing a great job.
Also found the Boxster hill climb car info v interesting.
Soon, or very soon when the Lola is too much And I still have my 2.9 Boxster it will become the hill climb car, the lovely old 911 has become like your 914 was to you, too valuable to ruin racing the clock...
I will have returned to where I started!
Looking forward to you next instalments Wayne.
Graham.
73T 911 Coupe, road/hillclimber 3.2L
Lola t 492 / 3.2 hillclimb racer
Boxster 987 Gen II 2.9
Lola t 492 / 3.2 hillclimb racer
Boxster 987 Gen II 2.9
-
rhd racer
- Me and DDK sitting in a tree! KISSING
- Posts: 2515
- Joined: Wed Jun 23, 2004 9:47 pm
- Location: Nottinghamshire
Re: 964 C2 - Rolling Resto
In my experience they do not work to factory colours, and when they did my graphics they showed me several shades on the roll and we picked the closest. The options are pretty much limitless so I am sure you will get what you wantDammit wrote:A comprehensive answer, thanks!
I like the look - and it's the bumper and wing mirrors that take the majority of punishment from stones, flying insects etc, hence my thinking of wrapping them.
Is there a specific Porsche bright orange- maybe Signal Orange?
93 964 C2
99 Boxster 2.5 > 3.4 hill climber
71 914/6 3.0 - gone
'You see Paul, hill climbing is like making love to a beautiful woman. You get your motor running, check your fluids, hang on tight and WHOA..30 seconds later it's all over!' Swiss Tony
99 Boxster 2.5 > 3.4 hill climber
71 914/6 3.0 - gone
'You see Paul, hill climbing is like making love to a beautiful woman. You get your motor running, check your fluids, hang on tight and WHOA..30 seconds later it's all over!' Swiss Tony
-
rhd racer
- Me and DDK sitting in a tree! KISSING
- Posts: 2515
- Joined: Wed Jun 23, 2004 9:47 pm
- Location: Nottinghamshire
Re: 964 C2 - Rolling Resto
Thanks Graham.
I am a bit time poor at the moment, lots of family stuff, MOTs, house and garden jobs - plus in the back of my mind I know that the calipers are still not ready and so it is not going anywhere until I get them. However, I stole half an hour this morning and wrapped up the front wishbones.
I was not entirely happy with the bolts that I did manage to remove without cutting up, so I order a new set from my local OPC. When I got back from holiday, they were on the doormat in a jiffy bag, together with a new wheel bearing end cap as one was missing.
So after the all important smear of duralac they all went in, taking care to put the spring washers in the right order


And taking care to line up the notch on the front bush with that one the front cross-member
So now ready to fit the front hubs, all painted and with new bearings fitted courtesy of the press in the village garage I have also drilled and tapped the disc bolts which I needed to drill the heads off when dismantling.
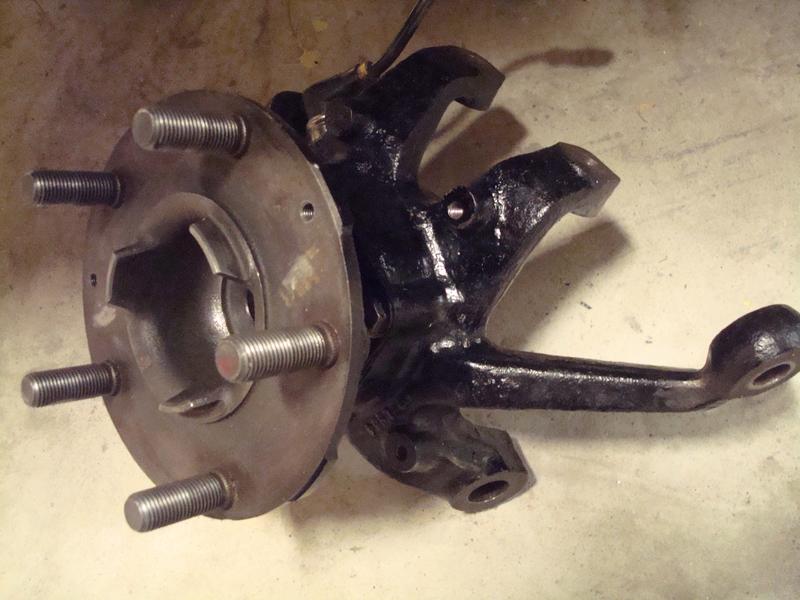
I am a bit time poor at the moment, lots of family stuff, MOTs, house and garden jobs - plus in the back of my mind I know that the calipers are still not ready and so it is not going anywhere until I get them. However, I stole half an hour this morning and wrapped up the front wishbones.
I was not entirely happy with the bolts that I did manage to remove without cutting up, so I order a new set from my local OPC. When I got back from holiday, they were on the doormat in a jiffy bag, together with a new wheel bearing end cap as one was missing.
So after the all important smear of duralac they all went in, taking care to put the spring washers in the right order
And taking care to line up the notch on the front bush with that one the front cross-member
So now ready to fit the front hubs, all painted and with new bearings fitted courtesy of the press in the village garage
93 964 C2
99 Boxster 2.5 > 3.4 hill climber
71 914/6 3.0 - gone
'You see Paul, hill climbing is like making love to a beautiful woman. You get your motor running, check your fluids, hang on tight and WHOA..30 seconds later it's all over!' Swiss Tony
99 Boxster 2.5 > 3.4 hill climber
71 914/6 3.0 - gone
'You see Paul, hill climbing is like making love to a beautiful woman. You get your motor running, check your fluids, hang on tight and WHOA..30 seconds later it's all over!' Swiss Tony
-
rhd racer
- Me and DDK sitting in a tree! KISSING
- Posts: 2515
- Joined: Wed Jun 23, 2004 9:47 pm
- Location: Nottinghamshire
Re: 964 C2 - Rolling Resto
Well I did not make it out at the weekend as the children have decided that they are getting too big to share a double bed in the motorhome so was preparing it for sale. However I did get out into the garage tonight for a couple of hours.
Catching up on where I left off reminded me that I have not told the saga of the front hubs. With the benefit of hindsight, I would have undone the hub nuts on the car when the brakes were functioning, so they could be locked. Doing so on the bench was tricky....
Little did I know, that 964 front hubs are basically a large bolt (prob M16 at a guess) inserted from the rear, holding the ABS drive gear in the process. On the front there is a large nut like you expect - but the issue being you need to have a socket on the front and the rear, whilst balancing the heavy cast hub in thin air.
So we tried at my village garage using his air tools (after I foolishly tried on the bench at home with a scaffold pole!). Basically the process had to be a 32mm socket on a straight lever bar clamped in the bench. Then with one person holding the hub to stop it slopping about, the other person gets on the impact driver. We couldn't shift it. I called my mobile tyre man, and he said he didn't have anything meaty enough, but he gave me the brilliant idea of contacting someone that does HGV tyres or repairs.
I called my mate Graham whom I race with, knowing that his cousins run a haulage business only 5 miles away, so we met in the workshop the next day and for the price of a drink we did it. The wrench was an enormous thing, with a 1" air feed and sounded like a concrete breaker. The large vice would not hold it, so I was on a 6 foot lever bar, and it still moved me with Graham standing on the bench operating from above!! Anyhow, we did it, and then Simon in the village stepped in with the press to do the rest. Quite an adventure....
So, on with the build. I tightened up all the suspension and steering arms, although only did those that will need undoing to set it up a little over hand tight. I then cleaned off some overspray on the arch liners from the last repaint and generally cleaned them up. Then, after creating some appropriately short bolts, fitted the backing plates.
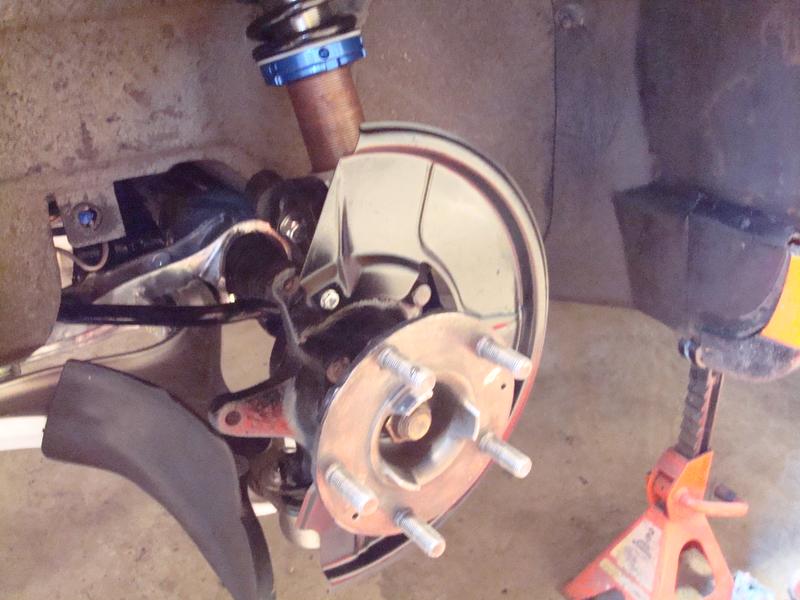
And then after searching for an hour for some disc locating screws after drilling out 2 of the originals upon disassembly, put the discs on
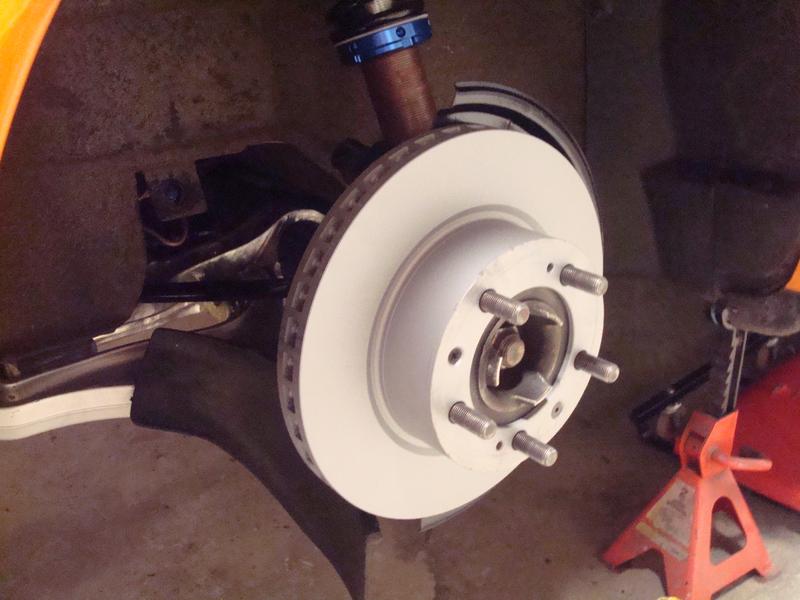
Then painted the 'bell' area like the rears so they don't rust in service, and refitted the ABS drives and hub nuts. (and left myself a note to tighten them properly later!)

Tomorrow is caliper day - after the longest rebuild service in history. It has been a bit of a nightmare, but they have had the bolts machined out, shots blasted to remove the corrosion, painted with a lifetime guarantee, new pistons where required (3) and all new rubbers / bleed nipples. They have been about 10 weeks, expensive too, but hopefully worth the wait.....
For some reason I then looked in the car, through all the grime (luckily I cleaned and waxed the car before I did all the deep cleaning of the suspension units which covered it in dust, grease and oil). Through the crud, the steering wheel looked odd. You might recall it had been refurbished, but the protective film had reportedly been left on it and melted in the sun, meaning it has a semi cling film, semi leather kind of feel to it. Nice. You may also recall the car had a generally damp and manky feel to it (dank I call it), probably leaking through a window seal or the poorly fitted sunroof seal. Anyhow, after months in the dry I didn't think anything of it. I also, locked the car before I went on holiday (I know, nobody was going to drive it out of the garage! But I do work in insurance so tend to err on the side of caution...).
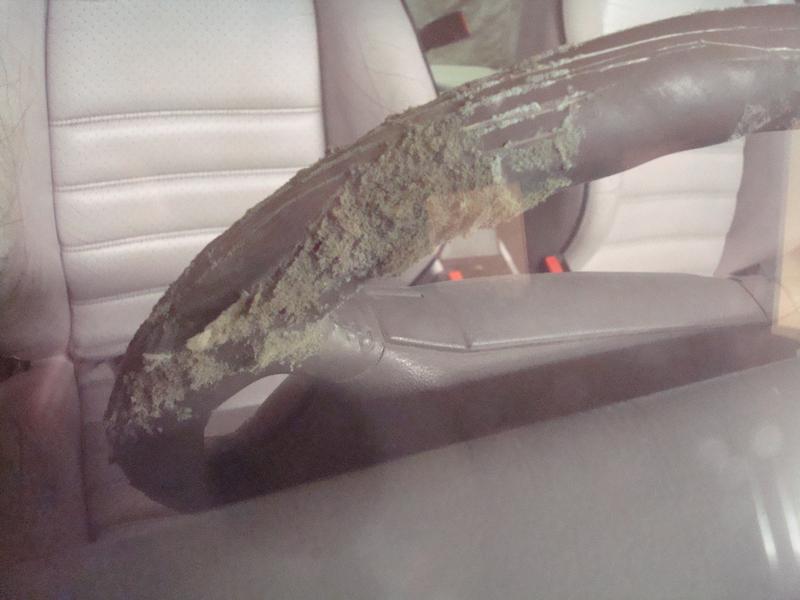
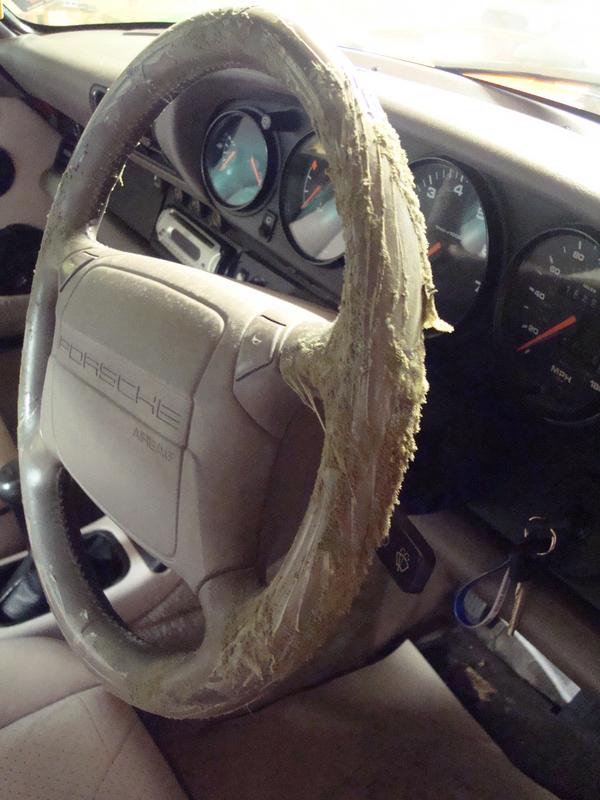
Yep, alive with mould. Nice. Another thing to sort before I put the Prototipo on it!
Catching up on where I left off reminded me that I have not told the saga of the front hubs. With the benefit of hindsight, I would have undone the hub nuts on the car when the brakes were functioning, so they could be locked. Doing so on the bench was tricky....
Little did I know, that 964 front hubs are basically a large bolt (prob M16 at a guess) inserted from the rear, holding the ABS drive gear in the process. On the front there is a large nut like you expect - but the issue being you need to have a socket on the front and the rear, whilst balancing the heavy cast hub in thin air.
So we tried at my village garage using his air tools (after I foolishly tried on the bench at home with a scaffold pole!). Basically the process had to be a 32mm socket on a straight lever bar clamped in the bench. Then with one person holding the hub to stop it slopping about, the other person gets on the impact driver. We couldn't shift it. I called my mobile tyre man, and he said he didn't have anything meaty enough, but he gave me the brilliant idea of contacting someone that does HGV tyres or repairs.
I called my mate Graham whom I race with, knowing that his cousins run a haulage business only 5 miles away, so we met in the workshop the next day and for the price of a drink we did it. The wrench was an enormous thing, with a 1" air feed and sounded like a concrete breaker. The large vice would not hold it, so I was on a 6 foot lever bar, and it still moved me with Graham standing on the bench operating from above!! Anyhow, we did it, and then Simon in the village stepped in with the press to do the rest. Quite an adventure....
So, on with the build. I tightened up all the suspension and steering arms, although only did those that will need undoing to set it up a little over hand tight. I then cleaned off some overspray on the arch liners from the last repaint and generally cleaned them up. Then, after creating some appropriately short bolts, fitted the backing plates.
And then after searching for an hour for some disc locating screws after drilling out 2 of the originals upon disassembly, put the discs on
Then painted the 'bell' area like the rears so they don't rust in service, and refitted the ABS drives and hub nuts. (and left myself a note to tighten them properly later!)
Tomorrow is caliper day - after the longest rebuild service in history. It has been a bit of a nightmare, but they have had the bolts machined out, shots blasted to remove the corrosion, painted with a lifetime guarantee, new pistons where required (3) and all new rubbers / bleed nipples. They have been about 10 weeks, expensive too, but hopefully worth the wait.....
For some reason I then looked in the car, through all the grime (luckily I cleaned and waxed the car before I did all the deep cleaning of the suspension units which covered it in dust, grease and oil). Through the crud, the steering wheel looked odd. You might recall it had been refurbished, but the protective film had reportedly been left on it and melted in the sun, meaning it has a semi cling film, semi leather kind of feel to it. Nice. You may also recall the car had a generally damp and manky feel to it (dank I call it), probably leaking through a window seal or the poorly fitted sunroof seal. Anyhow, after months in the dry I didn't think anything of it. I also, locked the car before I went on holiday (I know, nobody was going to drive it out of the garage! But I do work in insurance so tend to err on the side of caution...).
Yep, alive with mould. Nice. Another thing to sort before I put the Prototipo on it!
93 964 C2
99 Boxster 2.5 > 3.4 hill climber
71 914/6 3.0 - gone
'You see Paul, hill climbing is like making love to a beautiful woman. You get your motor running, check your fluids, hang on tight and WHOA..30 seconds later it's all over!' Swiss Tony
99 Boxster 2.5 > 3.4 hill climber
71 914/6 3.0 - gone
'You see Paul, hill climbing is like making love to a beautiful woman. You get your motor running, check your fluids, hang on tight and WHOA..30 seconds later it's all over!' Swiss Tony