2.4T engine rebuild - Shock: It actually runs!

Need some help with a technical problem - ask away and let's see if we can all help.

Moderators: hot66, impmad2000, Nige

Post Reply
Gary71
Nurse, I think I need some assistance
Posts: 10733
Joined: Wed Mar 31, 2004 1:27 pm
Location: Cheshire
Contact:

Re: 2.4T engine rebuild - In progress...

Post by Gary71 »

Evening, I didn't do compression or leakdown as I'm not chasing a problem other than lots of smoke and cam wear. It wouldn't have changed what I'm doing anyway.

I took the heads off the LH cam box tonight and pulled one of the cylinders off to have a better look at the bore.

Cam wear is evident on a couple of lobes.:

Image

Bores have surface markings but you can't feel them. I'm taking one into work tomorrow to measure it up but I'm hopeful a light hone can recover them.

Image
johnM
I need to get out more!
Posts: 3397
Joined: Mon Apr 03, 2006 10:27 pm
Location: Lake District

Re: 2.4T engine rebuild - In progress...

Post by johnM »

Hi Gary

Put the cam back in and see if you can get an old fashioned oil can and squirt oil into the cam feed. This should highlight any oil spray bar holes that are blocked.

Kind regards.
John
1970 2.2E Coupe.
2004 996 GT3 mkII
2015 Skoda Octavia VRS TSI DSG.
2021 Toyota GR Yaris Circuit Pack
Gary71
Nurse, I think I need some assistance
Posts: 10733
Joined: Wed Mar 31, 2004 1:27 pm
Location: Cheshire
Contact:

Re: 2.4T engine rebuild - In progress...

Post by Gary71 »

Cheers John, will do. It's fair to say everything needs a proper clean. I've managed to misplace my vintage valve spring compressor so I stopped again! After 40 minutes of searching I've decided to buy a new one :)
Gary71
Nurse, I think I need some assistance
Posts: 10733
Joined: Wed Mar 31, 2004 1:27 pm
Location: Cheshire
Contact:

Re: 2.4T engine rebuild - In progress...

Post by Gary71 »

So it's on to some of the fun jobs, like drilling out an exhaust stud:

Image[/url]

Got the apprentice making some cylinder retainers:

Image

And in action:
Image

Evidence of some work: The oil cooler is ten years newer than the rest.

Image

I've stripped down one of the heads and there is very little play in the valves so I'm thinking this engine has been 'done' at some point as other than some rock hard valve stem seals it all looks pretty good.
sladey
Nurse, I think I need some assistance
Posts: 9388
Joined: Sat Apr 23, 2005 9:08 pm
Location: Nottingham, UK

Re: 2.4T engine rebuild - In progress...

Post by sladey »

Gary71 wrote:So it's on to some of the fun jobs, like drilling out an exhaust stud:

Image[/url]

.
That looks a useful little jig - I had to use a steady hand and eye
The simple things you see are all complicated
I look pretty young but I'm just backdated yeah
User avatar
Jonny Hart
Put a fork in me, I'm done!
Posts: 1612
Joined: Mon Feb 01, 2010 2:28 pm

Re: 2.4T engine rebuild - In progress...

Post by Jonny Hart »

Good job!

Another option on exhaust fixings is to use the shakeproof 12mm copper plated nuts that were fitted to VW campers.

I have them on mine with no problems. They fit the SSI tool and a 12mm socket also (just) fits through the holes in the SSI.
markm
Put a fork in me, I'm done!
Posts: 1997
Joined: Thu Aug 23, 2007 2:55 am

2.4T engine rebuild - In progress...

Post by markm »

Mightly impressive garry
72 2.4S
92 964RS
96 993RS
Series 1 DDK membership card
Gary71
Nurse, I think I need some assistance
Posts: 10733
Joined: Wed Mar 31, 2004 1:27 pm
Location: Cheshire
Contact:

Re: 2.4T engine rebuild - In progress...

Post by Gary71 »

Answering Andrew's post from a different thread as it seemed a better place for it!
AndrewSlater wrote:Finally I also have two exhaust studs that have snapped. Is you drilling jig homemade or available online?
The jig is homemade. I put it together a good few years back when I fitted the second hand heat exchangers I have just cut off and had to drill out a few studs upside down with the engine in the car.

It's a good alternative if you don't have a nice big pillar drill and right angle plate to do it properly. You do need to have one stud per port left to hold it in place though.

It's sized to redrill the hole to accept a helicoil accepting that there is no way even with a jig you can aim the drill that accurately down the centre of a stud and recover the thread. Well I can't anyway! :)

Once I've sorted all the studs on my engine you are welcome to borrow it, accepting its limitations of course!
911hillclimber
Nurse, I think I need some assistance
Posts: 20708
Joined: Mon Mar 10, 2008 6:26 pm
Location: West Midlands

Re: 2.4T engine rebuild - In progress...

Post by 911hillclimber »

Ref the cylinder and other case studs..

If the heads came off and all the tube nuts were of equal torque, then I would think they do not need Timeserts as none will show they have pulled, ie low torque on a given nut.

This .test. Applies to all the threads and studs.
73T 911 Coupe, road/hillclimber 3.2L
Lola t 492 / 3.2 hillclimb racer
Boxster 987 Gen II 2.9
Gary71
Nurse, I think I need some assistance
Posts: 10733
Joined: Wed Mar 31, 2004 1:27 pm
Location: Cheshire
Contact:

Re: 2.4T engine rebuild - In progress...

Post by Gary71 »

All the head nuts came off fine, some with bit of a 'ping' as the rust let go but all good. I agree.
User avatar
AndrewSlater
I luv DDK!
Posts: 994
Joined: Wed Nov 30, 2011 3:35 pm

Re: 2.4T engine rebuild - In progress...

Post by AndrewSlater »

Once I've sorted all the studs on my engine you are welcome to borrow it, accepting its limitations of course!
Thanks for the offer Gary, I will see if I can ask my local specialist to remove them for a reasonable fee.

As for the case savers - as my case came apart without any issues and none of the head studs were loose there is a temptation to leave well alone. Although I am sure the specialists might advice otherwise.

Keep up the good work ( and thread )
1966 Porsche 912 Slate Grey, red interior - first owner owned for 41 years
1974 Porsche 911 2.7 (The Manhattan project) viewtopic.php?f=28&t=51455
1973 VW 914 1.7 Olympic Blue - ( gone to a good home )
Gary71
Nurse, I think I need some assistance
Posts: 10733
Joined: Wed Mar 31, 2004 1:27 pm
Location: Cheshire
Contact:

Re: 2.4T engine rebuild - The Taa daah moment!

Post by Gary71 »

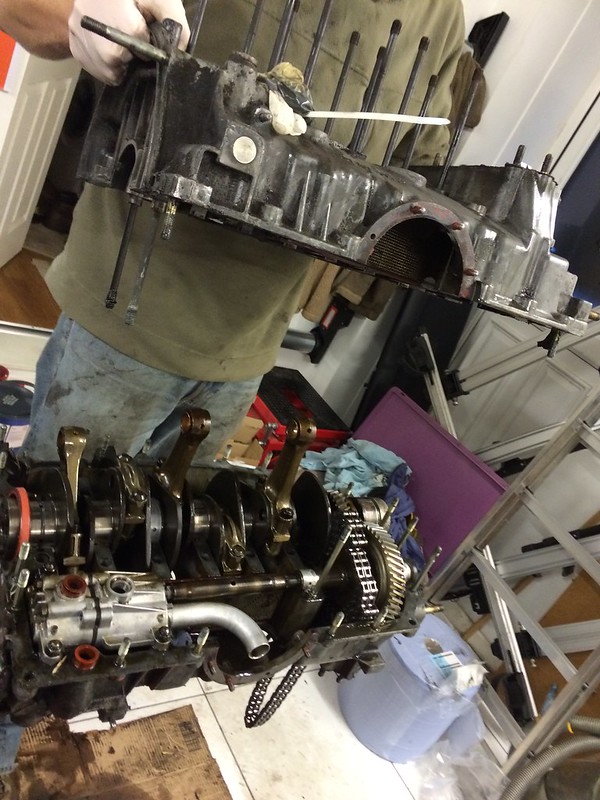
So after much pointless debate I decided to open her up properly this afternoon.

Image

'Where there is doubt, there is no doubt' should be the moto for this one.

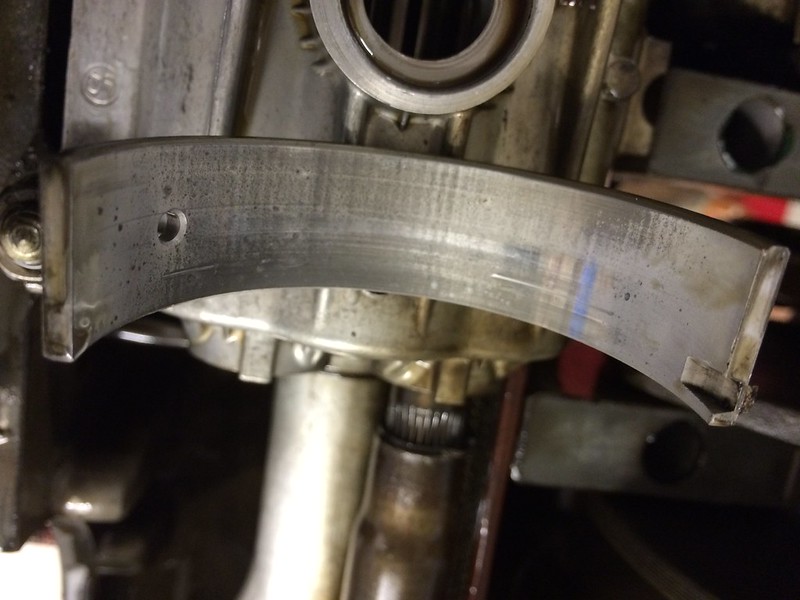
It turns out this was a good call:

Worn main bearings - Although just hanging in there

Image

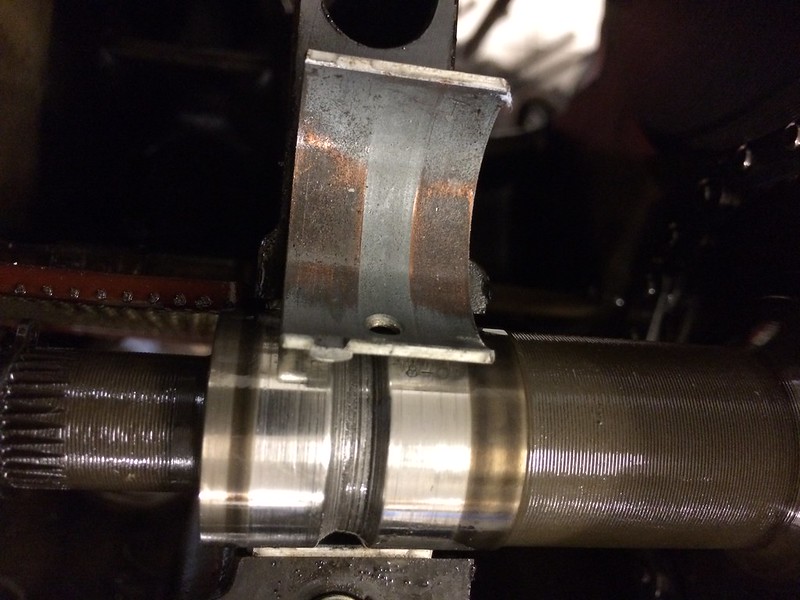
Completely shot intermediate shaft bearing:

Image

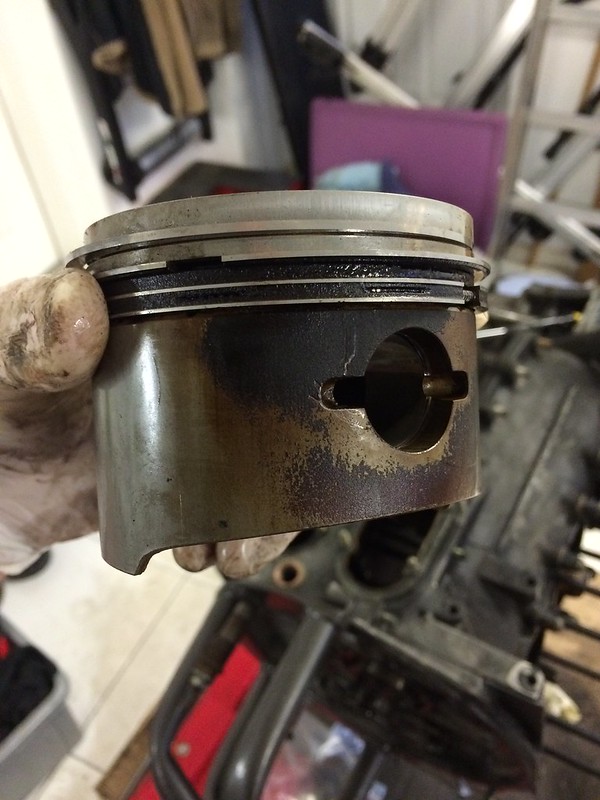
Not entirely certain you should have carbon build up on the side of the piston... Two are like this.

Image

This all trebles the cost of the rebuild (as is the norm for these things), but all good in the long term.

Stopped now for a beer after all that so crank out and rods off will have to wait for tomorrow.
Gary71
Nurse, I think I need some assistance
Posts: 10733
Joined: Wed Mar 31, 2004 1:27 pm
Location: Cheshire
Contact:

Re: 2.4T engine rebuild - The Taa daah moment!

Post by Gary71 »

Is this the standard pump?

Image
MT
DDK rules my life!
Posts: 1247
Joined: Wed Nov 10, 2010 5:42 pm
Location: Gatwick

Re: 2.4T engine rebuild - The Taa daah moment!

Post by MT »

I think you sometimes get that carbon build-up on the side of a piston when the rings have been installed with the gap to the bottom. This allows oil to seep into the cylinder when the car is sat for a while, and then gets burnt off when next started ....... however at least the piston in the photo shows the build up on the side, not the bottom, given the gudgeon pin location. Which leaves the possibility that cylinder is a bit out of round on that side. Certainly a check of that is in order, I think. Were you getting any blue smoke signals, Gary?

If you come to a different conclusion please do post the reason as I for one would be interested.

Good call opening up by the looks of those bearings.

Mick
'Creativity is the product of time wasted' Albert Einstein

1972 RHD 2.4E (ex Bob Watson racer - now in original Tangerine)
1966 LHD swb (Doctors car - now with Mrs. Ferrari in Madrid)
1966 TR4A (now sold and replaced by 1990 944 turbo)
1966 S2a Landrover
Gary71
Nurse, I think I need some assistance
Posts: 10733
Joined: Wed Mar 31, 2004 1:27 pm
Location: Cheshire
Contact:

Re: 2.4T engine rebuild - The Taa daah moment!

Post by Gary71 »

MT wrote:I think you sometimes get that carbon build-up on the side of a piston when the rings have been installed with the gap to the bottom. This allows oil to seep into the cylinder when the car is sat for a while, and then gets burnt off when next started ....... however at least the piston in the photo shows the build up on the side, not the bottom, given the gudgeon pin location. Which leaves the possibility that cylinder is a bit out of round on that side. Certainly a check of that is in order, I think. Were you getting any blue smoke signals, Gary?

If you come to a different conclusion please do post the reason as I for one would be interested.

Good call opening up by the looks of those bearings.

Mick
Thanks Mick, I was getting plenty of blue smoke signals, it's one of the main reasons for taking it apart. I've had a chat with one of the guys in the metrology lab today and have arranged to take in all my cylinders next week for a proper inspection.
Post Reply