

Ha, thanks Raymond. Happy for you to send on if you want, although if you want me to look at your fan it might be better the whole car has a holiday!
Thanks for the tip!
964 C2 - Rolling Resto
Moderator: Bootsy
-
rhd racer
- DDK 1st, 2nd and 3rd for me!
- Posts: 2043
- Joined: Wed Jun 23, 2004 9:47 pm
- Location: Nottinghamshire
Re: 964 C2 - Rolling Resto
93 964 C2
99 Boxster 2.5 > 2.7 hill climber
71 914/6 3.0 - gone
'You see Paul, hill climbing is like making love to a beautiful woman. You get your motor running, check your fluids, hang on tight and WHOA..30 seconds later it's all over!' Swiss Tony
99 Boxster 2.5 > 2.7 hill climber
71 914/6 3.0 - gone
'You see Paul, hill climbing is like making love to a beautiful woman. You get your motor running, check your fluids, hang on tight and WHOA..30 seconds later it's all over!' Swiss Tony

Re: 964 C2 - Rolling Resto
that looks really cool  Starting to really come together
James
1973 911 2.4S
1993 964 C2
2010 987 Spyder
1973 MGB Roadster
Its not how fast you go, but how you go fast
1973 911 2.4S
1993 964 C2
2010 987 Spyder
1973 MGB Roadster
Its not how fast you go, but how you go fast
-
rhd racer
- DDK 1st, 2nd and 3rd for me!
- Posts: 2043
- Joined: Wed Jun 23, 2004 9:47 pm
- Location: Nottinghamshire
Re: 964 C2 - Rolling Resto
Cheers James
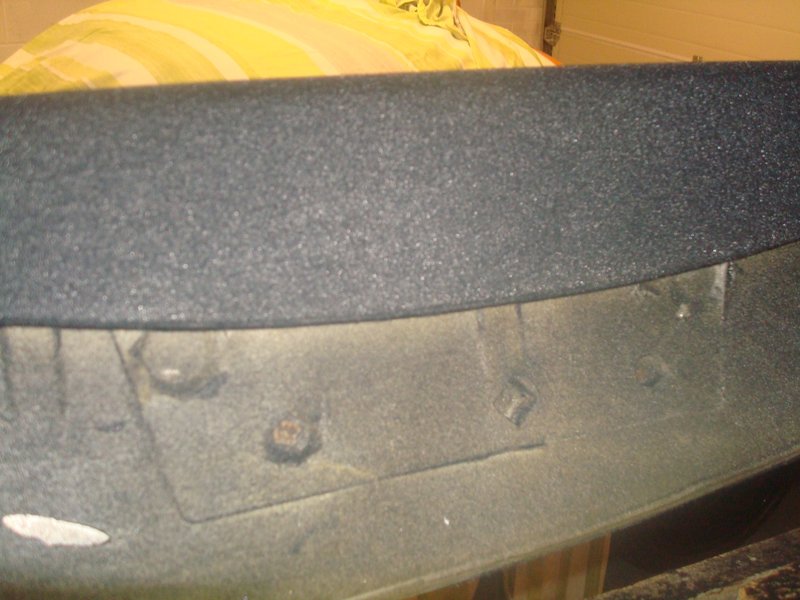
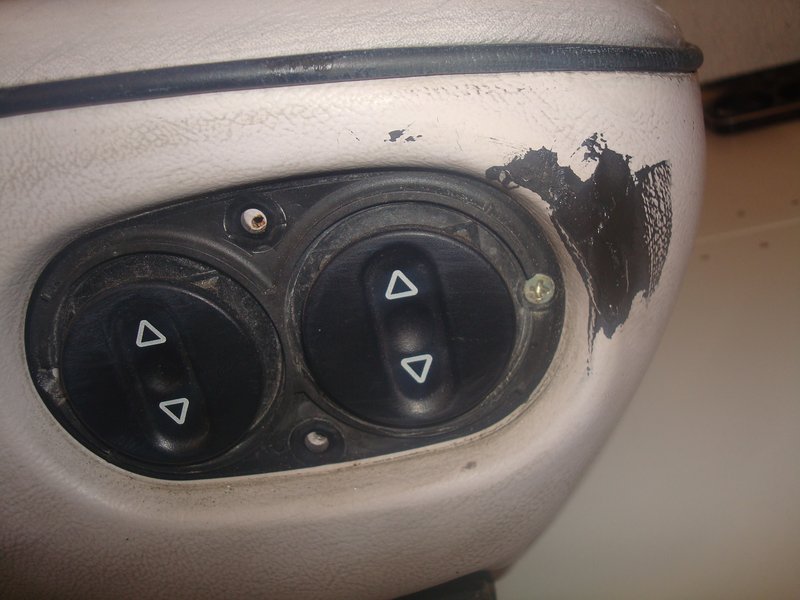
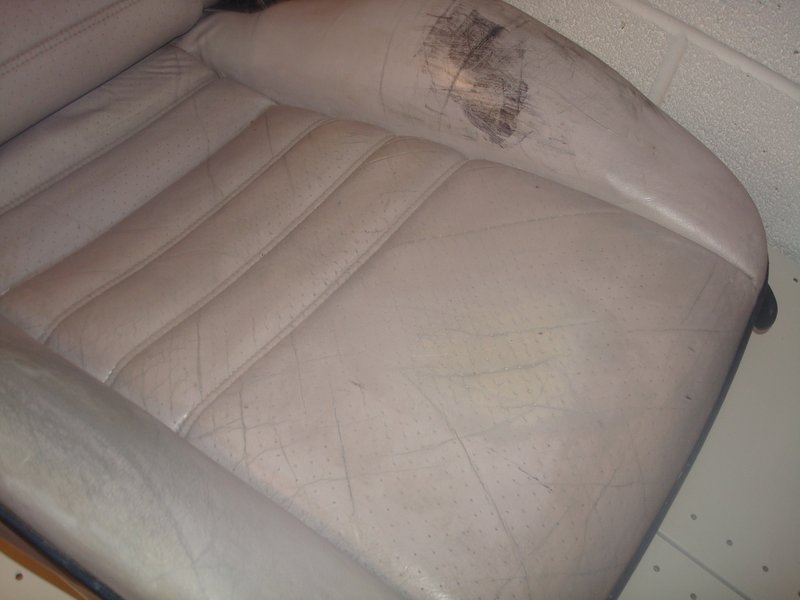
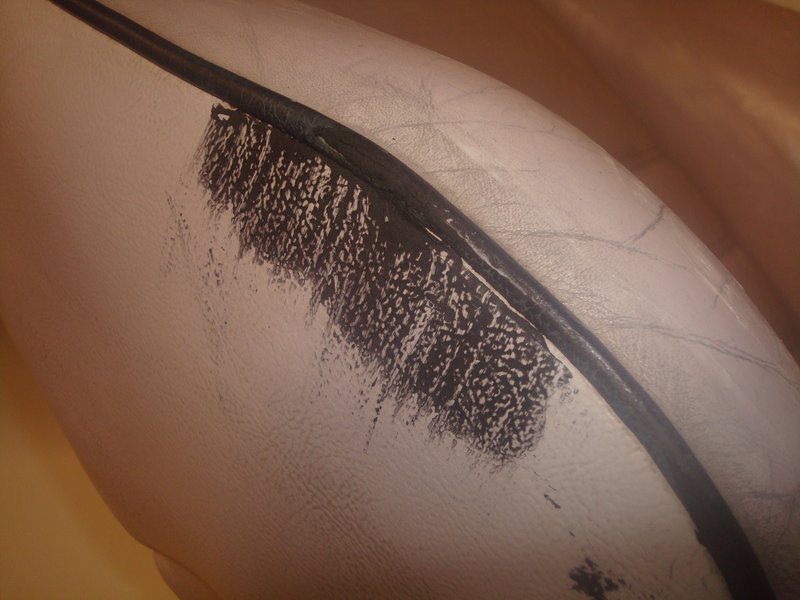
Took it all outside today and hoovered off the excess - dash repair looks great

Whilst it appears some great clot managed to stick his fingers on it at some point.....it is fair to say I could possibly get away with this but then again, I know is it is there so will do a local repair whilst I do the knee pads I dropped, which look horrendous!

I also fitted the rear seat belt guides to get a sense of how the two textures will work together. The front door caps and rear quarter trims are flocked, so will sit directly next to black vinyl. Works for me, exactly what I was hoping for in terms of contrast

Sent from my iPhone using Tapatalk
93 964 C2
99 Boxster 2.5 > 2.7 hill climber
71 914/6 3.0 - gone
'You see Paul, hill climbing is like making love to a beautiful woman. You get your motor running, check your fluids, hang on tight and WHOA..30 seconds later it's all over!' Swiss Tony
99 Boxster 2.5 > 2.7 hill climber
71 914/6 3.0 - gone
'You see Paul, hill climbing is like making love to a beautiful woman. You get your motor running, check your fluids, hang on tight and WHOA..30 seconds later it's all over!' Swiss Tony
Re: 964 C2 - Rolling Resto
Every time I see these pics I think you’ve resprayed the car mint green 
( my fav colour on @ 964 )
( my fav colour on @ 964 )
James
1973 911 2.4S
1993 964 C2
2010 987 Spyder
1973 MGB Roadster
Its not how fast you go, but how you go fast
1973 911 2.4S
1993 964 C2
2010 987 Spyder
1973 MGB Roadster
Its not how fast you go, but how you go fast
-
rhd racer
- DDK 1st, 2nd and 3rd for me!
- Posts: 2043
- Joined: Wed Jun 23, 2004 9:47 pm
- Location: Nottinghamshire
Re: 964 C2 - Rolling Resto
I don't work that quickly James! In fact, am living Jonny's expression - the last 20% takes 40% of the time. Annoyingly, my OCD has meant doing a few things again, but am getting there now. Fortunately, the alarm was done last week, replacing this old stuff with a box the size of a matchbox (yes really!).
It is a Cat 1 system, with twin circuit immobiliser with a key fob for the central locking - it does not re-arm the alarm unless you set it to, so it is ideal for working on a car without it going off every 5 minutes. A really neat install by a local company too, with wired connections and cloth tape. It seems alarms have come on a bit since the last one I had fitted to a Golf GTI about 20 years ago!
It is a Cat 1 system, with twin circuit immobiliser with a key fob for the central locking - it does not re-arm the alarm unless you set it to, so it is ideal for working on a car without it going off every 5 minutes. A really neat install by a local company too, with wired connections and cloth tape. It seems alarms have come on a bit since the last one I had fitted to a Golf GTI about 20 years ago!
93 964 C2
99 Boxster 2.5 > 2.7 hill climber
71 914/6 3.0 - gone
'You see Paul, hill climbing is like making love to a beautiful woman. You get your motor running, check your fluids, hang on tight and WHOA..30 seconds later it's all over!' Swiss Tony
99 Boxster 2.5 > 2.7 hill climber
71 914/6 3.0 - gone
'You see Paul, hill climbing is like making love to a beautiful woman. You get your motor running, check your fluids, hang on tight and WHOA..30 seconds later it's all over!' Swiss Tony
-
rhd racer
- DDK 1st, 2nd and 3rd for me!
- Posts: 2043
- Joined: Wed Jun 23, 2004 9:47 pm
- Location: Nottinghamshire
Re: 964 C2 - Rolling Resto
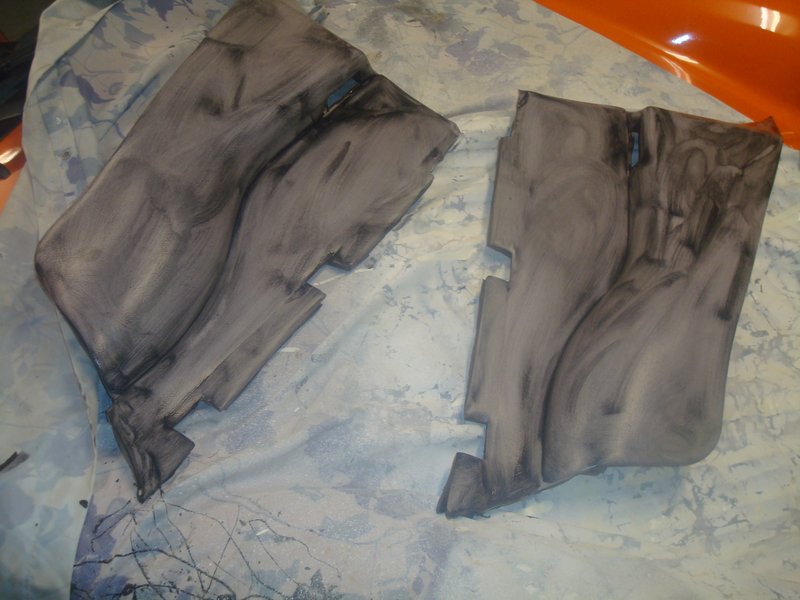
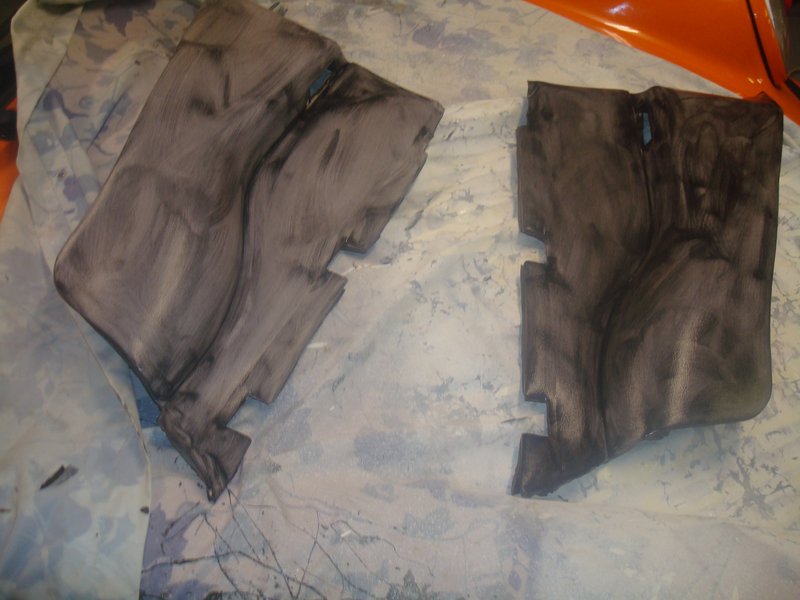
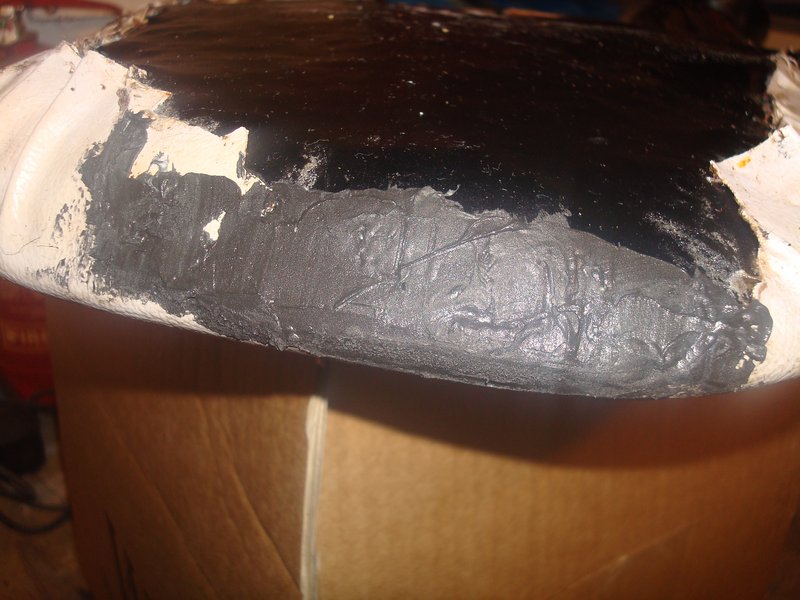
On to redoing jobs, I was not happy to live with the dash, and the rear quarter panel cappings and knee pads that I dropped, so the only way to deal with these was to sand them done and re-flock. I was surprise at how hardy the flocking was, I really had to work hard on 80 grit to remove it all, and even then it left a slightly furry surface.
I then found that the two part sealant was kind of claggy, and hard to apply making it a bit of a rush, so a bit of extra thinning with acetate was required, but got there in the end
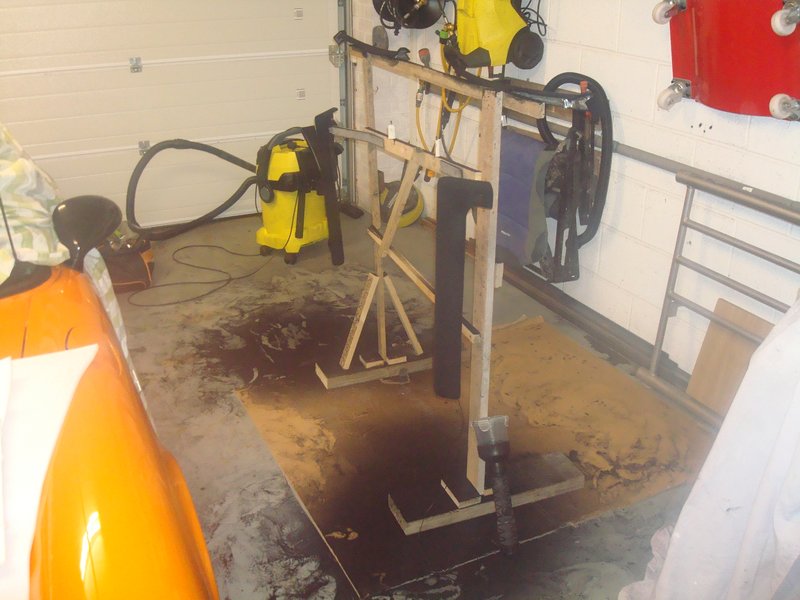
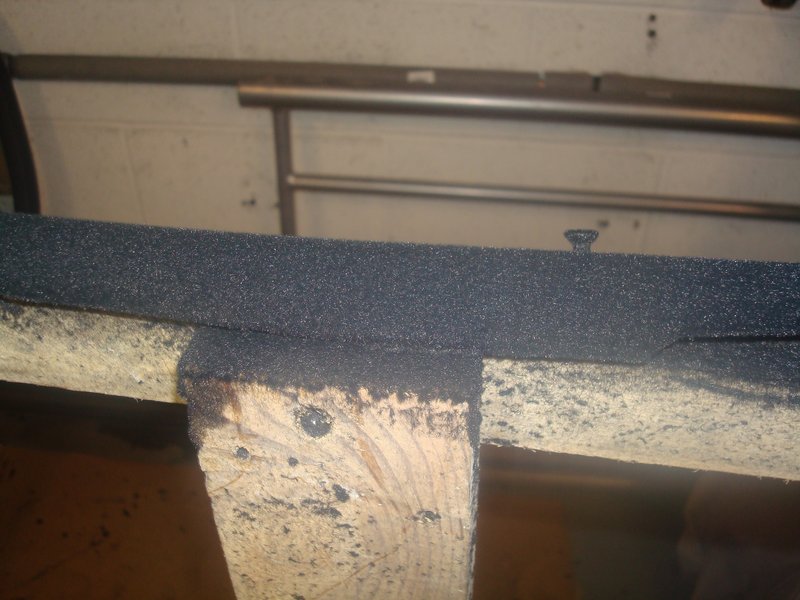
Dash ready to flock again
I did it in two parts to ensure I got really good coverage, laying over the Heath Robinson rack for the top, then doing the remainder upright
Finally went well, and covered up the horrid finger marks from the last cock up!
Same with the knee pads


Metal tape on the underside helps the earthing. Job done, several days of negotiating them in variou parts of the house followed whilst the adhesive set, so I got on with the door panels
I then found that the two part sealant was kind of claggy, and hard to apply making it a bit of a rush, so a bit of extra thinning with acetate was required, but got there in the end
Dash ready to flock again
I did it in two parts to ensure I got really good coverage, laying over the Heath Robinson rack for the top, then doing the remainder upright
Finally went well, and covered up the horrid finger marks from the last cock up!
Same with the knee pads
Metal tape on the underside helps the earthing. Job done, several days of negotiating them in variou parts of the house followed whilst the adhesive set, so I got on with the door panels
93 964 C2
99 Boxster 2.5 > 2.7 hill climber
71 914/6 3.0 - gone
'You see Paul, hill climbing is like making love to a beautiful woman. You get your motor running, check your fluids, hang on tight and WHOA..30 seconds later it's all over!' Swiss Tony
99 Boxster 2.5 > 2.7 hill climber
71 914/6 3.0 - gone
'You see Paul, hill climbing is like making love to a beautiful woman. You get your motor running, check your fluids, hang on tight and WHOA..30 seconds later it's all over!' Swiss Tony
-
rhd racer
- DDK 1st, 2nd and 3rd for me!
- Posts: 2043
- Joined: Wed Jun 23, 2004 9:47 pm
- Location: Nottinghamshire
Re: 964 C2 - Rolling Resto
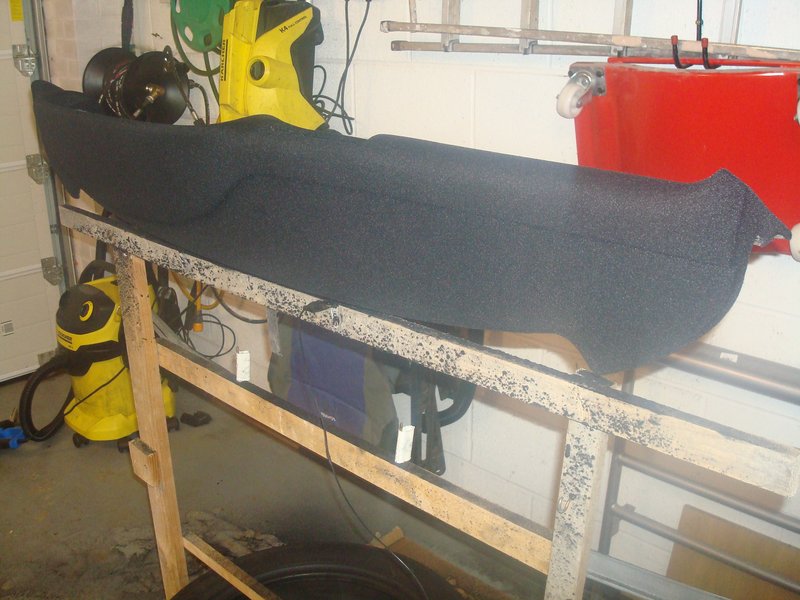
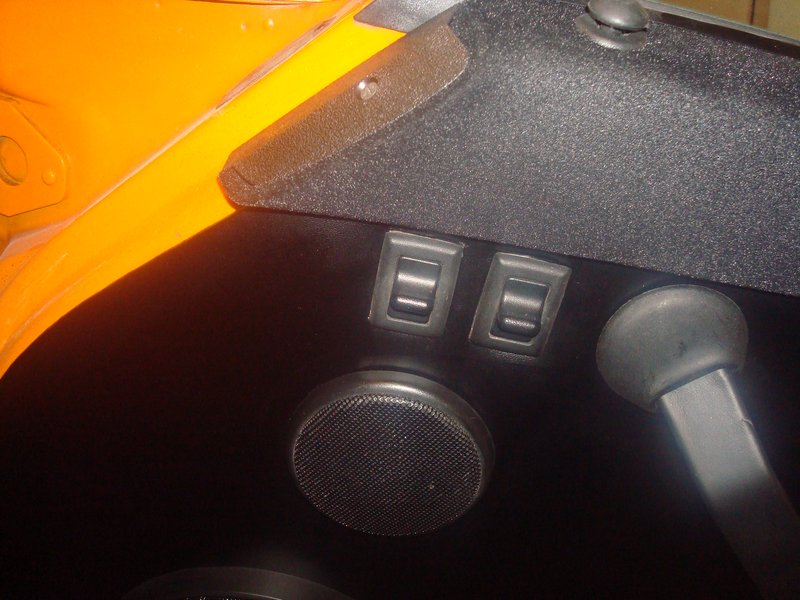
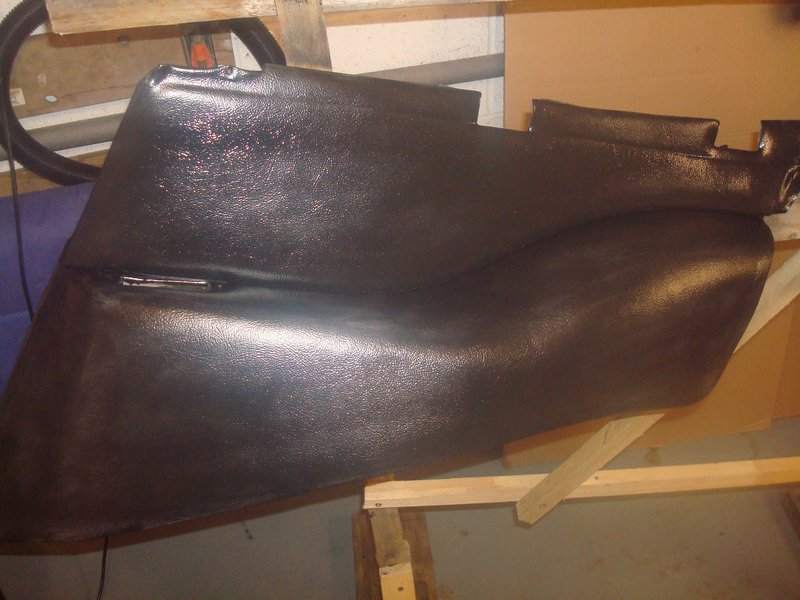
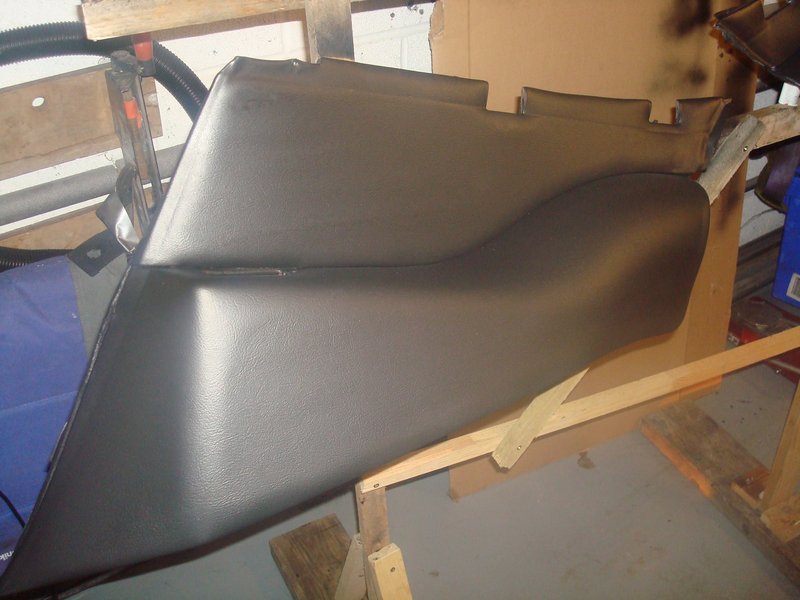
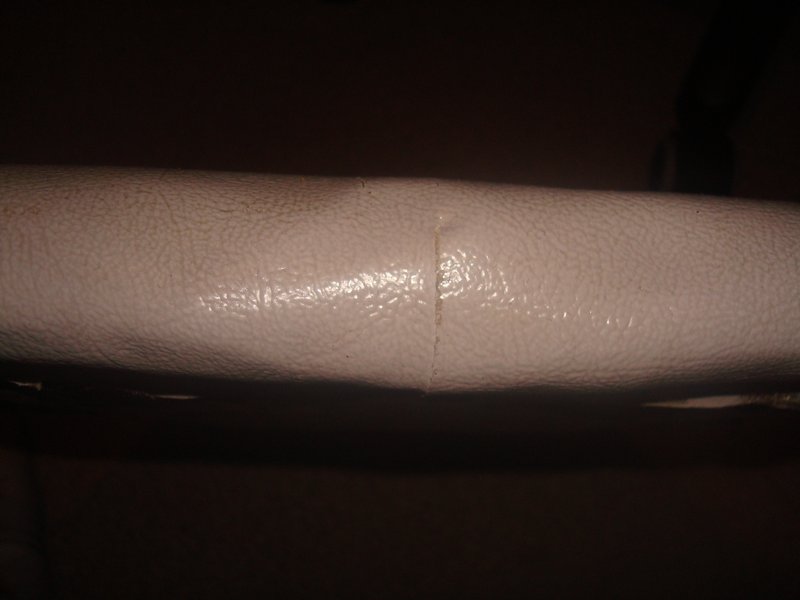
I bought a job lot of 6mm foam. As you can see, I have covered 4 here as decided to cover the racecar panels at the same time to match the posh new dash
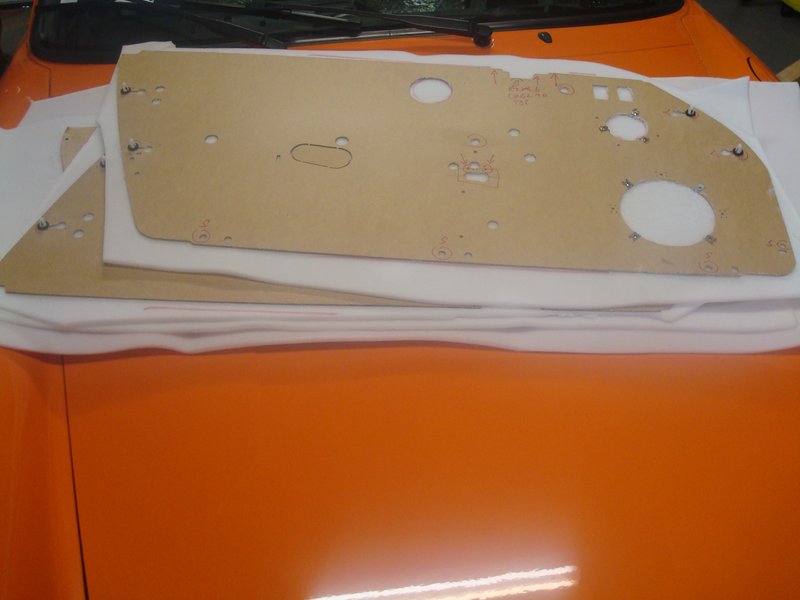
I made some aluminium spreader plates for the back of the door panels where the pull strap operates, just to take some of the stress from that part of the panel
Covering the panels themselves was ok, although I did redo one whn my 2nd effort was so much better than the first. I found that clamping the panel stretched over the short length before glueing, gave a headstart on stretching the other 3 sides.
I started on the passenger side, and it took a lot longer than I expected, because you can only make the holes required once, and it needs to be perfect. The handles needed spacers, which having tried washers I ended up using bamboo of all things, about 4mm depth was about right.
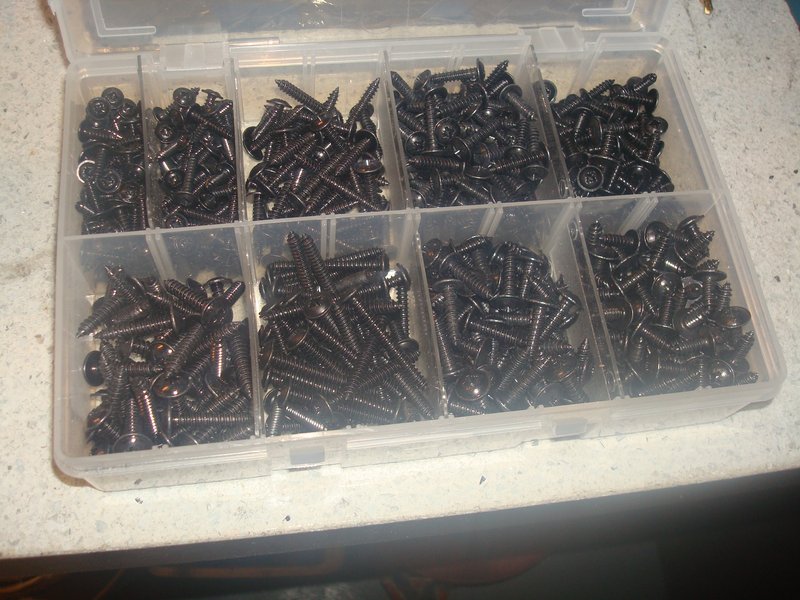
I bought a bunch of new pan head screws off ebay which came really quickly and have been brilliant at replacing all the original crud
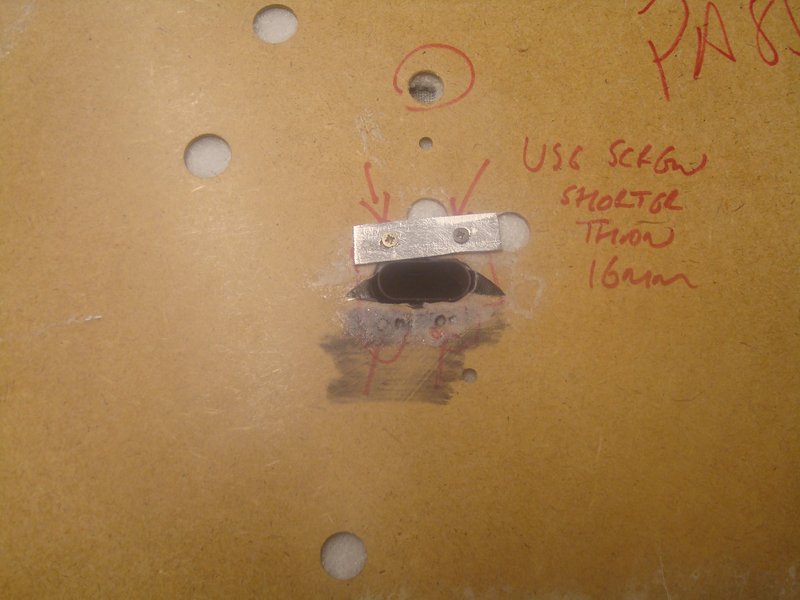
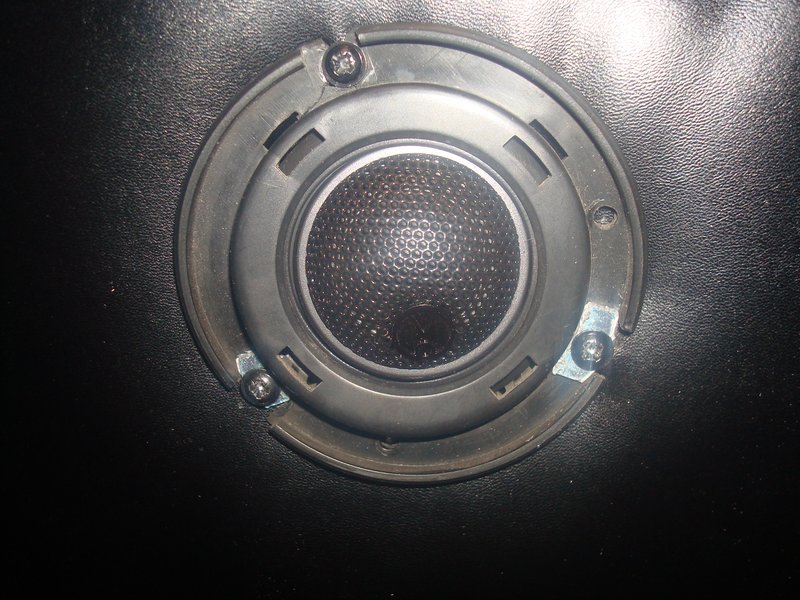
And I had to make some tiny aluminium spreader plates because I forgot to order new tweeter mounts
But achieved the look I was aiming for
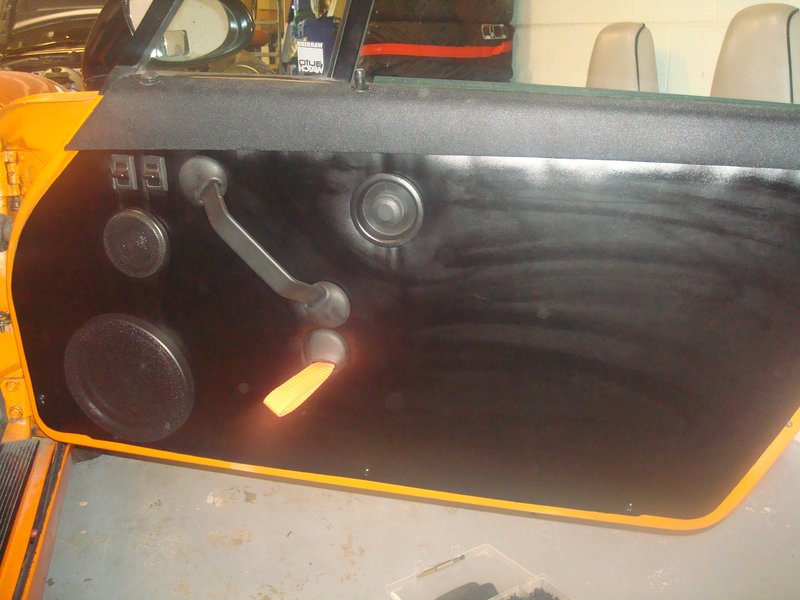
The panel is still wet after a wipe over, but you get the idea.
New end caps fitted. Worth mentioning the electric window switches have a little metal frame which crimps into the door card. These were a serious pain, and given the cards are covered when you fit them, you can't clamp them in a vice tight enough to tap the tabs down, so I found a rather awkward method of using long nose pliers in reverse (opening the jaws) would close the teeth on both sides at the same time. Result
I made some aluminium spreader plates for the back of the door panels where the pull strap operates, just to take some of the stress from that part of the panel
Covering the panels themselves was ok, although I did redo one whn my 2nd effort was so much better than the first. I found that clamping the panel stretched over the short length before glueing, gave a headstart on stretching the other 3 sides.
I started on the passenger side, and it took a lot longer than I expected, because you can only make the holes required once, and it needs to be perfect. The handles needed spacers, which having tried washers I ended up using bamboo of all things, about 4mm depth was about right.
I bought a bunch of new pan head screws off ebay which came really quickly and have been brilliant at replacing all the original crud
And I had to make some tiny aluminium spreader plates because I forgot to order new tweeter mounts
But achieved the look I was aiming for
The panel is still wet after a wipe over, but you get the idea.
New end caps fitted. Worth mentioning the electric window switches have a little metal frame which crimps into the door card. These were a serious pain, and given the cards are covered when you fit them, you can't clamp them in a vice tight enough to tap the tabs down, so I found a rather awkward method of using long nose pliers in reverse (opening the jaws) would close the teeth on both sides at the same time. Result
93 964 C2
99 Boxster 2.5 > 2.7 hill climber
71 914/6 3.0 - gone
'You see Paul, hill climbing is like making love to a beautiful woman. You get your motor running, check your fluids, hang on tight and WHOA..30 seconds later it's all over!' Swiss Tony
99 Boxster 2.5 > 2.7 hill climber
71 914/6 3.0 - gone
'You see Paul, hill climbing is like making love to a beautiful woman. You get your motor running, check your fluids, hang on tight and WHOA..30 seconds later it's all over!' Swiss Tony
-
rhd racer
- DDK 1st, 2nd and 3rd for me!
- Posts: 2043
- Joined: Wed Jun 23, 2004 9:47 pm
- Location: Nottinghamshire
Re: 964 C2 - Rolling Resto
Finally, I can now get on with the re-colour of the interior. To remind you of what I was trying to lose....
First I had to enter a box I bought quite a while ago, still sealed up, containing all the kit. I remember buying it, with good intentions for lockdown 1, it was almost a year to the day since it arrived. At least I found it, I usually buy things I know I need and then lose them
There was some minor damage, a scuff that had torn the PVC that I filled before starting, using the filler supplied with the gear I had bought
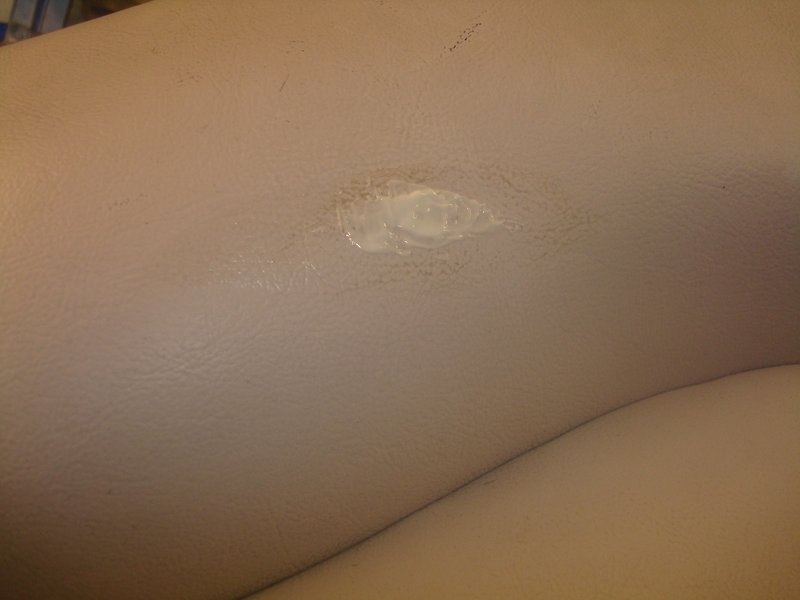
Then after rubbing down with 600 grit, I needed to clean the panels, and they recommend alcohol on a cloth. It was amazing how that alone took years of grime and dirt off the panels - before and after
Then your get the dye and sponge on, the plan here is not to get full coverage but to work it into cracks and crevices. You do this 3 times, building on the layers, and then brilliantly dry it with a hair dryer between applications. I used a heat gun on the lowest setting. This is after the first coat
And the one on the right has had the 2nd coat.
I was starting to get nervous at this point, but in for a penny and all that. There were still a few creases not fully covered, so I used a small brush to get these
Before ending up with these, after 3 coats and TLC in the difficult to get to areas

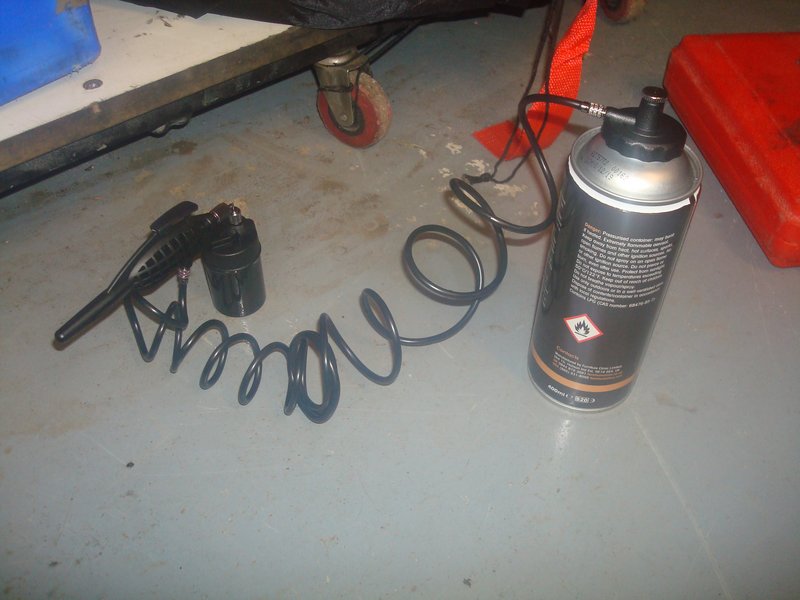
The kit you get is great. The next stage is airbrushing the colourant, but instead of needing to get a little compressor they supply propellant cans which I was surprised by how well they work. They get ice cold, so you need to rotate them for large areas with others kept in a warm bucket, but it is no hardship.
Then 3 coats of colourant again, by airbrush, again drying in between

And they are starting to look really good....
The final step is to apply a protective coating, which is two part affiar roughly 1:10, again applied by airbrush. Luckily this is all water based, so cleaning the airbrush (and yourself!) is quick and easy!

I found it is much more likely to run than the colourant, so you need to go steady, but another 3 coats, again dried in between with the heatgun (this time highest setting, but moving it around quickly was best) and they look like factory black panels - the final stage giving a much softer, satin finish.
Starting to feel ok about attacking the seats now!
First I had to enter a box I bought quite a while ago, still sealed up, containing all the kit. I remember buying it, with good intentions for lockdown 1, it was almost a year to the day since it arrived. At least I found it, I usually buy things I know I need and then lose them
There was some minor damage, a scuff that had torn the PVC that I filled before starting, using the filler supplied with the gear I had bought
Then after rubbing down with 600 grit, I needed to clean the panels, and they recommend alcohol on a cloth. It was amazing how that alone took years of grime and dirt off the panels - before and after
Then your get the dye and sponge on, the plan here is not to get full coverage but to work it into cracks and crevices. You do this 3 times, building on the layers, and then brilliantly dry it with a hair dryer between applications. I used a heat gun on the lowest setting. This is after the first coat
And the one on the right has had the 2nd coat.
I was starting to get nervous at this point, but in for a penny and all that. There were still a few creases not fully covered, so I used a small brush to get these
Before ending up with these, after 3 coats and TLC in the difficult to get to areas
The kit you get is great. The next stage is airbrushing the colourant, but instead of needing to get a little compressor they supply propellant cans which I was surprised by how well they work. They get ice cold, so you need to rotate them for large areas with others kept in a warm bucket, but it is no hardship.
Then 3 coats of colourant again, by airbrush, again drying in between
And they are starting to look really good....
The final step is to apply a protective coating, which is two part affiar roughly 1:10, again applied by airbrush. Luckily this is all water based, so cleaning the airbrush (and yourself!) is quick and easy!
I found it is much more likely to run than the colourant, so you need to go steady, but another 3 coats, again dried in between with the heatgun (this time highest setting, but moving it around quickly was best) and they look like factory black panels - the final stage giving a much softer, satin finish.
Starting to feel ok about attacking the seats now!
93 964 C2
99 Boxster 2.5 > 2.7 hill climber
71 914/6 3.0 - gone
'You see Paul, hill climbing is like making love to a beautiful woman. You get your motor running, check your fluids, hang on tight and WHOA..30 seconds later it's all over!' Swiss Tony
99 Boxster 2.5 > 2.7 hill climber
71 914/6 3.0 - gone
'You see Paul, hill climbing is like making love to a beautiful woman. You get your motor running, check your fluids, hang on tight and WHOA..30 seconds later it's all over!' Swiss Tony
-
rhd racer
- DDK 1st, 2nd and 3rd for me!
- Posts: 2043
- Joined: Wed Jun 23, 2004 9:47 pm
- Location: Nottinghamshire
Re: 964 C2 - Rolling Resto
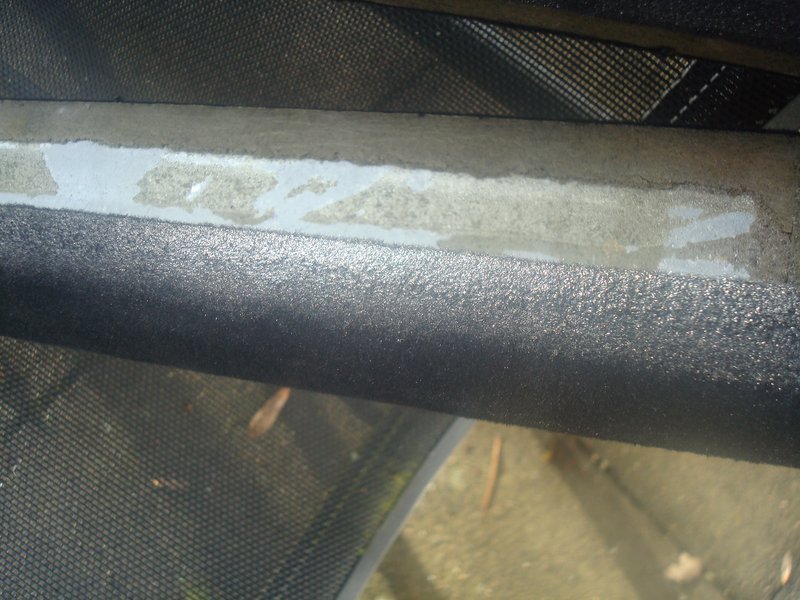
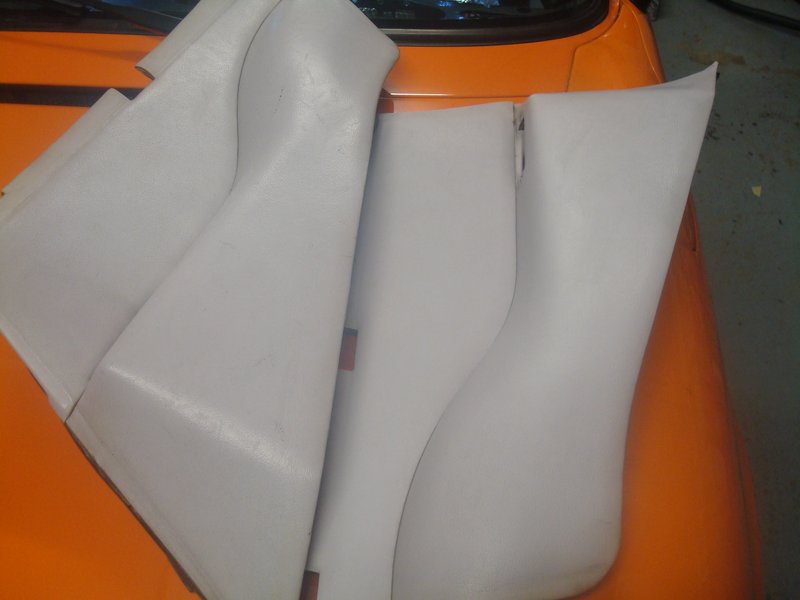
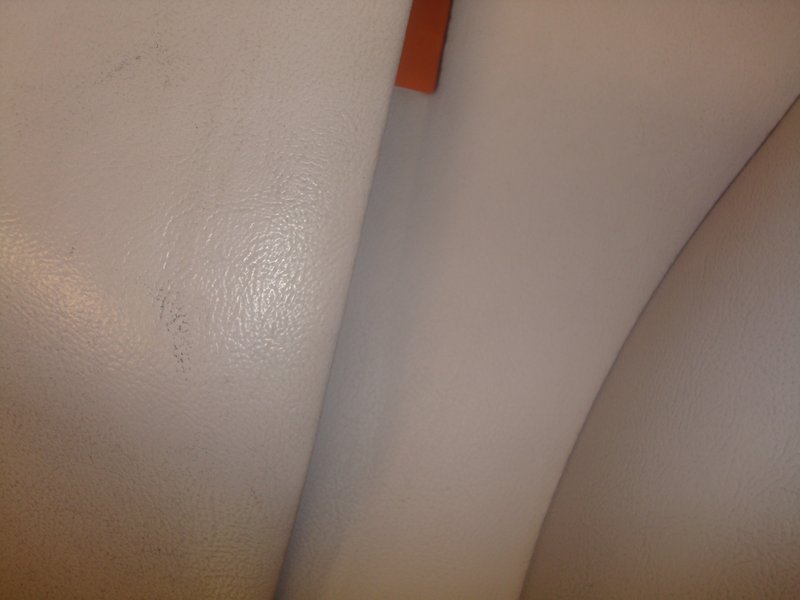
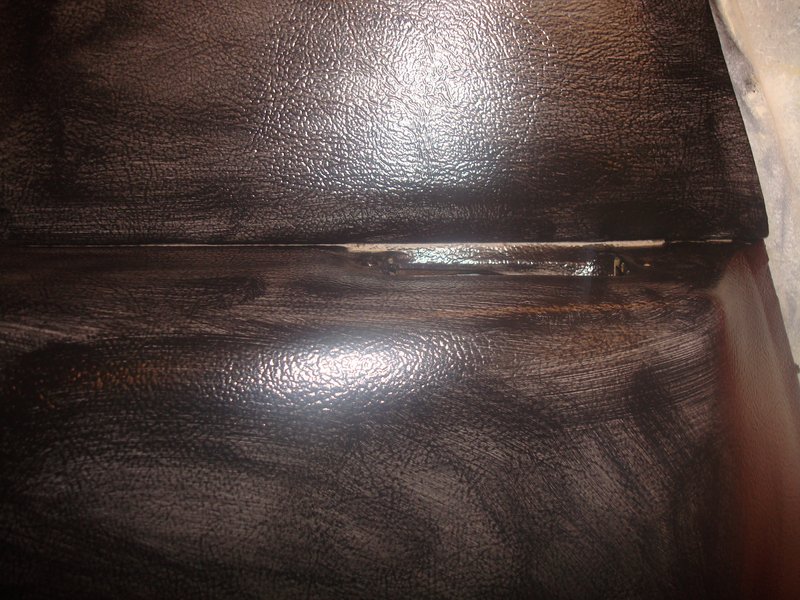
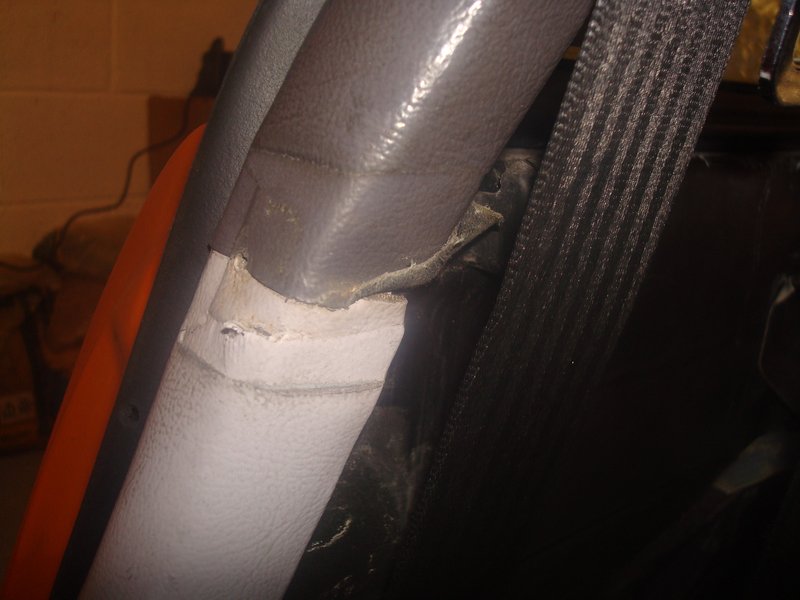
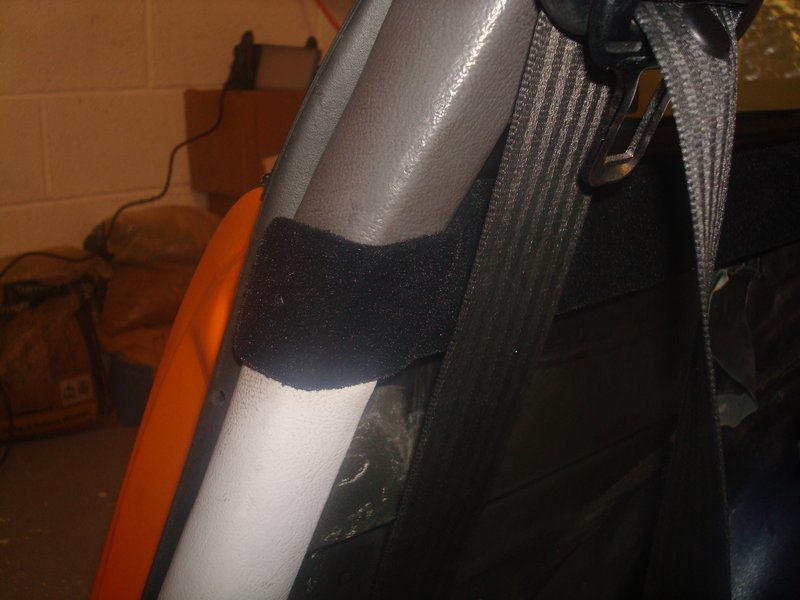
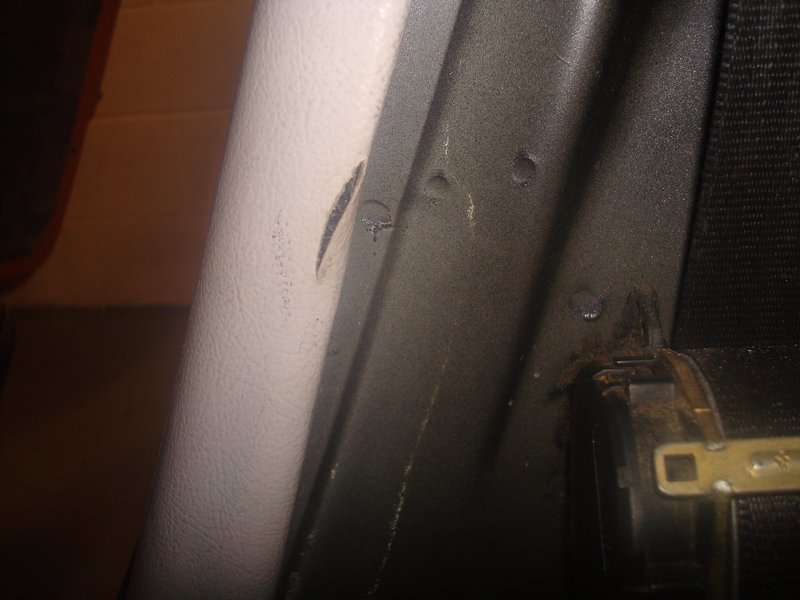
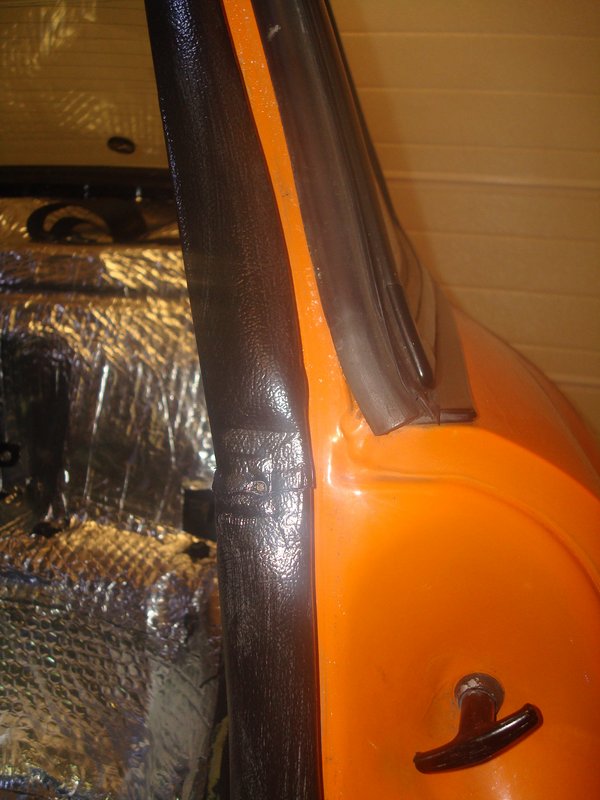
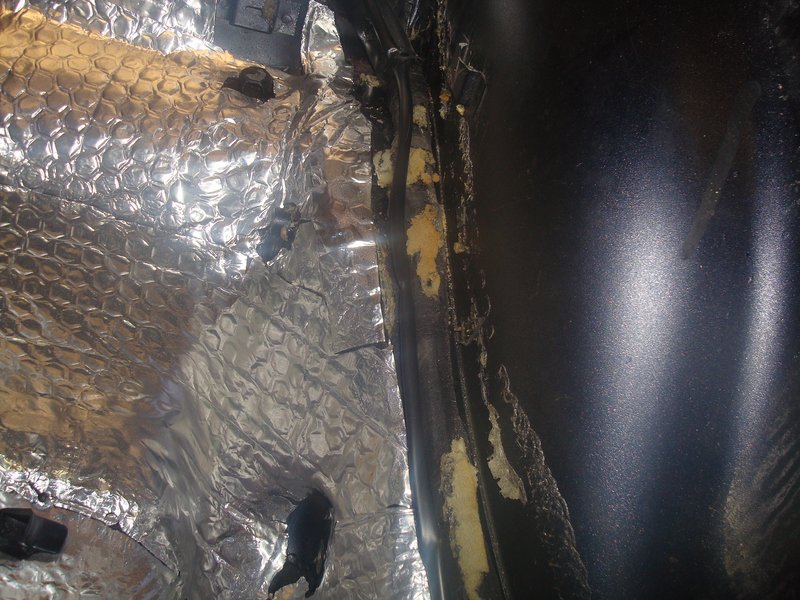
To bring this right up to date, the bit that was troubling me was the A & B post panels - the latter being light coloured below the waist, and dark grey above the waistline. The headliner is grey. Now it was clear that below the waist would need to be black to match the rear quarter trim, but could I live with dark grey above the waist?
I intend to have a grey headlining, preferably alcantra, when I repaint the car for a bit of a contrast as I think all black might be too dark.
A mock up, with the flocked capping panels suggested to me at least it would look rubbish
So, that decided I need to repair some damage on both sides, and found sikoflex worked well as it is flexible and strong.
Then repeated all the other processes described on the panels to these, albeit awkwardly in the car. I painted all the edges with a small brush (thanks kids!) but then had to use it to do all the tiny nooks and crannies down the side of the screen - easy with your good hand, not so easy with your other hand

I then decided, having success with the panels, to spray these two, which obviously required some masking to save making a proper horlicks of it...
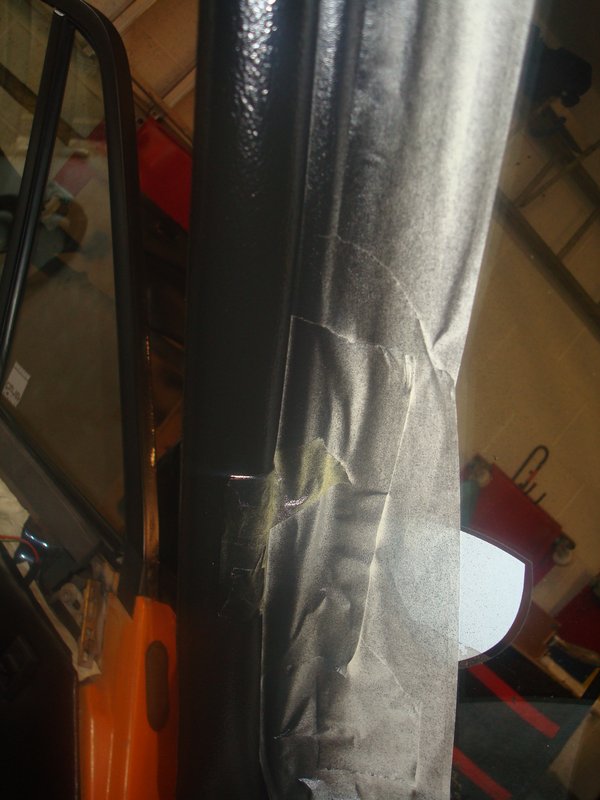
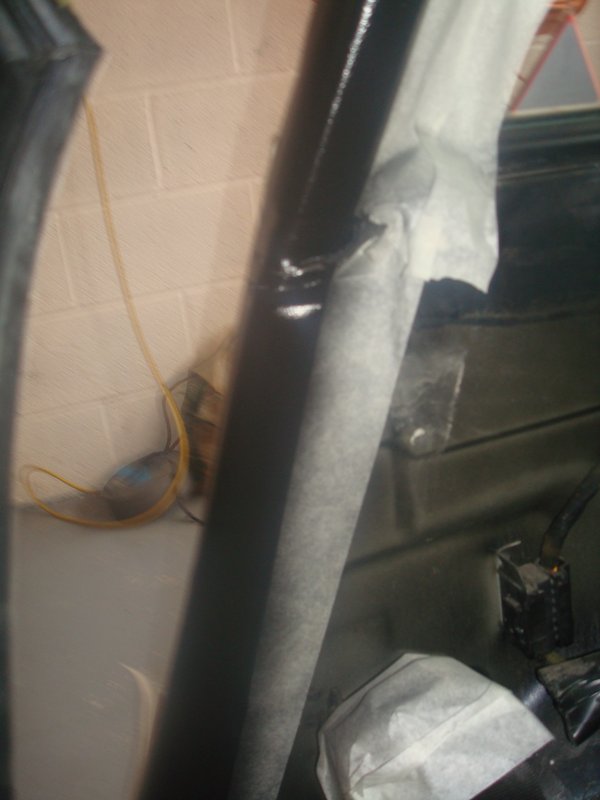
And job done. If I say so myself, they look brilliant. Hardest bit was masking around the chassis plate (which I didnt know was there!)


A good weekends work, and one you can do in between circuits on the lawnmower!!
I intend to have a grey headlining, preferably alcantra, when I repaint the car for a bit of a contrast as I think all black might be too dark.
A mock up, with the flocked capping panels suggested to me at least it would look rubbish
So, that decided I need to repair some damage on both sides, and found sikoflex worked well as it is flexible and strong.
Then repeated all the other processes described on the panels to these, albeit awkwardly in the car. I painted all the edges with a small brush (thanks kids!) but then had to use it to do all the tiny nooks and crannies down the side of the screen - easy with your good hand, not so easy with your other hand
I then decided, having success with the panels, to spray these two, which obviously required some masking to save making a proper horlicks of it...
And job done. If I say so myself, they look brilliant. Hardest bit was masking around the chassis plate (which I didnt know was there!)
A good weekends work, and one you can do in between circuits on the lawnmower!!
93 964 C2
99 Boxster 2.5 > 2.7 hill climber
71 914/6 3.0 - gone
'You see Paul, hill climbing is like making love to a beautiful woman. You get your motor running, check your fluids, hang on tight and WHOA..30 seconds later it's all over!' Swiss Tony
99 Boxster 2.5 > 2.7 hill climber
71 914/6 3.0 - gone
'You see Paul, hill climbing is like making love to a beautiful woman. You get your motor running, check your fluids, hang on tight and WHOA..30 seconds later it's all over!' Swiss Tony
Re: 964 C2 - Rolling Resto
Nice work! What's the kit and where's it from? I keep thinking about recolouring my interior as it's painfully blue.
-
rhd racer
- DDK 1st, 2nd and 3rd for me!
- Posts: 2043
- Joined: Wed Jun 23, 2004 9:47 pm
- Location: Nottinghamshire
Re: 964 C2 - Rolling Resto
Thanks
It’s from Furniture Clinic - I just phoned and told them the extent of what I wanted to do, and they put together a kit for me. I have to say was very impressed with them (1 week into lockdown 1 and working from home) and the quality of the kit. It’s really good, hope the seats go as well as that!
It’s from Furniture Clinic - I just phoned and told them the extent of what I wanted to do, and they put together a kit for me. I have to say was very impressed with them (1 week into lockdown 1 and working from home) and the quality of the kit. It’s really good, hope the seats go as well as that!
93 964 C2
99 Boxster 2.5 > 2.7 hill climber
71 914/6 3.0 - gone
'You see Paul, hill climbing is like making love to a beautiful woman. You get your motor running, check your fluids, hang on tight and WHOA..30 seconds later it's all over!' Swiss Tony
99 Boxster 2.5 > 2.7 hill climber
71 914/6 3.0 - gone
'You see Paul, hill climbing is like making love to a beautiful woman. You get your motor running, check your fluids, hang on tight and WHOA..30 seconds later it's all over!' Swiss Tony

Re: 964 C2 - Rolling Resto
It's got to be said, your dash and knee pads are flocking brilliant.
The re-colouring looks fab also.
Nice work.
Karl
The re-colouring looks fab also.
Nice work.
Karl
Keep the Outlaw Faith
-
rhd racer
- DDK 1st, 2nd and 3rd for me!
- Posts: 2043
- Joined: Wed Jun 23, 2004 9:47 pm
- Location: Nottinghamshire
Re: 964 C2 - Rolling Resto
Cheers Karl, almost time to get brave and attack the seats....
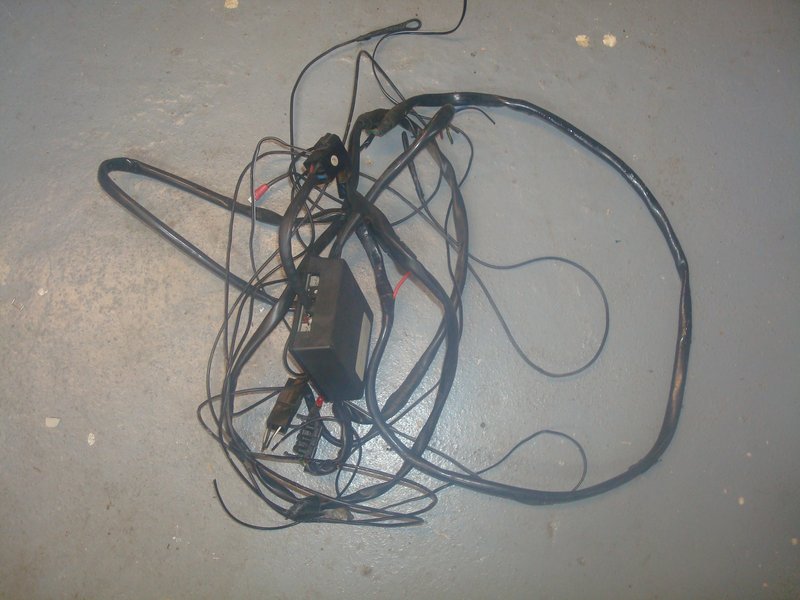
But first, last job before being able to re-carpet. The only thing that does not work on the car is the fan belt warning light, or rather it works too well because it never goes out!!! This is despite a new sender in the engine bay (they frequently fail) and a good second hand control unit (they do also). So that leaves either a gauge failure (quite possible) or a break in one of the wires. I was going to do a continuity test, but there are about a million wires going into the control unit, and whilst I looked up the wiring diagram online it was completely incomprehensible. So, for now, I made up a little loom of two new wires and fed it through with the main loom, so I have it already routed if I need it and the refurbished gauge does not fix the issue. Once the carpets are glued in, this would be a nightmare to find out I need to do later....
So fed through the big grommet with a wire feeder and simply tucked behind the engine bay fuse box.
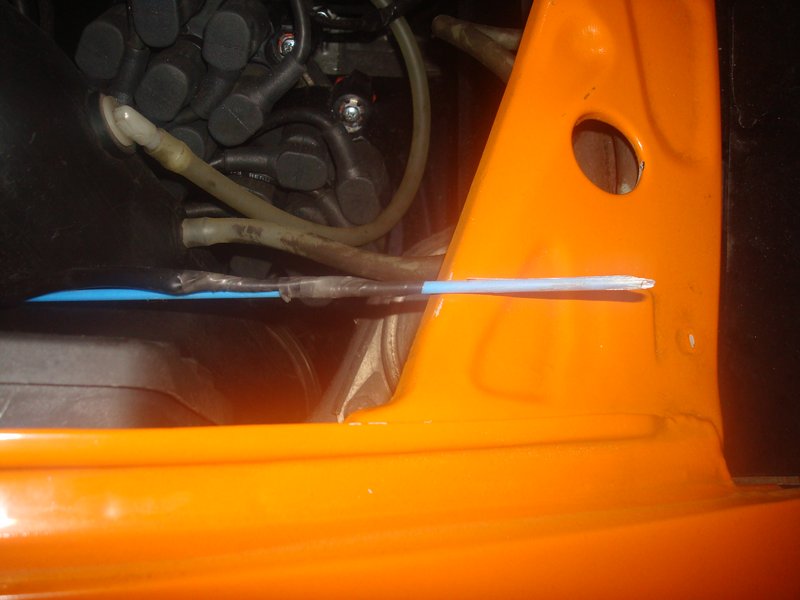
and routed with the main loom using the original chassis ties
before terminating it in the front footwell, with a note on it explaining what it is (because I will probably forget, but equally one day I might sell it and there is no point giving someone kittens that it might be live)

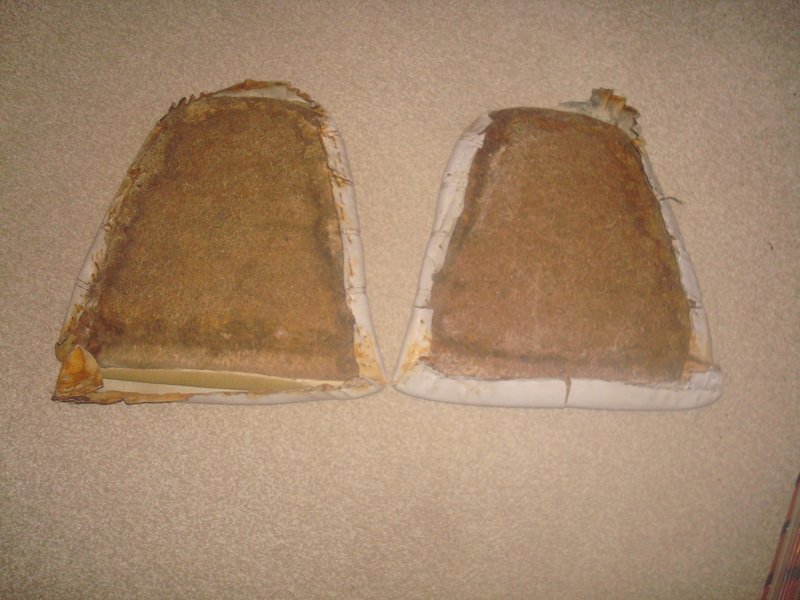
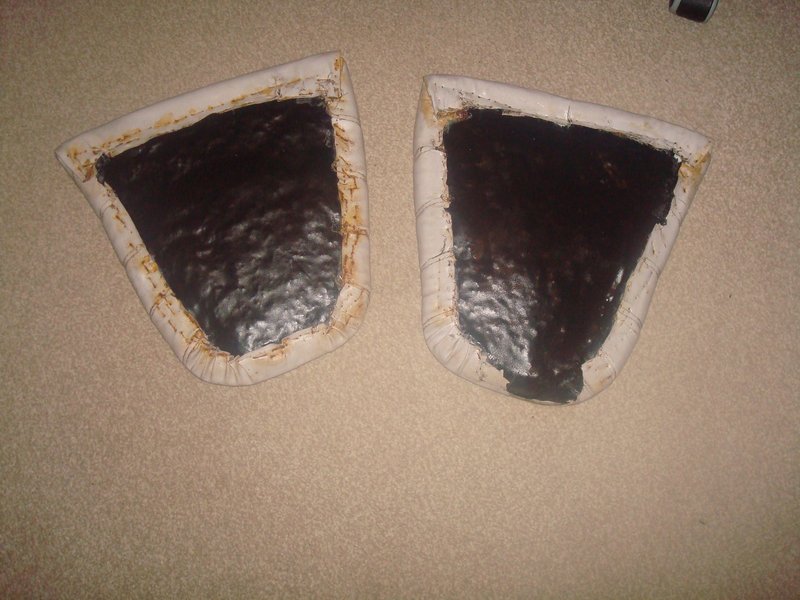
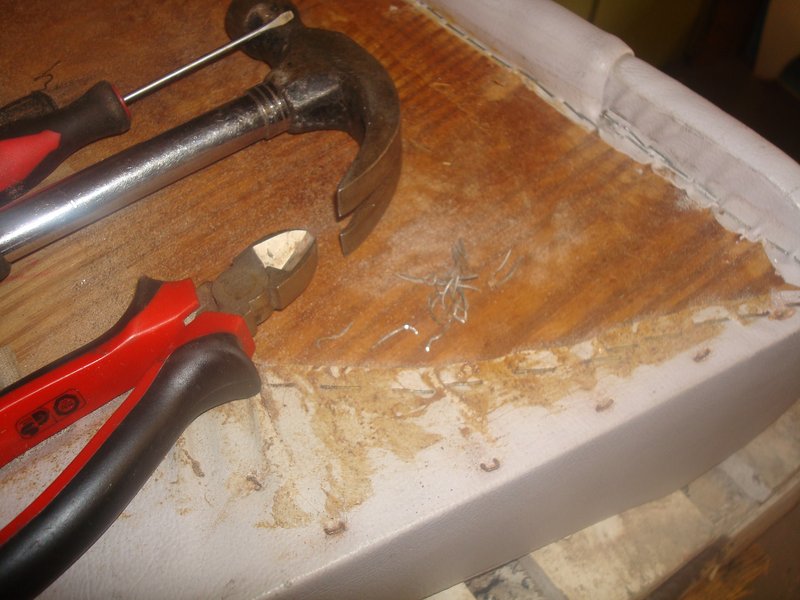
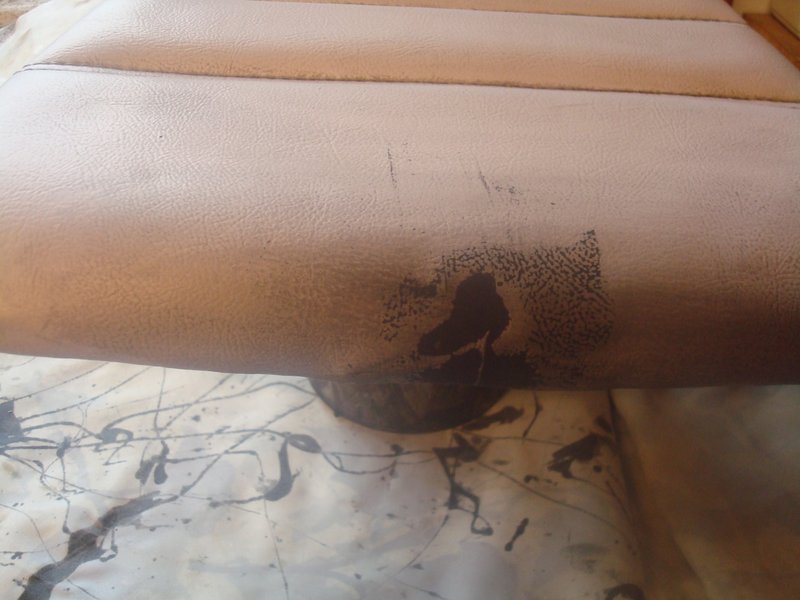
I then started to repair the rear seat squabs, which were inevitably damaged when unceremoniously tearing them off the carpet. They are a right state, made only worse by my decision to remove all the staples to line the horse hair bottoms. A thankless task, if ever there was one, and everything still has sticky, manky glue all over it.

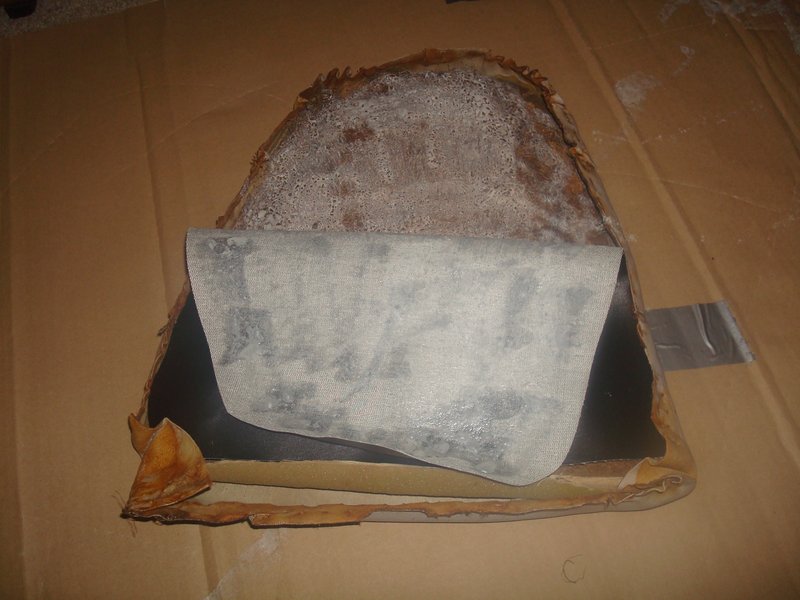
So everything was cleaned up with white spirit to remove as much as possible. With the outer covers loose, I could line the bases with some spare leatherette from the door cards, using contact adhesive
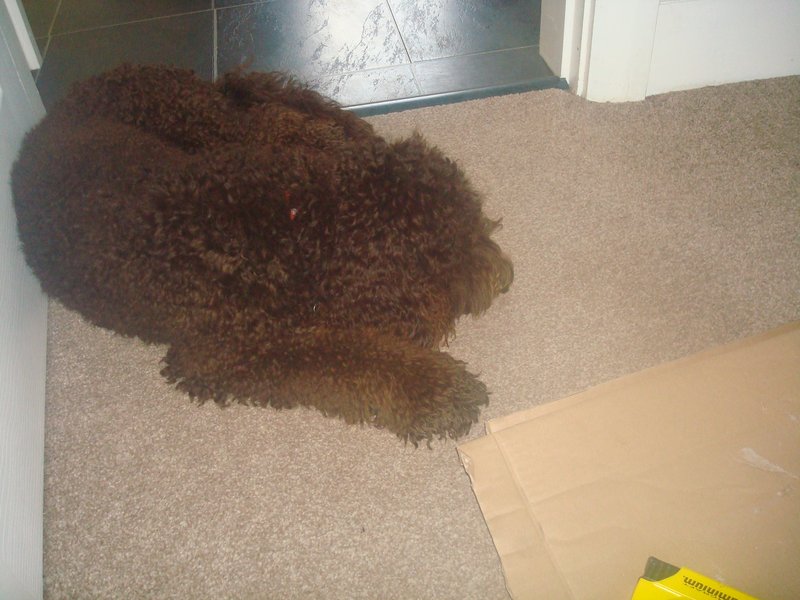
My helper fell asleep on the job
I tried stapling the covers back on, but 6mm staples (all I had) didn't really grab, so I did them with impact adhesive

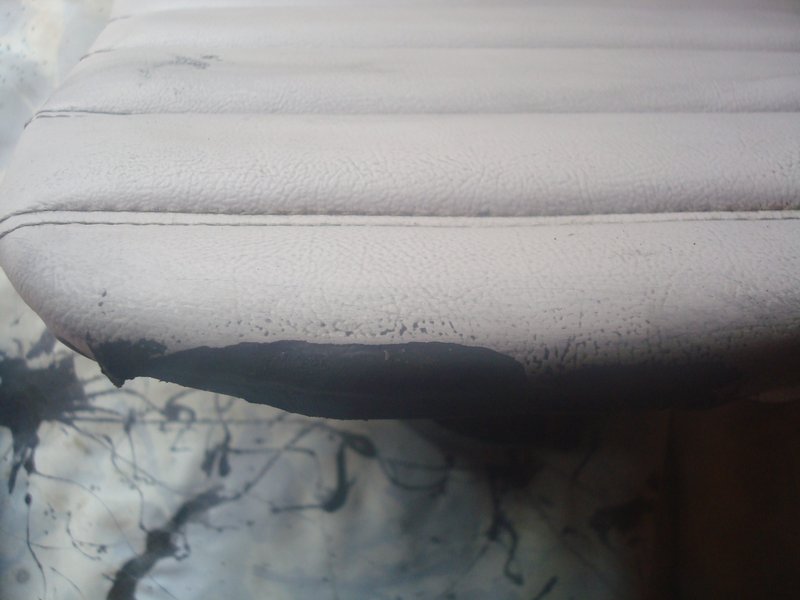
I repaired a tear with some leatherette and impact adhesive on the back, to tie the tear together, with a view to filling later
and an early grab on the adhesive meant this bit would need filling too.....
Luckily the dye suppliers to a light and a heavy filler, the heavy I ordered in black and set about it. It is slightly odd stuff, no mixing required, can be dried with a hairdryer again to speed things up, which I did to get it curing and then left overnight

But first, last job before being able to re-carpet. The only thing that does not work on the car is the fan belt warning light, or rather it works too well because it never goes out!!! This is despite a new sender in the engine bay (they frequently fail) and a good second hand control unit (they do also). So that leaves either a gauge failure (quite possible) or a break in one of the wires. I was going to do a continuity test, but there are about a million wires going into the control unit, and whilst I looked up the wiring diagram online it was completely incomprehensible. So, for now, I made up a little loom of two new wires and fed it through with the main loom, so I have it already routed if I need it and the refurbished gauge does not fix the issue. Once the carpets are glued in, this would be a nightmare to find out I need to do later....
So fed through the big grommet with a wire feeder and simply tucked behind the engine bay fuse box.
and routed with the main loom using the original chassis ties
before terminating it in the front footwell, with a note on it explaining what it is (because I will probably forget, but equally one day I might sell it and there is no point giving someone kittens that it might be live)
I then started to repair the rear seat squabs, which were inevitably damaged when unceremoniously tearing them off the carpet. They are a right state, made only worse by my decision to remove all the staples to line the horse hair bottoms. A thankless task, if ever there was one, and everything still has sticky, manky glue all over it.
So everything was cleaned up with white spirit to remove as much as possible. With the outer covers loose, I could line the bases with some spare leatherette from the door cards, using contact adhesive
My helper fell asleep on the job
I tried stapling the covers back on, but 6mm staples (all I had) didn't really grab, so I did them with impact adhesive
I repaired a tear with some leatherette and impact adhesive on the back, to tie the tear together, with a view to filling later
and an early grab on the adhesive meant this bit would need filling too.....
Luckily the dye suppliers to a light and a heavy filler, the heavy I ordered in black and set about it. It is slightly odd stuff, no mixing required, can be dried with a hairdryer again to speed things up, which I did to get it curing and then left overnight
93 964 C2
99 Boxster 2.5 > 2.7 hill climber
71 914/6 3.0 - gone
'You see Paul, hill climbing is like making love to a beautiful woman. You get your motor running, check your fluids, hang on tight and WHOA..30 seconds later it's all over!' Swiss Tony
99 Boxster 2.5 > 2.7 hill climber
71 914/6 3.0 - gone
'You see Paul, hill climbing is like making love to a beautiful woman. You get your motor running, check your fluids, hang on tight and WHOA..30 seconds later it's all over!' Swiss Tony
-
rhd racer
- DDK 1st, 2nd and 3rd for me!
- Posts: 2043
- Joined: Wed Jun 23, 2004 9:47 pm
- Location: Nottinghamshire
Re: 964 C2 - Rolling Resto
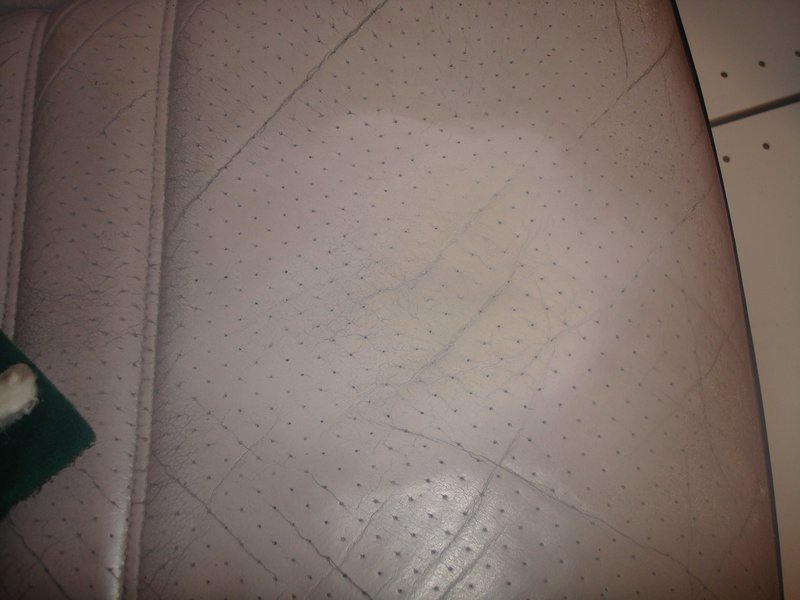
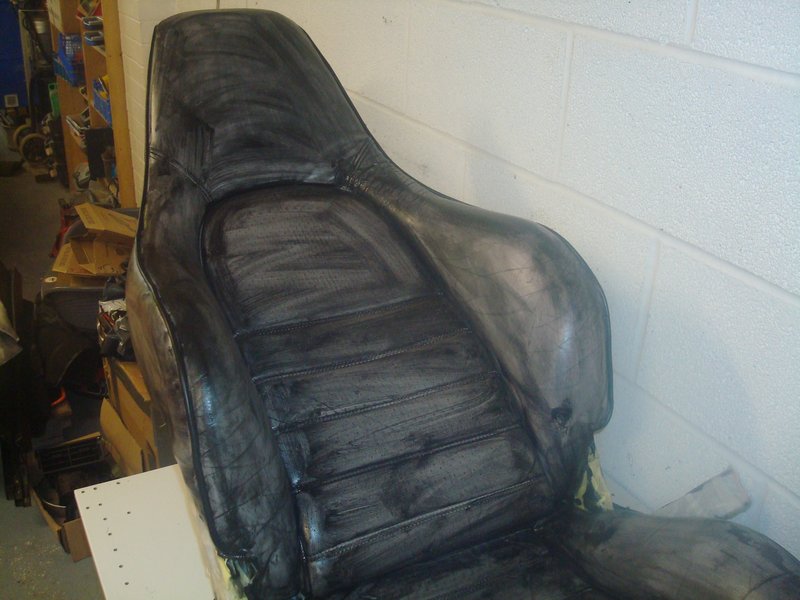
This morning it was onto the serious stuff - prepping the seats. Being leather, there is another stage of prep that I could not do on the rear quarter cards, and that is to use 'leather prep'. This is described as a solvent, which you bathe cotton wool balls in, before wrapping them in a scotchpad and wiping over the seats. Then stand back and watch 28 years of crud pull out of the leather right before your eyes!!
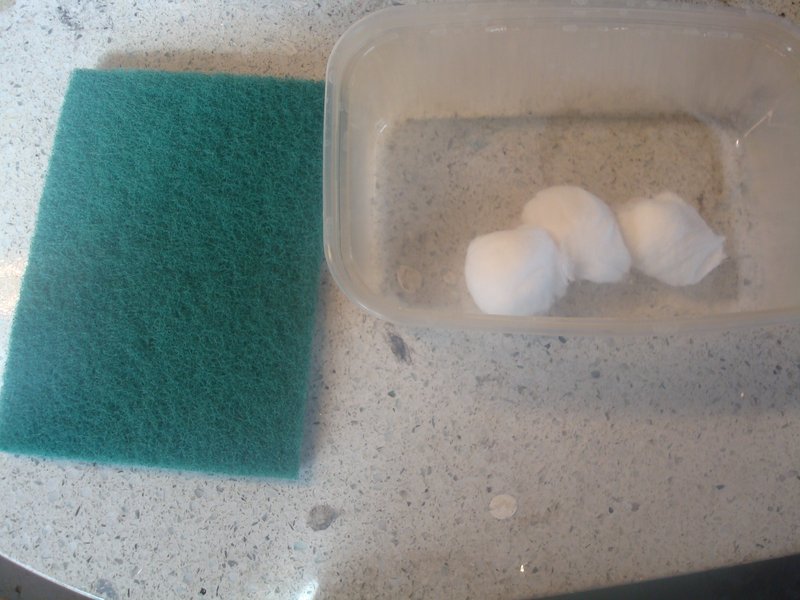
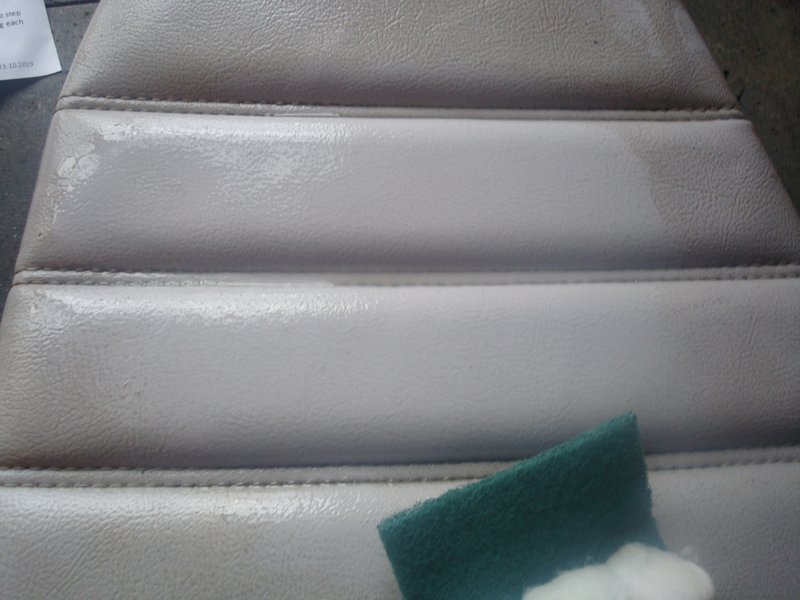
The stuff is pretty pungent, I suspect it is some sort of acetate. The only complaint I have with any of the stuff supplied is that the glives they supply for doing this job dissolved in it! So, using my own latex gloves which are a bit more hardy, I kept going
Then on the rear seat back rests I removed the old carpet, pulled out the old staples where possible, and tapped them fully hole where I couldn't get them out, and then prepped them too
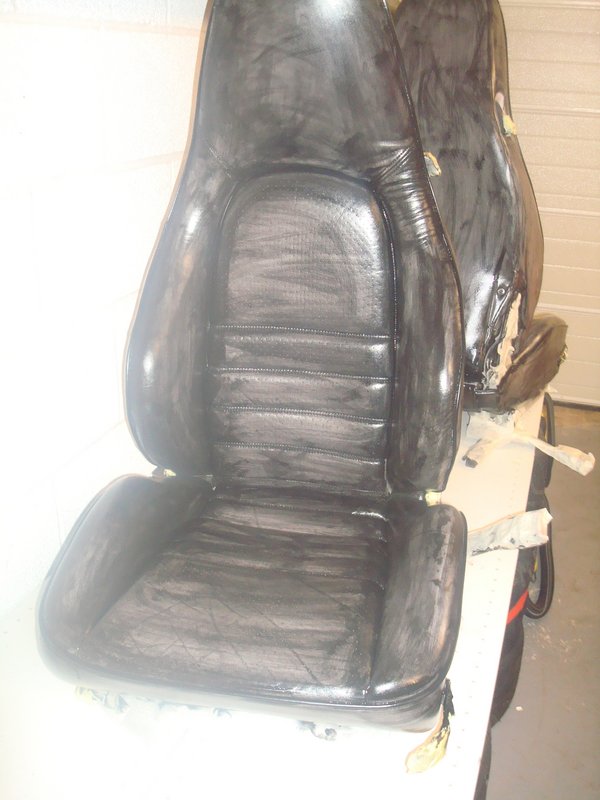
You then wipe them over with the alcohol based cleaner, to remove a different range of contaminants. At this point, the leather feels unnervingly sticky, a bit rough, and has also had some of the colour lifted out of it.
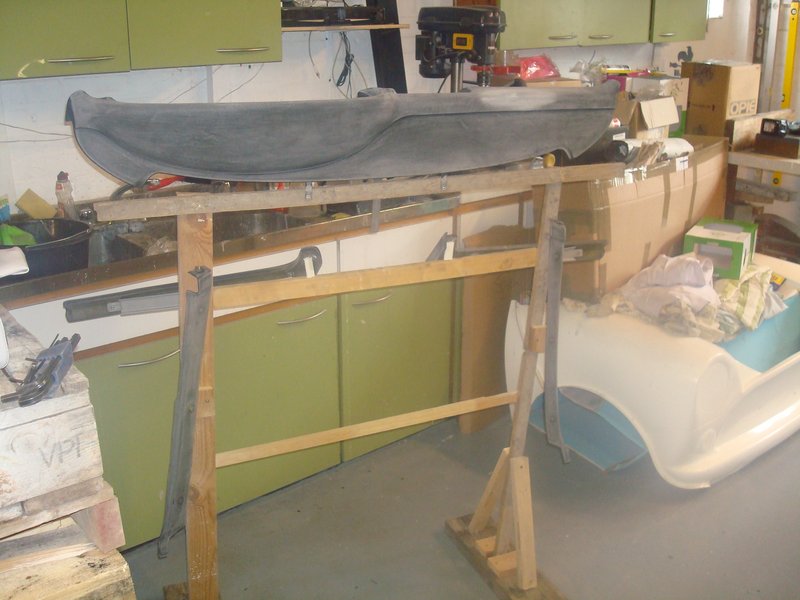
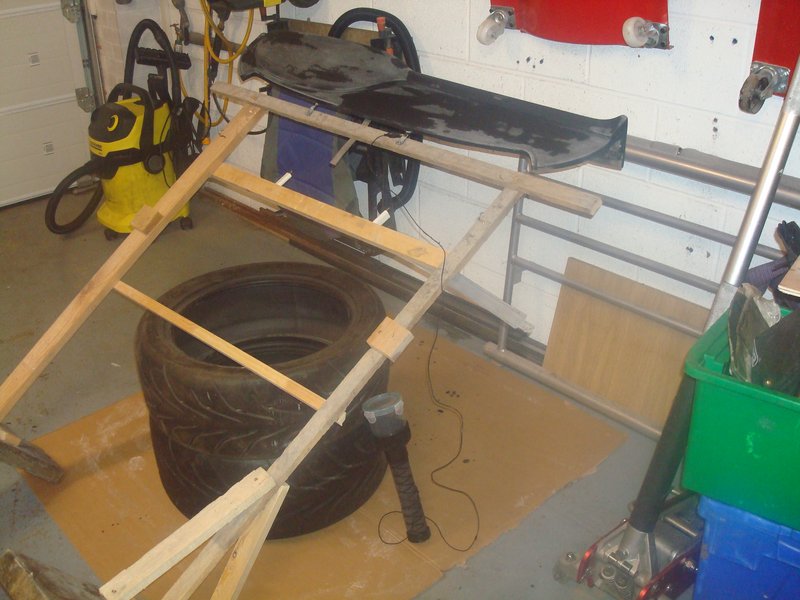
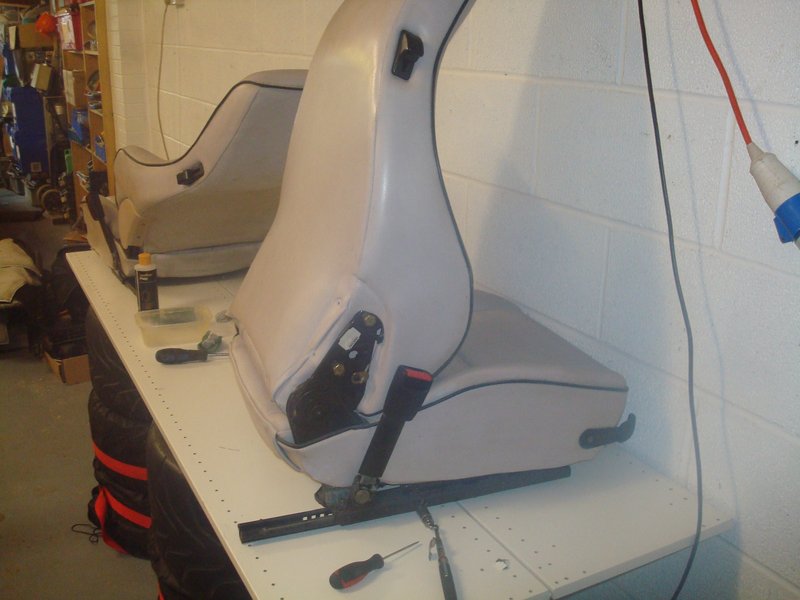
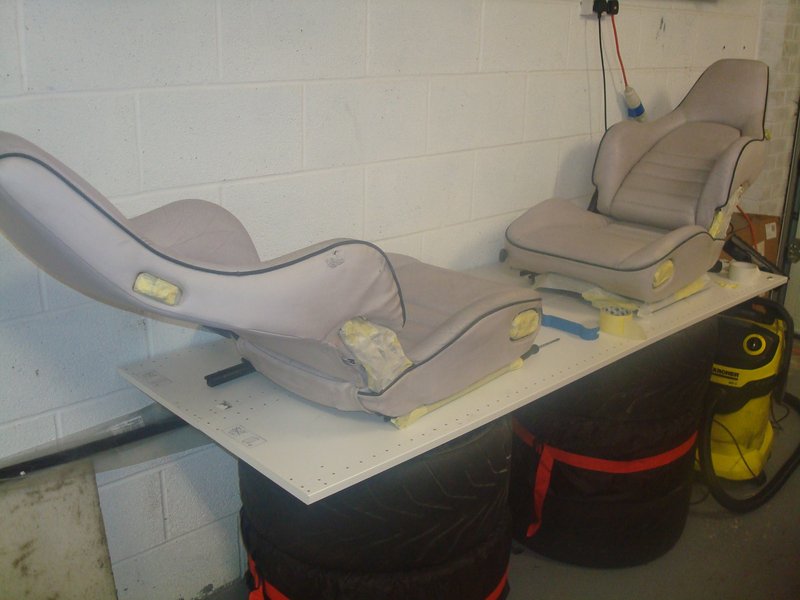
Then onto the front seats, same process, but they end up looking even worse due to the prior damage / cracks etc. I made myself an impromptu workbench using wheels and tyres and some old wardrobes sides I kept because I knew they would be helpful one day
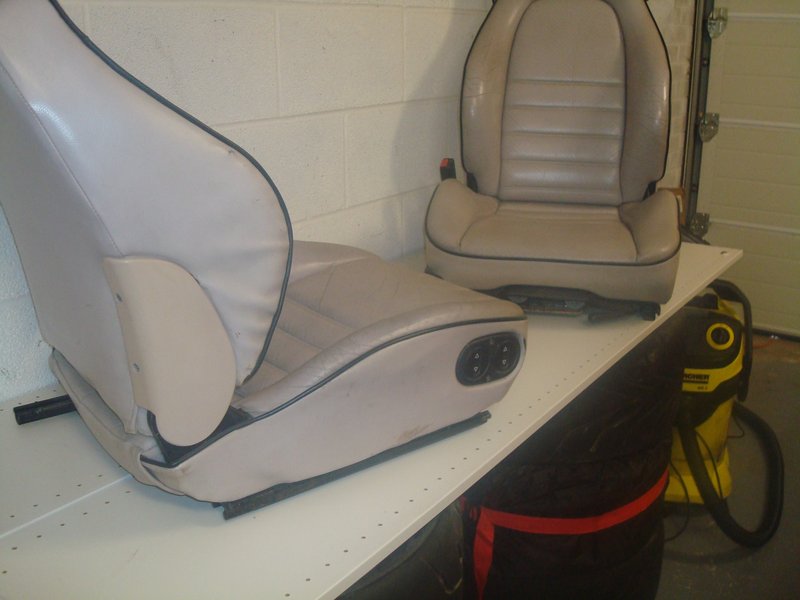
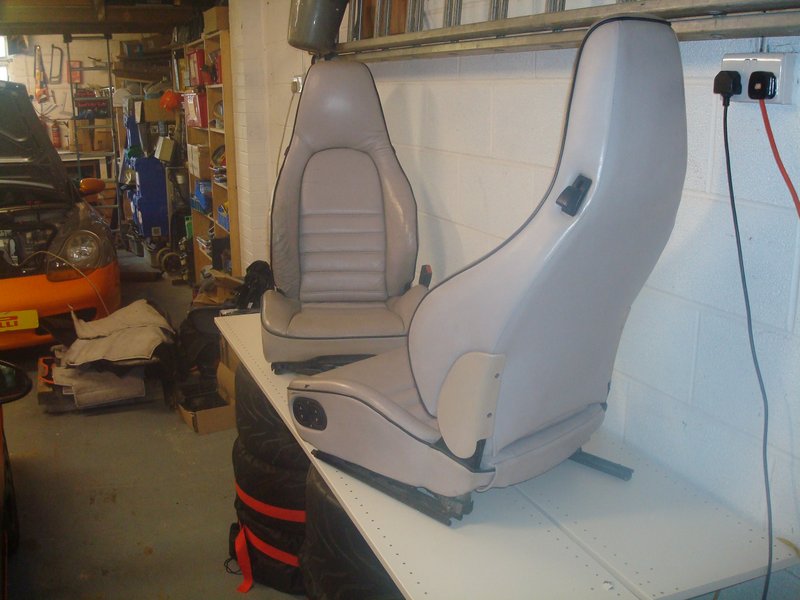

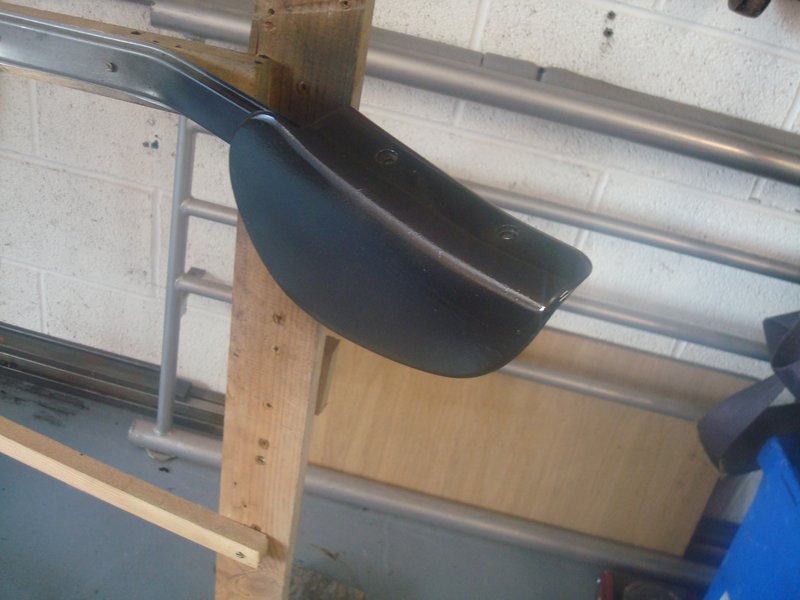
Because there are so many tight bits to get into, Having the seat fully reclined and also tiled forwards was needed to get into everywhere I needed to. This then jogged my memory that the passenger side backrest tilt mechanism didn't work at all on one lever, and poorly on the other. I was hoping it wasn't a snapped cable, so went investigating.
First remove the hard plastic covers, which need painting anyway, you can see that the cable pulls a little cam to operate the release. If you look at the angle, you can see this pulls the cam up to operate the release.

On the other side, it was in totally the wrong place, and had no 'pull' left, and the cable seemed in good order
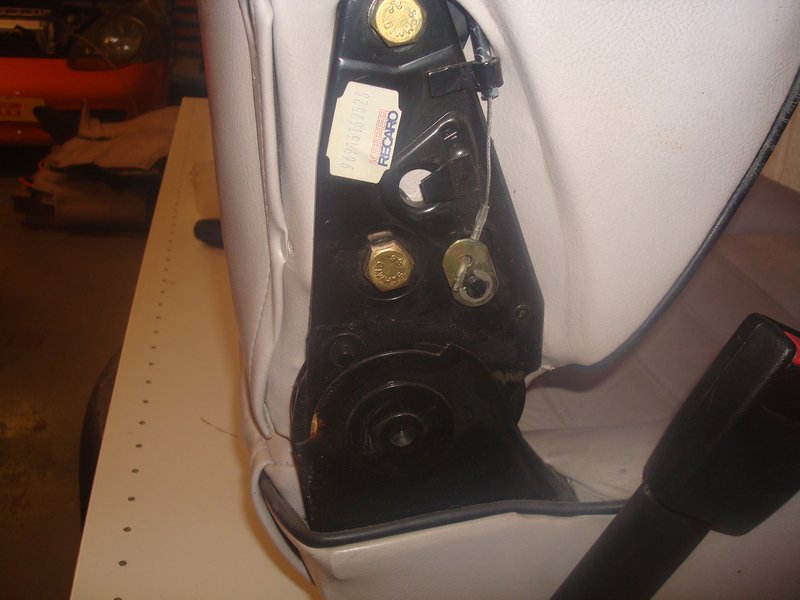
So removing the small circlip, I pull off the arm and it is on splines, so appears had slipped round
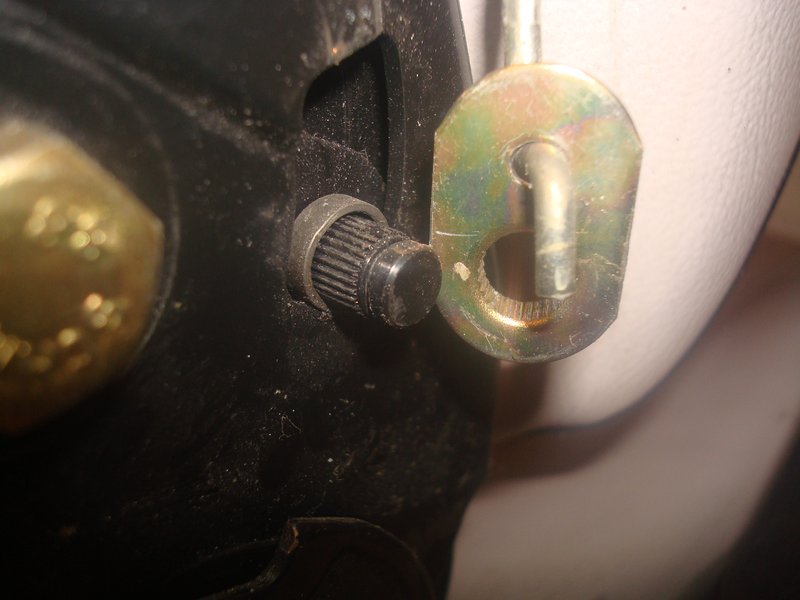
So I just repositioned, refitted the circlip and it works perfectly. Easiest fix ever!
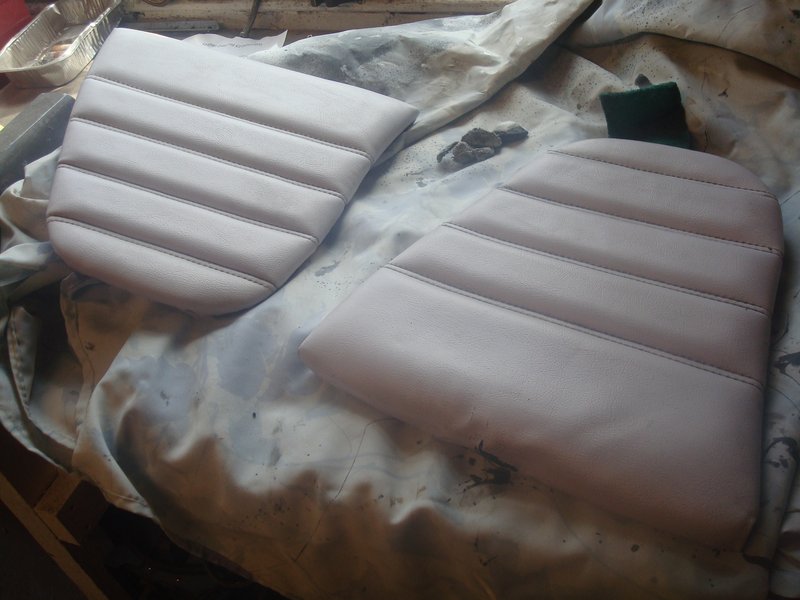
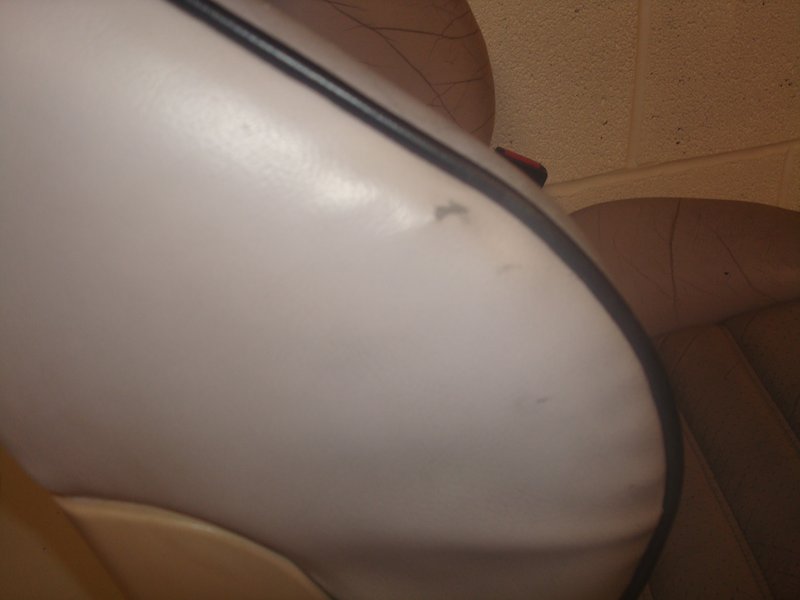
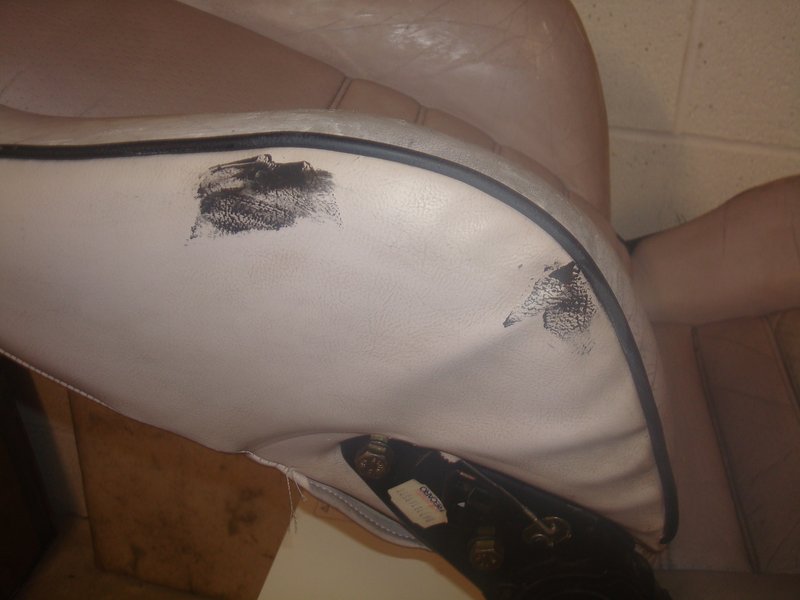
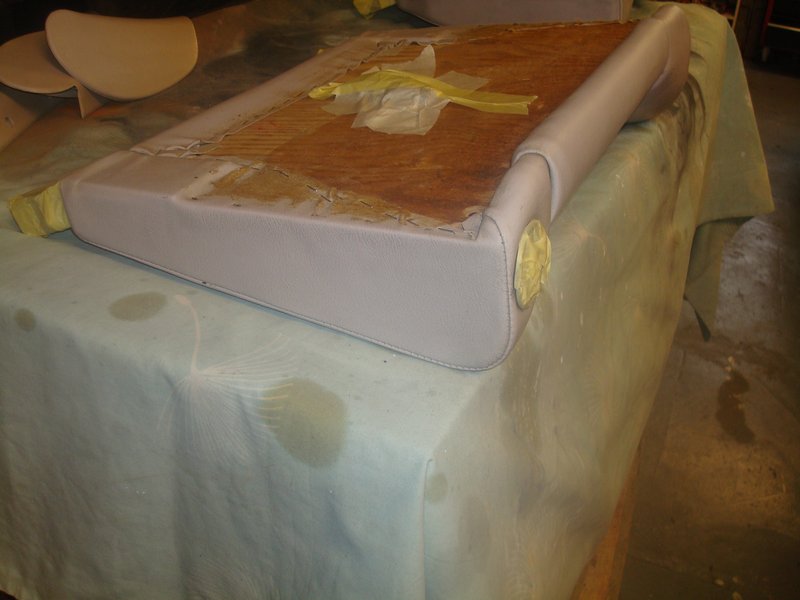
I then removed the covers from the electric seat switches and then set about filling the damaged areas of leather, the black filler used on holes and white filler used on the cracks.
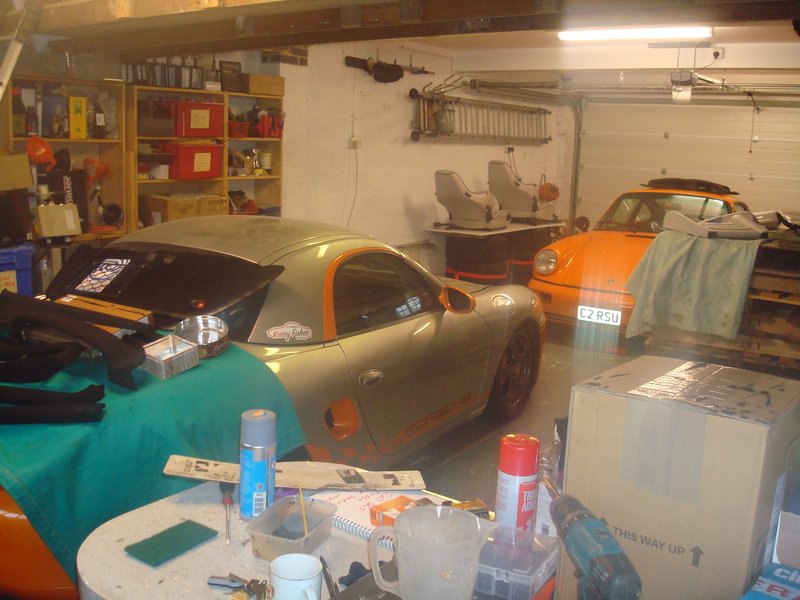
So I have left the filler to set overnight, and will sand off tomorrow then start the colouring process. The garage is a bit of a nightmare, with bits of interior everywhere, it just takes up so much room
The stuff is pretty pungent, I suspect it is some sort of acetate. The only complaint I have with any of the stuff supplied is that the glives they supply for doing this job dissolved in it! So, using my own latex gloves which are a bit more hardy, I kept going
Then on the rear seat back rests I removed the old carpet, pulled out the old staples where possible, and tapped them fully hole where I couldn't get them out, and then prepped them too
You then wipe them over with the alcohol based cleaner, to remove a different range of contaminants. At this point, the leather feels unnervingly sticky, a bit rough, and has also had some of the colour lifted out of it.
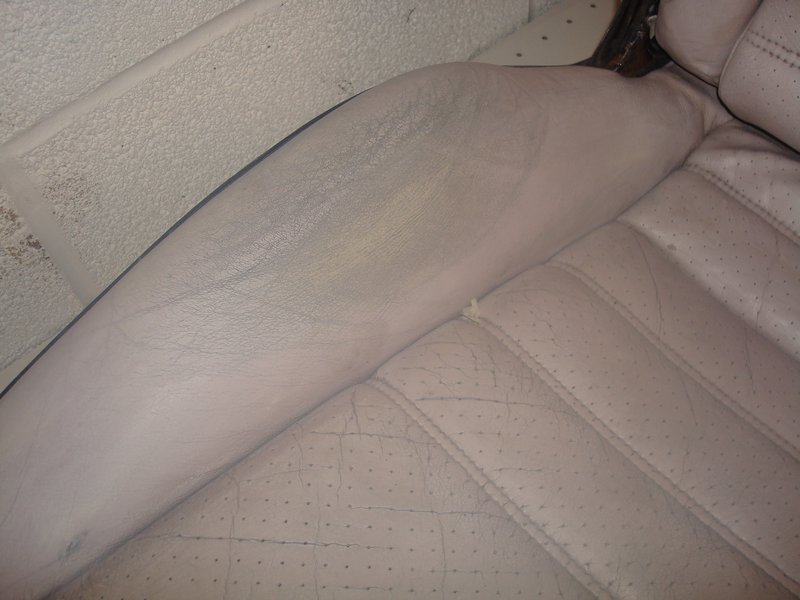
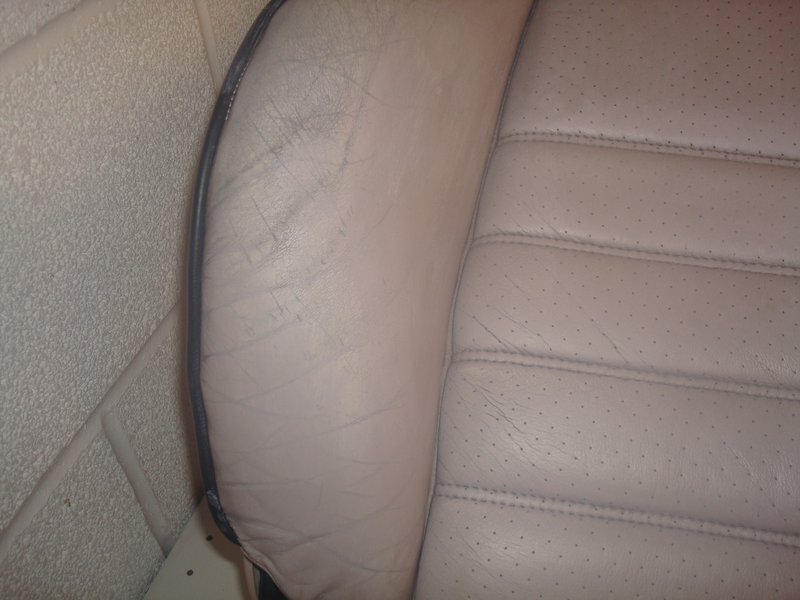
Then onto the front seats, same process, but they end up looking even worse due to the prior damage / cracks etc. I made myself an impromptu workbench using wheels and tyres and some old wardrobes sides I kept because I knew they would be helpful one day
Because there are so many tight bits to get into, Having the seat fully reclined and also tiled forwards was needed to get into everywhere I needed to. This then jogged my memory that the passenger side backrest tilt mechanism didn't work at all on one lever, and poorly on the other. I was hoping it wasn't a snapped cable, so went investigating.
First remove the hard plastic covers, which need painting anyway, you can see that the cable pulls a little cam to operate the release. If you look at the angle, you can see this pulls the cam up to operate the release.
On the other side, it was in totally the wrong place, and had no 'pull' left, and the cable seemed in good order
So removing the small circlip, I pull off the arm and it is on splines, so appears had slipped round
So I just repositioned, refitted the circlip and it works perfectly. Easiest fix ever!
I then removed the covers from the electric seat switches and then set about filling the damaged areas of leather, the black filler used on holes and white filler used on the cracks.
So I have left the filler to set overnight, and will sand off tomorrow then start the colouring process. The garage is a bit of a nightmare, with bits of interior everywhere, it just takes up so much room
93 964 C2
99 Boxster 2.5 > 2.7 hill climber
71 914/6 3.0 - gone
'You see Paul, hill climbing is like making love to a beautiful woman. You get your motor running, check your fluids, hang on tight and WHOA..30 seconds later it's all over!' Swiss Tony
99 Boxster 2.5 > 2.7 hill climber
71 914/6 3.0 - gone
'You see Paul, hill climbing is like making love to a beautiful woman. You get your motor running, check your fluids, hang on tight and WHOA..30 seconds later it's all over!' Swiss Tony
-
rhd racer
- DDK 1st, 2nd and 3rd for me!
- Posts: 2043
- Joined: Wed Jun 23, 2004 9:47 pm
- Location: Nottinghamshire
Re: 964 C2 - Rolling Resto
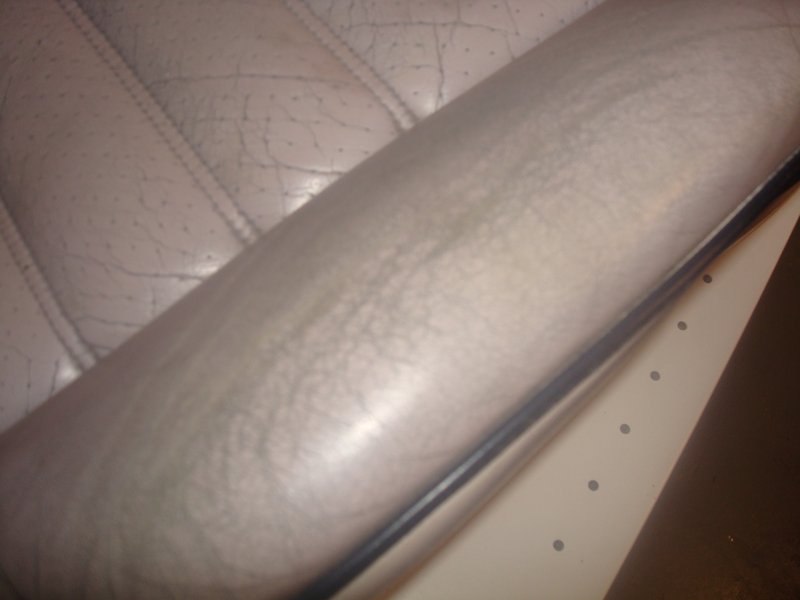
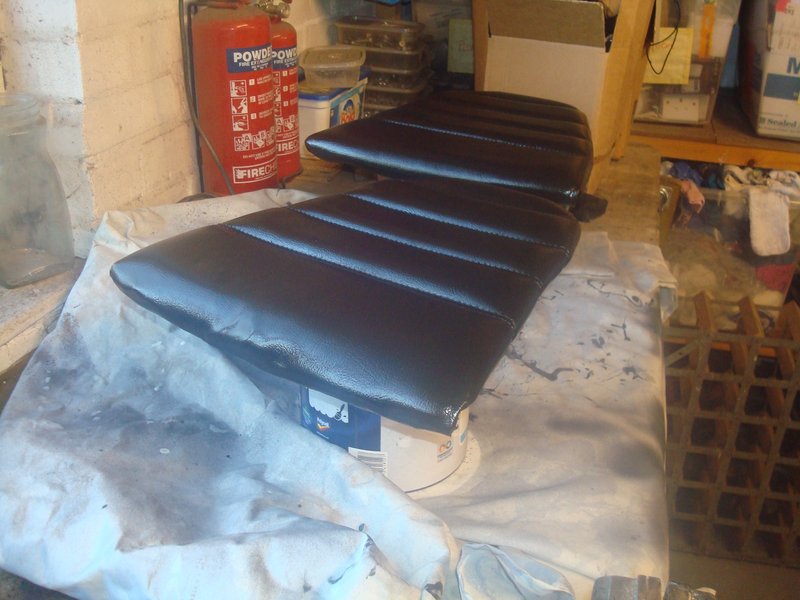
First up I sanded the tear in the rear seat pad, and started to get bad feelings about the filler. It is not that it doesn't work, it does, it just feels odd and takes loads of effort for little reward. It is kind of claggy, which I guess is so that it is flexible, but that makes it slow going...
To it's credit, it does what you need it to and these otherwise scrap covers will live to see another day. The only issue, as I was to find out later, is that a flat bit of filled leather uses the texture of the original. Obvious really, and I regretted skipping past the product designed to do just that when I placed several orders for top-ups on materials in the coming days. Never mind - it adds characher
I then masked up what I did not want to colour on the seats, on my makeshift worktable
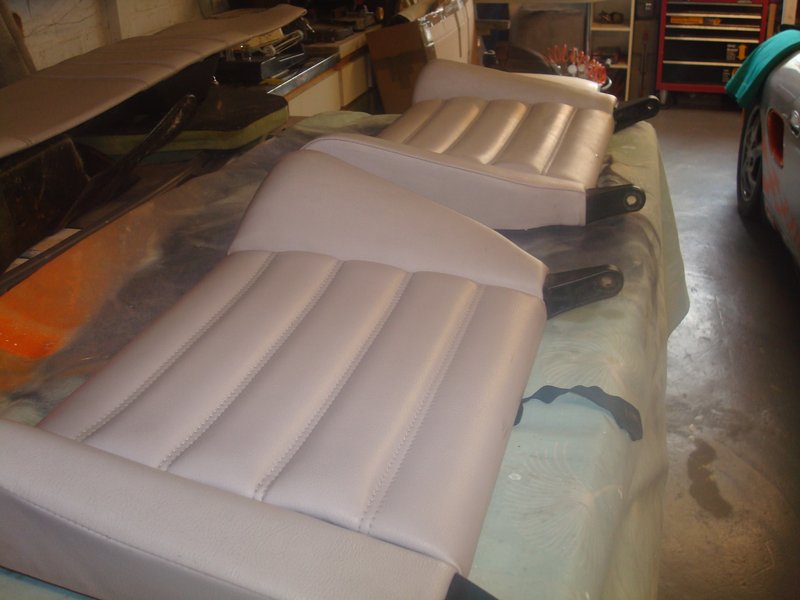
And set to the colouring

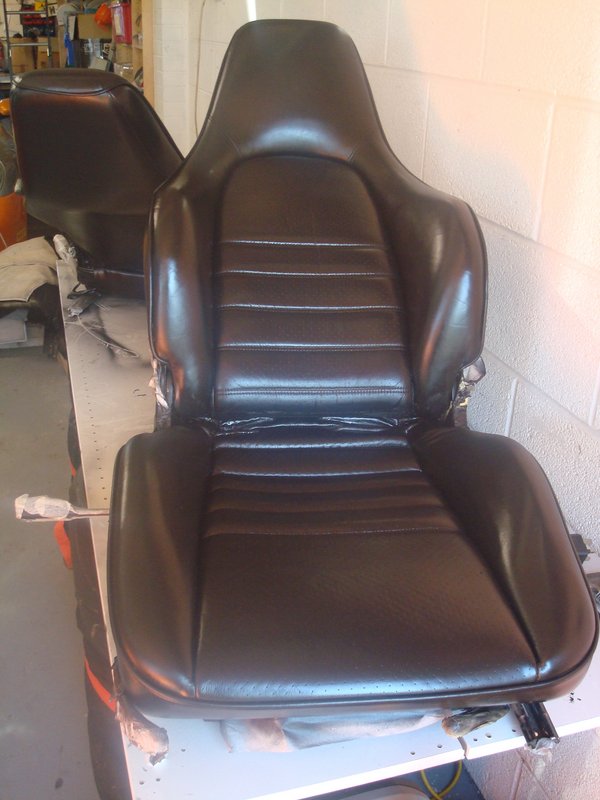
I took lots of care to get into every nook and cranny, using a fine brush if needed. I didn't want there to be any patches visible anywhere, and be a giveaway of their prior life!

Overall, I was very happy with how they turned out for now, but like all new skills I had some lessons coming....
I then painted the hinge mechanism covers with some direct to plastic satin paint, and gave the dash vent the same treatment, which should again give a decent contract against the flocked dash top
To it's credit, it does what you need it to and these otherwise scrap covers will live to see another day. The only issue, as I was to find out later, is that a flat bit of filled leather uses the texture of the original. Obvious really, and I regretted skipping past the product designed to do just that when I placed several orders for top-ups on materials in the coming days. Never mind - it adds characher
I then masked up what I did not want to colour on the seats, on my makeshift worktable
And set to the colouring
I took lots of care to get into every nook and cranny, using a fine brush if needed. I didn't want there to be any patches visible anywhere, and be a giveaway of their prior life!
Overall, I was very happy with how they turned out for now, but like all new skills I had some lessons coming....
I then painted the hinge mechanism covers with some direct to plastic satin paint, and gave the dash vent the same treatment, which should again give a decent contract against the flocked dash top
93 964 C2
99 Boxster 2.5 > 2.7 hill climber
71 914/6 3.0 - gone
'You see Paul, hill climbing is like making love to a beautiful woman. You get your motor running, check your fluids, hang on tight and WHOA..30 seconds later it's all over!' Swiss Tony
99 Boxster 2.5 > 2.7 hill climber
71 914/6 3.0 - gone
'You see Paul, hill climbing is like making love to a beautiful woman. You get your motor running, check your fluids, hang on tight and WHOA..30 seconds later it's all over!' Swiss Tony