Wot, not another '79 Targa resto thread

Ongoing and archived Porsche (and other marques) restoration threads from DDK members

Moderator: Bootsy

User avatar
PeterK
DDK rules my life!
Posts: 1069
Joined: Mon Sep 01, 2014 3:04 pm
Location: GU51 - Fleet, Hampshire, UK

Re: Wot, not another '79 Targa resto thread

Post by PeterK »

So …….
It’s not pretty, but not ordering new side seals just yet….
The roof now fits a whole lot better (further tweaking of the seal over the screen improved the fit again)
Image

The window is too far out and not high enough at the front, although it is just under the lip and in the groove of the seal at the rear
Image


Next step – take the door apart (again)
Image

And as a ‘while I was in there’, I added some rivnuts for the arm rests
Image

Bu$$er about for a while making adjustments and I ended the day with the front nicely against the seals, with no light visible through the gap, even with the torch behind
Image

The window slots into the groove in the seal when the door is closed
Image

And the rear edge is tight to the door seal
Image


From where I started, I’m mucho relieved. Clearly I need to do some cleaning up of the glue, but it’s now OK to drive. Well on the one side anyway, as I now need to do the near-side. I’ve surgically adjusted the NS side seal, ripped it off its backing and re-glued it as far back as it will go.

If I hadn’t bought the parts three or four years ago, I would have sent them back as totally not fit for purpose. As it is, I could either buy more and hope or try to bodge what I’ve got. For now I’ve gone with the latter and it seems to have paid off.


Having got the targa roof where I want it, I'll also remove (again) the targa bar and screen seals and tweak them a tad.
'79 Targa - restoration now mainly complete & being driven
viewtopic.php?f=28&t=59756
The Garage Bitch
DDK Fanatic
Posts: 56
Joined: Thu Feb 07, 2019 4:37 pm

Re: Wot, not another '79 Targa resto thread

Post by The Garage Bitch »

Well done mate

Sounds like a good TFFT day :lol:
User avatar
hot66
Moderator
Posts: 18264
Joined: Tue Nov 11, 2003 4:17 pm
Location: North Yorkshire

Re: Wot, not another '79 Targa resto thread

Post by hot66 »

Like that skid plate . Would it fit an early car with a low slung plastic tank ?
James

1973 911 2.4S
1993 964 C2
2010 987 Spyder
1973 MGB Roadster

Its not how fast you go, but how you go fast ;)
Gary71
Nurse, I think I need some assistance
Posts: 10275
Joined: Wed Mar 31, 2004 1:27 pm
Location: Cheshire
Contact:

Re: Wot, not another '79 Targa resto thread

Post by Gary71 »

Would have been quicker to convert it into a coupe….

That’s a whole load of work. Full credit to you for sticking with it!
User avatar
PeterK
DDK rules my life!
Posts: 1069
Joined: Mon Sep 01, 2014 3:04 pm
Location: GU51 - Fleet, Hampshire, UK

Re: Wot, not another '79 Targa resto thread

Post by PeterK »

hot66 wrote:Like that skid plate . Would it fit an early car with a low slung plastic tank ?
No idea, but can’t see why not.

It’s spaced off the front torsion mounts (20mm or so) and the two sets of mounting points used by the standard (pump) bash plate
'79 Targa - restoration now mainly complete & being driven
viewtopic.php?f=28&t=59756
User avatar
PeterK
DDK rules my life!
Posts: 1069
Joined: Mon Sep 01, 2014 3:04 pm
Location: GU51 - Fleet, Hampshire, UK

Re: Wot, not another '79 Targa resto thread

Post by PeterK »

Gary71 wrote:Would have been quicker to convert it into a coupe….
I know that SC targas are most desirable of all 911s, but it did cross my mind :lol:
'79 Targa - restoration now mainly complete & being driven
viewtopic.php?f=28&t=59756
User avatar
PeterK
DDK rules my life!
Posts: 1069
Joined: Mon Sep 01, 2014 3:04 pm
Location: GU51 - Fleet, Hampshire, UK

Re: Wot, not another '79 Targa resto thread

Post by PeterK »

Well, despite not intending to drive the car in the wet until I had fitted my wheel arch liners, I chose to.
My daily (BMW X1) had an advisory on its lower tension arms, so I parked the 911 outside and used my lift. Problem arose then I couldn’t split the ball joints. Having gone through the tap it gently, tap if harder, swear at it lots, I ended up having to use my Harvey Smith ball joint splitter bars. In the end if took a BFH and lots of ‘persuasion’ to split them, which of course didn’t end well for the ball joint rubbers. ECP had no stock but could get them in for the morning, so that was arranged. As the X1 wouldn’t drive very well with its front suspension hanging off, the 911 stayed out in the sleet and heavy rain.
Image
I did add a strip of tape to the gap above the window on the NS, where I had still to ‘play’.
Image


Next day it was still raining hard and the decision was to take SWMBO’s F-type of the 911. No decision really, so off we set in the 911. The front screen soon misted up, so on went the front screen heater. Or rather, on went the switch, the rear screen cleared (mostly, well the screen is over 40 year old) but the front did nothing. That was a simple fix when I got home – (most likely while refitting the petrol tank) I had ripped a wire out of the relays. With the autoheat set on maximum defrost, the heat soon built up in the car. I reset the autoheat to mid-range but the heat continued to build up in the car. If I select no heat on the autohreat, the controller motors to turn heat off, but at any other setting, I only get full heat - it does get plenty hot too. Need to check my Peter-built sensors. I have an autoheat from a turbo (I have it advertised on ebay, but luckily not sold yet), so if I suspect the sensors to be good, I can try that. The electrical connections are different, but I’m sure we can work something out.


Another issuette is the exhaust, well the drone in the running-in rev range. I may try capping off one outlets on my 2-in, 2-out Dansk st/st box. Anyone know of an off the shelf item or do I need to make my own ?


I still have my little oil seepage, which I suspect is from the hard oil line that enters the block on the NS. I’ll give it a nip up, but while nipping it up is simple, it does require me to drop the NS h/ex off. I’ve bought a set of 12mm flanged copper coated nuts to replace my 13mm versions, so I might even be able to use the special SSI exhaust nut tool when I refit it.

Other than that, the car behaved very well. I did about 4 stops in my 25 mile jaunt, with a short bit of motorway driving, some A-roads and a lot of town traffic, and the car started, drove and stopped fine. Sitting in the inside lane of the motorway with a truck passing you is a new experience, but 3k revs was my limit and I was a good boy (first time for everything). I know it was 25 miles, as my speedo odometer is working now, following my replacement of the cheese cog. Oh, and the really good news is that it all stayed dry inside - is this a first for a targa ?


So, ages later, with a lot of grief but we now have a roof that is not 100% right, but bearable.

I ended up dripping the rubber off the NS side seal twice, eventually having it reglued about ¼” further back than as delivered.
Image

I removed the rear seal to ensure that the targa top was set as far back as possible while I tweaked the front. I managed to rip the holding down latch out of the windscreen surround (where it latches to). A small amount of emergency welding and the latch now holds again.

Lots of playing with the positioning of the door window frame (a tiny bit up and maximum leaning inwards) got it looking better. I did have a bit of a mental leakage while trying to adjust the front of the window up while needing the rear of the window to go down. No amount of playing with the window lift mechanism would fix the last bit - until I remembered that I had removed the rear targa seal and so the rear of the targa roof was actually sitting about 5mm lower than ’normal’. Adding rear targa seal back got me to an acceptable place.

I reglued the front and rear targa seals, locked on the roof and walked away to let the glue dry - hopefully the seals will be in the right place,


The outer corners of the targa roof are slightly proud, maybe due to the age of the targa frame and looseness in the linkage. Both outer corners flex upwards, noticeably, when the roof is latched down, but I need to look at another to see whether ‘they all do that, Sir’.

Everything looks like it will be (broadly) water-tight, but if I get too much noise when driving, I can a) bend down the front edge of the aluminium and/or b) shave some off the front targa seal. It’s from Don Petchell (Cars Inc) and should be right, but shaving would let the targa roof sit lower, with less pressure from the seals forcing the roof upwards. I half expect to do the latter as it not sitting right at the edges will probably start bugging me.
'79 Targa - restoration now mainly complete & being driven
viewtopic.php?f=28&t=59756
User avatar
PeterK
DDK rules my life!
Posts: 1069
Joined: Mon Sep 01, 2014 3:04 pm
Location: GU51 - Fleet, Hampshire, UK

Re: Wot, not another '79 Targa resto thread

Post by PeterK »

I had a jaunt over to ChrisT from IB to play with his non-starting 3.4, about 65 miles in total. It was very frosty, the fog was thick, but the 911 is supposed to be used, so off we went, and that's now about 100 of my 500 running in stage 1 completed.
I still have all or no heat, so more investigation needed. I checked the sensors (in-car and in the NS flapper box) and both are giving broadly similar readings to each other (and the other 5 I have in a packet). I aimed a hot air gun at the in-car sensor and the autoheat moved the control lever as expected, so next steps are to try to adjust the autoheat (IIRC there is an internal adjustment potentiometer) and if that doesn’t work, then I’ll need to try changing the sensor resistance.


In other news, Chris offered me a pair of motorcycle baffles that he had previously used on track days. They’re not capping off a pipe exit, but worth a try to see if they impact (reduce) the 2-3k drone. They were quickly fitted when I returned, but I’ve not started the car since, so no idea what, if any, impact they have had.

I also aligned the screen washer jets – they were about as much use as a chocolate teapot on the drive over to Chris’s


Oil leak time.
I have had oil (only a tiny amount, but enough to make a mess) dripping from the rear of my engine. I cleaned it up, hoping that I had just spilled oil while filling (you’ve got to love a good straw clutch), but of course not. It appeared to be coming from the hard oil pipe that enters the lower engine block on the NS. I needed to drop the h/ex to properly get a spanner on the union, but I managed a smidge of a turn without dismantling anything. I also noticed that there was a small pool of oil behind the pressure sender
Image
So I replaced the crush washers on the adapter block. The sender itself appeared dry.

I cleaned up any evidence of the oil leak again, trundled over to Chris’s and on my return the good news is, no oil on the hard pipe. The not so good news is that the pool of oil by the pressure sender is back, as is a puddle of oil under the fan. It looks like this overflows, runs down the rear of the engine and collects right at the back of the engine block seam. I can find no evidence that oil is coming down the sides of the engine, or from the block join/seam backwards.

So, what’s happening behind the fan & alternator - time to remove the alternator. I fitted it while the engine was on the stand, not in the car and having undone the fan strap, the alternator wouldn’t come out without further dismantling. A quick Google indicates that you simply remove the ‘3’ nuts securing the fan air baffle / shroud / thingy, disconnect the electrical cables and Bob’s your mother’s live-in lover. Ha Ha. Mine has 6 nuts and they aren’t the easiest to get at, but I did.
Image

Image
You can see the pool of oil just under where the fan sat, just by the plug in the end of the oil gallery. This plug had been JB Welded, but showed evidence of what could be a crack on the lower right corner (of the circle !).

While undoing the fan strap, I saw this
Image

So, has the fan strap failed and allowed the fan to fret the JB Weld, did I cock up when replacing it, or is this just a red herring and the oil leak is from elsewhere.

No point in guessing, so I welded up the fan strap, removed the old JB Weld and added a new dollop. That’s drying now, so the plan is to run the engine tomorrow and look for evidence of leakages, before I refit the alternator and fan.
'79 Targa - restoration now mainly complete & being driven
viewtopic.php?f=28&t=59756
User avatar
PeterK
DDK rules my life!
Posts: 1069
Joined: Mon Sep 01, 2014 3:04 pm
Location: GU51 - Fleet, Hampshire, UK

Re: Wot, not another '79 Targa resto thread

Post by PeterK »

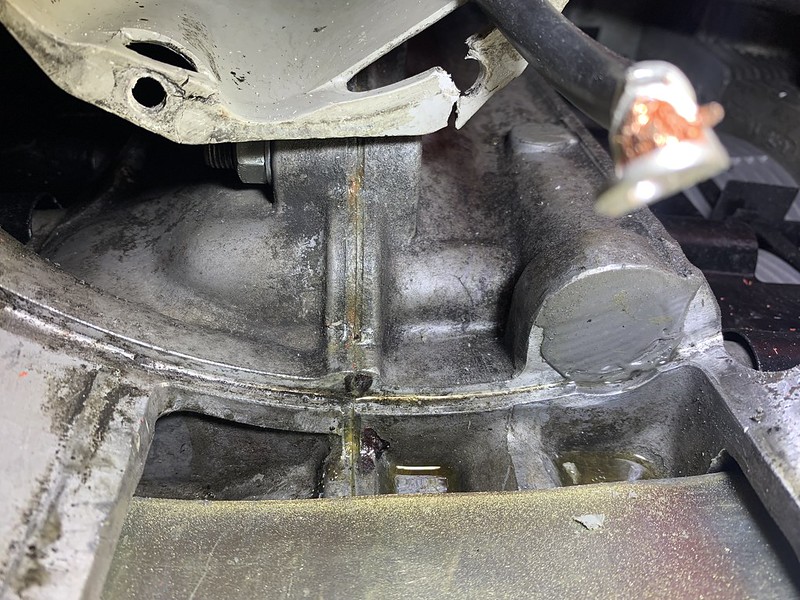
JB Weld hard, strap welded up and time to run the engine. No leaks evident, so I refitted the alternator and fan. Ran engine again, still no evidence of leaks, but will keep an eye on things after my next run out.


Autoheat.
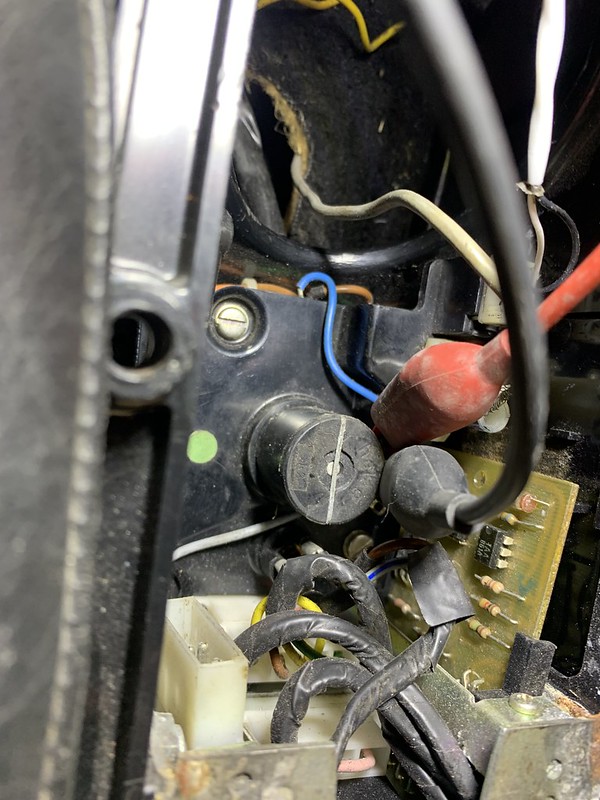
I pulled the controller unit out and my first check was the potentiometer that sits under the temperature setting/control knob
Image

The factory setting (with knob set to position 5 of 9) is 950ohms. Mine was 2.5k, so maybe a tad out. With the knob pulled off, you can adjust the default setting but it was soon fairly evident that all was not well with my pot. I set it to 950, but if I turned the knob fully on then off, when it went back to setting 5, it was nowhere near 950. The range from max to min should be something like 50-2.2k, but I saw ranges from 100-300 and 1.5-2.2, all totally not repeatable. Time to strip the unit down.

The knob pulls off, the stepper motor assembly is retained by 4 cross-head bolts
Image
And the selector assembly by 3 cross-headed self-tapping screws.

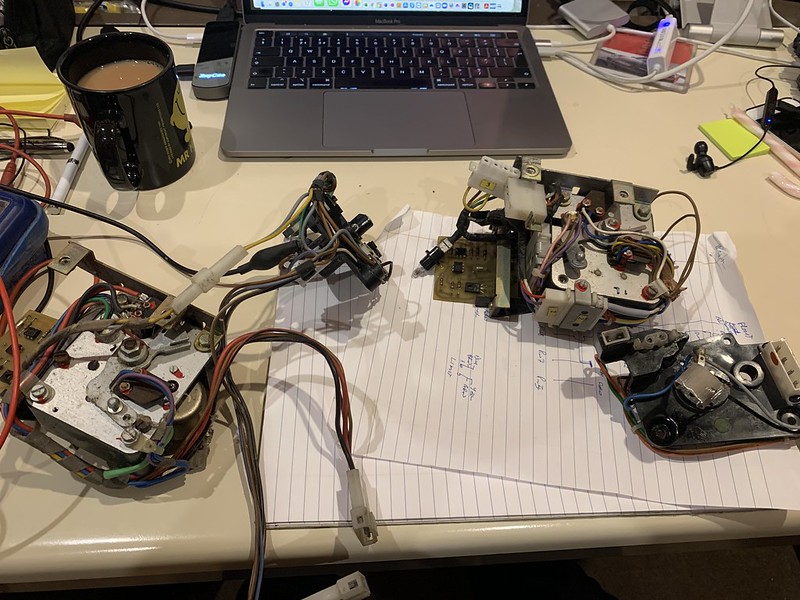
When apart it looks a bit like this
Image


I spent quite a while trying to work out how it all works, with multiple limit switches on both the selector and the stepper assemblies. I also had the benefit (or not) of a later model turbo version, from a car with footwell blowers. That is of course, completely different in how it is wired up, what connectors it has and how many limit switches it uses. The PCBs are identical (part number). The autoheat unit is not included in the Bentley SC manual wiring diagrams and the 3.2 Bentley makes no sense compared to what I had in my hand.
Image


However, at the end of the day, it is really quite simple
A limit switch is built into the in-car sensor circuit. If the selector is set to off, then the circuit is short-circuited, the circuit has no resistance and the stepper motor goes to the stop. Otherwise, the resistance of the NTC thermistor / sensor is added to the resistance of the potentiometer under the selector and the controller decides what position it wants the stepper motor to be in.
The other limit switch on the rotary selector knob (defrost position) makes the sensor circuit go open circuit, and the stepper motor goes to full heat. That explains why if you have a sensor fail open circuit, the autoheat goes to maximum.


As the two units were so different, I decided just to swap the potentiometer from the turbo to the SC autoheat. Having completely destroyed the SC pot, without managing to get it out, we went to Plan B - change the connectors on the turbo box and use that.

Unfortunately, the stepper motor didn’t work, no matter what power I connected. It was sold to me years ago as ‘untested’ by the IBer, but was allegedly working when he bought it. So on to Plan C – use the controller from the turbo with the stepper from the SC.
Image


There are limit switches on the stepper motor assembly, and one controls the engine fan – when the stepper motor is at its ‘off’ stop, the fan circuit is not completed, whereas for any other position, the circuit is made.
Image

All my limit switches worked, except this one. I started disassembling it to replace it with one from the turbo, but in the end and good bit of attention with some fine sandpaper got it working again.


Then it was simply a case of reassembly, starting with an empty case
Image

Add the controller knob ‘scale’
Image

Refit the selector assembly – 3 screws
Image

Add in the stepper motor assembly, not forgetting to make the necessary wiring connections
Image

Attach the control rod (which also needed adjustment to bring it back to factory spec length), give it a quick bench test and it's ready for refitting to the car.
Image


Once refitted, when I select Off, the heating lever moves all the way down. When I select Defrost, the lever is pulled all the way up. When I select a mid-position the lever stays on full heat, until I blow some warm air over the in-car sensor, when the lever moves to a mid-position.

Obvs I’ll need to test properly by driving it and playing with settings and check that it does what I expect, but for now, it looks like a good job, jobbed.


If anyone has some old autoheat parts that thye don't want or need, I'd love to play further with my 'spare' parts
'79 Targa - restoration now mainly complete & being driven
viewtopic.php?f=28&t=59756
deano
I luv DDK!
Posts: 755
Joined: Wed Jul 22, 2020 11:34 am

Re: Wot, not another '79 Targa resto thread

Post by deano »

PeterK wrote: bend down the front edge of the aluminium and/or b) shave some off the front targa seal. It’s from Don Petchell (Cars Inc) and should be right, but shaving would let the targa roof sit lower, with less pressure from the seals forcing the roof upwards. I half expect to do the latter as it not sitting right at the edges will probably start bugging me.
Just caught up on your excellent thread. I managed to get the front corners down on my roof purely with some stretching (pulled the seal down at the sides, and adjustment of the rubber - mine wasn't pushed/seated all the way into the frame. Unfortunately, that was after I tried unsuccessfully to bend the aluminium and instead sheared the rather brittle adjacent frame tab that the corner rivet holds on to :(

I'm assuming that the door frame isn't holding that corner up :wink:

all the best!
Dean
1973T Targa MFI 334 met blu- under restoration https://www.ddk-online.com/phpBB2/viewt ... 28&t=67060
1980 924 Turbo, blu/grn tartan - restored
User avatar
PeterK
DDK rules my life!
Posts: 1069
Joined: Mon Sep 01, 2014 3:04 pm
Location: GU51 - Fleet, Hampshire, UK

Re: Wot, not another '79 Targa resto thread

Post by PeterK »

Hi Dean
Mine is (I think) caused by the pressure between the over-screen seal at the corners and the front edges of the side seals. I leave it to settle for a few days, then I’ll try trimming the (underside of the) over-screen seal.
'79 Targa - restoration now mainly complete & being driven
viewtopic.php?f=28&t=59756
User avatar
PeterK
DDK rules my life!
Posts: 1069
Joined: Mon Sep 01, 2014 3:04 pm
Location: GU51 - Fleet, Hampshire, UK

Re: Wot, not another '79 Targa resto thread

Post by PeterK »

Lots of bitty updates
My car lift is sorted ! Before I went hacking into the or tried moving sensors, I rang Automotech. After a week of ‘I’ll get a techie to ring you’, I managed to call and a techie answered, rather than an intermediary. He requested a photo of the main control panel wiring and within the hour the techies had identified 2 wires in the wrong terminals of a contactor. They were somewhat embarrassed about their error, but I swapped them over, and all now sorted. The logic is that the lift is lowered from full height to about 450mm off the floor by the DOWN button. Pressing the YELLOW button then lowers the lift the rest of the way, whilst making beepy beepy warning noises. When this yellow button is pressed, the level sensor is bypassed for the final lowering (although not if they wire it into the wrong terminals).


Good news about the autoheat – it all appears to be working fine now (setting 4 or 5 is about the right temperature). Following my test drive, the oil leak also appears to have been sorted.


I’ve added some mesh and a strengthening bar under the whale, although I will go back and add supporting webs under the middle of the mesh, as it is a bit baggy there. That is unless someone has a proper set of mesh and strengthening bars, pretty please. I’ve ordered a new pair of rear struts, as the whale is just a bit too heavy for the original pair. Ask my head how I know that !.


I’ve had another go at pulling the rubber strip off the NS targa side seal and re-gluing. The OS sits almost correctly now, but the NS seal was still holding the roof up too high, so one more go around.


I realised that I had attached the rear ARB with the bolts the wrong way around when they were the lowest point when using the car lift. Normally bolts feed from underneath into captive nuts. My captive nuts went walkabout when removing them yonks ago, so now I just use nuts and bolts. So a quick job to remove and reinsert the other way around.


I now need to book the car into my local MOT station. I want to more accurately set up the fuelling with their exhaust analyser, adjust the handbrake on their brake tester, set headlamp alignment on their beam analyser and while I’m there, finesse my front tracking. Although it doesn’t need one, I’ll also arrange an MOT sometime soon, just to get another pair of eyes to do a safety check for me.


Really need to find some excuses to just get out and drive it now.
'79 Targa - restoration now mainly complete & being driven
viewtopic.php?f=28&t=59756
The Garage Bitch
DDK Fanatic
Posts: 56
Joined: Thu Feb 07, 2019 4:37 pm

Re: Wot, not another '79 Targa resto thread

Post by The Garage Bitch »

Yaaaaaaay

They might be "bitty" but they're good :)
User avatar
PeterK
DDK rules my life!
Posts: 1069
Joined: Mon Sep 01, 2014 3:04 pm
Location: GU51 - Fleet, Hampshire, UK

Re: Wot, not another '79 Targa resto thread

Post by PeterK »

Oh, and the motorbike muffler inserts seem to have taken the edge of the noise level and the boom is no longer noticeable (or I’ve already gone deaf)
'79 Targa - restoration now mainly complete & being driven
viewtopic.php?f=28&t=59756
User avatar
jb
DDK 1st, 2nd and 3rd for me!
Posts: 2352
Joined: Thu Jul 13, 2006 10:34 pm
Location: London

Re: Wot, not another '79 Targa resto thread

Post by jb »

You do some amazing work Peter
re: the targa roof I have probably mentioned before but I chopped the front part of my side seals off to make them fit lower at the front which works well - you are welcome to look sometime

also how did you manage this as I cannot see how - short of a hammer and screwdriver butchers approach.
PeterK wrote: Oil leak time.
...
It appeared to be coming from the hard oil pipe that enters the lower engine block on the NS. I needed to drop the h/ex to properly get a spanner on the union, but I managed a smidge of a turn without dismantling anything.
#1370
Post Reply