

https://www.ebay.co.uk/itm/256072645579
Wot, not another '79 Targa resto thread
Moderator: Bootsy
Re: Wot, not another '79 Targa resto thread
Waved this Merak idea past my wife, who wasn't too impressed, so its a no then... 
https://www.ebay.co.uk/itm/256072645579
https://www.ebay.co.uk/itm/256072645579
Dean
1973T Targa MFI 334 met blu- under restoration https://www.ddk-online.com/phpBB2/viewt ... 28&t=67060
1980 924 Turbo, blu/grn tartan - restored
1973T Targa MFI 334 met blu- under restoration https://www.ddk-online.com/phpBB2/viewt ... 28&t=67060
1980 924 Turbo, blu/grn tartan - restored
-
PeterK

- DDK rules my life!
- Posts: 1069
- Joined: Mon Sep 01, 2014 3:04 pm
- Location: GU51 - Fleet, Hampshire, UK
Re: Wot, not another '79 Targa resto thread
Sometime forgiveness is easier than permission (providing you’re still alive to seek forgiveness).
That said, when I bought my Lotus, SWMBO didn’t speak to me for about 6 months
That said, when I bought my Lotus, SWMBO didn’t speak to me for about 6 months
'79 Targa - restoration now mainly complete & being driven
viewtopic.php?f=28&t=59756
viewtopic.php?f=28&t=59756
-
PeterK
- DDK rules my life!
- Posts: 1069
- Joined: Mon Sep 01, 2014 3:04 pm
- Location: GU51 - Fleet, Hampshire, UK
Re: Wot, not another '79 Targa resto thread
Last minute change of plan – I went to the Basingstoke Festival of Transport instead of Beaulieu. A few aircooled Veedubs & vans, but no aircooled Porsches. Well, except for mine in the ‘visitors’ carpark.
What did I learn on this little jaunt
1 – the heaters are staying partially on. Simple on the road solution was to turn the aircon on.
2 – it’s fun with the targa top off
3 – a 4 litre BMW X5 may like to charge up by the side of me at the roundabout and rev his engine, but once we were clear to go, he was left in my wake
So, once home, up on the lift for a quick looksee. The NS heater box was not fully opening. It would open if given a poke, but after cycling the autoheat to hot and back to cold, it stayed slightly closed. Plenty of lube (oh er missus) and still the same. I tried adjusting the cable a bit more but the end snapped off, so I left the heater box in the open / off position and ordered a new cable from Matthew (Type911).
That cable came this morning, so as SWMBO was going out, plans were made.
Plan was to start by removing the cables from the heater boxes, so up on the ramp. Well the original plan was to undo the nuts and just pull the cables out, but although the nuts undid easily, the cables were a bit bent and liked it where they were. A pair of side cut pliers and they soon lost the argument.

Car back on the ground and remove the 4 bolts retaining the autoheat

Off with the rubber boot

And the side panel for access to the connecting rod

Disconnect the various electrical plugs

It had all been going so well …

Top tip – when you unpin the connector, don’t drop the pin down here (especially as it is not magnetic)

Wire reattached to pin and slotted back into the connector

Back on track and undo this small set screw to release the old cable (sorry, the phone was too close to focus properly and if I moved further away, the screw was hidden)

Equally impossible for focus on, were the two tubes that lead the cables towards the flapper boxes

So, having pulled the old cable out, I fed the new cable ends down the tubes and secured the end to the red lever.
More top tips – don’t (repeatedly) drop the small set screw when trying to attach the new cable. I probably should have removed the seat, but I knew better. Haha. At least the set screw and washer were magnetic.
I found it better to pull off the short flexible outer sleeves that run from the rear bulkhead to the flapper boxes when feeding the cables down and through the tubes inside the tunnel. That allowed me to wriggle the flexible outers onto the inners – the inners were originally getting held up passing through the ferrules at each end of the flexibles.
Then it was a case of reattaching everything inside the car, raise it and back underneath. I cycled the autoheat to full heat, then attached the cables to the flapper boxes with them set to closed (heat mode). I then cycled the autoheat to cold and thankfully, the flapper boxes were spot in the middle of the open (no heat mode).
What did I learn on this little jaunt
1 – the heaters are staying partially on. Simple on the road solution was to turn the aircon on.
2 – it’s fun with the targa top off
3 – a 4 litre BMW X5 may like to charge up by the side of me at the roundabout and rev his engine, but once we were clear to go, he was left in my wake
So, once home, up on the lift for a quick looksee. The NS heater box was not fully opening. It would open if given a poke, but after cycling the autoheat to hot and back to cold, it stayed slightly closed. Plenty of lube (oh er missus) and still the same. I tried adjusting the cable a bit more but the end snapped off, so I left the heater box in the open / off position and ordered a new cable from Matthew (Type911).
That cable came this morning, so as SWMBO was going out, plans were made.
Plan was to start by removing the cables from the heater boxes, so up on the ramp. Well the original plan was to undo the nuts and just pull the cables out, but although the nuts undid easily, the cables were a bit bent and liked it where they were. A pair of side cut pliers and they soon lost the argument.
Car back on the ground and remove the 4 bolts retaining the autoheat
Off with the rubber boot
And the side panel for access to the connecting rod
Disconnect the various electrical plugs
It had all been going so well …
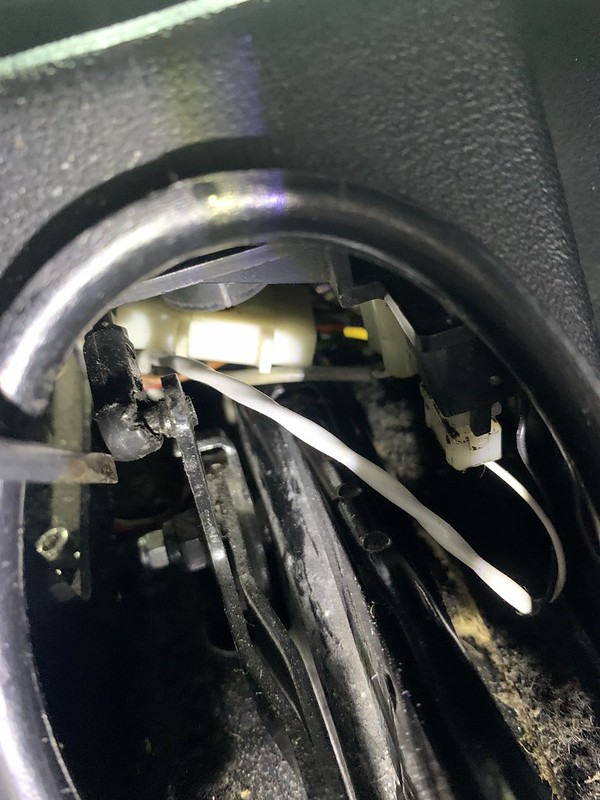
Top tip – when you unpin the connector, don’t drop the pin down here (especially as it is not magnetic)
Wire reattached to pin and slotted back into the connector
Back on track and undo this small set screw to release the old cable (sorry, the phone was too close to focus properly and if I moved further away, the screw was hidden)
Equally impossible for focus on, were the two tubes that lead the cables towards the flapper boxes
So, having pulled the old cable out, I fed the new cable ends down the tubes and secured the end to the red lever.
More top tips – don’t (repeatedly) drop the small set screw when trying to attach the new cable. I probably should have removed the seat, but I knew better. Haha. At least the set screw and washer were magnetic.
I found it better to pull off the short flexible outer sleeves that run from the rear bulkhead to the flapper boxes when feeding the cables down and through the tubes inside the tunnel. That allowed me to wriggle the flexible outers onto the inners – the inners were originally getting held up passing through the ferrules at each end of the flexibles.
Then it was a case of reattaching everything inside the car, raise it and back underneath. I cycled the autoheat to full heat, then attached the cables to the flapper boxes with them set to closed (heat mode). I then cycled the autoheat to cold and thankfully, the flapper boxes were spot in the middle of the open (no heat mode).
'79 Targa - restoration now mainly complete & being driven
viewtopic.php?f=28&t=59756
viewtopic.php?f=28&t=59756
-
PeterK
- DDK rules my life!
- Posts: 1069
- Joined: Mon Sep 01, 2014 3:04 pm
- Location: GU51 - Fleet, Hampshire, UK
Re: Wot, not another '79 Targa resto thread
It’s been a while. Loads of sailing maybe, but also actually driving the SC. There are a few things that I want to do, like change the oil and repair a slight front spoiler doorstep interface issue, but job 1 is to replace the starter solenoid.
On the odd occasion the starter just doesn’t engage, nada, nothing. If I try a couple of times, then it will spin and the car always starts, so hopefully, it is just the solenoid.
I purchased a replacement solenoid from AES. The good news is a keen price, the less good news is that having confirmed my order they quoted a 2-day despatch (or otherwise they would let me know). After a week I emailed for an update yet got no response. A week later I was advised that it had shipped. So here we are, a month later, and I have actually got my act together and it’s finally time to fit it.
Step 1, remove the starter. Step 1a, disconnect battery (usefully I had fitted a battery cut out during the main resto). I have the luxury of a mid-height lift, but it was still a challenge. The lower barrel nut was easy, the top one less so. I found kneeling under the car, with the rachet and extension on the right side of the transmission and my left hand looped over the top of the transmission to locate and steady it was least problematic.
Having disconnected the main battery cable and the yellow ’start’ cable, forgetting to remove the alternator cable made the starter reluctant to come out. However, having rectified that small error, out it came.
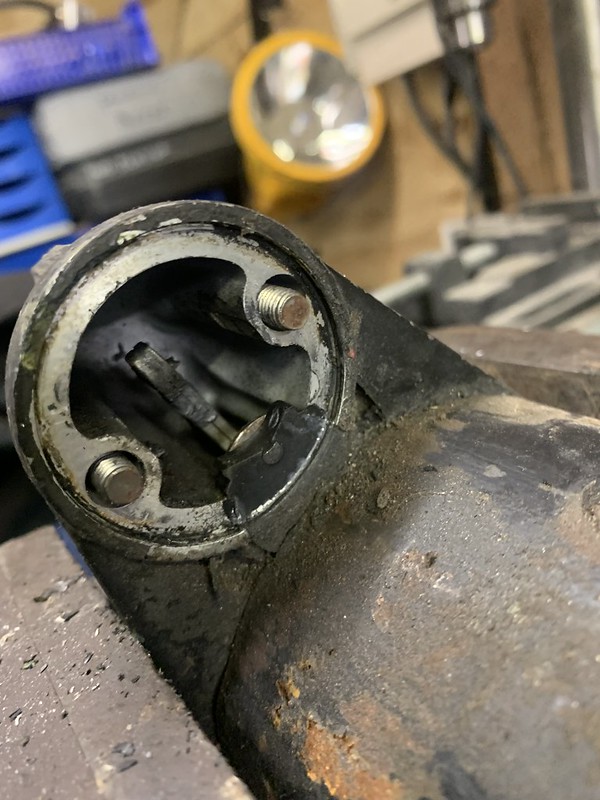
Starter into vice (gently)

Remove starter earth

Then remove the two retaining machine screws

I used a screwdriver bit from my impact driver on a ratchet to get started, but they came out easily enough
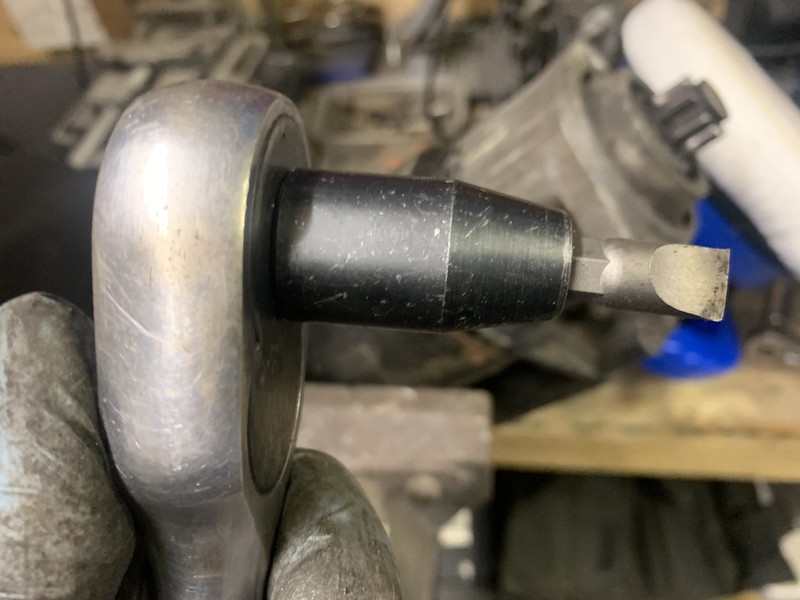
Maybe I should have done this a bit earlier, but I compared the solenoids before finally removing the old one.

There’s a lever/arm thingy that the end of the solenoid has to slip over
Then reassembly is fairly straightforward

Refit to car, reconnect the battery, reset the clock (mine still works) and turn the key. Instant spinning of the starter, followed by the engine starting (which I hadn’t intended as I’m not driving it for a couple of days).
I don't have any cake (unlike some others), but time for a cuppa methinks
On the odd occasion the starter just doesn’t engage, nada, nothing. If I try a couple of times, then it will spin and the car always starts, so hopefully, it is just the solenoid.
I purchased a replacement solenoid from AES. The good news is a keen price, the less good news is that having confirmed my order they quoted a 2-day despatch (or otherwise they would let me know). After a week I emailed for an update yet got no response. A week later I was advised that it had shipped. So here we are, a month later, and I have actually got my act together and it’s finally time to fit it.
Step 1, remove the starter. Step 1a, disconnect battery (usefully I had fitted a battery cut out during the main resto). I have the luxury of a mid-height lift, but it was still a challenge. The lower barrel nut was easy, the top one less so. I found kneeling under the car, with the rachet and extension on the right side of the transmission and my left hand looped over the top of the transmission to locate and steady it was least problematic.
Having disconnected the main battery cable and the yellow ’start’ cable, forgetting to remove the alternator cable made the starter reluctant to come out. However, having rectified that small error, out it came.
Starter into vice (gently)
Remove starter earth
Then remove the two retaining machine screws
I used a screwdriver bit from my impact driver on a ratchet to get started, but they came out easily enough
Maybe I should have done this a bit earlier, but I compared the solenoids before finally removing the old one.
There’s a lever/arm thingy that the end of the solenoid has to slip over
Then reassembly is fairly straightforward
Refit to car, reconnect the battery, reset the clock (mine still works) and turn the key. Instant spinning of the starter, followed by the engine starting (which I hadn’t intended as I’m not driving it for a couple of days).
I don't have any cake (unlike some others), but time for a cuppa methinks
'79 Targa - restoration now mainly complete & being driven
viewtopic.php?f=28&t=59756
viewtopic.php?f=28&t=59756