

Project Blue Book
Moderators: drummerboytom, MdR

Re: Project Blue Book
Result looks great 
James
1973 911 2.4S
1993 964 C2
2010 987 Spyder
1973 MGB Roadster
Its not how fast you go, but how you go fast
1973 911 2.4S
1993 964 C2
2010 987 Spyder
1973 MGB Roadster
Its not how fast you go, but how you go fast
-
Bootsy
- Site admin and the Boss
- Posts: 23940
- Joined: Sat Nov 08, 2003 6:09 pm
- Location: Norwich
- Contact:
Re: Project Blue Book
Agreed, quality work
1972 911T | 1994 993 Carrera | 1999 986 Boxster | 1990 T25 Camper
Vintage Heuer, Omega, Zenith and other vintage watches - http://www.heuerheritage.co.uk
Vintage Heuer, Omega, Zenith and other vintage watches - http://www.heuerheritage.co.uk
Re: Project Blue Book
Thank you fellas 
I couldn't find a decent description anywhere on-line so thought I would get something down for others to use.
Soooooo stressful. Worrying about how it would turn out, did I use enough glue or too much. However I think it came out about right. The wide rubber roller helped and I had a really narrow one for the folded edges.
In reflection I think the key is the masking and pre prep cleaning. Using the tack rag on both surfaces just gave me the confidence to know there wouldn't be any lumps!
h'Project Blue Book' - 'The Red Baron' - Amber Alert!
-
Nine One One
- Put a fork in me, I'm done!
- Posts: 1647
- Joined: Fri Mar 01, 2013 11:45 am
- Location: Kernow - good old Cornwall
Re: Project Blue Book
When I was looking something up to help young Mr Bardsley with his sail trim connectors I did come across this, not as detailed as yours though.
http://www.914world.com/specs/sail_panel_install.php
http://www.914world.com/specs/sail_panel_install.php
-
KS

- Nurse, I think I need some assistance
- Posts: 14956
- Joined: Fri May 07, 2004 3:12 pm
- Location: Cornwall
Re: Project Blue Book
Blimey! I've just caught up with this. Amazing work – I think I'll keep my 914 tucked out of sight in future! 
Well done sir!
Well done sir!
Re: Project Blue Book
Really impressed by the fuel lines, they look like stainless steel and Army Navy standard fittings. I really struggle to know what AN6 fitting works with 3/8 or 10mm whole thing just impossible to understand. Countless Mr Google searches and still cant work out what I need to do for either hard lines or flex lines, so much respect. How to's very useful, if you have anymore that would be great.
1963 Karmann Ghia
1959 356A Coupe Outlaw
1957 3.2 Speedster replica
1959 356A Coupe Outlaw
1957 3.2 Speedster replica
-
Gary71
- Nurse, I think I need some assistance
- Posts: 10294
- Joined: Wed Mar 31, 2004 1:27 pm
- Location: Cheshire
- Contact:
Project Blue Book
Lovely work on the trim
Do it once, do it right
Do it once, do it right
Re: Project Blue Book
Totally agreegreg356a wrote:Really impressed by the fuel lines, they look like stainless steel and Army Navy standard fittings. I really struggle to know what AN6 fitting works with 3/8 or 10mm whole thing just impossible to understand. Countless Mr Google searches and still cant work out what I need to do for either hard lines or flex lines, so much respect. How to's very useful, if you have anymore that would be great.
AN-6 and AN-8 is the closest to 8 and 10mm.
Well worth the effort but it does take some thinking through. A few wrong ordered fitting and your wallet knows all about it!
h'Project Blue Book' - 'The Red Baron' - Amber Alert!
Re: Project Blue Book
Thank you all for the kind words. They are honestly appreciated. Spending hours alone in the garage can sometimes get you wandering……
h'Project Blue Book' - 'The Red Baron' - Amber Alert!
Re: Project Blue Book
Right oh, time for the engine lid to be sorted out along with the 'Ears' each side of it. These notoriously fitted 'Poorly' from the factory. I have tried my best, but still just a little 'Adjustment' needed :o
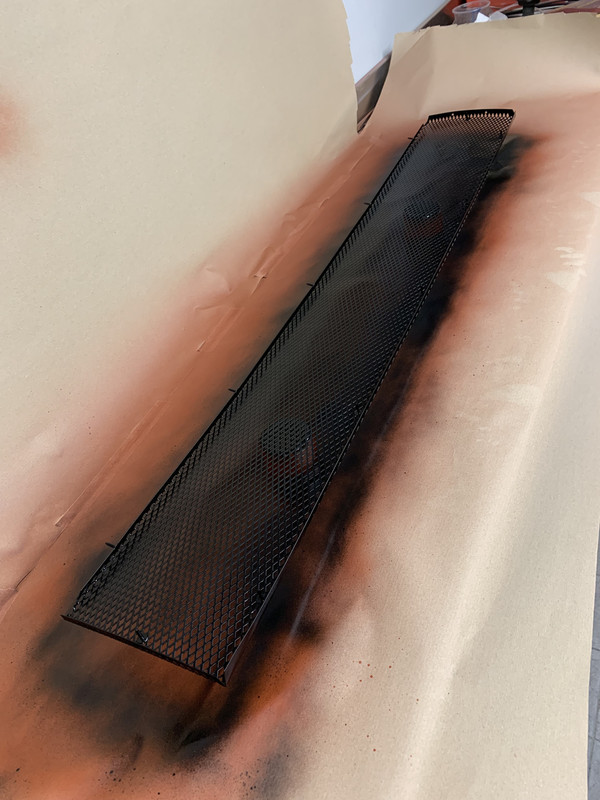
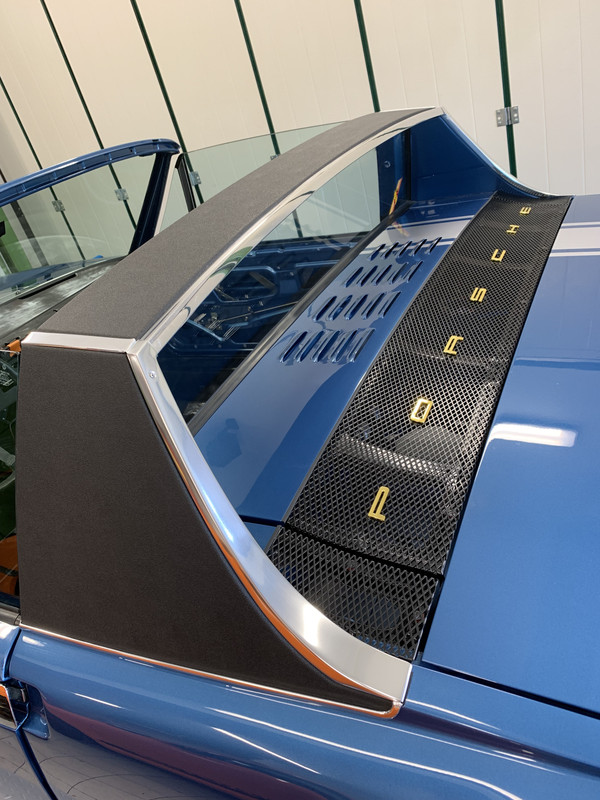
A clean up and a flash of satin black. The factory finish was duller but this is my choice. I think in truth that the 'Purists' have long turned their collective backs on this ST build....
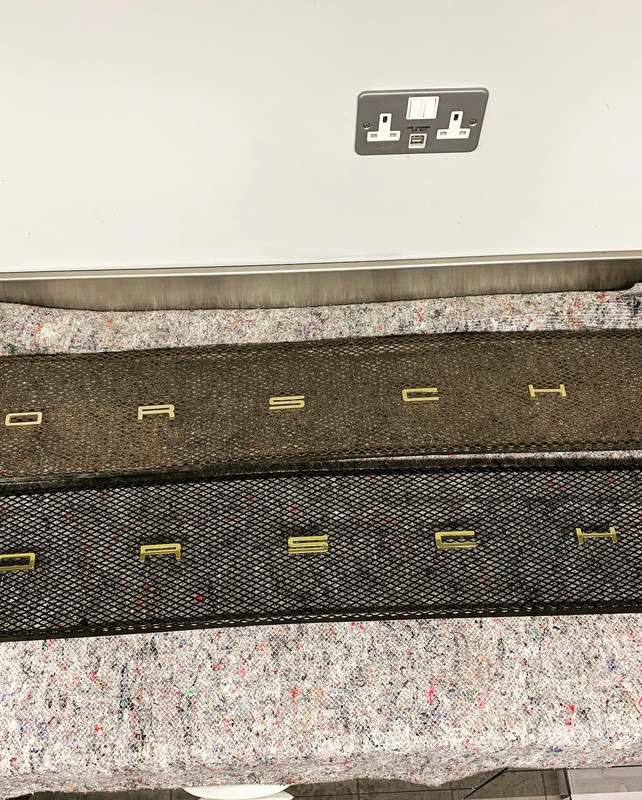
I had an old grill with the correct letter spacing so matched to this.
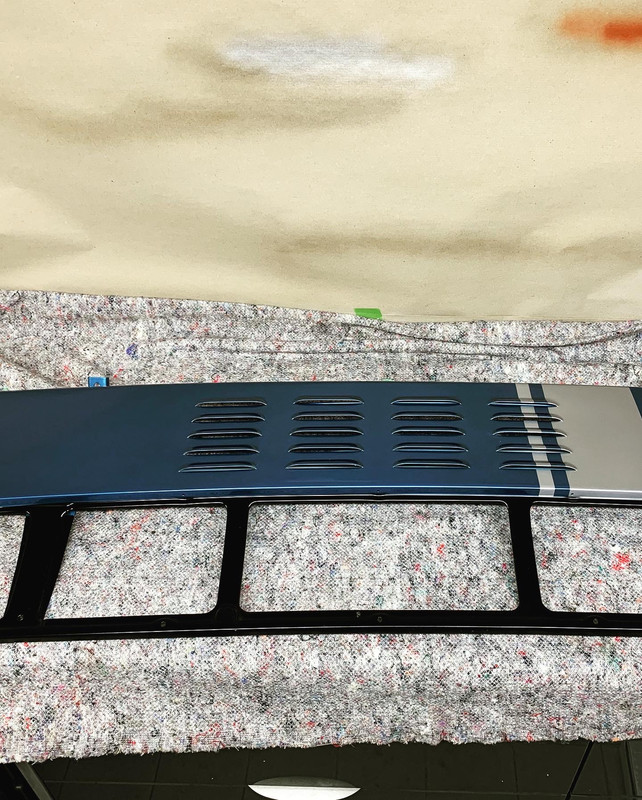
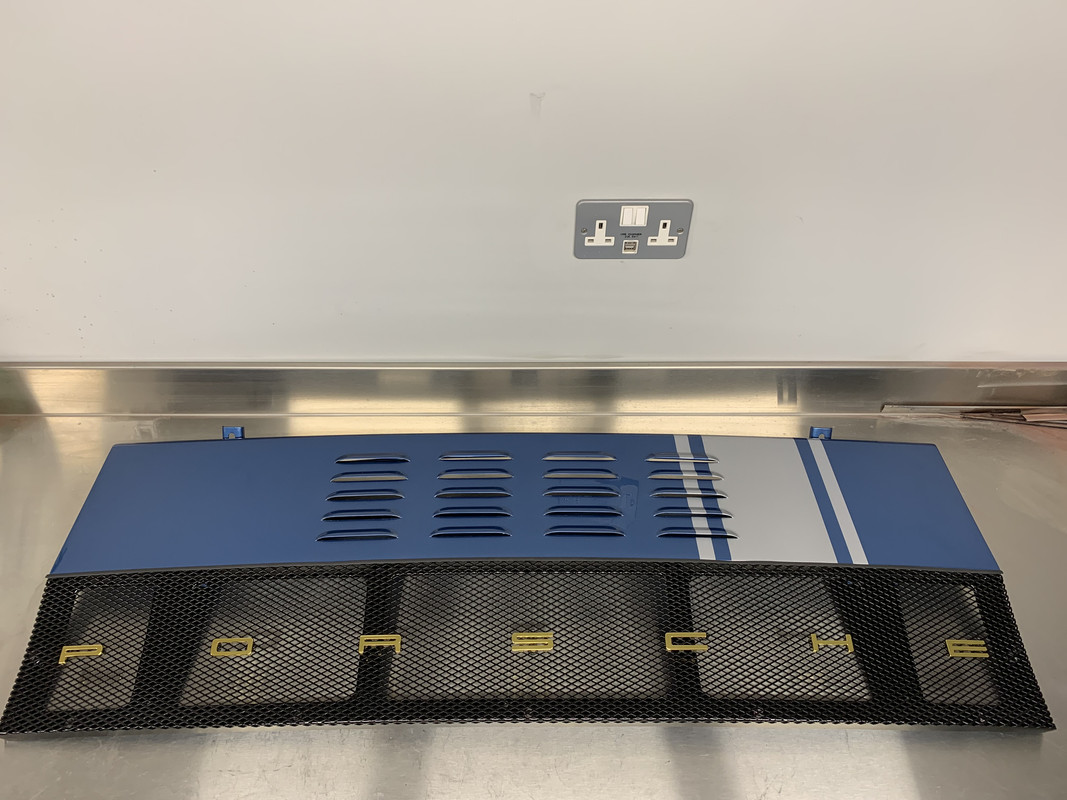
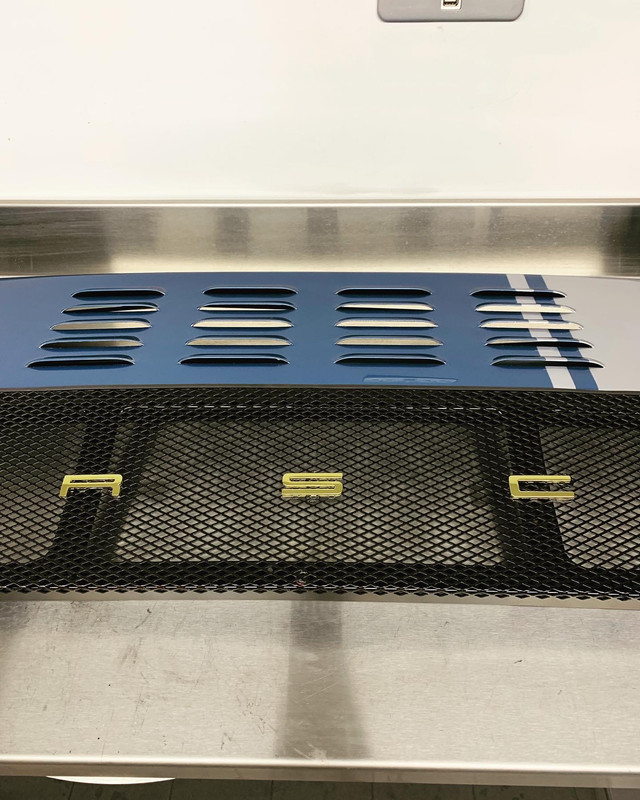

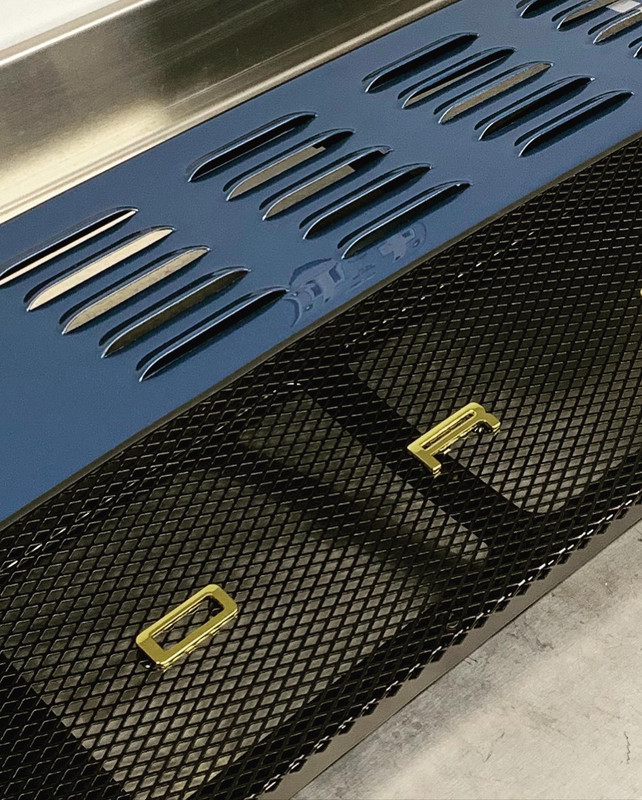

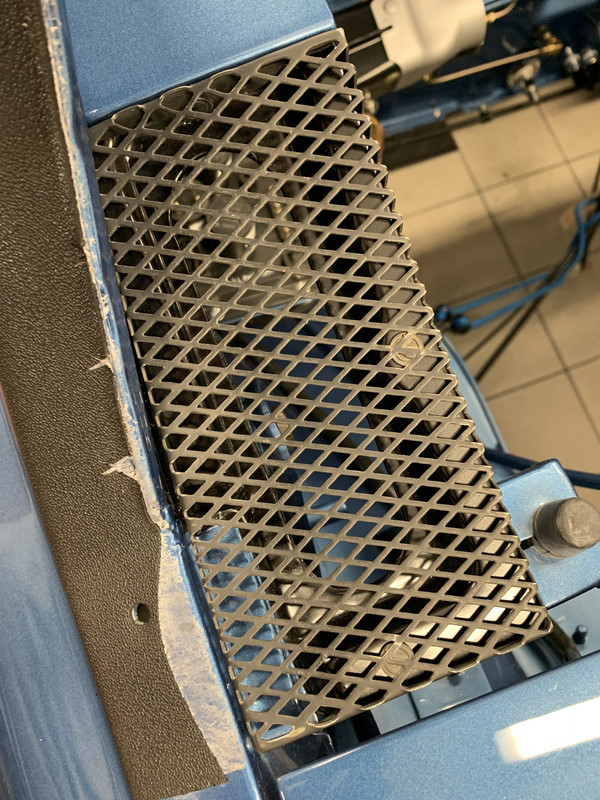
I think that punching the louvres looks right for that 70's vibe. This has distorted the metal a little and with having to weld back in the hinge structure some adjustment was anticipated. In the long run this should aid with the engine cooling and is neater that cutting out and adding more of the grill like the factory did.
The 'Ears' have to be packed up a little to sit with the engine lid once set to the closing latch. This is the bit that takes a whole lot of time.
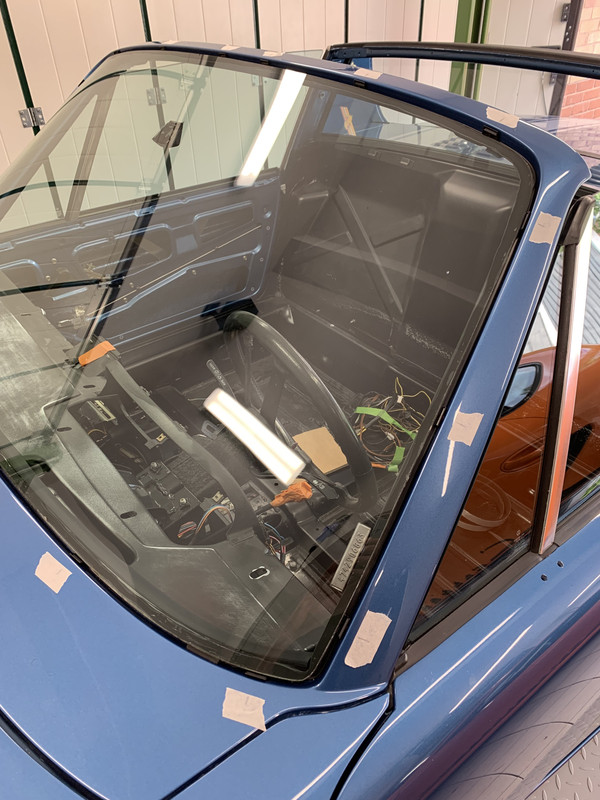
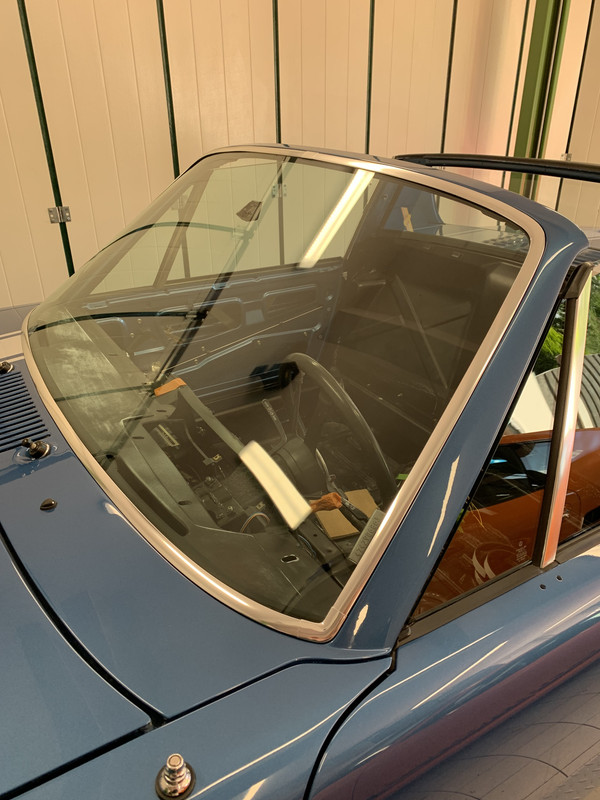
Next was to pinch weld prime for the frame for windscreen fitting.
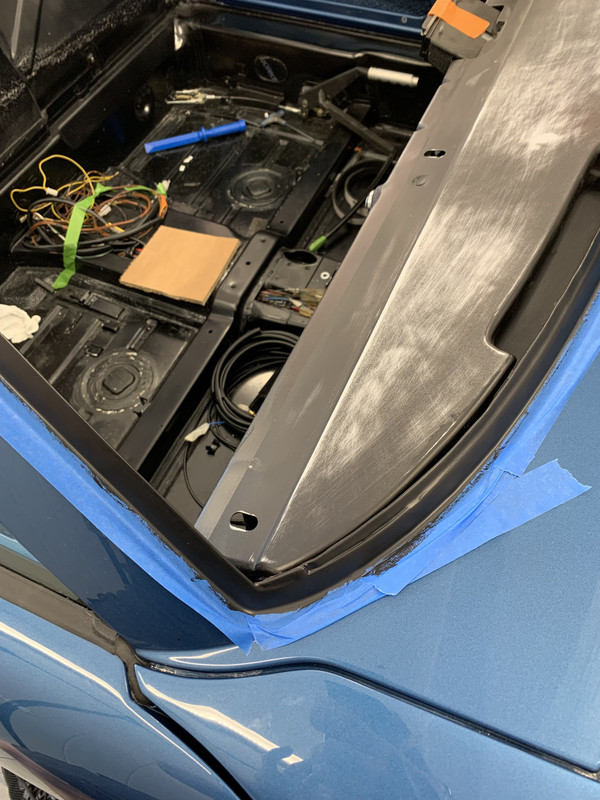
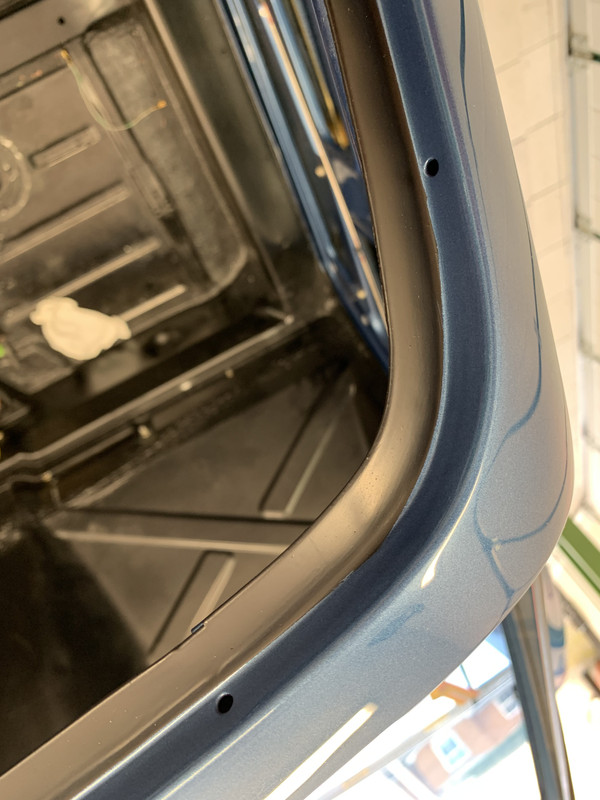
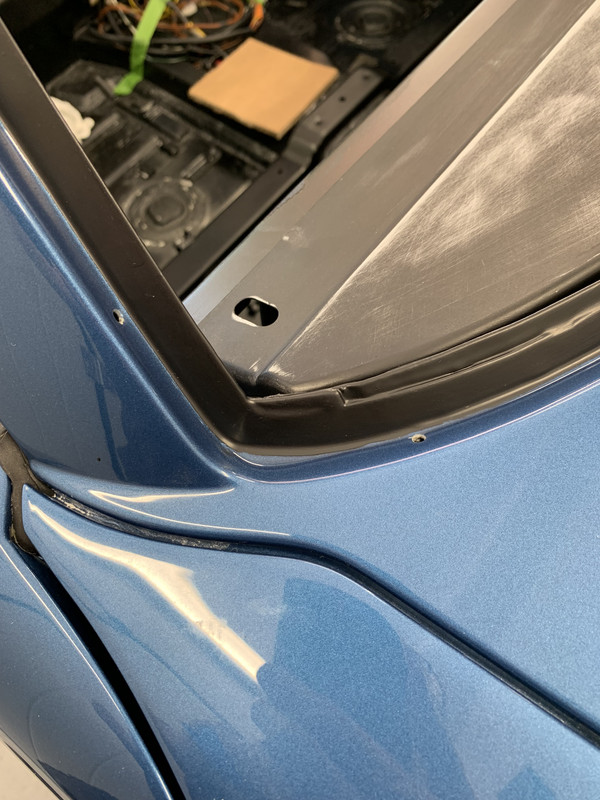
No reason not to mask this off and do it properly. Chrome trim clips were then installed and the 8mm buytol rope fitted.
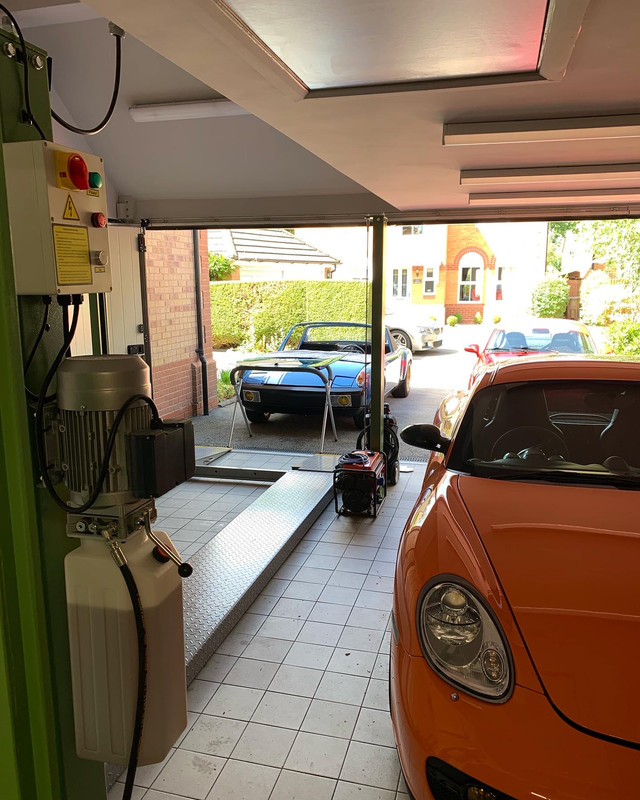
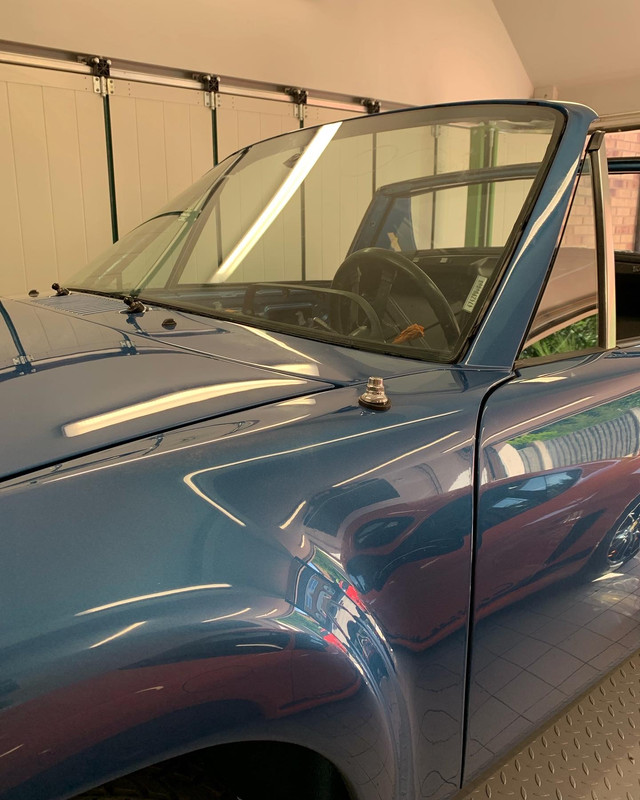
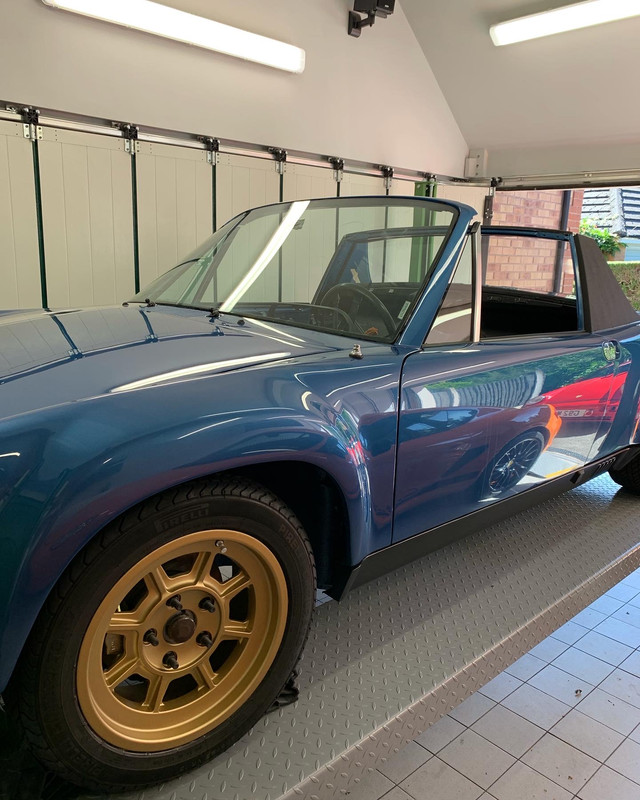
It was nice to roll the car outside for the first time! I did this to get some heat and sun on the buytol rope to help it soften and bond to the glass. I have to give a huge thank you to my wife for being brave enough to help me fit the glass! She is game for anything....
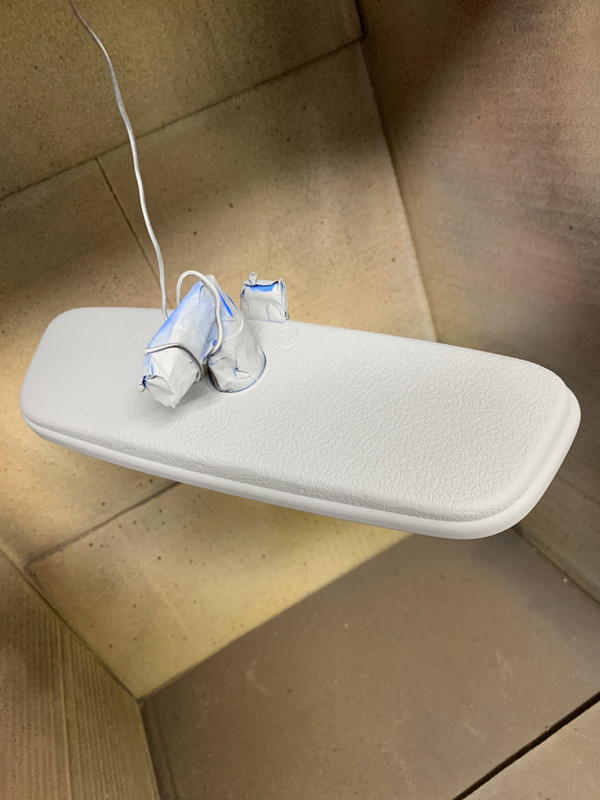
I have started to refurbish the rear view mirror which as seen better days and would cost about two hundred and fifty squids for a new one!!!!
I am going with a mixture of crackle black and matt lacquered gold (Like the engine fan) to match the imagined interior...

More of this later....
A clean up and a flash of satin black. The factory finish was duller but this is my choice. I think in truth that the 'Purists' have long turned their collective backs on this ST build....
I had an old grill with the correct letter spacing so matched to this.
I think that punching the louvres looks right for that 70's vibe. This has distorted the metal a little and with having to weld back in the hinge structure some adjustment was anticipated. In the long run this should aid with the engine cooling and is neater that cutting out and adding more of the grill like the factory did.
The 'Ears' have to be packed up a little to sit with the engine lid once set to the closing latch. This is the bit that takes a whole lot of time.
Next was to pinch weld prime for the frame for windscreen fitting.
No reason not to mask this off and do it properly. Chrome trim clips were then installed and the 8mm buytol rope fitted.
It was nice to roll the car outside for the first time! I did this to get some heat and sun on the buytol rope to help it soften and bond to the glass. I have to give a huge thank you to my wife for being brave enough to help me fit the glass! She is game for anything....
I have started to refurbish the rear view mirror which as seen better days and would cost about two hundred and fifty squids for a new one!!!!
I am going with a mixture of crackle black and matt lacquered gold (Like the engine fan) to match the imagined interior...
More of this later....
h'Project Blue Book' - 'The Red Baron' - Amber Alert!
Re: Project Blue Book
Thank you all for the very positive and supportive comments, they are really appreciated.
I have been a bit caught up of late although I have been busy working away on the little 914.
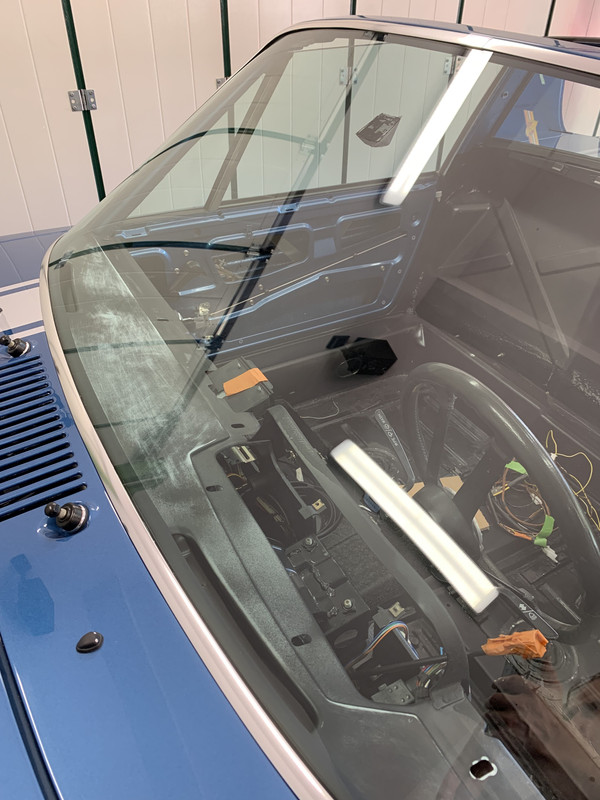
After fitting the windscreen it was time to set up for the chrome trim. This arrived a little twisted and bent, but this is how it is. It all needs gently massaging into shape and stretched. I first marked up the clip locations so I would know where to press a little firmer for the chrome to click into place.
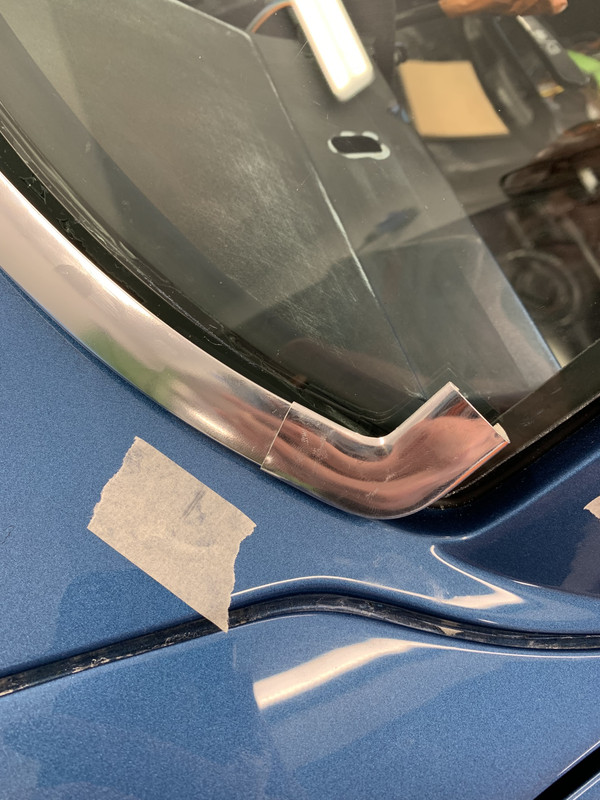
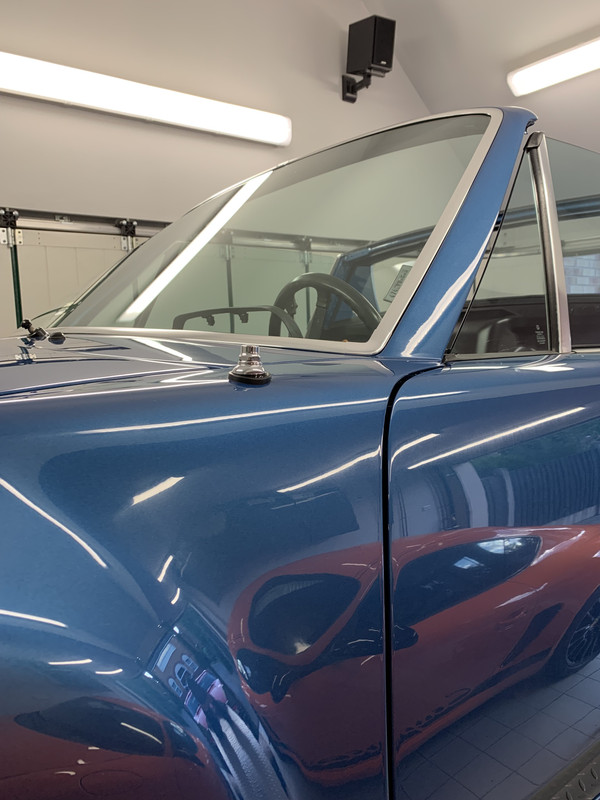
As you can see on the one picture the chrome can come up short and needs a lot of work to gently get it to fit into place. This what a whole days work on and off to get it right.
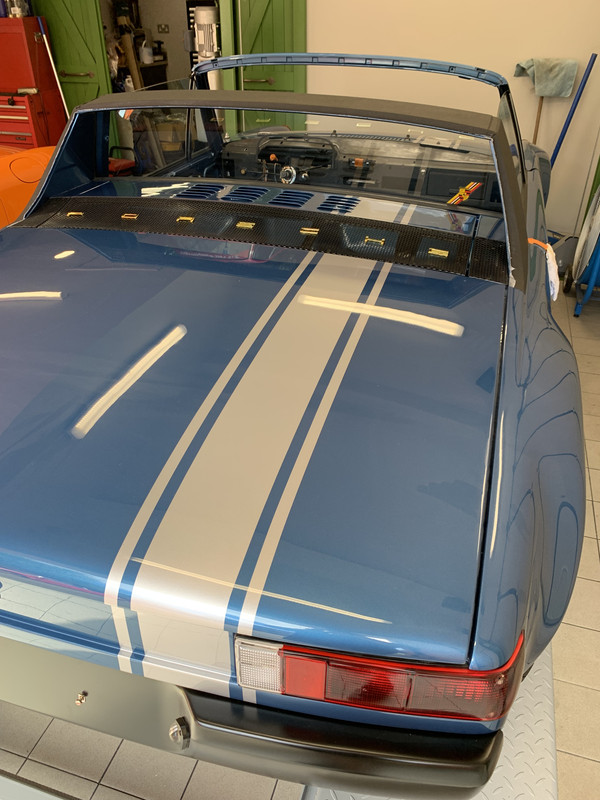
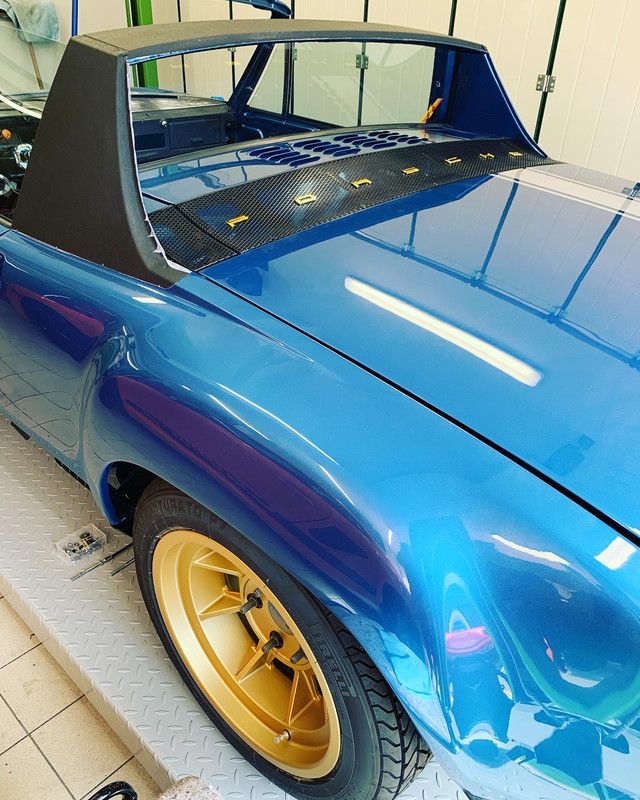
Next was this Targa Bar trim. Again this was a long game of patients.
Looks really retro now. The more that goes on the tidier my workshop is becoming, so win, win!
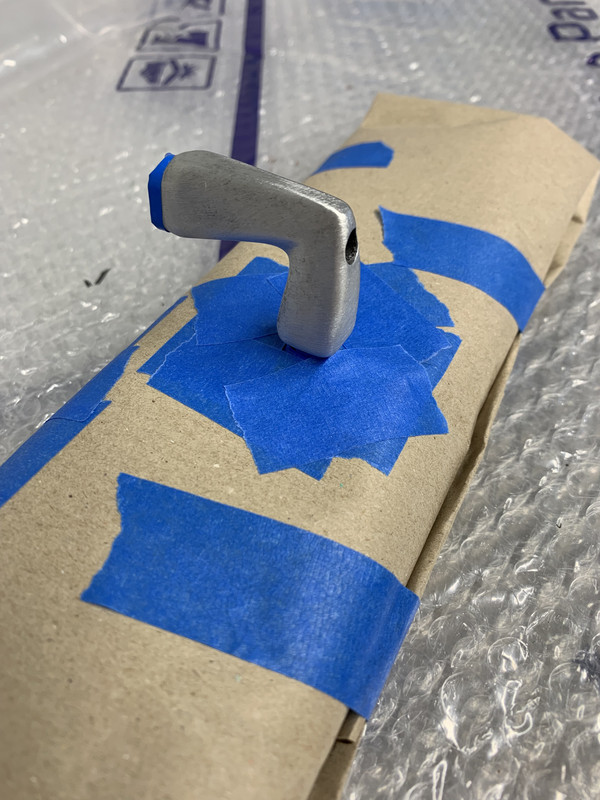
A little teaser of the next fabrication project...
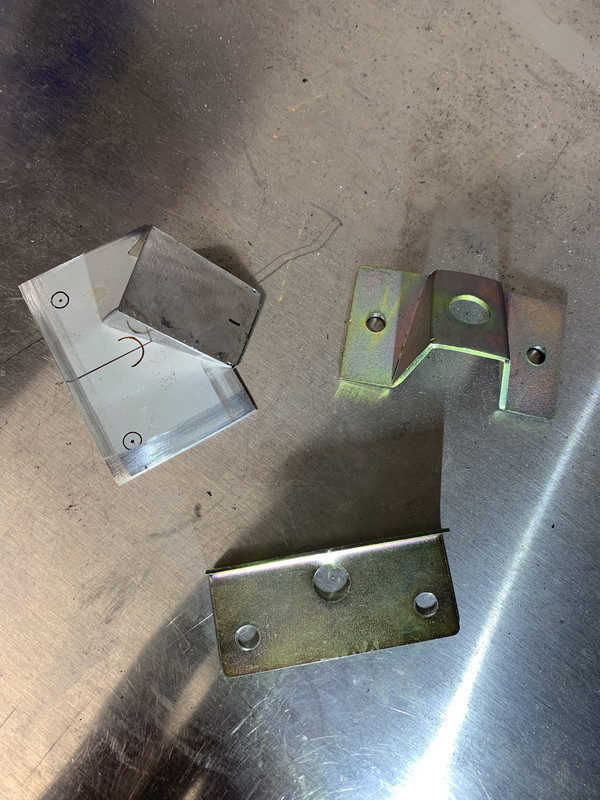
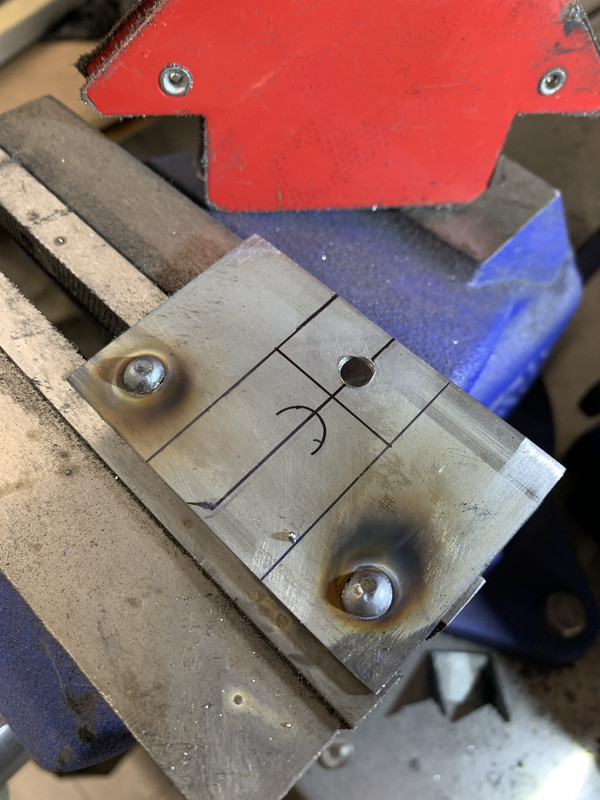
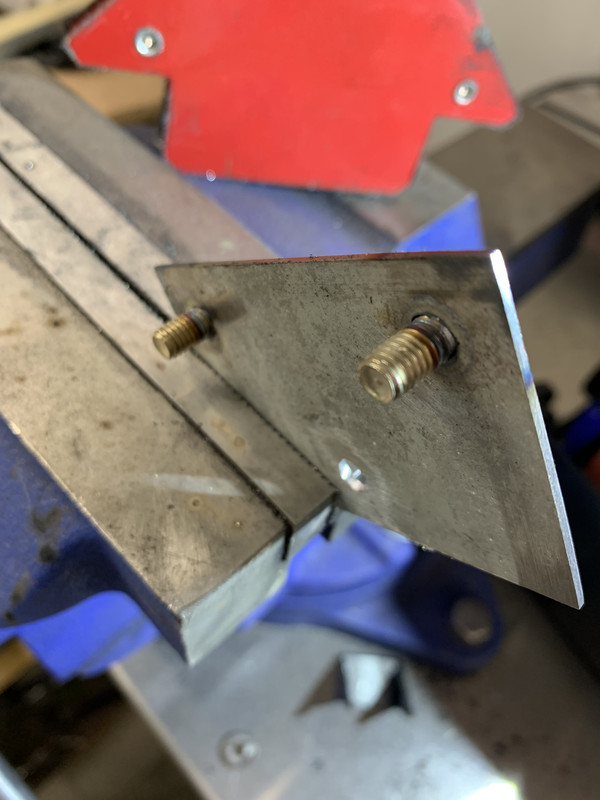
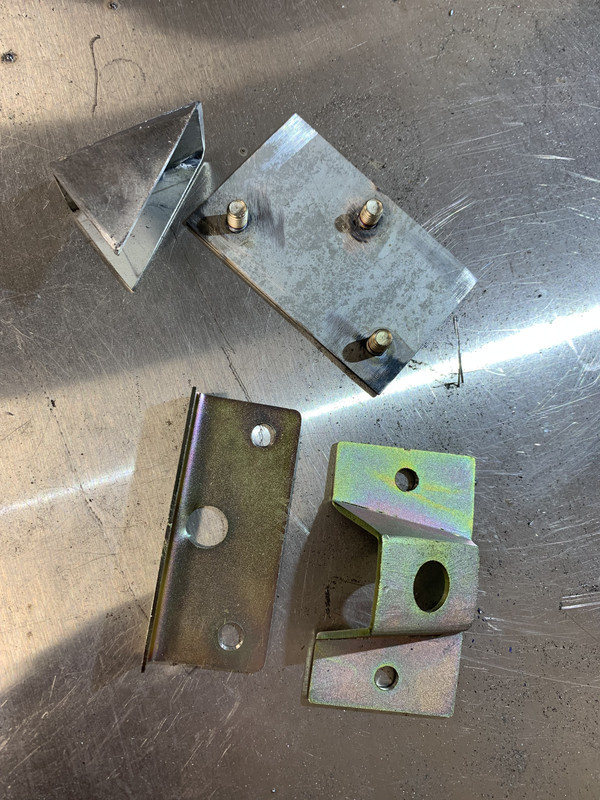
Any guesses
I have been a bit caught up of late although I have been busy working away on the little 914.
After fitting the windscreen it was time to set up for the chrome trim. This arrived a little twisted and bent, but this is how it is. It all needs gently massaging into shape and stretched. I first marked up the clip locations so I would know where to press a little firmer for the chrome to click into place.
As you can see on the one picture the chrome can come up short and needs a lot of work to gently get it to fit into place. This what a whole days work on and off to get it right.
Next was this Targa Bar trim. Again this was a long game of patients.
Looks really retro now. The more that goes on the tidier my workshop is becoming, so win, win!
A little teaser of the next fabrication project...
Any guesses
h'Project Blue Book' - 'The Red Baron' - Amber Alert!
Re: Project Blue Book
A few updates before the weekend kicks in.
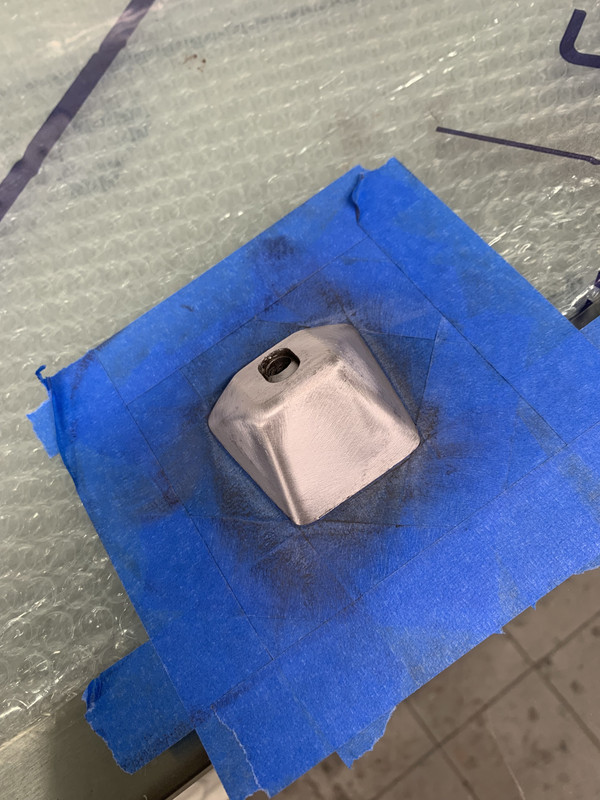
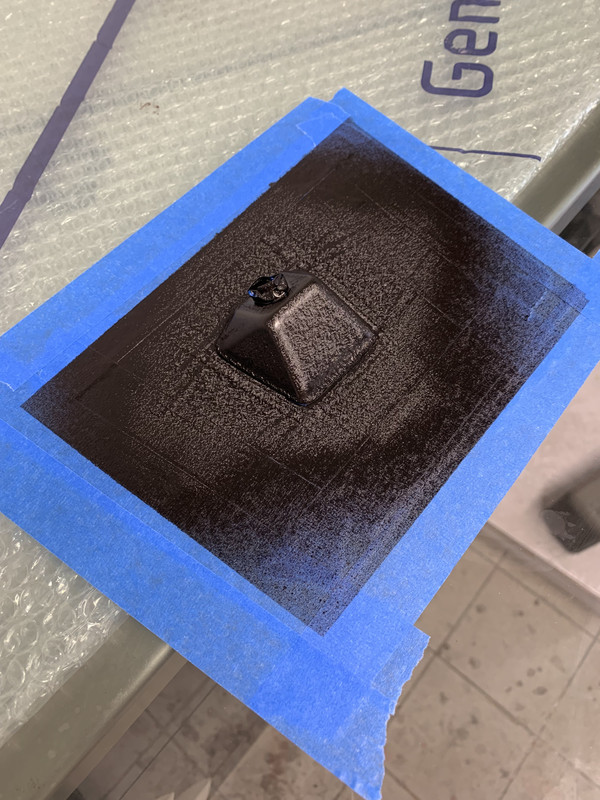
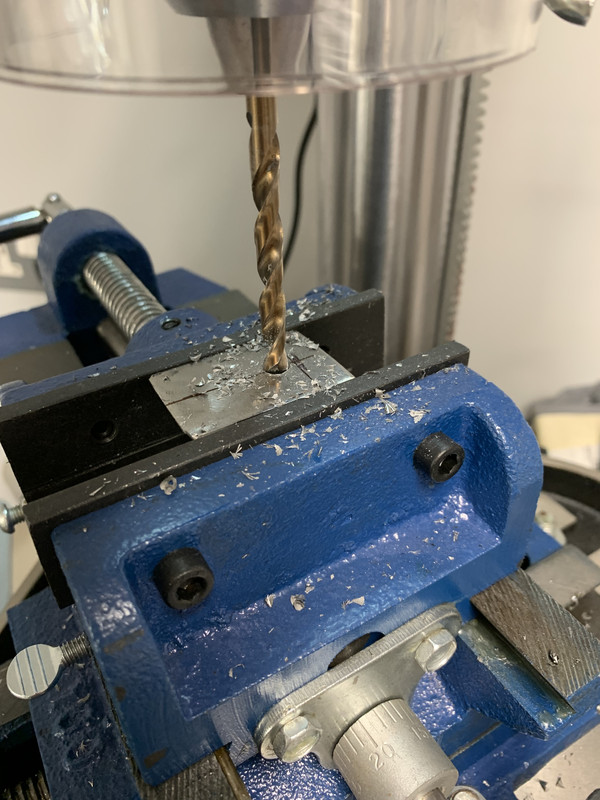
I have been struggling with the front tunk. I get everything lined up nicely and once I fit the huge springs that open it, it shifts the trunk lid to one side and there isn't enough adjustment in the hinges to compensate.
So I have taken it off and removed the hinges. These appear to be the culprit. They are a flat face fit controlled by the shoulder bolts. Over the years it's all got a bit slack.
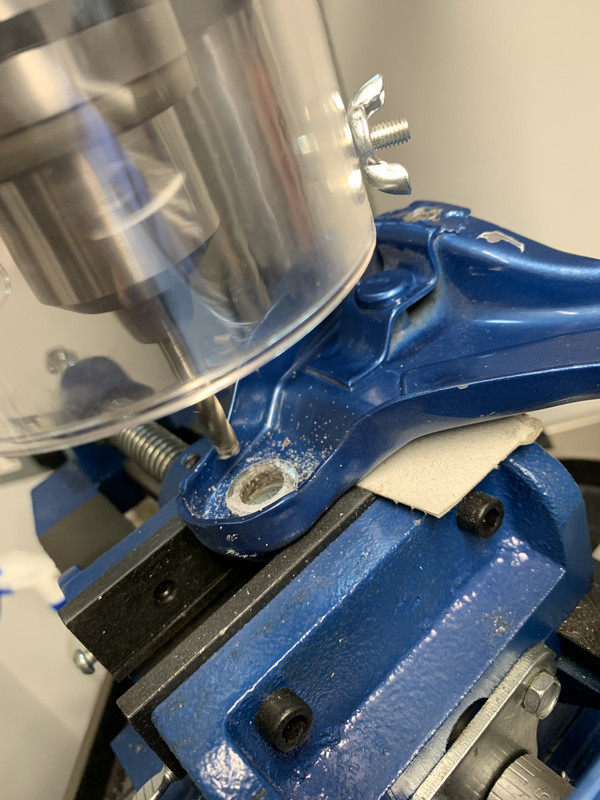

So an idea popped into my noodle. If I grab a bit off a CNC milling machine I should be able to machine the worn face flat then add a shim to try and get them tight again.
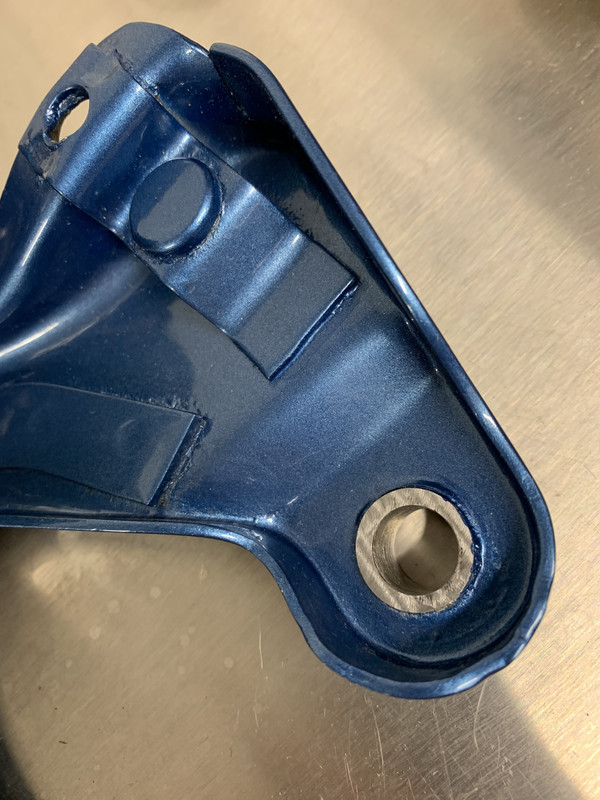
Only took .3mm off and added a shim. Just got to give it a try now but trying to waggle the longer arm of the hinge now is as tight as a Tit mouses ear. So hopefully fixed....we will see.
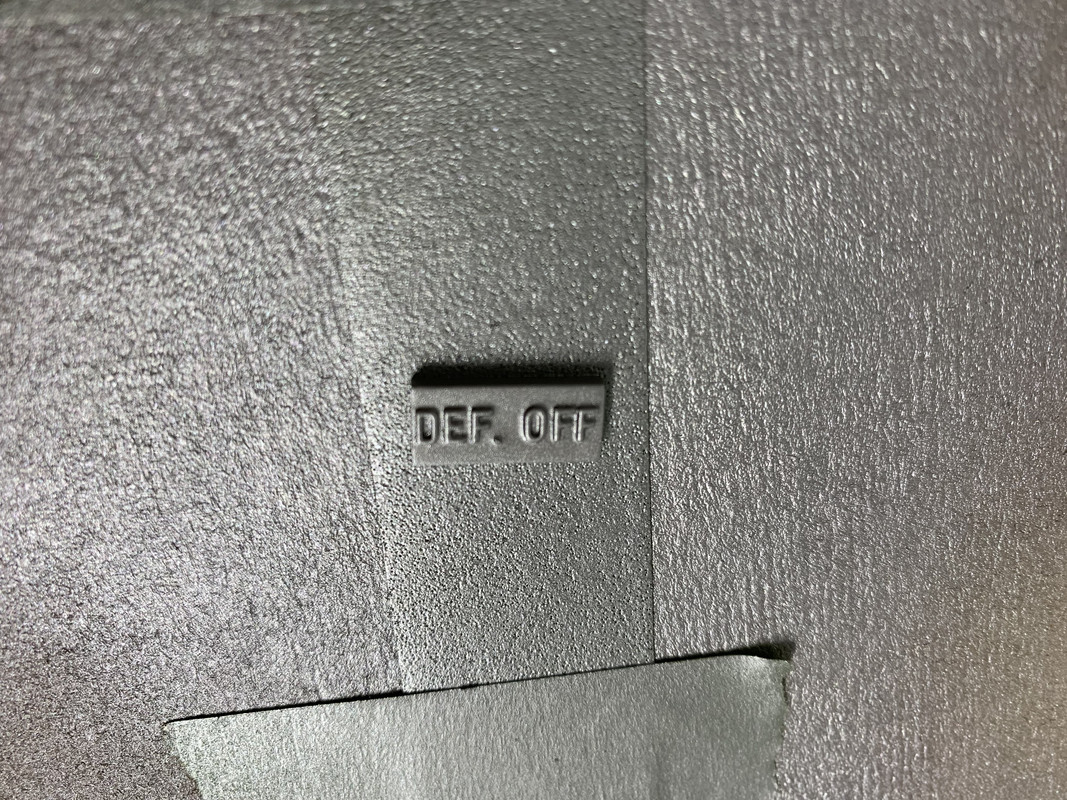
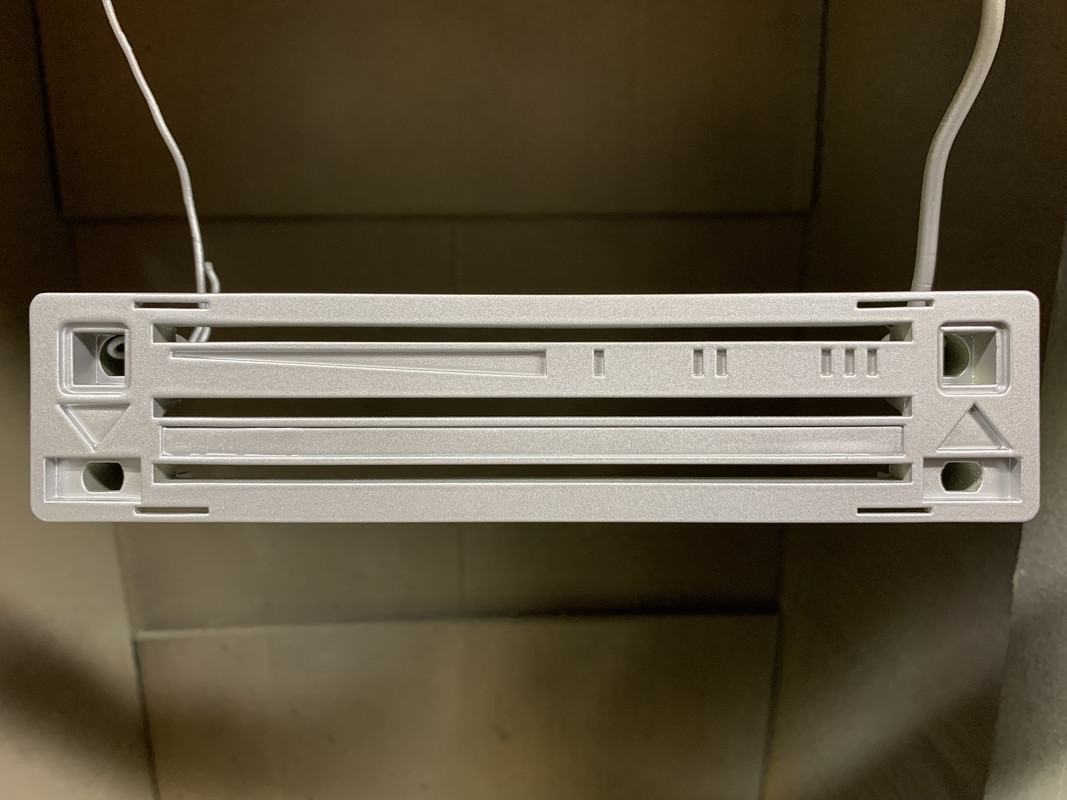
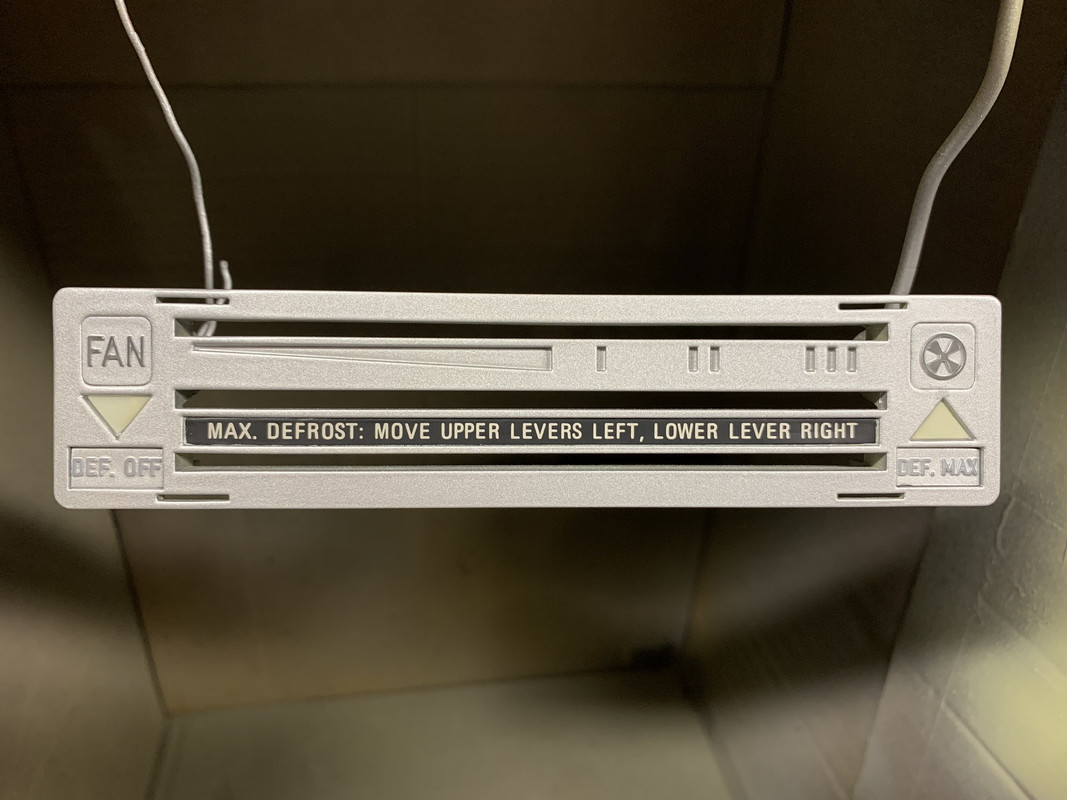
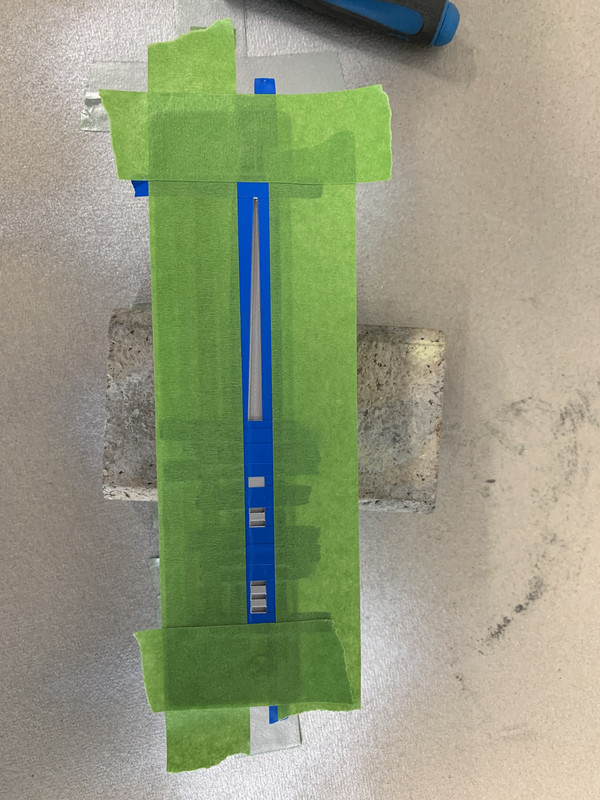
Next little project that I have been putting off is the heater controls into the dashboard. The original although all together had been butchered.

As you can see, someone had a good go with there paints!
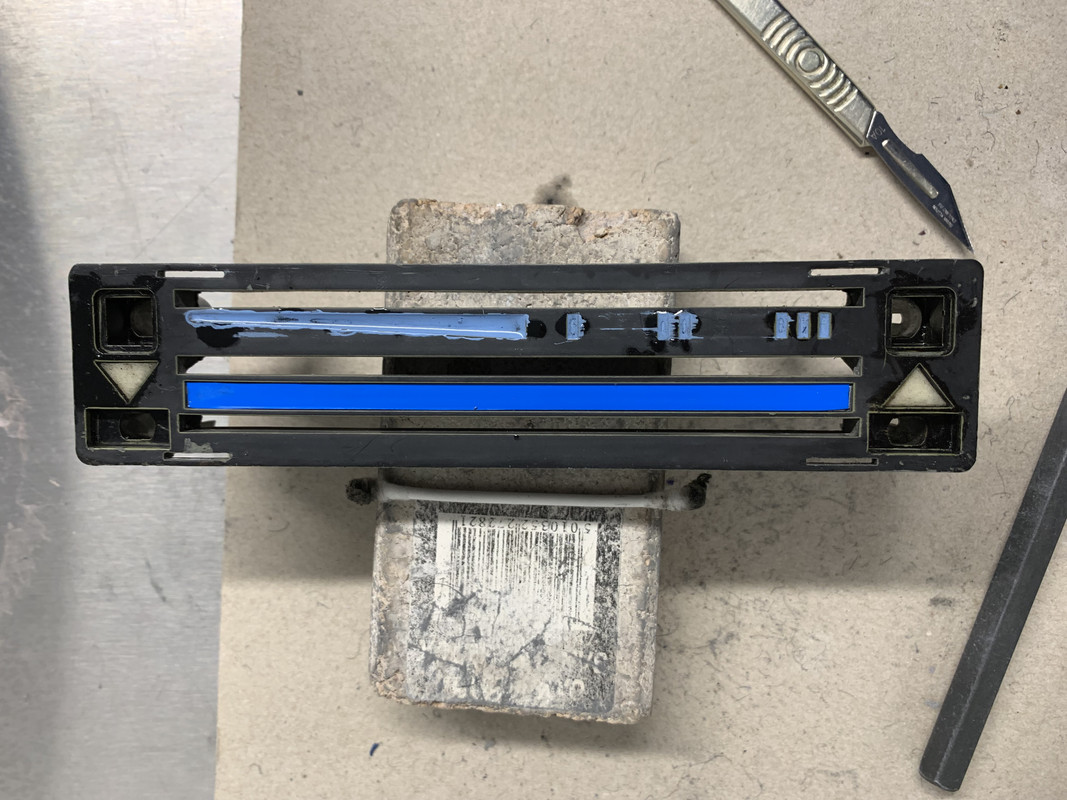
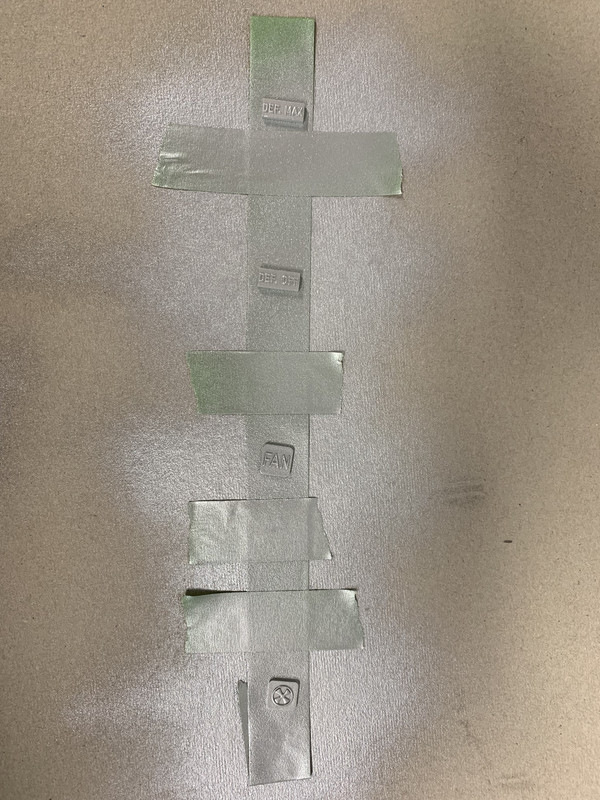
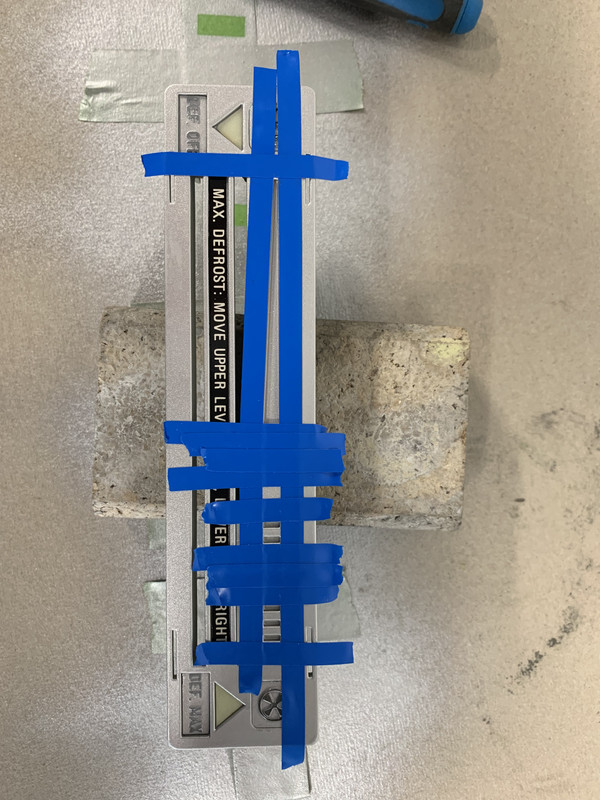
First off I covered the 'Text' as this is a printed and glued in strip.
I then used patients and a lot of superglue remover to soften the glus at the back of the lit lozenges to get them out. It did work but took a few attempts.
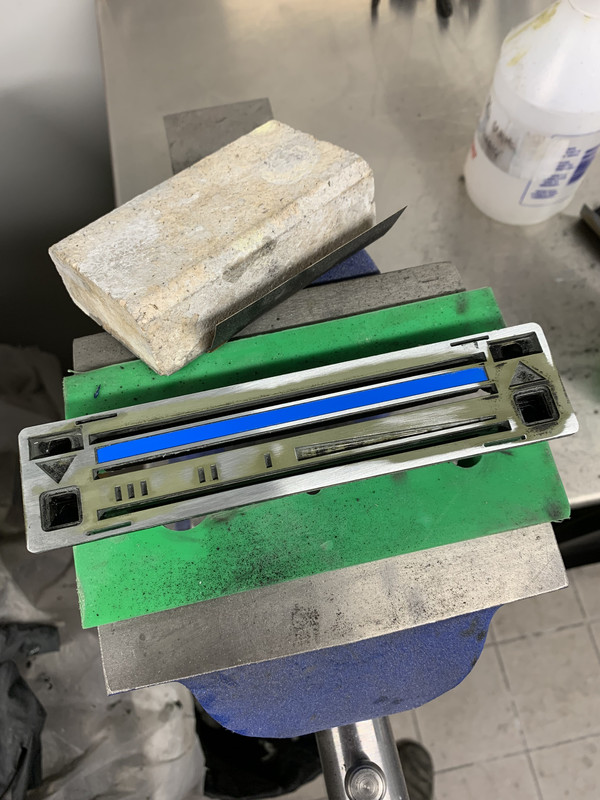
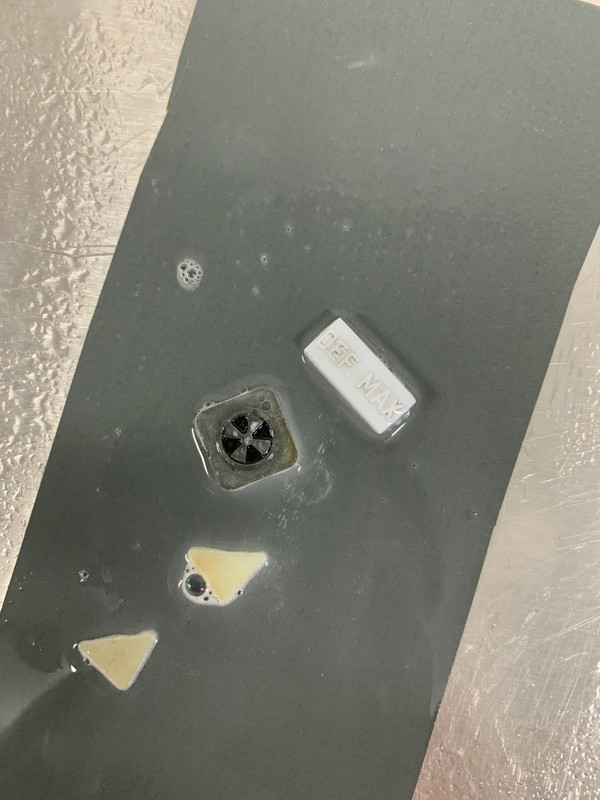
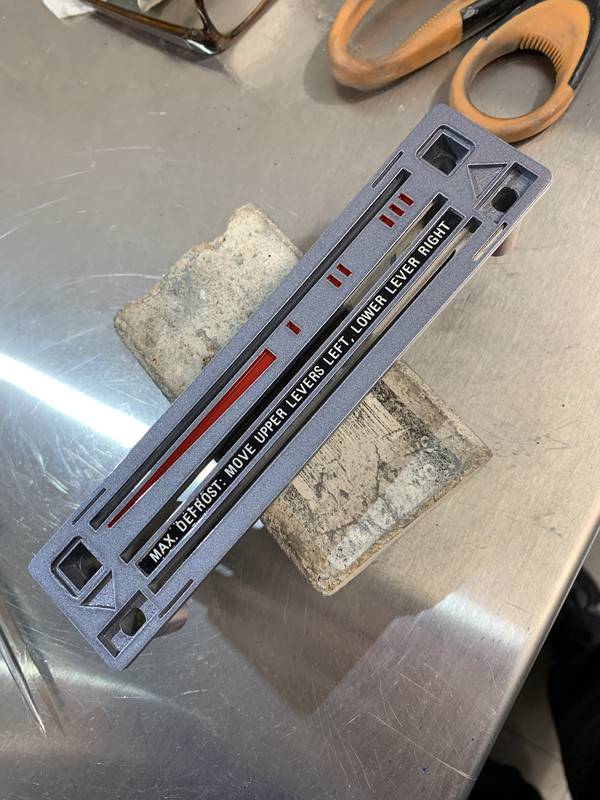
Above picture shows that the surface isn't so flat. My logic was this. If I get it flat then paint it. A light coat of lacquer, mask off and paint the recessed control indicators. Then I could sand back any overspray without effecting the silver. Then fit the lozenges back in and lacquer again to finish. After lightly sanding the top of the text on the lozenges to expose the plastic so the light from the bulbs would show through I finished with this...
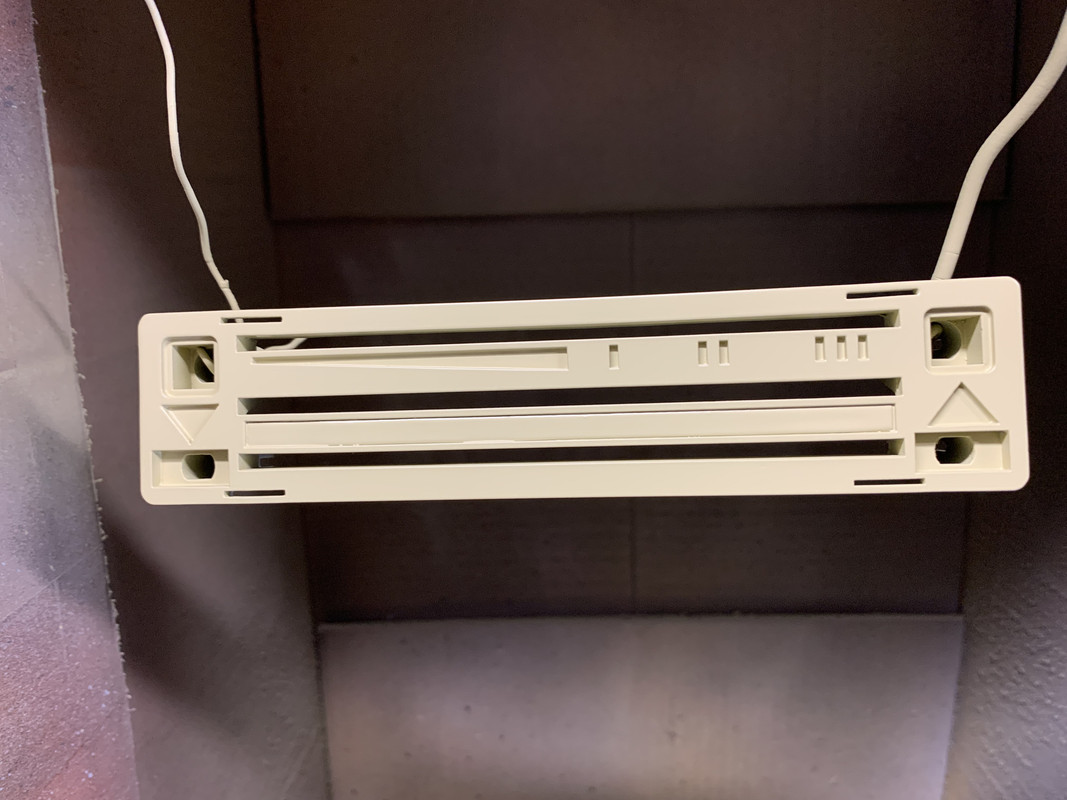

So I finished, however all did not go exactly to plan. I had a reaction with the superglue on the lacquered surface.
Also the more I looked at it the more I didn't like the silver. It just looked a bit too much like Aluminum. So more superglue remover and I did the whole job again. This time I mixed a little more blue into the silver and ended up with this (below). I just need to glue the lozenges in, but this time I have left it a week for the paint to really harden. I am hoping this will be the last time I do this...
So hopefully this saga is finished and I can move onto the Targa top for refurbishing. Let's see eh!
I have been struggling with the front tunk. I get everything lined up nicely and once I fit the huge springs that open it, it shifts the trunk lid to one side and there isn't enough adjustment in the hinges to compensate.
So I have taken it off and removed the hinges. These appear to be the culprit. They are a flat face fit controlled by the shoulder bolts. Over the years it's all got a bit slack.
So an idea popped into my noodle. If I grab a bit off a CNC milling machine I should be able to machine the worn face flat then add a shim to try and get them tight again.
Only took .3mm off and added a shim. Just got to give it a try now but trying to waggle the longer arm of the hinge now is as tight as a Tit mouses ear. So hopefully fixed....we will see.
Next little project that I have been putting off is the heater controls into the dashboard. The original although all together had been butchered.
As you can see, someone had a good go with there paints!
First off I covered the 'Text' as this is a printed and glued in strip.
I then used patients and a lot of superglue remover to soften the glus at the back of the lit lozenges to get them out. It did work but took a few attempts.
Above picture shows that the surface isn't so flat. My logic was this. If I get it flat then paint it. A light coat of lacquer, mask off and paint the recessed control indicators. Then I could sand back any overspray without effecting the silver. Then fit the lozenges back in and lacquer again to finish. After lightly sanding the top of the text on the lozenges to expose the plastic so the light from the bulbs would show through I finished with this...
So I finished, however all did not go exactly to plan. I had a reaction with the superglue on the lacquered surface.
Also the more I looked at it the more I didn't like the silver. It just looked a bit too much like Aluminum. So more superglue remover and I did the whole job again. This time I mixed a little more blue into the silver and ended up with this (below). I just need to glue the lozenges in, but this time I have left it a week for the paint to really harden. I am hoping this will be the last time I do this...
So hopefully this saga is finished and I can move onto the Targa top for refurbishing. Let's see eh!
h'Project Blue Book' - 'The Red Baron' - Amber Alert!
-
rhd racer
- DDK 1st, 2nd and 3rd for me!
- Posts: 2060
- Joined: Wed Jun 23, 2004 9:47 pm
- Location: Nottinghamshire
Re: Project Blue Book
Great work as usual. Live the shims for the boot panel.
No idea what that little fabrication job is on the brackets!
Sent from my iPhone using Tapatalk
No idea what that little fabrication job is on the brackets!
Sent from my iPhone using Tapatalk
93 964 C2
99 Boxster 2.5 > 2.7 hill climber
71 914/6 3.0 - gone
'You see Paul, hill climbing is like making love to a beautiful woman. You get your motor running, check your fluids, hang on tight and WHOA..30 seconds later it's all over!' Swiss Tony
99 Boxster 2.5 > 2.7 hill climber
71 914/6 3.0 - gone
'You see Paul, hill climbing is like making love to a beautiful woman. You get your motor running, check your fluids, hang on tight and WHOA..30 seconds later it's all over!' Swiss Tony
-
neilbardsley
- Nurse, I think I need some assistance
- Posts: 7772
- Joined: Mon Apr 16, 2012 4:31 pm
Re: Project Blue Book
Great job as always. How did you get louvres in your engine lid. Do you think they will hellp much with cooling?
Sent from my M2004J19C using Tapatalk
Sent from my M2004J19C using Tapatalk
“A REMINDER. I would be grateful if those members who have borrowed bits from me in emergencies (e.g starter motor, oil cooler, etc) would return them and/or contact me”. – Chris Turner RIP
Re: Project Blue Book
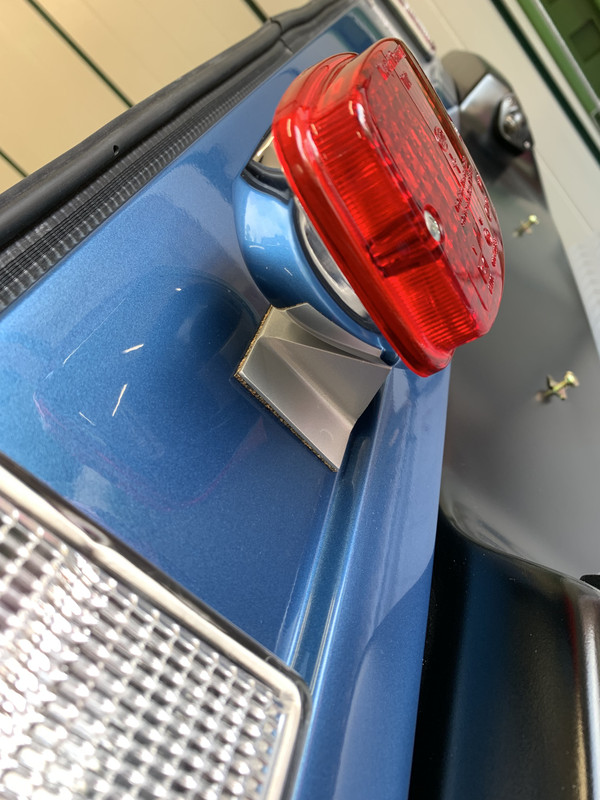
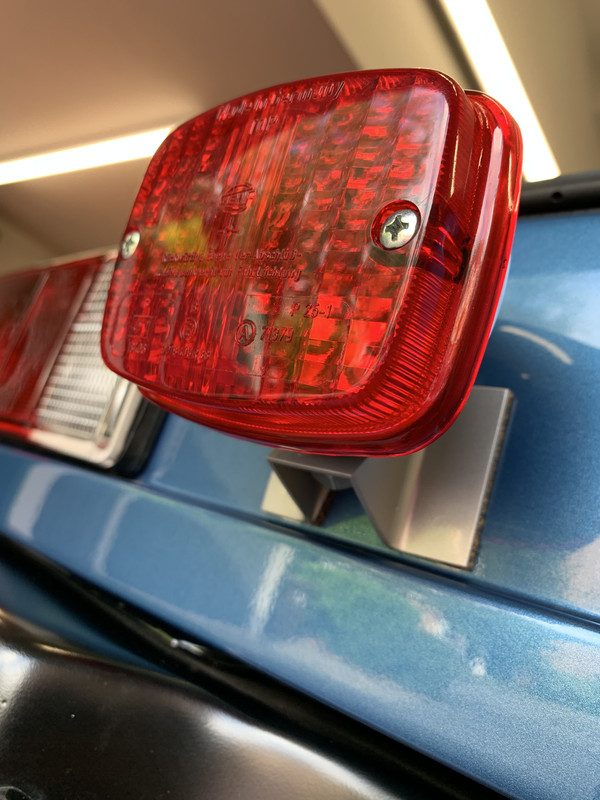
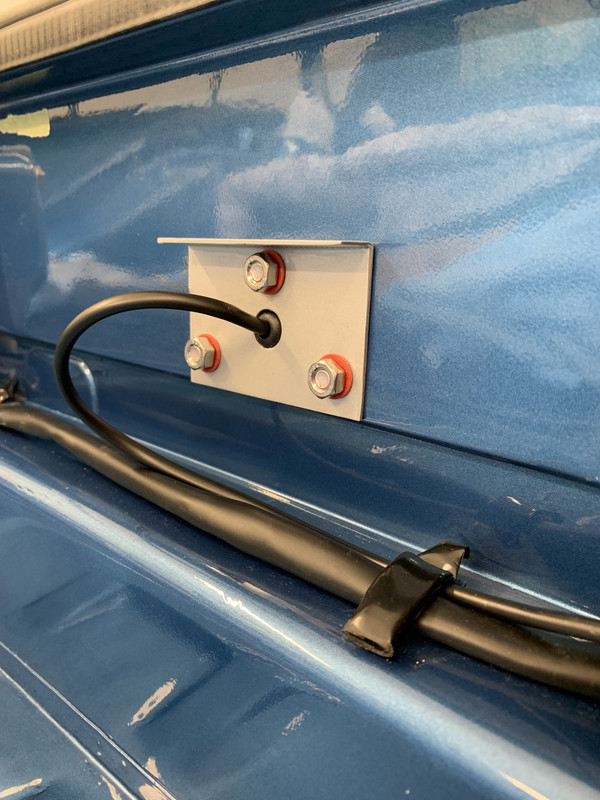
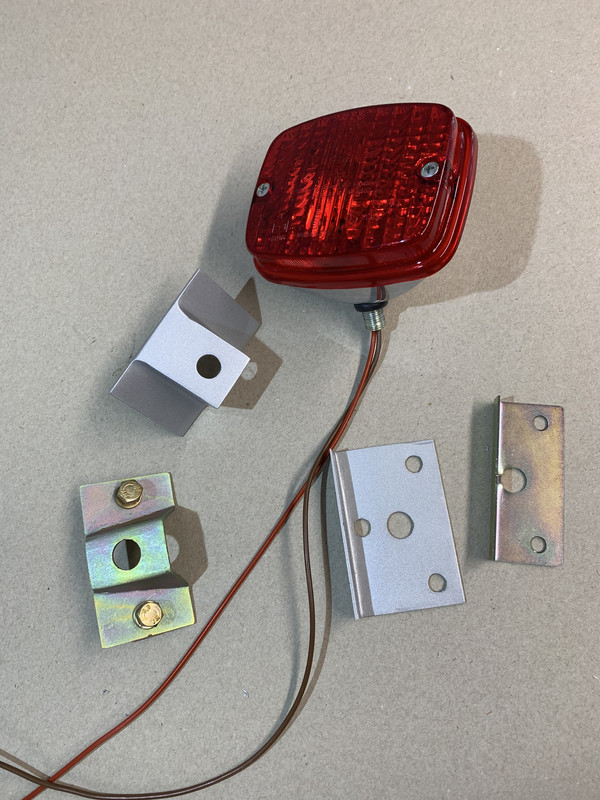
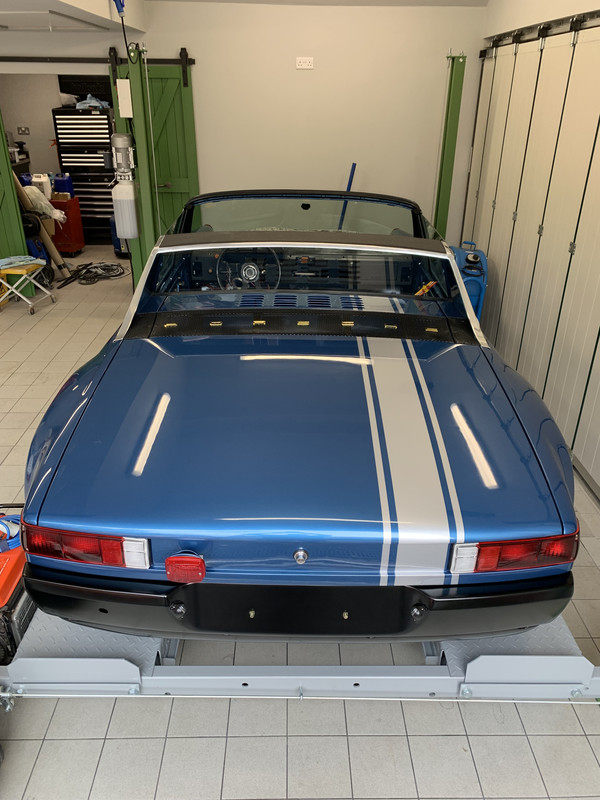
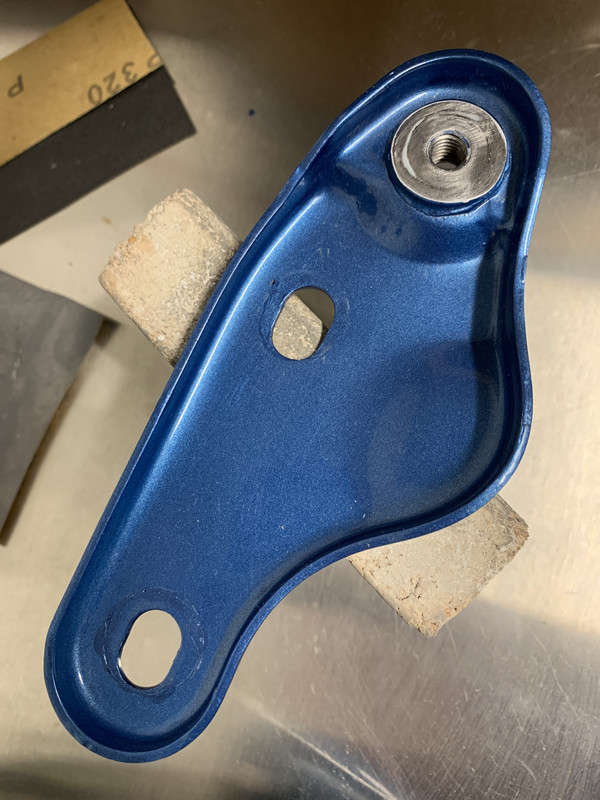
So it was a fog light bracket all along !
I couldn’t live those ugly bolts being on show, so decided to remake for a cleaner look.
Thanks both for looking in on the build. Very kind of you.
h'Project Blue Book' - 'The Red Baron' - Amber Alert!