


for interest, couple of track / race cars for sale on csl reg forum
e36:
http://www.cslregister.com/forum/showthread.php?t=14366
e46:
http://www.cslregister.com/forum/showthread.php?t=14371
BMW BTCC Inspired Track car
Moderator: Bootsy
Re: BMW BTCC Inspired Track car
James
1973 911 2.4S
1993 964 C2
2010 987 Spyder
1973 MGB Roadster
Its not how fast you go, but how you go fast
1973 911 2.4S
1993 964 C2
2010 987 Spyder
1973 MGB Roadster
Its not how fast you go, but how you go fast
-
smallspeed
- I used to have a life, then came DDK
- Posts: 3856
- Joined: Mon Mar 31, 2008 12:38 pm
- Location: leicester
- Contact:
Re: BMW BTCC Inspired Track car
sub 1:20 around donington is fast 
So.. The dodgy eastern European guy came through, despite my worries, and the car was delivered to Nickson Motorsport on the south coast! More on that, and the trials and tribulations of dealing with "roll-cage people" later..
With the car out of the way for a few weeks, I set about re-building the engine. The car had the m52b28 engine which is a 2.8 litre aluminium block straight six, knocking out about 190-ish bhp.. its a dohc 24v engine with on-off variable valve timing on the inlet only (comes on around 1200rpm and off again about 5000rpm if memory serves). its a pretty neat set-up, and I have some bits on how it works somewhere which i'll post later. Its pretty simple, but effective
The engine had a mighty 130k on the clock, and despite some of the internet horror stories about bmw m52 aluminium blocks (nikasil lining failures), this is a very late m52 so has the later alusil lining and no associated issues, infact compression was spot-on across all 6 cylinders. These are really great engines and throttled quite a bit by the inlet and cam shafts (intentionally to gap them vs. the m3) so there's quite a bit that can be done to improve them over and above the stock sub 200bhp. They were also the basis for the M3 engine in North America (although with an iron block) - they didn't get the "proper m3" due to emissions - and so there's a few trick bits you can steal from them too
Right - In the words of the spice girls, this is where "two (engines) become one.."
First M54B30 from the later e46 330ci. This has a longer stroke crank, and different pistons (crown height) to cope with the increased stroke. It also has different con-rods, but they're the same length - the m54 had fracture split rods, whereas the m52 did not. Both have forged everything so a good basis for tuning!

Picked up a "short engine" for £100 from a breakers. It came from an engine that suffered a HG failure which is not uncommon on those engines. I removed everything I needed and sold the block for scrap for £40 Bit of a bargain..
Crank measured up OK and was put to one side

Pistons in good shape too, con-rods were disregarded (used m52 conrods as they're better at going back together again than the fracture split ones, and other than that detail they're basically the same)

All of these things went into the ultrasonic cleaner and came-out like new
Pulled the 2.8 block to bits (mostly to get to the con-rods)
Purchased a single mass flywheel kit and clutch from euro carparts - this was a kit they were getting rid of and so I managed to pick up the whole lot (flywheel, clutch friction and pressure plate, plus a release bearing) for £120!
I had done a little research and found out about a mystical beast called "billy the balancing man" who lived the far side of the M1 from me, so after 2 or 3 attempts at getting in touch with him finally arranged a meeting.. I packed everything up and set off to see him!
I was 1/2 expecting a "hagrid" from harry potter, but actually billy turned out to be a fairly quietly spoken guy smoking a roll-up, with a very placid border collie at his side. When I arrived he was just packing-off a works Moto GP team with their latest set of bits! I figure if its good enough for them its probably going to be good enough for me..
Dropped it all off, drove away, then started to fear the worst (price wise) once the whole moto-gp thing sunk in! I decided not to worry TOO much, and flew to the US / Canada for 3 weeks with work leaving my wife at home training a 6wk old puppy!
On my return I had a voicemail saying everything was done, so headed back and picked it all up! The following work was done for a VERY reasonable sum!
Flywheel - Clutch surface re-faced (was a bit rusty before) then flywheel lightened and balanced
Conrods - End-to-ended and weight matched
Pistons - Weight matched
Conrods/pistons paired up and assembled, then marked so they're weight matched as assemblies
Crank lightened and balanced
Crank and flywheel assembly balanced
Crank, flywheel and clutch pressure plate assembly balanced, marked up, etc. etc.
I was a very happy chappie
So.. The dodgy eastern European guy came through, despite my worries, and the car was delivered to Nickson Motorsport on the south coast! More on that, and the trials and tribulations of dealing with "roll-cage people" later..
With the car out of the way for a few weeks, I set about re-building the engine. The car had the m52b28 engine which is a 2.8 litre aluminium block straight six, knocking out about 190-ish bhp.. its a dohc 24v engine with on-off variable valve timing on the inlet only (comes on around 1200rpm and off again about 5000rpm if memory serves). its a pretty neat set-up, and I have some bits on how it works somewhere which i'll post later. Its pretty simple, but effective
The engine had a mighty 130k on the clock, and despite some of the internet horror stories about bmw m52 aluminium blocks (nikasil lining failures), this is a very late m52 so has the later alusil lining and no associated issues, infact compression was spot-on across all 6 cylinders. These are really great engines and throttled quite a bit by the inlet and cam shafts (intentionally to gap them vs. the m3) so there's quite a bit that can be done to improve them over and above the stock sub 200bhp. They were also the basis for the M3 engine in North America (although with an iron block) - they didn't get the "proper m3" due to emissions - and so there's a few trick bits you can steal from them too
Right - In the words of the spice girls, this is where "two (engines) become one.."
First M54B30 from the later e46 330ci. This has a longer stroke crank, and different pistons (crown height) to cope with the increased stroke. It also has different con-rods, but they're the same length - the m54 had fracture split rods, whereas the m52 did not. Both have forged everything so a good basis for tuning!
Picked up a "short engine" for £100 from a breakers. It came from an engine that suffered a HG failure which is not uncommon on those engines. I removed everything I needed and sold the block for scrap for £40
Crank measured up OK and was put to one side
Pistons in good shape too, con-rods were disregarded (used m52 conrods as they're better at going back together again than the fracture split ones, and other than that detail they're basically the same)
All of these things went into the ultrasonic cleaner and came-out like new
Pulled the 2.8 block to bits (mostly to get to the con-rods)
Purchased a single mass flywheel kit and clutch from euro carparts - this was a kit they were getting rid of and so I managed to pick up the whole lot (flywheel, clutch friction and pressure plate, plus a release bearing) for £120!
I had done a little research and found out about a mystical beast called "billy the balancing man" who lived the far side of the M1 from me, so after 2 or 3 attempts at getting in touch with him finally arranged a meeting.. I packed everything up and set off to see him!
I was 1/2 expecting a "hagrid" from harry potter, but actually billy turned out to be a fairly quietly spoken guy smoking a roll-up, with a very placid border collie at his side. When I arrived he was just packing-off a works Moto GP team with their latest set of bits! I figure if its good enough for them its probably going to be good enough for me..
Dropped it all off, drove away, then started to fear the worst (price wise) once the whole moto-gp thing sunk in! I decided not to worry TOO much, and flew to the US / Canada for 3 weeks with work leaving my wife at home training a 6wk old puppy!
On my return I had a voicemail saying everything was done, so headed back and picked it all up! The following work was done for a VERY reasonable sum!
Flywheel - Clutch surface re-faced (was a bit rusty before) then flywheel lightened and balanced
Conrods - End-to-ended and weight matched
Pistons - Weight matched
Conrods/pistons paired up and assembled, then marked so they're weight matched as assemblies
Crank lightened and balanced
Crank and flywheel assembly balanced
Crank, flywheel and clutch pressure plate assembly balanced, marked up, etc. etc.
I was a very happy chappie
-
911hillclimber
- Nurse, I think I need some assistance
- Posts: 18925
- Joined: Mon Mar 10, 2008 6:26 pm
- Location: West Midlands
Re: BMW BTCC Inspired Track car
Great thread, really interesting.
I know a young chap who used to hill climb with his dad and then went to the BMW track series and still runs an M3 (Richard Marsh) and he has done well and when I saw them last his dad (sponsor) raved about the car and series. The M3's seem well suited even in mild tune.
That engine prep is nice!
I know a young chap who used to hill climb with his dad and then went to the BMW track series and still runs an M3 (Richard Marsh) and he has done well and when I saw them last his dad (sponsor) raved about the car and series. The M3's seem well suited even in mild tune.
That engine prep is nice!
73T 911 Coupe, road/hillclimber 3.2L
Lola t 492 / 3.2 hillclimb racer
Boxster 987 Gen II 2.9
Lola t 492 / 3.2 hillclimb racer
Boxster 987 Gen II 2.9
BMW BTCC Inspired Track car
For interest.....
The E46 Alpina (both 3.3 & 3.4 'S' versions) used the US iron block M3 motor as its base. Also used the simple inlet-only on/off switchable valve timing system with their lumpy cams. They shared (3.3/3.4) a custom long stroke crank with differing bore sizes. The 3.4 uses the euro M3 bore (unique Mahle pistons with thin rings) but suffers from head gasket failures between 80-100k miles because of the thin gaps between bores.
Oh, & the heads where hand ported, and the bearings were hand picked for optimal clearances!
-
smallspeed
- I used to have a life, then came DDK
- Posts: 3856
- Joined: Mon Mar 31, 2008 12:38 pm
- Location: leicester
- Contact:
Re: BMW BTCC Inspired Track car
I'm limited to 2.9 litre by "class c" so no larger pistons or super-big cranks for me.. also the alu blocks are pretty light compared to the iron ones, so quite a good weight advantage, especially on a long(ish) 6-cyl engine that hangs the front 2 cyl infront of the front axle line! one of my other cars has the 3.2 iron 6 (alu head) and its quite a lump! although set well back in the chassis, and more than makes up for it with 125bhp/litre
They allow 330's under the regs (which are a shade under 2.95 litre) hence this upgrade for a little more capacity vs. 27XX CC.. The other class limits are power to weight incl. driver (and minimum weight with and without driver) so there's plenty of scope for making as much power as possible
I don't think being over power will be too much of an issue for me though - doing the math...
Driver with clothes and helmet on = 105kg (current) / 95kg (target)
Car = 1200kg (realistic) / 1100kg (probably dreaming for the time being)
Class limits = 185rwhp/ton and 1050kg (car) and 1100kg (car+driver)*
Transmission losses = assume somewhere around 15-20%
That works out somewhere between 255 and 290bhp ish
260bhp seems like a sensible number for this engine, although I think 270, maybe 280 could be possible with more work (head work, throttle bodies and bespoke re-mapping for 99Ron fuel/high revs).. Probably easier to stick to 260bhp and eat less
* for the maths people amongst us, optimum driver weight is 50kg WITH all your safety gear on.. One of my mates is a test driver for a motor manufacturer and he weighs 46kg in his fire-proof undies, so he's about where you'd need to be to hit all the optimums..
I take heart from seeing people like matt neal winning races - if someone that big can go fast then there's hope, without me resorting to an auto-box and a voluntary left arm and leg amputation!
-
smallspeed
- I used to have a life, then came DDK
- Posts: 3856
- Joined: Mon Mar 31, 2008 12:38 pm
- Location: leicester
- Contact:
Re: BMW BTCC Inspired Track car
So, I promised more dry-ice fun, and here it is!
Dioxice / Cleansurface (who supplied the dry ice for stripping the shell) also have a big "blasting room" on their premesis which they will rent out to people who look competent at around £40 an hour (I think). That said, they also let me use it!
They do a lot of engine cleaning for different automotive people and race teams, and while I was initially a bit unsure about it, since using it I'm pretty impressed! The system uses "crunched-up" dry ice and blasts it out of a big hose (literally 1" diameter or more). The method is pretty clever in that as the tiny particles of dry-ice hit the surface of the part being cleaned, the ice evaporates and the huge expansion lifts any dirt and debris from the surface of the part
I cleaned most of the engine components using this method and they came up brilliantly! It doesn't remove any of the "staining" you get on aluminium surfaces, however everything else comes up brilliantly - its fast, clean because there's no residue left behind, and doesn't damage threads, soft surfaces, anything! very impressed.. I did all the engine bits, covers, trims, etc in 90mins and was charged £50 which included the dry ice, and use of their safety gear.. Word to the wise, if you do this ever WEAR WARM CLOTHES AND A HAT! You have no idea how frickin' cold it gets until you've experienced working in a closed booth with dry ice!
Some examples of the head below


Next up was the head - this underwent quite a bit of tidy-up work..
Combustion chambers were pretty good to start with, and not a lot of scope for de-shrouding valves and things. What I did do was clean it up a bit, particularly any of the sharp edges or transitions
Inlet was ported, mostly working the large radius and blending the valve guides, also the valve seats into the head material to remove any steps. Ports were left at a 240 grit finish
On the exhaust side, the ports were fully matched to the manifold, valve seats and guides blended, then polished. Not much material removal to do on that side of the head
Kind of hard to get any meaningful photographs! but..
During - roughing out:

After:

Rebuilding the head - valve gear, tensioners, oil pump, etc all ultrasonically cleaned ready for installation


And then re-assembled


The camshafts were fitted - these are a set of cams from a US Specification 3.2 M3, which is basically the same engine with an iron block and a few tweaks. They're basically shrick cams in terms of the grind, so quite a lot more agressive than the standard 328i cams
For comparison..
US M3 cam specs (S52B32)
Duration / Lift
252 Deg / 10.3 mm Intake
244 Deg / 10.2 mm Exhaust
328i cam specs (M52B28)
Duration / Lift
228 Deg / 9 mm Intake
228 Deg / 9 mm Exhaust
328i Schrick cam specs (M52B28)
Duration / Lift
252 Deg / 10.2 mm Intake
244 Deg / 9.5 mm Exhaust
..all fitted and ready to go..

As I mentioned, there's a fairly simple but clever on/off variable vale timing system
This works as follows -
There's a normal timinig chain from the bottom end to the exhaust cam
Theres a second timing chain from the exhaust cam to the inlet cam
The inlet cam sprocket is mounted through slotted holes and held under tension with a bevel washer. The sprocket can rotate between two stops of the slots independant to the camshaft
There is a helical gear cut into the inside of the cam gear, and a matching thread on a "stud" which screws into the end of the inlet cam
The "vanos unit" has a free turning "cup" with matching internal and external threads to the cam/sprocket, and has a hydraulic piston which allows the cup to move in and out under oil pressure
Oil to the piston within the vanos unit is controlled with a simple on/off (2 posn/3 way) solenoid valve that either pressurises the piston forcing it out, or drains the oil back to the sump
Probably easier to explain with photos and a video..


Clicky for video of single vanos operation
Head all back together and ready to go on!
Dioxice / Cleansurface (who supplied the dry ice for stripping the shell) also have a big "blasting room" on their premesis which they will rent out to people who look competent at around £40 an hour (I think). That said, they also let me use it!
They do a lot of engine cleaning for different automotive people and race teams, and while I was initially a bit unsure about it, since using it I'm pretty impressed! The system uses "crunched-up" dry ice and blasts it out of a big hose (literally 1" diameter or more). The method is pretty clever in that as the tiny particles of dry-ice hit the surface of the part being cleaned, the ice evaporates and the huge expansion lifts any dirt and debris from the surface of the part
I cleaned most of the engine components using this method and they came up brilliantly! It doesn't remove any of the "staining" you get on aluminium surfaces, however everything else comes up brilliantly - its fast, clean because there's no residue left behind, and doesn't damage threads, soft surfaces, anything! very impressed.. I did all the engine bits, covers, trims, etc in 90mins and was charged £50 which included the dry ice, and use of their safety gear.. Word to the wise, if you do this ever WEAR WARM CLOTHES AND A HAT! You have no idea how frickin' cold it gets until you've experienced working in a closed booth with dry ice!
Some examples of the head below
Next up was the head - this underwent quite a bit of tidy-up work..
Combustion chambers were pretty good to start with, and not a lot of scope for de-shrouding valves and things. What I did do was clean it up a bit, particularly any of the sharp edges or transitions
Inlet was ported, mostly working the large radius and blending the valve guides, also the valve seats into the head material to remove any steps. Ports were left at a 240 grit finish
On the exhaust side, the ports were fully matched to the manifold, valve seats and guides blended, then polished. Not much material removal to do on that side of the head
Kind of hard to get any meaningful photographs! but..
During - roughing out:
After:
Rebuilding the head - valve gear, tensioners, oil pump, etc all ultrasonically cleaned ready for installation
And then re-assembled
The camshafts were fitted - these are a set of cams from a US Specification 3.2 M3, which is basically the same engine with an iron block and a few tweaks. They're basically shrick cams in terms of the grind, so quite a lot more agressive than the standard 328i cams
For comparison..
US M3 cam specs (S52B32)
Duration / Lift
252 Deg / 10.3 mm Intake
244 Deg / 10.2 mm Exhaust
328i cam specs (M52B28)
Duration / Lift
228 Deg / 9 mm Intake
228 Deg / 9 mm Exhaust
328i Schrick cam specs (M52B28)
Duration / Lift
252 Deg / 10.2 mm Intake
244 Deg / 9.5 mm Exhaust
..all fitted and ready to go..
As I mentioned, there's a fairly simple but clever on/off variable vale timing system
This works as follows -
There's a normal timinig chain from the bottom end to the exhaust cam
Theres a second timing chain from the exhaust cam to the inlet cam
The inlet cam sprocket is mounted through slotted holes and held under tension with a bevel washer. The sprocket can rotate between two stops of the slots independant to the camshaft
There is a helical gear cut into the inside of the cam gear, and a matching thread on a "stud" which screws into the end of the inlet cam
The "vanos unit" has a free turning "cup" with matching internal and external threads to the cam/sprocket, and has a hydraulic piston which allows the cup to move in and out under oil pressure
Oil to the piston within the vanos unit is controlled with a simple on/off (2 posn/3 way) solenoid valve that either pressurises the piston forcing it out, or drains the oil back to the sump
Probably easier to explain with photos and a video..
Clicky for video of single vanos operation
Head all back together and ready to go on!
Last edited by smallspeed on Wed Nov 09, 2016 11:34 am, edited 1 time in total.
-
smallspeed
- I used to have a life, then came DDK
- Posts: 3856
- Joined: Mon Mar 31, 2008 12:38 pm
- Location: leicester
- Contact:
Re: BMW BTCC Inspired Track car
onto the bottom-end..
The block was cleaned using the same "ice-blasting" technique, as was the sump, oil pump parts, etc.
The crank (now fully balanced) was dropped into the block and torqued down using a set of cheap standard main bearings, and the old cap-bolts, and the joints measured using plastigauge strips.
Most of the bearings were showing in-tolerance clearance, however a couple were towards the top end, and so a "custom set" of main bearings were ordered from BMW - they offer various colours of bearings relating to how far oversize they are - red, yellow, green, blue, etc. They offer these individually, and in standard, first ground and second ground fitments too, so its pretty easy to get them right!
Bearings in, crank was assembled and re-checked with another set of plastigauges - clearances all now at the bottom end or thereabouts
Plastigagues removed, everything cleaned and suitably lubricated with an assembly lubricant, torqued down with new bolts, pistons and con-rods fitted, again with "correct colour bearings"

At this point I set the crank to piston 1 TDC and found the best way to do this was with a dual dial test gauge - I'm not sure what the correct term is for this thing, but its used for leveling the bed of a milling machine and looks like this..
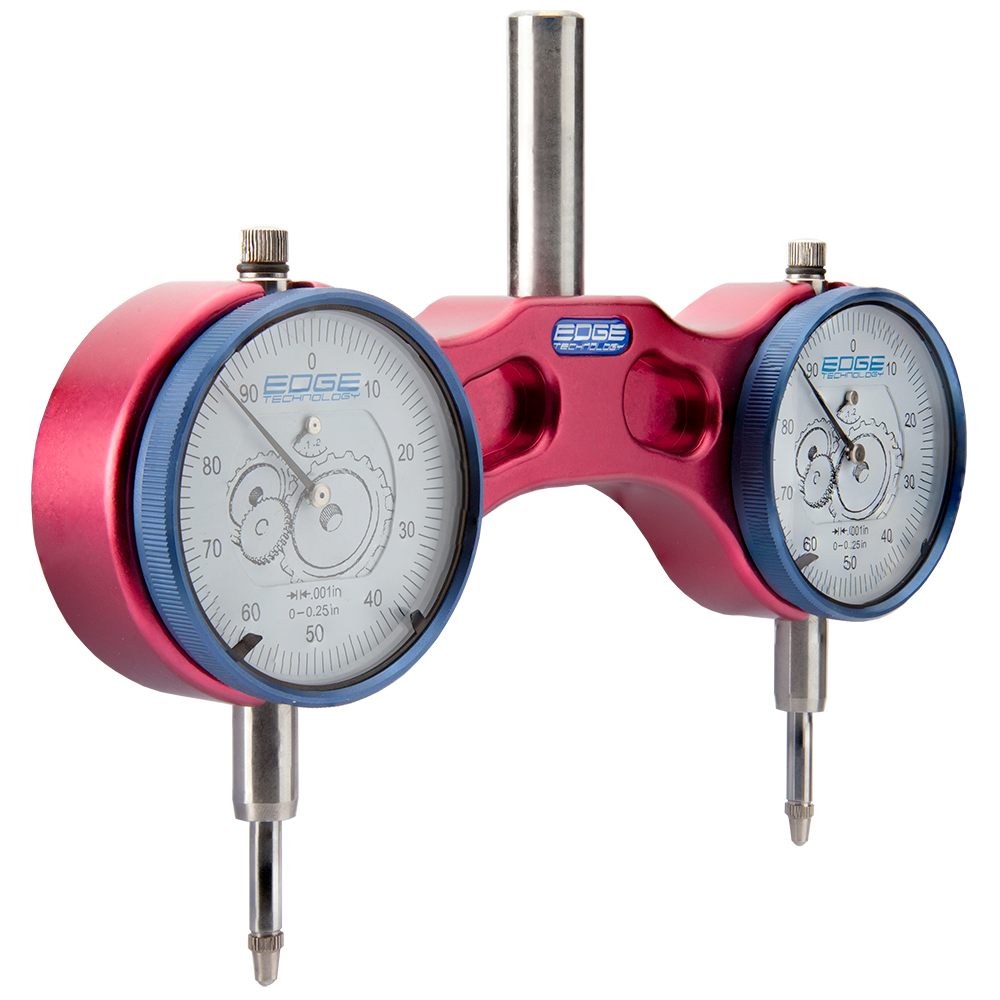
..I was able to stick it on pistons 3/4 which are level at piston 1 TDC, and then lock it out
I thought this was a really neat piece of kit, but the guy I borrowed it off remembered I had borrowed it so I had to give it back
I've since brought one of these..
..which is about 1/10th the price of the first thing, and works really well for setting piston 1 (although not on aluminium blocks!)
All set and ready to go, crank locked out against the block..

Lower timing case on..

Cams set to TDC and locked out, head, oil pump, (aluminium*) water pump, and upper timing case on..
* A lot of BMW engines run a plastic impellor on their water pumps and they're a bit of a ticking time-bomb. I think they're OK if they're replaced every 50k or so, but they're a risk either way, so if you're replacing one get either the later version which has a metal impellor, or an aftermarket one with a metal impellor - there are a couple of versions, one with a welded steel arrangement and the other with a cast aluminium one. I prefer the latter, it looks WAY more robust to me and mimics the plastic impellor design
Now we take a bit of a leap!.. Head on, all timed up, vanos unit fitted, cam cover fitted, COP's in, everything snugged down and wired up!

Exhaust manifold "art"..


These are from the "Euro" e36 m3 evo (S50B32) and are about as good as it gets really - there are a lot of third party performance exhaust manifolds (or headers if you're american) however none of them really perform better than the factory manifolds.. The S50B32 was a proper 100bhp/litre engine (first naturally aspirated standard production engine to achieve it i believe) so they weren't messing about
I know of some big power race engines using these manifolds, so they're not going to be a restriction for my little 2.9
And, wrapped..


I asked a lot of questions about wrapping vs. paint and wrapping vs. coating, etc., and ended up deciding coating was not going to fly on my budget, or on second hand manifolds without a lot of cleaning inside and out! I got a top tip from Mr Race-Mechanic next door though - use the titanium wrap! Apparently the standard black / white / cream stuff is nasty to fit, and a lot of people recommend doing things like soaking it in water before fitting, painting over it, painting under it, etc. All seem to either make the wrap degrade, the wrap catch-fire, or the manifolds rot over time..
Titanium wrap - fit it, move on!
He then proceded to produce 30 meters of the stuff from a box in the garage and give it to me, saving me about £100.. He then stood and watched me wrap the damn things - offered no help, just lots of laughing, tutting, and head-shaking! I think he had his 100 quids worth that morning!! All locked in place with double-loops of double-lock-wire rather than straps (another tip) because it holds everything tight, but add a bit more flexibility vs. the very solid stainless straps
Couple more bits and bobs, some wiring, and its ready for fitting!

ENGINE DONE! And pictured on the drive with its 125bhp/litre n/a little sister (s54b32tu)
The block was cleaned using the same "ice-blasting" technique, as was the sump, oil pump parts, etc.
The crank (now fully balanced) was dropped into the block and torqued down using a set of cheap standard main bearings, and the old cap-bolts, and the joints measured using plastigauge strips.
Most of the bearings were showing in-tolerance clearance, however a couple were towards the top end, and so a "custom set" of main bearings were ordered from BMW - they offer various colours of bearings relating to how far oversize they are - red, yellow, green, blue, etc. They offer these individually, and in standard, first ground and second ground fitments too, so its pretty easy to get them right!
Bearings in, crank was assembled and re-checked with another set of plastigauges - clearances all now at the bottom end or thereabouts
Plastigagues removed, everything cleaned and suitably lubricated with an assembly lubricant, torqued down with new bolts, pistons and con-rods fitted, again with "correct colour bearings"
At this point I set the crank to piston 1 TDC and found the best way to do this was with a dual dial test gauge - I'm not sure what the correct term is for this thing, but its used for leveling the bed of a milling machine and looks like this..
..I was able to stick it on pistons 3/4 which are level at piston 1 TDC, and then lock it out
I thought this was a really neat piece of kit, but the guy I borrowed it off remembered I had borrowed it so I had to give it back
I've since brought one of these..
..which is about 1/10th the price of the first thing, and works really well for setting piston 1 (although not on aluminium blocks!)
All set and ready to go, crank locked out against the block..
Lower timing case on..
Cams set to TDC and locked out, head, oil pump, (aluminium*) water pump, and upper timing case on..
* A lot of BMW engines run a plastic impellor on their water pumps and they're a bit of a ticking time-bomb. I think they're OK if they're replaced every 50k or so, but they're a risk either way, so if you're replacing one get either the later version which has a metal impellor, or an aftermarket one with a metal impellor - there are a couple of versions, one with a welded steel arrangement and the other with a cast aluminium one. I prefer the latter, it looks WAY more robust to me and mimics the plastic impellor design
Now we take a bit of a leap!.. Head on, all timed up, vanos unit fitted, cam cover fitted, COP's in, everything snugged down and wired up!
Exhaust manifold "art"..
These are from the "Euro" e36 m3 evo (S50B32) and are about as good as it gets really - there are a lot of third party performance exhaust manifolds (or headers if you're american) however none of them really perform better than the factory manifolds.. The S50B32 was a proper 100bhp/litre engine (first naturally aspirated standard production engine to achieve it i believe) so they weren't messing about
I know of some big power race engines using these manifolds, so they're not going to be a restriction for my little 2.9
And, wrapped..
I asked a lot of questions about wrapping vs. paint and wrapping vs. coating, etc., and ended up deciding coating was not going to fly on my budget, or on second hand manifolds without a lot of cleaning inside and out! I got a top tip from Mr Race-Mechanic next door though - use the titanium wrap! Apparently the standard black / white / cream stuff is nasty to fit, and a lot of people recommend doing things like soaking it in water before fitting, painting over it, painting under it, etc. All seem to either make the wrap degrade, the wrap catch-fire, or the manifolds rot over time..
Titanium wrap - fit it, move on!
He then proceded to produce 30 meters of the stuff from a box in the garage and give it to me, saving me about £100.. He then stood and watched me wrap the damn things - offered no help, just lots of laughing, tutting, and head-shaking! I think he had his 100 quids worth that morning!! All locked in place with double-loops of double-lock-wire rather than straps (another tip) because it holds everything tight, but add a bit more flexibility vs. the very solid stainless straps
Couple more bits and bobs, some wiring, and its ready for fitting!
ENGINE DONE! And pictured on the drive with its 125bhp/litre n/a little sister (s54b32tu)
-
911hillclimber
- Nurse, I think I need some assistance
- Posts: 18925
- Joined: Mon Mar 10, 2008 6:26 pm
- Location: West Midlands
Re: BMW BTCC Inspired Track car
How interesting is this!?
Great to see, big fan of the BMW straight 6.
Never seen the titanium wrap before, used to use the fabric stuff on my hot Impreza, bloody awful stuff over time, smells, frays and becomes a mess.
Look forward to the next leap of progress.
Great to see, big fan of the BMW straight 6.
Never seen the titanium wrap before, used to use the fabric stuff on my hot Impreza, bloody awful stuff over time, smells, frays and becomes a mess.
Look forward to the next leap of progress.
73T 911 Coupe, road/hillclimber 3.2L
Lola t 492 / 3.2 hillclimb racer
Boxster 987 Gen II 2.9
Lola t 492 / 3.2 hillclimb racer
Boxster 987 Gen II 2.9
-
smallspeed
- I used to have a life, then came DDK
- Posts: 3856
- Joined: Mon Mar 31, 2008 12:38 pm
- Location: leicester
- Contact:
Re: BMW BTCC Inspired Track car
it stank the first couple of times the engine ran but since then no smells and no issues so far with fraying / burning / flaking.. its just expensive! although its a kind of gold shiny finish and it says "titanium" in the title which is enough to justify it to me
-
smallspeed
- I used to have a life, then came DDK
- Posts: 3856
- Joined: Mon Mar 31, 2008 12:38 pm
- Location: leicester
- Contact:
Re: BMW BTCC Inspired Track car
So with the engine done, the work finaly moved onto the diff, which is what kicked all this off.. I apologise but I had a lot of phone trouble when I was doing the diff and I don't have many pictures - the trouble was mostly that I went to Peru with work for a week and my phone decided to stay an extra few days before flying back!
e36 6-cylinder non-M cars use a 188mm diff, which is the same ZF "pumpkin" as a few porsches (I forget which models, but I think 944 turbo / 968 and maybe some more)
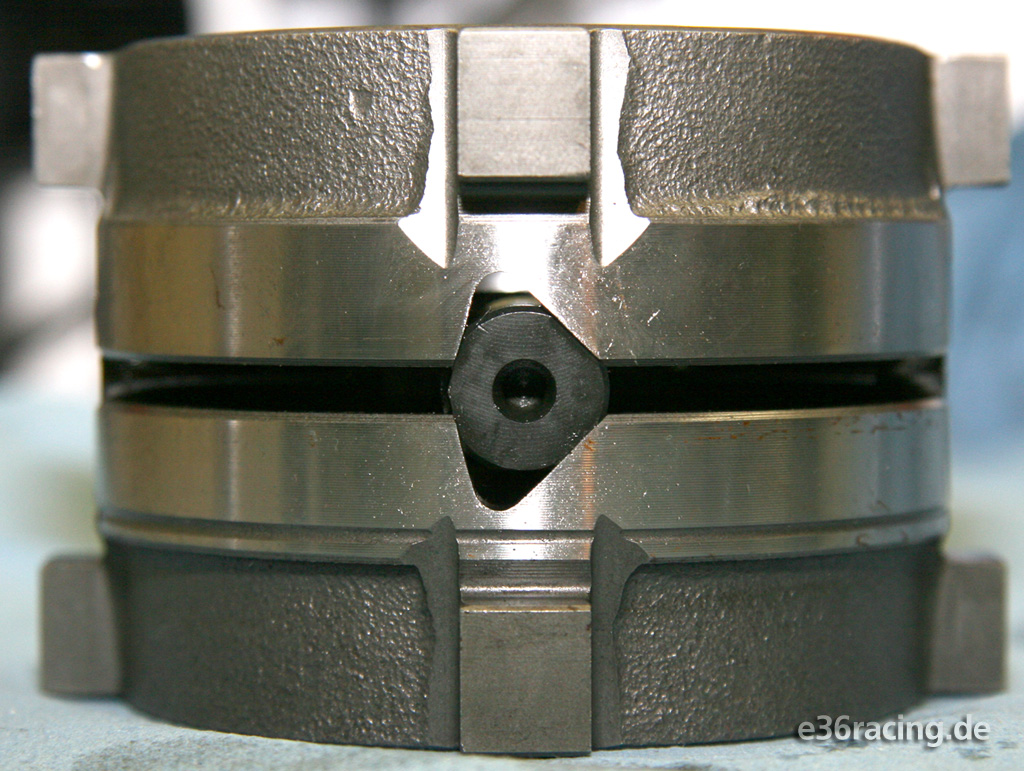
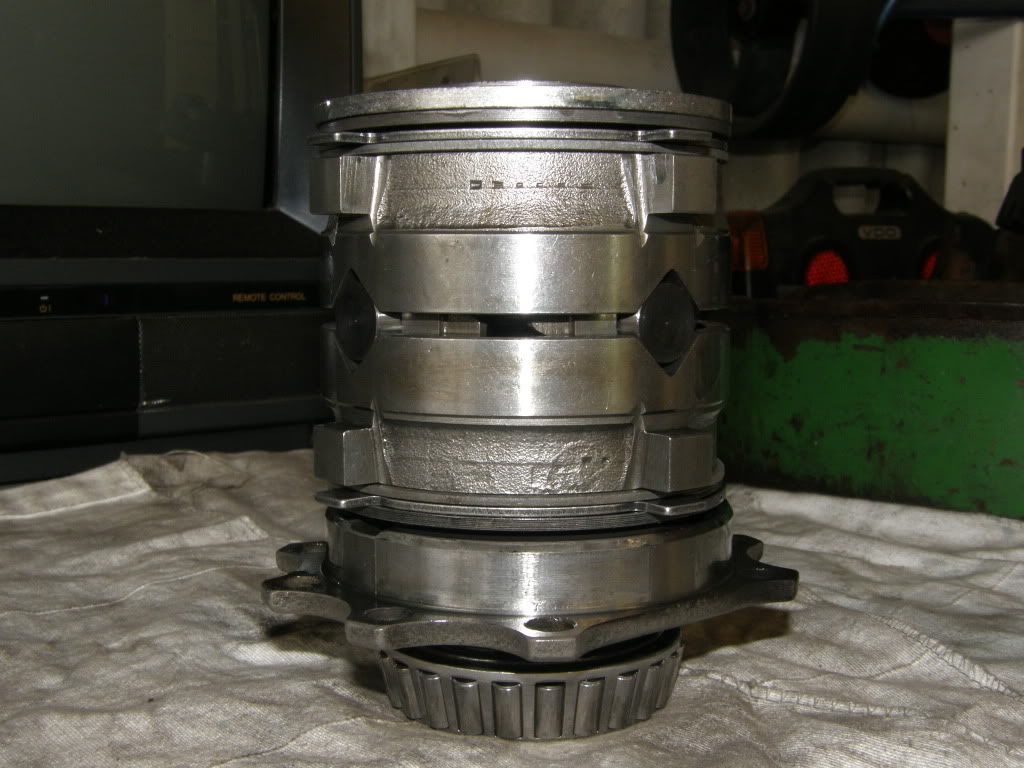
Due to the lack of photos, I've robbed some from the internet to explain the internals of the diff and what was done..
This is a nearly accurate image of what the insides look like!

part numbers 1 and 2 are the case or "pumpkin" if you're american! On a 188 diff, part number 2 is actually part of part number 1 - they're not seperable
Part number 3 is the other end of the case and part number 4 is the bolt which holds this to the case. These can fail, will explain more later.. The face showing with the two holes in it top and bottom (which aren't there) is a friction face
Parts 5 and 6 don't exist either they're a single large washer about 2.5mm thich and similar in size to part number 8 but without the ears
Parts 7 are belville washers whcih create some pre-load
Parts 8 are steel plates, the side facing part number 9 is a friction face (think flywheel), the "ears" fit into slots inside the pumpkin
Parts 9 are the friction plates (think clutch plate) - its not really show above, but its important to understand, they have a star shape on the inside face which matches and fits over the splines of the main gears going out to the drive shafts
Parts 10 are the carriers or pressure rings - these also have ears which slot into the case. They also have a friction face (think flywheel) which is facing parts number 9, and ramps on the other end which are shown here as nice round cut-outs. More explanation below, but these are actually V-Shaped cut-outs
Parts number 11 is connected to the driveshaft either side
Parts number 12 are the "little gear things" (spur gears?). These mout to the spider #13 which is actually two rods with a cut out in the center so they sit over each other and form a cross. The ends of these "rods" sit into the V-Shaped cut-outs in the carrier #10
So in operation, the crown wheel (mounted to the large PCD hole array in the pumpkin) is turned by the pinion gear connected to the prop shaft. The whole pumpkin rotates, and torque is transmitted to each wheel via part numbers 11
If there's a difference in torque between the two wheels greater than the "pre load" provided by the belville washers (#7) then the two gears (#11) will try and rotate the cross shaft made up of part numbers #13
This rides up the ramps on #10, forcing #10(left) and #10(right) apart. That clamps the friction plate (#9) between the friction faces on parts #8 and #10 either side
Hopefully that makes some sense?!
So a couple of driving factors..
1) pre-load effects when the diff "locks", and also how much drag or loss there is in the system when you're travelling in a straight line
2) The number of friction plates (9) and friction faces (8) effects the amount of lock the differential is able to create
3) the angle of the ramps effects the amount of lock the differential creates
As standard #1 is set somewhere around 19-22Nm, #2 is 2 combination of plates (one per side) and #3 is 45 degrees in each direction. This results in around 25% lock in acceleration and deceleration
While #2 works in both accel and decel, #3 is direction dependant - there's one face for accel and one for decel, so its possible to increase or decrease the amount of lock in each direction independantly
Here's some examples..
This is a standard set of ramps - 45-degree either way which is a 2 way set-up
This set of ramps has been re-ground with a very steep angle in one direction (presumably decel). This wil give very little lock in deceleration but more in acceleration. This is a 1.5 way differential
This set of ramps is a 2-way set-up aswell but with a very flat ramp angle which gives a much larger lock-up
You can see they've ground a second set of ramps on the right pressure ring which is preferable to re-grinding the standard ramps. The one on the left is actually a "home made" one they produce at whatever angle you want from scratch

Its also possible to grind the ramps with a vertical face in one direction and a ramp in the other - this is a 1 way differential and only gives lock under (usually) acceleration
If you remember, I mentioned parts 5 and 6 don't exist in the BMW diff - there is however a large washer that is not shown above, and this is the same diameter as a friction plate or clutch plate (part 8 and 9), AND with the same thickness as 1x part 8 and 1x part 9. A really simple "trick" when rebuilding these diffs is just to bin that washer and fit another plate and clutch (8 and 9) which increases your lock to around 35% in both accel and decel. This is what I decided to do!
You can go a step further and have the friction face of part number 4 ground down by the thickness of this washer and add another pair of plates (bringing the total to 4) or even more and have 5 plates.. This is a VERY high locking diff, and not very normal, although quite a few people go upto 4 for the small amount of work involved
Another trick (if you're doing a BMW diff) is to use the super-duper sintered BMW Motorsport clutch plates. These cost an ARM AND A LEG! What I found though working back through the ZF parts books, is they're the same part number as the standard porsche clutch plates! Another kick in the nuts - the standard porsche clutches (from Porsche) are cheaper than the standard moly clutches from BMW.. Fortunately for me I figured this out before I brought anything, and so was able to build this diff up using those porsche parts - saving a few quid and adding a little more bite
I also mentioned before pre-load - there are a few people who like different values, some preferring zero preload which gives less drag in a straight line and a very harsh engagement, others preferring a lot more preload than standard (45Nm in some cases!). This gives more drag but a more progressive engagement.
I had no idea what I was going to want, so I hit bang on 20Nm which is pretty much standard - we will see how that works out!
Final specs for my diff build:
20Nm pre load
3x clutch plates
45 degree ramps
That little lot gives around 35% lock in accel and decel which is a nice increase over standard but without going too crazy. ALso pretty much standard engagement so hopefully friendly on road and track
Here's an example of the complete "stack" outside of the diff case to give you an idea what it all looks like..
And this is an assembled diff unit complete with new bearings and the trigger wheel for "speed"
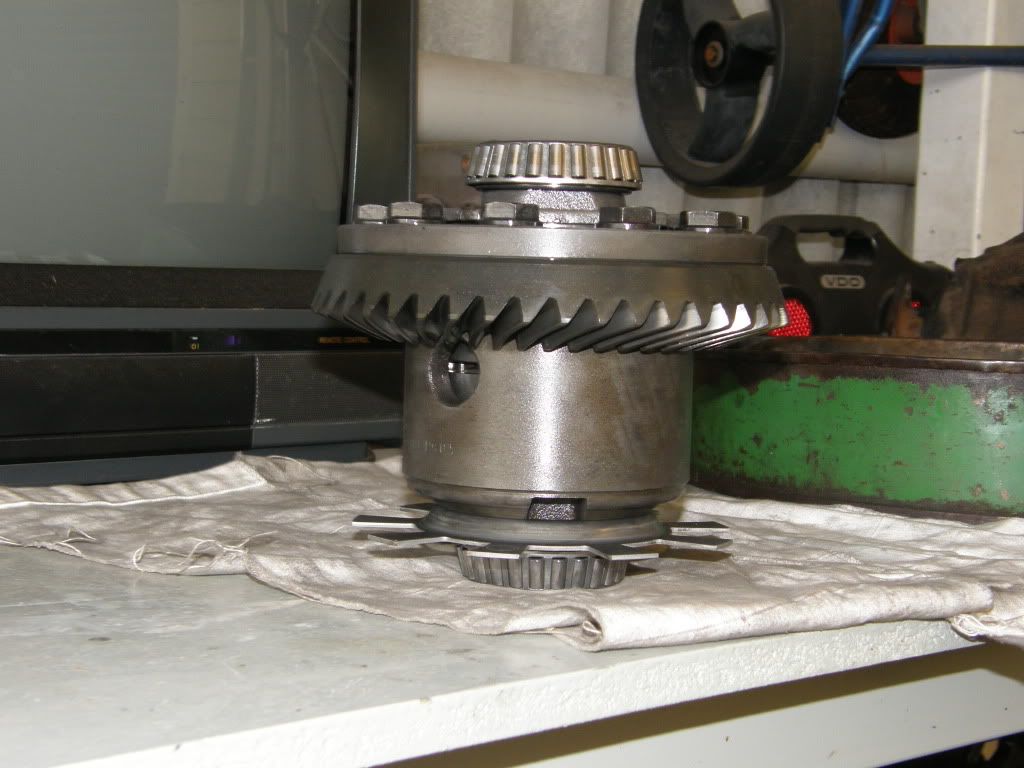
My diff was rebuilt using new bearings, seals, etc., and a new crush washer (more like a collar thing) which is used to set the position from the centre line of the pumpkin to the pinion gear for engagement, and a bunch of new shims which sets the position of the pumpkin (along its centre line) relative to the centreline of the pinion to ensure correct engagement
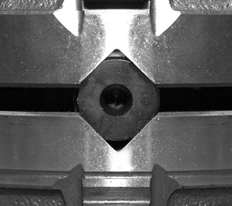
One other thing I did - I mentioned earler the bolts can fail which hold the cover onto the end of the main diff casing.. I had all new bolts and got them cross drilled. I know its weak having them done for you, but having brought a jig and snapped about 3 drills and one small end-mill on my pillar drill I gave in! I then loctite'd the bolts per spec, and lockwired for back-up. This was one of those super-anal things i really enjoyed, that should have taken 10mins, but probably took 3hrs!
I also drilled out and re-tapped the front mounting bolt hole - this is an M12 bolt as standard and they've been known to SNAP! There's a lot of speculation whether this is caused by agressive driving and worn out bushes, or if its an actual weakness.. Given BMW went to an M14 bolt on the next gen cars it seemed a no brainer while it was all out of the car, especially since I had an M14 tap already, and was making my own bushes!
Case painted up, new bushes pressed in (thanks to Chris, who's press has never seen so much action until I started this project) and all mounted up back in the car!
After all that, I'm happy to report my phone appeared! so back to MY pictures
This is a test-fit in a spare back-plate, so excuse the rusty-scabby-horribleness!

This is the final back-plate and its not a load better to be honest

For the time being this is using a standard back-plate, however depending on the temps I may fit an "alpina cover" which has a small sump at the bottom and is heavilly finned for cooling (or just smash a couple of AN ports in the side of the housing and fit a pump and a separate cooler, per the original group a / stw cars).
I have a temp sensor in the bottom of the housing anyway, so can keep an eye on this
Next time - "The shell returns and my mrs gets WASTED on the driveway!"
e36 6-cylinder non-M cars use a 188mm diff, which is the same ZF "pumpkin" as a few porsches (I forget which models, but I think 944 turbo / 968 and maybe some more)
Due to the lack of photos, I've robbed some from the internet to explain the internals of the diff and what was done..
This is a nearly accurate image of what the insides look like!
part numbers 1 and 2 are the case or "pumpkin" if you're american! On a 188 diff, part number 2 is actually part of part number 1 - they're not seperable
Part number 3 is the other end of the case and part number 4 is the bolt which holds this to the case. These can fail, will explain more later.. The face showing with the two holes in it top and bottom (which aren't there) is a friction face
Parts 5 and 6 don't exist either they're a single large washer about 2.5mm thich and similar in size to part number 8 but without the ears
Parts 7 are belville washers whcih create some pre-load
Parts 8 are steel plates, the side facing part number 9 is a friction face (think flywheel), the "ears" fit into slots inside the pumpkin
Parts 9 are the friction plates (think clutch plate) - its not really show above, but its important to understand, they have a star shape on the inside face which matches and fits over the splines of the main gears going out to the drive shafts
Parts 10 are the carriers or pressure rings - these also have ears which slot into the case. They also have a friction face (think flywheel) which is facing parts number 9, and ramps on the other end which are shown here as nice round cut-outs. More explanation below, but these are actually V-Shaped cut-outs
Parts number 11 is connected to the driveshaft either side
Parts number 12 are the "little gear things" (spur gears?). These mout to the spider #13 which is actually two rods with a cut out in the center so they sit over each other and form a cross. The ends of these "rods" sit into the V-Shaped cut-outs in the carrier #10
So in operation, the crown wheel (mounted to the large PCD hole array in the pumpkin) is turned by the pinion gear connected to the prop shaft. The whole pumpkin rotates, and torque is transmitted to each wheel via part numbers 11
If there's a difference in torque between the two wheels greater than the "pre load" provided by the belville washers (#7) then the two gears (#11) will try and rotate the cross shaft made up of part numbers #13
This rides up the ramps on #10, forcing #10(left) and #10(right) apart. That clamps the friction plate (#9) between the friction faces on parts #8 and #10 either side
Hopefully that makes some sense?!
So a couple of driving factors..
1) pre-load effects when the diff "locks", and also how much drag or loss there is in the system when you're travelling in a straight line
2) The number of friction plates (9) and friction faces (8) effects the amount of lock the differential is able to create
3) the angle of the ramps effects the amount of lock the differential creates
As standard #1 is set somewhere around 19-22Nm, #2 is 2 combination of plates (one per side) and #3 is 45 degrees in each direction. This results in around 25% lock in acceleration and deceleration
While #2 works in both accel and decel, #3 is direction dependant - there's one face for accel and one for decel, so its possible to increase or decrease the amount of lock in each direction independantly
Here's some examples..
This is a standard set of ramps - 45-degree either way which is a 2 way set-up
This set of ramps has been re-ground with a very steep angle in one direction (presumably decel). This wil give very little lock in deceleration but more in acceleration. This is a 1.5 way differential
This set of ramps is a 2-way set-up aswell but with a very flat ramp angle which gives a much larger lock-up
You can see they've ground a second set of ramps on the right pressure ring which is preferable to re-grinding the standard ramps. The one on the left is actually a "home made" one they produce at whatever angle you want from scratch
Its also possible to grind the ramps with a vertical face in one direction and a ramp in the other - this is a 1 way differential and only gives lock under (usually) acceleration
If you remember, I mentioned parts 5 and 6 don't exist in the BMW diff - there is however a large washer that is not shown above, and this is the same diameter as a friction plate or clutch plate (part 8 and 9), AND with the same thickness as 1x part 8 and 1x part 9. A really simple "trick" when rebuilding these diffs is just to bin that washer and fit another plate and clutch (8 and 9) which increases your lock to around 35% in both accel and decel. This is what I decided to do!
You can go a step further and have the friction face of part number 4 ground down by the thickness of this washer and add another pair of plates (bringing the total to 4) or even more and have 5 plates.. This is a VERY high locking diff, and not very normal, although quite a few people go upto 4 for the small amount of work involved
Another trick (if you're doing a BMW diff) is to use the super-duper sintered BMW Motorsport clutch plates. These cost an ARM AND A LEG! What I found though working back through the ZF parts books, is they're the same part number as the standard porsche clutch plates! Another kick in the nuts - the standard porsche clutches (from Porsche) are cheaper than the standard moly clutches from BMW.. Fortunately for me I figured this out before I brought anything, and so was able to build this diff up using those porsche parts - saving a few quid and adding a little more bite
I also mentioned before pre-load - there are a few people who like different values, some preferring zero preload which gives less drag in a straight line and a very harsh engagement, others preferring a lot more preload than standard (45Nm in some cases!). This gives more drag but a more progressive engagement.
I had no idea what I was going to want, so I hit bang on 20Nm which is pretty much standard - we will see how that works out!
Final specs for my diff build:
20Nm pre load
3x clutch plates
45 degree ramps
That little lot gives around 35% lock in accel and decel which is a nice increase over standard but without going too crazy. ALso pretty much standard engagement so hopefully friendly on road and track
Here's an example of the complete "stack" outside of the diff case to give you an idea what it all looks like..
And this is an assembled diff unit complete with new bearings and the trigger wheel for "speed"
My diff was rebuilt using new bearings, seals, etc., and a new crush washer (more like a collar thing) which is used to set the position from the centre line of the pumpkin to the pinion gear for engagement, and a bunch of new shims which sets the position of the pumpkin (along its centre line) relative to the centreline of the pinion to ensure correct engagement
One other thing I did - I mentioned earler the bolts can fail which hold the cover onto the end of the main diff casing.. I had all new bolts and got them cross drilled. I know its weak having them done for you, but having brought a jig and snapped about 3 drills and one small end-mill on my pillar drill I gave in! I then loctite'd the bolts per spec, and lockwired for back-up. This was one of those super-anal things i really enjoyed, that should have taken 10mins, but probably took 3hrs!
I also drilled out and re-tapped the front mounting bolt hole - this is an M12 bolt as standard and they've been known to SNAP! There's a lot of speculation whether this is caused by agressive driving and worn out bushes, or if its an actual weakness.. Given BMW went to an M14 bolt on the next gen cars it seemed a no brainer while it was all out of the car, especially since I had an M14 tap already, and was making my own bushes!
Case painted up, new bushes pressed in (thanks to Chris, who's press has never seen so much action until I started this project) and all mounted up back in the car!
After all that, I'm happy to report my phone appeared! so back to MY pictures
This is a test-fit in a spare back-plate, so excuse the rusty-scabby-horribleness!
This is the final back-plate and its not a load better to be honest
For the time being this is using a standard back-plate, however depending on the temps I may fit an "alpina cover" which has a small sump at the bottom and is heavilly finned for cooling (or just smash a couple of AN ports in the side of the housing and fit a pump and a separate cooler, per the original group a / stw cars).
I have a temp sensor in the bottom of the housing anyway, so can keep an eye on this
Next time - "The shell returns and my mrs gets WASTED on the driveway!"
-
smallspeed
- I used to have a life, then came DDK
- Posts: 3856
- Joined: Mon Mar 31, 2008 12:38 pm
- Location: leicester
- Contact:
Re: BMW BTCC Inspired Track car
So, as promised, this installment covers the rollcage!
First up some trauma..
I spoke with the guy next door about roll cages on several occasions, but he only ever used some crazy scottish chap near Banbury who's taken over the old Prodrive rigs and things. Apparently he's "the best" however his price was the best too! I never spoke to him, but I have it on fairly good authority he charged around £25k for the shell prep and cage installation for the roger clark motorsport gobstopper 2.. Now don't get me wrong, the thing is a work of art, BUT I don't have a 25k roll cage budget!
I set about contacting a bunch of people about rollcages - from some of the largest UK roll-cage companies, to the smallest, and I didn't get a great feeling from ANY of them.
They mostly fit into one of three buckets in my experience..
1) Potential Arthur Daleys - people who when questioned about technicalities crumble, or try and convince you what you're asking for or expecting is some way irrelevant or incorrect
2) Poor communicators - people who you spend 3 or 4 days getting hold of, are great on the phone, seem to know everything, but ultimately are impossible to deal with (these are likely "craftsmen" rather than "businessmen" which is fine, but it kind of makes my foot itch when someone is that hard to contact)
3) Sellers - people who just want to take your money and give you a load of tubes
I had discussions with supposed experts who didn't understand MIG / TIG requirements based on the materials they were using
I had discussions with very large companies who claimed all sorts of ISO certification, yet had zero traceability of their materials, inconsistent suppliers, and offered no material or installation certification
I had discussions with numerous answer machines
In the end I tried a guy at the end of the earth (middle of the south downs national park, hampshire) and FINALLY found someone on my wavelength!
He actually confirmed to me some of my suspicions with the big companies, particularly regards material specifications which isn't good.. I'm not going to name and shame; these companies are big and make a good living doing what they're doing, with many happy customers, however I'll never be one of them.. Instead I'll just sing Nick's praises and hope others have similar experiences with whoever they end up using
Nickson Motorsport are based here..

..its a long way from my house, but I wanted a good cage, installed by someone who knew what they were doing
Nick immediately started talking my language, understood my budget, came-up with a plan with me on what I'd have where, what I needed, etc.
He also seemed far more up to speed on roll cage design than most of the other people I'd spoken with (I started out in spaceframe design/development, so was nice to talk a similar language) and also had a really good understanding of current and future regulations and specifications - perfect example, the changes being proposed re: door bars, and the potential outlawing of traditional X-Bars (where there's one continual diagonal tube, and two short tubes making up an X, welded in the centre). After George Plasza's fatal accident (in a BMW) people were moving towards door bars that were an X made from two continual tubes - one U and one n (hope this makes sense?!) welded in the centre with bracing
Plan formed, car was shipped off to Nick (as previously covered) and work commenced!
Now, I was travelling a lot with work at the time, and had other things to do (engine rebuild, etc) so this was a fairly slow process - Nick put a couple of other "urgent" cars ahead of me in the queue as and when, as agreed by me. He continued to impress with his communication and flexibility on getting the job done in a sensible time frame
There's some great examples of his work on his website here..
http://www.nicksonmotorsport.co.uk/
..I really can't recommend him enough! He's also a complete car nut, and is currently working on a very interesting Porsche project of his own
I had a few requirements for the cage:
- Pick-up front and rear strut towers
- Pick-up rear subframe mounting points - these are a weakspot on these cars (and most BMW's)
- X in the Rear legs with harness mounting bars
- Harness mounting points to be added for lap and crotch belts
- Tie in directly to the A and B posts
- Dash bar
- Rear bar between rear strut towers
- Rear bar between "main hoop legs" to be tied in across the front of the back seat
- X in the roof
- "new spec" door bars
We discussed an X in the main hoop, but its quite a small car inside and didn't deem it necessary at this time - the plan is to add an X (or more likely a single diagonal) another time if required
We also discussed "touring car bars" but there's not a huge space between A and B posts, or behind the drivers seat to move it backwards, and so we left these out too, HOWEVER the cage has been designed to allow for them to be added in the future if required and if the driver looses some weight
Final results were exactly what I wanted! Nick managed to push all the tubes out as close to the car body as possible, which tied it into the shell at every opportunity but more importantly maximises the space within the car for the driver (and also the largest entry/exit space through the door)
I'm really impressed with how this has gone together and how much space there is in this car compared to some others I've been in or seen - in particularly for me, the height of the front legs (how close they follow the roof and the a-posts) and the headroom to the roof-X, as while I'm only 5ft10, i'm really shot legged/long bodied so I appreciate the space above and around my head and shoulders
Pics during install...


Pics below of the finished cage..
Rear Strut tower bracing

Rear X and harness bars

Passenger side door bars, front legs, etc..

Roof X

Pass through to front strut towers

Rear part of cage with pick-up to front mounts of rear subframe (the ones which take most of the loading)

Front legs with bracing/gussets to a-post

Seat belt mountings, plus bar across leading edge of back seat with tie-in's to the shell

Some bits where the cage is picking up directly on the shell

Rear tower pick-ups - you can see how the pick-up is done with the X tubes to transfer load directly through the x's diagonally from front to rear struts (focus on torsional stiffness)

This hopefully gives you an idea how tight the cage is to the shell, and how unobtrusive it is to vision, driver space, access/exit space, etc (well, for a massive weld in rollcage anyway)
So next steps..
Rubbing down the inside ready for paint

And as promised, a pic of my wife getting wasted on the driveway!!
I actually "missed a few areas" of tar before sending the car off for the cage treatment - i was running out of time before flying out to some dusty-country-or-other with work, hence rear screen was still in and some tar remained on the rear parcel shelf, and directly behind where the rear seat back would be. This was dealt with quickly on the shell's return however i really struggled to get in there past the cage so help was enlisted!
Kudos to Amie, although she looks like a girly-girl, she's a vet / horse rider, so she's not afraid of getting stuck in! She apparently "Didn't need a mask" but about 3 mins later was feeling rather woozy and conceeded breating apparatus was the order of the day!

First up some trauma..
I spoke with the guy next door about roll cages on several occasions, but he only ever used some crazy scottish chap near Banbury who's taken over the old Prodrive rigs and things. Apparently he's "the best" however his price was the best too! I never spoke to him, but I have it on fairly good authority he charged around £25k for the shell prep and cage installation for the roger clark motorsport gobstopper 2.. Now don't get me wrong, the thing is a work of art, BUT I don't have a 25k roll cage budget!
I set about contacting a bunch of people about rollcages - from some of the largest UK roll-cage companies, to the smallest, and I didn't get a great feeling from ANY of them.
They mostly fit into one of three buckets in my experience..
1) Potential Arthur Daleys - people who when questioned about technicalities crumble, or try and convince you what you're asking for or expecting is some way irrelevant or incorrect
2) Poor communicators - people who you spend 3 or 4 days getting hold of, are great on the phone, seem to know everything, but ultimately are impossible to deal with (these are likely "craftsmen" rather than "businessmen" which is fine, but it kind of makes my foot itch when someone is that hard to contact)
3) Sellers - people who just want to take your money and give you a load of tubes
I had discussions with supposed experts who didn't understand MIG / TIG requirements based on the materials they were using
I had discussions with very large companies who claimed all sorts of ISO certification, yet had zero traceability of their materials, inconsistent suppliers, and offered no material or installation certification
I had discussions with numerous answer machines
In the end I tried a guy at the end of the earth (middle of the south downs national park, hampshire) and FINALLY found someone on my wavelength!
He actually confirmed to me some of my suspicions with the big companies, particularly regards material specifications which isn't good.. I'm not going to name and shame; these companies are big and make a good living doing what they're doing, with many happy customers, however I'll never be one of them.. Instead I'll just sing Nick's praises and hope others have similar experiences with whoever they end up using
Nickson Motorsport are based here..
..its a long way from my house, but I wanted a good cage, installed by someone who knew what they were doing
Nick immediately started talking my language, understood my budget, came-up with a plan with me on what I'd have where, what I needed, etc.
He also seemed far more up to speed on roll cage design than most of the other people I'd spoken with (I started out in spaceframe design/development, so was nice to talk a similar language) and also had a really good understanding of current and future regulations and specifications - perfect example, the changes being proposed re: door bars, and the potential outlawing of traditional X-Bars (where there's one continual diagonal tube, and two short tubes making up an X, welded in the centre). After George Plasza's fatal accident (in a BMW) people were moving towards door bars that were an X made from two continual tubes - one U and one n (hope this makes sense?!) welded in the centre with bracing
Plan formed, car was shipped off to Nick (as previously covered) and work commenced!
Now, I was travelling a lot with work at the time, and had other things to do (engine rebuild, etc) so this was a fairly slow process - Nick put a couple of other "urgent" cars ahead of me in the queue as and when, as agreed by me. He continued to impress with his communication and flexibility on getting the job done in a sensible time frame
There's some great examples of his work on his website here..
http://www.nicksonmotorsport.co.uk/
..I really can't recommend him enough! He's also a complete car nut, and is currently working on a very interesting Porsche project of his own
I had a few requirements for the cage:
- Pick-up front and rear strut towers
- Pick-up rear subframe mounting points - these are a weakspot on these cars (and most BMW's)
- X in the Rear legs with harness mounting bars
- Harness mounting points to be added for lap and crotch belts
- Tie in directly to the A and B posts
- Dash bar
- Rear bar between rear strut towers
- Rear bar between "main hoop legs" to be tied in across the front of the back seat
- X in the roof
- "new spec" door bars
We discussed an X in the main hoop, but its quite a small car inside and didn't deem it necessary at this time - the plan is to add an X (or more likely a single diagonal) another time if required
We also discussed "touring car bars" but there's not a huge space between A and B posts, or behind the drivers seat to move it backwards, and so we left these out too, HOWEVER the cage has been designed to allow for them to be added in the future if required and if the driver looses some weight
Final results were exactly what I wanted! Nick managed to push all the tubes out as close to the car body as possible, which tied it into the shell at every opportunity but more importantly maximises the space within the car for the driver (and also the largest entry/exit space through the door)
I'm really impressed with how this has gone together and how much space there is in this car compared to some others I've been in or seen - in particularly for me, the height of the front legs (how close they follow the roof and the a-posts) and the headroom to the roof-X, as while I'm only 5ft10, i'm really shot legged/long bodied so I appreciate the space above and around my head and shoulders
Pics during install...
Pics below of the finished cage..
Rear Strut tower bracing
Rear X and harness bars
Passenger side door bars, front legs, etc..
Roof X
Pass through to front strut towers
Rear part of cage with pick-up to front mounts of rear subframe (the ones which take most of the loading)
Front legs with bracing/gussets to a-post
Seat belt mountings, plus bar across leading edge of back seat with tie-in's to the shell
Some bits where the cage is picking up directly on the shell
Rear tower pick-ups - you can see how the pick-up is done with the X tubes to transfer load directly through the x's diagonally from front to rear struts (focus on torsional stiffness)
This hopefully gives you an idea how tight the cage is to the shell, and how unobtrusive it is to vision, driver space, access/exit space, etc (well, for a massive weld in rollcage anyway)
So next steps..
Rubbing down the inside ready for paint
And as promised, a pic of my wife getting wasted on the driveway!!
I actually "missed a few areas" of tar before sending the car off for the cage treatment - i was running out of time before flying out to some dusty-country-or-other with work, hence rear screen was still in and some tar remained on the rear parcel shelf, and directly behind where the rear seat back would be. This was dealt with quickly on the shell's return however i really struggled to get in there past the cage so help was enlisted!
Kudos to Amie, although she looks like a girly-girl, she's a vet / horse rider, so she's not afraid of getting stuck in! She apparently "Didn't need a mask" but about 3 mins later was feeling rather woozy and conceeded breating apparatus was the order of the day!
Last edited by smallspeed on Tue Nov 22, 2016 3:18 pm, edited 1 time in total.
-
911hillclimber
- Nurse, I think I need some assistance
- Posts: 18925
- Joined: Mon Mar 10, 2008 6:26 pm
- Location: West Midlands
Re: BMW BTCC Inspired Track car
That is impressive (cage and Amie).
As an aside, in MSA events, particularly Hill climb and sprint and only single seaters and Sports Libre cars, there is a LOT of grief about roll cages, or ROPS as the phrase goes.
This has not come down to saloons/circuit cars yet, but is all about roll hoop dimensions and the sizes in the Blue Book.
Can I suggest you get as much certification on the materials used from your man?
A little while ago I was facing to have made a new ROPS system for my Lola hill climb car and got exactly the same response as you from the industry.
I have since managed to get a formal Certificate for my car, but I know of a lot of single seater cars that are being cut open to install a much larger roll cage hoop.
This will be a nice car when you are done!
73T 911 Coupe, road/hillclimber 3.2L
Lola t 492 / 3.2 hillclimb racer
Boxster 987 Gen II 2.9
Lola t 492 / 3.2 hillclimb racer
Boxster 987 Gen II 2.9
-
smallspeed
- I used to have a life, then came DDK
- Posts: 3856
- Joined: Mon Mar 31, 2008 12:38 pm
- Location: leicester
- Contact:
Re: BMW BTCC Inspired Track car
Yeah I'm punching way above my weight
Nick purchases (or did) from proformance metals, pretty much on a job by job basis, so fully certified, tracable, etc. and I have the paperwork, which hopefully will help. He had a good understanding of what was coming in terms of regs, so size-wise this is correct for now and any likely future changes, in terms of both diameter and wall thickness. Also hopefully in terms of design, especially with the non-X door bars. Its also MSA compliant, and by using one diameter throughout also meets the proposed future European requirements too.. It looked a bit big and clunky when I first got it back (see images above) with the "full size door bars" and diagonals, however now its painted it looks more sensible.
I have built this with the plan of using it long term, so fingers crossed its built to be future proof (or as near to as possible). A little more than crossed fingers went into it but there's always an element of not knowing what's around the corner unfortunately - I guess this is exactly what you're running into with your Lola, where regs change and older cars are stuck! I've designed for Hans, 6 point belts, current (high end) seats, so hopefully it will bring me many years of track-day/racing/hillclimbing fun without too much additional serious modification
-
smallspeed
- I used to have a life, then came DDK
- Posts: 3856
- Joined: Mon Mar 31, 2008 12:38 pm
- Location: leicester
- Contact:
Re: BMW BTCC Inspired Track car
sat waiting for a stinking train, so figured I'd post another update..
when the shell was cleaned out on the inside i set to in the engine bay - i'd removed a lot of the sealant and things to do my welding first, and nick had obviously done a fair bit of grinding and welding too, so it was looking a bit of a mess..
I did a bit of research on all sorts of black magic paints and things, but ended up coming down on epoxy mastic as something that kind of ticked all the boxes..
Could be applied in my garage without turning the neighbours kids infertile
Could be applied with a brush or roller and give a decent finish
Covered a lot of crap in one go
Sealed everything up nicely and
Compatible with paint shops / top coats
I brought 1 litre from a company in essex i think, and set to..
Started at this..

First coat went on quite thin, per their instructions

this was done with a roller and took a while, but gave a nice even glossy coverage
I sanded it down a bit to give a key a couple of days later and went at it again, this time with a brush. This gave quite a matt finish weirdly! but still smooth and even, and using a brush allowed me to get everywhere

for the super-observant, yes, we jumped about a bit there - the bulkhead was sealed up in the rollcage pictures, now its open again!
This was also the time when the rear suspension went in proper - it just made more sense to cover that a few posts back when I was talking about suspension component refurb!

Anyway, I painted underneath too, ad all four wheel wells.. The picture above is at the rear right of the car looking towards front left
The whole of the trans tunnel was done too, however I've not done the two floor pans as I could really get the car up to do that - my plan is once its on the road again I will clean off the floor pans (which have nothing covering them up) and paint those too
At this point I started getting all precious, and thinking about shiny paint, so i turned the car around (my wife "drove" while I pushed!) to give me some more space and then set-too tidying up the engine bay - the white paint went in there OK but it wasn't great.. I sprayed over with some tins I had laying around of dark grey, blue and black! And then basically used that as a guide coat to sand it down
Heres the engine bay after spraying..


..and part way through sanding..

..starting to look like a REAL mess!
Sprayed the wheel arches too and tidied them..

..and fitted the refurbished/reinorced front subframe along with my new steering rack, inner/outer track rods, and gaiters

This isn't just any steering rack, its the purple label steering rack from the e46 compact!
Now the world of steering racks is confusing, but here we go..
E30 = very slow racks because some had power steering some didnt.. its about 4.5 turns lock to lock in mine!
E36 = slow and non linear steering rack in some of the cars - these are weird as they're very dead about centre
E36 M3 = bit quicker, but non linear and the stop-to-stop turns doesn't tell the whole story as the steering angle is diferent.. overall a horrible rack!
E46 / M3 = non linear again, and not much use
E46 CS / CSL = Superfast linear rack, and considered by a lot of people to be what the m3 should have come with from the factory.. Virtually unobtainable, and mega bucks when they are (3-400 dollars / 250 quid)
Z4M Coupe = the FASTEST production rack BMW have made, linear, and an absolute peach! See above re: avaiabiliy, except x5 because they didn't build many z4mc's at all, even compared to CSL's and CS's!
The saving grace is, they put some weird rack in the e46 post facelift compact - its nearly as quick as the CSL rack, but has more travel so is actually a little faster in terms of mm/rev, and is completely linear. Its also avaiable for about £50!
The other saving grace is all of the above racks are interchangeabe, except the e30 which has 15mm thicker mounting "blocks" - great news for E30's as you can shove an e46 ti rack in it and some 15mm spacers, lifting the rack up and curing any bump steer you may have (if your car is lowered )
This went in without issue, however i had too much lock with my wheels/tyres and the coilovers, so 1/2hr of hogging out on the lathe later...

Got them hardened by my local knife maker (reeve handmade knives - if you're into that sort of thing check him out! He's a good mate of mine and his work is amazing! He wil be popping up again later in the story)
Pressed them on, and then started wrapping up the front end ready for paint

These give a decent amount of lock still, but also leave space for everything with zero rubbing, plus 2.5" spare clearance to the front legs even on my widest wheels/tyres, so i have space to route a (squashed) 3" brake cooling hose down each side without too much fear of wearing them through

Few more bts and bobs before paint..
Small brackets for mounting the dashboard to the a-post tubes of the cage

Knocked up some "dimple dies"

Went to work on just about everything!
Inside of the doors - most people rip all this panel out and fit fixed perspex windows, but the fronts are frameless so i stuck with glass in here to avoid issues with rain water ingress, etc for the time being, so this was a 1/2 way house for weight reduction


Inside of the boot - again most replace with GRP and I probably will when this becomes a track-only car but for now enoying the security of a locking boot!

Then sanded all the inside bits of the exterior panels..

..which I wish i'd done BEFORE i did all my drilling and dimpling!
After about a week and a half of 3hrs per night sanding, smoothing, cleaning, etc., everything was packed-up, and with the loan of a trailer from a friendly local, was driven the mighty journey of 3 miles to Bruntingthorpe for "Pete" to Paint!
Pete is a trade paint guy who does a lot of work for the local car auctions at bruntingthorpe, and I was put onto him by the guy next door - AGAIN ever greatful for simons input!
Pete is an interesting guy - about 5ft 4, COVERED in sanding dust (like ALWAYS covered in dust) always wears the same jumper, and is a real straight talker!
I took his advice on everything paint related - what grade paper to sand with, what to clean with, what not to do/use, etc. which was great as I wanted to do as much as possible myself, party to keep the cost down, and partly because i could and i wanted to! The only thing I didn't take his advice on was the colour.. on the day the paint was delivered I had a phone conversation that went like this (no more no less)..
ME: Hello..
PETE: F***ING HELL BOY! Are you sure that paint code you gave me is right?
ME: Hi Pete.. ..yeah, has it arrived? whats it like?
PETE: F***ING AWFUL! I hope I don't spill any of it! Anyway its your car, phone you when its done..
(DIAL TONE)
I love northerners! And yes I know Leicester isn't north to some of you, but trust me it is to me!
when the shell was cleaned out on the inside i set to in the engine bay - i'd removed a lot of the sealant and things to do my welding first, and nick had obviously done a fair bit of grinding and welding too, so it was looking a bit of a mess..
I did a bit of research on all sorts of black magic paints and things, but ended up coming down on epoxy mastic as something that kind of ticked all the boxes..
Could be applied in my garage without turning the neighbours kids infertile
Could be applied with a brush or roller and give a decent finish
Covered a lot of crap in one go
Sealed everything up nicely and
Compatible with paint shops / top coats
I brought 1 litre from a company in essex i think, and set to..
Started at this..
First coat went on quite thin, per their instructions
this was done with a roller and took a while, but gave a nice even glossy coverage
I sanded it down a bit to give a key a couple of days later and went at it again, this time with a brush. This gave quite a matt finish weirdly! but still smooth and even, and using a brush allowed me to get everywhere
for the super-observant, yes, we jumped about a bit there - the bulkhead was sealed up in the rollcage pictures, now its open again!
This was also the time when the rear suspension went in proper - it just made more sense to cover that a few posts back when I was talking about suspension component refurb!
Anyway, I painted underneath too, ad all four wheel wells.. The picture above is at the rear right of the car looking towards front left
The whole of the trans tunnel was done too, however I've not done the two floor pans as I could really get the car up to do that - my plan is once its on the road again I will clean off the floor pans (which have nothing covering them up) and paint those too
At this point I started getting all precious, and thinking about shiny paint, so i turned the car around (my wife "drove" while I pushed!) to give me some more space and then set-too tidying up the engine bay - the white paint went in there OK but it wasn't great.. I sprayed over with some tins I had laying around of dark grey, blue and black! And then basically used that as a guide coat to sand it down
Heres the engine bay after spraying..
..and part way through sanding..
..starting to look like a REAL mess!
Sprayed the wheel arches too and tidied them..
..and fitted the refurbished/reinorced front subframe along with my new steering rack, inner/outer track rods, and gaiters
This isn't just any steering rack, its the purple label steering rack from the e46 compact!
Now the world of steering racks is confusing, but here we go..
E30 = very slow racks because some had power steering some didnt.. its about 4.5 turns lock to lock in mine!
E36 = slow and non linear steering rack in some of the cars - these are weird as they're very dead about centre
E36 M3 = bit quicker, but non linear and the stop-to-stop turns doesn't tell the whole story as the steering angle is diferent.. overall a horrible rack!
E46 / M3 = non linear again, and not much use
E46 CS / CSL = Superfast linear rack, and considered by a lot of people to be what the m3 should have come with from the factory.. Virtually unobtainable, and mega bucks when they are (3-400 dollars / 250 quid)
Z4M Coupe = the FASTEST production rack BMW have made, linear, and an absolute peach! See above re: avaiabiliy, except x5 because they didn't build many z4mc's at all, even compared to CSL's and CS's!
The saving grace is, they put some weird rack in the e46 post facelift compact - its nearly as quick as the CSL rack, but has more travel so is actually a little faster in terms of mm/rev, and is completely linear. Its also avaiable for about £50!
The other saving grace is all of the above racks are interchangeabe, except the e30 which has 15mm thicker mounting "blocks" - great news for E30's as you can shove an e46 ti rack in it and some 15mm spacers, lifting the rack up and curing any bump steer you may have (if your car is lowered
This went in without issue, however i had too much lock with my wheels/tyres and the coilovers, so 1/2hr of hogging out on the lathe later...
Got them hardened by my local knife maker (reeve handmade knives - if you're into that sort of thing check him out! He's a good mate of mine and his work is amazing! He wil be popping up again later in the story)
Pressed them on, and then started wrapping up the front end ready for paint
These give a decent amount of lock still, but also leave space for everything with zero rubbing, plus 2.5" spare clearance to the front legs even on my widest wheels/tyres, so i have space to route a (squashed) 3" brake cooling hose down each side without too much fear of wearing them through
Few more bts and bobs before paint..
Small brackets for mounting the dashboard to the a-post tubes of the cage
Knocked up some "dimple dies"
Went to work on just about everything!
Inside of the doors - most people rip all this panel out and fit fixed perspex windows, but the fronts are frameless so i stuck with glass in here to avoid issues with rain water ingress, etc for the time being, so this was a 1/2 way house for weight reduction
Inside of the boot - again most replace with GRP and I probably will when this becomes a track-only car but for now enoying the security of a locking boot!
Then sanded all the inside bits of the exterior panels..
..which I wish i'd done BEFORE i did all my drilling and dimpling!
After about a week and a half of 3hrs per night sanding, smoothing, cleaning, etc., everything was packed-up, and with the loan of a trailer from a friendly local, was driven the mighty journey of 3 miles to Bruntingthorpe for "Pete" to Paint!
Pete is a trade paint guy who does a lot of work for the local car auctions at bruntingthorpe, and I was put onto him by the guy next door - AGAIN ever greatful for simons input!
Pete is an interesting guy - about 5ft 4, COVERED in sanding dust (like ALWAYS covered in dust) always wears the same jumper, and is a real straight talker!
I took his advice on everything paint related - what grade paper to sand with, what to clean with, what not to do/use, etc. which was great as I wanted to do as much as possible myself, party to keep the cost down, and partly because i could and i wanted to! The only thing I didn't take his advice on was the colour.. on the day the paint was delivered I had a phone conversation that went like this (no more no less)..
ME: Hello..
PETE: F***ING HELL BOY! Are you sure that paint code you gave me is right?
ME: Hi Pete.. ..yeah, has it arrived? whats it like?
PETE: F***ING AWFUL! I hope I don't spill any of it! Anyway its your car, phone you when its done..
(DIAL TONE)
I love northerners! And yes I know Leicester isn't north to some of you, but trust me it is to me!
Last edited by smallspeed on Tue Nov 22, 2016 3:22 pm, edited 2 times in total.
-
911hillclimber
- Nurse, I think I need some assistance
- Posts: 18925
- Joined: Mon Mar 10, 2008 6:26 pm
- Location: West Midlands
Re: BMW BTCC Inspired Track car
Good grief, those holes will win it a nick name when seen by your racing mates!
Holey Mackerel!
Glad you are on top of the Rops stuff.
Holey Mackerel!
Glad you are on top of the Rops stuff.
73T 911 Coupe, road/hillclimber 3.2L
Lola t 492 / 3.2 hillclimb racer
Boxster 987 Gen II 2.9
Lola t 492 / 3.2 hillclimb racer
Boxster 987 Gen II 2.9