

Shrek
Moderator: Bootsy
-
Bootsy

- Site admin and the Boss
- Posts: 23904
- Joined: Sat Nov 08, 2003 6:09 pm
- Location: Norwich
- Contact:
Re: Shrek
Looking just wonderful
1972 911T | 1994 993 Carrera | 1999 986 Boxster | 1990 T25 Camper
Vintage Heuer, Omega, Zenith and other vintage watches - http://www.heuerheritage.co.uk
Vintage Heuer, Omega, Zenith and other vintage watches - http://www.heuerheritage.co.uk
-
Magnum
- DDK slapper chatter
- Posts: 471
- Joined: Tue Apr 08, 2008 4:29 pm
- Location: Cape Town, South Africa
Re: Shrek
Fantastic - that colour is going to look absolutely amazing, and I'm sure will generate interest wherever the car goes! Please send us piccies as assembly advances?
Magnus
1972 3.2 RS lightweight. Still a bit scary...
1987 3.2 Carrera. Sold..
1972 Alfa 1750 GTV. Sold...
1971 911E in Silver. So lovely, sold..
1971 911S. sold....
1972 BMW CSL. Stupidly sold...
1968 Land Rover SIIa SWB..rusted in half...
1972 3.2 RS lightweight. Still a bit scary...
1987 3.2 Carrera. Sold..
1972 Alfa 1750 GTV. Sold...
1971 911E in Silver. So lovely, sold..
1971 911S. sold....
1972 BMW CSL. Stupidly sold...
1968 Land Rover SIIa SWB..rusted in half...
-
Dougieboy1
- I luv DDK!
- Posts: 867
- Joined: Mon Jan 04, 2016 7:27 pm
- Location: Definitely round here somewhere
Re: Shrek
Episode 41: Priorities
The first thing to do with any project is the important jobs. Such as stick badges on the back so the car is easy to identify inside the garage especially when it is dark. It also distinguishes it from other green vehicles in the garage with which it could easily be confused - you can just see the grille of my jeep through the screen aperture. Practically indistinguishable to the Porsche from some angles.

Added the build ID number under the dash using a german yellow crayon for authenticity and basing it on the original markings that were under the dash when i ripped it off a few years ago.....
As a reminder, this is what the original looked like


Note the carefully crafted repro german script!
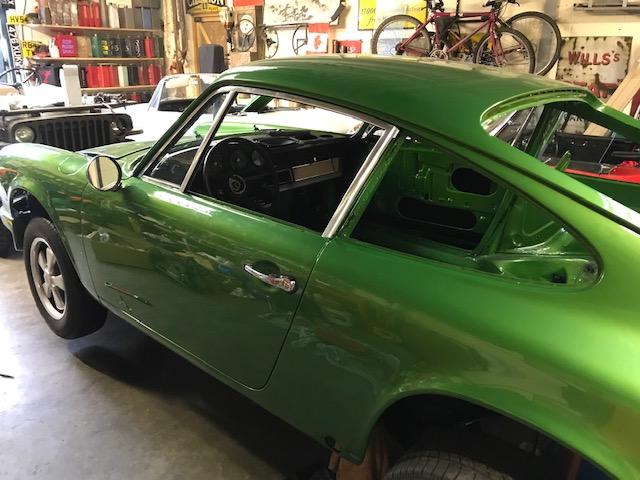
Bolted on an original durant wing mirror so i can see if anyone is coming up behind me whilst working on the car. Plus the restored door handles (took ages to rekey the locks so glove box, ignition and doors now all work on the same key) and window frames. It is at this point that i start to appreciate the efforts i had made over the last few years to restore all the individual sub components and include inwith each component, the original fixings - all replated where required
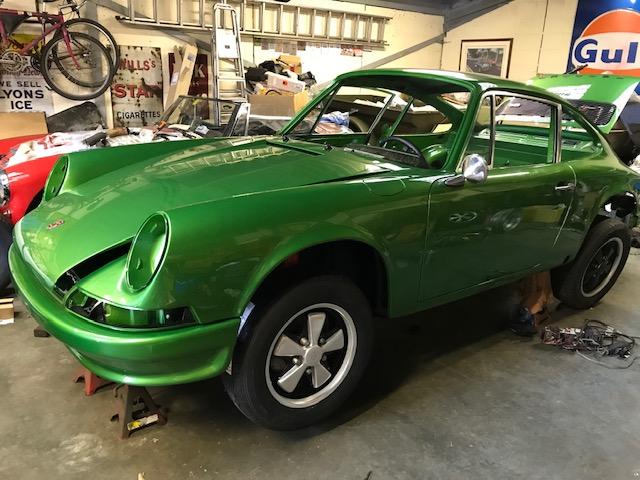
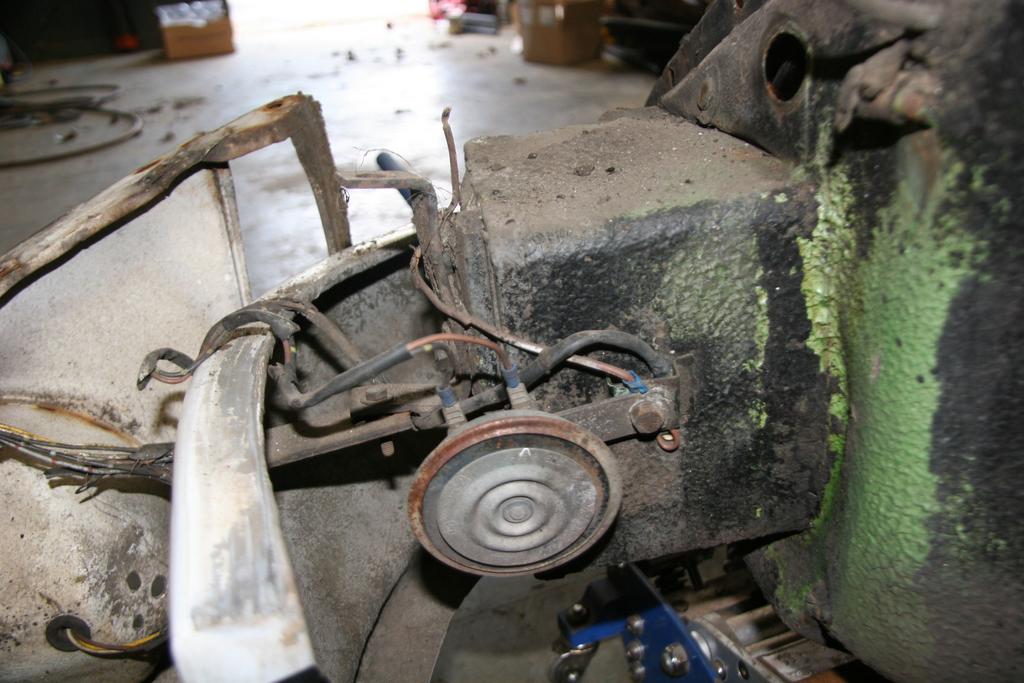
Front and rear suspension fitted. Wheels added. At this point i didnt have any tyres on the restored rear wheels so i used a pair of the original wheels it came with (they are the later ones that dont take the 3 prong caps so incorrect for hte car - i have replaced them with 68 dated deep 6 at the front and 69 dated 7R for the back. Also incorrect for the car but a damn sight nicer.
I didnt take photos of the suspension fit up - i was too excited to get it all on and make it look like a car. You will get to see it later though in other photos. Suffice it to say, at the front, fully rebuilt konis, new disks, front roll bar and all other components stove enamelled in black. All original hardware replated. 19 mm hollow torsion bars fitted. At the back, konis (according to the CoA, these were original fitment and are all date correct), original rear torsion bars, enamelled spring plates and replated original hardware.
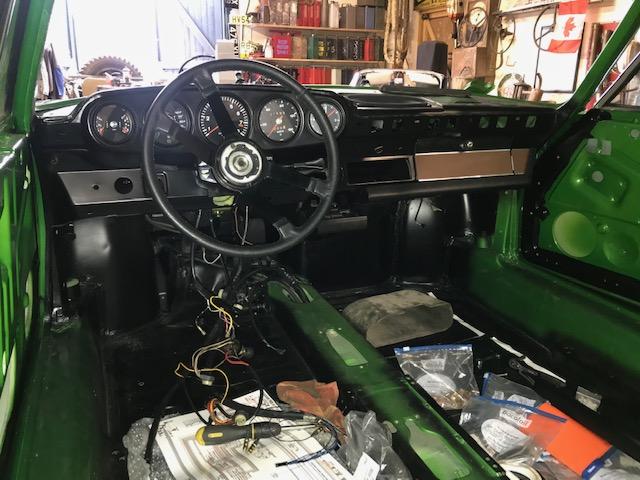
Then went inside and again to make it look like a car, stuck the instruments (Reap restored) in and fitted the upper part of the steering column so i could put a wheel on it. It's the wheel that came with the car but its crap - more on that later. I also fitted the restored steering rack so it can be rolled and steered. In the passenger foot well, you can see some of the bags of replated fixing hardware.
I had also started fitting the wiring by piling it all on the floor of the driver side and willing it to be fitted by sheer strength of mind.
More to come.....
The first thing to do with any project is the important jobs. Such as stick badges on the back so the car is easy to identify inside the garage especially when it is dark. It also distinguishes it from other green vehicles in the garage with which it could easily be confused - you can just see the grille of my jeep through the screen aperture. Practically indistinguishable to the Porsche from some angles.
Added the build ID number under the dash using a german yellow crayon for authenticity and basing it on the original markings that were under the dash when i ripped it off a few years ago.....
As a reminder, this is what the original looked like
Note the carefully crafted repro german script!
Bolted on an original durant wing mirror so i can see if anyone is coming up behind me whilst working on the car. Plus the restored door handles (took ages to rekey the locks so glove box, ignition and doors now all work on the same key) and window frames. It is at this point that i start to appreciate the efforts i had made over the last few years to restore all the individual sub components and include inwith each component, the original fixings - all replated where required
Front and rear suspension fitted. Wheels added. At this point i didnt have any tyres on the restored rear wheels so i used a pair of the original wheels it came with (they are the later ones that dont take the 3 prong caps so incorrect for hte car - i have replaced them with 68 dated deep 6 at the front and 69 dated 7R for the back. Also incorrect for the car but a damn sight nicer.
I didnt take photos of the suspension fit up - i was too excited to get it all on and make it look like a car. You will get to see it later though in other photos. Suffice it to say, at the front, fully rebuilt konis, new disks, front roll bar and all other components stove enamelled in black. All original hardware replated. 19 mm hollow torsion bars fitted. At the back, konis (according to the CoA, these were original fitment and are all date correct), original rear torsion bars, enamelled spring plates and replated original hardware.
Then went inside and again to make it look like a car, stuck the instruments (Reap restored) in and fitted the upper part of the steering column so i could put a wheel on it. It's the wheel that came with the car but its crap - more on that later. I also fitted the restored steering rack so it can be rolled and steered. In the passenger foot well, you can see some of the bags of replated fixing hardware.
I had also started fitting the wiring by piling it all on the floor of the driver side and willing it to be fitted by sheer strength of mind.
More to come.....
1972 911S
1944 VW Schwimmwagen (originally a Porsche typ128, eventually VW166)
A bunch of other crap (according to my wife)
1944 VW Schwimmwagen (originally a Porsche typ128, eventually VW166)
A bunch of other crap (according to my wife)
-
rhd racer
- DDK 1st, 2nd and 3rd for me!
- Posts: 2043
- Joined: Wed Jun 23, 2004 9:47 pm
- Location: Nottinghamshire
Re: Shrek
I've just caught up with the last 4 years or so in one evening. A fantastic build, amazing skills and brilliantly written.
Love the colour, utterly stunning.
Cheers
Wayne
Love the colour, utterly stunning.
Cheers
Wayne
93 964 C2
99 Boxster 2.5 > 2.7 hill climber
71 914/6 3.0 - gone
'You see Paul, hill climbing is like making love to a beautiful woman. You get your motor running, check your fluids, hang on tight and WHOA..30 seconds later it's all over!' Swiss Tony
99 Boxster 2.5 > 2.7 hill climber
71 914/6 3.0 - gone
'You see Paul, hill climbing is like making love to a beautiful woman. You get your motor running, check your fluids, hang on tight and WHOA..30 seconds later it's all over!' Swiss Tony
-
Dougieboy1
- I luv DDK!
- Posts: 867
- Joined: Mon Jan 04, 2016 7:27 pm
- Location: Definitely round here somewhere
Re: Shrek
Thanks Wayne, will try to catch up to where I am up to now in the coming weeks. I hope to have the car roadworthy by July (of this year!)
1972 911S
1944 VW Schwimmwagen (originally a Porsche typ128, eventually VW166)
A bunch of other crap (according to my wife)
1944 VW Schwimmwagen (originally a Porsche typ128, eventually VW166)
A bunch of other crap (according to my wife)
-
Dougieboy1
- I luv DDK!
- Posts: 867
- Joined: Mon Jan 04, 2016 7:27 pm
- Location: Definitely round here somewhere
Re: Shrek
Episode 42: Ooh, the suspense...shun
As noted, i did not take photos of the suspension fit up as i was so excited to be getting the car back on its feet so to speak. So here are some retrospective and not especially good photos included for completeness of this archive!!
Front:
Here is what i started with. Koni struts. I thought these were standard on S model cars but they show on my CoA as optional equipment. Anyway, all date correct


Wife and Horse feet are not essential to the dismantling process
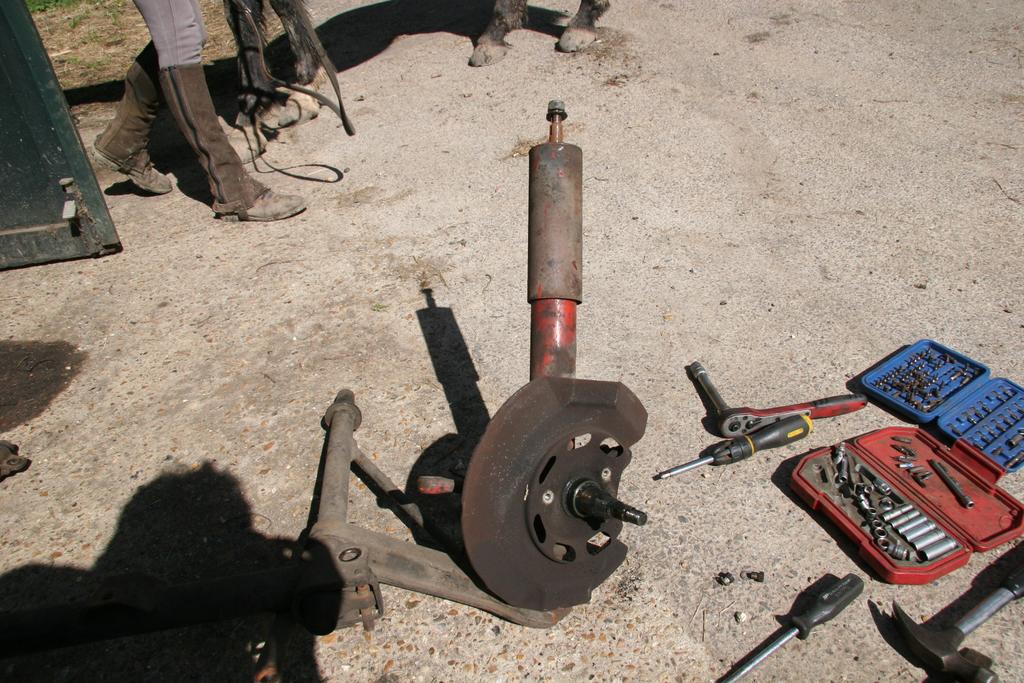
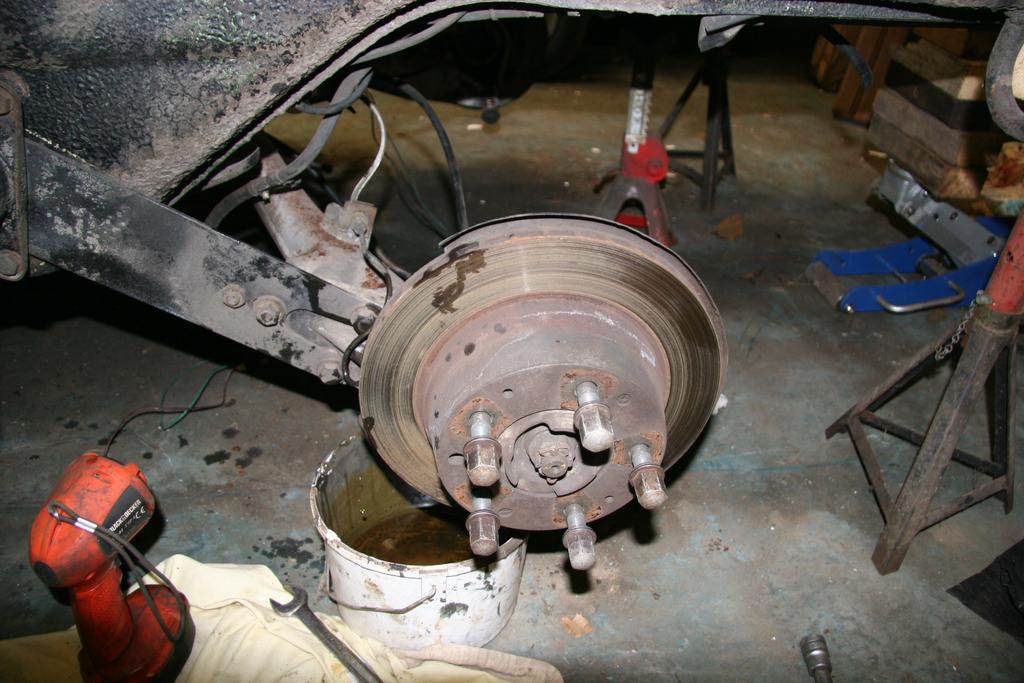
S ali calipers
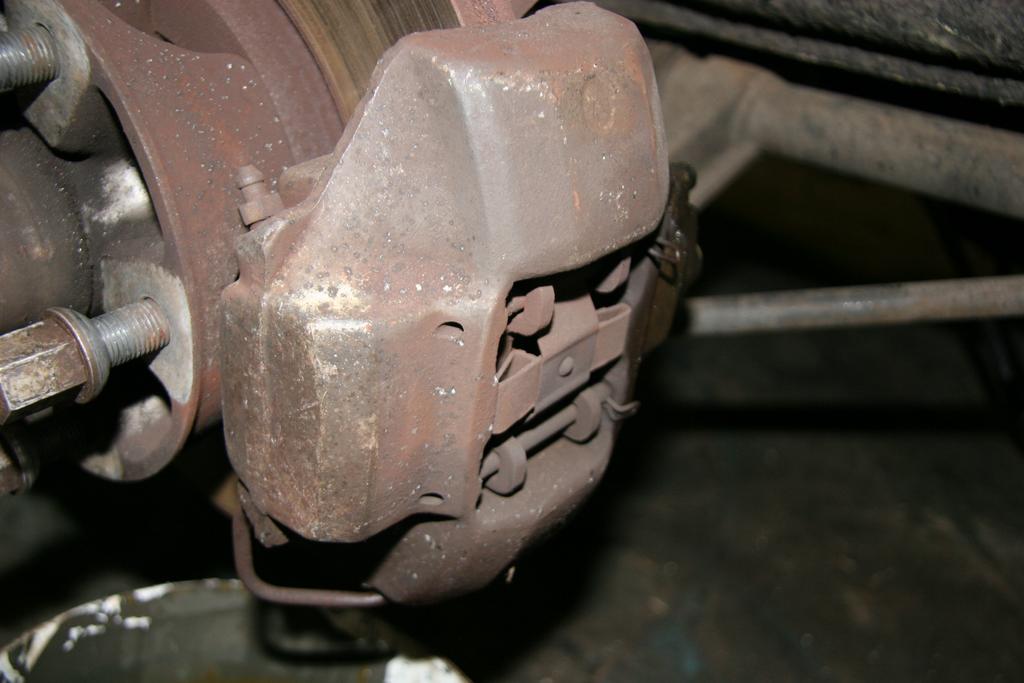
Generally tired suspension castings
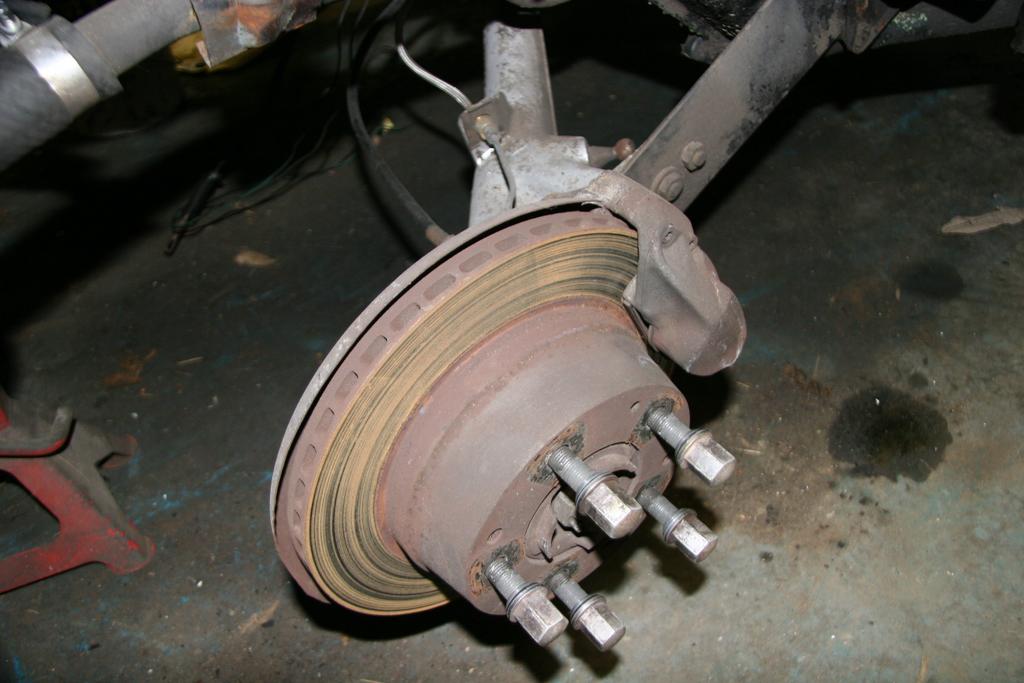
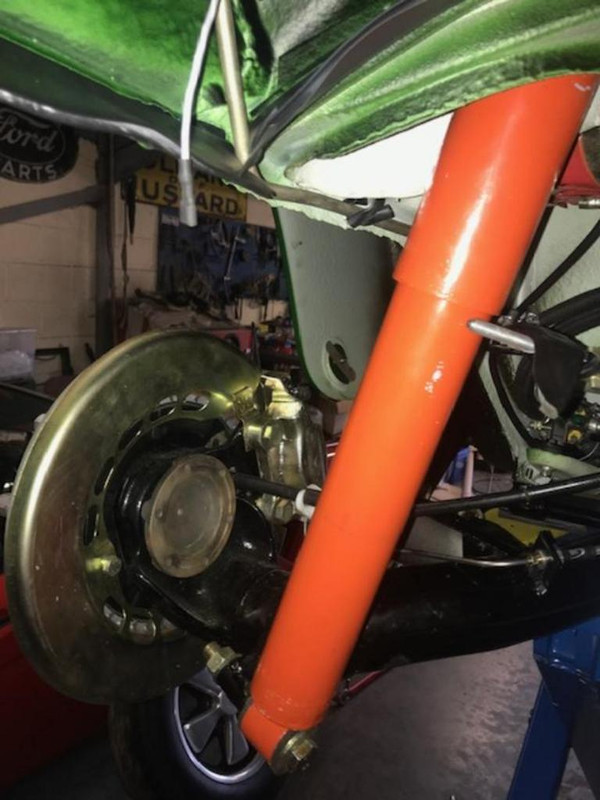
And this is what it looks like now - and shoutout to Ian at IG Racing who rebuilt these and the rear shocks for me and did a fine job. Looking at the email trail, this rebuild was completed 2 years ago...
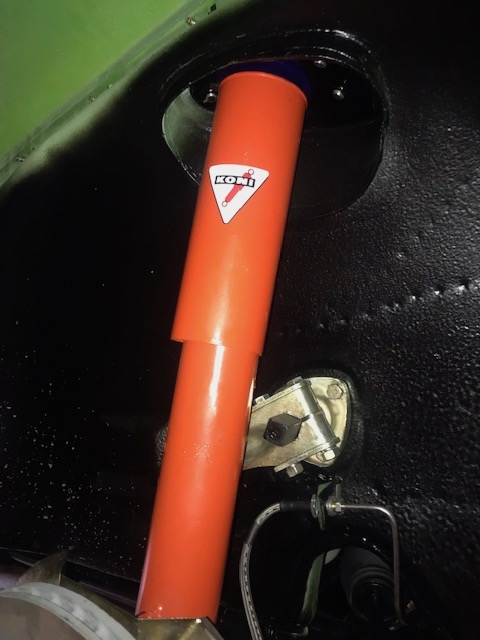
As an aside, sourcing the correct decal for the konis (mine were long gone) was an interesting educational journey as they have changed significantly over the years. I pored over the internet for hours searching for pictures of period correct konis. In the end, i concluded that what you need for a 1972S is:
- Large size
- The mounting of the shock should be open eye at both ends even though they actually arent ,
- The black edging
It definitely isnt the the 'classic' winged logo.
Nice repro job by a gentleman called Rob Sangster and a mere £4 for all i needed....

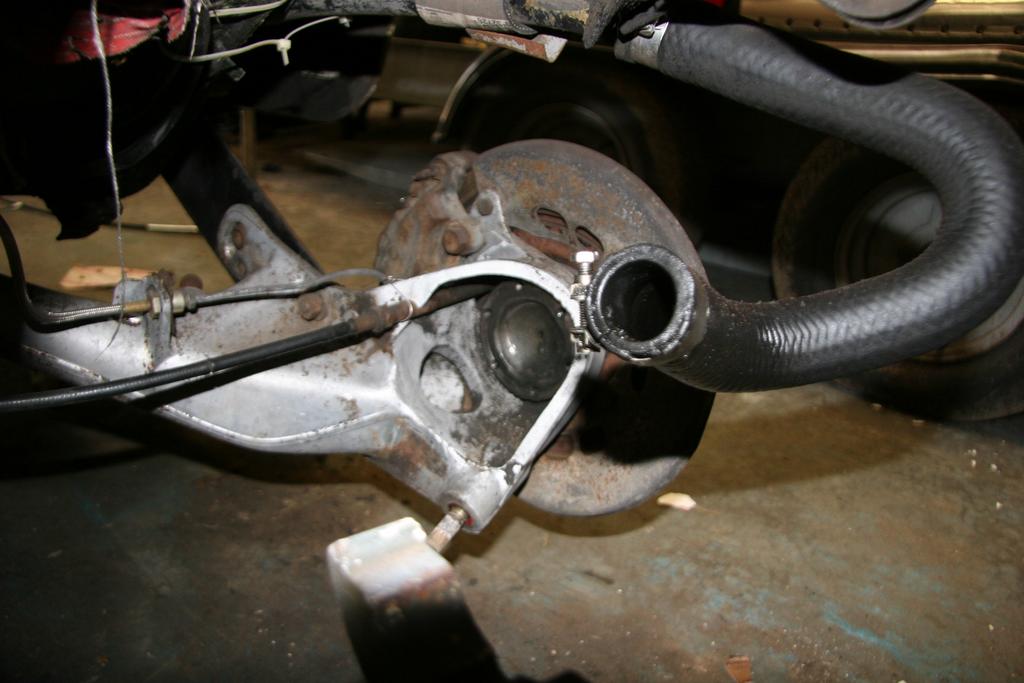
Restored calipers courtesy of the guys in Macclesfield. You can also just see the anti roll bar. Dispute about paint or plate. I like shiny so went plated. All painted parts have been enamelled as i was put off powder coating by tales of chips resulting in the powder coat becoming compromised, concealing creeping corrosion and eventually peeling off - with paint, it chips and any corrosion is localised.. Went with CL brake pads as per recommendations from this fine forum

New disks, the originals were shot - complete with 'made in Germany' sticker to prove, well, that they were made in Germany........ The dust shields were replated. Some people say black is correct finish but an equal number say plated - there was no evidence of paint under the 50 years of grime so i went with plated. you can also see some of the stainless brake lines i have used to replace the originals. Bought pre formed from PMB in the US, fitted perfectly although getting the kit was not easy!

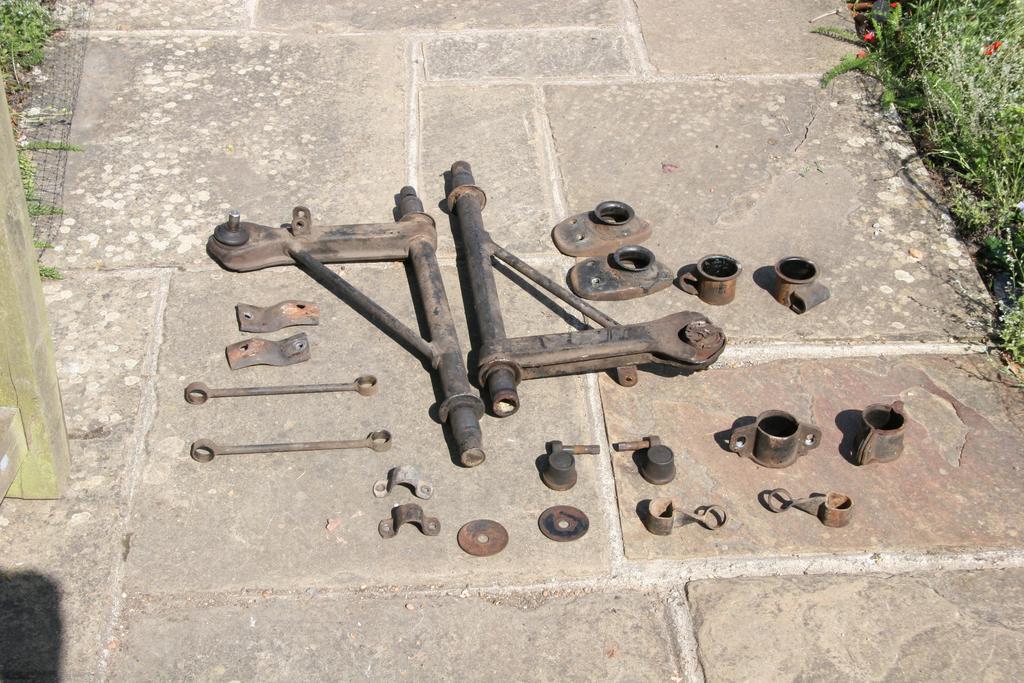
Rear
You will notice from the photos, that the car came with the wrong trailing arms - ali replacements had been fitted.
I know Ali is 'better' than steel but again, originally is important to me so i had to source 2 replacement trailing arms - the clean one was NOS and painted, not powder coated. Again some research required as for 1972, the arm is slightly different to early arms as in 1972, the rear shocks changed to beefier units and the mounting points for them on the trailing arm are slightly different. Also needed them with anti roll bar mounts although my ARB was missing. Again, had them enamelled
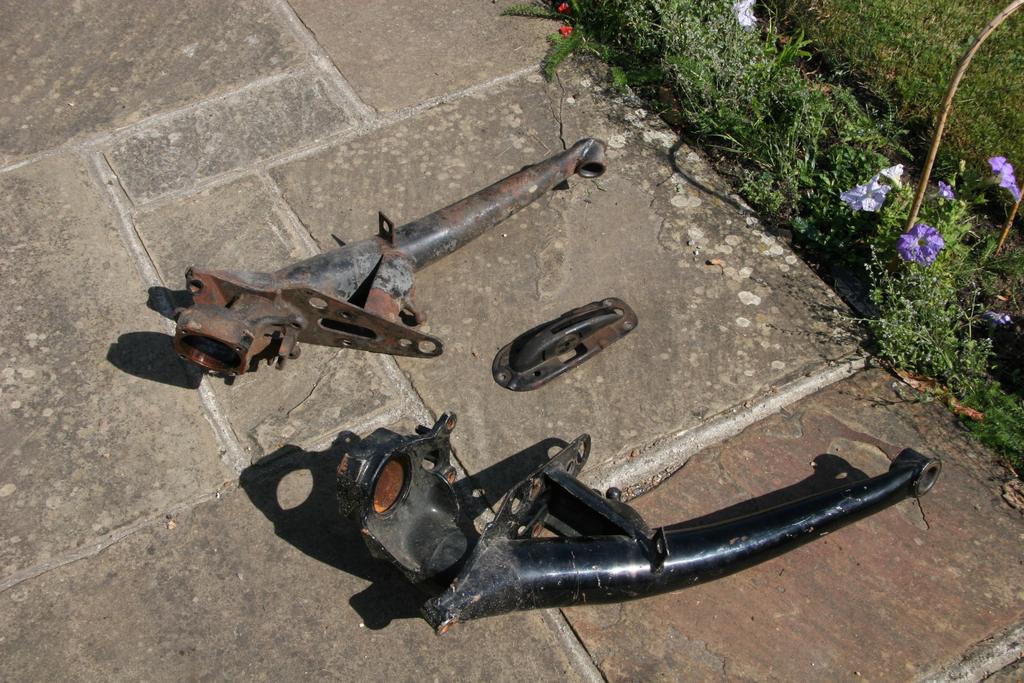
And as before, voila, what it all looks like now
New disks again, rebuilt and date correct konis, obviously new bearings, new handbrake linings, CL brake pads. Ended up buying new dust shields from porsche as mine were toast (and i seem to recall wrong for 1972.....). All original hardware was replated and reused. I became somewhat obsessive about this..........more on that later if i remember

Whilst in the general vicinity of the suspension, i also fitted up the horns.
Again, what the car was fitted with......Best described as 'very sad'.....
What it has now, courtesy of a DDK member who generally prefers to remain anonymous..... from a brand new 'in the box' set......
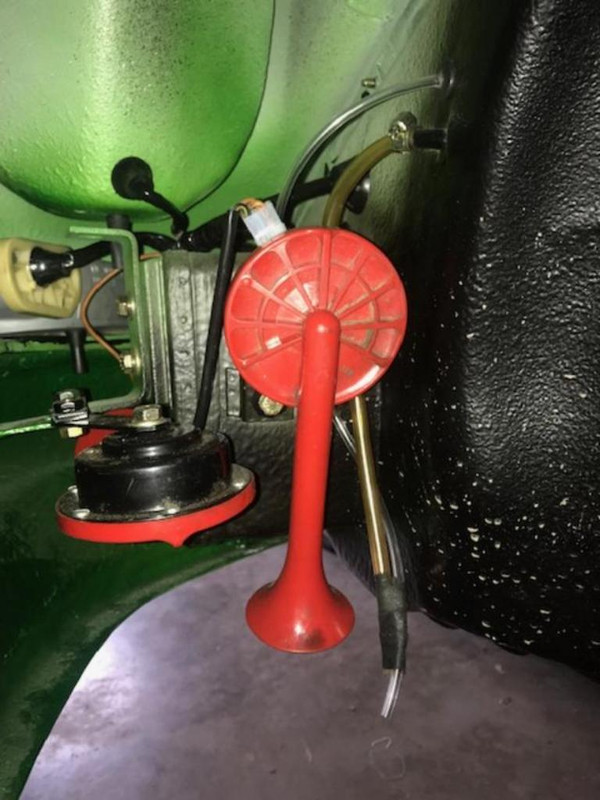
Well, actually, i couldnt bear to use the boxed set so they are still in the box, and i bought a set that weren't in a box that i felt able to use.

In the upper photo, if you are wondering what the pipes are near the horn, these are the fuel vent and brake master overflow pipes. They should go into a catch tank but i dont have one and to be honest, despite my 'originality' drive, i dont think this is absolutely necessary...... is there really that much overflow?
So i think that is enough suspension at this point......
As noted, i did not take photos of the suspension fit up as i was so excited to be getting the car back on its feet so to speak. So here are some retrospective and not especially good photos included for completeness of this archive!!
Front:
Here is what i started with. Koni struts. I thought these were standard on S model cars but they show on my CoA as optional equipment. Anyway, all date correct
Wife and Horse feet are not essential to the dismantling process
S ali calipers
Generally tired suspension castings
And this is what it looks like now - and shoutout to Ian at IG Racing who rebuilt these and the rear shocks for me and did a fine job. Looking at the email trail, this rebuild was completed 2 years ago...
As an aside, sourcing the correct decal for the konis (mine were long gone) was an interesting educational journey as they have changed significantly over the years. I pored over the internet for hours searching for pictures of period correct konis. In the end, i concluded that what you need for a 1972S is:
- Large size
- The mounting of the shock should be open eye at both ends even though they actually arent ,
- The black edging
It definitely isnt the the 'classic' winged logo.
Nice repro job by a gentleman called Rob Sangster and a mere £4 for all i needed....
Restored calipers courtesy of the guys in Macclesfield. You can also just see the anti roll bar. Dispute about paint or plate. I like shiny so went plated. All painted parts have been enamelled as i was put off powder coating by tales of chips resulting in the powder coat becoming compromised, concealing creeping corrosion and eventually peeling off - with paint, it chips and any corrosion is localised.. Went with CL brake pads as per recommendations from this fine forum
New disks, the originals were shot - complete with 'made in Germany' sticker to prove, well, that they were made in Germany........ The dust shields were replated. Some people say black is correct finish but an equal number say plated - there was no evidence of paint under the 50 years of grime so i went with plated. you can also see some of the stainless brake lines i have used to replace the originals. Bought pre formed from PMB in the US, fitted perfectly although getting the kit was not easy!
Rear
You will notice from the photos, that the car came with the wrong trailing arms - ali replacements had been fitted.
I know Ali is 'better' than steel but again, originally is important to me so i had to source 2 replacement trailing arms - the clean one was NOS and painted, not powder coated. Again some research required as for 1972, the arm is slightly different to early arms as in 1972, the rear shocks changed to beefier units and the mounting points for them on the trailing arm are slightly different. Also needed them with anti roll bar mounts although my ARB was missing. Again, had them enamelled
And as before, voila, what it all looks like now
New disks again, rebuilt and date correct konis, obviously new bearings, new handbrake linings, CL brake pads. Ended up buying new dust shields from porsche as mine were toast (and i seem to recall wrong for 1972.....). All original hardware was replated and reused. I became somewhat obsessive about this..........more on that later if i remember
Whilst in the general vicinity of the suspension, i also fitted up the horns.
Again, what the car was fitted with......Best described as 'very sad'.....
What it has now, courtesy of a DDK member who generally prefers to remain anonymous..... from a brand new 'in the box' set......
Well, actually, i couldnt bear to use the boxed set so they are still in the box, and i bought a set that weren't in a box that i felt able to use.
In the upper photo, if you are wondering what the pipes are near the horn, these are the fuel vent and brake master overflow pipes. They should go into a catch tank but i dont have one and to be honest, despite my 'originality' drive, i dont think this is absolutely necessary...... is there really that much overflow?
So i think that is enough suspension at this point......
1972 911S
1944 VW Schwimmwagen (originally a Porsche typ128, eventually VW166)
A bunch of other crap (according to my wife)
1944 VW Schwimmwagen (originally a Porsche typ128, eventually VW166)
A bunch of other crap (according to my wife)
-
Dougieboy1
- I luv DDK!
- Posts: 867
- Joined: Mon Jan 04, 2016 7:27 pm
- Location: Definitely round here somewhere
Re: Shrek
Episode 43 Some Ouch!
So it happens i am guessing in every restoration.
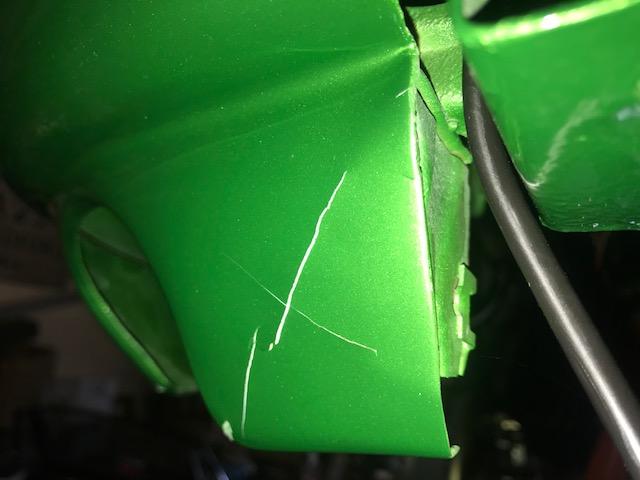
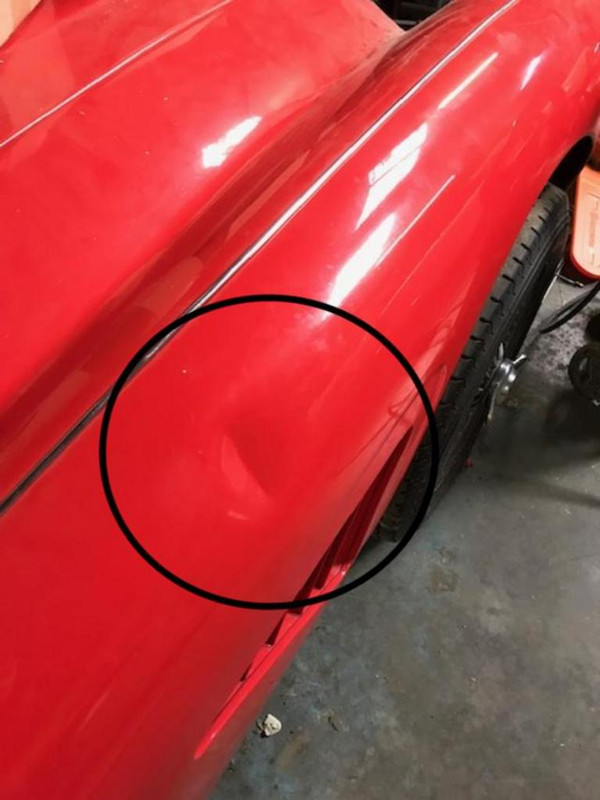
Ouch 1: Have got the car up on the ramp. Am fitting the rear nearside quarter bumper. Have got 2 of the 4 mounting bolts fixed. I turned my back to get the other 2 bolts.....there is a massive crashing sound and i see the quarter bumper sliding across the concrete floor.
Clearly, the 2 bolts i had thought were engaged were not......
I picked it up. It was mightily scuffed and the paint around the exhaust cut out was cracked.....I was a little bit cross.
Still, its only a small detachable panel so thats ok. Thought i would pretend it never happened and as there are no photographs, then it never did happen....did it. Took it to be repainted.
Ouch 2: So a month later, the repainted rear quarter bumper collected. With the words of the painter ringing in my ears ('I dont want to see that "*$%*"& panel ever again') Went home, attached the panel properly and all good.
Lowered the car to the accompanying sound of bending metal.
F**k me, i have only lowered the newly painted and attached rear quarter onto the nose of the gearbox..... i had moved the engine and gearbox slightly the week before and this was not a problem when no rear quarter was fitted!!!
Lifted the car up and voila!
Almost exactly the same damage as last time...... Back to the painters......'remember you didnt want to see that panel again.....'
Ouch 3: Am standing at the back of the ramp on the offside of the car - this is where the ramp controls are - lowering the car. I notice the car seems to be moving on the ramp. I think my eyes have gone wonky but stop lowering the car. lift it back up. Walk around the car and see i left the nearside door open. This had come down on the wing of my Healey.
So if you have ever wondered what shape dent a 911 door would leave in a a Healey wing if it were dropped on it, then today is your lucky day.
'Luckily' the Healey wing is aluminium so a) i hope it will pop out relatively easily given the paint is not broken b) the porsche door and paint were undamaged....
Onwards and upwards!
So it happens i am guessing in every restoration.
Ouch 1: Have got the car up on the ramp. Am fitting the rear nearside quarter bumper. Have got 2 of the 4 mounting bolts fixed. I turned my back to get the other 2 bolts.....there is a massive crashing sound and i see the quarter bumper sliding across the concrete floor.
Clearly, the 2 bolts i had thought were engaged were not......
I picked it up. It was mightily scuffed and the paint around the exhaust cut out was cracked.....I was a little bit cross.
Still, its only a small detachable panel so thats ok. Thought i would pretend it never happened and as there are no photographs, then it never did happen....did it. Took it to be repainted.
Ouch 2: So a month later, the repainted rear quarter bumper collected. With the words of the painter ringing in my ears ('I dont want to see that "*$%*"& panel ever again') Went home, attached the panel properly and all good.
Lowered the car to the accompanying sound of bending metal.
F**k me, i have only lowered the newly painted and attached rear quarter onto the nose of the gearbox..... i had moved the engine and gearbox slightly the week before and this was not a problem when no rear quarter was fitted!!!
Lifted the car up and voila!
Almost exactly the same damage as last time...... Back to the painters......'remember you didnt want to see that panel again.....'
Ouch 3: Am standing at the back of the ramp on the offside of the car - this is where the ramp controls are - lowering the car. I notice the car seems to be moving on the ramp. I think my eyes have gone wonky but stop lowering the car. lift it back up. Walk around the car and see i left the nearside door open. This had come down on the wing of my Healey.
So if you have ever wondered what shape dent a 911 door would leave in a a Healey wing if it were dropped on it, then today is your lucky day.
'Luckily' the Healey wing is aluminium so a) i hope it will pop out relatively easily given the paint is not broken b) the porsche door and paint were undamaged....
Onwards and upwards!
Last edited by Dougieboy1 on Sat Jul 06, 2019 10:00 am, edited 1 time in total.
1972 911S
1944 VW Schwimmwagen (originally a Porsche typ128, eventually VW166)
A bunch of other crap (according to my wife)
1944 VW Schwimmwagen (originally a Porsche typ128, eventually VW166)
A bunch of other crap (according to my wife)


-
Dougieboy1
- I luv DDK!
- Posts: 867
- Joined: Mon Jan 04, 2016 7:27 pm
- Location: Definitely round here somewhere
Re: Shrek
exactly!!
1972 911S
1944 VW Schwimmwagen (originally a Porsche typ128, eventually VW166)
A bunch of other crap (according to my wife)
1944 VW Schwimmwagen (originally a Porsche typ128, eventually VW166)
A bunch of other crap (according to my wife)
-
AndrewSlater

- I luv DDK!
- Posts: 969
- Joined: Wed Nov 30, 2011 3:35 pm
Re: Shrek
Sorry to hear about your mishaps but I'm sure it will all come good in the end and be worth the wait.
Andrew
Andrew
1966 Porsche 912 Slate Grey, red interior - first owner owned for 41 years
1974 Porsche 911 2.7 (The Manhattan project) viewtopic.php?f=28&t=51455
1973 VW 914 1.7 Olympic Blue - ( gone to a good home )
1974 Porsche 911 2.7 (The Manhattan project) viewtopic.php?f=28&t=51455
1973 VW 914 1.7 Olympic Blue - ( gone to a good home )
-
Dougieboy1
- I luv DDK!
- Posts: 867
- Joined: Mon Jan 04, 2016 7:27 pm
- Location: Definitely round here somewhere
Re: Shrek
Episode 44 The third Gulf War, the battle for Sussex oil
Being an 1972S, i have the one year only front mounted radiator with the larger 30mm fittings. This apparently rather rare piece of kit was present in the car when i bought it. As you can see, it looks nice.....
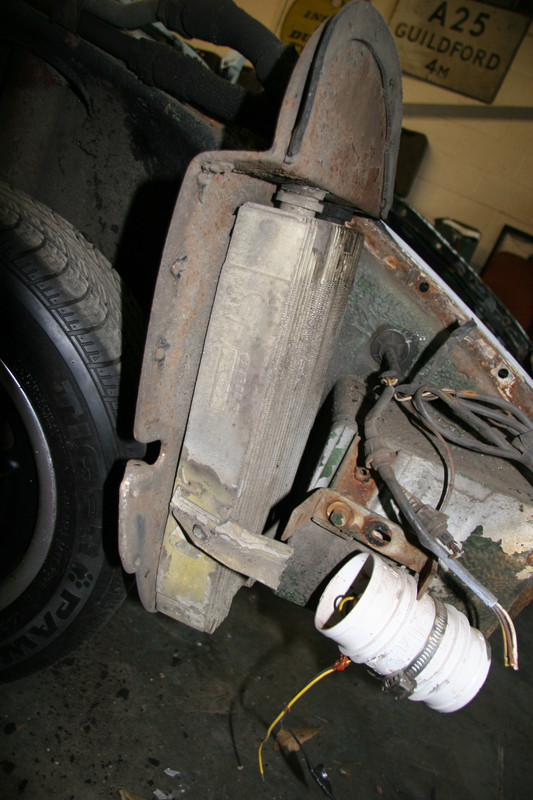
or maybe not

Who knows how long ago this last held hot oil, at least a decade by my estimation. It was tested when i took it off and does hold pressure but as i dont want to be stranded in the Alps at some point, i decided there was only one thing for it and luckily in the 3 years since i bought the car, Porsche have restarted making them. They are ever so slightly different but i feel will be so much more reliable!

Much nicer.....

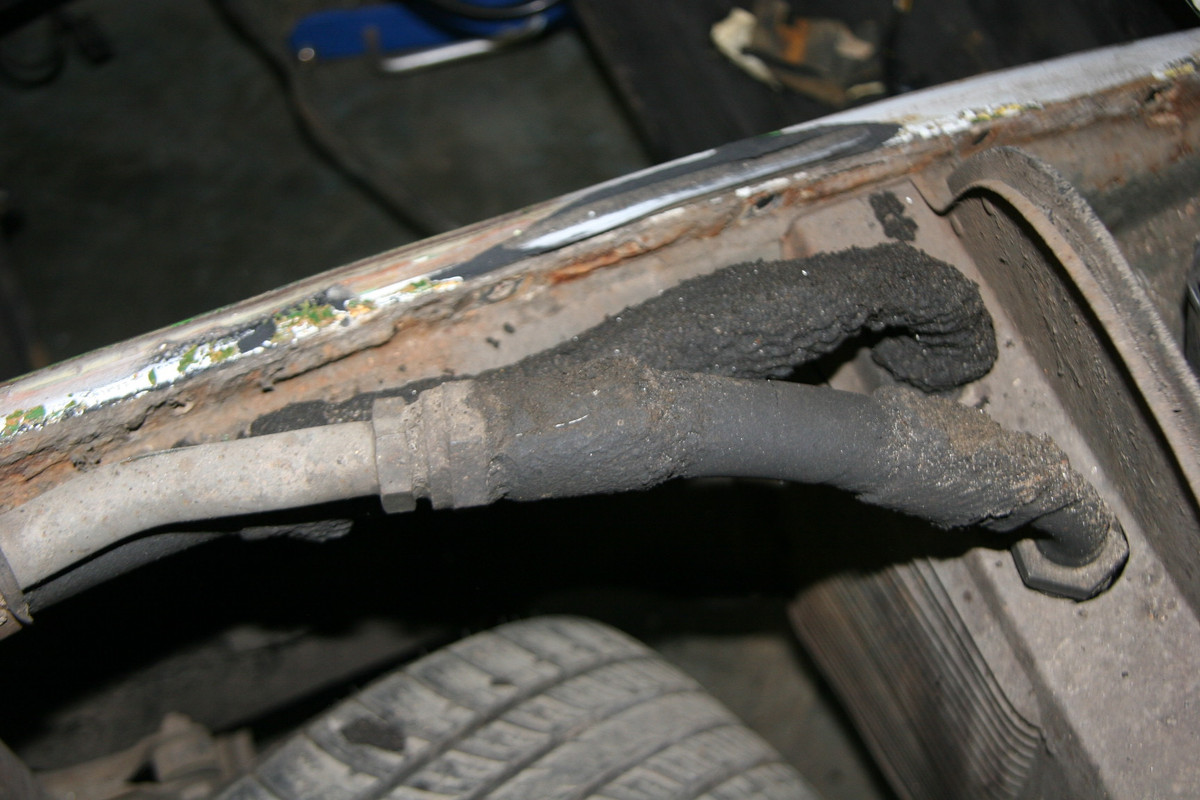
Having sorted out the radiator, the next items were the pipes that run the length of the car. from the oil tank mounted behind the B post to the radiator.
The pipes are of the 'self assembly' variety, ie the end fittings are screwed on, not crimped on. After receiving advice from DDK on how to remove the fittings - screw off the angled end fitting, you remove the collar from the rubber tube by screwing the opposite way to normal, i.e. anticlockwise. Until this was explained to me, i hadnt a clue - Thanks Dave (Stretch). Whilst some of the fittings came off easily. several of them were in this state

And so unscrewing the angled fitting was difficult without having a tight grip on the collar. And as i had discovered that my fittings were dated, i was keen to preserve them and not simply cut them off or clamp them in a vice to facilitate unscrewing, as this would inevitably mark the dated collars. So with the help of experts i looked at many ways of securing the dated collar whilst providing sufficient purchase to clamp it solid to unscrew the angled fitting. The best solution i found was to wrap the collar in loads of masking tape and then clamp it up. Never failed.
Anyway, through judicious ordering of new Cohline, i replaced all the rubber tubing so the above started to look like this.
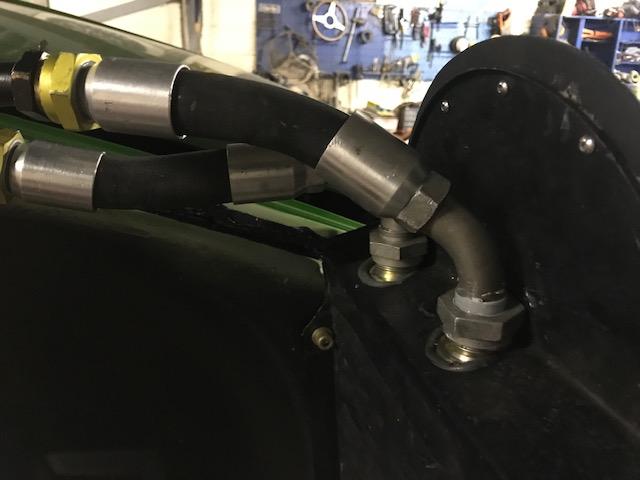
Here you can just see the date on the fittings, 10/71 to match my Nov 71 build date.

I did find that one line tank/console line was missing and one line had fittings dated 1972, clearly a period replacement. I was lucky enough to find a second hand pipe on the internet with 10/71 fittings and one with a 5/71 date so these replaced the incorrectly dated ones. I also found that as the fittings are aluminium as opposed to steel in the earlier cars, some of the tightening nuts were either cracked or disintegrated on disassembly.
Luckily, i found a guy some years ago in the US who remanufactured these. For reference, they are called Argus fittings and are aircraft grade. In the above and below photos, the nuts that are anodised yellow are replacement.
I discovered i didnt have enough though and couldnt locate the guy in the US but via google, found that EB motorsport in the UK also now make them and so remainder were ordered from them.
I now needed to sort out the sill lines. Whilst one line was in great condition, one was not. Lengths of it were missing and had been replaced by rubber tubing jubilee clipped into place. This the front 90 degree in front of the A post. The same was true of the 90 degree at the rear.
So i ordered a porsche replacement. It arrived. It was the wrong one, i had quoted the wrong part number and now had another one of the line i could already reuse. And non returnable as it was special order. (if anyone needs a brand new sill oil line for a 1972, i have a spare, its the one with the kink in it for going round the jacking point)
So ordered the correct one this time. It arrived i argued with Porsche that they had sent the wrong one. Turns out, i had it turned the wrong way round....
So all of the crappy lines were replaced, all of the reusable ones were refurbished


and voila, you end up eventually with a decent oil system that holds pressure....hopefully. Will find out on start up

Being an 1972S, i have the one year only front mounted radiator with the larger 30mm fittings. This apparently rather rare piece of kit was present in the car when i bought it. As you can see, it looks nice.....
or maybe not
Who knows how long ago this last held hot oil, at least a decade by my estimation. It was tested when i took it off and does hold pressure but as i dont want to be stranded in the Alps at some point, i decided there was only one thing for it and luckily in the 3 years since i bought the car, Porsche have restarted making them. They are ever so slightly different but i feel will be so much more reliable!
Much nicer.....
Having sorted out the radiator, the next items were the pipes that run the length of the car. from the oil tank mounted behind the B post to the radiator.
The pipes are of the 'self assembly' variety, ie the end fittings are screwed on, not crimped on. After receiving advice from DDK on how to remove the fittings - screw off the angled end fitting, you remove the collar from the rubber tube by screwing the opposite way to normal, i.e. anticlockwise. Until this was explained to me, i hadnt a clue - Thanks Dave (Stretch). Whilst some of the fittings came off easily. several of them were in this state
And so unscrewing the angled fitting was difficult without having a tight grip on the collar. And as i had discovered that my fittings were dated, i was keen to preserve them and not simply cut them off or clamp them in a vice to facilitate unscrewing, as this would inevitably mark the dated collars. So with the help of experts i looked at many ways of securing the dated collar whilst providing sufficient purchase to clamp it solid to unscrew the angled fitting. The best solution i found was to wrap the collar in loads of masking tape and then clamp it up. Never failed.
Anyway, through judicious ordering of new Cohline, i replaced all the rubber tubing so the above started to look like this.
Here you can just see the date on the fittings, 10/71 to match my Nov 71 build date.
I did find that one line tank/console line was missing and one line had fittings dated 1972, clearly a period replacement. I was lucky enough to find a second hand pipe on the internet with 10/71 fittings and one with a 5/71 date so these replaced the incorrectly dated ones. I also found that as the fittings are aluminium as opposed to steel in the earlier cars, some of the tightening nuts were either cracked or disintegrated on disassembly.
Luckily, i found a guy some years ago in the US who remanufactured these. For reference, they are called Argus fittings and are aircraft grade. In the above and below photos, the nuts that are anodised yellow are replacement.
I discovered i didnt have enough though and couldnt locate the guy in the US but via google, found that EB motorsport in the UK also now make them and so remainder were ordered from them.
I now needed to sort out the sill lines. Whilst one line was in great condition, one was not. Lengths of it were missing and had been replaced by rubber tubing jubilee clipped into place. This the front 90 degree in front of the A post. The same was true of the 90 degree at the rear.
So i ordered a porsche replacement. It arrived. It was the wrong one, i had quoted the wrong part number and now had another one of the line i could already reuse. And non returnable as it was special order. (if anyone needs a brand new sill oil line for a 1972, i have a spare, its the one with the kink in it for going round the jacking point)
So ordered the correct one this time. It arrived i argued with Porsche that they had sent the wrong one. Turns out, i had it turned the wrong way round....
So all of the crappy lines were replaced, all of the reusable ones were refurbished
and voila, you end up eventually with a decent oil system that holds pressure....hopefully. Will find out on start up
1972 911S
1944 VW Schwimmwagen (originally a Porsche typ128, eventually VW166)
A bunch of other crap (according to my wife)
1944 VW Schwimmwagen (originally a Porsche typ128, eventually VW166)
A bunch of other crap (according to my wife)
-
Dougieboy1
- I luv DDK!
- Posts: 867
- Joined: Mon Jan 04, 2016 7:27 pm
- Location: Definitely round here somewhere
Re: Shrek
thanks, am very happy with the colour. It looks fantastic in direct sunlight.
The car was mot'd yesterday and Garry is finishing off the trimming this week. I should have it back next week. Needs to be road registered as well.
Cant wait for that first drive, very excited!!
The thread is a bit behind !! Getting the car back should give me the impetus to get up to date.......
The car was mot'd yesterday and Garry is finishing off the trimming this week. I should have it back next week. Needs to be road registered as well.
Cant wait for that first drive, very excited!!
The thread is a bit behind !! Getting the car back should give me the impetus to get up to date.......
1972 911S
1944 VW Schwimmwagen (originally a Porsche typ128, eventually VW166)
A bunch of other crap (according to my wife)
1944 VW Schwimmwagen (originally a Porsche typ128, eventually VW166)
A bunch of other crap (according to my wife)