

H-Gs Project 356
Moderator: Bootsy
Re: H-Gs Project 356
Great attention to detail. love it 
1963 Karmann Ghia
1959 356A Coupe Outlaw
1957 3.2 Speedster replica
1959 356A Coupe Outlaw
1957 3.2 Speedster replica
-
mdmax72
- Put a fork in me, I'm done!
- Posts: 1512
- Joined: Thu Sep 28, 2006 8:23 pm
- Location: midlands u.k
Re: H-Gs Project 356
Moving along nicely Ian. Must be ready for the wireloom next?
Rich
DDK Member 0547
Evolving Speedster Build
DDK Member 0547
Evolving Speedster Build
Re: H-Gs Project 356
I've got the bits to get the steering column in which will let me centre the instruments. Once those are in and I have the screen how I want it and the door latches finish (including the inner release handles) I will turn my attention to the loom.
I have a list of modifications I want to make to the loom before I fit it:
- update to give a full 14v to the headlights rather than via the switch
- include the wiring for the electric fuel pump
- include the wiring for the brake fluid level warning etc
- make ready for the heated screen (we will get them!!)
- include the wiring for the current electric seats and future heated seats
- include the wiring for the engine bay extinguisher
- extend the loom for the high level brake light
- incorporate the circuit for the fog light to meet IVA
- incorporate DRLs
- include ancillary sockets for phones, sat navs and other gadgets
- future proof with some additional cables running from the dash to the engine bay to prevent the need to run cables outside of the main loom.
- install a SMS tracking box
I'm sure I'll think of something else a want to do to it but that's about everything I can remember without looking on the wall of the garage!
Oh, I've got the seat to fit as well now that I have the aluminium billet and load spreading plates.
When does it all stop?
Re: H-Gs Project 356
Evening all.
It's been a while but I've been tinkering when time and temperature has allowed.
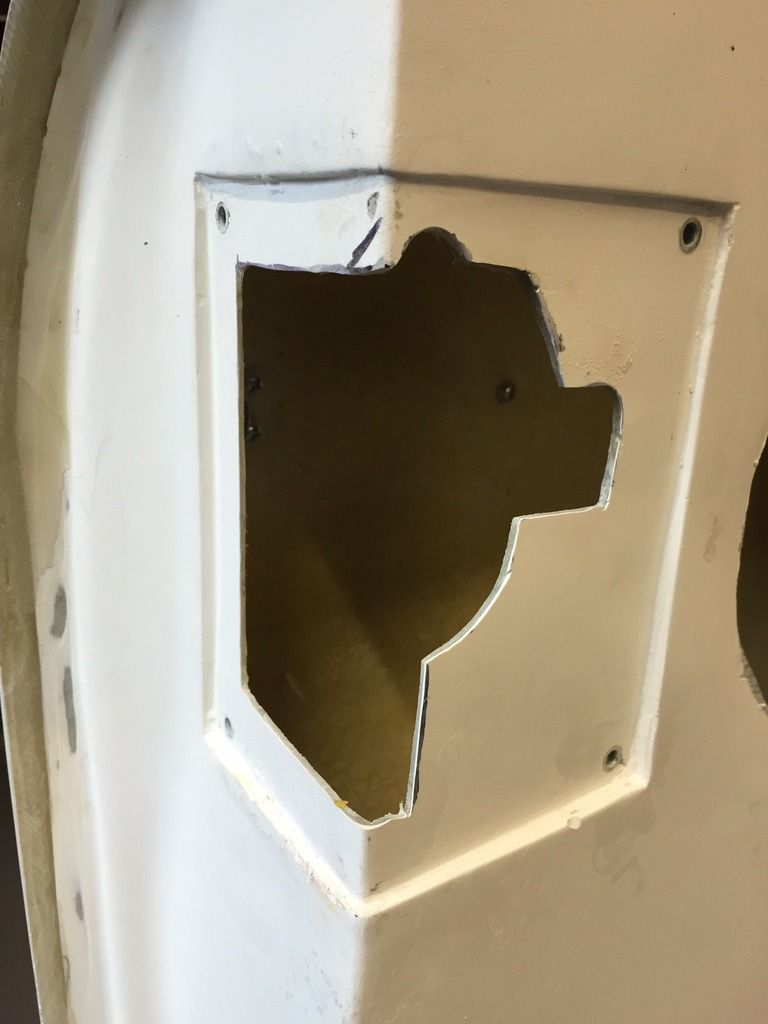
Since the last update I've worked more on the doors, re-doing the lock mechanisms as the last ones I used I had re-profiled to fit up against the GRP skin. I since found that the mechanisms fit up against the metal panel. Re welding the mechs so that they would not lock inadvertently, and re-profiling the door so that the lock bolted up to the metal panel properly.
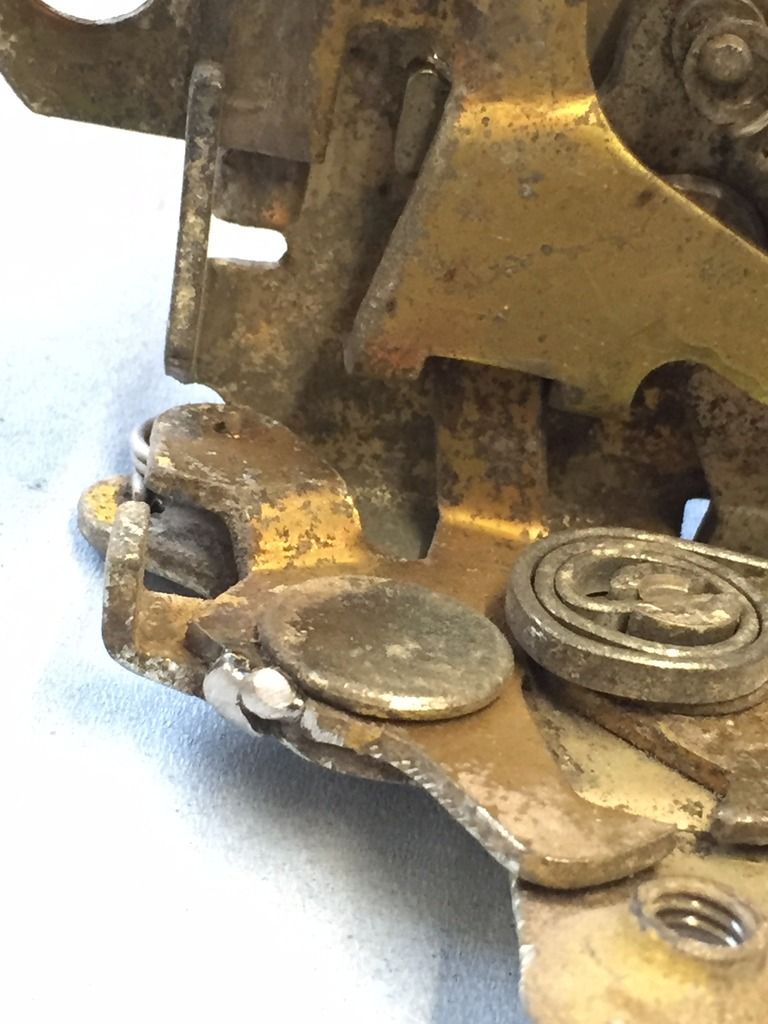
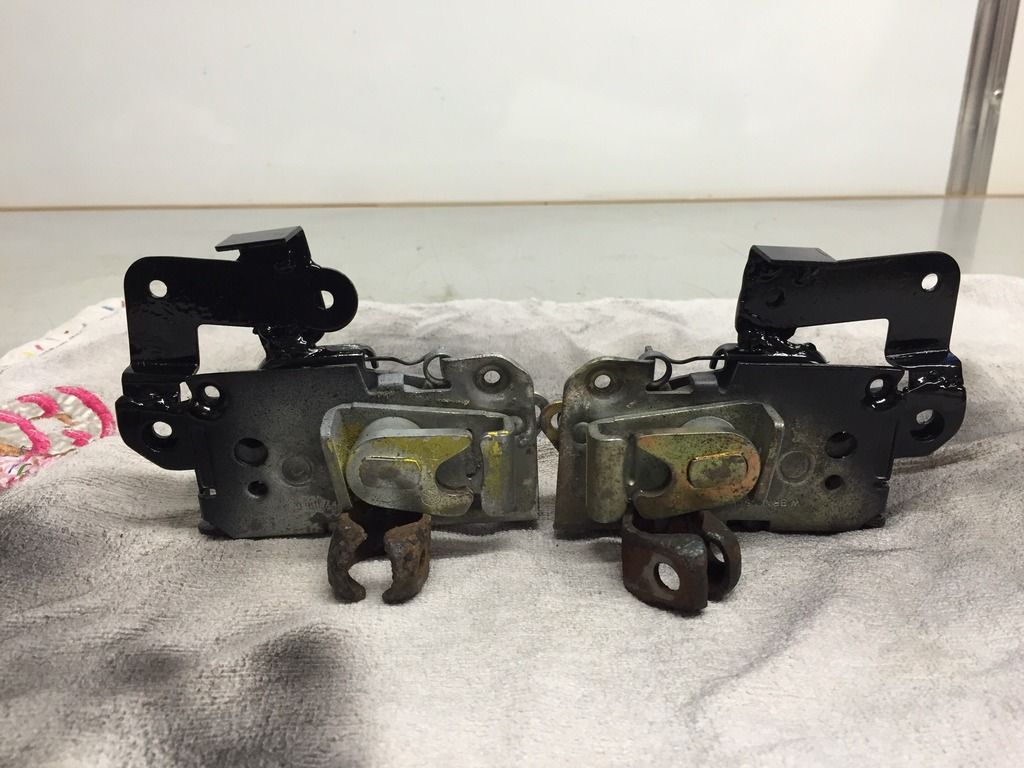
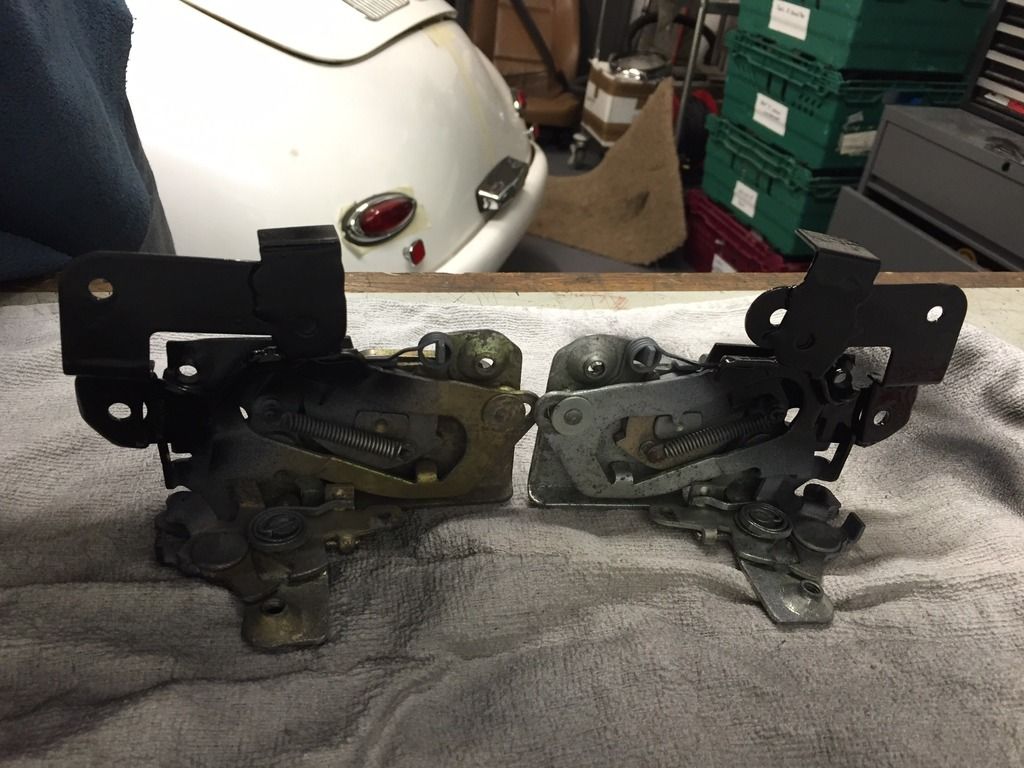
I've also sorted the inner release mechanisms.I took the decision to just use the beetle pull-rods and position the handles where I wanted them to be rather than go to the trouble of trying to manufacture the rods and make it all work. With the B-Post latches in place the doors are now doing the things that doors do!
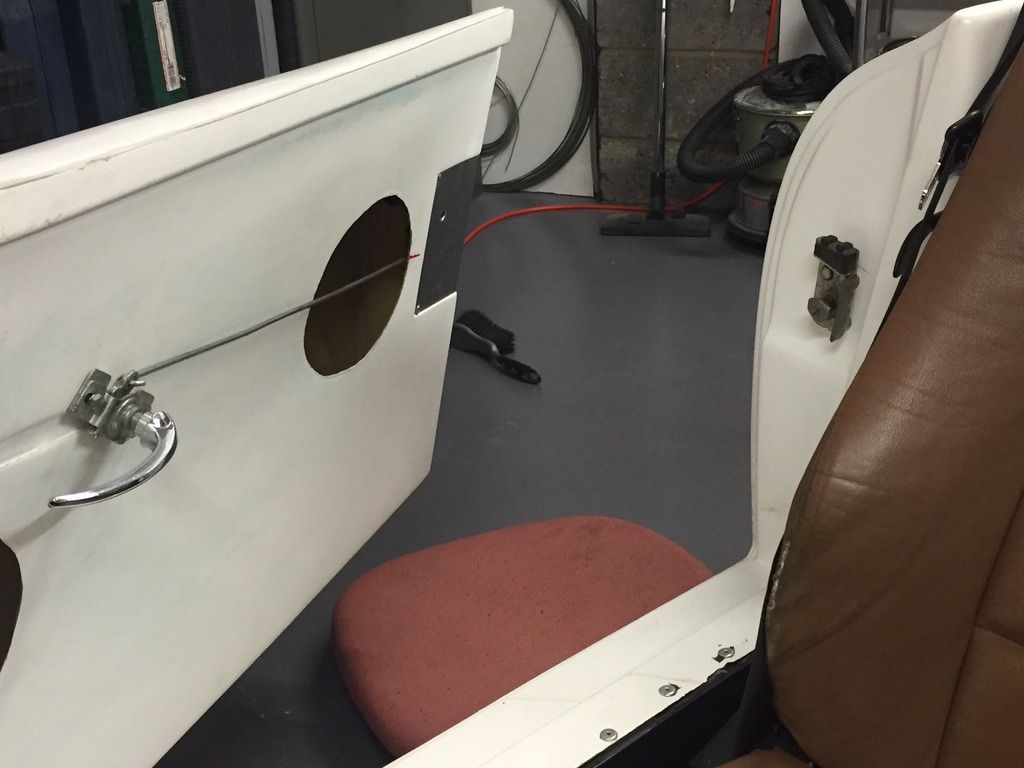
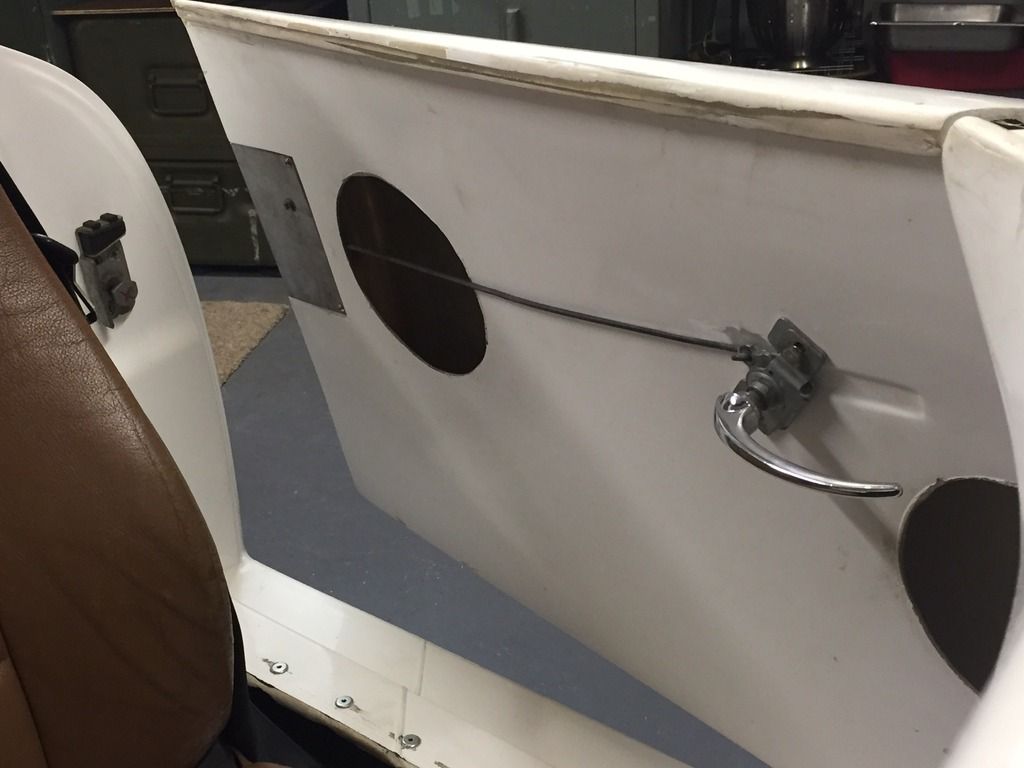
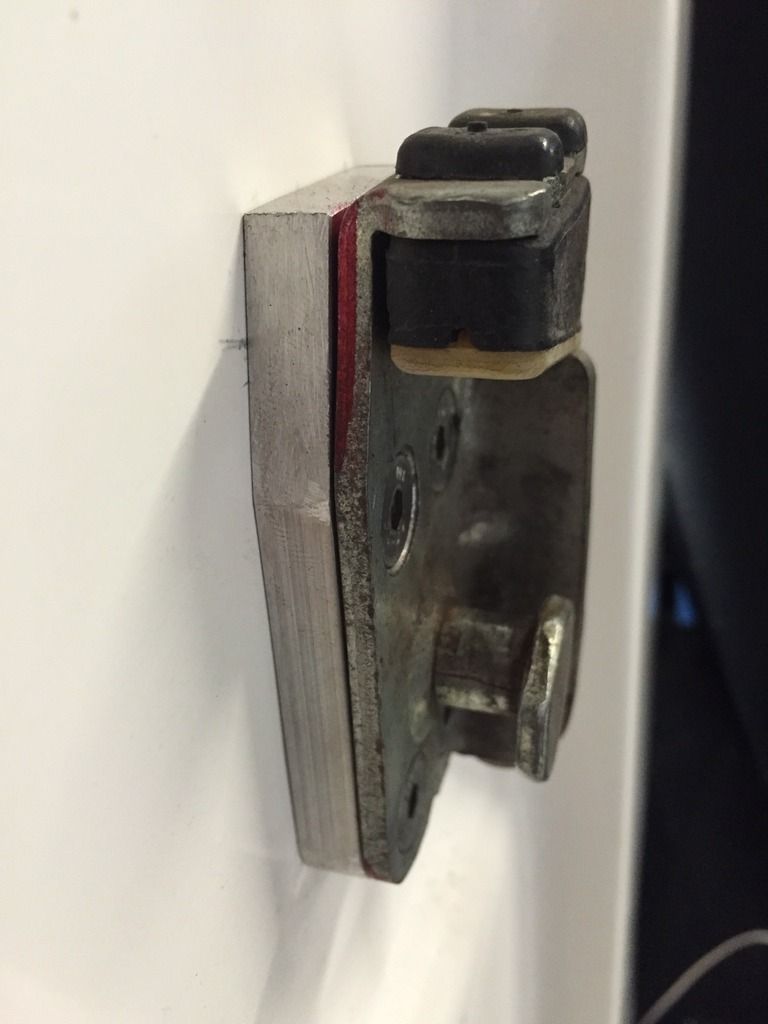
There is a little adjusting to do to the door handles but apart from that, I think that the locks are about done.
It's been a while but I've been tinkering when time and temperature has allowed.
Since the last update I've worked more on the doors, re-doing the lock mechanisms as the last ones I used I had re-profiled to fit up against the GRP skin. I since found that the mechanisms fit up against the metal panel. Re welding the mechs so that they would not lock inadvertently, and re-profiling the door so that the lock bolted up to the metal panel properly.
I've also sorted the inner release mechanisms.I took the decision to just use the beetle pull-rods and position the handles where I wanted them to be rather than go to the trouble of trying to manufacture the rods and make it all work. With the B-Post latches in place the doors are now doing the things that doors do!
There is a little adjusting to do to the door handles but apart from that, I think that the locks are about done.
Re: H-Gs Project 356
Hi Ian, great sense of satisfaction when you push the door and it goes click. Fully understand how many hours go into getting doors to do the things doors do
1963 Karmann Ghia
1959 356A Coupe Outlaw
1957 3.2 Speedster replica
1959 356A Coupe Outlaw
1957 3.2 Speedster replica
Re: H-Gs Project 356
So other areas that I've worked on.....
Well, to be honest I've not done this and it remains a bit of a work in progress as the chap doing this piece of work is unreliable, never turns up when he says he will and the few times he is here, all he does is drink coffee and eat chocolate brownies' fortunately the chap in question won't read this on here, but it's good to have a bit of company in The Cave on occasion.
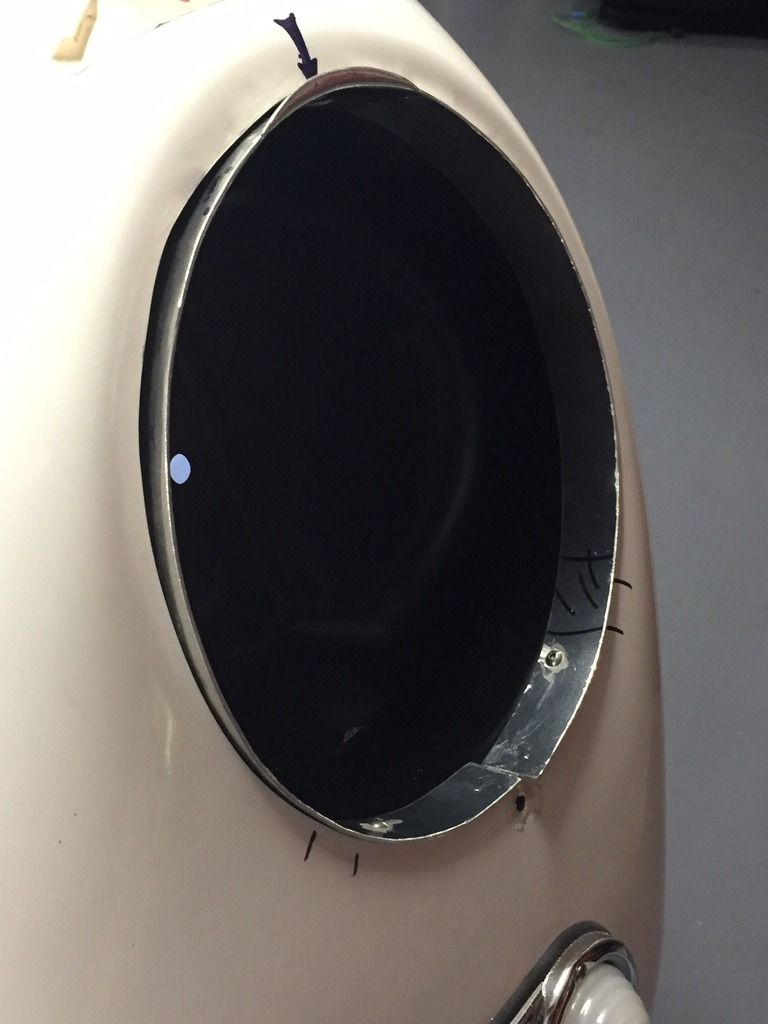
The headlight bowls are bonded in from the rear and don't have the rim in place to hold the rubber seal in place and guide rain and crap around headlight, preventing it from filling with water.
A few templates and literally hundreds of trial fits later has produced the aluminium rings that are currently being held in place using rivnuts and M4 stainless bolts. These will eventually be bonded into place and not only help weatherproof the bowls, they will also be the brackets to hang the headlights from. The lip can then be filed down to give a even height and then the gap between the front panel and the weather ring can be filled and sanded back to give the finish I'm looking for.
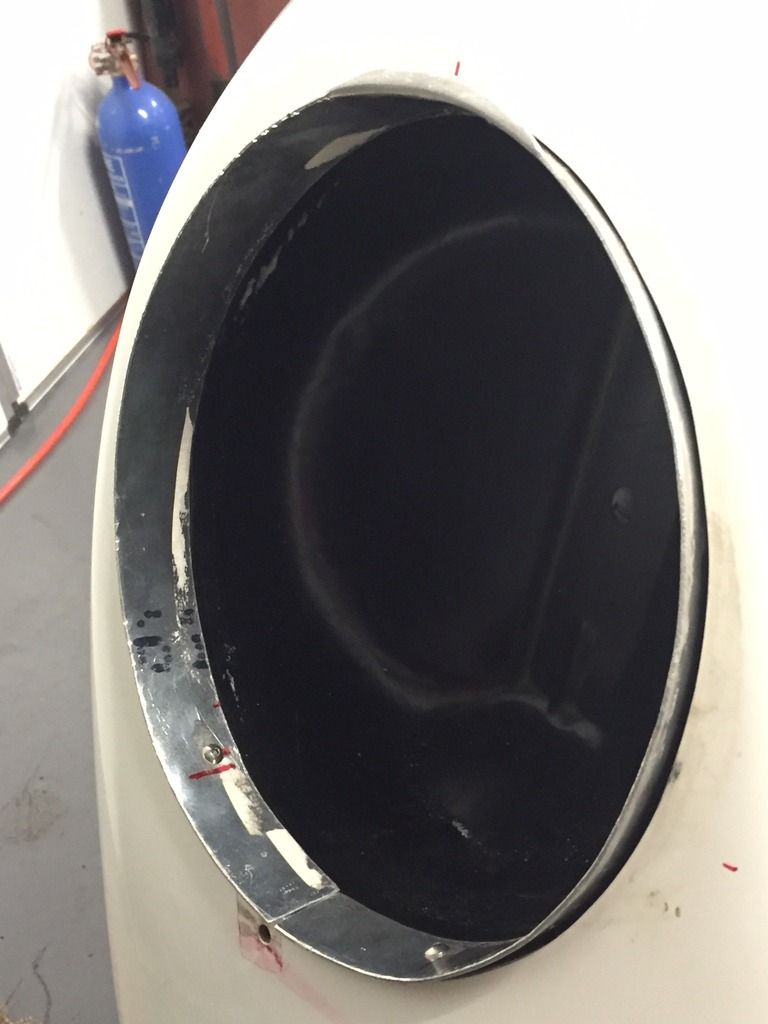
I have been considering a few modern twists, including incorporating DRLs within the headlights. I need to do this is a way that the DRLs are not seen when off or detract from the look of the car.
In the sloping lens on the headlight there is a 'frosted' area at the top which is where I intend to hide the DRLs. I have bought some flexible LED strips and also a DRL controller which will reduce the brightness of the DRLs to 30% when the headlights are turned on and will turn the relevant side off when the indicators or on.
The stripes are 300mm which is far too long but they can be cut down. A sneaky trial fit of the full length lights give an indication where they will fit and of how things will look a bit further down the line.
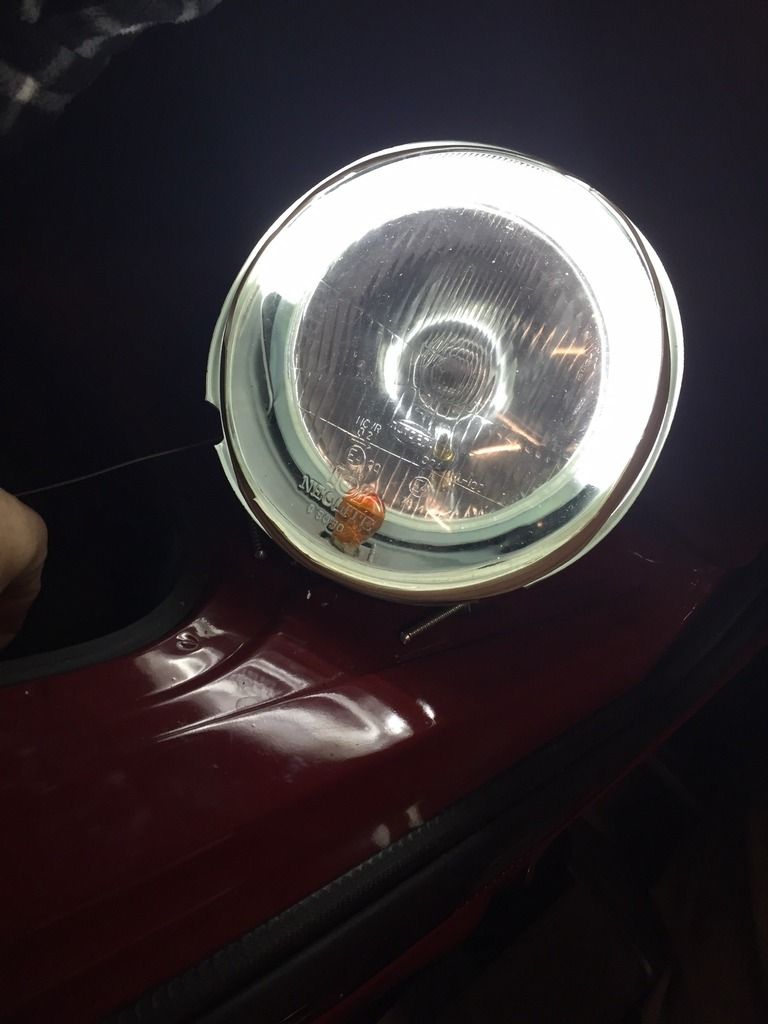
The astute of you will notice that there is an amber indicator lamp at within the headlight unit. I have a plan to turn this into a DRL also, however I am hoping to create a new lamp out of crystal resin to look like a 356 speedster and fit it with a LED so it lights up as a DRL. Something to look forward to a bit later down the line....
Next - steering column.
Well, to be honest I've not done this and it remains a bit of a work in progress as the chap doing this piece of work is unreliable, never turns up when he says he will and the few times he is here, all he does is drink coffee and eat chocolate brownies' fortunately the chap in question won't read this on here, but it's good to have a bit of company in The Cave on occasion.
The headlight bowls are bonded in from the rear and don't have the rim in place to hold the rubber seal in place and guide rain and crap around headlight, preventing it from filling with water.
A few templates and literally hundreds of trial fits later has produced the aluminium rings that are currently being held in place using rivnuts and M4 stainless bolts. These will eventually be bonded into place and not only help weatherproof the bowls, they will also be the brackets to hang the headlights from. The lip can then be filed down to give a even height and then the gap between the front panel and the weather ring can be filled and sanded back to give the finish I'm looking for.
I have been considering a few modern twists, including incorporating DRLs within the headlights. I need to do this is a way that the DRLs are not seen when off or detract from the look of the car.
In the sloping lens on the headlight there is a 'frosted' area at the top which is where I intend to hide the DRLs. I have bought some flexible LED strips and also a DRL controller which will reduce the brightness of the DRLs to 30% when the headlights are turned on and will turn the relevant side off when the indicators or on.
The stripes are 300mm which is far too long but they can be cut down. A sneaky trial fit of the full length lights give an indication where they will fit and of how things will look a bit further down the line.
The astute of you will notice that there is an amber indicator lamp at within the headlight unit. I have a plan to turn this into a DRL also, however I am hoping to create a new lamp out of crystal resin to look like a 356 speedster and fit it with a LED so it lights up as a DRL. Something to look forward to a bit later down the line....
Next - steering column.
-
sladey
- Nurse, I think I need some assistance
- Posts: 8734
- Joined: Sat Apr 23, 2005 9:08 pm
- Location: Nottingham, UK
Re: H-Gs Project 356
What's a DRL?
The simple things you see are all complicated
I look pretty young but I'm just backdated yeah
I look pretty young but I'm just backdated yeah
Re: H-Gs Project 356
Steering column - but before that I found that I needed the drivers seat in place so I could see where the column needed to be in order of it all to fall to hand when you are driving the car. Nothing scientific to this in any way, sit in the seat and just move the column around until it's where everything feels come table (bit being very mindful of where the instruments need to go!). Ultimately, I want the centre instrument to be directly above the column rather to one side or the other.
Seat fitting was 'simply' a case of drilling 4 holes in the floor, and bolting it down with 4 aluminium spacers to lift the seat subframe above the floor strengthening ribs. For the IVA I need to fit spreaders (100 x 100mm and 4mm thick) above and below the floor panel. This is because the seats incorporate the seatbelt so need to meet specific criteria for, yup, you guessed it - IVA! I think the additional work is worth it as I don't have to mess around fitting the seat belts to meet the IVA specifications which would mean cutting the bodywork about.
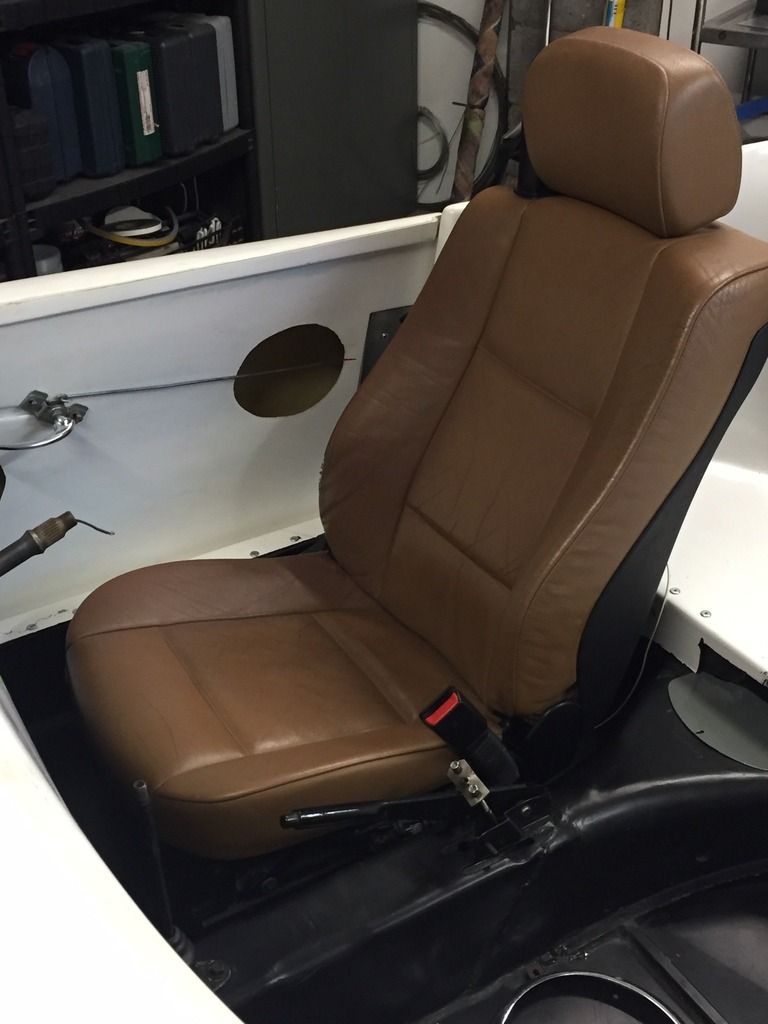
Once the seat was in place I could turn to the steering column - I've had a few false starts and I'm now the proud owner of 3 different beetle steering columns.
After a bit of trial, error and emails to Gary at The Speedster Clinic I now have a pre-57 column which is the right length. I also bought the early indicator stalk which is more in keeping with the speedster.
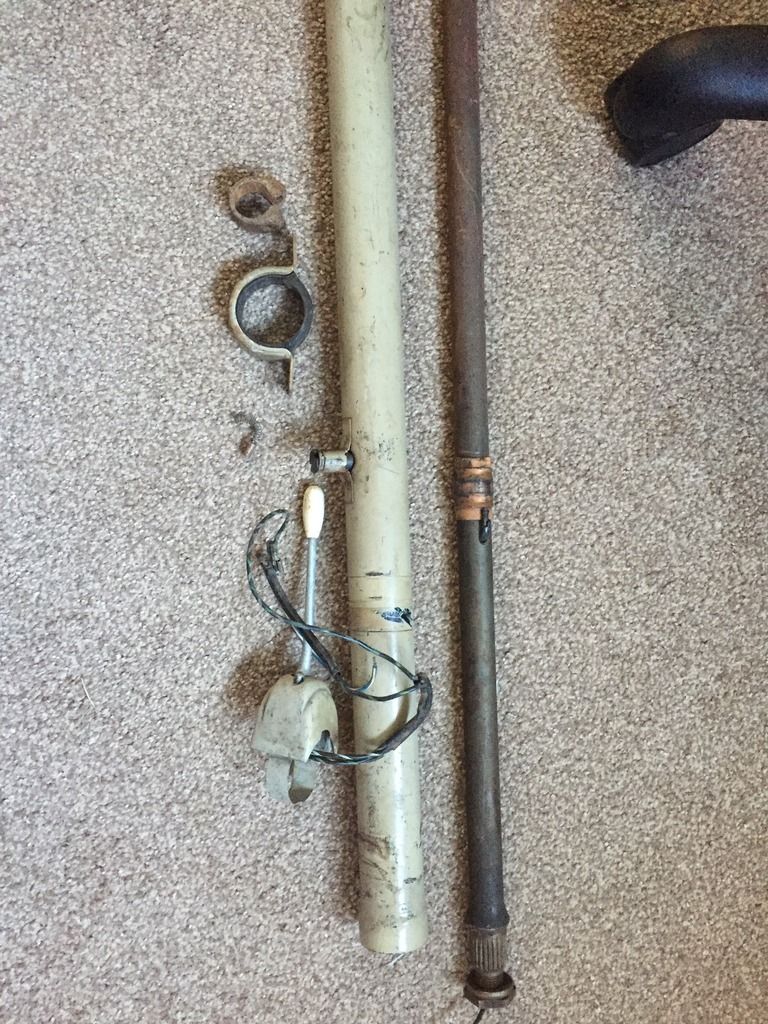
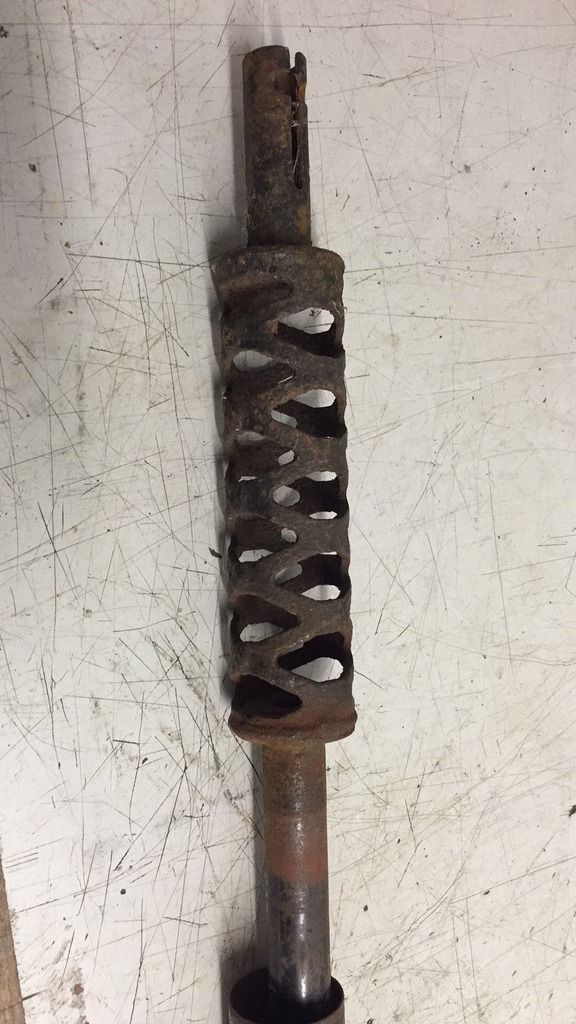
It's not all roses quite yet as to get through the IVA it must have a collapsible portion so I will be engaging the services of a coded welder to take the collapsible portion out of one of the later columns and welding it to the pre-57 column so we have a pre/post 57 hybrid which should be acceptable to the tester.
So this has to be welded into the early column I will be fitting to the car:
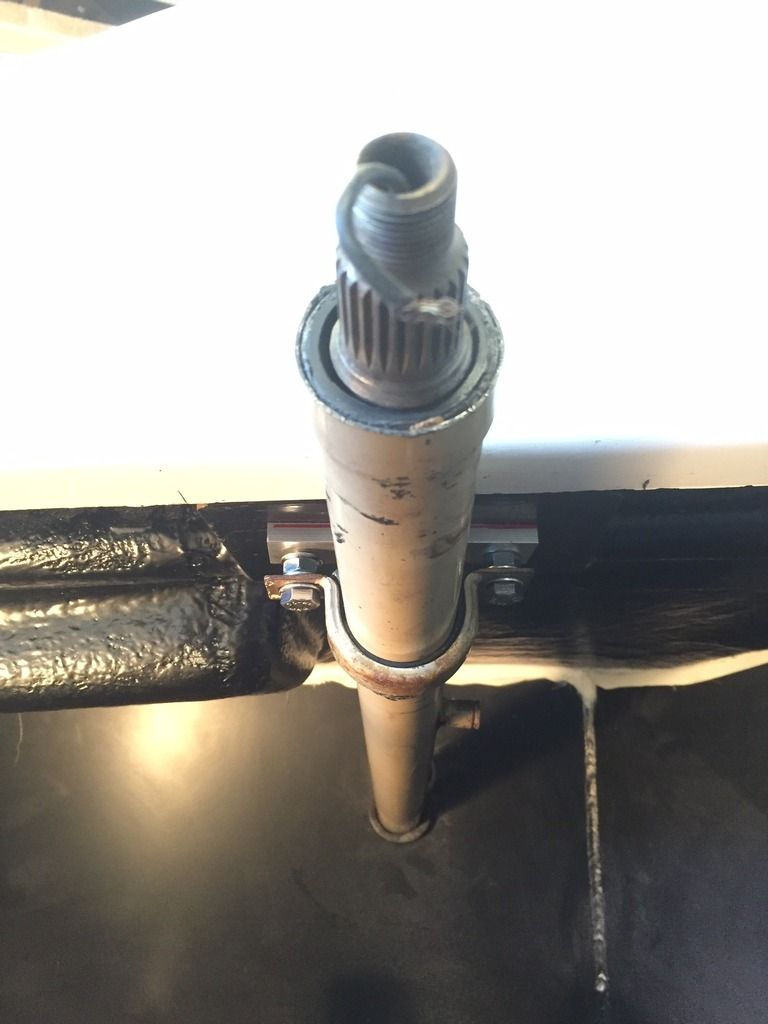
An additional challenge is that the dash on the pre-57 is scalloped to accept the upper part of the column - no such profile on the replica so in the interim I have used a combination of aluminium spacer and washers to allow me to fit the column and continue with other areas which need the column fitted. In time, I will fabricate a shaped spacer out of a piece of billet aluminium which will give the necessary support to the column.
So with this all bolted into place I can move on to the dashboard and in particular instrument positioning.
Seat fitting was 'simply' a case of drilling 4 holes in the floor, and bolting it down with 4 aluminium spacers to lift the seat subframe above the floor strengthening ribs. For the IVA I need to fit spreaders (100 x 100mm and 4mm thick) above and below the floor panel. This is because the seats incorporate the seatbelt so need to meet specific criteria for, yup, you guessed it - IVA! I think the additional work is worth it as I don't have to mess around fitting the seat belts to meet the IVA specifications which would mean cutting the bodywork about.
Once the seat was in place I could turn to the steering column - I've had a few false starts and I'm now the proud owner of 3 different beetle steering columns.
After a bit of trial, error and emails to Gary at The Speedster Clinic I now have a pre-57 column which is the right length. I also bought the early indicator stalk which is more in keeping with the speedster.
It's not all roses quite yet as to get through the IVA it must have a collapsible portion so I will be engaging the services of a coded welder to take the collapsible portion out of one of the later columns and welding it to the pre-57 column so we have a pre/post 57 hybrid which should be acceptable to the tester.
So this has to be welded into the early column I will be fitting to the car:
An additional challenge is that the dash on the pre-57 is scalloped to accept the upper part of the column - no such profile on the replica so in the interim I have used a combination of aluminium spacer and washers to allow me to fit the column and continue with other areas which need the column fitted. In time, I will fabricate a shaped spacer out of a piece of billet aluminium which will give the necessary support to the column.
So with this all bolted into place I can move on to the dashboard and in particular instrument positioning.
Re: H-Gs Project 356
Hi Sladey - Daylight Running Lights.
Re: H-Gs Project 356
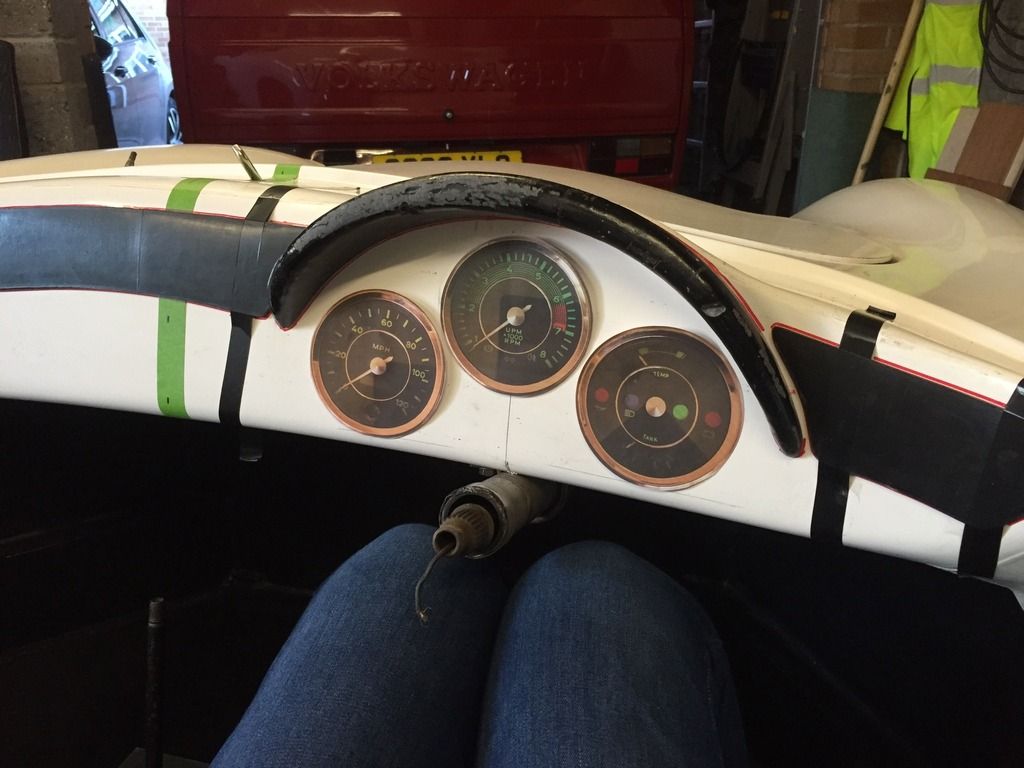
One of the biggest challenges I've found is understanding the impact that one area has on another, so while I've been itching to install the instruments, I needed to get the steering column in position first, but before that I had to fit the drivers seat and so it goes on. The last domino to set up before measuring for the instruments was the eyebrow on the dash as the instruments are all beneath it. To make sure that the dash pads all lined up with the eyebrow, they were also trial fitted and taped into place.
The eyebrow is now screwed to the dash; to do this I have drilled and fitted 3no M4 rivnuts in the back of the eyebrow and then used stainless screws through from the rear of the dash to hold it on place. The finished look is like this:
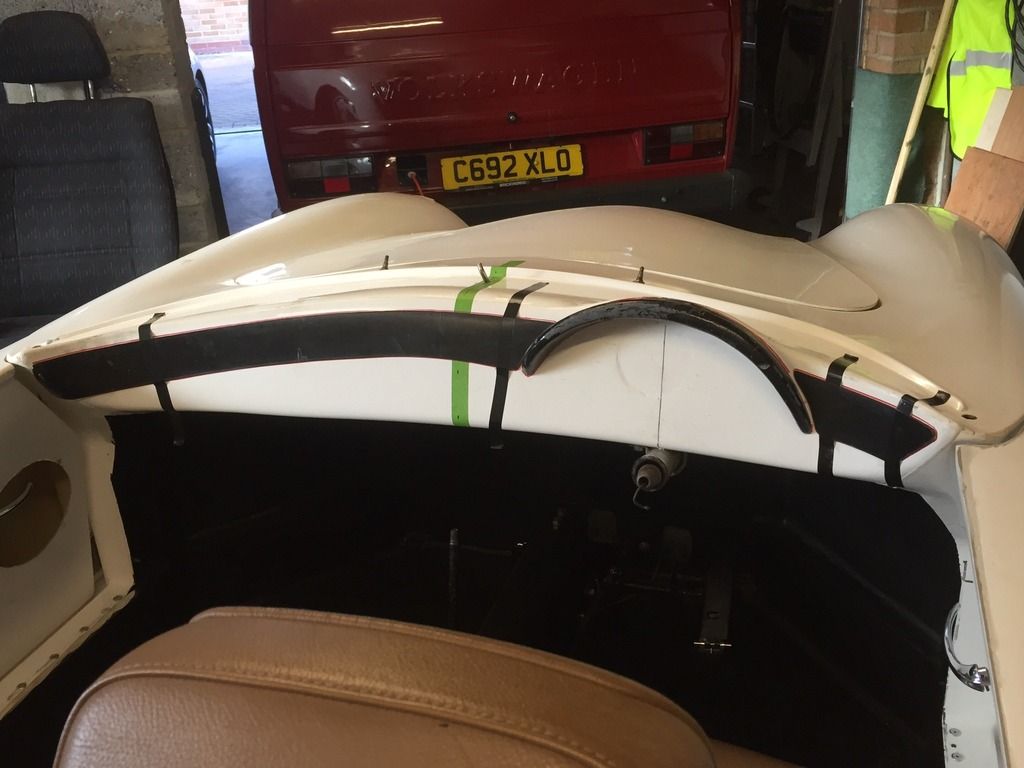
I'm not quite ready to cut the 100mm holes in the dash yet as I need to go back and remeasure and recheck that I'm happy with the instrument positions, however to give me a good idea how it will look, I've printed off full-size copies of the intruments and stuck them in place. This is what it should look like, however we have the various switches, knobs, buttons and lights to put in place too.
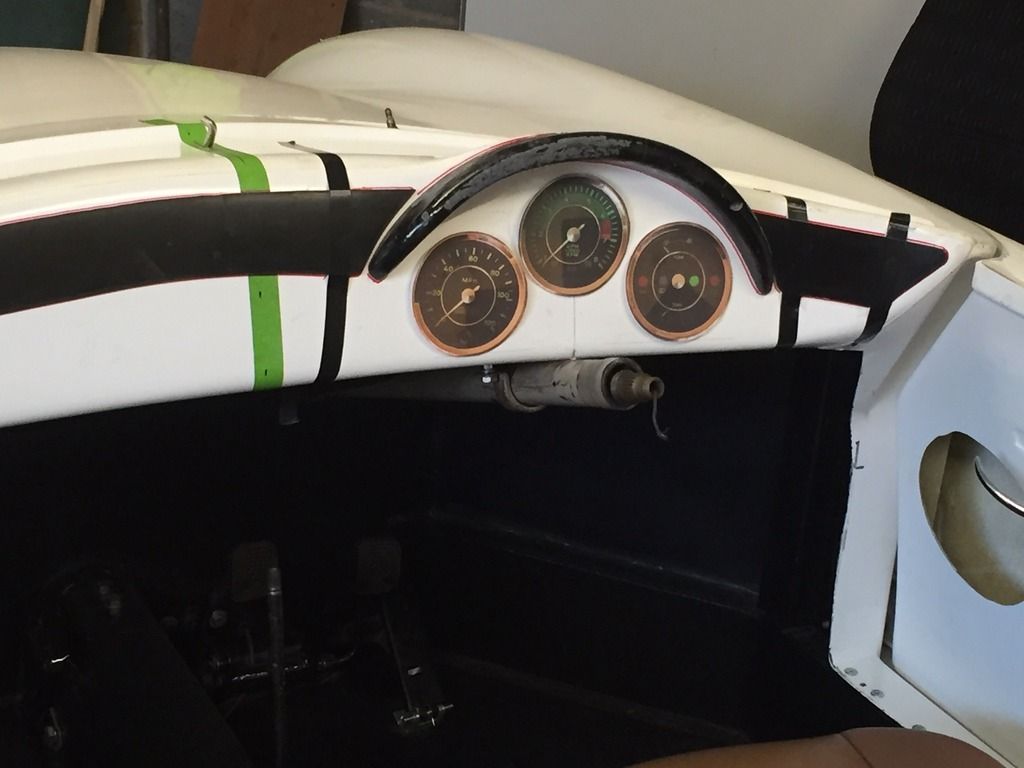
In addition to the above, I have also installed the engine lid release cable and rather than the 'traditional' position of behind the drivers seat, I have bought an extra-long cable with the release handle up front.
The eyebrow is now screwed to the dash; to do this I have drilled and fitted 3no M4 rivnuts in the back of the eyebrow and then used stainless screws through from the rear of the dash to hold it on place. The finished look is like this:
I'm not quite ready to cut the 100mm holes in the dash yet as I need to go back and remeasure and recheck that I'm happy with the instrument positions, however to give me a good idea how it will look, I've printed off full-size copies of the intruments and stuck them in place. This is what it should look like, however we have the various switches, knobs, buttons and lights to put in place too.
In addition to the above, I have also installed the engine lid release cable and rather than the 'traditional' position of behind the drivers seat, I have bought an extra-long cable with the release handle up front.
Re: H-Gs Project 356
So last update for the night. I went to Dubfreeze last weekend and amongst other things, I picked up some CREE LED lamps.
The stop/tail are just normal and will be fitted as usual. I also bought some Amber lamps for the indicators - nothing special there, but when fitted in the US spec red lens clusters, they are so bright that they give a very good Amber light when operating.
[video]http://vid1239.photobucket.com/albums/f ... twhpda.mp4[/video]
Now, I'm looking at being a bit clever when it comes to the fog and reversing lights. The number plate light cluster also houses the reversing light, however I'm looking to use this as both fog and reversing light. I picked up a CREE high intensity red lamp and fitted it where the reversing light normally fits - when illuminated we get this:
[video]http://vid1239.photobucket.com/albums/f ... d0cqtx.mp4[/video]
The next step is to fit a couple of high-intensity COBB LED strips within the housing which will provide the White reversing light when needed. I have also designed the loom so that when reverse is selected, it will over-ride the fog light when reverse is selected. Once reverse is de-selected, the fog light will come back on.
In the videos above, I am just using a battery to provide a 12v feed to directly to the lamps - the loom is not fitted yet however we can see how bright the lamps will be.
The video link takes you to another screen - is there a way to upload the video so that it looks like a photo and plays within the thread?
-
Richardab1967
- DDK Fanatic
- Posts: 59
- Joined: Tue Jan 01, 2013 12:27 am
Re: H-Gs Project 356
I like the fog light idea, but is that OK with IVA, I thought the fog light had to be a special 'E' market item...doesn't stop you fixing up a horrid modern one for the test and then going to this solution afterwards though
H-G wrote:
Now, I'm looking at being a bit clever when it comes to the fog and reversing lights. The number plate light cluster also houses the reversing light, however I'm looking to use this as both fog and reversing light. I picked up a CREE high intensity red lamp and fitted it where the reversing light normally fits - when illuminated we get this:
Re: H-Gs Project 356
You make a good point - perhaps the boxy E marked jobbie will have to go on for the test. The bumper is coming off for the test anyway so maybe I can just bolt it stright onto the body so no brackets etc will be required.
Re: H-Gs Project 356
Morning Ian,
The lights look great, fantastic idea and much improved on standard lighting.
As we know IVA does create a few challenges, least trying to understand the requirements. Don't shoot the messenger but just a couple of points;
1. I have read somewhere that there should be no light bleed between the two coloured lenses, from memory may need to improve the wall height/ seal between the two.
2. I can't tell from the IVA M1 Inspection Manual whether the indicator stalk (Control, Tell-tale or Indicator) needs to have the modern arrow symbols on them (readily identifiable) or not or if the directional lights are enough. Also cant tell from your gauges if the directional lights are separate i.e. one left and one right or combined like the old beetle? I believe it needs to be two to show direction.
Maybe Rich can add some light on the subject
Great stuff
1963 Karmann Ghia
1959 356A Coupe Outlaw
1957 3.2 Speedster replica
1959 356A Coupe Outlaw
1957 3.2 Speedster replica
Re: H-Gs Project 356
The guages that you can see are actually photos so that I can move them around and get them where I want them before cutting holes.
The indicator tell-tale is a single light in the speedo for both left and right - I'll have to have a check in the manual to make sure that I get that bit right - I see more holes appearing in the dash......
There is a little bleeding between the stop/tail and indicator in the rear clusters but I think this should be easy to overcome as it seems to be bleeding through a gap where the divider meets the reflector - I'll look at that and post up what I come up with to overcome the challenge idc.