The Manhattan Project

Ongoing and archived Porsche (and other marques) restoration threads from DDK members

Moderator: Bootsy

Post Reply
User avatar
AndrewSlater
I luv DDK!
Posts: 969
Joined: Wed Nov 30, 2011 3:35 pm

Re: The Manhattan Project

Post by AndrewSlater »

'Looks to me the tank support has been done before?'
Just curious but what makes you think that?
I'm pretty sure the car was taken off the road in the late 80's and sat up for the best part of 30 years.

We've yet to find any evidence of any previous repair work other than a little bondo and overspray for a dent in the engine lid.

That's not to say there isn't any - just that we haven't spotted it :)


So here's a further technical question.
I've just realised that one of my new wings has the four headlamp brackets for the US sugar scoop lights and the other hasn't.

Do the sugar scoop brackets foul the Euro light assemblies?
i.e. Do I have to remove them to fit Euro lights?

Thanks again - keep all the feedback coming - and no it's not going to revert to brown. Although the Bonhams Sepia Brown car did make strong money this weekend.
1966 Porsche 912 Slate Grey, red interior - first owner owned for 41 years
1974 Porsche 911 2.7 (The Manhattan project) viewtopic.php?f=28&t=51455
1973 VW 914 1.7 Olympic Blue - ( gone to a good home )
911hillclimber
Nurse, I think I need some assistance
Posts: 18925
Joined: Mon Mar 10, 2008 6:26 pm
Location: West Midlands

Re: The Manhattan Project

Post by 911hillclimber »

Ref the tank support;
The welds don't look 'factory' to me, comparing the spot weld on the support panel to the welds (spacing) on the panel leading back to the back of the tank hole.

Please, I could be very wrong, just a comment.
73T 911 Coupe, road/hillclimber 3.2L
Lola t 492 / 3.2 hillclimb racer
Boxster 987 Gen II 2.9
User avatar
AndrewSlater
I luv DDK!
Posts: 969
Joined: Wed Nov 30, 2011 3:35 pm

Re: The Manhattan Project

Post by AndrewSlater »

Hi,
no problem with the comment - I don't know whether it has been previously redone.
My bodyshop guy seems to think it has not been previously touched.

Maybe someone else, who is more knowledgeable than me, can comment.

I'm currently sourcing the remaining repair panels that are needed and then the welding work can commence.
1966 Porsche 912 Slate Grey, red interior - first owner owned for 41 years
1974 Porsche 911 2.7 (The Manhattan project) viewtopic.php?f=28&t=51455
1973 VW 914 1.7 Olympic Blue - ( gone to a good home )
User avatar
AndrewSlater
I luv DDK!
Posts: 969
Joined: Wed Nov 30, 2011 3:35 pm

Re: The Manhattan Project

Post by AndrewSlater »

Finally made some progress this evening in getting my engine onto the stand (big thanks to Fetuhoe).

Image

Removed one of the timing chain covers, which dispelled the thought that the engine was totally original and untouched.

Image

Makes me wonder what I might find next :shock:
Last edited by AndrewSlater on Sun Jul 16, 2017 8:27 pm, edited 2 times in total.
1966 Porsche 912 Slate Grey, red interior - first owner owned for 41 years
1974 Porsche 911 2.7 (The Manhattan project) viewtopic.php?f=28&t=51455
1973 VW 914 1.7 Olympic Blue - ( gone to a good home )
User avatar
AndrewSlater
I luv DDK!
Posts: 969
Joined: Wed Nov 30, 2011 3:35 pm

Re: The Manhattan Project

Post by AndrewSlater »

So things have moved on a bit in the engine teardown stakes.

Firstly big thanks to Andy B ( Lightweight_911 ) for the loan of his camshaft removal socket P202.

The first job was to remove the exhausts from the engine.
At first I thought one side had a race exhaust fitted and the other a standard heat exchanger.

Image

However as the metalwork on the heat exchanger disintegrated in my hands I think the other side had just rotted out.
I broke a couple of studs getting them off - but eventually they were off.

I then removed the camshaft nuts which was a 60s job with the right tools. Chain covers off and then this is where I went a bit 'off piste' I think.

The Dempsey book reads as though you are taking the cam cover off, which didn't budge at all until I spotted the extra fixings under the rockers. I re-read the book again and it became clear he means for you to take the cam covers and heads off together.

However no matter how hard I tried a number of the head fixings are fouled by the cam cover.

So I decided the easiest route was to remove the rockers in turn, to gain access to the fixings holding the cam covers on.
Eventually the cams covers and then the heads were off.

Wow pistons !!
Image
and heads !!
Image

So on first inspection nothings looking too horrendous at all.

Although the engine has had Racing Designs chain tensioners fitted at some point, the timing chains are split types which suggests maybe that's as far as the builder went at that point. So looks like it may have had a head rebuild recently ( recently in miles that is as I think the car has been off the road since the late 80's ).

More to follow - just need some time to write it down.
Andrew

PS So my cylinders are marked as Mahle, have 11 fins and the bores are slightly magnetic - can I say for sure they are Nikasils?
Last edited by AndrewSlater on Sun Jul 16, 2017 8:31 pm, edited 1 time in total.
1966 Porsche 912 Slate Grey, red interior - first owner owned for 41 years
1974 Porsche 911 2.7 (The Manhattan project) viewtopic.php?f=28&t=51455
1973 VW 914 1.7 Olympic Blue - ( gone to a good home )
User avatar
AndrewSlater
I luv DDK!
Posts: 969
Joined: Wed Nov 30, 2011 3:35 pm

Re: The Manhattan Project

Post by AndrewSlater »

So next off were the cylinders.

Once off I cannot detect any wear lip in the bores so I think I might be lucky and they are good to go again.

I then removed the pistons and so far no horrors.
I used paint remover as suggested on one of the engine rebuilds on DDK and the pistons have come up pretty clean after a day or so of cleaning.

However I managed to get some of the paint remover on my gudgeon pins, and it has discoloured them as follows.

Image

I seem to have taken the shiny finish off them - which is a bit surprising. Are the knackered or recoverable?

I then attempted to remove my flywheel. Most of the bolts were pretty tight but one seemed loose. That would be a snapped flywheel bolt then!

Image

When I got back to the flywheel bolts I found a sharp tap with a hammer on each one helped with the loosening. Once removed the broken bolts wound out using my fingers. Huge relief :P

So then crank out and removed the conn rods.

Image

Again pretty astounded how little wear there is on any of the bushes - great news!

The crankshaft is also looking good
Image

Again the journals look pretty good.
Image

With a quick measure they seem to be within standard size tolerance but I intend to check this again.

Finally dropped all my valves out of the heads.
Image
So next step some more cleaning and some measuring of tolerances.

I plan on getting the parts to a specialist for an assessment and to work out what machining work I will need doing - but that's for another day.

Well the engine doesn't come much further apart than this :shock:

If anyone spots anything in the photos then please don't hesitate to shout out.
Last edited by AndrewSlater on Sun Jul 16, 2017 8:40 pm, edited 1 time in total.
1966 Porsche 912 Slate Grey, red interior - first owner owned for 41 years
1974 Porsche 911 2.7 (The Manhattan project) viewtopic.php?f=28&t=51455
1973 VW 914 1.7 Olympic Blue - ( gone to a good home )
Gary71
Nurse, I think I need some assistance
Posts: 10275
Joined: Wed Mar 31, 2004 1:27 pm
Location: Cheshire
Contact:

Re: The Manhattan Project

Post by Gary71 »

Looks good, I'm a week or two behind you doing the same!
911hillclimber
Nurse, I think I need some assistance
Posts: 18925
Joined: Mon Mar 10, 2008 6:26 pm
Location: West Midlands

Re: The Manhattan Project

Post by 911hillclimber »

Memories!

I now put all these ( cleaned) parts in freezer bogs, labeled, to keep the grouping and easy then to get them off the bench unless you have an aircraft carrier of a bench that is..
73T 911 Coupe, road/hillclimber 3.2L
Lola t 492 / 3.2 hillclimb racer
Boxster 987 Gen II 2.9
User avatar
AndrewSlater
I luv DDK!
Posts: 969
Joined: Wed Nov 30, 2011 3:35 pm

Re: The Manhattan Project

Post by AndrewSlater »

The car has moved along on a few fronts recently.

Firstly the bodyshop has finally made a start to the shell - so that has made me happier.

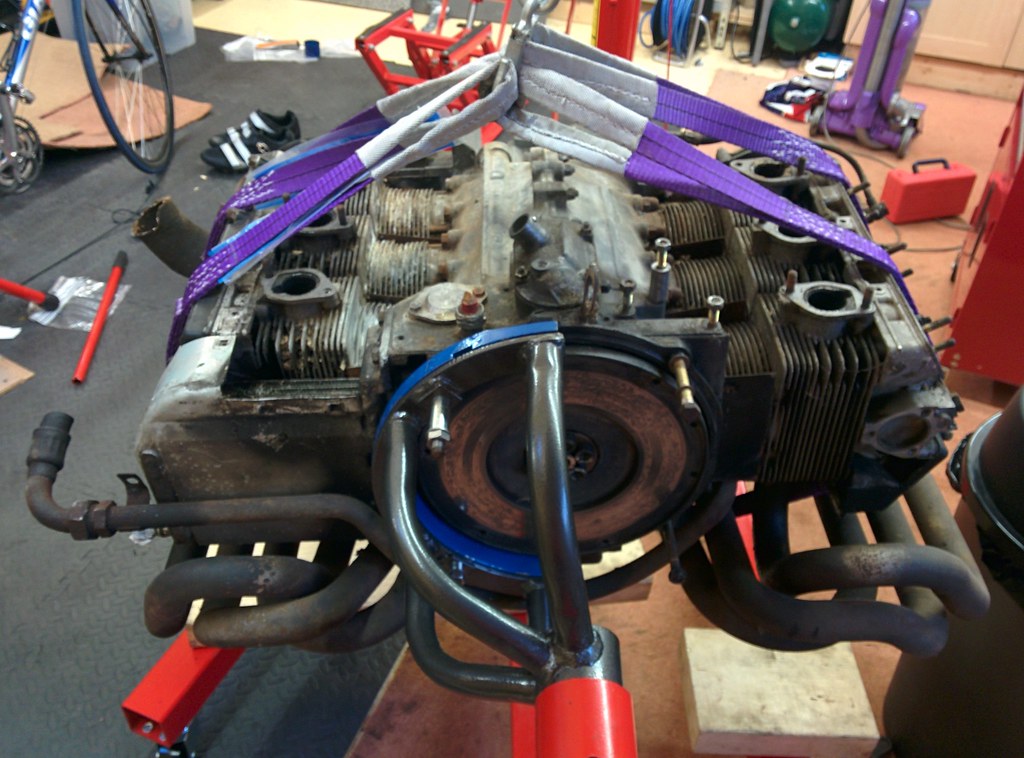
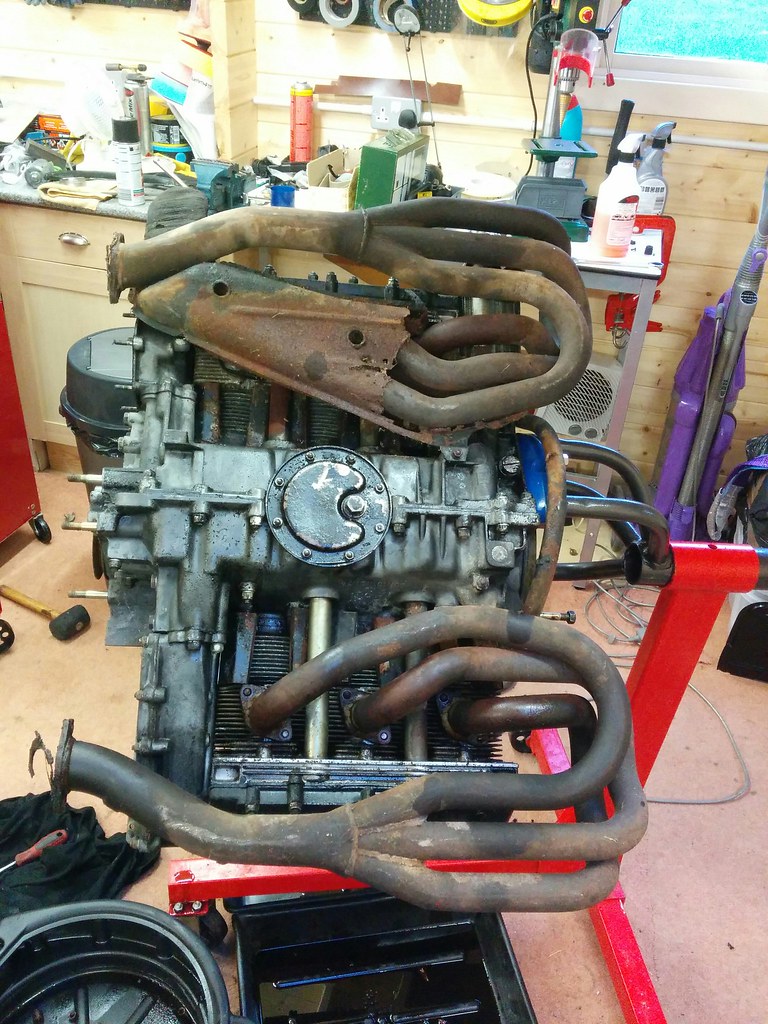
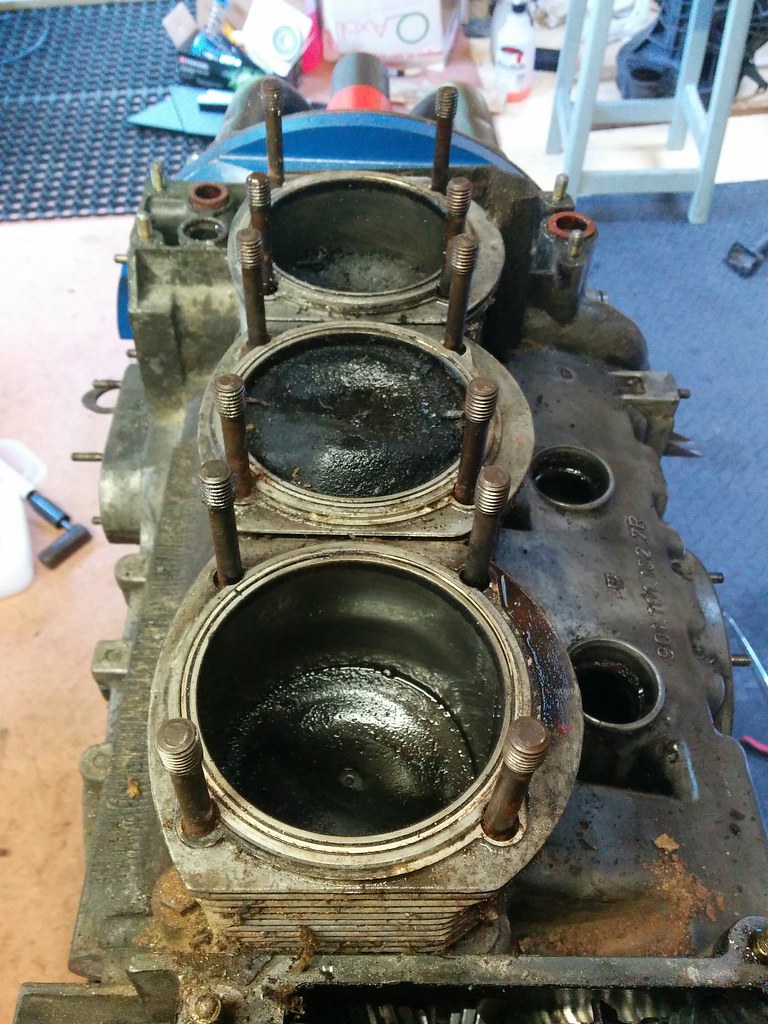
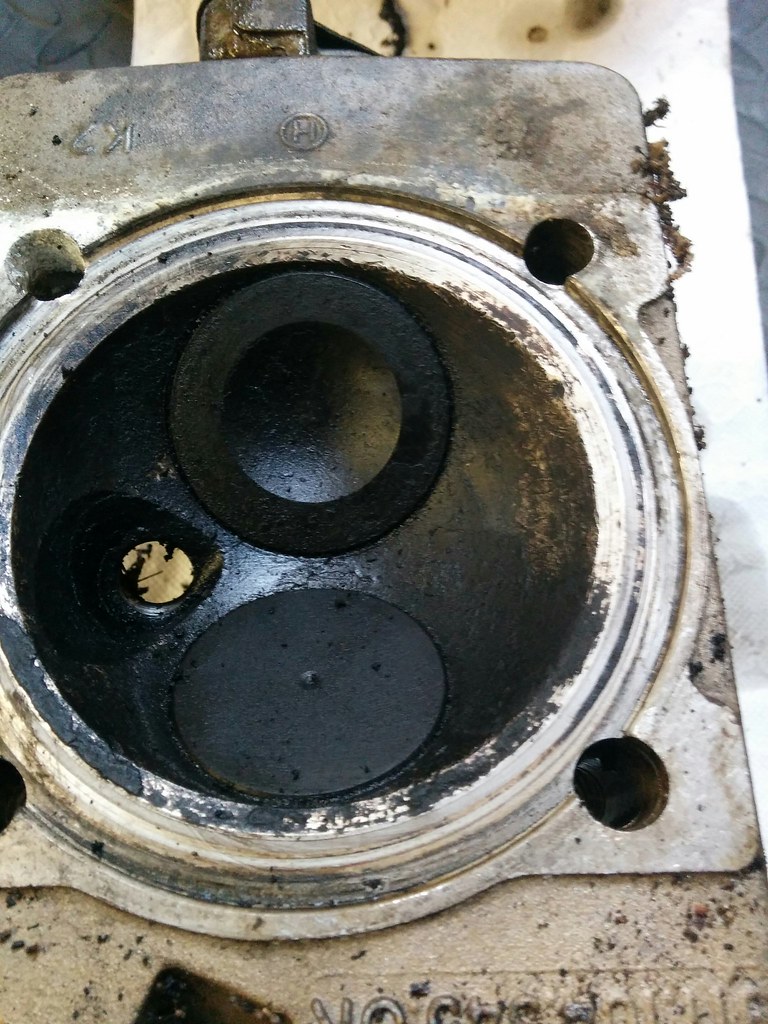
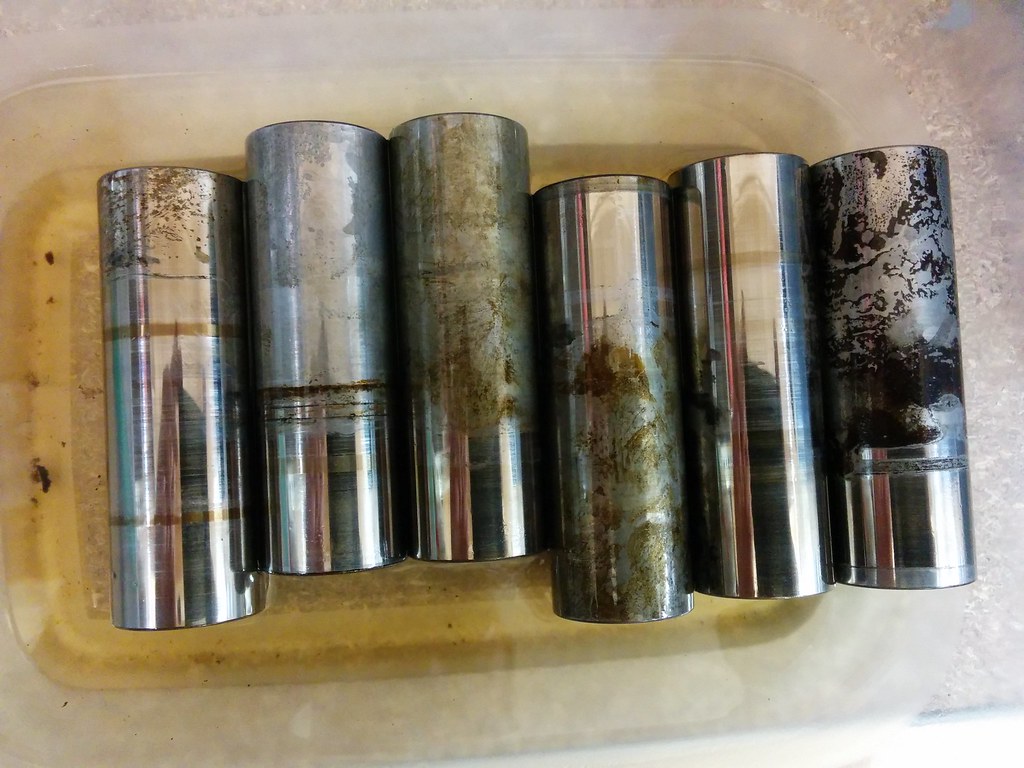
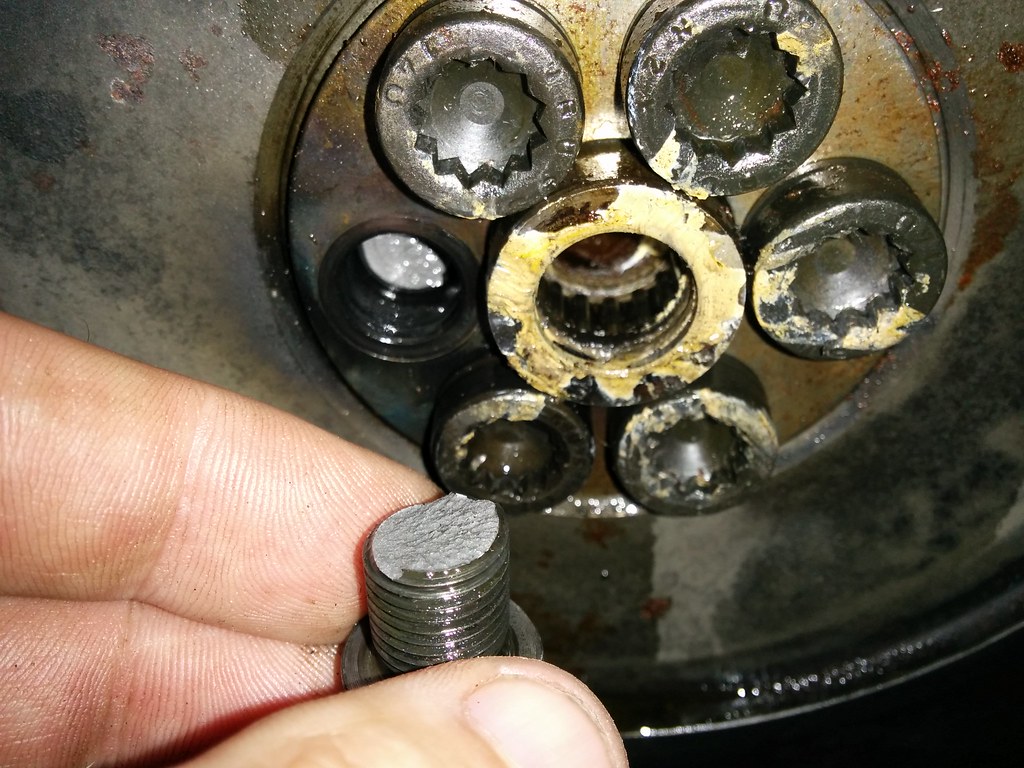
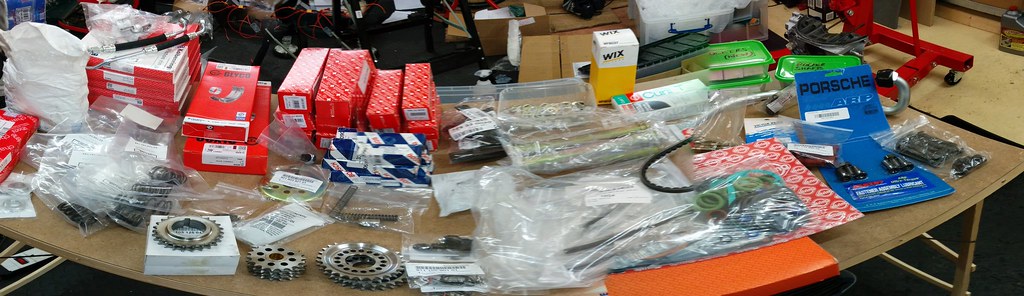
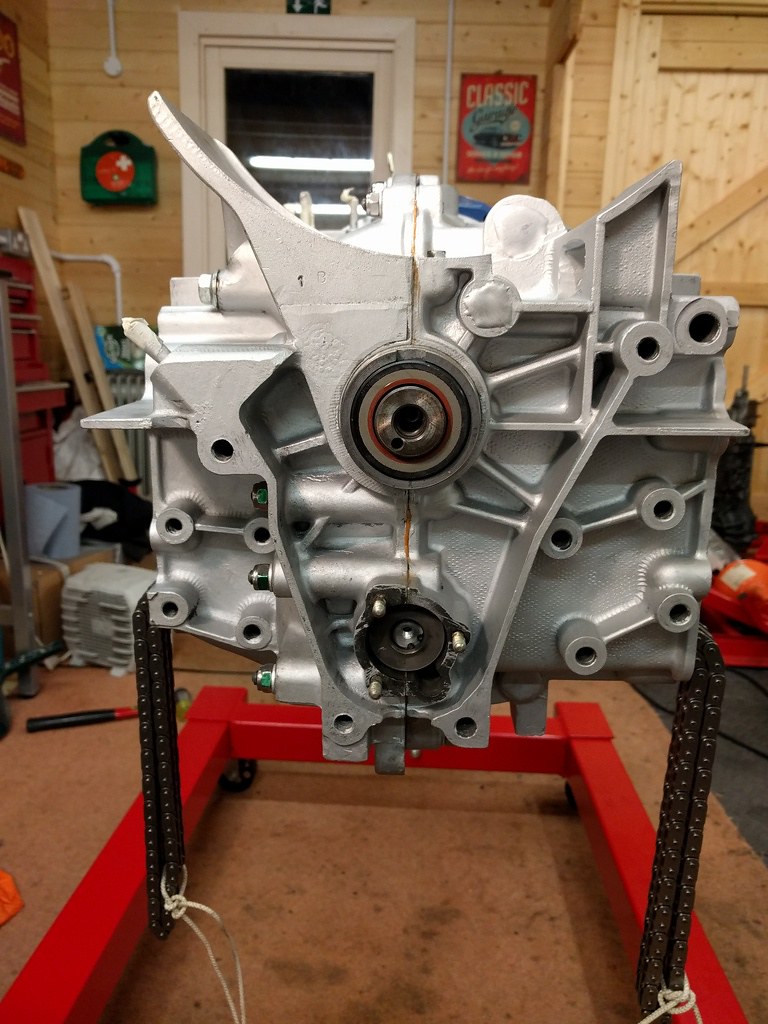
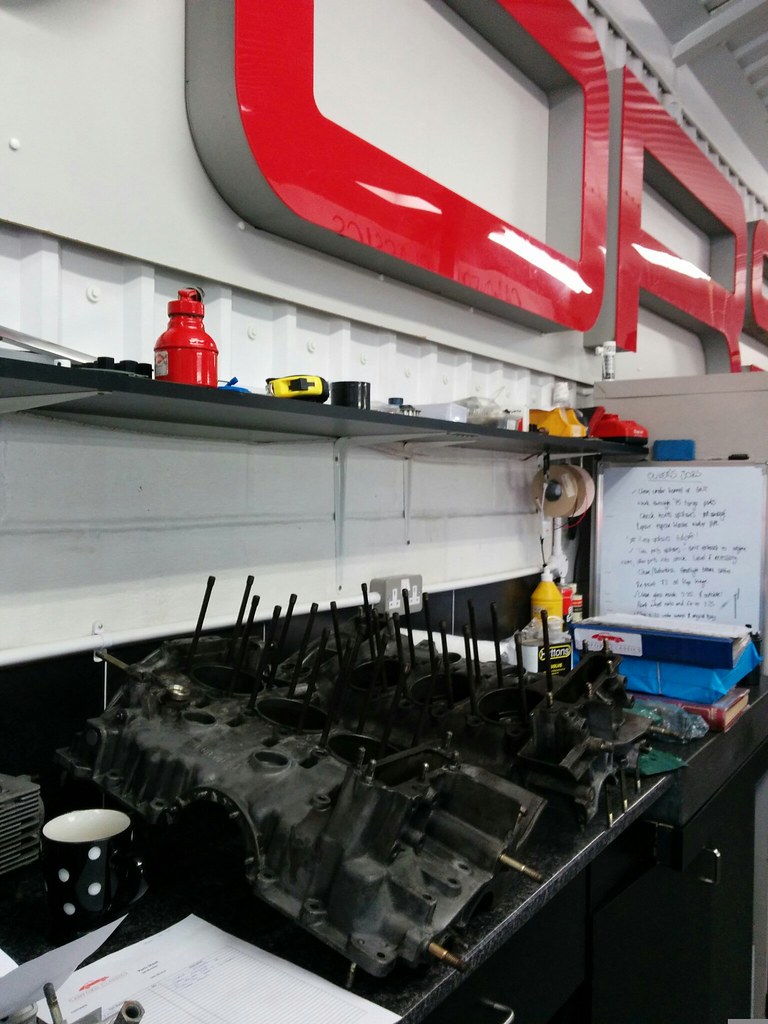
I have also finished disassembling and cleaning my engine and took it over to Canford Classics for an assessment.

It was good to catch up with Alan (not to mention viewing the wonderful selection of cars there) and we spent 90 mins or so going over the parts.
Image

So the brief summary ( subject to measurement ) is that it seems the engine has been apart previously as Alan felt the sealant between the case halves wasn't factory.

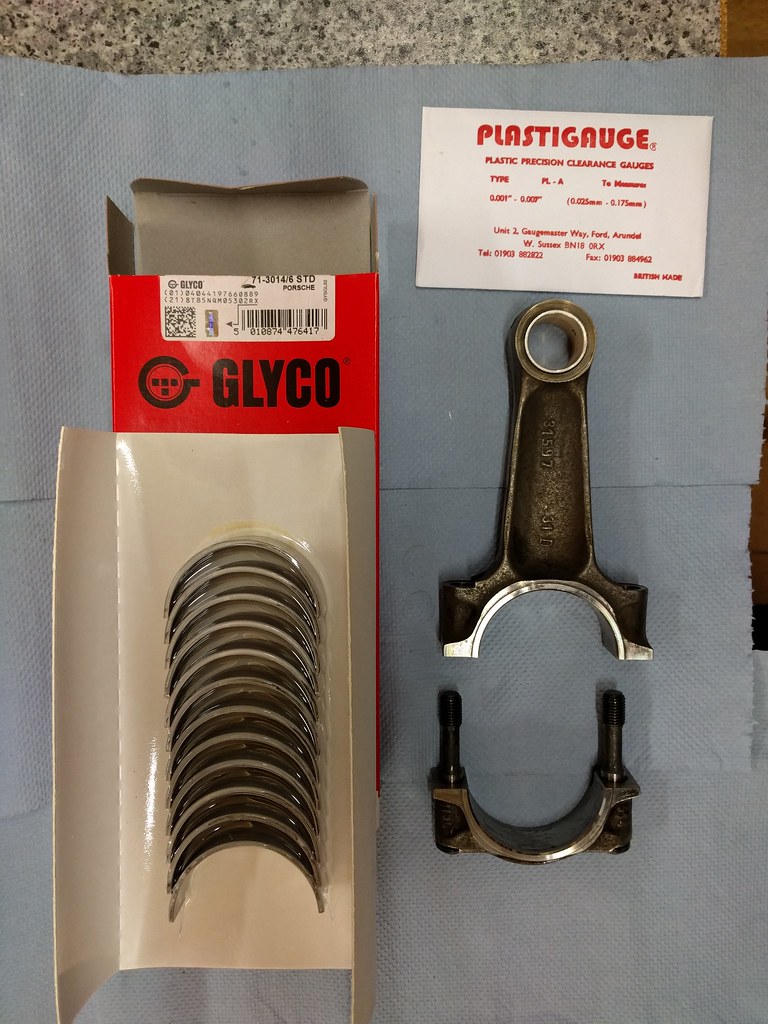
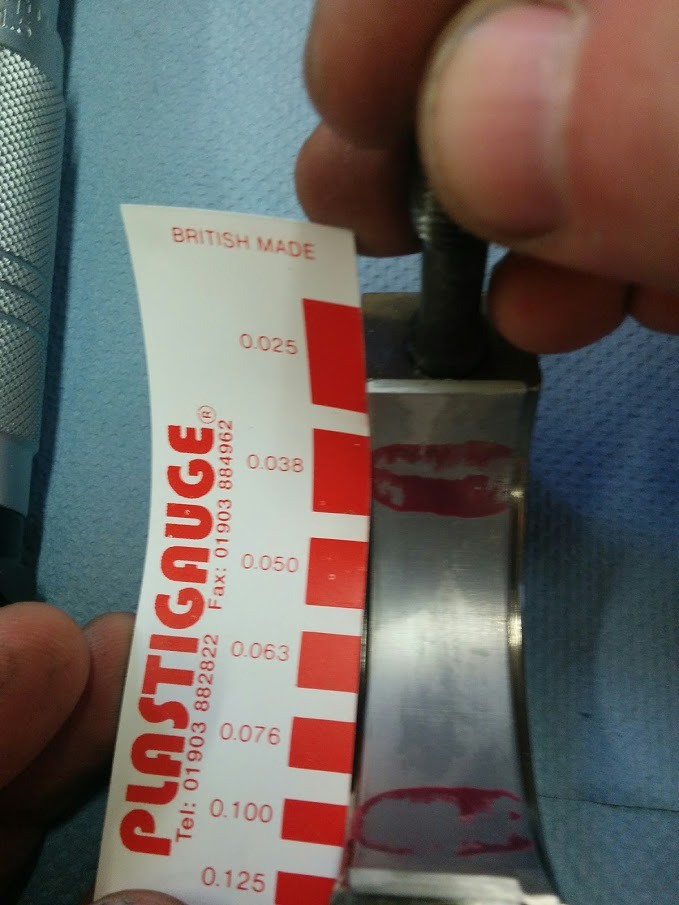
However he also felt that the bottom end had just been rebuilt as he thought all the shells looked pretty much new. His first impressions were as follows:-

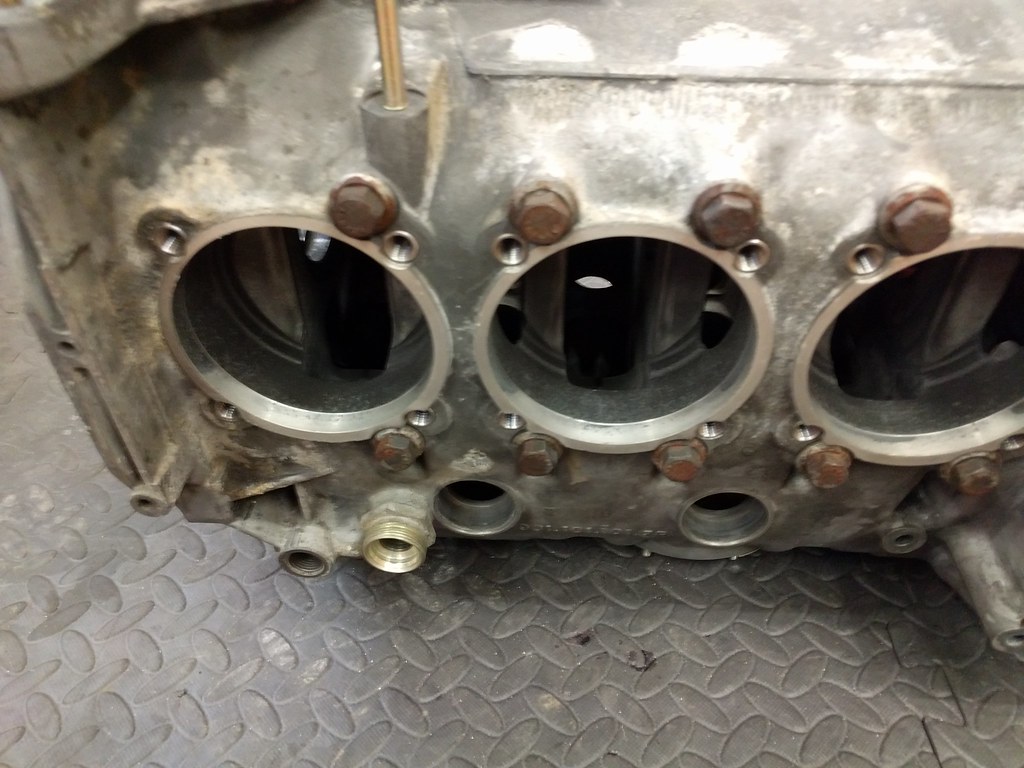
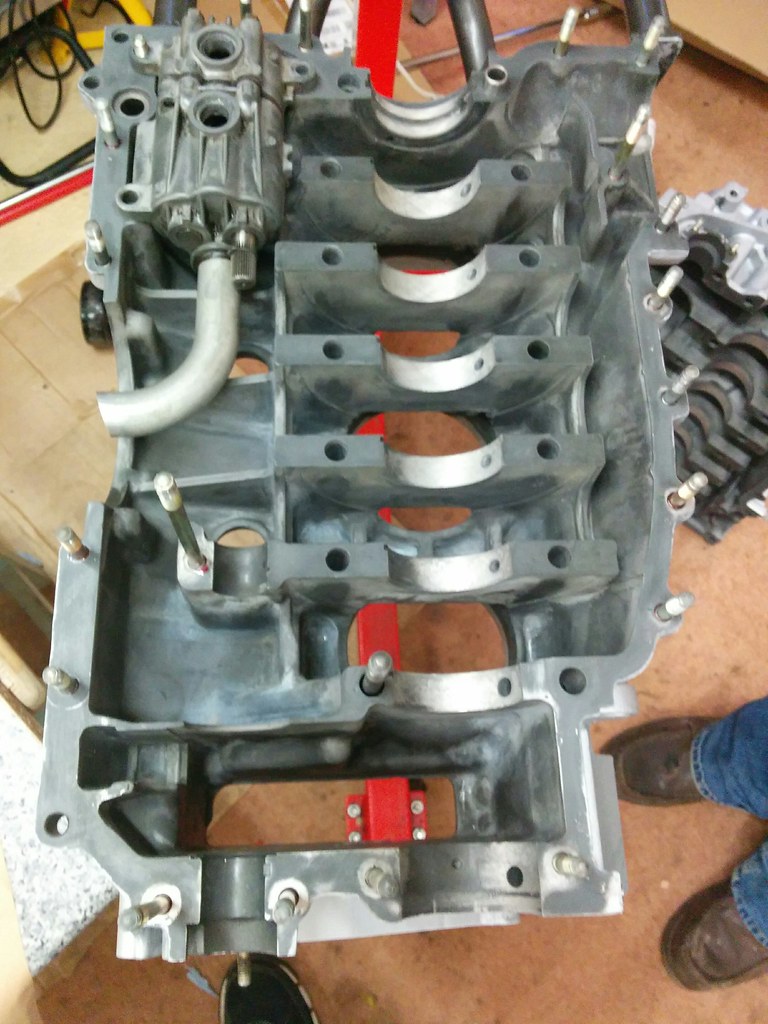
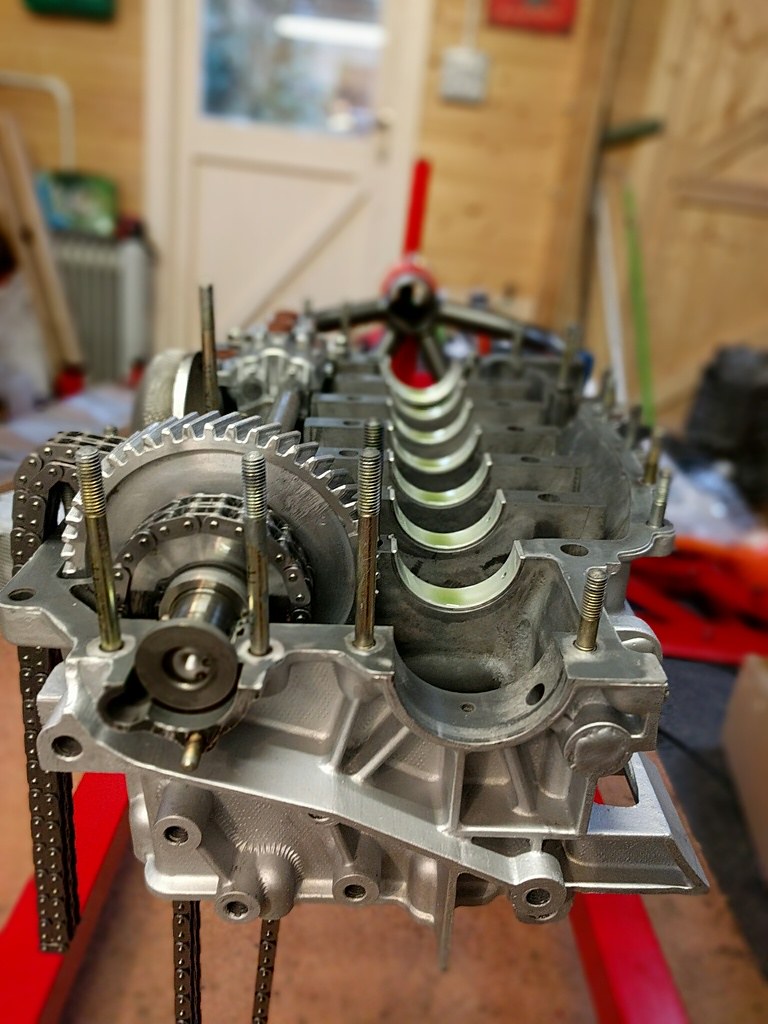
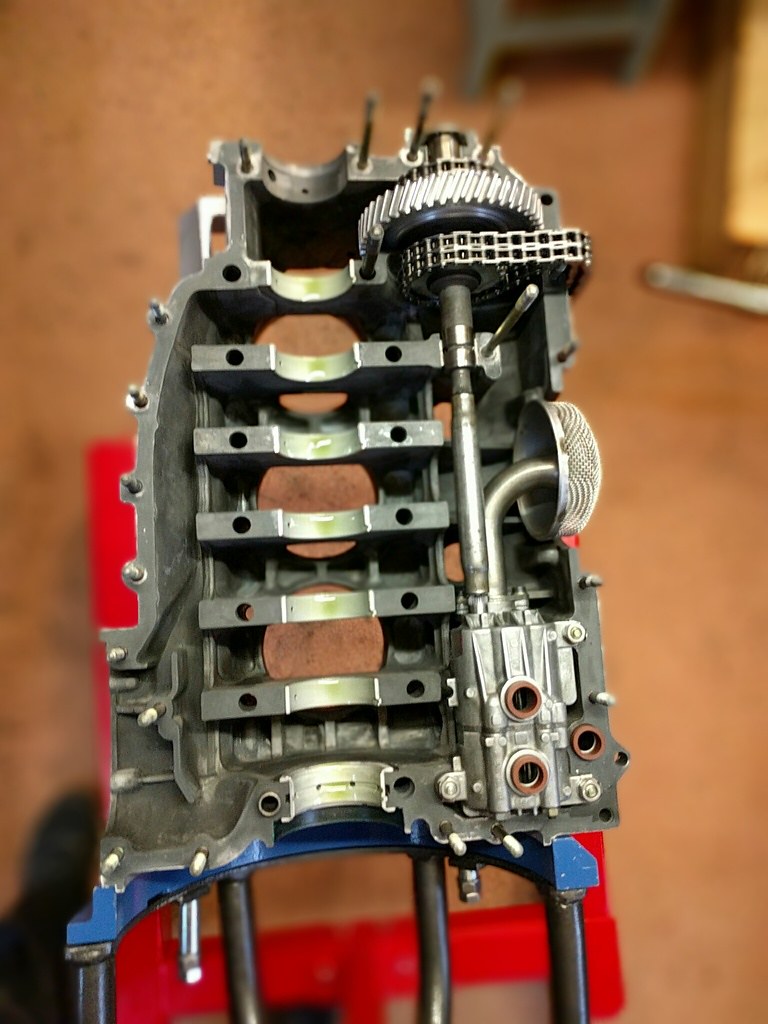
Case looks good but would benefit from case savers and the oil pump mod, might need a bore hone.
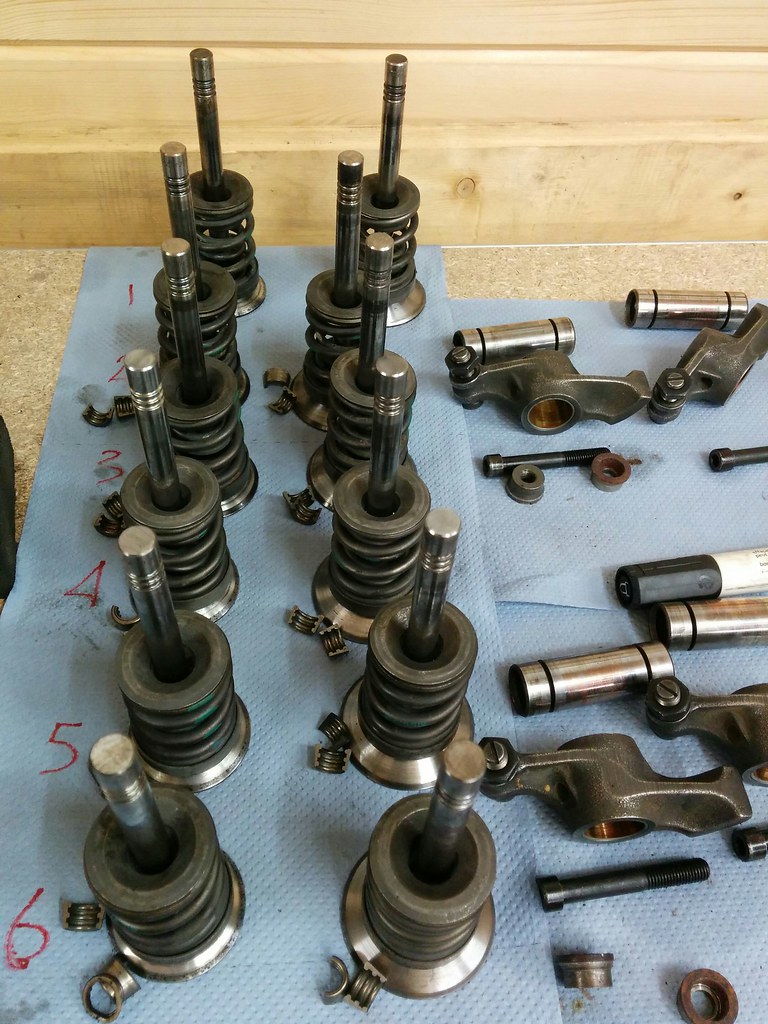
5 Heads look good - but probably need new guides - prudent to go with new valves and possibly springs.
One head may need further work as it may have ingested a broken valve or something at one point.
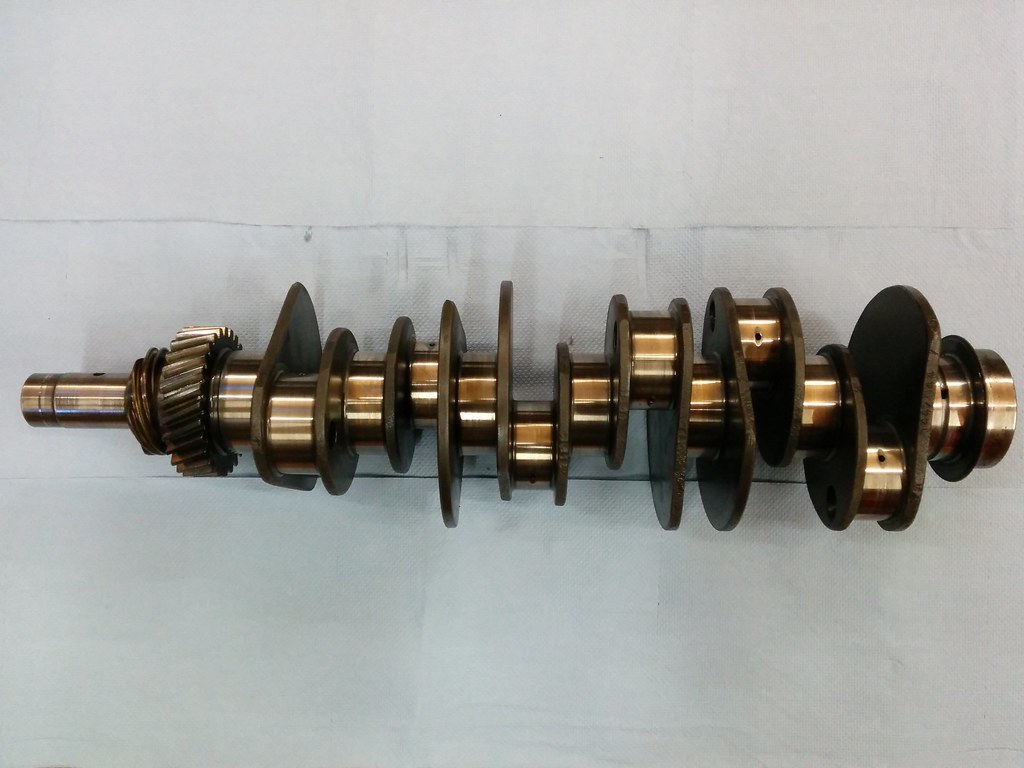
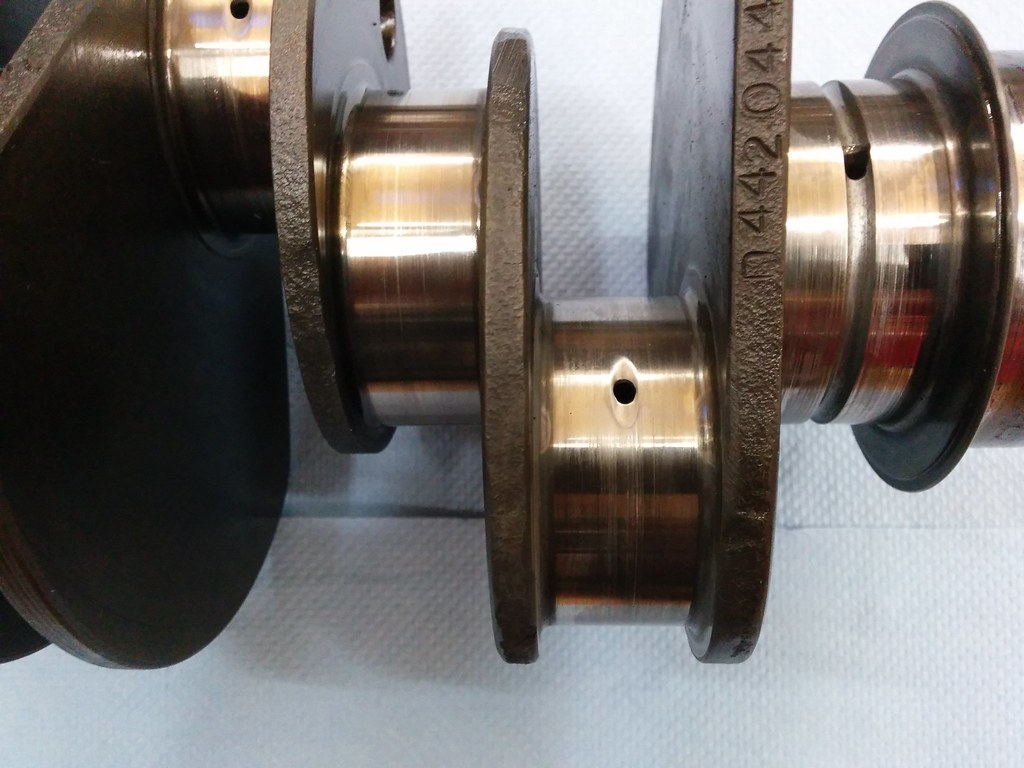
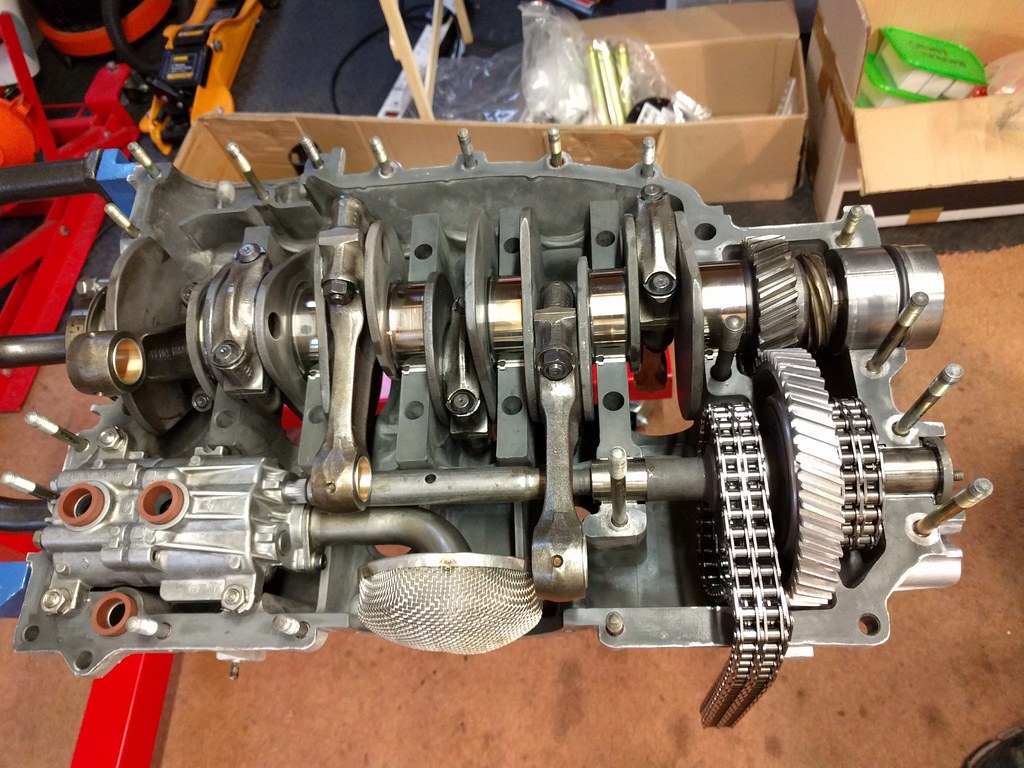
Crankshaft looks standard and in really good nick - best to have a polish.
Camshafts are also pretty good and would easily go again
Cylinders are in great shape with no signs of wear.
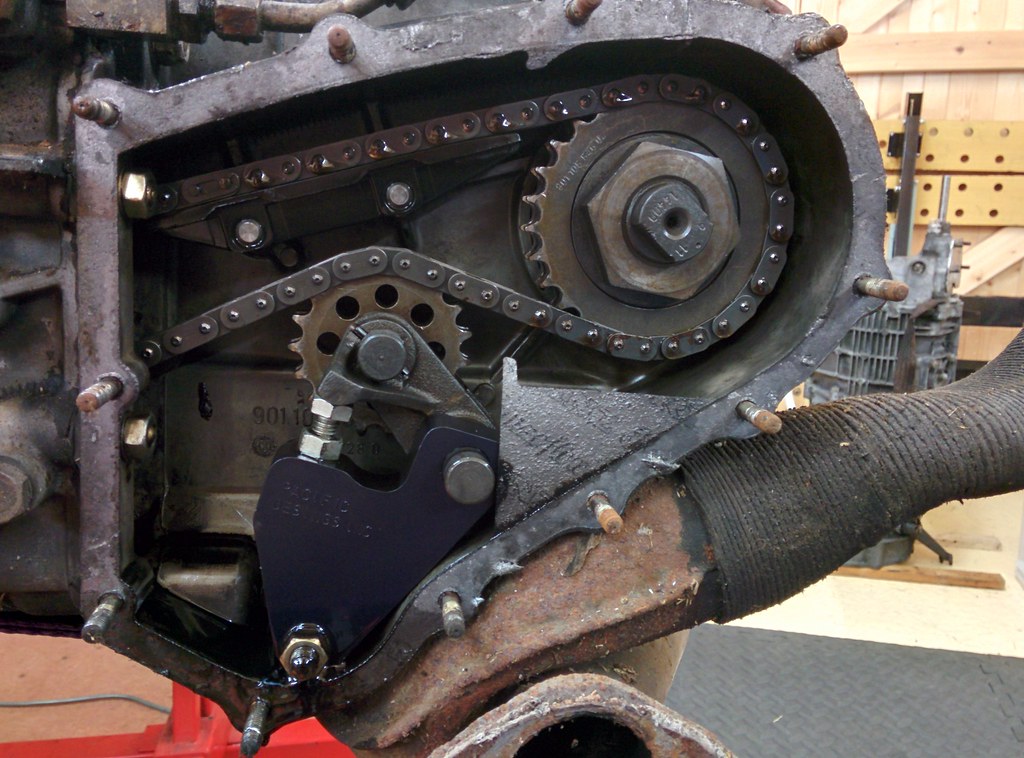
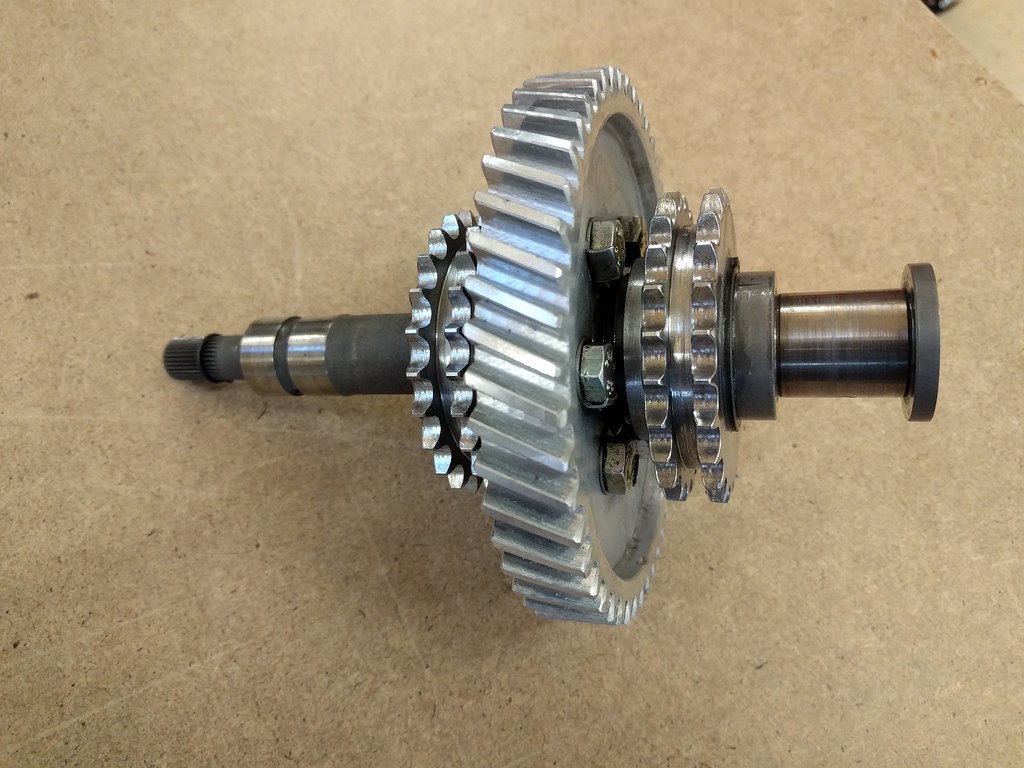
There is also evidence that at one point one of the chains had come off - so it would be prudent to change all the timing chain cogs and sprockets.

So all in all it seems pretty good and not too different from my 'gut feeling / amateur' assessment.

The only annoying thing was that after spending hours cleaning all the parts by hand, using my media blaster and a few cycles through the dishwasher, the first recommendation was to have everything cleaned. :lol:

Alan also encouraged me to keep the engine original and stick with the stock '74 year only pistons - so if they all measure up that would save me some money.

Once some proper measurements are made then we can discuss a recommended list of machining work.
Clearly I want to do as much of the work I can myself so hope to keep the assistance to a minimum.

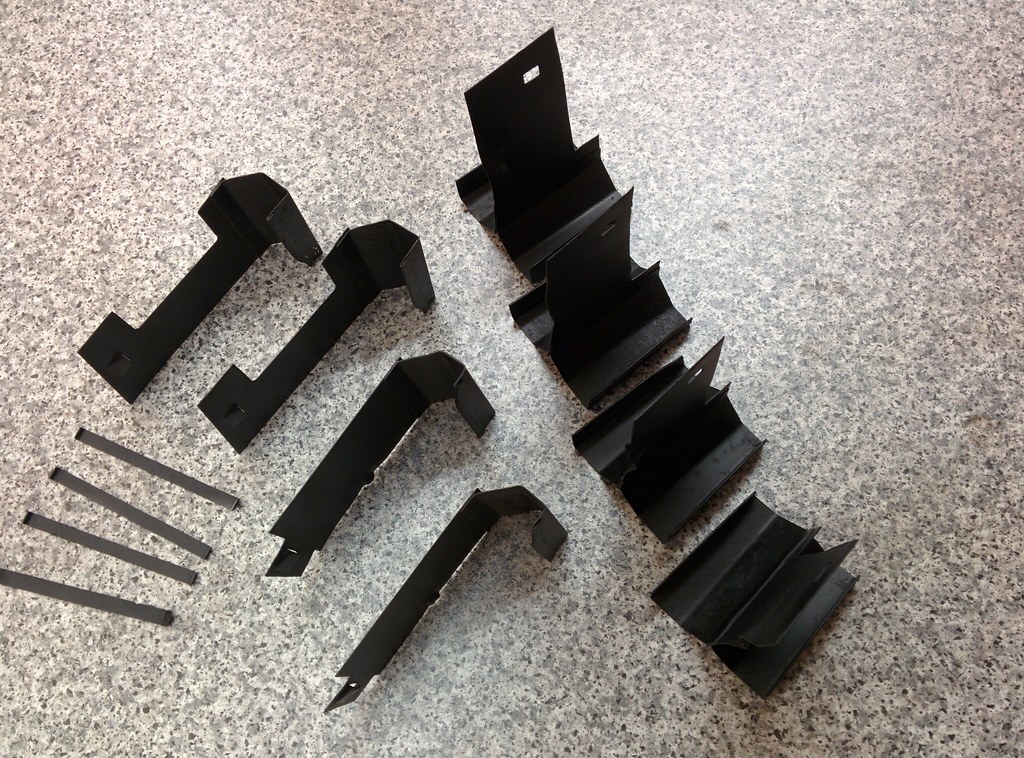
I have also now completed media blasting, modifying and repainting my air plate baffles.
I found my cheapo Lidl air shears made light work of cutting the plates, so I am pretty pleased with the results.

Image
Last edited by AndrewSlater on Sun Jul 16, 2017 8:43 pm, edited 1 time in total.
1966 Porsche 912 Slate Grey, red interior - first owner owned for 41 years
1974 Porsche 911 2.7 (The Manhattan project) viewtopic.php?f=28&t=51455
1973 VW 914 1.7 Olympic Blue - ( gone to a good home )
User avatar
AndrewSlater
I luv DDK!
Posts: 969
Joined: Wed Nov 30, 2011 3:35 pm

Re: The Manhattan Project

Post by AndrewSlater »

I've not posted an update for a while, but that's not to say the project hasn't been progressing.

The weekend before Christmas I picked up my engine parts that had gone out for assessment and machining.
The list of work undertaken was as follows:

Supply and fit case savers to crankcase
Helicoil x 5 on crankcase
Crankcase Line honing
Head spigots refaced
Oil bypass mod
Fit new inlet and exhaust valve guides to cylinder heads
Removal of all inlet and exhaust studs on cylinder heads
Helicoil all exhaust studs on cylinder heads
Cut three angles for valve seats on cylinder heads
Fit new small end bushes to piston rods ( matched to new wrist pins )
Reface and flexhone all cylinders
Reface chain covers
Crankshaft polish

Here is a photo of the case with the case savers fitted
Image

and here are some of the new parts ready for the rebuild
Image

The first job was to refit all the case studs that had been removed during the machining work.
I couldn't match the PET diagram and stud descriptions with the box of studs that were returned.

I ended up taking a template of the case halves and then measuring the flange depths at each fixing to work out which stud went where.

Several hours later and I had a logical match all planned.
Image

and a little later all the case studs fitted ready for the next stage
Image

Now is the time to shout if you spot a problem. :wink:
Last edited by AndrewSlater on Sun Jul 16, 2017 8:56 pm, edited 1 time in total.
1966 Porsche 912 Slate Grey, red interior - first owner owned for 41 years
1974 Porsche 911 2.7 (The Manhattan project) viewtopic.php?f=28&t=51455
1973 VW 914 1.7 Olympic Blue - ( gone to a good home )
User avatar
AndrewSlater
I luv DDK!
Posts: 969
Joined: Wed Nov 30, 2011 3:35 pm

Re: The Manhattan Project

Post by AndrewSlater »

Another job was to sort out my intermediate shaft gears - as my engine had previous evidence of some bad timing chain event and the gears were worn with at least one tooth partly broken.

I had originally sourced a good replacement IMS only to find it was the wrong size for my case.
Although I was told you can use a size 0 IMS in a size 1 case and vice versa, I decided to buy replacement gears to fix mine.

The gears were easily removed with a puller but required a press and some assembly lube to get the new ones fitted ( courtesy of my local Porsche specialist ).

So the IMS is now good to go.

Image

My current job is check my new rob bearings out on the crankshaft.

Image

I am still a little confused about the best way to torque the rod bolts ( see my questions in the technical section ).
I expect I will buy a new torque wrench and torque with a light oiling to 20Nm + quarter turn, and check the clearances with plastigage.

Then I will give a final clean, lube and then fit my new bolts and nuts to the same spec.
Last edited by AndrewSlater on Sun Jul 16, 2017 8:59 pm, edited 1 time in total.
1966 Porsche 912 Slate Grey, red interior - first owner owned for 41 years
1974 Porsche 911 2.7 (The Manhattan project) viewtopic.php?f=28&t=51455
1973 VW 914 1.7 Olympic Blue - ( gone to a good home )
User avatar
AndrewSlater
I luv DDK!
Posts: 969
Joined: Wed Nov 30, 2011 3:35 pm

Re: The Manhattan Project

Post by AndrewSlater »

Spent the day working on the crankshaft having bought a Clarke 1/4" torque wrench with a 5Nm to 25Nm range to do the first 20Nm of the torque spec.

I also bought a torque angle gauge to do the "+90 degree" part of the torquing sequence.

First I checked the rod bearing clearances using plastigage. I'm able to use standard sized bearings with my newly polished crankshaft and all clearances looked good.

Image

I then recleaned everything again and fitted the piston rods using a spray can of liquid moly 48.
In hindsight a bottle or tub of assembly lube would have been easier to use. I'm also not sure how good the lube is as it seems quite dry.
Image
The rods are currently torqued to the first 20Nm with the extra 1/4 turn to go.
I'm currently in two minds whether to redo them again with a different assembly lube so I won't final torque them for the moment - but that's enough for today.
Last edited by AndrewSlater on Sun Jul 16, 2017 9:05 pm, edited 2 times in total.
1966 Porsche 912 Slate Grey, red interior - first owner owned for 41 years
1974 Porsche 911 2.7 (The Manhattan project) viewtopic.php?f=28&t=51455
1973 VW 914 1.7 Olympic Blue - ( gone to a good home )
sladey
Nurse, I think I need some assistance
Posts: 8729
Joined: Sat Apr 23, 2005 9:08 pm
Location: Nottingham, UK

Re: The Manhattan Project

Post by sladey »

It might be worth asking Mike Bainbridge what assembly lube he used - from memory it was a Japanese one but if he uses it then it would be a good choice to follow.
The simple things you see are all complicated
I look pretty young but I'm just backdated yeah
User avatar
AndrewSlater
I luv DDK!
Posts: 969
Joined: Wed Nov 30, 2011 3:35 pm

Re: The Manhattan Project

Post by AndrewSlater »

I bought some Lucas Oil Assembly Lube and removed one of the con rods from the crankshaft to have a look.

The lube I had used was showing signs of wearing off in a few places on the bearings which was my original concern. It seems a bit to dry to lube properly.

I tried the new lube and it seemed much better in my opinion, so I reassembled all the con rods.
A few hours extra work - but probably worth the peace of mind.

I also bought a new engine stand as the one I used for the teardown felt a little insecure so thought I would get one rated for a higher weight to be safe.

However looking at the new stand tonight I notice that the yoke is held horizontally, whereas other stands I have seen normally have a slight tilt ( I have always assumed to use the weight of the engine to keep the yoke firmly in the stand ).
Now I am wondering whether this is a problem - so need to get my head around this before I can start building up the crankcase.

Hoping to have the two case halves together this weekend if possible.
1966 Porsche 912 Slate Grey, red interior - first owner owned for 41 years
1974 Porsche 911 2.7 (The Manhattan project) viewtopic.php?f=28&t=51455
1973 VW 914 1.7 Olympic Blue - ( gone to a good home )
User avatar
AndrewSlater
I luv DDK!
Posts: 969
Joined: Wed Nov 30, 2011 3:35 pm

Re: The Manhattan Project

Post by AndrewSlater »

I modified my engine yoke so that it accepts the turning handle that came with the engine stand. This is mainly to hold the yoke in the stand in case of a problem.

The first job was to clean the case halves further and to fit the number 8 bearing to the crankshaft.

I then fitted the 3.2 Carrera oil pump that is part of the oil bypass mod upgrade, IMS and new chains.

Then all the bearing half shells were fitted and lubed with my new green and gloopy lube.

Image

Image

The crankshaft was then fitted.
Image

Conscious that time would be tight once the Loctite 574 went onto the case, I prepared my bevelled washers with RTV.
Wayne Dempseys book say you have 45mins before the 574 goes off, so once you start using it the pressure is really on.
I found it took a good 15mins to get it onto the case with a satisfactory coating - giving me 30 mins to get the case together.

At first I found it difficult to get the two case halves together which resulted in plenty of use of the rubber mallet.
At last it went together but on rotating the case on the stand to get better access to the through bolts something seemed to fall out of the case and onto the floor. It was one of the IMS bearing shells that had come loose with the excessive hammering.

Nooooo! :oops:

Case halves separated, bearing recleaned and refitted. Everything checked and back together again - tick tock - no pressure.
This time the case halves went back together much quicker - great - hold on where did the unique M10 washer go it was there a minute ago.

Nooooo! :oops:

Case apart again - no extraneous washer in there - finally find it on the floor.

Tick tock - getting very tight on time now.

Third time lucky and it is all back together.
Image

Time to relax, stand back and admire the .... hold on a minute a couple of the through bolts have popped their O-rings - oh well not the end of the world.

Wait a minute another thing surely the acorn nuts are on the opposite side to the PET guide.
Quick recheck Dempseys book - all looks good - except the book is opposite to the PET guide.

Grrrr! Time to walk away and check again with a fresh pair of eyes.
Last edited by AndrewSlater on Sun Jul 16, 2017 9:09 pm, edited 1 time in total.
1966 Porsche 912 Slate Grey, red interior - first owner owned for 41 years
1974 Porsche 911 2.7 (The Manhattan project) viewtopic.php?f=28&t=51455
1973 VW 914 1.7 Olympic Blue - ( gone to a good home )
Post Reply