

My '72 911T
Moderator: Bootsy
-
Gary71
- Nurse, I think I need some assistance
- Posts: 10274
- Joined: Wed Mar 31, 2004 1:27 pm
- Location: Cheshire
- Contact:
Job has progressed very slowly...
Ali arms now painted up and with bearings and bushes pressed in.
For the record:
'72 Steel arm with wheel bearing and bushes: 7.4kg
'73 Aluminium arm with wheel bearing and bushes: 5.5kg
So a total saving of 3.8kg, the majority of which is unsprung, and very much at the right end, so well worth the hassle!
Hopefully I'll grab a few more hours over this week and get them fully built up with the handbrake etc.
-
Gary71
- Nurse, I think I need some assistance
- Posts: 10274
- Joined: Wed Mar 31, 2004 1:27 pm
- Location: Cheshire
- Contact:
One side fitted up to see what doesn't fit. The brake pipe needed to be completely reshaped, but luckily they are fairly new and copper to make this possible. They don't look like £150 notes worth of bolts, but Porsche reckons they are! 
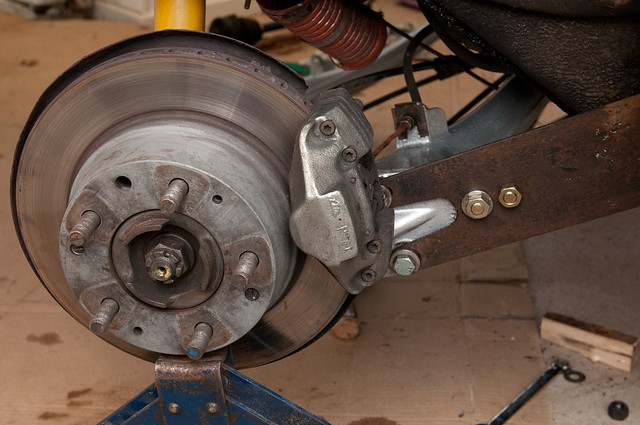
Old bits and new bits by Suggs, on Flickr
However I do need to replace the bushes in the bottom of the dampers to allow use of the correct 14mm bolt.
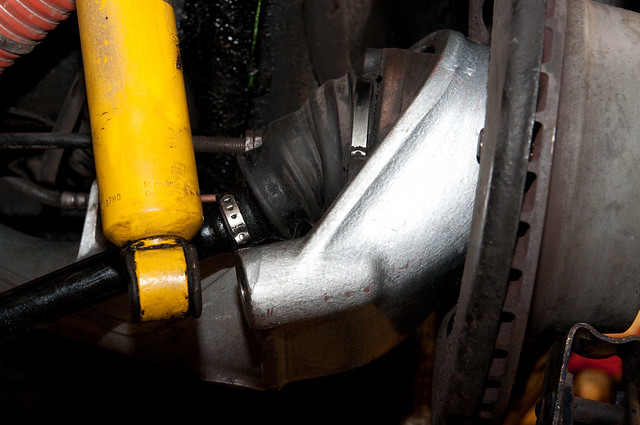
Doesn't fit. by Suggs, on Flickr
Old bits and new bits by Suggs, on Flickr
However I do need to replace the bushes in the bottom of the dampers to allow use of the correct 14mm bolt.
Doesn't fit. by Suggs, on Flickr
-
Gary71
- Nurse, I think I need some assistance
- Posts: 10274
- Joined: Wed Mar 31, 2004 1:27 pm
- Location: Cheshire
- Contact:
14mm Rear damper bushes are supposedly on their way from Bilstein, only a tenner, although they have been in the post for over a week!
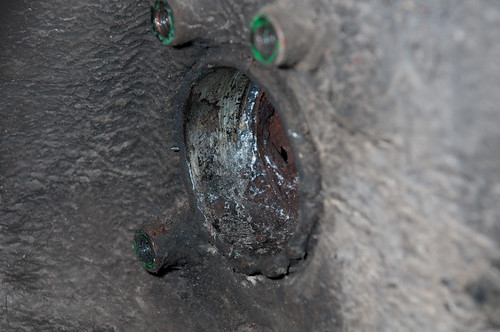
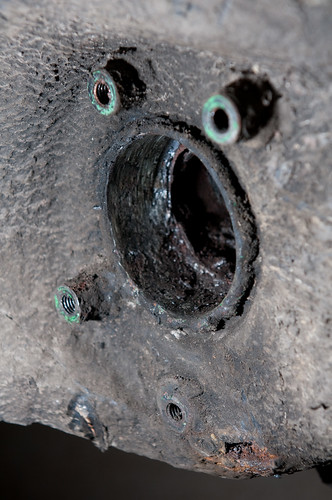
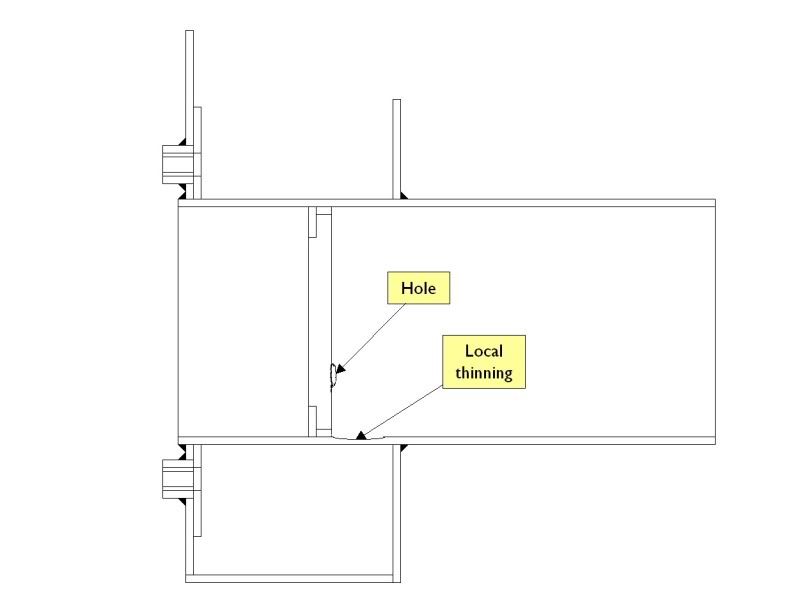
However the suspension has come off again as I found a small hole under the torsion bar mount, then another inside the tube. Just need to work out how to repair it now...
Also bought some 930 spec rocker covers from Andy, so hopefully one less oil leak.
However the suspension has come off again as I found a small hole under the torsion bar mount, then another inside the tube. Just need to work out how to repair it now...
Also bought some 930 spec rocker covers from Andy, so hopefully one less oil leak.
-
911hillclimber
- Nurse, I think I need some assistance
- Posts: 18924
- Joined: Mon Mar 10, 2008 6:26 pm
- Location: West Midlands
-
Barry
- Nurse, I think I need some assistance
- Posts: 4319
- Joined: Tue Aug 24, 2004 8:50 pm
- Location: East Sussex
Hi Gary, you have mail in reply to your P.M., but I've just seen this bit with the lower hole.
The one thing that you should be aware of is that this area is double skinned.
If you bought a new inner wing, you'd see that the female 'studs' are mounted (welded) on the inside to a thick doubler, and then again on the outside (welded again, as can be seen). This doubler covers all four 'studs', and drops down until it is underneath this area by an inch or so.
Have you had a good clonk around the rest of that under-torsion-tube area of the inner wing? Well worth doing, as this will dicate how the repair panels are to be made. I wouldn't worry too much about this area though, it's very straightforward, certainly compared to the tube work.
I've got loads of pictures of repairs in this area: any use?
DDK Member1243 07741 273865. Now booking Spring '24. Home of the RY Austin 7 Trophy's
-
Gary71
- Nurse, I think I need some assistance
- Posts: 10274
- Joined: Wed Mar 31, 2004 1:27 pm
- Location: Cheshire
- Contact:
I know...
The only saving grace is that I've already done the area all round it towards the front, sill, floor, jacking point etc, the repair I did a few years back stopped about 40mm short of where that hole is. You can just see the end of it under the boss to the left.
So yet another patch and start saving up for a 'Barry' in a few years! Maybe I should book my slot now...
-
Barry
- Nurse, I think I need some assistance
- Posts: 4319
- Joined: Tue Aug 24, 2004 8:50 pm
- Location: East Sussex
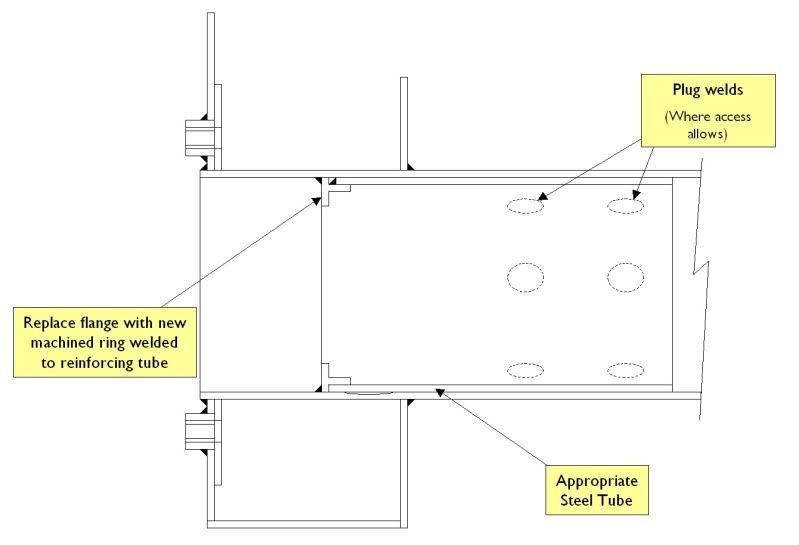
Yes, that flange is a separate part: just mark the depth of the remains from the outside of the tube all round, so that any new one can be put in correctly.
It would have originally been held in with four spot welds, and my modified design can be put in with the MIG, or I do one that is straight copy of the original.
I'll get some pics up tomorrow evening .
It would have originally been held in with four spot welds, and my modified design can be put in with the MIG, or I do one that is straight copy of the original.
I'll get some pics up tomorrow evening
DDK Member1243 07741 273865. Now booking Spring '24. Home of the RY Austin 7 Trophy's
-
Barry
- Nurse, I think I need some assistance
- Posts: 4319
- Joined: Tue Aug 24, 2004 8:50 pm
- Location: East Sussex
I like the idea of leaving what you have got in situ, as you've then really covered your bases, strength-wise. Also you've taken the sleeve in further than I first thought you had in mind, so your plug welds have a very good chance. Nice touch on the machined ring as well  .
.
Here're some repairs I did on a 2.4 a while back: sorry for the poor pictures, it's a combination of shaky hands and cheap camera .
.
Probably worse than yours:


Repaired heater tube:

External panels made ready for joining into larger repair sections with TIG, which are welded into place with MIG:


Inner reinforcement repaired:

Finished repair:


And repeat for other side ....

BTW, This is probably slightly further than I would go now on an inner wing repair, but not by much. By time you factor in removing an old inner wing (with appropriate referencing and bracing), then backdating a new wing (quite a big job: seatbelt area, removal of bumper mounts, removal of jacking area, re-beating CDI area, welding up incorrect engine bay holes, form new CDI etc holes etc etc). Plus of course welding in the new ones, and trying to make it look factory on the welds. Therefore a rear inner wing has to be pretty bad before you throw it out.
Sorry Gary, I've wandered off topic a bit: anyway, the basic principle is the these compoundy repairs like this are always done in halves. One bit dropping from the vertical, one coming out from the horizontal. Bit of curvy curvy where they join, scribe one into the other, weld into one repair piece, scribe into parent metal, butt join using high quality Marmalade, as per Paddington Bear recommendations .
.
Here're some repairs I did on a 2.4 a while back: sorry for the poor pictures, it's a combination of shaky hands and cheap camera
Probably worse than yours:
Repaired heater tube:
External panels made ready for joining into larger repair sections with TIG, which are welded into place with MIG:
Inner reinforcement repaired:
Finished repair:
And repeat for other side ....
BTW, This is probably slightly further than I would go now on an inner wing repair, but not by much. By time you factor in removing an old inner wing (with appropriate referencing and bracing), then backdating a new wing (quite a big job: seatbelt area, removal of bumper mounts, removal of jacking area, re-beating CDI area, welding up incorrect engine bay holes, form new CDI etc holes etc etc). Plus of course welding in the new ones, and trying to make it look factory on the welds. Therefore a rear inner wing has to be pretty bad before you throw it out.
Sorry Gary, I've wandered off topic a bit: anyway, the basic principle is the these compoundy repairs like this are always done in halves. One bit dropping from the vertical, one coming out from the horizontal. Bit of curvy curvy where they join, scribe one into the other, weld into one repair piece, scribe into parent metal, butt join using high quality Marmalade, as per Paddington Bear recommendations
DDK Member1243 07741 273865. Now booking Spring '24. Home of the RY Austin 7 Trophy's
-
Gary71
- Nurse, I think I need some assistance
- Posts: 10274
- Joined: Wed Mar 31, 2004 1:27 pm
- Location: Cheshire
- Contact:
Great stuff Barry. Chances are I'll end up redoing the work I did before in the process of doing this. It won't look as good as yours, but I'll give it a shot!
Last time I did it I was outside on the drive, floor of the car 1 " from my nose and it was cold and raining, with limited tools and a borrowed worn out Clarke welder that would only work with the cable perfectly straight. Maybe not ideal conditions for sheet metal repair! Workmen and tools and all that...
Last time I did it I was outside on the drive, floor of the car 1 " from my nose and it was cold and raining, with limited tools and a borrowed worn out Clarke welder that would only work with the cable perfectly straight. Maybe not ideal conditions for sheet metal repair!
-
Barry
- Nurse, I think I need some assistance
- Posts: 4319
- Joined: Tue Aug 24, 2004 8:50 pm
- Location: East Sussex
Yes, a bit different from being in the warm and dry, with a bit of time, decent gear and plenty of access .
Still, it's healthy to have been through that experience (as did I, and I'm sure most of us on here), as it really makes you appreciate our current working conditions .
Still, it's healthy to have been through that experience (as did I, and I'm sure most of us on here), as it really makes you appreciate our current working conditions
DDK Member1243 07741 273865. Now booking Spring '24. Home of the RY Austin 7 Trophy's
-
Barry
- Nurse, I think I need some assistance
- Posts: 4319
- Joined: Tue Aug 24, 2004 8:50 pm
- Location: East Sussex
Yes, a bit different from being in the warm and dry, with a bit of time, decent gear and plenty of access .
Still, it's healthy to have been through that experience (as did I, and I'm sure most of us on here), as it really makes you appreciate our current working conditions .
Still, it's healthy to have been through that experience (as did I, and I'm sure most of us on here), as it really makes you appreciate our current working conditions
DDK Member1243 07741 273865. Now booking Spring '24. Home of the RY Austin 7 Trophy's