Posted: Wed Dec 23, 2009 10:52 pm
DDK - Die Deutschen Klassiker
The 'Maverick' Classic Porsche Forum and Classic Porsche Club for Porsche 356, Aircooled Porsche 911, Porsche 912, Porsche 914 & Porsche Replicas
https://www.ddk-online.com/phpBB2/
Replacing 911 sills and Jacking Points
Page 3 of 4
Posted: Thu Dec 24, 2009 8:19 am
Top thread Barry 
I never see any of your posts - imparting generous amounts of knowledge - as advertising. This is after all an internet forum for enthusiasts to share info, and this will no doubt be of great interest to many
I never see any of your posts - imparting generous amounts of knowledge - as advertising. This is after all an internet forum for enthusiasts to share info, and this will no doubt be of great interest to many
Posted: Thu Dec 24, 2009 8:23 am
58A - 71E wrote:Top thread Barry
I never see any of your posts - imparting generous amounts of knowledge - as advertising. This is after all an internet forum for enthusiasts to share info, and this will no doubt be of great interest to many
Ditto!
Posted: Thu Dec 24, 2009 12:44 pm
Barry
You are a genius. Thank you for posting all this. I think it about time you wrote a book on it all.
About time you got the reward for being the best
Happy Christmas
jb
You are a genius. Thank you for posting all this. I think it about time you wrote a book on it all.
About time you got the reward for being the best
Happy Christmas
jb
Posted: Thu Dec 24, 2009 1:02 pm
Where else would you find a specialist (in every sense of the word) taking the (not inconsiderable) time to write such a detailed acount - with pictures - freely ?
Maybe your contributions will be recognised/rewarded in the New Year honours list Barry ...
Maybe your contributions will be recognised/rewarded in the New Year honours list Barry ...
Posted: Thu Dec 24, 2009 5:15 pm
I too would like to add my praise for Barry.
Over a period of 6 months he completely transformed my 2.7 Carrera.
Not only were the sills,kidney bowls,B-posts and jacking points replaced,
but Barry also carried out repairs to the front floorpan, one A-post, the bonnet, windscreen scuttle area,and also around the sunroof.
New parts included the front crossmember,fuel tank, doorskins,windscreen and headliner.
Then a full bare metal repaint, and waxoyl / Dinitrol treatment.
Absolutely superb work and great attention to every detail.
A resto thread is somewhat overdue
Happy Christmas
Nigel
Posted: Sun Dec 27, 2009 7:41 pm
Just logged on for the first time in a few days.
I'm touched by the kind words, and very happy that the thread has been viewed with interest.
There will be a few detail shots to go on the thread in a few weeks. These are ones that I thought I might have on file, but which turned out not to quite show what I needed. Therefore, as the current car goes together I'll re-shoot some bits and post them up.
Posted: Tue Dec 29, 2009 9:55 pm
mint ,just started the same thing today,never seen aporsche rust the same, doing n/s which is totally different from the o/s which I did a few years back, are the new dansk outer sills any better, tried a few times with the o/s and ended up in the local porsche centre,for a real one,keep up the good work , bliss, garage, radio, grinder , and no kids,
Posted: Wed Dec 30, 2009 10:35 am
I do have some thoughts on the Dansk ones. It may be helpful to follow the below steps:
1) Measure exactly 426mm back from the very front edge of the sill.
2) Mark a vertical line at this point all the way down the sill.
3) Using either a guilotine, bandsaw or a grinder with a 1.0mm cutting disk, cut through the sill.
4) Take the two halves, and throw them with gusto in your scrap bin.
5) Never look back.
TBH, Unless they've changed a lot in the last two or three years, they just aren't worth it. Even when you do get them to fit, they have terrible definition on the outer top edge, where the doorgap is formed. The channel that holds the door seal is poorly formed, giving minimal room for the seal. This in turn means that the seal is inclined to push the door out of line. I'd spend the extra £60 a side and take the better fit all day long, even it you do have to deal with those pressings if you are going for the bare-sill, or narrow trim look.
However, it's not all bad: the 'inner' (centre) sill, jacking point socket, jacking point reinforcement, kidney bowls and battery boxes are all quite useable, and I've certainly used all of these quite happily in the past, although all of the Canford Classic work has been genuine only IIRC.
Posted: Thu Dec 31, 2009 8:17 pm
Hi
its interesting whats been said about the Dansk parts , I have used their sill sections a number of times and yes the inner parts work very well but and the left hand outers are not bad but the right hand ones are not good at all , I was put off using genuine outers because they have those big indentations in them, prior to that they had big holes in them, and I kind of thought it was swings and roundabouts as far as sod around dealing with big dents or sod around with general fit and finish (I am not blessed with Barry's Jedi metal forming talents, so fit problems won). I would like to see how Barry makes either the bottom of the front inner wing where it curves round ahead of the A post or the front of the outer rear wing , the section that covers the kidney bowl, I want to see tools and the different stages etc, Barry seems to be able to see it all in 3D as a finished item before he starts , a weirdly gifted chap, more pictures please, Bill.
its interesting whats been said about the Dansk parts , I have used their sill sections a number of times and yes the inner parts work very well but and the left hand outers are not bad but the right hand ones are not good at all , I was put off using genuine outers because they have those big indentations in them, prior to that they had big holes in them, and I kind of thought it was swings and roundabouts as far as sod around dealing with big dents or sod around with general fit and finish (I am not blessed with Barry's Jedi metal forming talents, so fit problems won). I would like to see how Barry makes either the bottom of the front inner wing where it curves round ahead of the A post or the front of the outer rear wing , the section that covers the kidney bowl, I want to see tools and the different stages etc, Barry seems to be able to see it all in 3D as a finished item before he starts , a weirdly gifted chap, more pictures please, Bill.
Posted: Thu Dec 31, 2009 8:31 pm
Me again
can I suggest if you don't want to pull the engine and box out when doing big repairs put a piece of timber across under the motor long enough for a trolley jack in the middle with a axle stand each side, take the weight of the engine then undo the bolts on the rear cross member and lower the motor a centimetre or so the weight is taken via the wood onto the axle stands , no need to disconnet anything else on most cars if you don't lower it far and most of the weight in the rear end is taken by the workshop floor and is not trying to lever the rear end of the car downwards, Bill.
can I suggest if you don't want to pull the engine and box out when doing big repairs put a piece of timber across under the motor long enough for a trolley jack in the middle with a axle stand each side, take the weight of the engine then undo the bolts on the rear cross member and lower the motor a centimetre or so the weight is taken via the wood onto the axle stands , no need to disconnet anything else on most cars if you don't lower it far and most of the weight in the rear end is taken by the workshop floor and is not trying to lever the rear end of the car downwards, Bill.
Posted: Wed Jun 01, 2011 9:31 pm
I agree with all thats been said above, but just to add a couple of pictures of my own

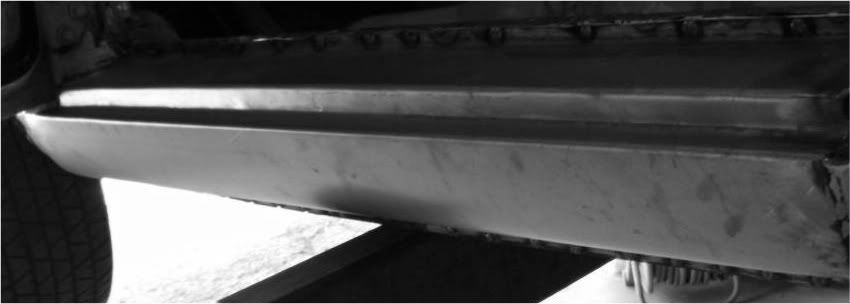
Having a very good Edwards 40" box and pan folder, enables me to make this in less time than it takes to mod a genuine porsche one. Additionaly no 2 cars sills fit the same especially on the early ones, so with carefull measuring, an exact fit to the door can be acheived every time
Lastly a picture viewed from underneath showing how well it follows the line of the door

I also have a genuine 1966 sill so I can make them with thge correct detail around the jacking point, and include the round hole in the base at the front. Will post some more pictures of the complete sill before fitting off the car.
Having a very good Edwards 40" box and pan folder, enables me to make this in less time than it takes to mod a genuine porsche one. Additionaly no 2 cars sills fit the same especially on the early ones, so with carefull measuring, an exact fit to the door can be acheived every time
Lastly a picture viewed from underneath showing how well it follows the line of the door
I also have a genuine 1966 sill so I can make them with thge correct detail around the jacking point, and include the round hole in the base at the front. Will post some more pictures of the complete sill before fitting off the car.
Re: Replacing 911 sills and Jacking Points
Posted: Thu Jul 19, 2018 7:19 am
An old thread but a great one!! I’m currently doing the sills, kidney bowls etc on my IB and this has been very useful! Mine has got the later kidney bowls is there something similar showing the difference in how they go together?
Thanks
Steve
Thanks
Steve
Re: Replacing 911 sills and Jacking Points
Posted: Wed Jul 25, 2018 9:17 pm
To update the thread slightly (and in case I’m not the only one still using it!!) the new genuine Porsche outer sills are now available as 911 items rather than the 993 version therefore they no longer have the dimples! Save a few hours welding and makes them better value, £196 from main dealer
It is just clamped in place in the pic
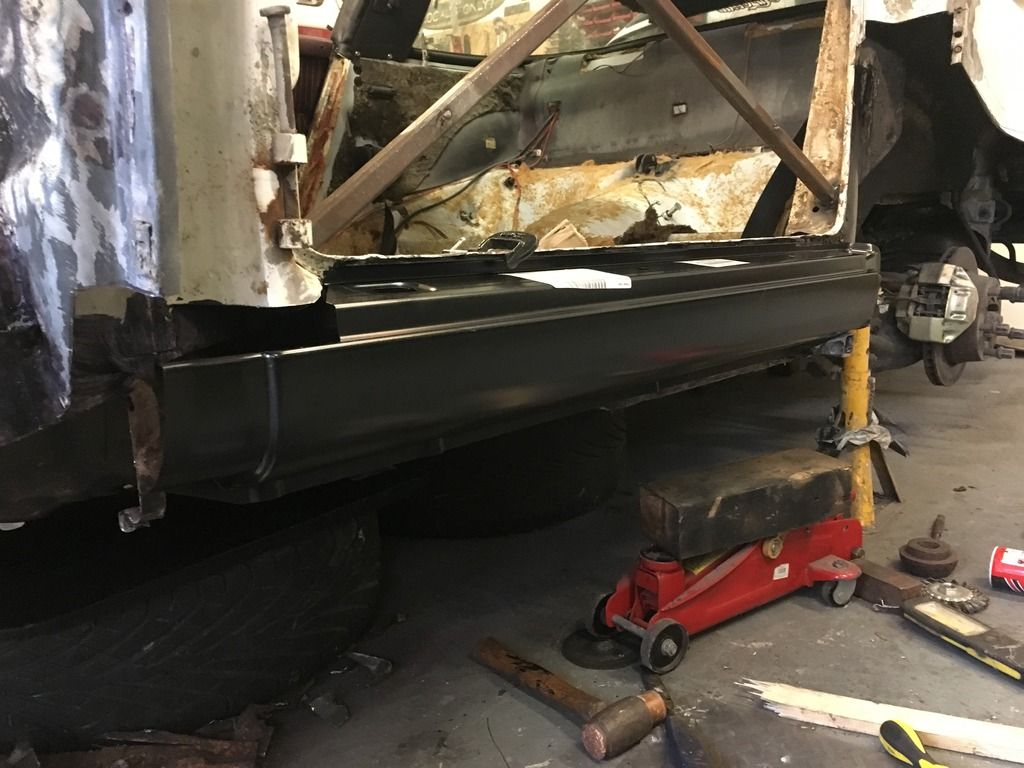
It is just clamped in place in the pic

Re: Replacing 911 sills and Jacking Points
Posted: Wed Jul 25, 2018 10:55 pm
I'm following this as I may need to re-visit my sills.
I fitted Dansk parts to my 73T in '89 and the fit was awful and took ages to get them close enough to the equally poor Dansk door skins fitted at the same time!
Double trouble at the time.
Maybe they are all better today.
Have you fitted the jacking tube sill bracing gussets?
I fitted Dansk parts to my 73T in '89 and the fit was awful and took ages to get them close enough to the equally poor Dansk door skins fitted at the same time!
Double trouble at the time.
Maybe they are all better today.
Have you fitted the jacking tube sill bracing gussets?