How To - Bilstein Suspension Upgrade / Boge struts

An archive of any Porsche 911 technical threads

Moderators: hot66, impmad2000, Barry, Viv_Surby, Derek, Mike Usiskin

Post Reply
User avatar
hot66
Moderator
Posts: 18261
Joined: Tue Nov 11, 2003 4:17 pm
Location: North Yorkshire

How To - Bilstein Suspension Upgrade / Boge struts

Post by hot66 »

I am slowly working my way through the suspension on my 1973 2.4S. So far I have replaced the front & rear torsion bushes with Elephant Racing Polybronzes ( www.elephantracing.com ) and replaced all my sway bar bushes with polybushes from Nick Moss (early911.com). The Elephant racing bushes really made a difference & tightened things up, especially at the rear. Following this I had a 4 wheel alignment done by a Porsche specialist in Leeds.

Since then the car has handled OK, but I’ve still not been 100% happy, the front end has felt far too hard ( wheels left the ground at speed on bumpy roads) & the rear a bit soft. I decided to check the corner weights using the ‘triangulation method’ and discovered the car was WAY OFF !! . This prompted me to look at the suspension again.

First thing was to discover what front struts I had fitted to the car … this took a bit of time and was detailed on this thread:

http://www.ddk-online.com/phpBB2/viewtopic.php?t=17717

As my car is pretty much stock, I didn’t really want to go ahead with major suspension upgrades so decided just to tackle the shocks (depending on the outcome I might upgrade the rear torsion bars to 26mm). On advice from rally specialists, Francis Tuthills, I ordered Bilstein ‘HD’ front inserts ( 150/110) for BOGE struts which are meant to be really well suited to a road going early 911 with stock 19mm torsion bars, At the rear I opted to stick with my original 23mm torsion bars but chose Bilstein Sprint ( 310/155 ) yellow shocks. I was advised these are a really nice shock for road use & suited to both 23mm & 26mm torsion bars.

Over the Xmas period I managed to get away & spend a bit of time in the garage replacing the front strut inserts and the rear shocks, so I thought I might as well try & document what I did for future DDK reference. There are lots of similar threads on Pelican etc to cross reference with , and I believe our own Sladey did a similar thread when he replaced his.

Anyway ….

Rear Shocks:

Might as well start with the easiest end of the car. Removing the old rear shocks is pretty straight forward, so straight forward I forgot to take any photos.

First remove the air box in the engine bay to give access to the top shock mounts. With the car still on the ground I loosened off the top nuts of the old shocks. My old shocks had flats on the thread which I used an adjustable wrench to hold & prevent the shock from turning, then using a ring spanner loosened the nut off.

Next I jacked up the car, put it on axle stands & removed the rear wheels so I could see what I was doing. Using a ring spanner & a socket I loosened off the lower shock bolt / nut.

I then placed the trolley jack under the rear wheel bearing housing ( the trailing arm of the rear suspension) and slowly ‘lifted’ the rear suspension & thus compressing the rear shock. With it compressed an amount, I removed the top mounting nut from the old shock.

Now when lowering the trailing arm down again the shock will drop through from the upper housing so make sure you are holding on to it, then remove the lower mounting bolt.

Replacment of the new shock is pretty much the reversal of above , except the new Bilstein used an allen key to prevent it spinning whilst tightening up the upper mount.


UPDATE :

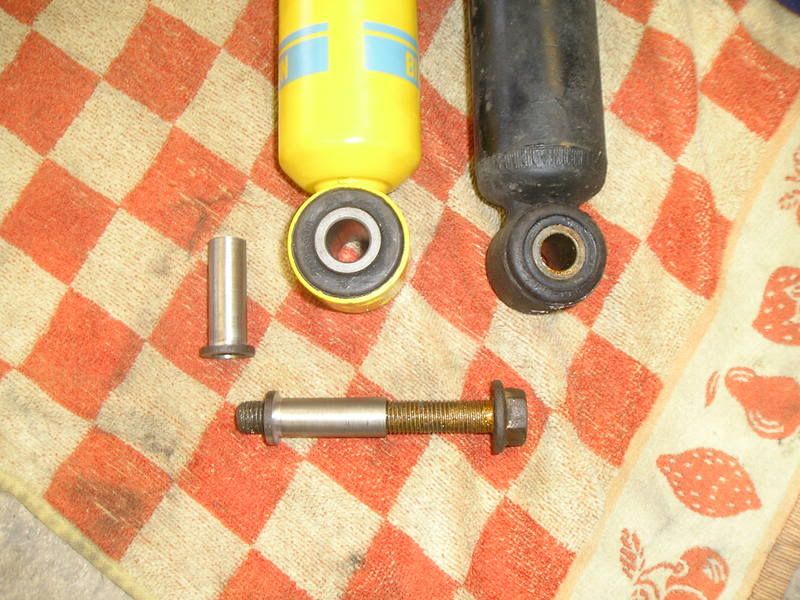
The rear shocks (sprints) do not fit out of the box for pre 72 cars, they modified the bottom shock mount bolt.

Pre 72 bolts are 12mm by 85mm long. If you look at pet they reference a different sized bolt 900 082 018 02 12mm -71

Post 72 bolts are 14mm by 95mm long. If you look at pet they reference a different sized bolt 900 082 049 02 14mm 72-

There appear to be 2 options for pre-72 cars :

make a sleeve 14mm O/D and 12mm I/D and reuse the original bolt

or

drill out the lower shock mount on my banana arms to 14mm and buy new 14mm bolts, BUT the 14mm bolts are no longer available from Porsche.


Front Struts:

As with all the other threads you read on this, the front end is a bit more involved. I decided to try & do this job without removing the front struts or disconnecting the brake lines.

With the car jacked up & on an axle stand ( I place a single axle stand in the centre of the front ‘tank support’ ), I remove both wheels & place them on the floor under the car.

Tackling the nearside first, I place the trolley jack under the ball joint on the A-arm and slowly lift the suspension up thus taking the ‘weight’ off the upper strut mounting nut. Using a socket & breaker bar I remove the top nut and washers.

I lift the suspension a bit more to compress the strut further , then lower it down. At this point you need to make sure you are holding the strut with one hand because it should now drop away from its top mounting and if not held it will swing out & stretch the brake hoses !!

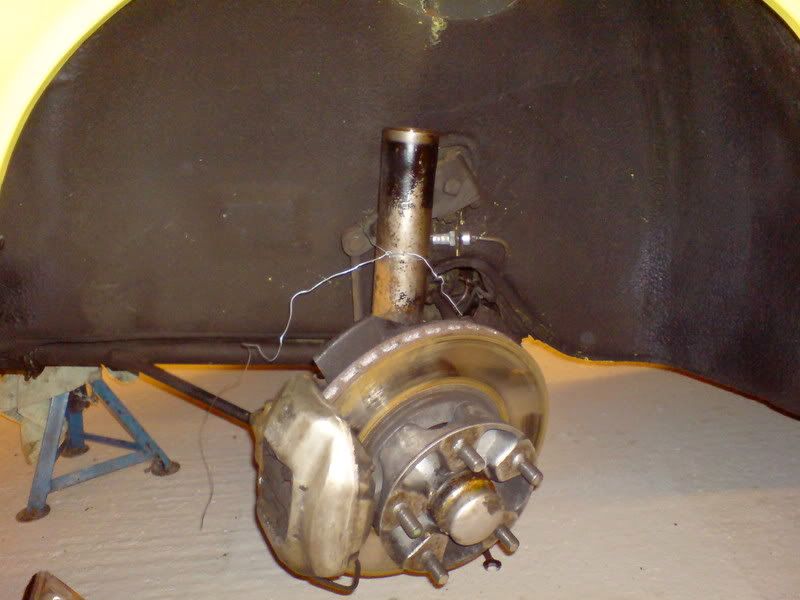
At this point I use some wire to tie the strut in an upright position ( picture below is showing a dismantled strut, but you can see my retaining wire)
Image

Now, to enable the insert to be removed later, I put the steering on full left lock ( full right lock when doing the offside) this gives a bit more movement of the strut without stretching the brake hose.

Next job is to remove the top part of the strut, the ‘dust cover’. I undo my support wire, angle the strut out to wards the wheel arch lip & slide off the cover. I then tied the strut back in the upright position and slid a carrier bag over the brake disc to protect it from any oil that might be within the strut.
Image

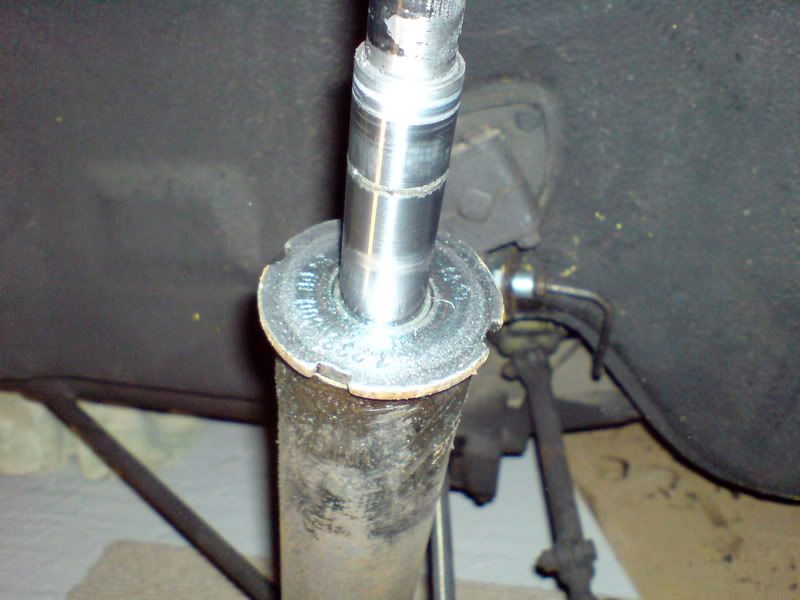
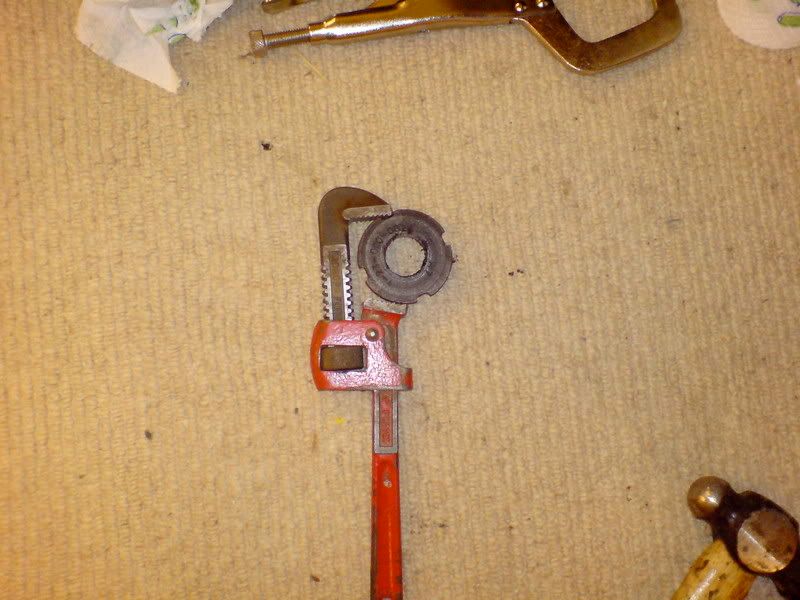
You should now be looking at the top of the strut body with a retaining nut holding in the strut internals ( see above). This retaining nut is pretty tight & looks like it needs a specialist tool to remove. I used a hammer & punch to give it a couple of ‘shocks’ & then used a pipe wrench to unscrew it.
Image


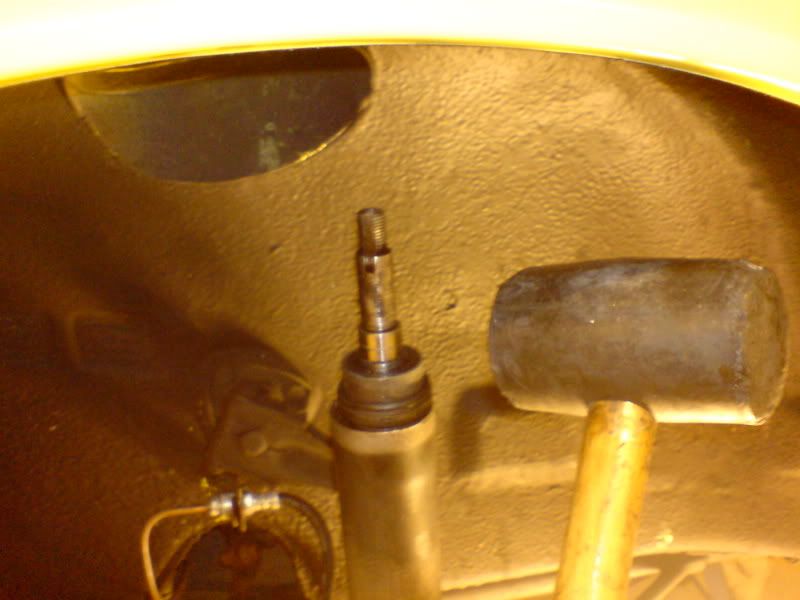
Once this retaining nut is removed, I again undid my wire and angled the strut to enable me to remove the internals from the strut. I had to give them a blow with my rubber hammer & then the assemble just pulled out NOTE: ORIGINAL BOGE STRUTS ARE FULL OF OIL ….. TRY NOT TO SPILL ANY ON YOUR BRAKES1.
Image


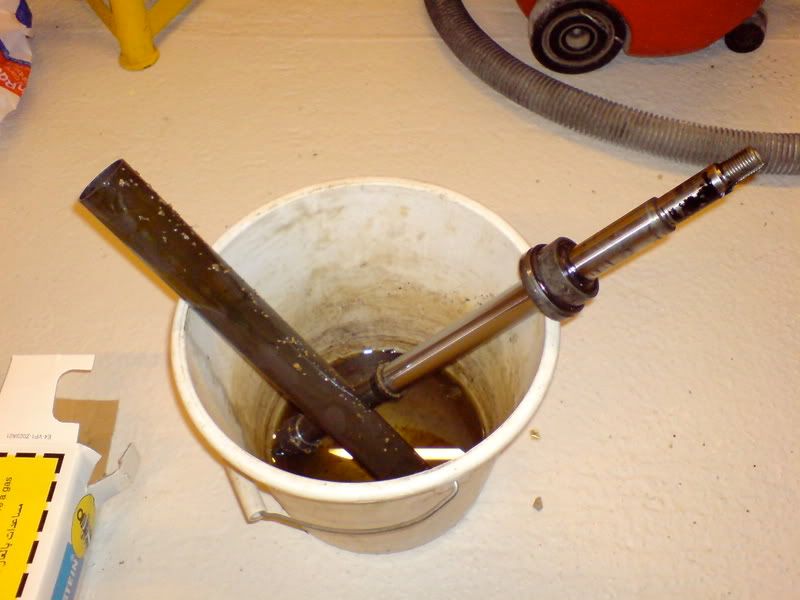
Here are what the internals of an original Boge strut looks like:
Image

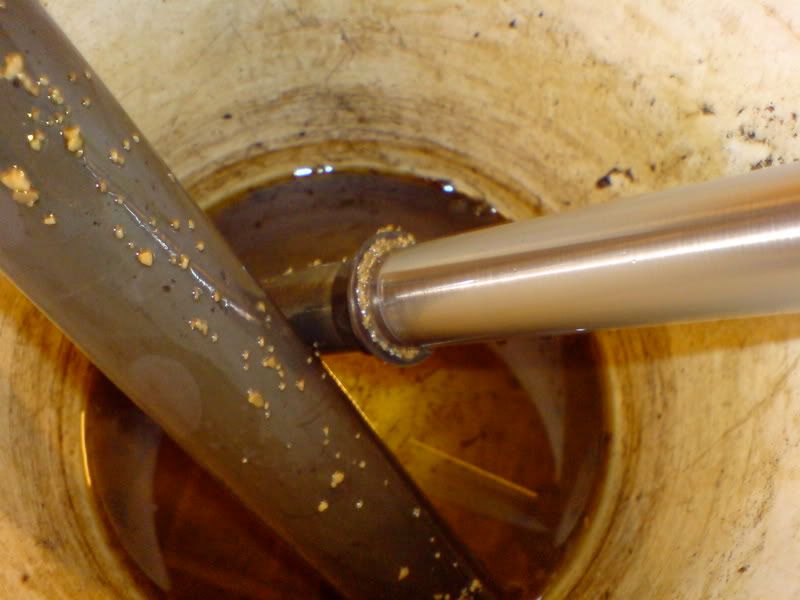
Mine appeared to be full of stone or remnants of a damaged spacer?
Image

With the internals removed I tied the strut upright again.

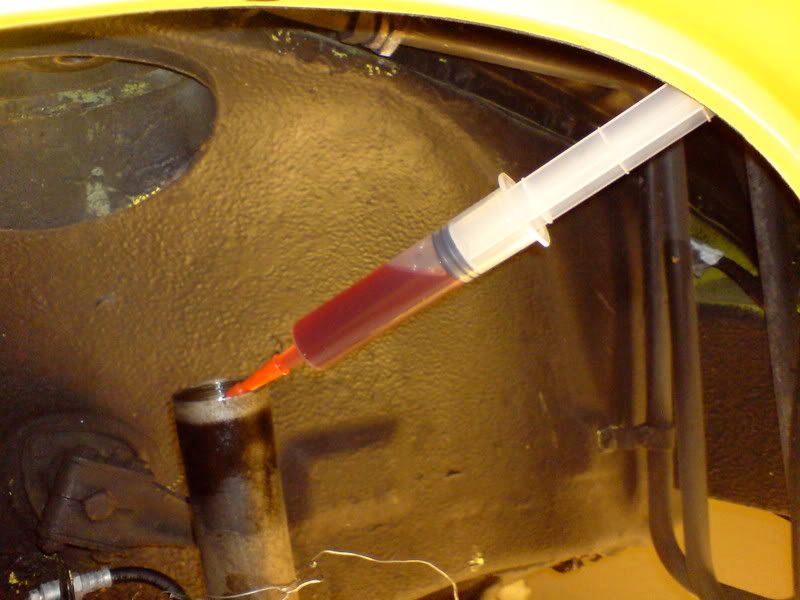
At this point the strut is still full of oil. If this oil is not removed as soon as the new insert is slid into the strut this oil will erupt out of the top of your strut all over the brakes etc ….

I found a nice solution by using a syringe and pipe ( normally used by Vets on sheep !! ) to suck out the oil.
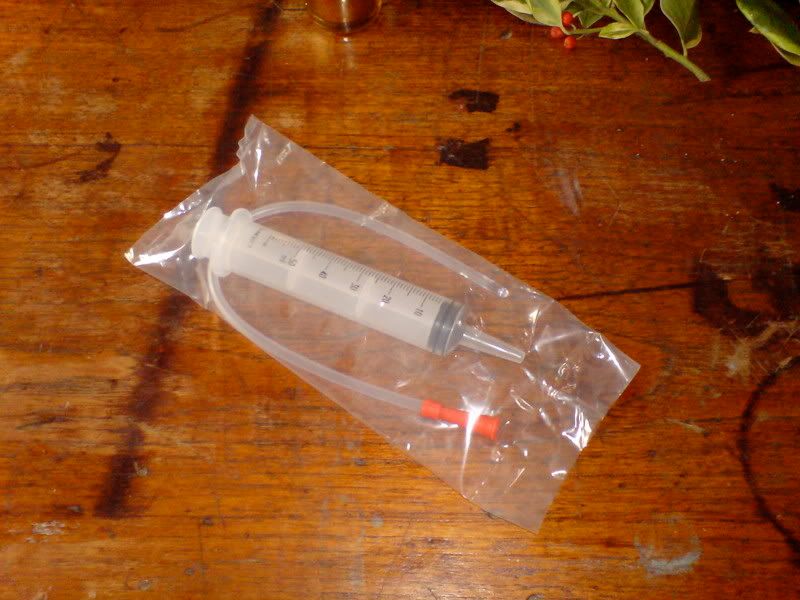
Image

Interestingly my struts had different oils in each of them !!

nearside:
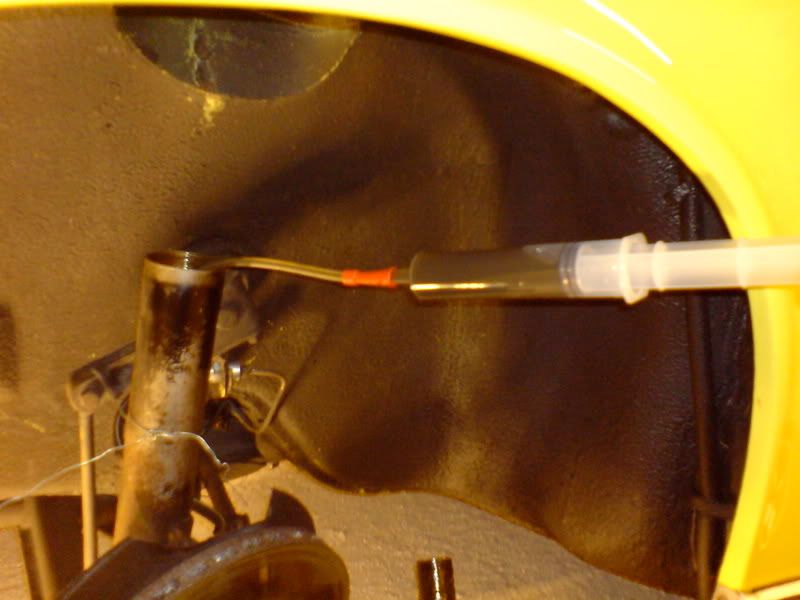
Image

offside:

Image

With the oil removed from the struts I again angled them to a position where I could slide the new Bilstein inserts into them. This is not quite as easy as it sounds as in my case the inserts just managed to clear the wheel arch lip. Once the insert is in, the new retaining nut can be fitted.

Just a note here, there seems to be mixed opinion on wether the strut should be filled with oil again with the Bilstein insert. It seems Bilstein don’t recommend this so I have opted not to add oil.

As I didn’t have the specialist tool to enable me to tighten up the new retaining nut, I took the advice of Sladey & used a pipe wrench to tighten it up. A couple of bangs with the hammer on the pipe wrench handle & I’m happy these are tight ☺
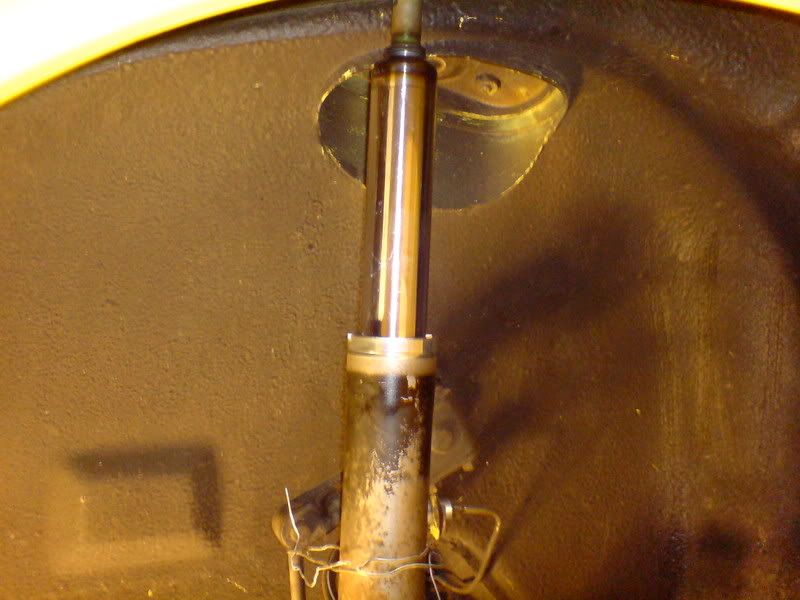
Image

Next it is simply a matter of fitting the new dust cover, which in my case meant I had to compress the insert to enable me to slip it over, & then fit the insert into the strut tower / upper mount on the car.
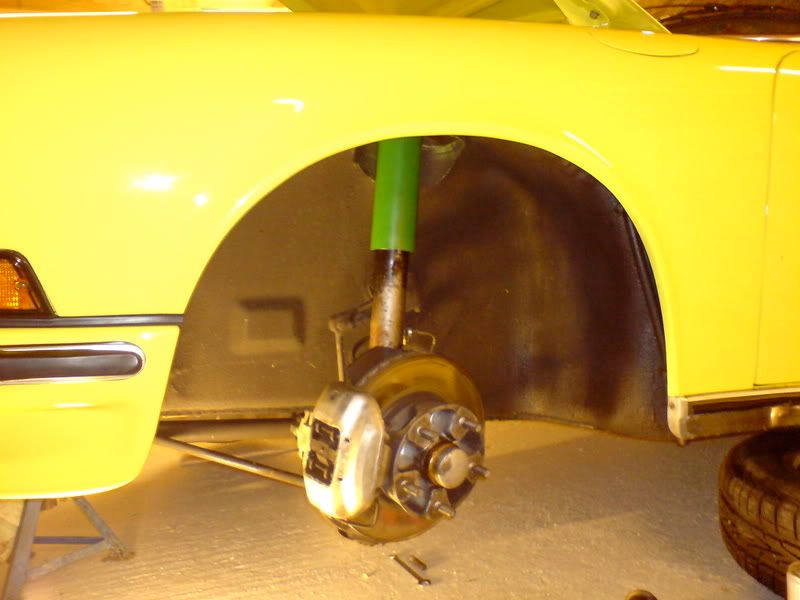
Image

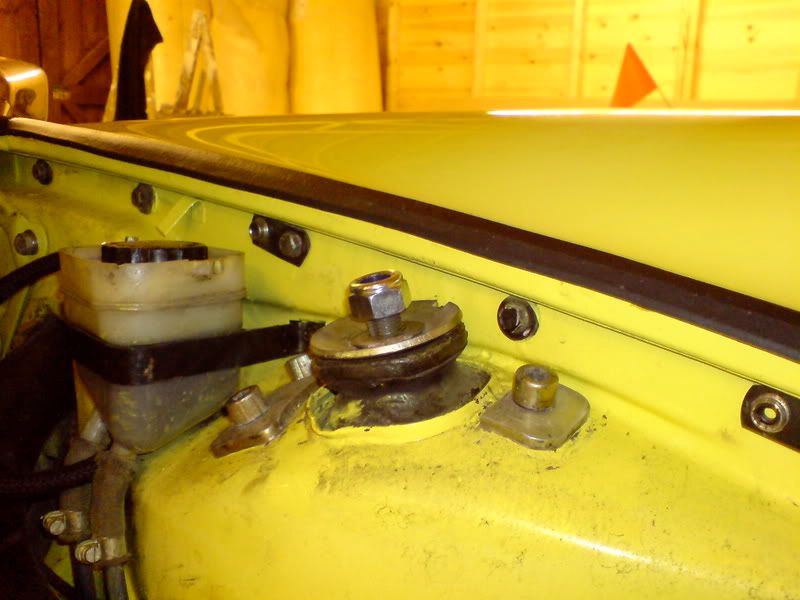
Using the trolley jack I again lift the suspension up to allow all the thread on the top of the insert to show at the upper mount.
Image

Then it is simply a matter of refitting the original top mount washers & the new nyloc nut as supplied with the inserts ( NOTE: THE INSETS COME WITH A RUBBER SPACER ON THE THREADS … THIS IS FOR PACKAGING ONLY & SHOULD NOT BE FITTED).

In my case I held the larger washer with one hand & tightened the nut with a socket wrench which prevented the insert from rotating. I finally torqued up to the recommended figure.

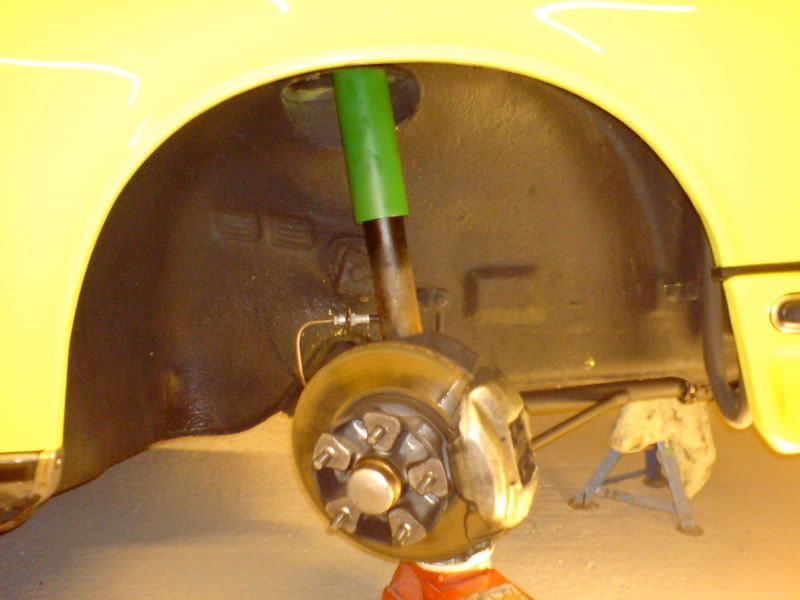
Job done:
Image

So wheels back on, car back on the floor … simple ;)

Well now of course the suspension heights have changed. The rear has lifted by an 1” !! . So next port of call is a full suspension set up including this time accurate corner weights .
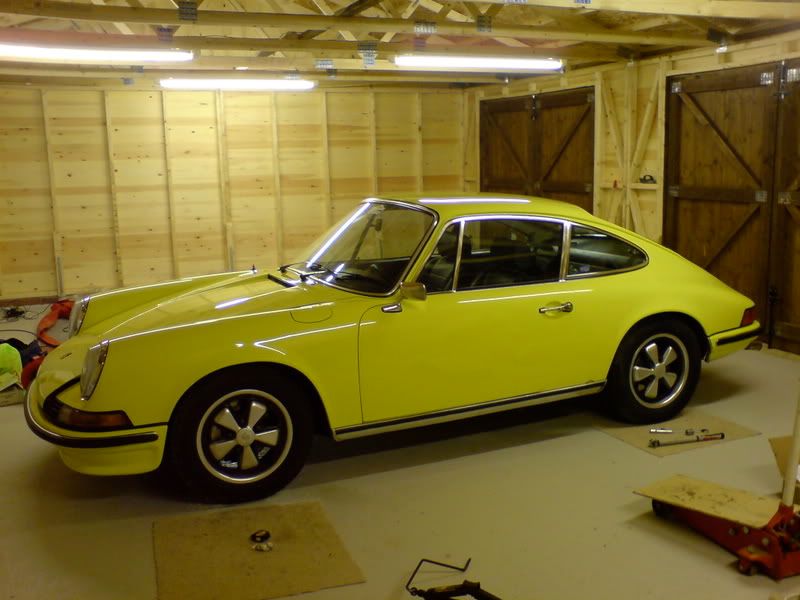
Image

I have not driven the car yet so can’t comment on the Bilsteins. I’ll report back after my suspension set up.


Hope I havn’t rambled too much
Last edited by hot66 on Thu Feb 12, 2009 8:17 pm, edited 1 time in total.
James

1973 911 2.4S
1993 964 C2
2010 987 Spyder
1973 MGB Roadster

Its not how fast you go, but how you go fast ;)
Mick Cliff
I need to get out more!
Posts: 3277
Joined: Mon Apr 26, 2004 7:51 am
Location: Selby

Re: How To - Bilstein Suspension Upgrade / Boge struts

Post by Mick Cliff »

hot66 wrote:Image

I have not driven the car yet so can’t comment on the Bilsteins. I’ll report back after my suspension set up.


Hope I havn’t rambled too much
Nice work James - I like your new "motor home" :wink:
Merc B Class diesel
Porsche-less
johnM
I need to get out more!
Posts: 3391
Joined: Mon Apr 03, 2006 10:27 pm
Location: Lake District

Post by johnM »

Looking good james, the ride hieght may settle a little once given a good run.

Kind Regards
John
1970 2.2E Coupe.
2004 996 GT3 mkII
2015 Skoda Octavia VRS TSI DSG.
2021 Toyota GR Yaris Circuit Pack
sladey
Nurse, I think I need some assistance
Posts: 8711
Joined: Sat Apr 23, 2005 9:08 pm
Location: Nottingham, UK

Post by sladey »

and I believe our own Sladey did a similar thread when he replaced his.
I did James but didn't do the pictures - they make it much easier to follow - the next beginners guide I do I'll include pictures.

Your guide makes for really good reading - well done. Be interested to hear your comments on the handling once the suspension is setup properly

Cheers

Mark
The simple things you see are all complicated
I look pretty young but I'm just backdated yeah
Barry
Nurse, I think I need some assistance
Posts: 4319
Joined: Tue Aug 24, 2004 8:50 pm
Location: East Sussex

Post by Barry »

Nice thread, James :) . Particularly like the method for the front struts.

What is 'the triangulation method' for the corner weights? I've got a rough and ready method that involves a cross-beam with central pivot that gets things pretty close, but interested to hear of another DIY solution.
DDK Member1243 07741 273865. Now booking Spring '24. Home of the RY Austin 7 Trophy's
User avatar
hot66
Moderator
Posts: 18261
Joined: Tue Nov 11, 2003 4:17 pm
Location: North Yorkshire

Post by hot66 »

Barry, this is a nice description on it :
pelicanparts wrote: Something that may be of value is a quick refresher on the Ferch method of corner balancing. It isn't necessarily perfect, but it's a decent way to estimate corner balance without spending a fortune getting it done professionally.

Basically, the problem that you're dealing with now is that the car has four corners, each of which is adjustable in its loading. What you need to do is reduce it to a tripod, on which only 2 points are variable. The easiest way to do this is to pick up the back at a conveniently provided center-point (like say, underneath the engine), then measure and compare the front ride heights. Correct as necessary. The same goes for the back two corners -- pick up the car by a center-point at the front, then measure the rear corner heights.

Thanks to Wil Ferch for thinking this up; I've used it plenty of times with great success. BTW, each time you make an adjustment, you really have to settle the suspension by running around the block, preferably a couple of times.

also this thread shows how accurate you can get it:

http://forums.pelicanparts.com/showthre ... angulation


In my case, when I jack the rear of the car up at the centre line, the front right ( offside) suspension compressed a lot more than the nearside :shock:

If I did the reverse & jacked the front of teh car up onits centre line the rear nearside compressed a lot more than the offside :roll:

With the car resting on all 4 wheels the suspension heights are all fine as opposing corners are working against each other ..... in otherwords my corner weights are shite :roll: :lol:
James

1973 911 2.4S
1993 964 C2
2010 987 Spyder
1973 MGB Roadster

Its not how fast you go, but how you go fast ;)
User avatar
hot66
Moderator
Posts: 18261
Joined: Tue Nov 11, 2003 4:17 pm
Location: North Yorkshire

Post by hot66 »

Things were quiet in the office this afternoon, the sun was out & the strong wind had wicked away the wetness from the roads, so I decided to take the Porsche out for 1/2 hour around my favorite local loop 8)

1st impressions of the new suspension are great :) .

Front suspension:

At last I now HAVE suspension travel ... previously when I hit a bump the front of the car would ride over it with hardly any suspension compression, resulting in me being thrown around all over the place. I had commented on this many times in the past, as had other DDKers who had followed me over bumpy Yorkshire country roads.

With the new inserts the suspension actually works 8) . Ride is a lot smoother ( although still hard compared to modern cars) & I can now attack the roads with more confidence. Bizarrly, now the suspenion is working through its travel, on flatish roads with an uneven surface I get a lot more of the road surface transfered through to the steering wheel. This didn't happen previously. I think this maybe more of a result of teh elephant bushes? Judging from the condition of my old strut inserts I now think the nearside one was partially siezing under compression.

Rear suspension:

This feels great 8) The old shocks must have really been worn because the rear end never felt secure, especially over yumps where the suspension just felt uncontrolled.

The new shocks have really tightened the rear end up & going over a yump on my route the car felt extremely well planted :) Mind you the sprint shocks are uprated spec.


Overall:

Even though I have only done about 25 miles, the car feels a lot more secure & stable & has allready given me the confidence to attack the roads harder than I used to. I have still not had the suspension set up done yet so hopefully that will improve things even further :)


Right, I'd better get back into the garage & get things torqued up :)
James

1973 911 2.4S
1993 964 C2
2010 987 Spyder
1973 MGB Roadster

Its not how fast you go, but how you go fast ;)
Barry
Nurse, I think I need some assistance
Posts: 4319
Joined: Tue Aug 24, 2004 8:50 pm
Location: East Sussex

Post by Barry »

:P Good news, James.

The method you describe as 'triangulation' is in fact what I have done on my cars.

The only difference is that I used a length of RSJ that happened to be around, marked the track-width on it, and then marked the centre. Jacked the car up, slid in the RSJ so that the centre was central, so to speak. Then I popped a bit of one inch bar under the centre and dropped the full weight of the car (front or back as appropriate) onto it. I.e. so that the wheels could see-saw freely.

I just got the rear as level as poss with the torsion bar adjustment, and then used the RSJ to level the front to match*, being much easier to change. Therefore didn't try the beam on the back at all.

* By sighting over the top of the RSJ to the bottom of the rear tyres, or any rear-of-car reference points.
DDK Member1243 07741 273865. Now booking Spring '24. Home of the RY Austin 7 Trophy's
Barry
Nurse, I think I need some assistance
Posts: 4319
Joined: Tue Aug 24, 2004 8:50 pm
Location: East Sussex

Post by Barry »

BTW, not sure why the Pelican method tests both ends :? . I would have thought that the rear (hardest, coursest, and heaviest) would have to be set as the reference anyway: i.e get the front just on the rock and adjust the rear to be as level as possible, with the ride height as close as possible.

Then get the front to match exactly because, on 'our' cars at least, the front is infinitely adjustable.

Unless I'm reading it wrong, the above method could have you chasing around the car adjusting out the corrections you've just made :? :?: .

EDIT: Now read the linked story as well: obviously very thorough, although it looks as though is relying on his workshop floor as his 'surface plate'.

My personal feeling is that if the rear wheels are placed on something pretty straight (bit of e.g. 8x2 timber), the top of the rear wheels look good side to side on the body, and the ride height is O.K., then adjusting the RSJ rocking beam, you can then sight to the rear beam and get it dead even. This must mean that the corner weights are spot-on, without needing any real measurements, and no flat floor either. I suppose that if you were really keen, you would ballast the car for it's usual driving load as well: e.g. driver's weight in seat if usually driven alone.

Nevertheless, all of the above shows that I'm not as clever as I thought, and what I thought was my own, unique system, is already known and out there :lol: .
DDK Member1243 07741 273865. Now booking Spring '24. Home of the RY Austin 7 Trophy's
Matt black70
DDK forever
Posts: 510
Joined: Fri Aug 04, 2006 9:40 pm
Location: Wolverhampton

Post by Matt black70 »

Hi James.
Can you recommend where to get the rear Bilsteins from?. I have adjustable Konis on the rear of mine which I've had to turn to their hardest setting to offer suitable damping. I don't know if Koni still offer a rebuild service and am undecided if I should get them rebuilt, replace with the same or buy some Bilsteins.
Any advice from members would be much appreciated.
They are for spirited road use only.
Thanks

Matt
Black 70T
72 Beetle 1302s
70 Triumph TR6
Corrado VR6 storm(kindly written of by a friendly police officer)
BMW E92 335D
Volvo V70 D5
User avatar
hot66
Moderator
Posts: 18261
Joined: Tue Nov 11, 2003 4:17 pm
Location: North Yorkshire

Post by hot66 »

I ordered my rear shocks from Tuthills ( 01295 750514 speak to Paul ) as they had offered me advice on which would be appropriate.

I choose Bilstein Sprint ( 310/155 ) yellow shocks for the rear.

Price was similar to all the other suppliers of Bilstein, but I did get a small discount as I was ordering front inserts as well.

I probabally would have saved a bit buying in the USA, but I wanted them quickly & wanted some comeback incase the parts had turned out to be wrong etc.
James

1973 911 2.4S
1993 964 C2
2010 987 Spyder
1973 MGB Roadster

Its not how fast you go, but how you go fast ;)
Highfield
Put a fork in me, I'm done!
Posts: 1519
Joined: Thu Oct 06, 2005 8:34 pm
Location: Warwickshire

Post by Highfield »

James

Great article - I really need to get on with mine, but lack that lovely garage you have :-)

I have been advised on a good "tarmac rally spec." from Paul at Tuthills so I will be getting my bilsteins (inserts and dampers) from Paul.

Similar to yours but different insert specs. I will get all new bushings but ER bushes look expensive ?

I will be going 26mm so perhaps we can compare setups at the track?

ATB for 2008.

Ian
Ian Highfield
Pre 73 1964 Alfa Giulia Sprint GT MSA Category 1 Rally Car
1992 964 C2 with RS Suspension setup and Sport Interior - SOLD
1973 911T (2.7 Carrera engine and loads of period mods - all steel) - SOLD
1986 Carrera Coupe (256bhp) - SOLD
User avatar
hot66
Moderator
Posts: 18261
Joined: Tue Nov 11, 2003 4:17 pm
Location: North Yorkshire

Post by hot66 »

Torqued everything up and took the car out again today to get a proper feel of teh suspension & bed in the new shocks.

The roads turned out to be damper than I was expecting & I had daughter No2 asleep in the back seat so ultimate performance couldnt be explored.

BUT I now can't believe I didn't change my shocks earlier :shock: In the past my car was very nervous in the damp .. now it actually grips :)

Ian, I'd be interested to see what your tarmac spec is & how the car feels. Good thing about the Bilsteins is they can be custom re-valved if required 8)
26mm rear torsions is still something I'm interested in, but I think I'll run the car as is for a year or 2 before upgrading. Again I'll be interested to hear what you think of yours.

Ultimatly my car is for fast road use ( bumpy country roads) so don't want to over do it.
James

1973 911 2.4S
1993 964 C2
2010 987 Spyder
1973 MGB Roadster

Its not how fast you go, but how you go fast ;)
User avatar
hot66
Moderator
Posts: 18261
Joined: Tue Nov 11, 2003 4:17 pm
Location: North Yorkshire

Post by hot66 »

I have just added an UPDATE to the Rear Shock fitting section in the original post.

John M has forwarded me some information regarding the fitment of the rear shocks to Pre-72 911's


UPDATE :

The rear shocks (sprints) do not fit out of the box for pre 72 cars, they modified the bottom shock mount bolt.

Pre 72 bolts are 12mm by 85mm long. If you look at pet they reference a different sized bolt 900 082 018 02 12mm -71

Post 72 bolts are 14mm by 95mm long. If you look at pet they reference a different sized bolt 900 082 049 02 14mm 72-

There appear to be 2 options for pre-72 cars :

make a sleeve 14mm O/D and 12mm I/D and reuse the original bolt

or

drill out the lower shock mount on my banana arms to 14mm and buy new 14mm bolts, BUT the 14mm bolts are no longer available from Porsche.
James

1973 911 2.4S
1993 964 C2
2010 987 Spyder
1973 MGB Roadster

Its not how fast you go, but how you go fast ;)
johnM
I need to get out more!
Posts: 3391
Joined: Mon Apr 03, 2006 10:27 pm
Location: Lake District

Post by johnM »

hot66 wrote:I have just added an UPDATE to the Rear Shock fitting section in the original post.

John M has forwarded me some information regarding the fitment of the rear shocks to Pre-72 911's


UPDATE :

The rear shocks (sprints) do not fit out of the box for pre 72 cars, they modified the bottom shock mount bolt.

Pre 72 bolts are 12mm by 85mm long. If you look at pet they reference a different sized bolt 900 082 018 02 12mm -71

Post 72 bolts are 14mm by 95mm long. If you look at pet they reference a different sized bolt 900 082 049 02 14mm 72-

There appear to be 2 options for pre-72 cars :

make a sleeve 14mm O/D and 12mm I/D and reuse the original bolt

or

drill out the lower shock mount on my banana arms to 14mm and buy new 14mm bolts, BUT the 14mm bolts are no longer available from Porsche.
This was my solution.

Image

Kind Regards
John
1970 2.2E Coupe.
2004 996 GT3 mkII
2015 Skoda Octavia VRS TSI DSG.
2021 Toyota GR Yaris Circuit Pack
Post Reply