Page 1 of 2
Tim's 2.4T Engine rebuild Thread
Posted: Tue Jul 10, 2007 9:47 pm
by impmad2000
Well, I've done the course (Many thanks once again to Mike at MB Engineering) and I've borrowed an engine stand (Thanks to Ian Donkin) Now its up to me to see if I can breathe a bit of fresh life into this engine. Here goes....
The engine on the stand
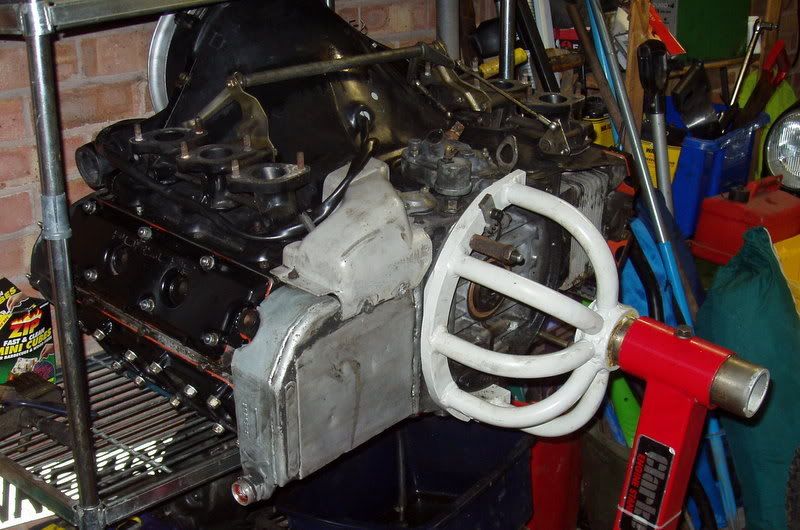
Good to see the case looks to have all the right visible hardware and Black adhesive around the case seams (could be original ?)
Also the Rocker pivots all seem to be positioned correctly, flush with the surface on the thin part of the casting

Now this I am curious about, the inlet ports look to have been worked upon ! !

Despite the crank case being full of the debris of a mangled cam chain ramp, the oils spray bars don't seem to be blocked.

Oh and all the barrel nuts on the heads are in place and all on about the same depth

favourable for the state of the head studs

Tim
Posted: Tue Jul 10, 2007 9:50 pm
by Gary71
Good luck Tim, can't wait for the 'it's started' thread on the good old Megasquirt
My ports look the same, maybe they are all worked to some extent by the factory?
Posted: Tue Jul 10, 2007 9:56 pm
by hot66
good one Tim ... are you the 1st apprentice to put Mikes teaching into practise ?


Look forward to seeing more photos as the engine comes apart
Posted: Wed Jul 11, 2007 10:41 am
by IanMcLeod
You know, you actually sound like you know what you are talking about ... very positive start.
Look forward to seeing this progress.
Ian.
Posted: Wed Jul 11, 2007 8:53 pm
by Ian Donkin
Nice one
If you need the cam tools Tim, I have some Carter 'Custom build' items in my collection and will be passing your way tomorrow (and again no doubt next week).
Posted: Thu Jul 12, 2007 8:23 pm
by Derek
Good start Tim
, keep the pictures coming.
Posted: Thu Jul 12, 2007 8:29 pm
by 912uk
good luck I am in the same boat but just ahead of you. The 12 engine is stripped cleaned all the parts layed out.. Some bits going to the powder coaters next week others going for that zinc platting.. and I collect the crank after the re grind next week I hope.. so it's a case of slowly putting it all back togeather..
just take lots of pictures and notes as you go.. keep it all clean and box / bag all items that are linked to every thing.. I have taken a tip from ALAN UK and taken photo's of all the parts I have sent off for zinc plating and powder coating so no messing about if they lose bits..
Posted: Mon Jul 16, 2007 1:34 pm
by 58A - 71E
Good luck Tim, looking forward to regular updates and more photos.
Having just done the tensioners (and a few other bits) to mine I'll be watching with interest. It took me just over 20 hours start to finish, once I knew what I needed parts/tools etc. From what I've read it may take over 40 hrs to do the full rebuild, but the feeling of satisfaction I had when I started it up and it didn't go bang makes it all worth it
James
Posted: Mon Jul 16, 2007 8:28 pm
by impmad2000
.. And these are the recently re-bushed chain tensioner pivot arms.

and don't forget to drill through the new bush so that the oil can lubricate the bearing nice new bearing surface

Posted: Mon Jul 16, 2007 8:35 pm
by Gary71
Do you have to ream these to size after pressing them in?
Posted: Mon Jul 16, 2007 9:06 pm
by impmad2000
?? I don't know, my machine man did them
Posted: Wed Jul 18, 2007 10:26 pm
by impmad2000
Thanks Ian, The tools turned up
These are the spacial tools I think I'll need for this stage

And they work, The cam nut removed easy

Ooo look now the rocker arms and cam are out

...and a bit more of the chain ramp hiding in there

and no matter how hard you try, the cam housing won't come off unless you undo these nuts too !!


This is all starting to happen

...very fast !!

One side done

and then in half the time the other side is done too

So the news.... the head studs are all in tact
the Rocker arms and cams look to be in good nick
One barrel feels very pitted
On the whole, a thoroughly good evenings work :
"Happy as a pig in muck" was how Mrs Impmad described me
Posted: Wed Jul 18, 2007 10:37 pm
by Gary71
Nice one
If only putting them back together was as swift
Posted: Thu Jul 19, 2007 12:33 am
by Barry
Pleased to see my budget tools are still working
.
BTW, the cam spanner is a water-pump tool, cut down with an old socket welded on

.
Posted: Thu Jul 19, 2007 9:17 am
by Derek
Great Job so far and sounds like no bad news and costly bits so far