Page 5 of 16
Posted: Thu Jun 05, 2008 11:39 am
by Bertroex
What is that tim? Chuck it in and see?

How very dare you

So we have to fantasise instead about the detailing of the screws, powdercoating of the tinware, correct shine on the washers and definetly the correct tools used so that you don't damage that reproduced rubber to correct new old stock spec -the original coming from a member who carefully preserved it in his climatised garage?
Honestly.

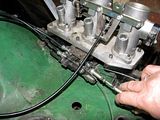
So is this thing going to run on EFI or the standard carbs? Compression test done or just "eyes closed and pedal to the metal?"
Bert
Posted: Thu Jun 05, 2008 12:10 pm
by impmad2000
Bertroex wrote:What is that tim? Chuck it in and see?
How very dare you
Sorry

Bertroex wrote:So we have to fantasise instead about the detailing of the screws, powdercoating of the tinware, correct shine on the washers and definetly the correct tools used so that you don't damage that reproduced rubber to correct new old stock spec -the original coming from a member who carefully preserved it in his climatised garage?
Honestly.
Sorry again

but some of you do need to get out more !
Bertroex wrote:So is this thing going to run on EFI or the standard carbs? Compression test done ?
EFI and distributorless - Yes, absolutely, all the way

I am told compressions are good on all pots, and that's good enough for me
Bertroex wrote:"eyes closed and pedal to the metal?"
Yeah baby !! Is there another way ?
Posted: Thu Jun 05, 2008 3:21 pm
by Matt black70
Hi Tim, great to see you're cracking on with it, when will it be back on the road do you think, be great to have a look when you bring it to the breakfast club.
Cheers
Matt
Posted: Sun Aug 31, 2008 8:40 am
by impmad2000
Got a bit of a kick on the project this week. I'd picked up some vinyl earlier in the week, so decided to have a go at trimming the Targa bar.
Starting with this

Using the old vinyl piece as a pattern, I cut a new piece. I then used spray adhesive to mount some foam padding to the back of the vinyl.

I then glued the core pieces to the targa bar with some Bostik contact adhesive.
Offering up the padded vinyl showed that the padding was a bit thin, so I glued a 2nd thickness of foam padding to the tagra bar, using spray adhesive.

Contact adhesive around the lip of the Targa hoop, and on the vinyl, I mounted the vinyl to the car.

A trial wrap around showed where to snip the vinyl to clear the tabs that support the main padding piece.

Loads more contact adhesive, wrap around and bond into place. Jeez, it a stretch round the corner, this is where its important to have a good stretchy, stocking backed vinyl.

Now chuck in the main part of the Targa hoop (I didnt touch the covering of this piece!!)

Dig out the seats , carpet, side trims and hey presto !! It starts to look like a car again !!

That felt really good, just what I needed
Tim
Posted: Sun Aug 31, 2008 7:39 pm
by jtparr
nice one Tim
keep up the momentum, those kind of jobs really lift the spirit as it makes a big visible difference
anyway its raining so what else are yuo going ot do

Jp
Posted: Mon Sep 01, 2008 11:05 am
by 912uk
yep keep at it.. I have fail on so many counts this year to get jobs done ops.. it's the weather.. I will just have to heat the work shop this winter to keep going

there goes aload of money out the window..
does one of these diesel heaters produce any harmfull fumes when burning.. my garage is 10Ft by 60 ft heats it up well just woundered if I was you know.. killing my self!!

Posted: Mon Sep 01, 2008 11:56 am
by Nige
Good to see it happening Tim.
Posted: Wed Sep 03, 2008 12:08 pm
by sladey
Looks a really nice job you've done there Tim - you can really see it when you put those rear seats in - keep it going!
Cheers
Mark
Posted: Sun Mar 01, 2009 9:03 pm
by impmad2000
Big day today. Back on all 4's !

Reckon the Deep 6's look a bit lost in the flares though !!
Not all good though, the Brake calipers dont fit !!

The caliper body fouls on the disk, so I can't get the second bolt in !!
Tim
Posted: Sun Aug 02, 2009 5:41 pm
by impmad2000
I can't believe some people think I won't be ready for the C2C !
Not much to do,
Electrics, brakes, re-time the cam, EFI conversion on the fuel and ignition system, re-fit engine and gearbox, Fit interior, gauges, setup suspension, and probably loads more !!
Oh well, head down, get busy
Tim
Posted: Sun Aug 02, 2009 6:09 pm
by Gary71
Ah well, at least you have an ignition map to start with!
Good luck Tim, keep posting the updates

Posted: Sun Aug 02, 2009 7:38 pm
by Bertroex
Good luck Tim! If you need a coffee gopher, a spanner hander or generally someone to abuse, please call James!
Only joking, call me if I can be of any help.
Remember I have these 8 x 15 rep fuchs here for you to try if you need them. Alternatively I also have a set of spacers.
Bert
Posted: Sun Aug 02, 2009 7:56 pm
by impmad2000
This was the photo I meant to post

As you can see, it's practically finished !!
Thanks, I'll probably be in touch about the wheels soon Bert.
Cheers
Tim
Posted: Tue Aug 04, 2009 8:50 pm
by Barry
Good luck Tim: glad to see things moving again
.
Posted: Wed Aug 05, 2009 9:04 am
by Nige
Good stuff Tim.
I think most people install the engine from the underneath and the right way around


