1965 RHD 911 restoration started

Ongoing and archived Porsche (and other marques) restoration threads from DDK members

Moderator: Bootsy

72911E
I luv DDK!
Posts: 817
Joined: Fri May 23, 2008 5:01 am
Location: SW London

Re: 1965 RHD 911 restoration started

Post by 72911E »

DEEMAN wrote: Does anyone have a pair of 65/66 ivory sunvisors available? Mine are mouse-chewn and need replacing. Or does anyone know where I can get them recovered like original new?
'Visualfx' Gary might be able to help you.

http://www.ddk-online.com/phpBB2/viewto ... 28&t=44341
'72 911E Coupe RHD
'72 911S Coupe RHD
DEEMAN
DDK forever
Posts: 672
Joined: Tue Jan 11, 2011 10:29 pm
Location: SCOTLAND

Re: 1965 RHD 911 restoration started

Post by DEEMAN »

Thanks for the nod. I've sent him a PM

Ian
Alan @ CanfordClassics
Nurse, I think I need some assistance
Posts: 4206
Joined: Fri Nov 14, 2003 3:10 pm
Location: Bournemouth
Contact:

Re: 1965 RHD 911 restoration started

Post by Alan @ CanfordClassics »

Hi Ian, I will also take a look as I think I saw some recently. Regarding the foam tubes, the early ones are much thinner than larger thick foam type used from (some time within 66). All used cable ties top and bottom.

HTH

Alan
http://www.canfordclassics.co.uk
Porsche Restoration & Sales
DEEMAN
DDK forever
Posts: 672
Joined: Tue Jan 11, 2011 10:29 pm
Location: SCOTLAND

Re: 1965 RHD 911 restoration started

Post by DEEMAN »

Thanks Alan, PM sent
DEEMAN
DDK forever
Posts: 672
Joined: Tue Jan 11, 2011 10:29 pm
Location: SCOTLAND

Re: 1965 RHD 911 restoration started

Post by DEEMAN »

Having just spent an hour doing this post using AOL as my IP and finding AOL has dropped me off the ddk site as I submit my thread update.......................

Grrrrrr I'm changing to BT I think - soon. I'll try again using Firefox so - if it doesn't work this time...

Rant over. Back to business.

When things happen, they happen fast. Spare capacity at the media blasters has produced results at an extraordinary rate. So much so that within a week my Blue Belle, recently in red oxide (in parts) has become the Lady in Grey as she has adorned her new coat of zinc phosphate post blasting.
The chap who did it has a knowing hand as nothing has been damaged or stretched. OK, one must expect something to show up but the bodyshell has emerged far better than I had ever hoped.
The floor has proved incredibly good. The areas to the rear sides are no worse than previously known and will be mostly corrected by the new floor repair panels.

Image

Image

The right longeron is a straightforward repair. The underside shows signs of grounding, or careless jacking, along the centreline but this is easily rectified.

Image

The main problem seem to be at the front where the steering shaft passes down to the front cross member arch. Looks a bit holey round there.

Image

Image

There are a couple of weak areas in the front foot wells but nothing too serious.

The left windscreen pillar has gone (like obvious man!) but we have plans to replace this whole area including the filler pipe aperture as it was all totally useless due to crash damage. This is where the Yellow Canary will donate a major organ.

Image

The dash-panel top has been protected from the blasting so as to preserve the original paint and crayon writing. This will be the only untouched area of the whole vehicle.

Image

Towards the rear the only area needing serious surgery is the lower left windscreen. Another usual habitat of the rotworm so remedial action will be taken to eradicate the wee beastie.

Image

Inside the engine bay looks really good and I am so pleased that the rear parcel shelf and seat buckets are like new.

Image

The 912 rear part-wing and lightbox cum rear slam panels have gone in a treat and only need a slight tweek to perfect.

Image

Image

Yes, we do need to trepan new holes for the oil tank in the 912 inner wing!

I love this picture. How wide is an RSR? This 1965 narrow-bodied ancestor seems to have set a good starting point.

Image

And, just to sign off. in this shot it looks as though my Blue Belle is floating (on Cloud Nine? -like me, - hey that's an even better name for her eh!).

Image

More anon

Ian

______________________________
1965 RHD 911
2001 3.2 Boxster
Last edited by DEEMAN on Sat Jan 30, 2021 10:50 pm, edited 1 time in total.
cobb911
Married to the DDK
Posts: 219
Joined: Thu Oct 03, 2013 6:37 pm
Location: Scotland

Re: 1965 RHD 911 restoration started

Post by cobb911 »

Ian, good progress being made. On the subject of AOL - use it to read your email but no more. A couple of years back I spent ages trying to checking in for a flight only to go round in circles on the website. Changed to IE and it worked fine.

Regards
Graeme
Graeme

Black 2003 996 C4S Coupe
Previously
Tangerine 1972 911T
Black 2005 987 Boxster
Grey 2001 986 Boxster S
Cobalt Blue 1991 944 S2

Member #731
DEEMAN
DDK forever
Posts: 672
Joined: Tue Jan 11, 2011 10:29 pm
Location: SCOTLAND

Re: 1965 RHD 911 restoration started

Post by DEEMAN »

I have just done nearly 2 hours update and lost the lot because ... why?
When I submitted the update it didn't go though (and I hadn't saved a draft!! Stupid me!!!) 'Try submitting again' it said - but it never went through on the second or third attempt and then I lost the lot.
Why?

I'll have another go tomorrow or the next day..... or the next.
When I have calmed down.

[*] :evil:
DEEMAN
DDK forever
Posts: 672
Joined: Tue Jan 11, 2011 10:29 pm
Location: SCOTLAND

Re: 1965 RHD 911 restoration started

Post by DEEMAN »

OK, I've calmed down a bit. Though I think I will submit smaller reports in case I loose them again.

On to the floor repairs. The right hand tackled first. You can see there is repair needed to the inner wall of the longeron and the seat rail support is lacking ..er support.

Image

Image

The required piece was exorcised from the Yellow Canary and inserted after it was cleaned up. John tells me that it was only held in place by four spot welds and one of those had 'missed.


Image

We are using floor repair panels (ex Rose Passion - worth getting just for the brown paper packaging they use!!¬) The necessary incision and spot weld drilling done and it went in a treat.


Image

Image


One side done.

More to follow.
DEEMAN
DDK forever
Posts: 672
Joined: Tue Jan 11, 2011 10:29 pm
Location: SCOTLAND

Re: 1965 RHD 911 restoration started

Post by DEEMAN »

I had a lot of other parts blasted and primed/protected at the same time as the body. Most of it came back as expected.

Image

Image

The rear quarters were cut on the Yellow Canary and my 911 quarters had rotten inner supports so the two will be blended.
I decided to have both complete front suspension units done and I'll take it from there. I know the 911 had crash damage at some time.

Image

But there were parts that were wholey unholy.... OMG

Image

Anyone got any lightboxes???

The wheels I am going to have done at Aerocoat. I was very impressed with MTs wheels on the 'Doctors' car. The starter motor and Alternator have been overhauled. New discs are coming from Berlyn autoparts. The brake calipers have been overhauled or are in the process of being overhauled by Classic Car Automotive. In fact, I just heard from Lee that one of the front calipers is beyond recovery due to cracking. Yellow Canary donated one of hers. She isn't in a state to argue any more!
I've been working on the pedal assembly and it really is amazing how something that looks so bad can come out so good. A good scrape, into the blast cabinet (I have a small one at home), then Metal Ready and finally POR15. New bushing kit coming from Design 911 and it should be good for another 50 years.
I am always amazed how good Porsche rubber is after all these years if it is not subject to the sun. Even the green rubber brake light switch cover is good.

Still looking for advice on the front suspension bushes. Thanks you Sean for your input.
DEEMAN
DDK forever
Posts: 672
Joined: Tue Jan 11, 2011 10:29 pm
Location: SCOTLAND

Re: 1965 RHD 911 restoration started

Post by DEEMAN »

Happy New Year everyone - good wishes and success with your Porsches and projects in 2014 and beyond.

It is six weeks or so since I last did an update but, although progress is slow, the rebirth of BSC 3B continues.

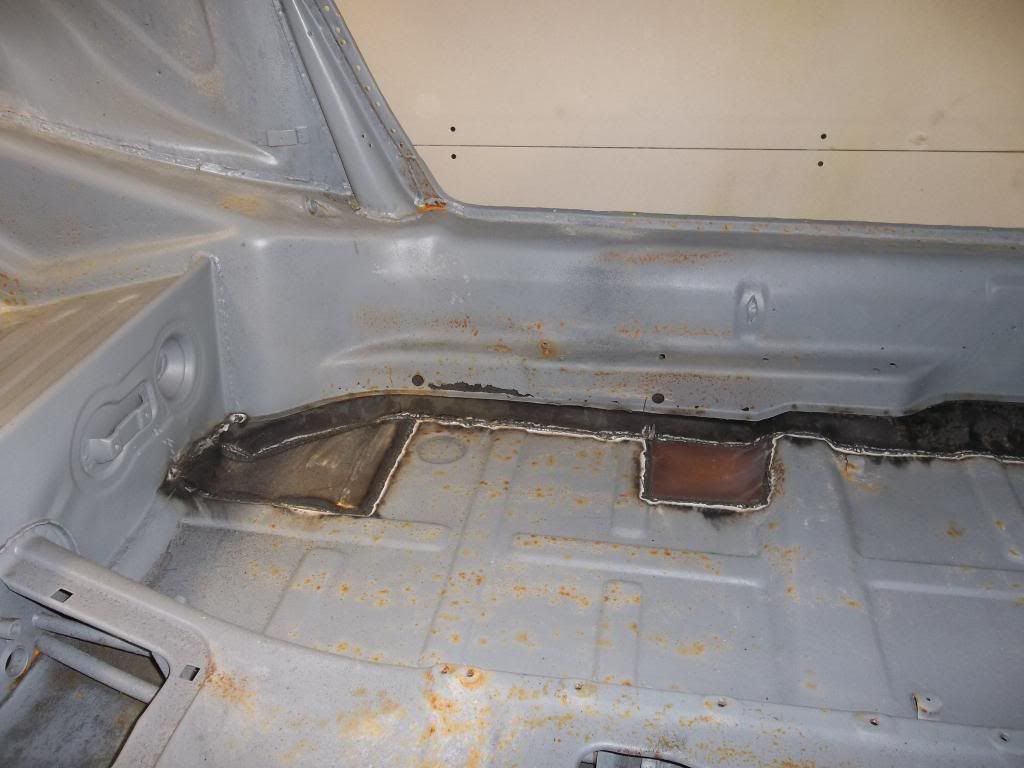
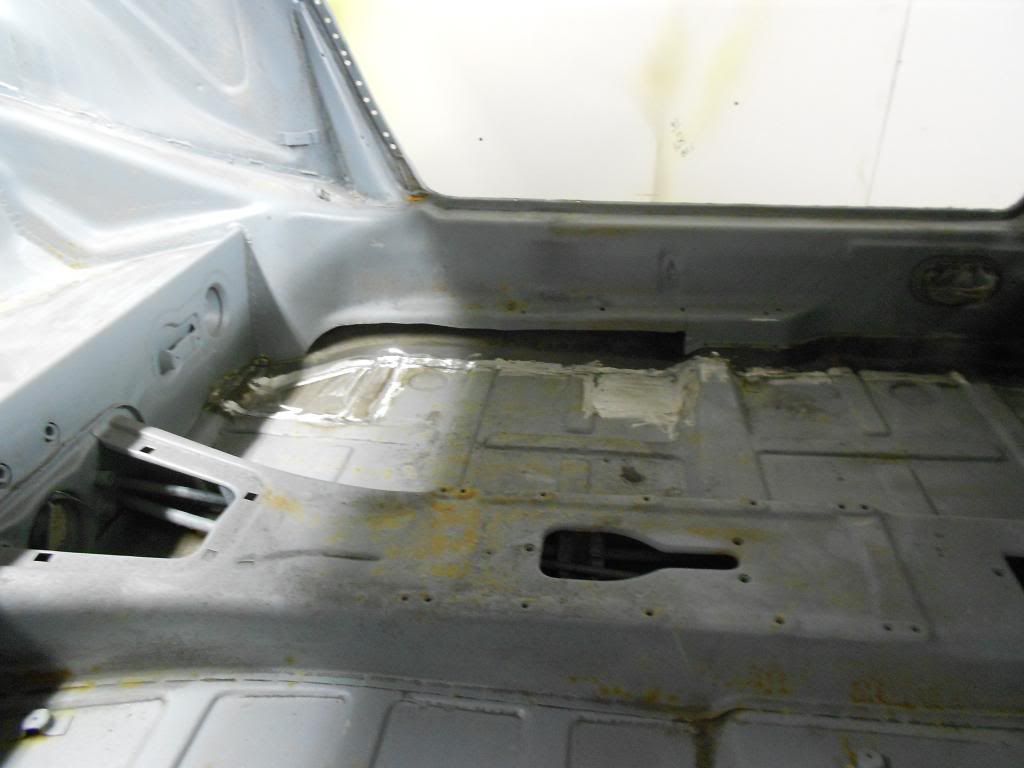
Firstly the left-hand floor repair section has been grafted in as have two panels in the floor that needed attention.

Image


Image


Image


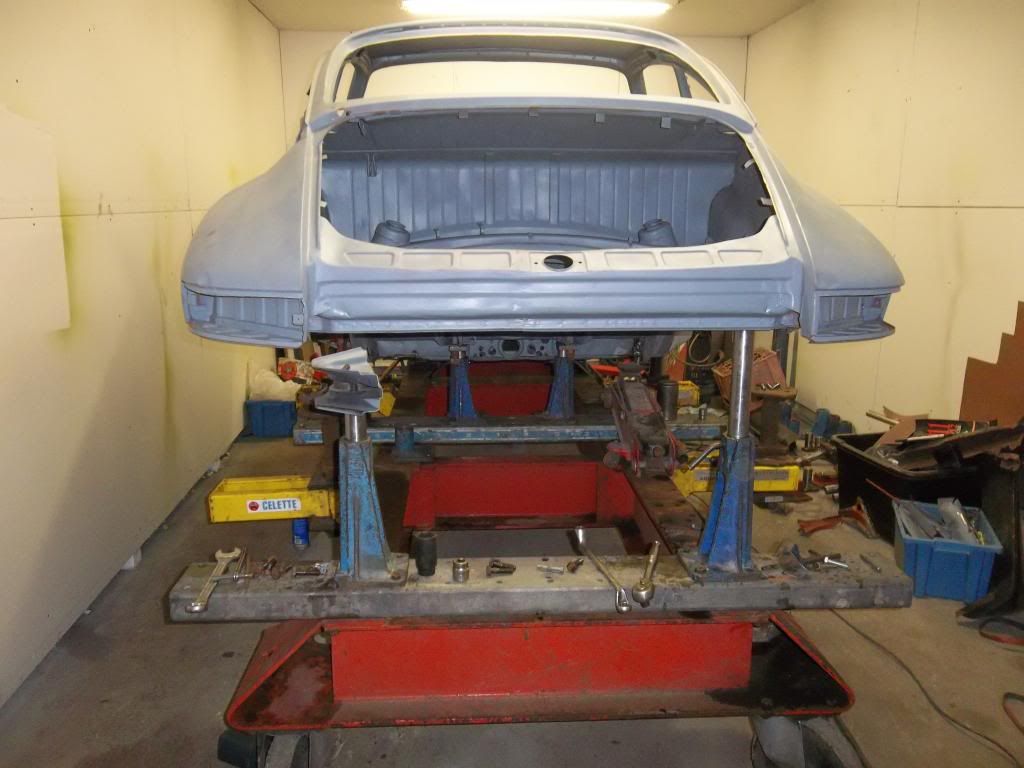
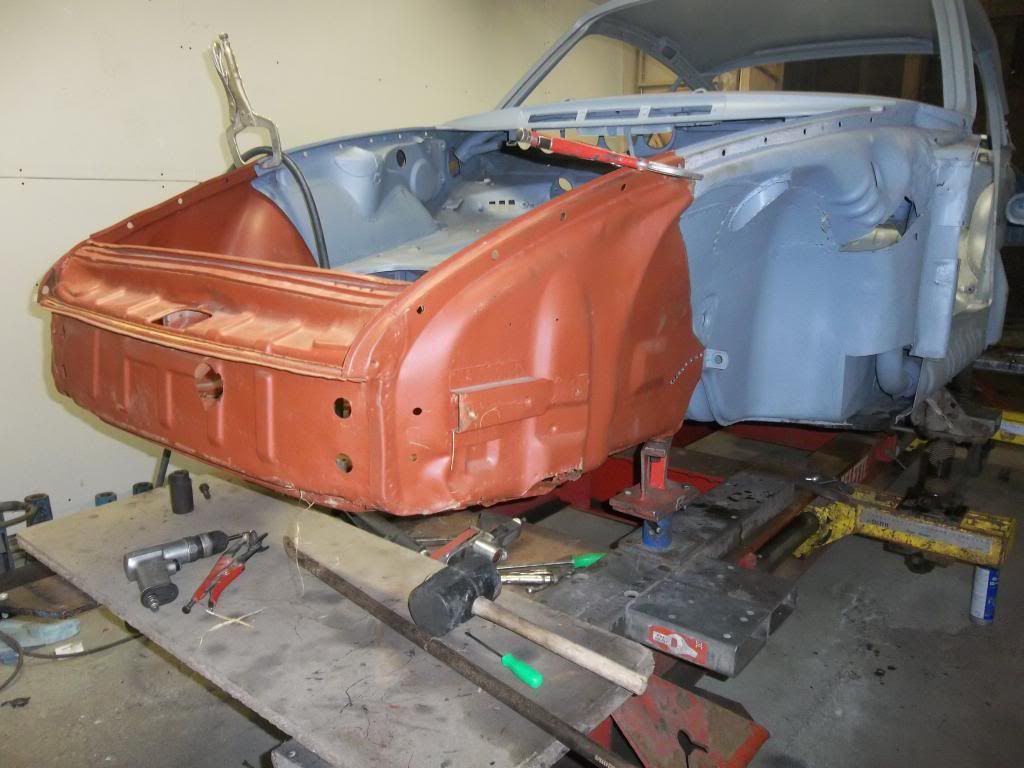
The Celette towers and plates arrived so we have been able to mount the car onto the bed and really get on with sorting some more major issues.

Image

First was the insertion of the new left -hand engine mount. Then some clean up work was needed around the torsion bar apertures to accommodate the billet. But all true and a good fit.

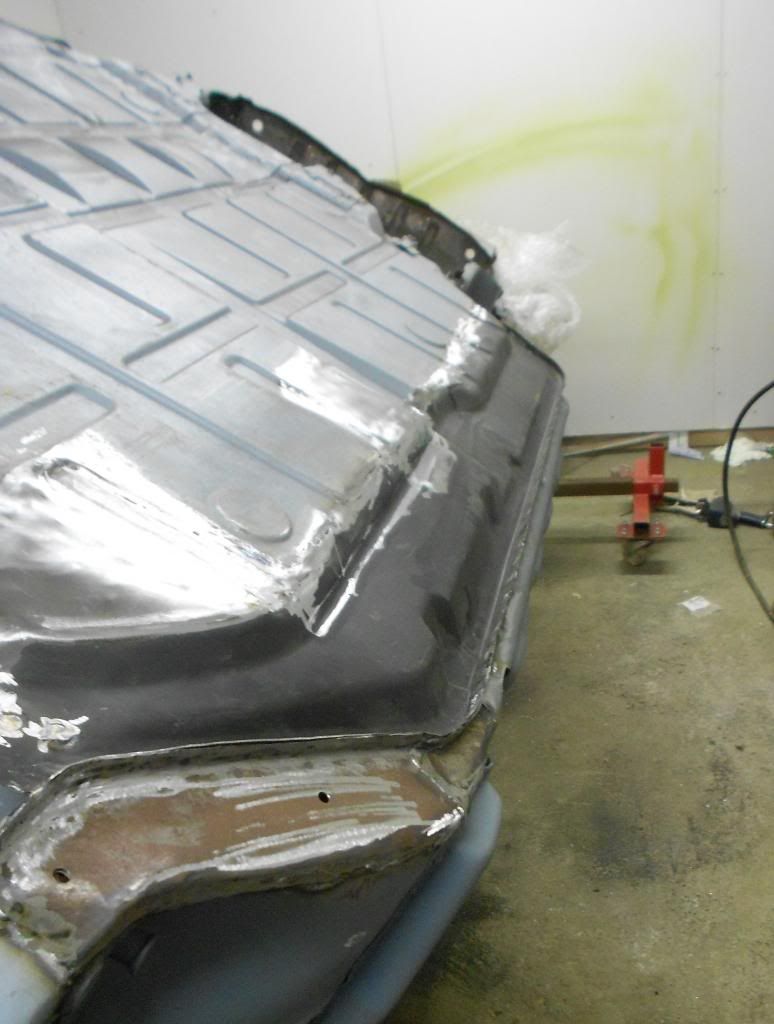
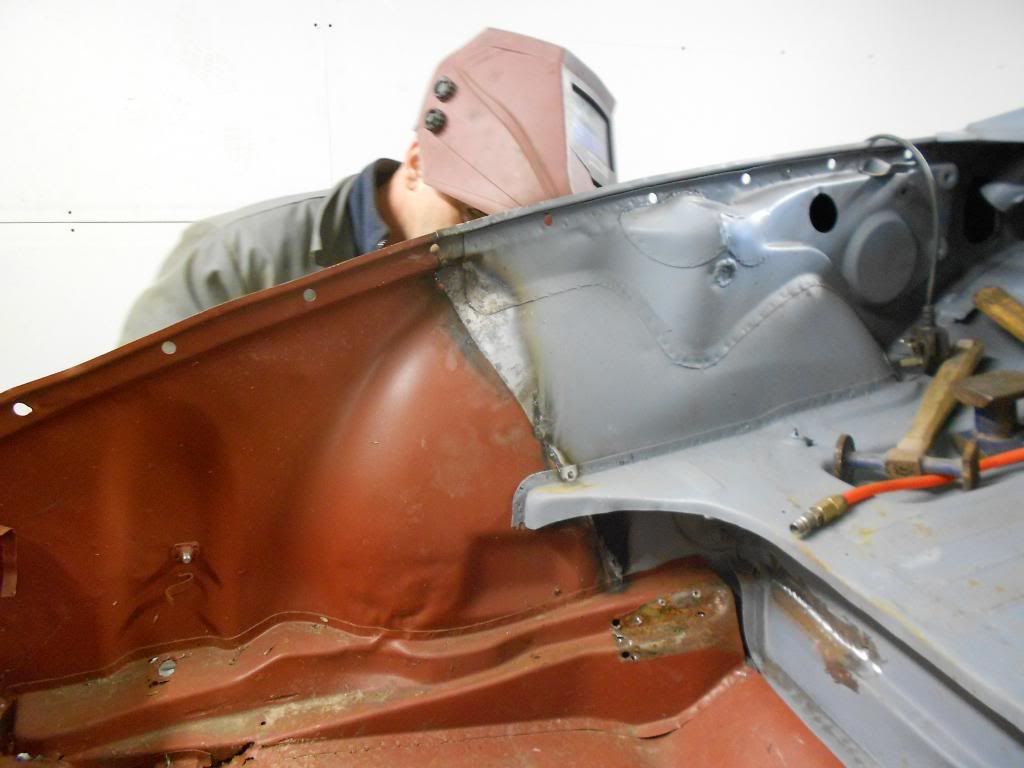
The most exciting (and worrying - for me) was to see how good or bad the front end was as we knew there had been previous accident damage to the front right.

Image

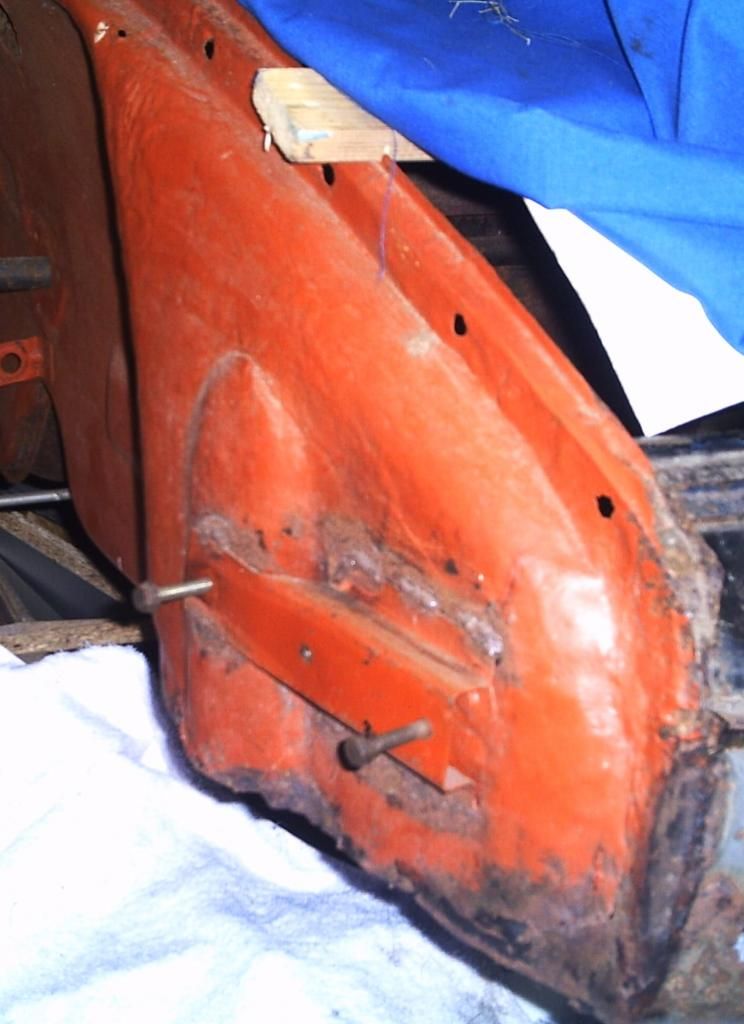
And there hadn't been much holding everything together as you may remember.

Image

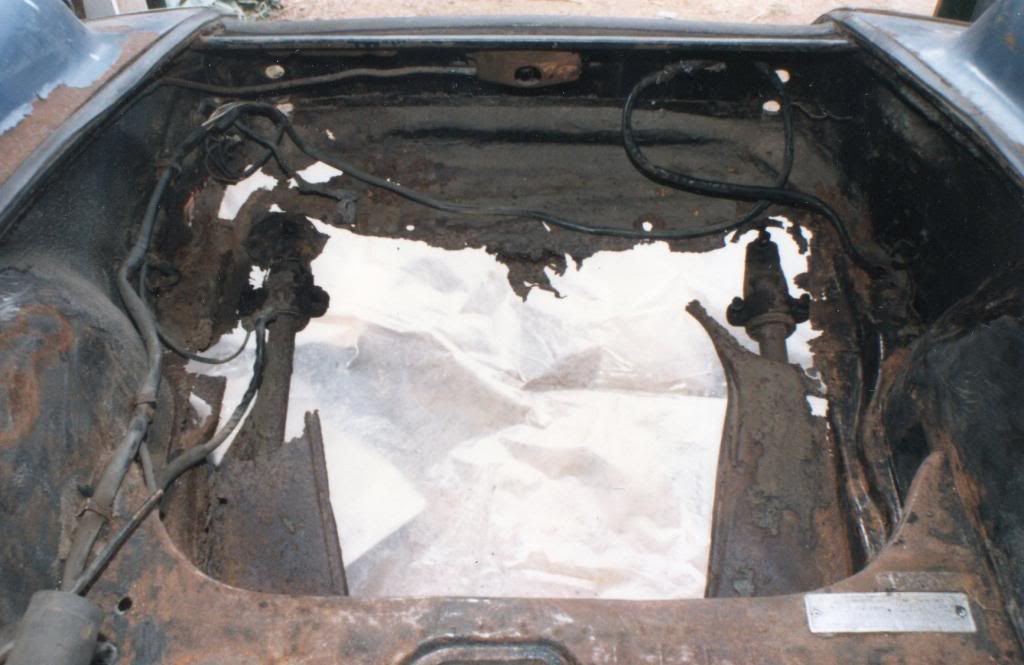
Amazingly, all the lower suspension brackets lined up perfectly with the plates so no problem at all. It was this damage, together the total absence of the front lower metal and the rotted away rear inner wings, that made me buy the Yellow Canary. The plan had always been to transplant in the whole 912 front tub into the 911. As a rigid complete section (albeit with minor dings, dents and minor grot) it was considered the best way forward as new panels are not available. Much thought went into where to cut to keep most strength on completion. This is the way we have gone about it. After mounting the complete original shell onto the plates, John started cutting, then fitting and finally welding.

Image

Image

Image

Image


Image


Image


Image

Image


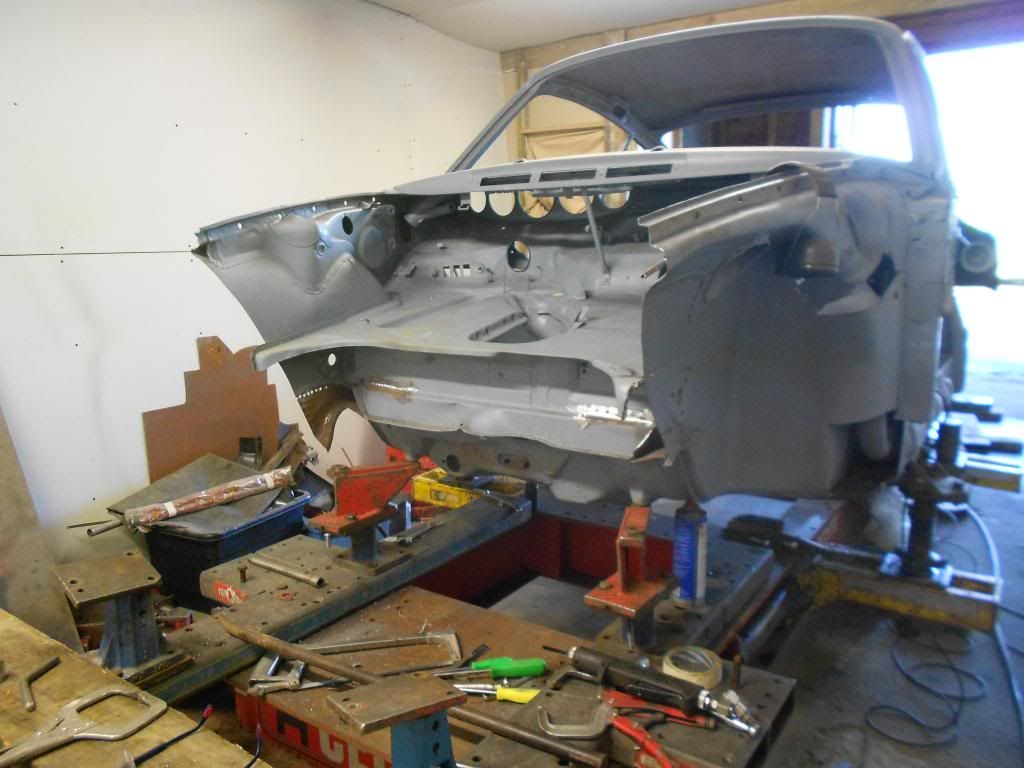
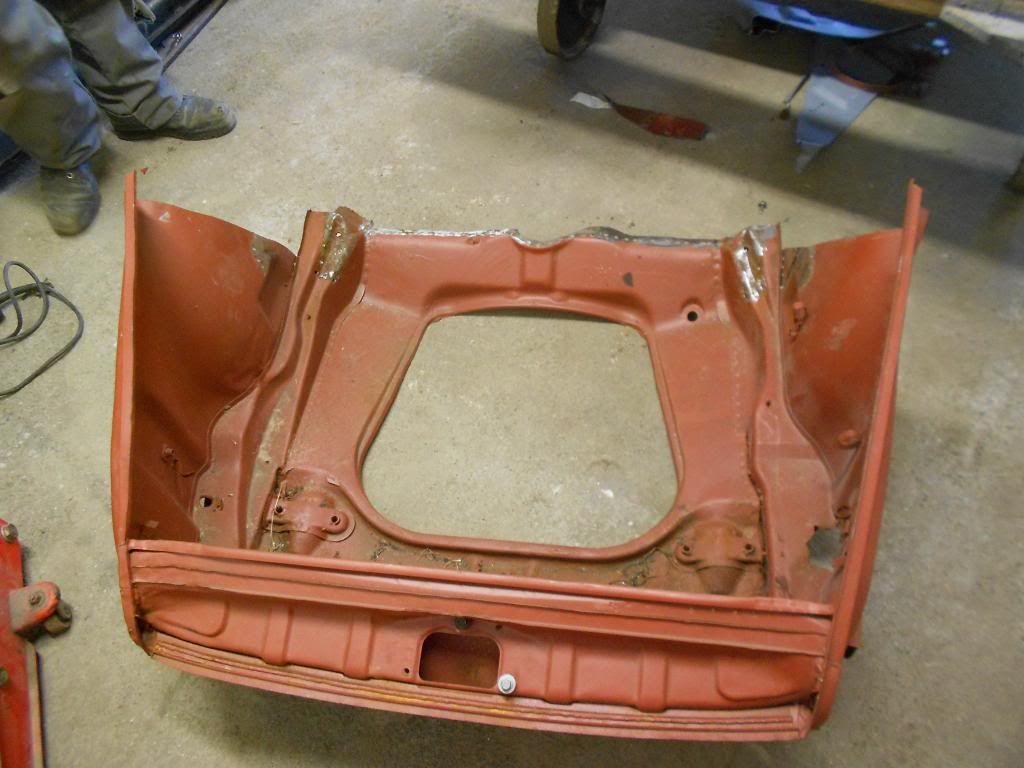
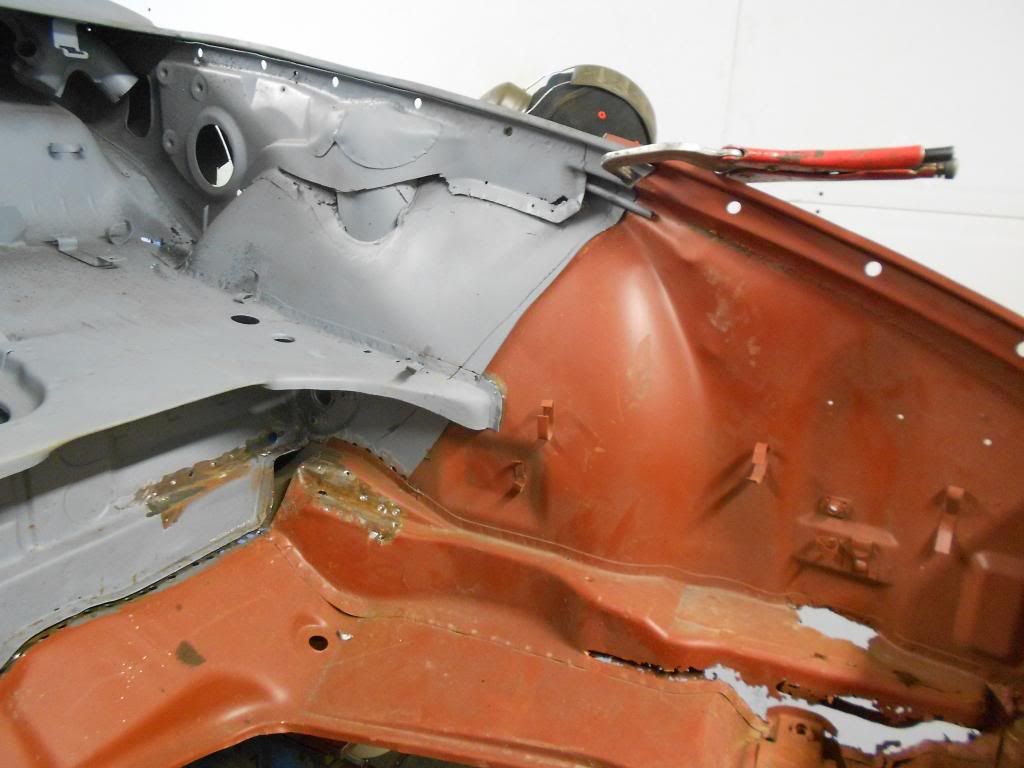
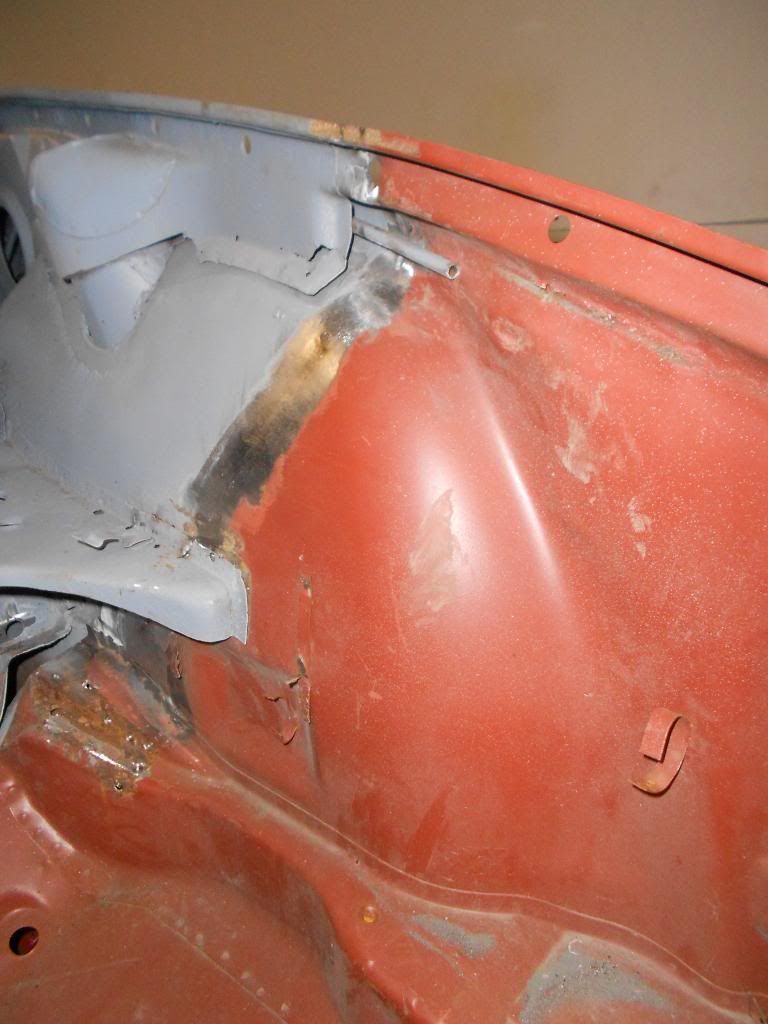
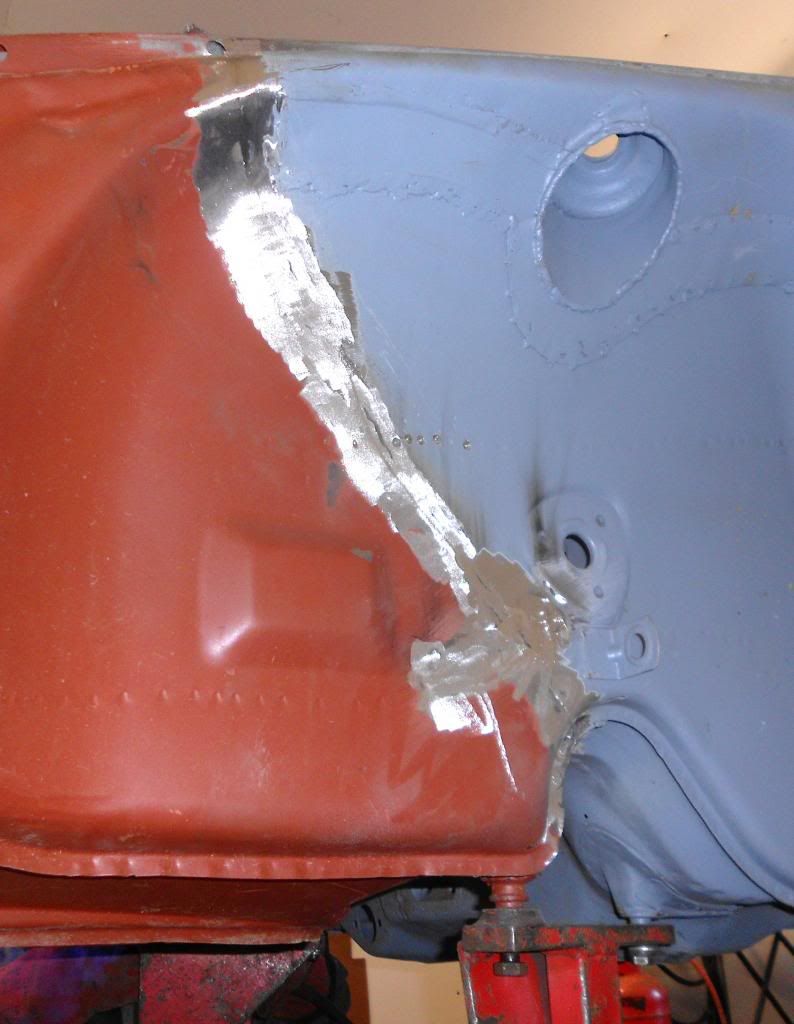
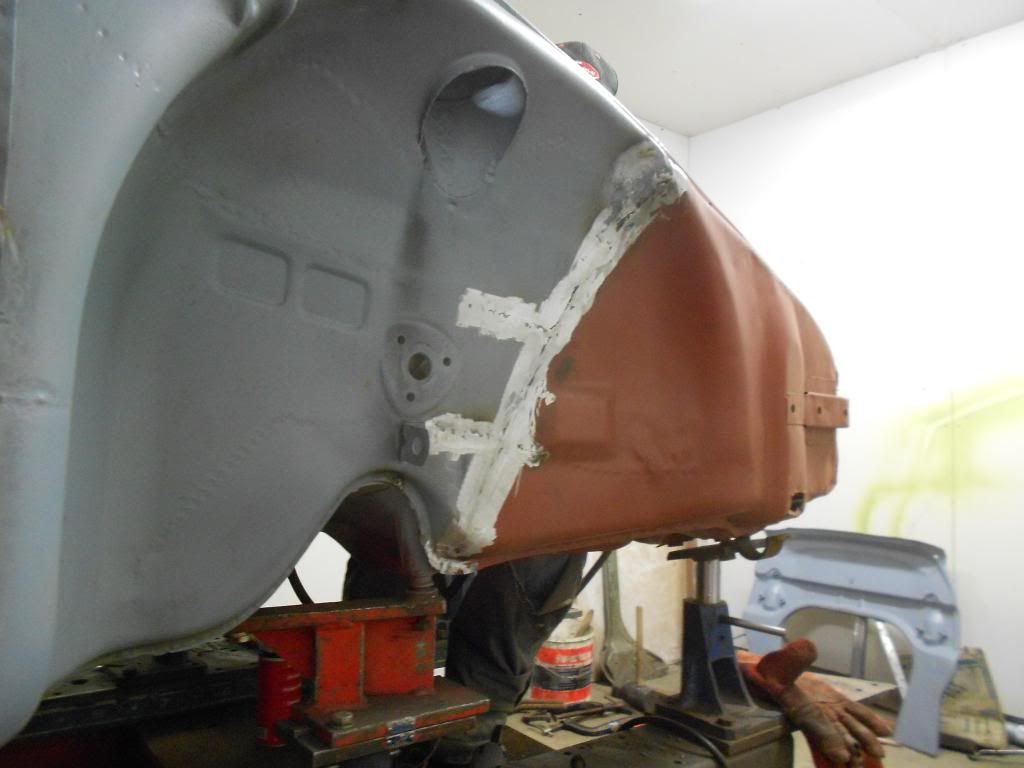
There is still a fair bit of finishing to do but it is now there, correct and solid. We plan to replace the front part of the suspension pan with a new panel and this is being done as I write this. There are still some significant minor repairs to be done but I am very pleased with the way everything has turned out.

I have refurbished the window frames with new quarter-light rubbers (bit fiddly) and and used new felts but kept everything as original as I can. The chromed brass doesn't stand up to very close scrutiny but it has survived the 48 years amazing well for our climate. And those 'wedge' frames are a treasure.

The front suspension has been prepped and and painted with POR15 Gloss Black and now awaits new bushes.

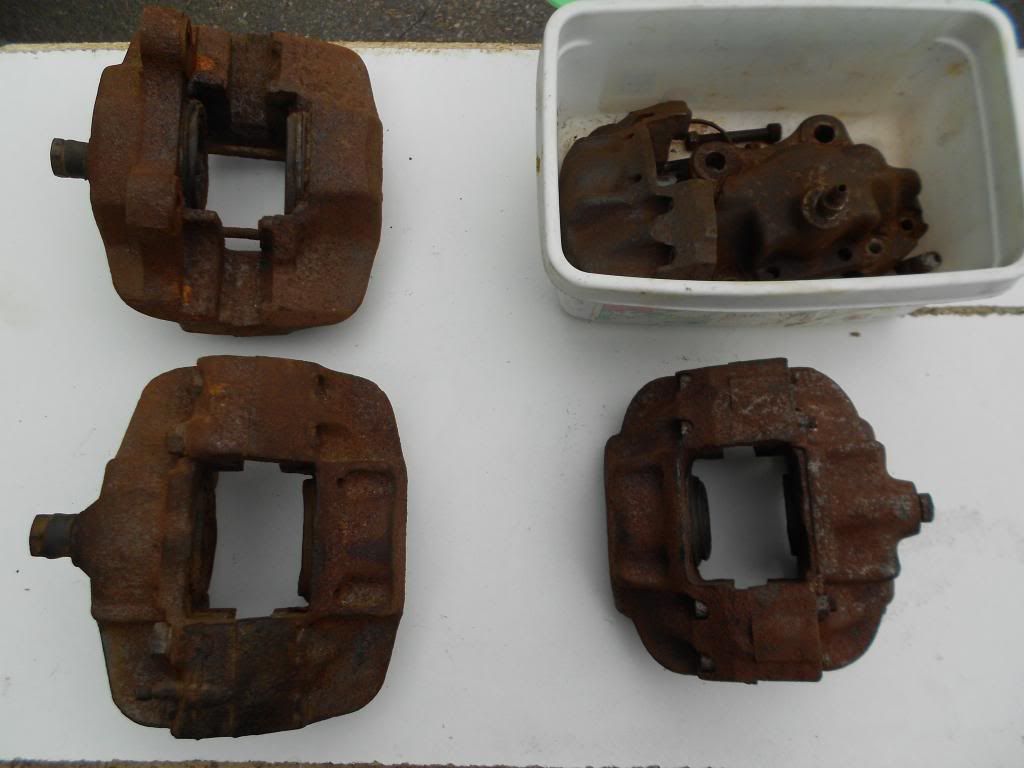
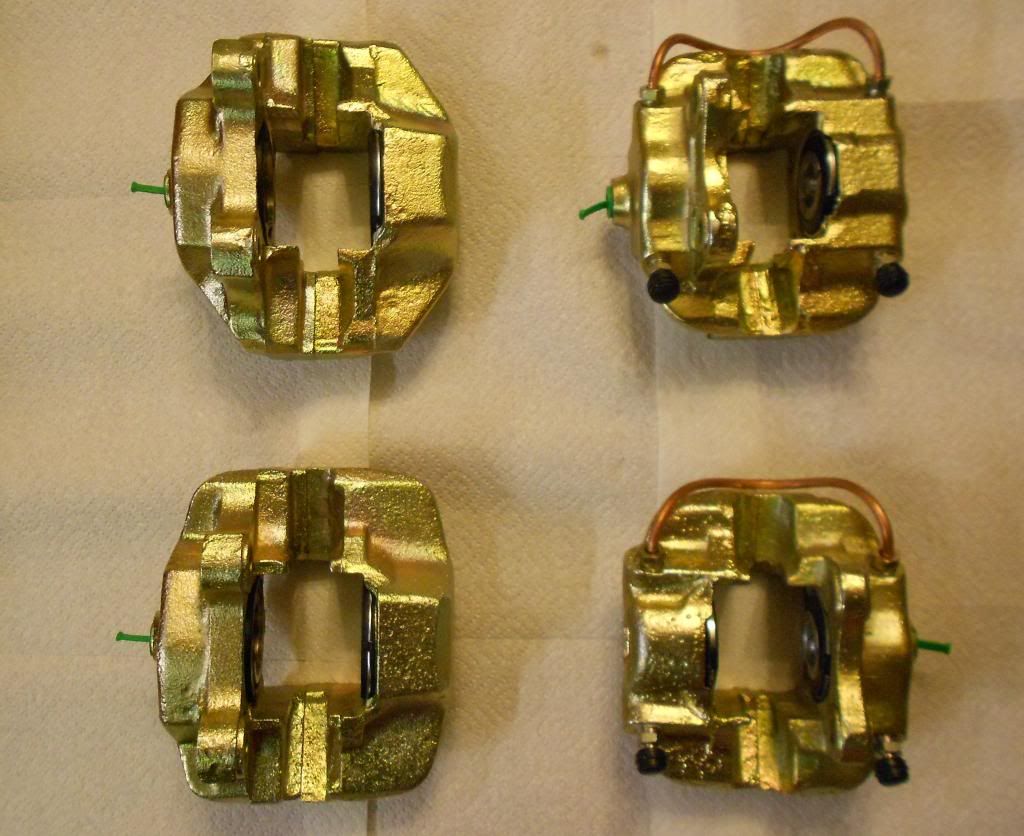
The calipers have been rebuilt by Classic Car Automotive and what a difference!

Image

Image

I have checked out the steering rack and as it all seems A1 I have just cleaned it up. There is nothing so satisfying than taking a component that is covered in the crud of ages and finding something like new underneath. Can't say the Yellow Canary's rack was as good though.

Image

Image

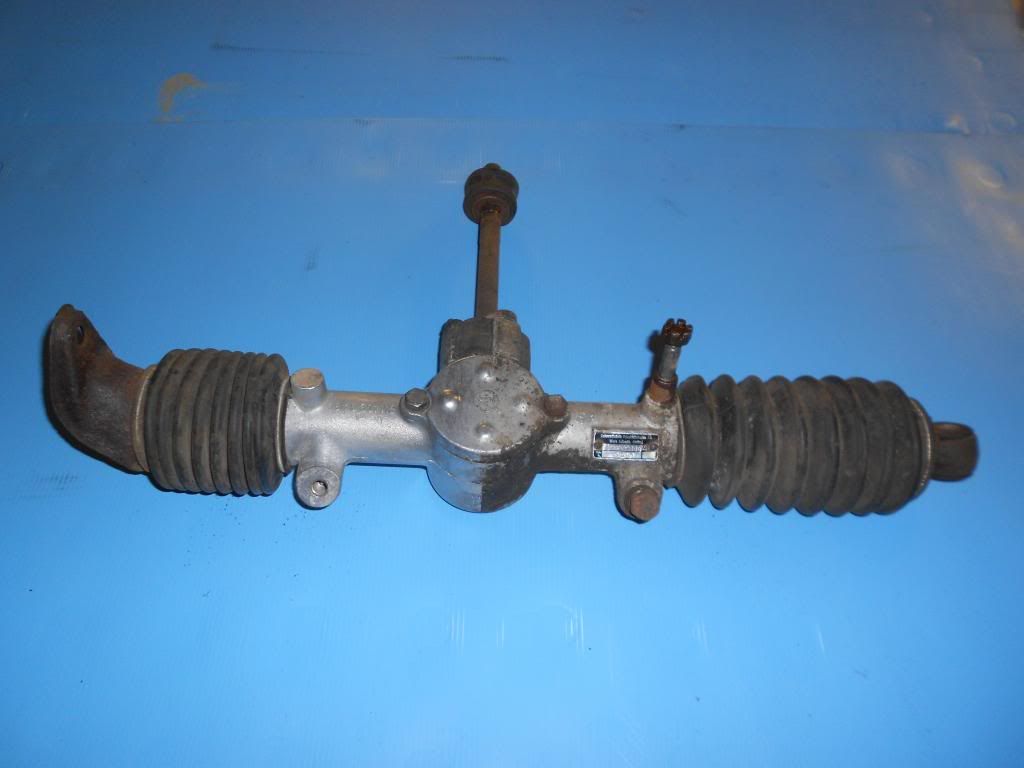
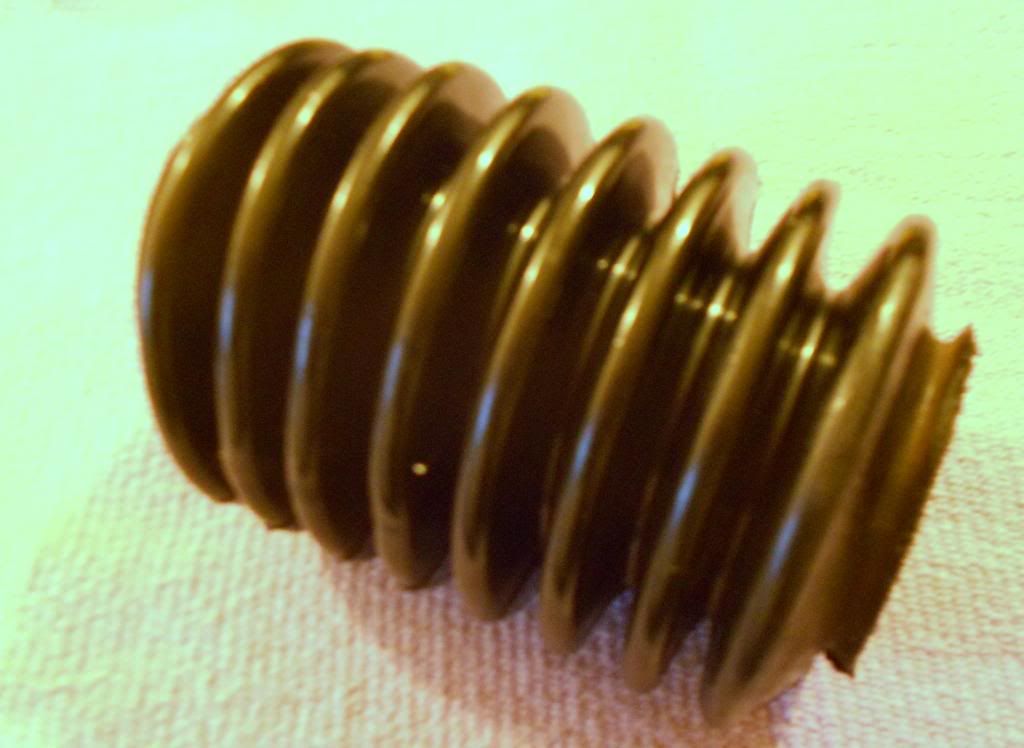
The bellows are unbelievable - they are just like new, supple and totally undamaged. As I have said before, I find the quality of rubber superb.

Image

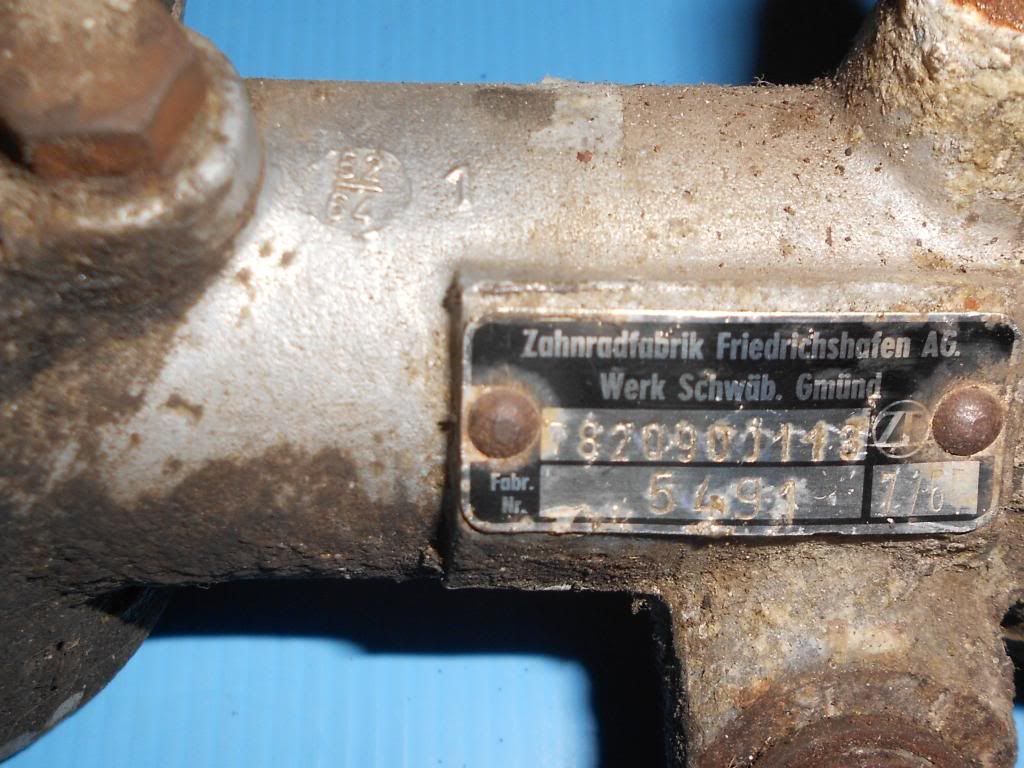
The box is interesting. the casting has a date on it of 52/64 though it was assembled in July '65. I see that ZF were based in Gumnd which I had not realised.

More anon.

Ian


______________________________

1965 RHD 911 Golfblau
2001 3.2 Boxster (sleeping)
Last edited by DEEMAN on Fri Mar 21, 2014 2:44 pm, edited 2 times in total.
72911E
I luv DDK!
Posts: 817
Joined: Fri May 23, 2008 5:01 am
Location: SW London

Re: 1965 RHD 911 restoration started

Post by 72911E »

Great progress Ian, keep going!
'72 911E Coupe RHD
'72 911S Coupe RHD
cubist
The Fenland Feltcher
Posts: 4044
Joined: Wed Dec 03, 2003 12:48 pm

Re: 1965 RHD 911 restoration started

Post by cubist »

Just reread from the start. Excellent stuff!
C U B I S T - 1 1 1 5

'83 Triumph Acclaim - 3sp Auto (cat D)
Singer 3232 - Titanium bobbin, Autothread
'67 Gresham Flyer - Puncture, rear
Sherbet Lemons - 4oz, loose
Motorola - PG 2000, locked
Gary71
Nurse, I think I need some assistance
Posts: 10322
Joined: Wed Mar 31, 2004 1:27 pm
Location: Cheshire
Contact:

Re: 1965 RHD 911 restoration started

Post by Gary71 »

Excellent! :)
911hillclimber
Nurse, I think I need some assistance
Posts: 19023
Joined: Mon Mar 10, 2008 6:26 pm
Location: West Midlands

Re: 1965 RHD 911 restoration started

Post by 911hillclimber »

Indeed, great to see, DIY restoration.
Keep going, great pictures speak a 1000 words!
73T 911 Coupe, road/hillclimber 3.2L
Lola t 492 / 3.2 hillclimb racer
Boxster 987 Gen II 2.9
DEEMAN
DDK forever
Posts: 672
Joined: Tue Jan 11, 2011 10:29 pm
Location: SCOTLAND

Re: 1965 RHD 911 restoration started

Post by DEEMAN »

Having welded the new front section in place, the next job was to correct the right hand turret position. It was 6mm inboard which must have happened in the accident years ago and never been rectified properly. Space is a bit limited in the 'warm' part of the workshop so the car and Celette had to be moved back so the dozer could be hooked up.

Image

I gather it took a bit of doing but the upper mount is now back in its correct position.

Image

Now that the front end transplant is finished and the car is back on the rotisserie, the towers and plates have been returned to Celette. I cannot say enough about how helpful and understanding they have been. We had the towers/plates for two weeks (which turned out to be three) and there was no way we could have done this without their help.
The idea is now to progressively work along the right hand side. There are many places that need minor attention but the fitting of the door, the slam panel and reworking the rear wing (from four different pieces), will prove a challenge for John. Is he bothered - nah!


I need to retract my comments on the good condition of the steering rack. Not that it is bad but the outer shaft bearing proved useless. The seal needs replacing as does the steering shaft couple. Luckily I have replacements. The upper bearing is also suspect so I am changing it and using the '67 type shaft which also has an almost new rubber coupling on it. More money saved.

Image

A point to note here is the shape of the castings. The '64 type has no circular taper surface for the boot to fit onto. It is much smaller in diameter and I guess that it was modified because dirt and water sat on the seal and slowly digressed into the bearing. Here it is (stripped case) compared to the '66 case off Yellow Canary and a '67 case that I have (now surplus to requirements). The earliest casting is not shown in the 64-68 Parts Book.

Image

I have painted the front suspension components and Chris Flavell says he can put new Silentbloc bushes on the torsion arms for me using reconditioned outer shells and leaving the original inner sleeve in place. Anyone had experience of such a set up?

Ian
Last edited by DEEMAN on Fri Mar 21, 2014 2:56 pm, edited 2 times in total.
Post Reply