

I think the other supplier you are thinking of is Energas (http://www.energas.co.uk/gases-industrial.html) - I've got one really local to me - if I go to a full oxy-acetylene setup I'll go to them for the gas. However I've paid for this mini-setup now - I either want to make it work or get my money back. It's most likely I'm doing something wrong (it's happened before...) but I specifically bought it to weld steel and I'm not convinced it's up to the job.
I appreciate what you're saying about getting through the bottles but in the short term I'm not anticipating doing too much more gas welding (anything hidden will be MIG'd) - it was just for the outer panels
1987 3.2 Carrera Backdate project - Sladeys hotrod
Moderator: Bootsy
-
sladey
- Nurse, I think I need some assistance
- Posts: 9305
- Joined: Sat Apr 23, 2005 9:08 pm
- Location: Nottingham, UK
Re: 1987 3.2 Carrera Backdate project
The simple things you see are all complicated
I look pretty young but I'm just backdated yeah
I look pretty young but I'm just backdated yeah
-
sladey
- Nurse, I think I need some assistance
- Posts: 9305
- Joined: Sat Apr 23, 2005 9:08 pm
- Location: Nottingham, UK
Re: 1987 3.2 Carrera Backdate project
Small update

The simple things you see are all complicated
I look pretty young but I'm just backdated yeah
I look pretty young but I'm just backdated yeah
-
jury
- I used to have a life, then came DDK
- Posts: 3530
- Joined: Mon Apr 16, 2007 9:06 pm
- Location: Portland, Oregon, USA
Re: 1987 3.2 Carrera Backdate project
Nice clock Mark 
# 465
1967 912 Polo Red
1968 912/11 RAL 7001 ' MOD ROD '
1990 964 C2 Velvet Red
1991 VW Vanagon GL (SOLD - Vanagone)
2017 Coleman CT200U
“It’s not where you’re from, it's where you’re at”
1967 912 Polo Red
1968 912/11 RAL 7001 ' MOD ROD '
1990 964 C2 Velvet Red
1991 VW Vanagon GL (SOLD - Vanagone)
2017 Coleman CT200U
“It’s not where you’re from, it's where you’re at”
-
hot66

- Moderator
- Posts: 19171
- Joined: Tue Nov 11, 2003 4:17 pm
- Location: North Yorkshire
Re: 1987 3.2 Carrera Backdate project
I've said it on another thread ..... Mark, your car is one of my favorite ones on DDK. It's a like a living thing  I love a car that is actually used as a car whilst also being repaired / improved as time & the miles go by
  If only it was LHD it would be perfect
..... Mark, your car is one of my favorite ones on DDK. It's a like a living thing I love a car that is actually used as a car whilst also being repaired / improved as time & the miles go by If only it was LHD it would be perfect James
1973 911 2.4S
1993 964 C2
2010 987 Spyder
1963 Honda C100 Supercub
Its not how fast you go, but how you go fast
1973 911 2.4S
1993 964 C2
2010 987 Spyder
1963 Honda C100 Supercub
Its not how fast you go, but how you go fast
-
sladey
- Nurse, I think I need some assistance
- Posts: 9305
- Joined: Sat Apr 23, 2005 9:08 pm
- Location: Nottingham, UK
1987 3.2 Carrera Backdate project
thanks Chrisjury wrote:Nice clock Mark
Thanks for the kind comments James - i really get so much out of the car in so many ways.
The simple things you see are all complicated
I look pretty young but I'm just backdated yeah
I look pretty young but I'm just backdated yeah
-
Nige

- Nurse, I think I need some assistance
- Posts: 6676
- Joined: Wed Nov 26, 2003 9:11 pm
- Location: Denby, Derbyshire
Re: 1987 3.2 Carrera Backdate project
all I see is the filth on the wiper stalk, eeuurgh Marky Mark's dead skin.
Nice clock BTW.
Nice clock BTW.
-
sladey
- Nurse, I think I need some assistance
- Posts: 9305
- Joined: Sat Apr 23, 2005 9:08 pm
- Location: Nottingham, UK
Re: 1987 3.2 Carrera Backdate project
OK back to metalwork......
In my last metalwork post I showed the support piece I'd made to go down the inside of the wing. It had some cuts in it that needed welding up. Whilst I'm pleased with my progress on the panel beating stuff, I still apparently can't weld for sh1t!
I welded up the slits I had made and apart from a bit of drizzle-art it went OK(ish). When I ground the welds back there were a couple of bits of daylight peaking through so I thought I'd weld them up. Here is the result:-

Not good.
The problem was partly down to me not looking after the wire in the welder - it had become a bit cacked up and at lower speeds the wire feed was slipping. I had my birthday last week

and my present arrives this coming Monday - a portamig welder. I understand a bad workman always blames his tools - I'm not blaming them but I do like having good tools to work with. Hence I've held off from doing any more welding until the new welder arrives.
In the meantime I've made a piece that will replace by drizzle-art crap.


I'm really enjoying learning from my mistakes. With this little piece I started out with a completely straight piece of steel. After I'd spent ages beating it into shape it occurred to me that it would have been much easier to start with a hockey-stick shaped piece and fold a curved flange onto it. As I didn't need too much curve in the piece it worked out OK though
Another piece I've been working on is on the top of the wing.
I made this piece the other week

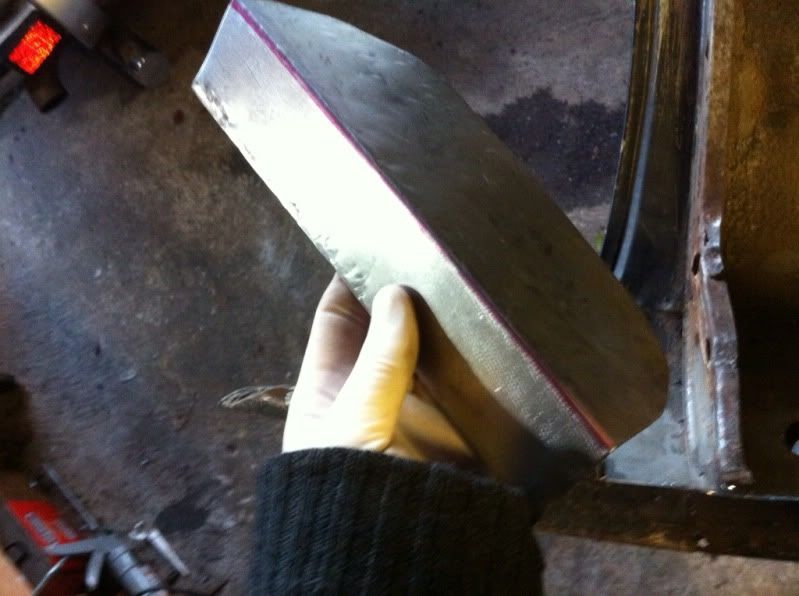
It wasn't easy as the top has a few curves in different directions which was hard to achieve. Once I'd finished it although I was pleased with the overall shape, there were too many hammer blows in the metal - if I ever managed to planish them out the stell would get too thin.
So I decided to scrap that piece and start again

This time I also wanted to put in a ridge that runs along the inside top of the wing (along the bit that the bolt holes go through) - I hadn't got round to this in version 1

Here it with the ridge in place but I haven't done the main fold yet

Lots of shaping, twisting and beating later I ended up with this

I'm pleased with teh panel fit

Compared to Mark 1 (which is on the right - you can see the hammer marks)

I trimmed the edges straight to make it easier to cut the metal out when fitting it in

I've got some more work to do around the front sidelight units - that involves pieces joined together - should be interesting....
In my last metalwork post I showed the support piece I'd made to go down the inside of the wing. It had some cuts in it that needed welding up. Whilst I'm pleased with my progress on the panel beating stuff, I still apparently can't weld for sh1t!
I welded up the slits I had made and apart from a bit of drizzle-art it went OK(ish). When I ground the welds back there were a couple of bits of daylight peaking through so I thought I'd weld them up. Here is the result:-
Not good.
The problem was partly down to me not looking after the wire in the welder - it had become a bit cacked up and at lower speeds the wire feed was slipping. I had my birthday last week
and my present arrives this coming Monday - a portamig welder. I understand a bad workman always blames his tools - I'm not blaming them but I do like having good tools to work with. Hence I've held off from doing any more welding until the new welder arrives.
In the meantime I've made a piece that will replace by drizzle-art crap.
I'm really enjoying learning from my mistakes. With this little piece I started out with a completely straight piece of steel. After I'd spent ages beating it into shape it occurred to me that it would have been much easier to start with a hockey-stick shaped piece and fold a curved flange onto it. As I didn't need too much curve in the piece it worked out OK though
Another piece I've been working on is on the top of the wing.
I made this piece the other week
It wasn't easy as the top has a few curves in different directions which was hard to achieve. Once I'd finished it although I was pleased with the overall shape, there were too many hammer blows in the metal - if I ever managed to planish them out the stell would get too thin.
So I decided to scrap that piece and start again
This time I also wanted to put in a ridge that runs along the inside top of the wing (along the bit that the bolt holes go through) - I hadn't got round to this in version 1
Here it with the ridge in place but I haven't done the main fold yet
Lots of shaping, twisting and beating later I ended up with this
I'm pleased with teh panel fit
Compared to Mark 1 (which is on the right - you can see the hammer marks)
I trimmed the edges straight to make it easier to cut the metal out when fitting it in
I've got some more work to do around the front sidelight units - that involves pieces joined together - should be interesting....
The simple things you see are all complicated
I look pretty young but I'm just backdated yeah
I look pretty young but I'm just backdated yeah
-
964RS
- Nurse, I think I need some assistance
- Posts: 6556
- Joined: Sun Sep 02, 2007 9:53 pm
- Location: Midlands
- Contact:
Re: 1987 3.2 Carrera Backdate project
Having seen this work in the flesh I can honestly say Sladey's work is of the highest level.
I've never seen someone repair a repair piece so well
Keep that ruddy watch away from the new welder....
I've never seen someone repair a repair piece so well
Keep that ruddy watch away from the new welder....
----------------------------------------------------
Jason
https://www.SweepingHand.co.uk
Rolex & Omega Watch Purchases & Sales

Jason
https://www.SweepingHand.co.uk
Rolex & Omega Watch Purchases & Sales

-
Gary71
- Nurse, I think I need some assistance
- Posts: 10681
- Joined: Wed Mar 31, 2004 1:27 pm
- Location: Cheshire
- Contact:
Re: 1987 3.2 Carrera Backdate project
Nice work Sladey Looks like you had the welder on kill rather than stun 
You won't regret the Portamig, as you say at least any problems you have after that are entirely yours!
Looks like you had the welder on kill rather than stun You won't regret the Portamig, as you say at least any problems you have after that are entirely yours!
-
sladey
- Nurse, I think I need some assistance
- Posts: 9305
- Joined: Sat Apr 23, 2005 9:08 pm
- Location: Nottingham, UK
1987 3.2 Carrera Backdate project
Thanks for the comments. VERY excited about the portamig
The simple things you see are all complicated
I look pretty young but I'm just backdated yeah
I look pretty young but I'm just backdated yeah
-
Mike
- Nurse, I think I need some assistance
- Posts: 5129
- Joined: Wed May 25, 2005 12:39 pm
- Location: Hampshire
Re: 1987 3.2 Carrera Backdate project
smoking!
cheers, Mike.
previously..
1994 968 Club Sport Riviera Blue
1994 993 C2 Carrera Riviera Blue
1972 911S to Martini RSR Prototype Spec
1973 911E to RS Lightweight Specification
1981 924 Carrera GT ex Mexborough car
3.2 Carrera Sport x2
previously..
1994 968 Club Sport Riviera Blue
1994 993 C2 Carrera Riviera Blue
1972 911S to Martini RSR Prototype Spec
1973 911E to RS Lightweight Specification
1981 924 Carrera GT ex Mexborough car
3.2 Carrera Sport x2
-
johnM
- I need to get out more!
- Posts: 3398
- Joined: Mon Apr 03, 2006 10:27 pm
- Location: Lake District
Re: 1987 3.2 Carrera Backdate project
Looking good Mark. I must admit metal work scares the sh1t out of me. Much respect.
Kind regards.
Kind regards.
John
1970 2.2E Coupe.
2004 996 GT3 mkII
2015 Skoda Octavia VRS TSI DSG.
2021 Toyota GR Yaris Circuit Pack
1970 2.2E Coupe.
2004 996 GT3 mkII
2015 Skoda Octavia VRS TSI DSG.
2021 Toyota GR Yaris Circuit Pack
-
sladey
- Nurse, I think I need some assistance
- Posts: 9305
- Joined: Sat Apr 23, 2005 9:08 pm
- Location: Nottingham, UK
Re: 1987 3.2 Carrera Backdate project
It needn't. Material cost are so low that you can go through quite a few learning curves and throw the results away and it's just cost you a fiver and some time. Total tools cost has been under £100. Barry's introduction day was great, and I've got a good DVD as well which was useful.
I suppose you've got to enjoy it too in order to be interested enough to persevere. I'm really loving it at the moment
I suppose you've got to enjoy it too in order to be interested enough to persevere. I'm really loving it at the moment
The simple things you see are all complicated
I look pretty young but I'm just backdated yeah
I look pretty young but I'm just backdated yeah
-
sladey
- Nurse, I think I need some assistance
- Posts: 9305
- Joined: Sat Apr 23, 2005 9:08 pm
- Location: Nottingham, UK
Re: 1987 3.2 Carrera Backdate project
Some more progress....
Eventually I knew I'd have to progress beyond fannying around with bits of metal and begin cutting stuff off the wing. Gulp. I measured loads of times but my big difficulty is that I can't trial fit at the moment. I aim to do a proper trial fit before the final paint - I accept at that stage I might have to do more cutting and shutting but c'est la vie.
Here's the bottom of the wing for which I've made the repair section. You can see my scribed line at about 45 degrees

Just to remind you this is one of a pair of wings I picked up at husborne Crawley for £50 each. I put some masking tape on to make it easier to see

I started by cutting the very edges with a fine cutting disc - because at each edge it would have to go through double or triple thickness the Aviation snips weren't an option. As I was only cutting the first inch or so I was able to be quite accurate. I chopped away some of the excess prior to starting with the tin snips

I then used the tin snips to cut carefully to the line. Cutting with Aviation Snips was way easier than I remembers. I always panicked that I could never work out what 'left' and 'right' meant when decide which aviation snips to use, but when it came down to it there were only one pair that gave me the space to do the jobs so they had to be the right ones. This is it half way through the cut (I folded the cut metal back after each cut to make it easier for the next one).

The aviation snips were surprisingly easy and very accurate. This is after the cut

It did surprise me how the snips distorted the line. A bit of hammer and dolly on that though and it came back into line quite easily.
Eventually I knew I'd have to progress beyond fannying around with bits of metal and begin cutting stuff off the wing. Gulp. I measured loads of times but my big difficulty is that I can't trial fit at the moment. I aim to do a proper trial fit before the final paint - I accept at that stage I might have to do more cutting and shutting but c'est la vie.
Here's the bottom of the wing for which I've made the repair section. You can see my scribed line at about 45 degrees
Just to remind you this is one of a pair of wings I picked up at husborne Crawley for £50 each. I put some masking tape on to make it easier to see
I started by cutting the very edges with a fine cutting disc - because at each edge it would have to go through double or triple thickness the Aviation snips weren't an option. As I was only cutting the first inch or so I was able to be quite accurate. I chopped away some of the excess prior to starting with the tin snips
I then used the tin snips to cut carefully to the line. Cutting with Aviation Snips was way easier than I remembers. I always panicked that I could never work out what 'left' and 'right' meant when decide which aviation snips to use, but when it came down to it there were only one pair that gave me the space to do the jobs so they had to be the right ones. This is it half way through the cut (I folded the cut metal back after each cut to make it easier for the next one).
The aviation snips were surprisingly easy and very accurate. This is after the cut
It did surprise me how the snips distorted the line. A bit of hammer and dolly on that though and it came back into line quite easily.
The simple things you see are all complicated
I look pretty young but I'm just backdated yeah
I look pretty young but I'm just backdated yeah
-
sladey
- Nurse, I think I need some assistance
- Posts: 9305
- Joined: Sat Apr 23, 2005 9:08 pm
- Location: Nottingham, UK
Re: 1987 3.2 Carrera Backdate project
Next we have a hand-held trial fit - looking OK so far

Before I did any joining I als had to trial fit the support section at the back.

Yes I know there's some 'blob' welding on that piece. If you remember I buggered up that piece before, but I made a new piece to repair the repair piece (!) when welding that on where it was new metal to new metal I got some nice welds that I was able to grind back to a good finish. However where I'd previously blown through it was a bit like paper. I ended up building this up using the drizzle-art technique - though it has to be said the portamig welder produces much more solid blobs that the old one ever did. As this bit is never going to be seen I decided to leave the blobs as they were rather than grind them back again and weaken them again
With it clamped into place I did the first of the tack welds

The tack welds went really well (didn't take a photo of them all in place) so I was feeling pretty smug at this stage.
I then went on to lay the seam welds. I practiced first to make sure the settings were OK - I practiced on two bits of scrap steel I had lying around. Laid a lovely neat weld. So I went on to the wing itself and started.
First weld - I blew a hole! Second weld - I blew a hole! Feck Feck Feck Feck Feck Feck Feck!!!! I moved along and ran an OK weld. And then another one. I then went back and stitched up the holes. It seems that the metal I was welding onto was thinner than my practice stuff (even the metal on the new bit I'd made) I also think where there was a tiny gap I managed to hit the edge - it doesn't like edges and blew a hole. with the better ones I started slightly to one side and stitched it across. Suffice to say it was a learning experience and I ended up with this

Although it's not pretty, the penetration's pretty good (being able to see the other side is a help). Where it wasn't so good I was able to fill it in. After grinding back with a flapper disc I ended up with this

Which overall I'm pretty pleased with.
I then went to add in the support piece at the back. I had another problem here in that the original support piece I was welding onto was thin and there was also a bit of a gap I would have to bridge. Again I'm happy with the result - it aint pretty but it is solid and it won't be seen.

Excuse the crappy pics but this is it from the other side

And here is a sideshot of the finished article

I'm going to be lead-loading it so I think this is as good as it needs to be for the time being.
Before I did any joining I als had to trial fit the support section at the back.
Yes I know there's some 'blob' welding on that piece. If you remember I buggered up that piece before, but I made a new piece to repair the repair piece (!) when welding that on where it was new metal to new metal I got some nice welds that I was able to grind back to a good finish. However where I'd previously blown through it was a bit like paper. I ended up building this up using the drizzle-art technique - though it has to be said the portamig welder produces much more solid blobs that the old one ever did. As this bit is never going to be seen I decided to leave the blobs as they were rather than grind them back again and weaken them again
With it clamped into place I did the first of the tack welds
The tack welds went really well (didn't take a photo of them all in place) so I was feeling pretty smug at this stage.
I then went on to lay the seam welds. I practiced first to make sure the settings were OK - I practiced on two bits of scrap steel I had lying around. Laid a lovely neat weld. So I went on to the wing itself and started.
First weld - I blew a hole! Second weld - I blew a hole! Feck Feck Feck Feck Feck Feck Feck!!!! I moved along and ran an OK weld. And then another one. I then went back and stitched up the holes. It seems that the metal I was welding onto was thinner than my practice stuff (even the metal on the new bit I'd made) I also think where there was a tiny gap I managed to hit the edge - it doesn't like edges and blew a hole. with the better ones I started slightly to one side and stitched it across. Suffice to say it was a learning experience and I ended up with this
Although it's not pretty, the penetration's pretty good (being able to see the other side is a help). Where it wasn't so good I was able to fill it in. After grinding back with a flapper disc I ended up with this
Which overall I'm pretty pleased with.
I then went to add in the support piece at the back. I had another problem here in that the original support piece I was welding onto was thin and there was also a bit of a gap I would have to bridge. Again I'm happy with the result - it aint pretty but it is solid and it won't be seen.
Excuse the crappy pics but this is it from the other side
And here is a sideshot of the finished article
I'm going to be lead-loading it so I think this is as good as it needs to be for the time being.
The simple things you see are all complicated
I look pretty young but I'm just backdated yeah
I look pretty young but I'm just backdated yeah