Driving an 1969 911 to China

Chat away, Classic Porsche related or otherwise

Moderators: hot66, Miggs, 58A - 71E, impmad2000, drummerboytom, Barry, Helen, Viv_Surby, Derek, KS, abm914, Mike Usiskin

CarreraToChina
DDK Seasoned Poster
Posts: 31
Joined: Sat Nov 18, 2006 12:30 pm
Contact:

Post by CarreraToChina »

car broke down in parco nazionale di Sila
Image

And that concludes our trip to Palermo ;)

a few weeks ago, we went on our first oldtimer-trip with a dutch organisation http://www.deklassieke912.nl . Together with about 20 other porsches we rolled through some fantastic countryside in holland. :)

Image


we have been writing to some magazines lately, and so far we have two definite positive answers: Porsche Excellence magazine has agreed to publish two big articles about our adventure, and a local men's magazine here in Belgium (i think you guys know it too: MAXIM magazine) has agreed to two big articles plus a daily blog on their website. :) Added to that, they're going to help us get in touch with some big sponsors, and TV-stations, etc... so we're on a roll.

We are making a deal at this moment with http://www.fascinationporsche.com to bring out a full DVD about our trip! :thumbup


more to come :)

cheers, Jan
CarreraToChina
DDK Seasoned Poster
Posts: 31
Joined: Sat Nov 18, 2006 12:30 pm
Contact:

Post by CarreraToChina »

We finally decided to do something about the shabby electrics in our car. We had a non-working rear light, and some fuses kept popping. After disconnecting every little electrical appliance, we traced the faulty wiring to the rear engine compartment. We dismantled the whole rear loom, and compared it to the electrical scheme for our car we found online. We also checked the condition of every wire and replaced bad/worn cables. We also had one broken relay switch (rear window heating realy).

After mounting the whole loom back in the car, we still had one fuse popping every time we put on the lights. We opened up the front headlight buckets and found some crappy repairs from a previous owner. We replaced the standing-lights wires, and rerouted them through a new little hole in the chassis.

Everything now works like it should.

Image
CarreraToChina
DDK Seasoned Poster
Posts: 31
Joined: Sat Nov 18, 2006 12:30 pm
Contact:

Post by CarreraToChina »

In this winterpreparation we decided to change the suspension as well, and our trusty sponsor Steven from <a href="http://www.bikesetup.be" target=blank>bikesetup</a> has donated 4 brand new Bilstein shocks and a Weltmeister Cambermeister to us! Thanks alot Steven, it's really appreciated! Before we could mount the 4 new shocks, we needed to change one of our front struts from a Koni setup to the original Boge strut (which we found at the local breaker). This process was quite straightforward, and we encountered little difficulties doing this. We used a special tool to open up the balljoint. We also had to take off the caliper and front brakelines, so that meant bleeding the front brakes again afterwards.

The installation of the front strut inserts is quite easy, the only problem is the realignment afterwards, which we are going to leave to our mechanics. The inserts simply slide in the strut, after having put a bit of oil in them (to keep them from moving in the strut, and making lots of noise).

The rear suspension is even more straightforward: it's a simple bolt-in. Jack up the car a little to take off the pressure, loosen up two bolts, take out old broken shock, insert new bilstein shock, and voila, you're done.

The car has risen now quite a few cms higher. The old shocks were really worn. It rides a whole lot better as well: it absorbs the bumps in the road way better, and seems to track a lot more accurately. Fantastic!

Image

Image

Image

Image
CarreraToChina
DDK Seasoned Poster
Posts: 31
Joined: Sat Nov 18, 2006 12:30 pm
Contact:

Post by CarreraToChina »

After we changed out the front suspension, it was time to mount the Weltmeister Cambermeister. This is a device which connects the tops of the two front shock towers, and should give extra strength and rigidity to our chassis. It should also make our steering more accurate.

The installation of this device is very easy, and after an hour or so, we were already done. We can now dial in extra negative or positive camber by adjusting the cambermeister.

Image

Image
CarreraToChina
DDK Seasoned Poster
Posts: 31
Joined: Sat Nov 18, 2006 12:30 pm
Contact:

Post by CarreraToChina »

People on the street were starting to notice it: the penetrating essence of a flat-six followed by a grey fog. Knowing that we have about 20.000 miles ahead of us, it seemed advisable to do something about this. A revised engine that could replace ours was found and yesterday and the preparation was started by garage Criel: removing engine and clutchplates, looking for parts to be replaced as well. Result: shuttling between the garage and Joma parts (90min drive back and forth) to buy pressure plate kit (clutch), bushings, seals, spark plugs, etc.
But at least the result will be even more trustworthy than our current engine. The replacement will have hydraulic chain tensioners, a revised cylinder head, new pistons, distributor, clutch pressure plate kit,...
I just can't wait untill we can drive our P911T an listen to the roaring howl of the engine.

We just received the car, and the new engine purrs like a kitten! It's much quieter than the old one, and starts much easier. We have to break it in first though, so no full throttle for a while still.

Image

Image
CarreraToChina
DDK Seasoned Poster
Posts: 31
Joined: Sat Nov 18, 2006 12:30 pm
Contact:

Post by CarreraToChina »

Hi guys,

we're going to have a bunch of 'Carrera To China' polo shirts made! ( www.carreratochina.com )

There's a choice between short sleeved or long sleeved polo shirts. The color is marine blue (darkblue), and the print will be in 'bahama-yellow', or the color that comes closest to that OEM porsche color.

- there will be a small carreratochina logo on the left-side of the chest
- a small carreratochina logo on the sleeve
- a big carreratochina logo on the backside

You can see the polos in the pics under this post. I've put up the logo as well, but in black/white (actual logo will be printed in dark yellow). If the demand is high enough, we are considering offering sweaters as well. So if you'd prefer a sweater, please let us know, and we will try to arrange it.

The prices will depend on the amount of shirts ordered, but we think 30 EUR would be a maximum, and that amount will drop as the order gets bigger.
The polos will be delivered begin februari.

You can place your order by simply replying to this thread or sending me a PM, with these details:

- number of shirts
- short or long sleeved
- sizes! (S-M-L-XL-XXL)
- Name and Address (international orders: please add tel-nr and email-addy)

We will place the order monday 21 january, so you can order untill sunday 20 january! Let this know to your friends too, because the more shirts we order, the cheaper it's gonna be! :)

We thank you very much for supporting our adventure! We don't make a profit out of these shirts, so it's purely a little enhancement of our visibility across the world. :)
Kind regards,
Jan and Erwin

www.carreratochina.com

polo short sleeved:
Image

polo long sleeved:
Image

logo carrera to china:
Image

and one for the road: ;)
Image
CarreraToChina
DDK Seasoned Poster
Posts: 31
Joined: Sat Nov 18, 2006 12:30 pm
Contact:

Post by CarreraToChina »

When we received the car with the new engine, we still had one problem from before: we had strange starting behaviour: it cranked fine, but wouldn't catch. Only when you let the key go back into the 'on' position, the engine caught!

Our first thought was a faulty/worn ignition switch, so we decided to take it out of the car and open it up. We didn't find anything suspicious in the lock, apart from some 40-year-old grease, but other that that, it looked very good! We cleaned and greased it, and mounted it back into the car.

The problem couldn't be in the wiring, because we revised the whole rear loom some time back. On to the ignition parts then: we switched coils and RPM transducers but nothing. The last possible cause was the CDI: it still whined, but could be faulty anyway.

We loaned a Permatune CDI and an original Bosch CDI from some very friendly Porsche enthousiasts, and tried it out: with the Permatune box the engine ignited a couple of times but not enough to have it run. Then we plugged in the Bosch CDI, and the car started right away!

So we knew the culprit then: a broken CDI, probably caused by riding with the wrong coil for a couple of months (the coil we received in Italy). So we sent the cDI off for repairs.

We didn't want to be immobilised though, so we decided to alter our ignition to the old 'Kettering' ignition (simple coil and distributor) and ride like that for a while. We bought a correct coil, and changed the wiring accordingly. The car started right away, and actually runs equally as fine as with the CDI...we haven't checked it at high RPM's yet though, because we're still running the engine in.

Anyway, we have learned a whole lot from this, and found a way to reduce the number of things that can breakdown during our trip and still be OK ;-)

Image

Image

Image
CarreraToChina
DDK Seasoned Poster
Posts: 31
Joined: Sat Nov 18, 2006 12:30 pm
Contact:

Post by CarreraToChina »

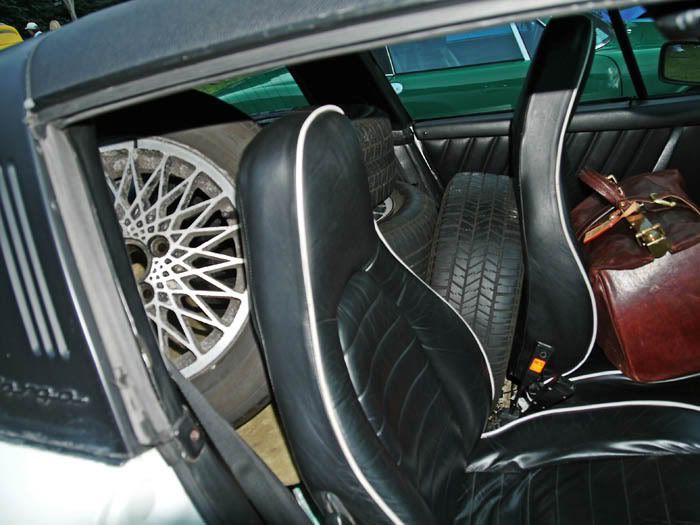
As it still is a very small sportscar, we were wondering about the luggage capacity of our Porsche. We want bring along more than one pair of underwear, so we decided to look out for a roofbox for our car.

We went to visit <a href="http://www.dbox.be" target="blank">D-Box</a>, a company specialized in the fabrication of high-quality roofboxes. They are located just around the corner from us, so that's pretty handy for us.

The friendly and helpful owner Stefan showed us around the company, and promptly mounted a large capacity roofbox on our car. The carriers are mounted on the raingutters of the car. They are also different in height to compensate the sloping roof. It is a bit of a strange look at first, but you get used to it quite fast, and from then on, you have the big advantage of extra luggage space, safe and sturdy. We are going to put the spare rims and jerrycans in there, because we don't want those in the passenger compartment.

Stefan decided he wants to support our adventure, and suggested we could use a box for free during our trip. We are very thankful of this nice gesture! We will compensate for this by handing over some of the most beautiful pictures of his roofboxes... :-)

click for big :-)


Image

Image

Image

Image

Image

Image

Image

Image

Image

Image

Image

Image
Helen
Events Organiser
Posts: 5519
Joined: Wed Mar 10, 2004 8:55 pm
Location: Cumbria

Post by Helen »

call me blonde BUT, wouldn't it be better if the deep side of the box was at the bottom instead of the lid. else everything is going to fall out when you open the box ?

how does it effect the airflow over the car ? = handling
member#1182
Currently Porscheless but on the look out for my 30th
CarreraToChina
DDK Seasoned Poster
Posts: 31
Joined: Sat Nov 18, 2006 12:30 pm
Contact:

Post by CarreraToChina »

Helen,

THe choice was more a practical one (there actually is not too much space in an 911-er), and stefan (www.dbox.be) told us that the handling would be okay.

We haven't tried it out yet, but I think it won't affect us too much (i'll post after we made a larger run with it)
Bertroex
DDK 1st, 2nd and 3rd for me!
Posts: 2052
Joined: Sat May 07, 2005 11:52 am
Location: Brewood, Staffs

Post by Bertroex »

CarreraToChina wrote: (there actually is not too much space in an 911-er),
:shock:

Ok, its not for going alllll the way to China but....

5 wheels

Image


Image

7m2 of ceramic floortiles

Image

Image

( a case of "How much you're offering?! Bloody hell Bert: as it is the last of the stock you can have it but only if you take it RIGHT NOW and clear off. I'll get my man with the forklift to bring it round to your estate car" )

911's are Grrrrrrrrrrrrreat :lol: !


Bert
-1968 912 SWB Targa LHD
-1976 911 Carrera 3.o Targa RHD
-1983 944 190bhp (Augment Automotive enhanced) RHD
-1993 964 C4 Jubi RHD
-1979 280SLC manual LHD, 1989 500SL, 1997 SL500,
Ex 1976 911 2.7 Targa, 1979 911 SC, 1983 930, etc
CarreraToChina
DDK Seasoned Poster
Posts: 31
Joined: Sat Nov 18, 2006 12:30 pm
Contact:

Post by CarreraToChina »

bert,

We 'll post the pictures when we'll leave - fully packed - december 1st.
Let's see if we can beat yours ;-)
CarreraToChina
DDK Seasoned Poster
Posts: 31
Joined: Sat Nov 18, 2006 12:30 pm
Contact:

Post by CarreraToChina »

Hello people,

our CTC-merchandise seemed very popular, and so we decided to have another batch of T-shirts made.

If you would like a www.carreratochina.com T-shirt, then just send us a pm with your order and details please.

We've got two choices now:

- Marine T-shirt with dark yellow print ( like in the included picture: print on the chest, shoulder and back )
- Dark yellow T-shirt with marine print ( dark yellow is similar to the color of our Porsche )

We can deliver these T-shirts in sizes from S to XXL, and the price is ( a hefty ;-) ) 15 EUR/shirt. (excl. shipping)
This way you support our adventure a little bit, AND you get to wear a supercool, superexclusive piece of clothing! :-)

These shirts are arriving within one month from now, and we can take orders untill 31 august.

Thanks a lot!
Kind regards,
Jan & Erwin

PS a little update:

- our new sponsor www.paintshield.co.uk will coat the car completely in a protective transparent film FOC!
- Another new sponsor www.lecatecs.com will give us a GPS tracker/alarm FOC!

If you'd like, you can always spot our progress on our website www.carreratochina.com . The departure is getting nearer and nearer!!

Image
CarreraToChina
DDK Seasoned Poster
Posts: 31
Joined: Sat Nov 18, 2006 12:30 pm
Contact:

Post by CarreraToChina »

Suspension adjustments

We made a big step towards our travelplans this week, by adjusting the wheels and suspension.

We swapped the aluminium fuchs wheels (with lowprofile tires) with much sturdier original porsche steel wheels. We have put heavy duty reinforced snowtires on these

rims, which will give us the necessary load capacity and strength. This gave us 2cms gain in rideheight right away.

Next on the list was a rideheight change, and a corner balance.

Front first: i turned the torsion bar adjustment bolts to the max, and went for a testdrive. Afterwards, i checked the left-right balance with the tripod method.

There was a difference of 1cm in rideheight, and i adjusted it accordingly.

At the rear there's more work involved to raise the car: you have to reindex the torion bars. This means putting more 'preload' on the bars by turning them in one

direction. This was my modus operandi:
- raise the car on the bridge
- loose the wheels
- take off the torsion bar protection caps
- raise the arm slightly so you can remove the shock from the arm.
- the arm now drops completely, with almost no tension on it (full droop). Take out the two excentric adjustment bolts and the two bolts that hold the springplate

to the arm.
- take off the springplate, and pray to god that the torsion bar stays in the car. I was 50% lucky. On one side, the torsion bar stuck to the springplate, and as

there is no way of putting force on it to pull it out, i opted to drill a hole in the center of the springplate 'bushing', and knock the torsion bar out of it. This

took a whole lot of force, because the bar was almost rusted solid in the bushing.
- I cleaned up the torsion bars with a wire brush and greased them up with lithium grease, and made sure they slid nice and smoothly in their bushings. The splines

were in good condition, and i checked if there were any scratches on the cars. I lubed the bars up with plenty of lithium grease.
- Then it was time to choose the position of the bars. I had put the car perfectly horizontal on the bridge, so i could simply measure the height of the springplate

to the ground. I did this before too. I chose to let the bottom point of the springplates drop around 3,5cms, so i would get around 5cms ride height increase. I did

it this way because i don't have a tool to measure the angle of the springplates. Anyway, i think my method is at least as accurate.
- i mounted everything back up, went for another testdrive, and came back with this conclusion: One side was still 1,5cms higher than the other side, so maybe

there's some difference in the strength of the torsion bars, or the car is not perfectly symmetrical.
- I reindexed one side again, did another testrun, and this time, both sides were within 2mm of eachother. I was more than happy!

Because we added so much ride height (6cms in total!), the wheels were completely out of alignment: the camber was waaaay positive on all wheels, and should be

around neutral or slightly negative to be good.

I decided to hand it over to the professionals, and went to a pro tire shop. Together with the mechanic, i aligned the complete car in about 2 hours. We maxed out

on the rear camber settings, and got an almost neutral figure luckily enough. (so, if i had put the car any higher still, we wouldn't have been able to set the

camber anymore, lucky!) It's a couple of minutes off, but im' not worried about that. We got the toe within spec. This car is meant to be driven very easily on the

street, so no need for big negative camber for us!

On the front, we easily got the camber set (0°) with the help of our cambermeister, and adjusted the toe afterwards. Caster was above max, but once again, not

worreid about that.

The car now looks and feels completely different: it's got a more classic look now, with the steel wheels, and the ride is much much improved!! It feels very light,

and steers very fast! At the same time we lost the nervosity feeling on the highway, and griplevels are drastically improved (we ran very old rubber on the fuchs

rims ). The heavy duty tires do not disturb the ride; the car feels comfy but still doesn't wallow when cornering. I'm very happy!

we're ready for our sponsortrip to England!!

Image

Image

Image

Image

Image

Image

Image

Image

Image

Image

Image

Image

Image

Image

Image
CarreraToChina
DDK Seasoned Poster
Posts: 31
Joined: Sat Nov 18, 2006 12:30 pm
Contact:

Post by CarreraToChina »

England 2008

When Erwin and i first started Carreratochina, we didn't have a clue what such an organisation would lead into, and where it would bring us. At first, you try to get as much attention as possible for the adventure - not always succesfully - but at a certain point, the whole thing starts to lead it's own life...you never know what's coming next, and that's one of the most fun parts of the whole endeavour!

For example, quite a while back, we got a very generous gift of a fellow Porsche enthousiast - who we never met before - and a couple of weeks ago, we got another great proposal in our mailbox: the company Painshield (from Grantham, UK) suggested that they would like to cover the whole car in protective transparant film, and use our bahamayellow beauty for their exhibitionday. We once again gladly accepted and prepared for another trip...this time to the British Islands. We were lucky to find a company in the neighbourhood that produces protective underplates (sump guards), so we arranged a meeting with them - Francis Tuthill's workshop - in the same week. For decades now, Francis Tuthill has been a reference on rally-preparation for old Porsches, so we were in good company.

I (Jan) left for the UK on Sept. 20th, and after crossing the eurotunnel (without incidents and delays) i arrived in London for a little gettogether with my friends over there. It was a hectic little weekend, but it was great to see my buddies back again!

On mondaymorning, i beat the London rush hour, and headed for Tuthill's shop in Wardington, Oxfordshire. I arrived there before 9 a.m. and about 10 minutes later, our car was already on four jackstands, with the boss himself checking the car thoroughly for any problems. I was having a couple of issues, like a oddly sounding clutch, a howling distributor, and an engine that misfired more and more on higher revs. Francis promptly took the cap off the distributor, and oiled the mechanism inside, while lecturing me i should maintain my car somewhat better. :-) He also discovered an oil leak just above the clutch, which could cause a lot of troubles on our way to China...troubles that might already have started. He pointed out that the steering column had too much play, and that the CV boots were due for a replacement. He pop-quizzed me as well as he was doubting my mechanical knowledge (rightfully so), and asked me how to check the oillevel in these dry-sumped cars, but i managed to get a top score on that! :-)

It was clear that this visit would be more than a simple mounting of underplates, and that it would cost another buck or two, but i didn't really mind...i was glad that our car was in the hands of prosfessionals, and that it would get a thorough check-up.

I almost forgot to mention that i had a teeny bit of a fire when leaving London! An electrical connector had worked itself loose, and the shortcut had set the nearby carpet almost on fire. I must say there was a little bit of panic when i saw the smoke coming from under the dashboard, but i quickly found out why, and repaired the little fault on the spot.

In the meanwhile, our little car endured quite a bit of welding, banging and grinding, and before i knew it, the underplates were mounted. They are very thick aluminium protection plates, both on the front (fueltank) and the back (engine and gearbox) of the car. The welding can be undone, so it doesn't compromise the future of our 911.

Image
Image
Image
Image
Image
Image
Image
Image
Image
Image
Image
Image
Image
Image
Image
Image
Image
Image
Image
Image
Image
Image
Image
Image
Image
Post Reply