

I was scared to ask that.
A good friend used to restore very old Rolls Royces and they did thebolt head alignment too, but asked the same question and it was a bit extra torque to align the flats was ok.
RR had a torque figure, and +/- tolerance which was used to get alignment but still to tech spec.
E Type 888330
Moderator: Bootsy
-
911hillclimber
- Nurse, I think I need some assistance
- Posts: 19000
- Joined: Mon Mar 10, 2008 6:26 pm
- Location: West Midlands
Re: E Type 888330
73T 911 Coupe, road/hillclimber 3.2L
Lola t 492 / 3.2 hillclimb racer
Boxster 987 Gen II 2.9
Lola t 492 / 3.2 hillclimb racer
Boxster 987 Gen II 2.9
Re: E Type 888330
Swap washers for slightly thinner / thicker versions, I imagine.
Re: E Type 888330
Masterclass stuff JP, as ever!
-
jtparr
- DDK 1st, 2nd and 3rd for me!
- Posts: 2241
- Joined: Mon May 24, 2004 10:54 pm
- Location: london/surrey
Re: E Type 888330
Hi NigeNige wrote:How do you manage to align all the bolt points and maintain the correct torque setting for all?
Apart from the dome headed chrome nuts for the cylinder head, and the big end bolts, Jaguar don’t specify any torque figures in the manual...( I might have missed one or two....).so “tight” or “f/tight” is perfectly adequate
1974 2.7 Carrera
(full restoration. now as an RS Touring)
1963 3.8 E Type
( 11 years in the making…………………….)
1952. XK120…the next one ……….……..)
(full restoration. now as an RS Touring)
1963 3.8 E Type
( 11 years in the making…………………….)
1952. XK120…the next one ……….……..)
-
jtparr
- DDK 1st, 2nd and 3rd for me!
- Posts: 2241
- Joined: Mon May 24, 2004 10:54 pm
- Location: london/surrey
Re: E Type 888330
Well....the worlds a somewhat different place since I wrote that last piece...and with working from home still commonplace I managed to complete a number of projects on the house and the garden...
so Jaguar came third best for the first half of the year....
..but... flying the flag for the OCD club, the quest for obsessive perfection naturally spread to brake pipes...as you do
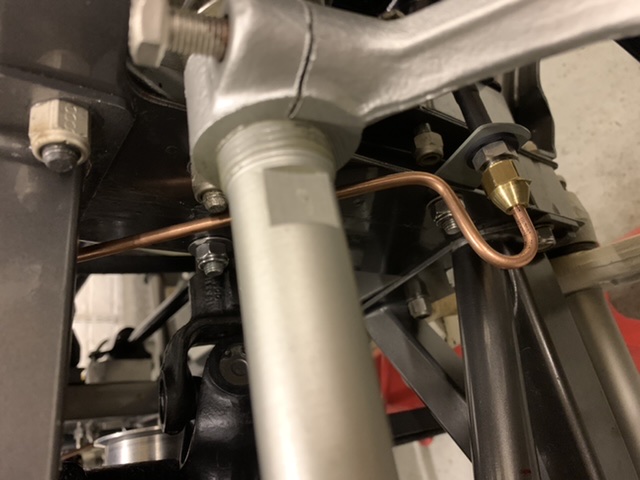
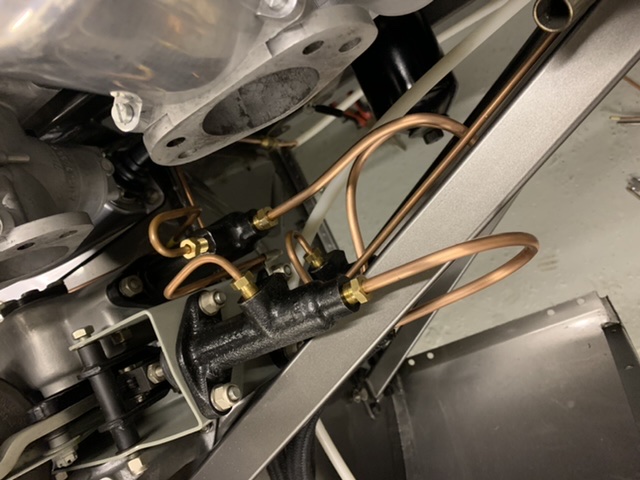
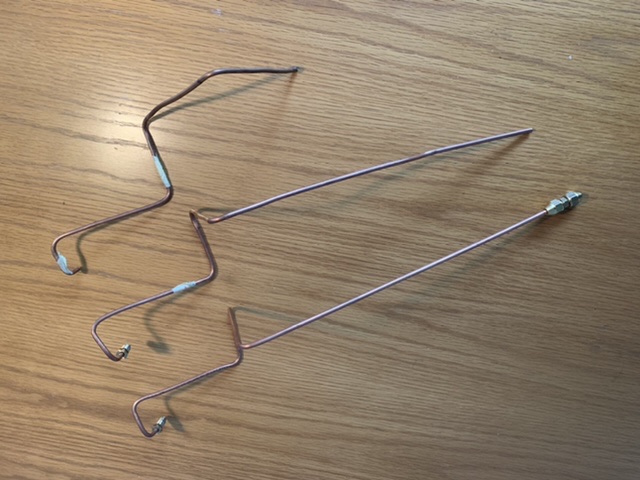
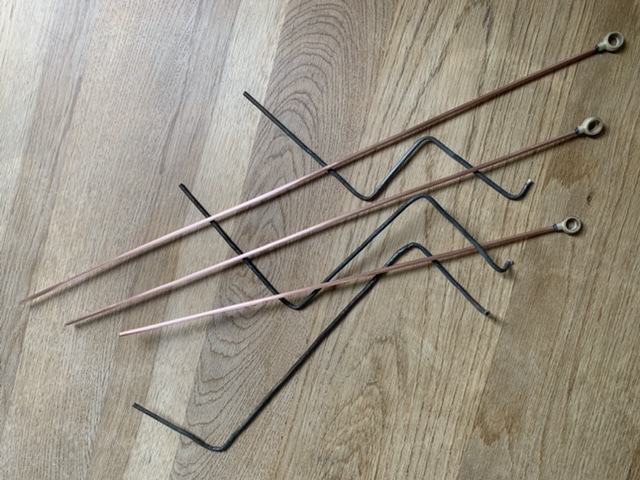
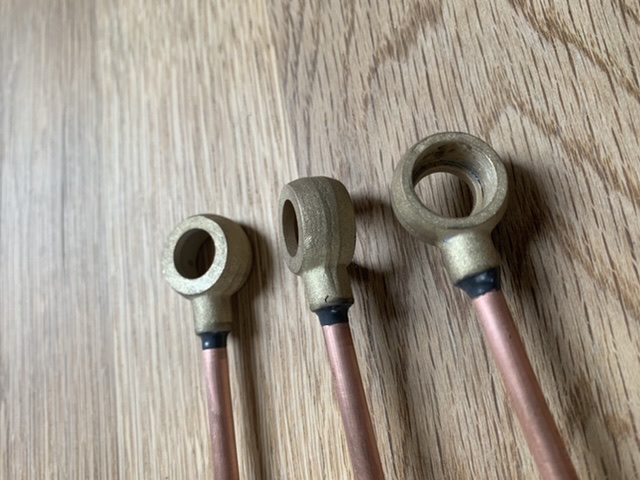
Automec make a great kit and sell generally lovely products, and because the car was originally left hand drive I though I would buy a kit to at least give me a clue as to what length and route the different right hand side pipe work should take, I also bought a length of extra copper piping as it is so economical and dusted off the basic Drapers flaring kit that had served me well for the 911
However this time I also invested in a straightening gadget and a small radius bending tool....both of which were superbly helpful
I have to confess that badly formed brake pipes kind of annoy me as there’s no excuse for not bending them neatly...and consistently.....sure I made mistakes and had to experiment...the Automec pipes were all made too long than actually needed so I cut the end of each pipe, routed in the neatest way possible and by trial and error I patiently worked my way around the engine bay, ultimately forming a new flared end to the correct length
These 3 stages were needed to establish correct length of the straight sections...needing a final version to get it “just” so.....
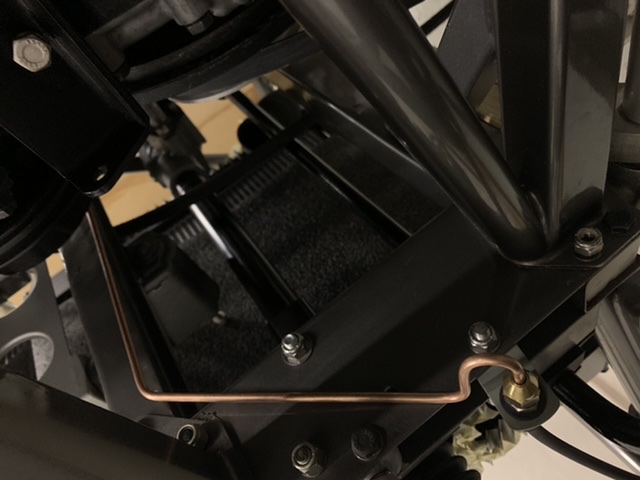
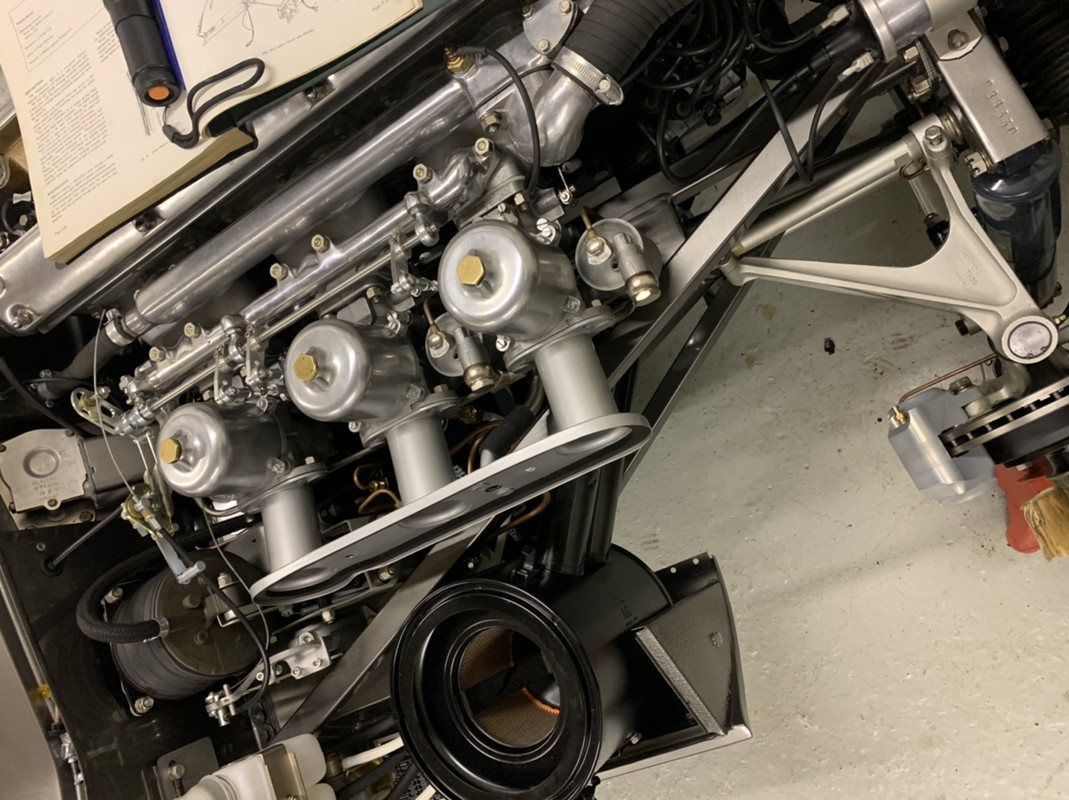
Jaguar used a perforated plastic strip to secure the brake lines and the wiring loom to the tubular metal frame, which whilst effective doesn’t score many points in the elegance department.....

so naturally I wasn’t having any of that any chose other means to determine where to run these pipes and avoid such visible fixings...which is why you cant see any pipes nor fixings in this photo....
And whilst I was at it i needed to re-make the 3 drain tubes from the SU carbs....which after cleaning up the banjo style ends i used JB weld to bond new tubes also from 3/16” copper tubing....
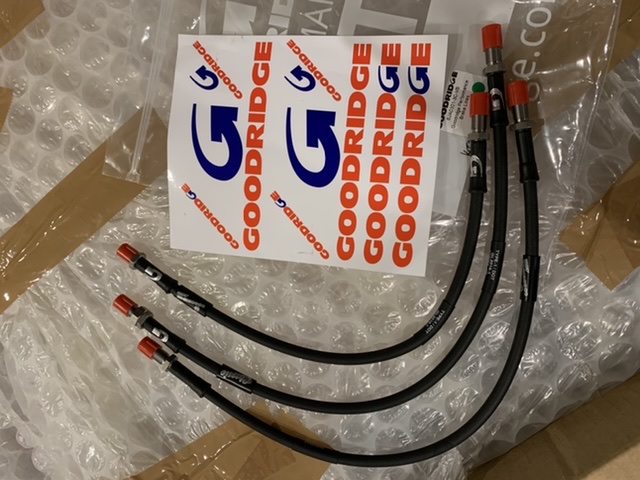
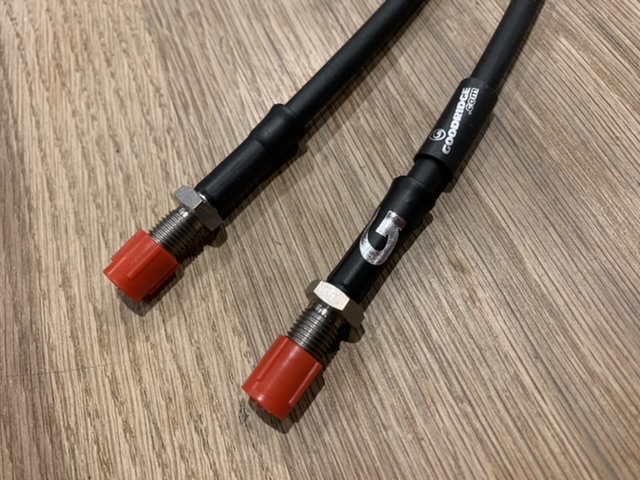
And having gone this far i needed to ensure fully stainless brake lines were made for the flexible connections....which annoyingly Goodridge seem to think their logo should be part of a restoration process....err....I don’t think so....
In a similar vein whilst determining the tidiest route for the brake lines I did a similar exercise for the main wiring loom which runs along and is secured to the main tubular engine frames....
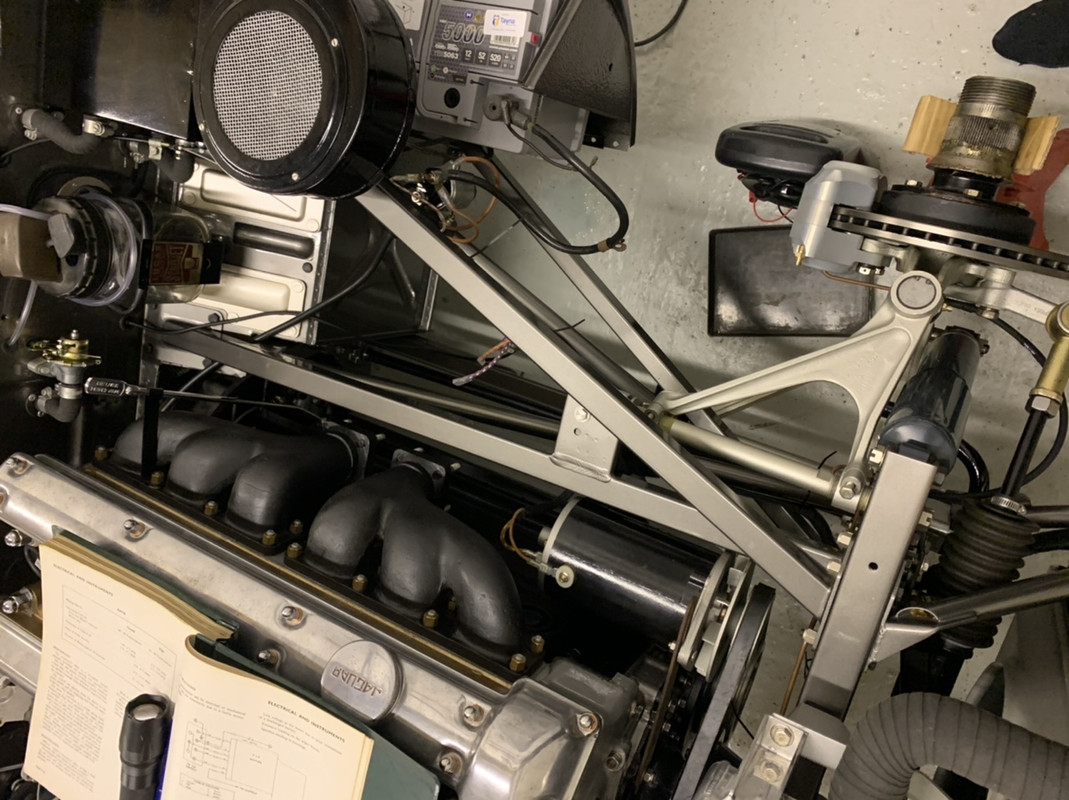
Again, no fixings or cables visible as they are underneath.....
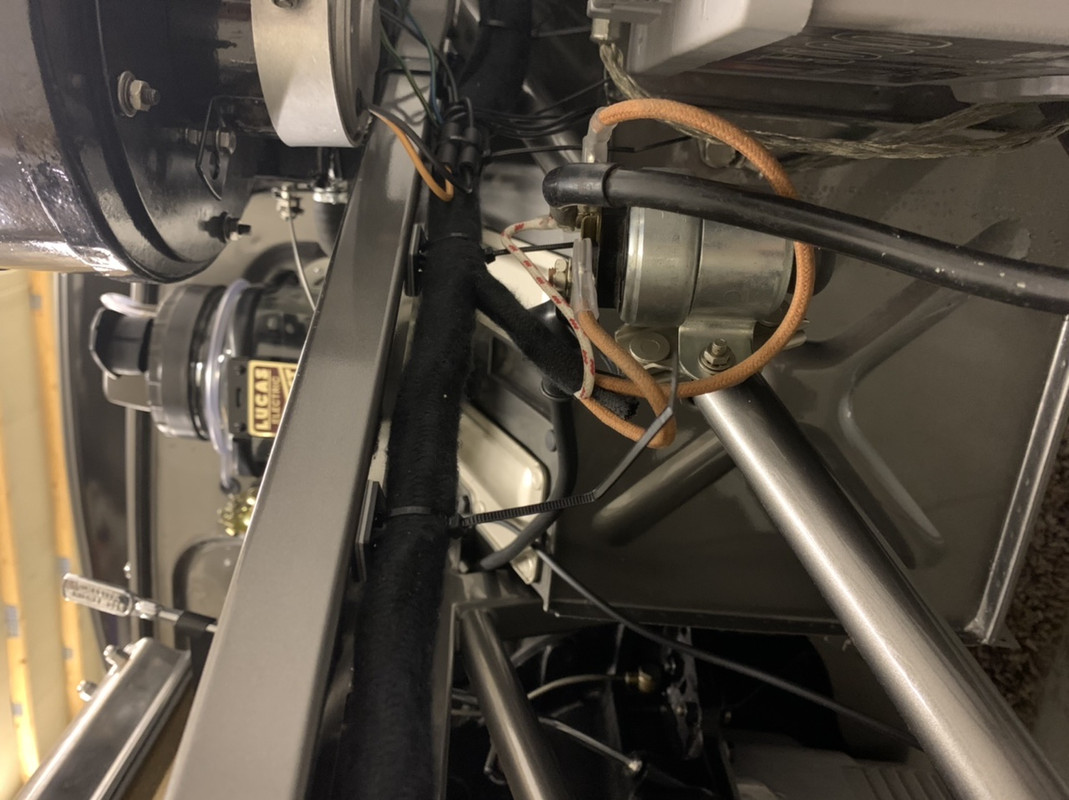
I used self adhesive nylon pads with integral eyelets to the underside of the square section tubes that allowed me to use concealed zip ties..whether these will survive the heat cycles of the engine remains to be seen....but if you don’t try you’ll never find out
so Jaguar came third best for the first half of the year....
..but... flying the flag for the OCD club, the quest for obsessive perfection naturally spread to brake pipes...as you do
Automec make a great kit and sell generally lovely products, and because the car was originally left hand drive I though I would buy a kit to at least give me a clue as to what length and route the different right hand side pipe work should take, I also bought a length of extra copper piping as it is so economical and dusted off the basic Drapers flaring kit that had served me well for the 911
However this time I also invested in a straightening gadget and a small radius bending tool....both of which were superbly helpful
I have to confess that badly formed brake pipes kind of annoy me as there’s no excuse for not bending them neatly...and consistently.....sure I made mistakes and had to experiment...the Automec pipes were all made too long than actually needed so I cut the end of each pipe, routed in the neatest way possible and by trial and error I patiently worked my way around the engine bay, ultimately forming a new flared end to the correct length
These 3 stages were needed to establish correct length of the straight sections...needing a final version to get it “just” so.....
Jaguar used a perforated plastic strip to secure the brake lines and the wiring loom to the tubular metal frame, which whilst effective doesn’t score many points in the elegance department.....
so naturally I wasn’t having any of that any chose other means to determine where to run these pipes and avoid such visible fixings...which is why you cant see any pipes nor fixings in this photo....
And whilst I was at it i needed to re-make the 3 drain tubes from the SU carbs....which after cleaning up the banjo style ends i used JB weld to bond new tubes also from 3/16” copper tubing....
And having gone this far i needed to ensure fully stainless brake lines were made for the flexible connections....which annoyingly Goodridge seem to think their logo should be part of a restoration process....err....I don’t think so....
In a similar vein whilst determining the tidiest route for the brake lines I did a similar exercise for the main wiring loom which runs along and is secured to the main tubular engine frames....
Again, no fixings or cables visible as they are underneath.....
I used self adhesive nylon pads with integral eyelets to the underside of the square section tubes that allowed me to use concealed zip ties..whether these will survive the heat cycles of the engine remains to be seen....but if you don’t try you’ll never find out
Last edited by jtparr on Thu Aug 27, 2020 6:37 pm, edited 1 time in total.
1974 2.7 Carrera
(full restoration. now as an RS Touring)
1963 3.8 E Type
( 11 years in the making…………………….)
1952. XK120…the next one ……….……..)
(full restoration. now as an RS Touring)
1963 3.8 E Type
( 11 years in the making…………………….)
1952. XK120…the next one ……….……..)
-
jtparr
- DDK 1st, 2nd and 3rd for me!
- Posts: 2241
- Joined: Mon May 24, 2004 10:54 pm
- Location: london/surrey
Re: E Type 888330
After the brake pipes was the wiring of the car in general...a somewhat daunting task as the wiring looms I bought had no means of identification, and now being RHD was a different configuration to the battered, butchered and unintelligible mantle of spaghetti that I had cut out of the car years ago
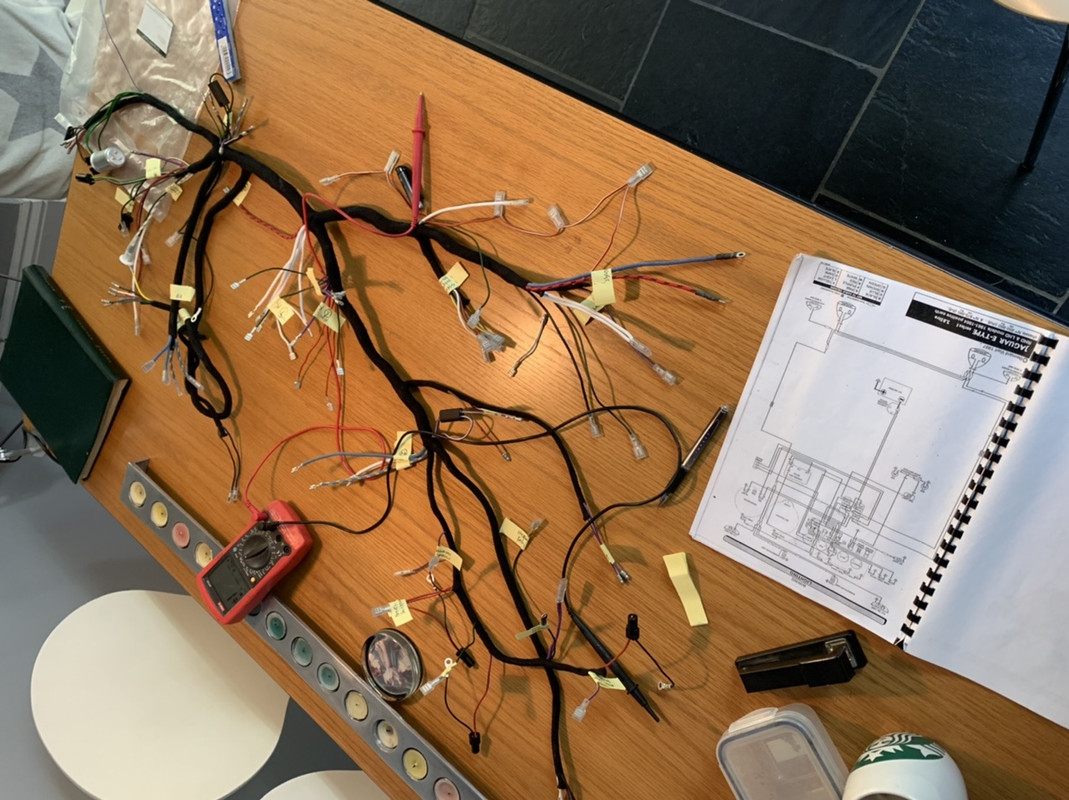
Whether this makes me stranger than I beleive some of your already think, I did actually enjoy the process of studying the wiring diagrams and slowly identifying a few wires at a time, which gradually left me less of a puzzle to solve.
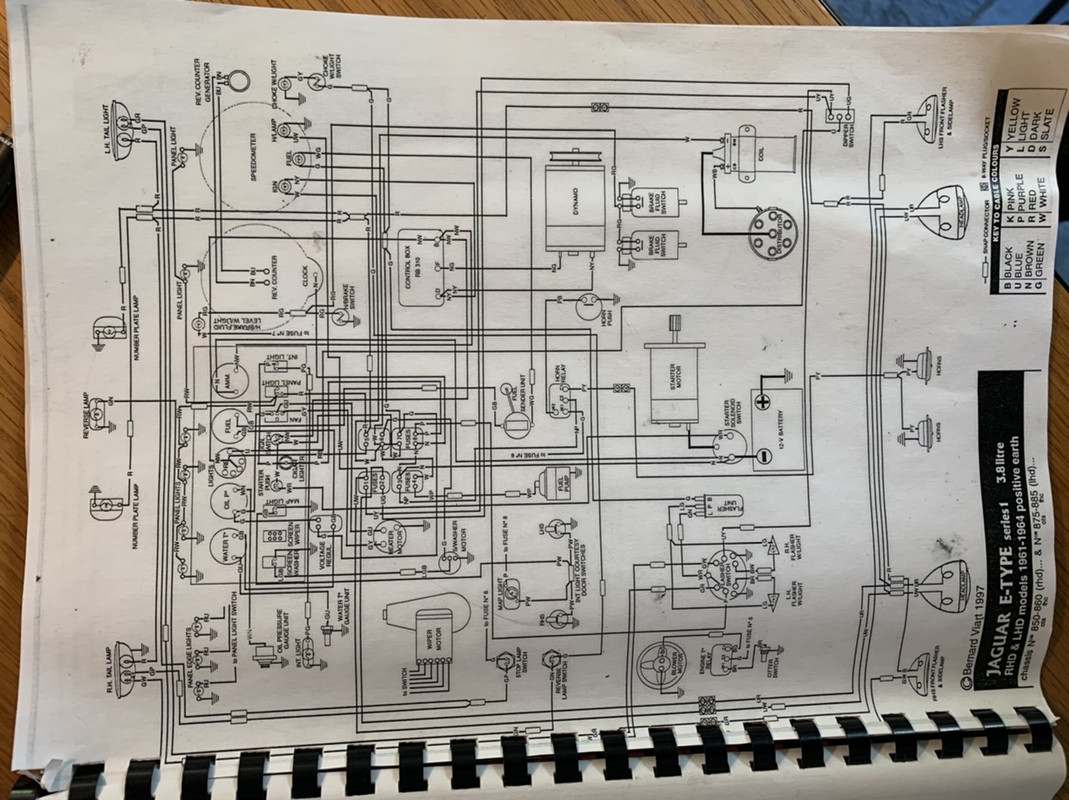
By identifying key components along the length of the looms a seemingly huge amount of problems became a series of smaller puzzles. where multiple cases of white or green or purple wires in one area were located it was then a case of using my multimeter to discount possible wires to leave the obvious answer at the end
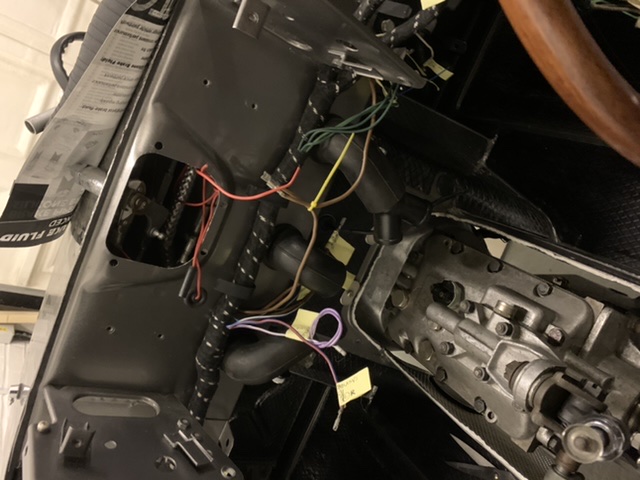
That was the easy part....the pain was installing...or rather trying to work out how to install the loom in the cockpit
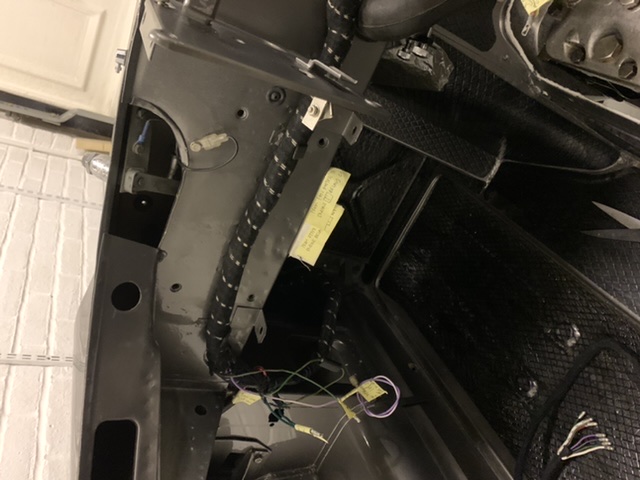
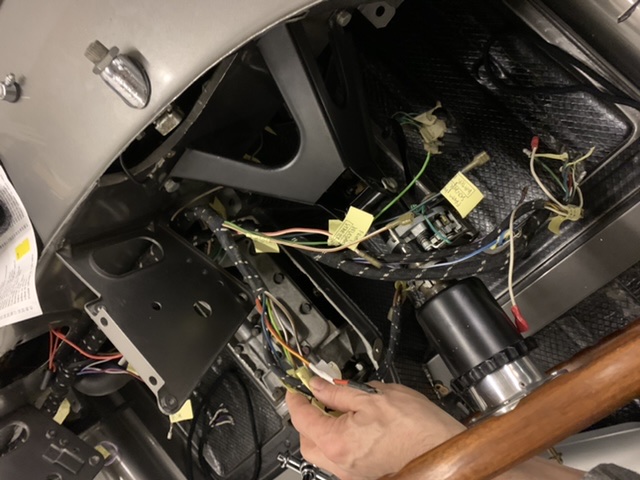
In hindsight I probably should have done this earlier, and not after I had installed the two dashboard instrument pods...but hey ho....
Sitting straddling the transmission tunnel, perched on a cushion to stop numb bum I slowly connected the loom...trying to group wires as neatly as possible whilst banging my forehand on the windscreen top due to the cramped nature of a coupe I eventually completed the task after what must have been days of effort, spread over weeks...some of it is pretty neat I have to say but it sure is old fashioned in concept
Old style looms are not the most flexible objects and I had to be very careful not to fray the protective cloth covering to the loom as I wrestled and cursed and willed the old git thing into what looked elegant and logical....2 qualities which on an E Type are often in short supply when paired together
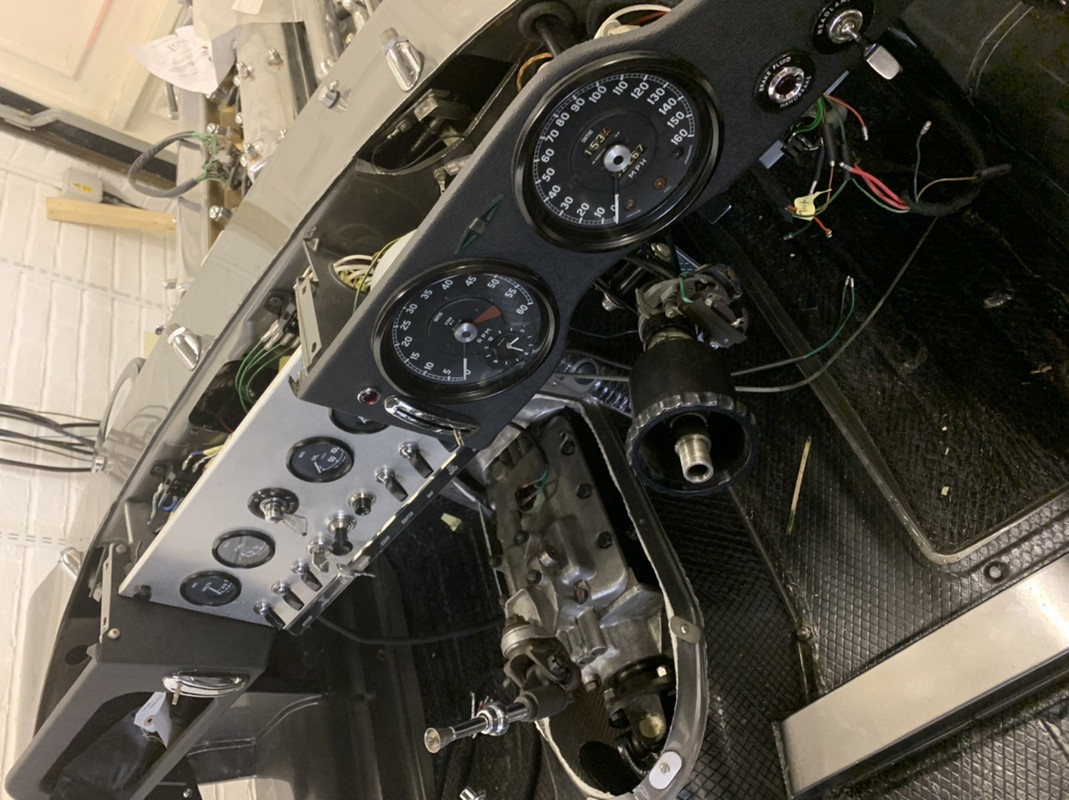
But it began to allow the interior to feel like a car not a shell after a while....
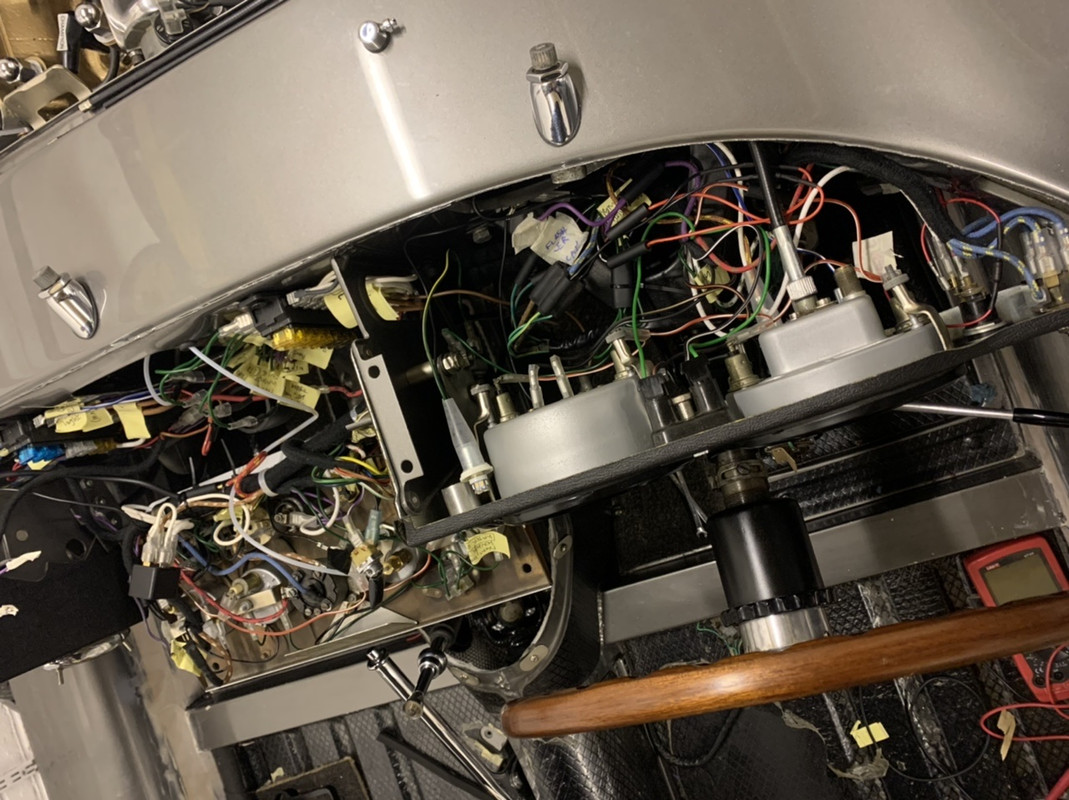
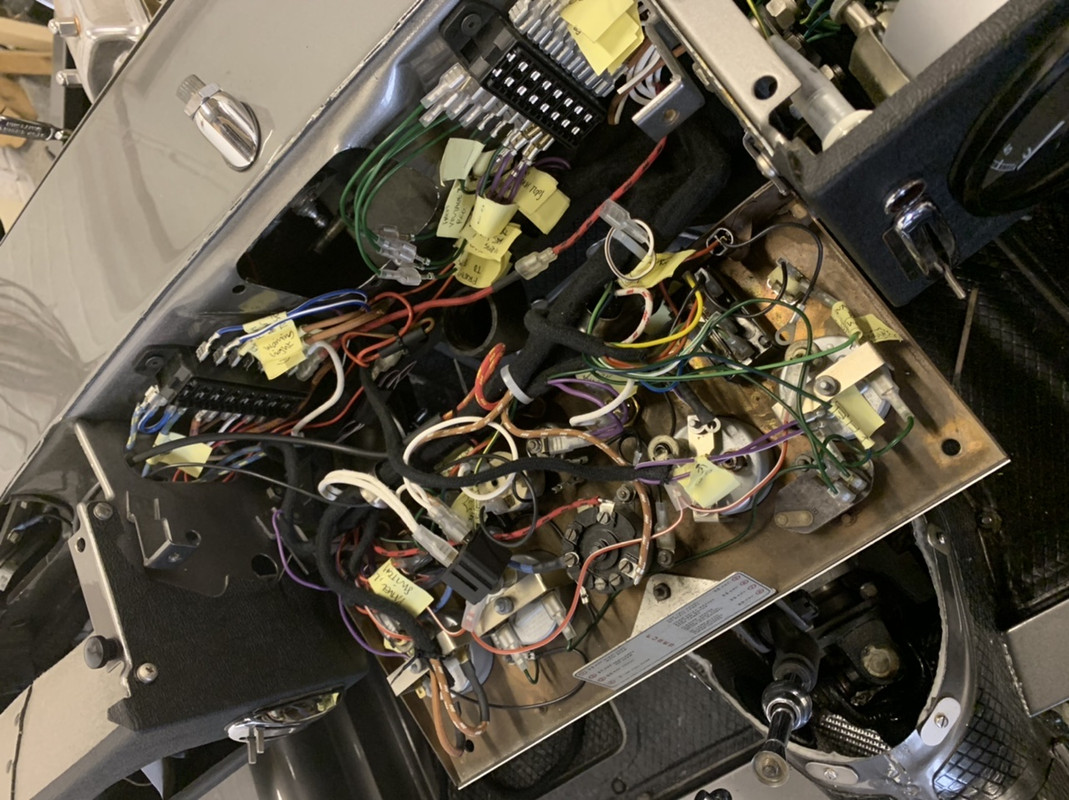
Just because I can, I had also undertaken to change the design of the main fuses....as you do...firstly I connected it all using the original fuse blocks....to then allow me to see how it should be modified
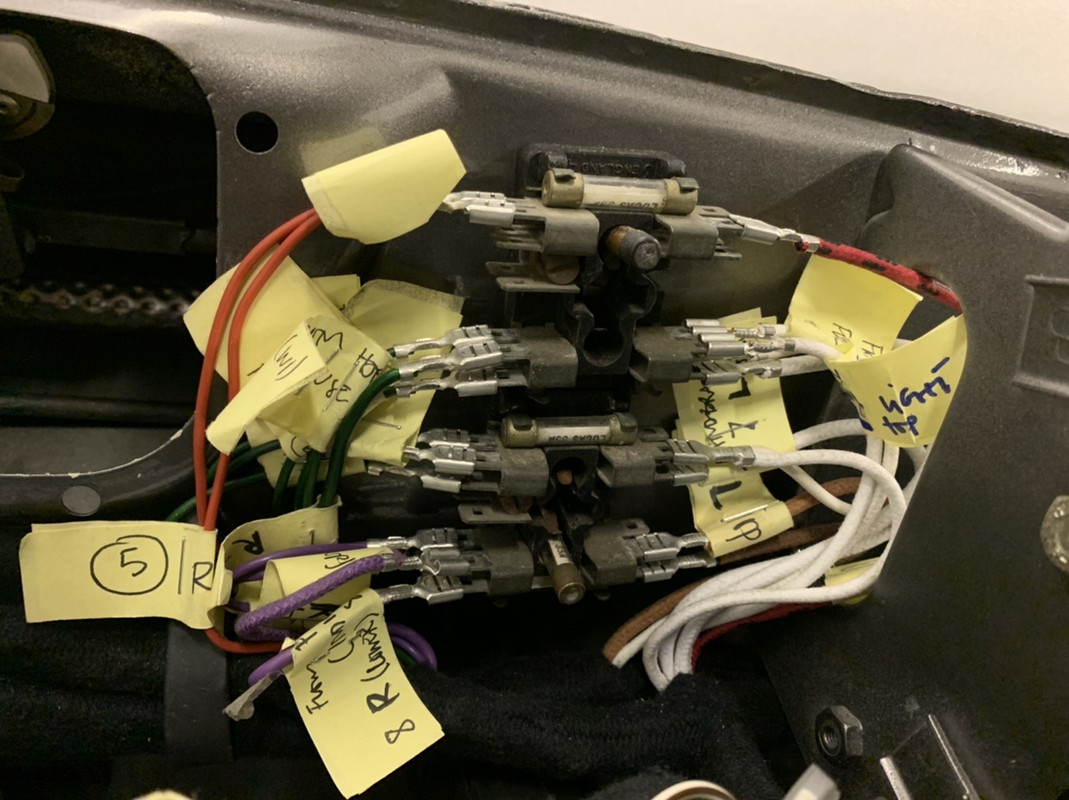
Jaguars originally grouped multiple circuits to be served by shared fuses...not a great idea when a blown fuse can be caused by an interior light but then rob then driver of multiple circuits because of that fuse configuration
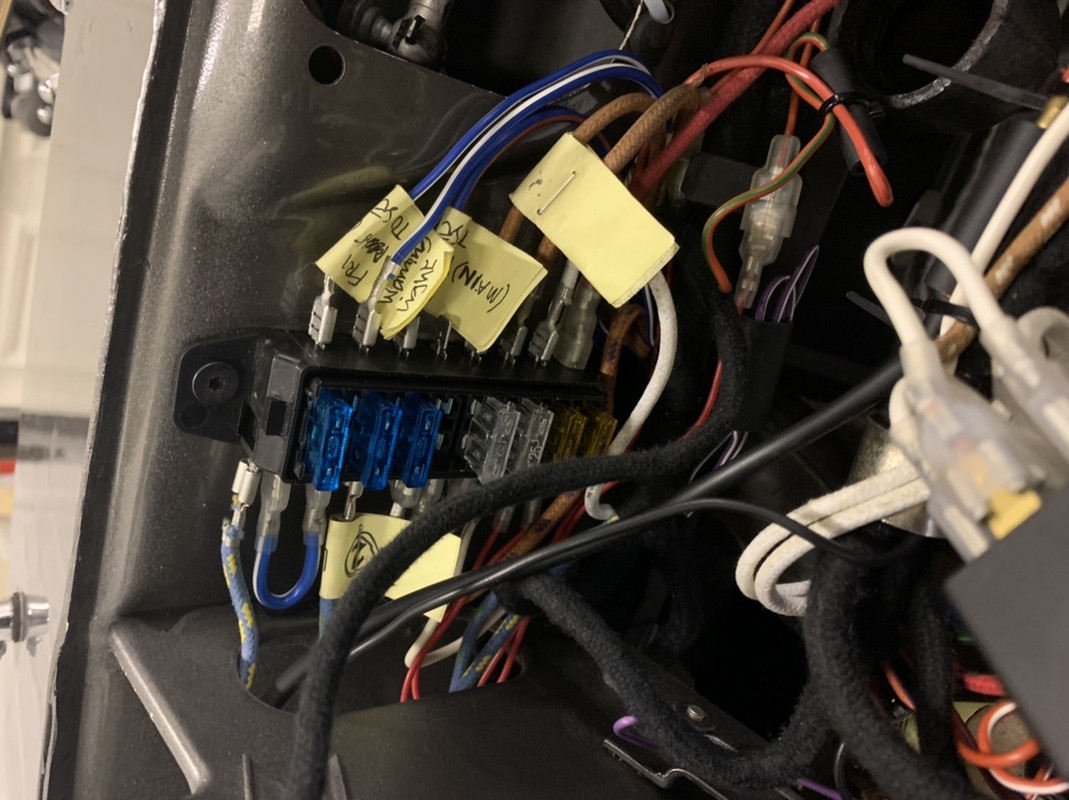
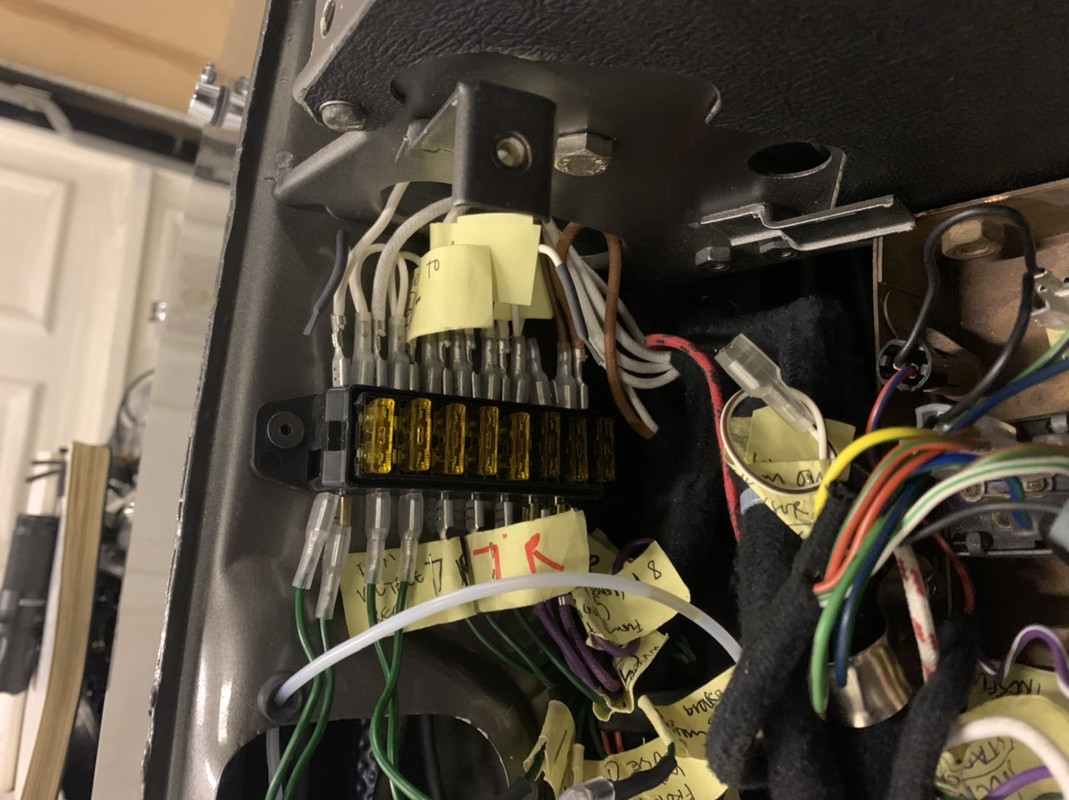
Fuse were also the old glass bulb type...so I have now amended all those to be twin blade type
And just because you also can, I began to upgrade the wiring with a series of relays...all usefully suggested by members of the EType forum
Fun...yes...well...most of the time....but it meant normal slow progress became snail pace progress and at times seemingly never ending...
And finally just because you really can if you really want to...I changes all the lights to LED types...which meant more amendments to the loom.....
Yeah...I am sure I need help....
Whether this makes me stranger than I beleive some of your already think, I did actually enjoy the process of studying the wiring diagrams and slowly identifying a few wires at a time, which gradually left me less of a puzzle to solve.
By identifying key components along the length of the looms a seemingly huge amount of problems became a series of smaller puzzles. where multiple cases of white or green or purple wires in one area were located it was then a case of using my multimeter to discount possible wires to leave the obvious answer at the end
That was the easy part....the pain was installing...or rather trying to work out how to install the loom in the cockpit
In hindsight I probably should have done this earlier, and not after I had installed the two dashboard instrument pods...but hey ho....
Sitting straddling the transmission tunnel, perched on a cushion to stop numb bum I slowly connected the loom...trying to group wires as neatly as possible whilst banging my forehand on the windscreen top due to the cramped nature of a coupe I eventually completed the task after what must have been days of effort, spread over weeks...some of it is pretty neat I have to say but it sure is old fashioned in concept
Old style looms are not the most flexible objects and I had to be very careful not to fray the protective cloth covering to the loom as I wrestled and cursed and willed the old git thing into what looked elegant and logical....2 qualities which on an E Type are often in short supply when paired together
But it began to allow the interior to feel like a car not a shell after a while....
Just because I can, I had also undertaken to change the design of the main fuses....as you do...firstly I connected it all using the original fuse blocks....to then allow me to see how it should be modified
Jaguars originally grouped multiple circuits to be served by shared fuses...not a great idea when a blown fuse can be caused by an interior light but then rob then driver of multiple circuits because of that fuse configuration
Fuse were also the old glass bulb type...so I have now amended all those to be twin blade type
And just because you also can, I began to upgrade the wiring with a series of relays...all usefully suggested by members of the EType forum
Fun...yes...well...most of the time....but it meant normal slow progress became snail pace progress and at times seemingly never ending...
And finally just because you really can if you really want to...I changes all the lights to LED types...which meant more amendments to the loom.....
Yeah...I am sure I need help....
1974 2.7 Carrera
(full restoration. now as an RS Touring)
1963 3.8 E Type
( 11 years in the making…………………….)
1952. XK120…the next one ……….……..)
(full restoration. now as an RS Touring)
1963 3.8 E Type
( 11 years in the making…………………….)
1952. XK120…the next one ……….……..)
-
jtparr
- DDK 1st, 2nd and 3rd for me!
- Posts: 2241
- Joined: Mon May 24, 2004 10:54 pm
- Location: london/surrey
Re: E Type 888330
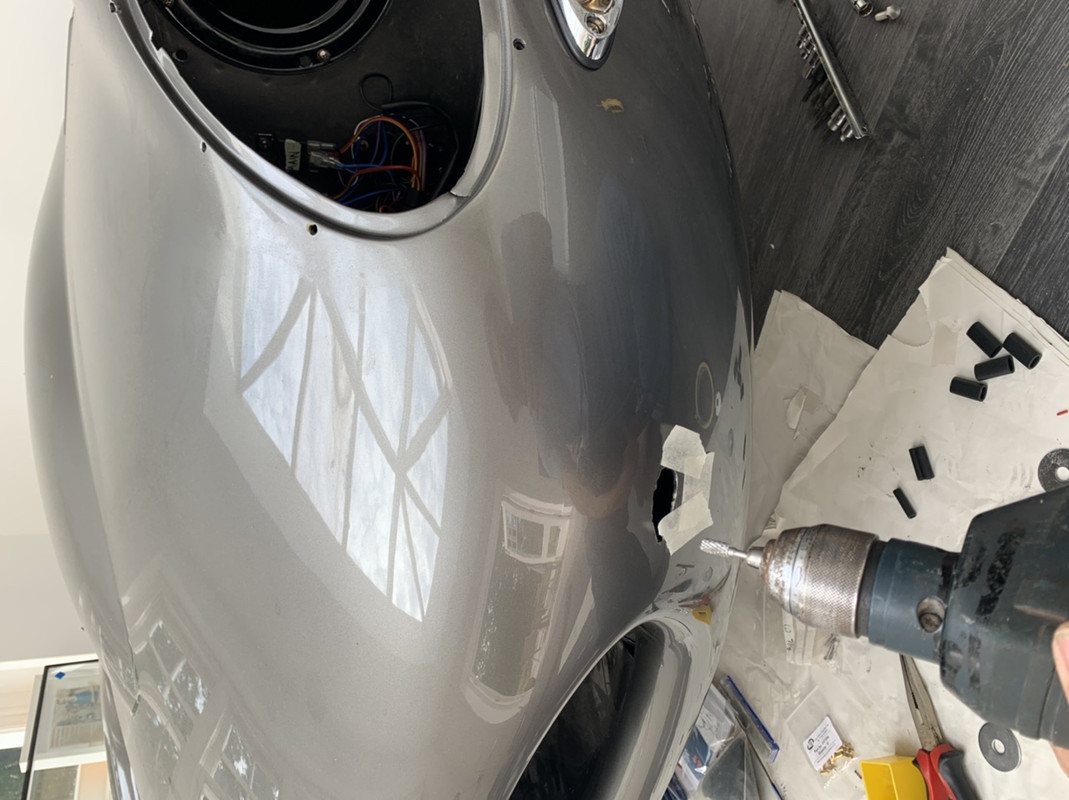
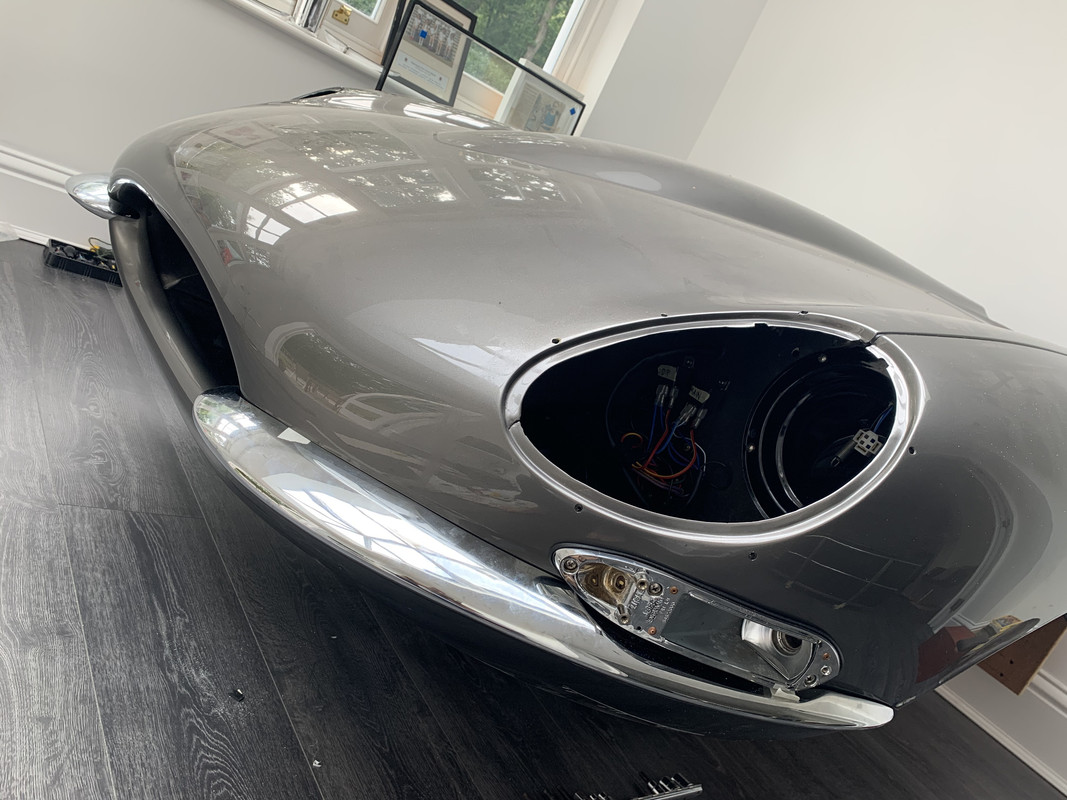
Bored of just wiring for a pastime, I had delivered a bundle of parts to Silvabronz for plating in spring, so once available for collection my Christmas came early ....

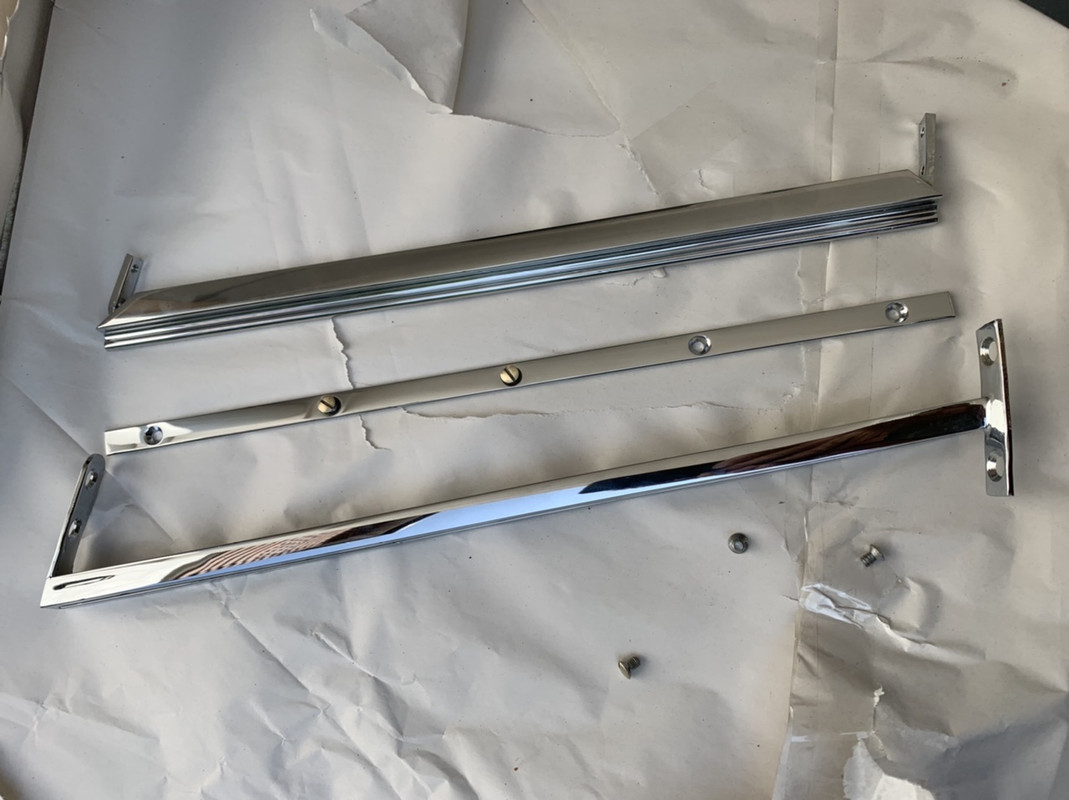
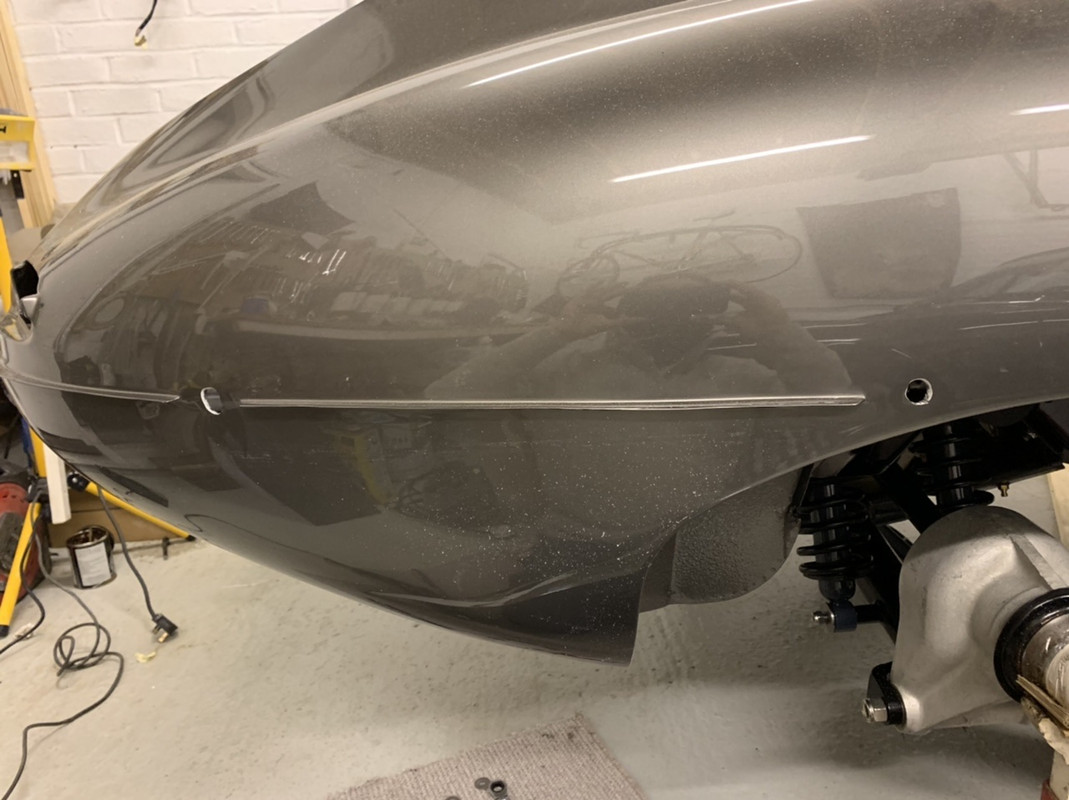
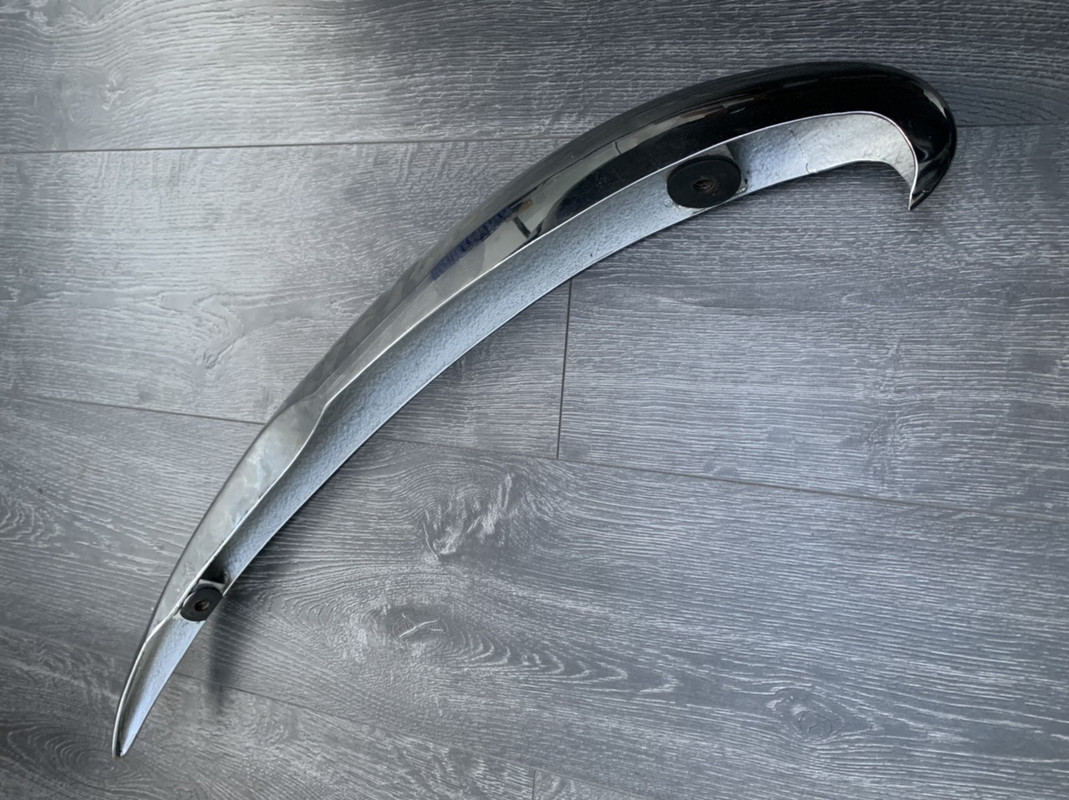
with amongst other things Barry’s unique bumpers....marvellous...time to break the routine and together with the indicator units put some shiny things on....
Err....no..
Firstly time to spend many more hours perfecting my self created solution to mounting the bumpers properly...level...symmetrical..and securely
And
Time to spend more incredibly frustrating days re-assembling the indicator units
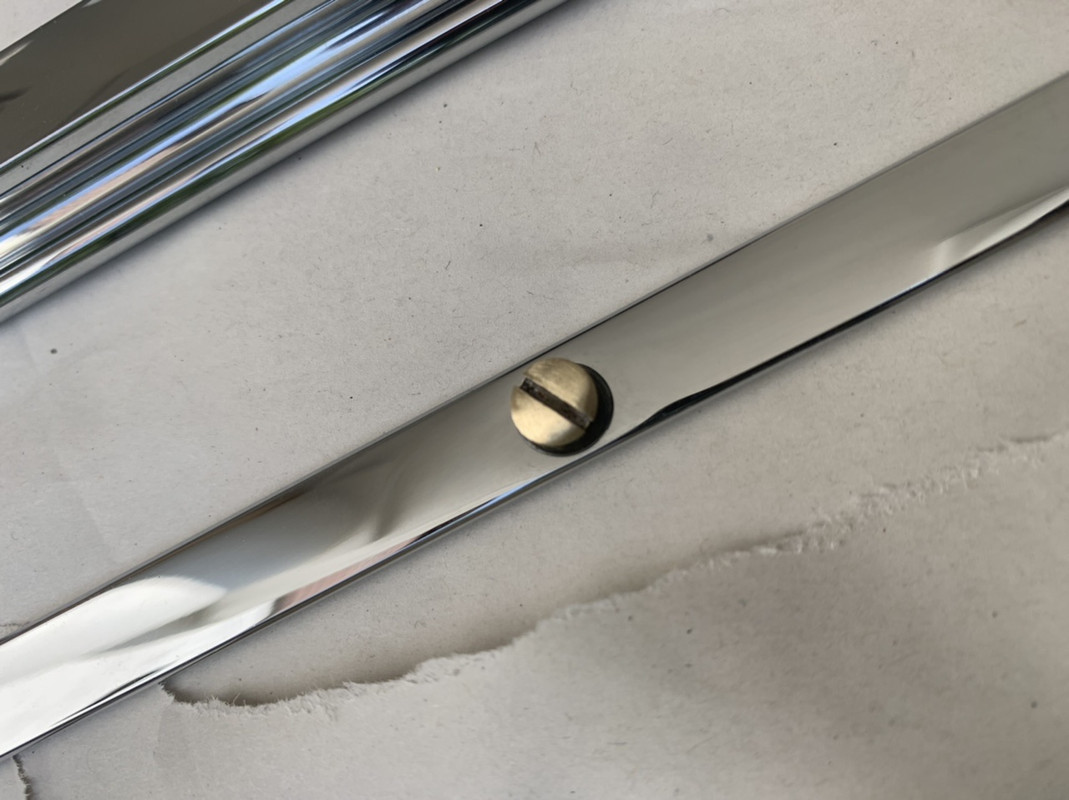
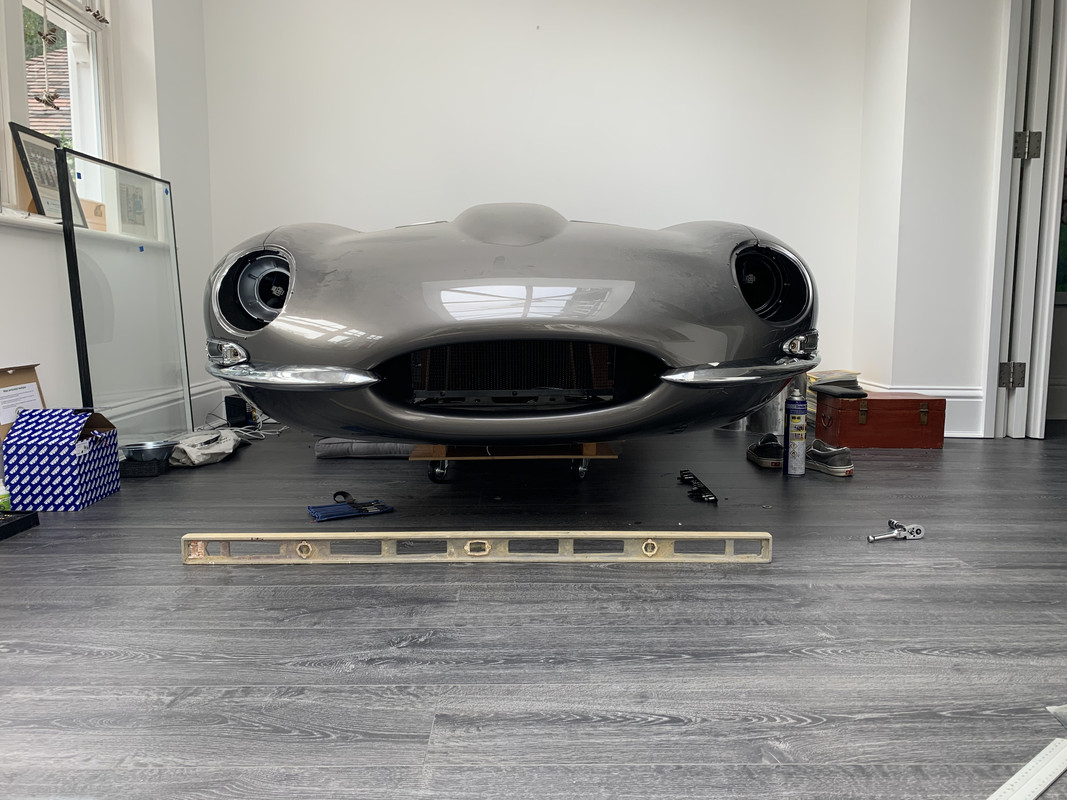
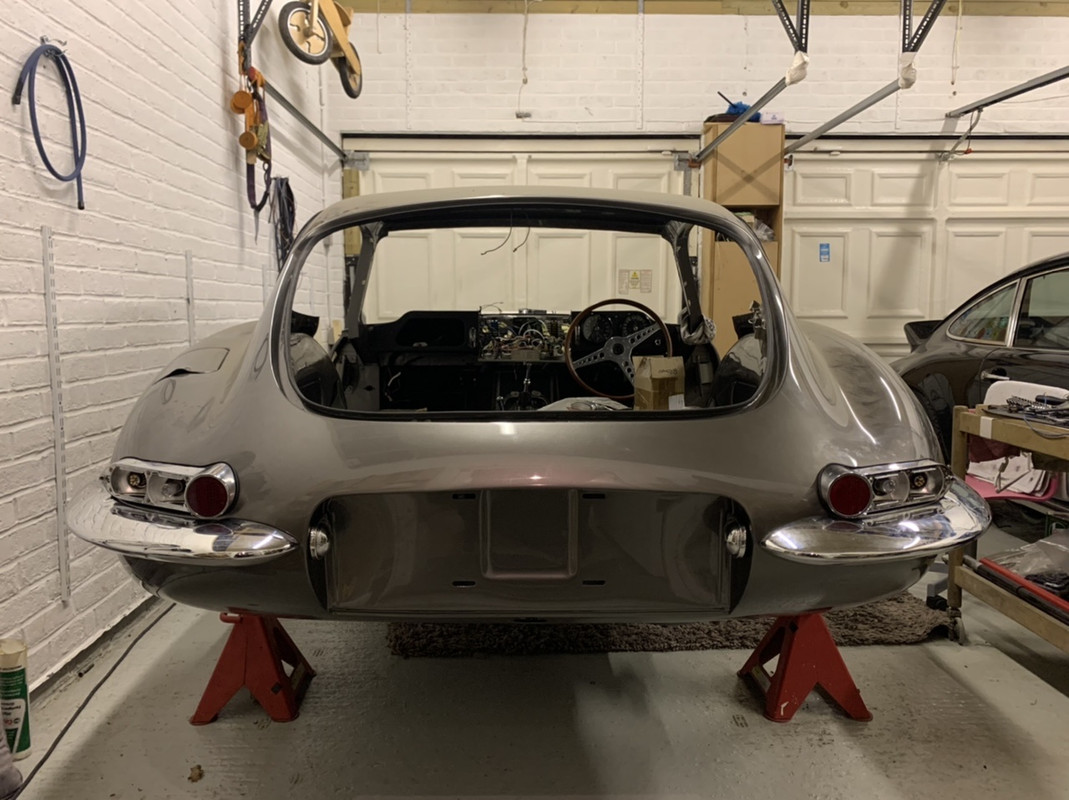
Bumpers.....hymmm...where do I start...on the positive side an elegant way of hiding a joint between body panels and a rudimentary means to protect that same body
On the negative...a truly rudimentary approach to fixing a complex geometry of double curves in an unyielding chrome finish to another series of handmade elliptical forms...which happens to be hand made
What could possibly go wrong
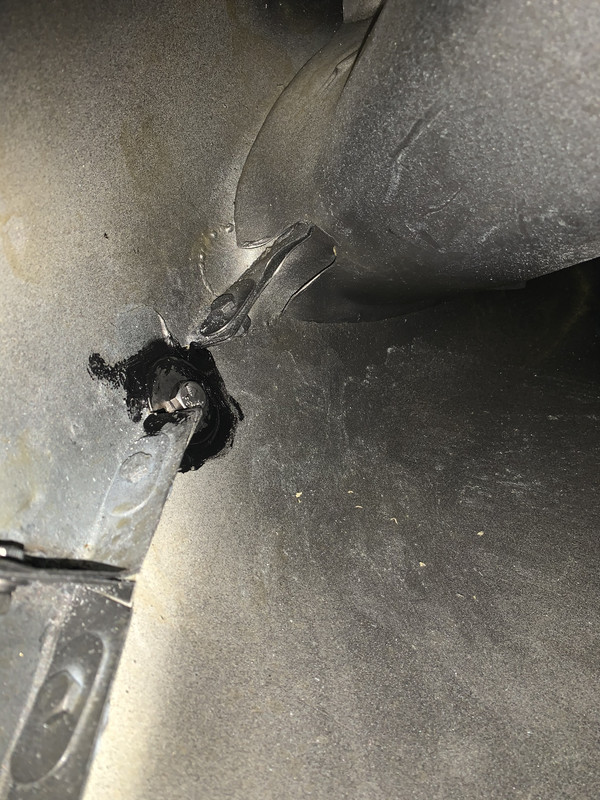
Oh...and the fixing method is elementary galvanised steel brackets..3/8” and 5/16” bolts...and some crude cast steel wedges...and 2 or 3 hand made irregular spaced holes in the body per bumper
I guess back in 1963 the production line didnt have 20 to 30 hours to fettle. Test..fix...adjust..remove..fettle..fix..check..remove...multiple times..to get the bumpers to be level and symmetrical
....and properly stop water getting in through the holes...
Jaguars solution was effective enough and part of the build to a price regime...once you know this detail you can’t help but spot uneven bumpers on the cars....and as for the water ingress...well that was dealt with via a gasket clipped (...!...therefore scratched and instantly started rusting...) to the chrome bumpers...this tried to seal the gap but also disguised the uneven junction between bumper and body..crudely....
This is a pretty car....notice the front near side bumper how it seems to sag....
And look at the near side rear..drooping..
My solution was to spend time adjusting the location of the holes to ensure each pair of bumpers were level and symmetrical...the holes were oversized to allow for adjustment...but then once positioned I made a perfect alignment by bonding (sikaflex) 40mm stainless penny washers one at a time to the inside of the body..these effectively ensured the bolts were angled perfectly with the sikalfex becoming the perfect packing profile....then allowing this to harden...removing the bumpers to then fill and smooth the outer part of the hole with more sikalfex to keep water out and then once that had cured I placed a similar 40mm neoprene washer between body and bumper bracket before tightening my choice of stainless bolts
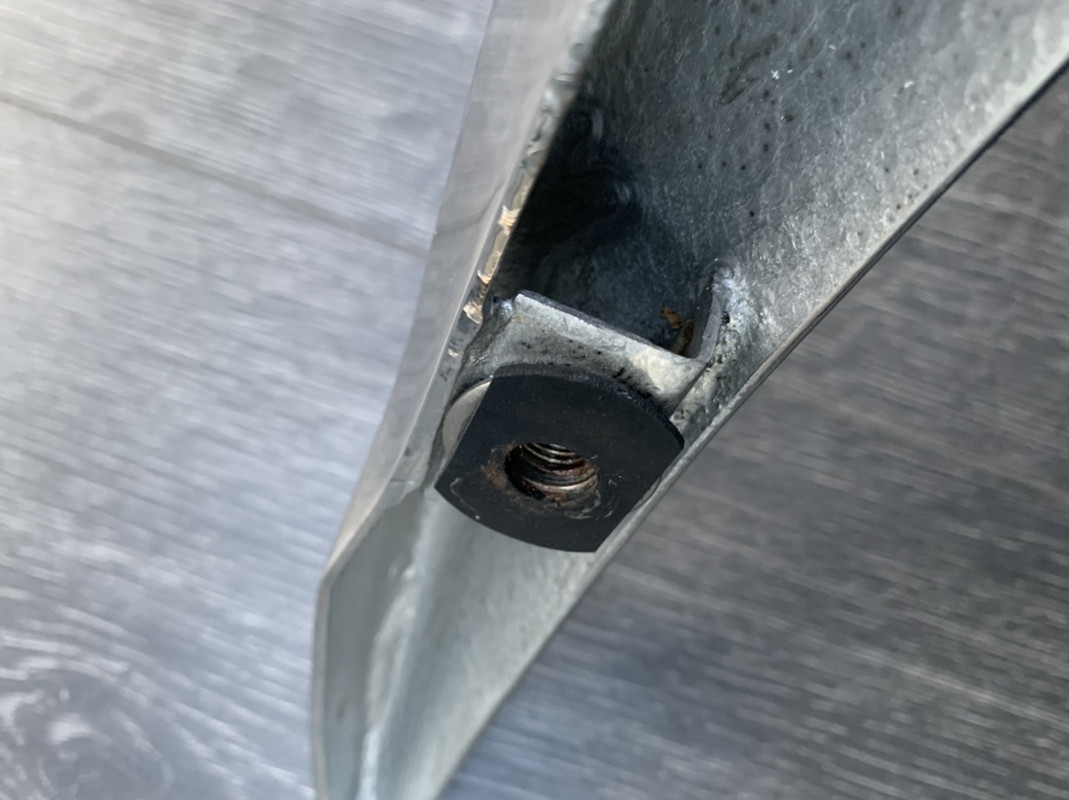
With more stainless washers acting as shims I could then space the bumpers evenly to provide a consistent 2mm gap all round....as Barry and I had painstakingly measured / scribed and ground the inner edges of the bumpers to match the profiles of the finished painted body ( try doing that and not scratching the paint.....)
And yes I did use a spirit level and steel rulers to complete the installation....
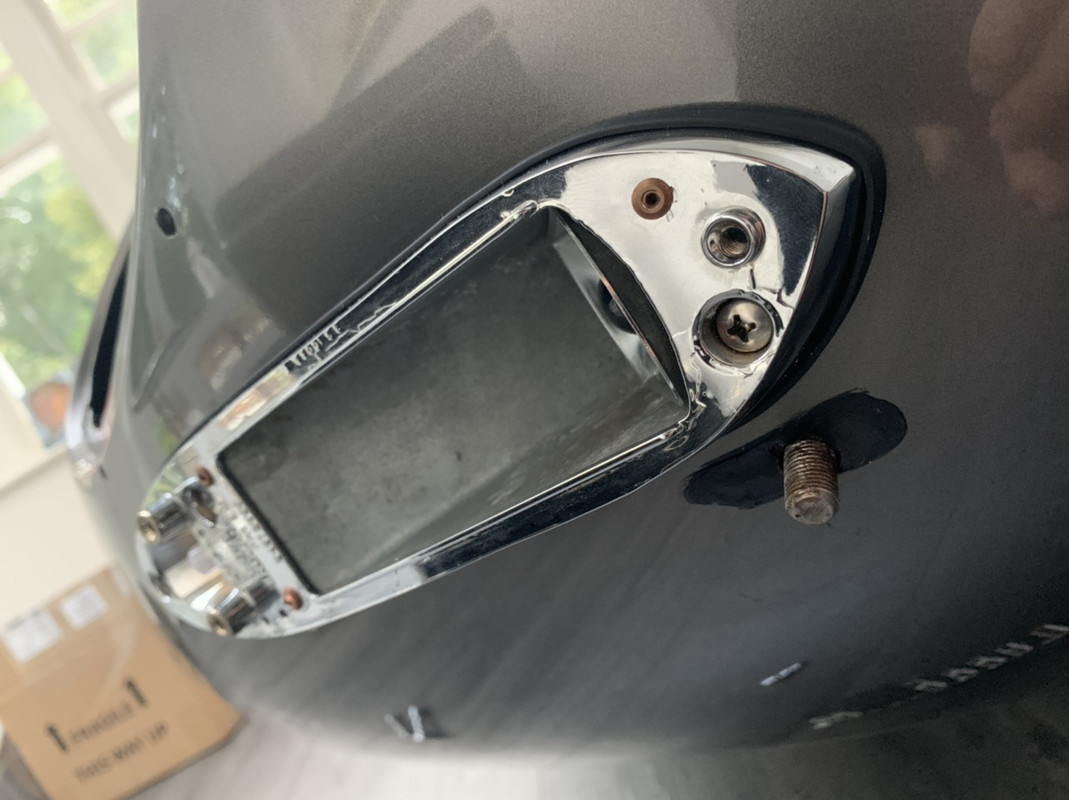
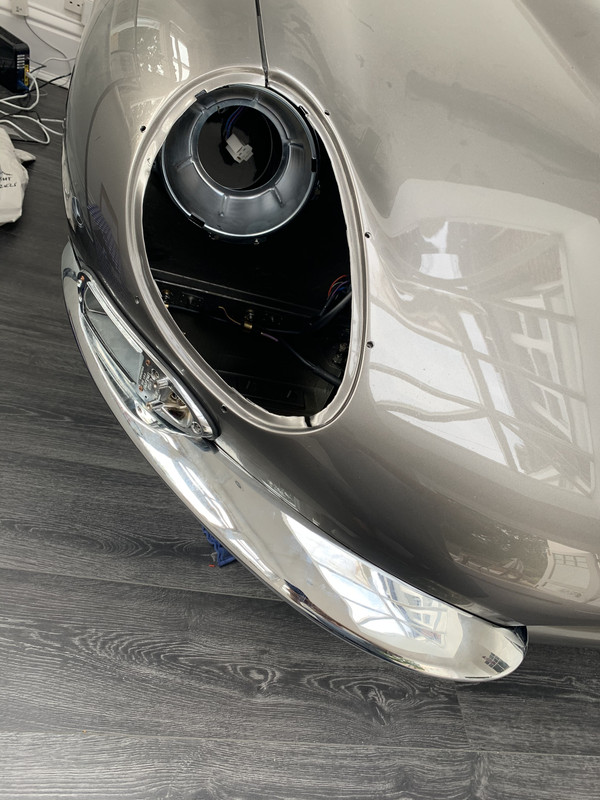
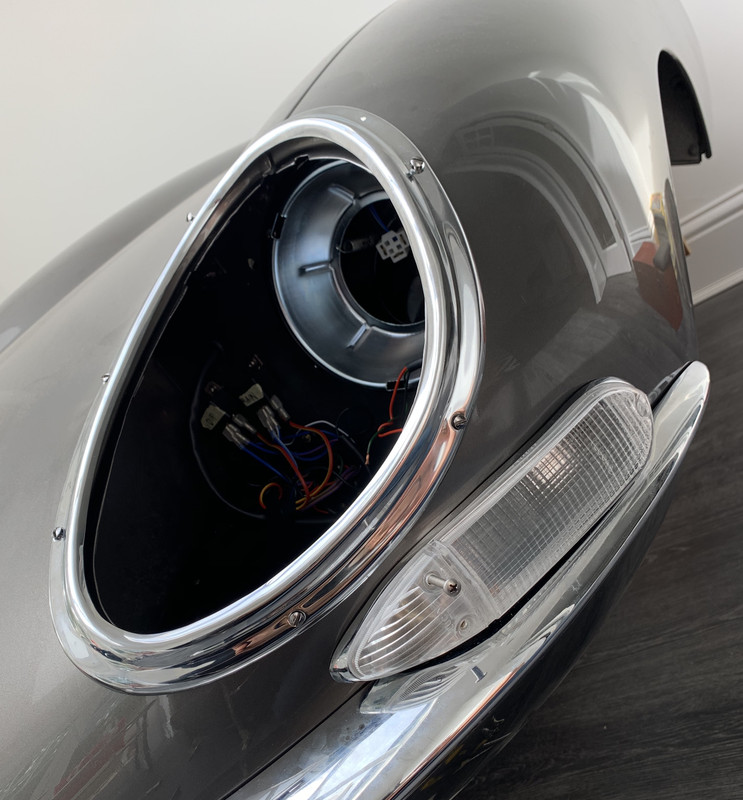
Indicators
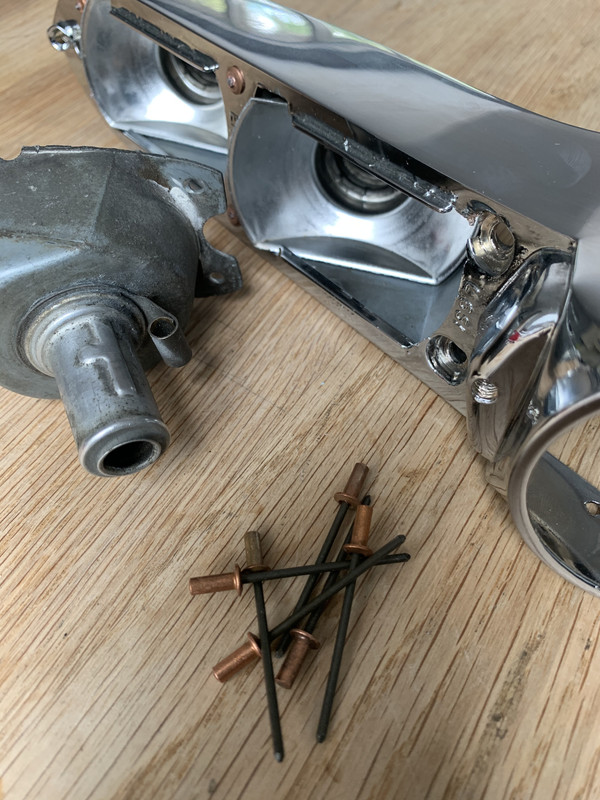
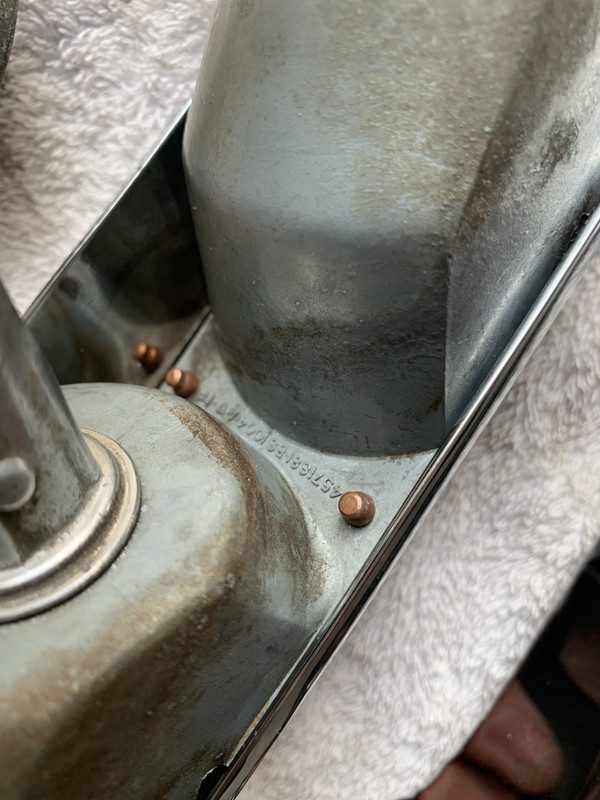
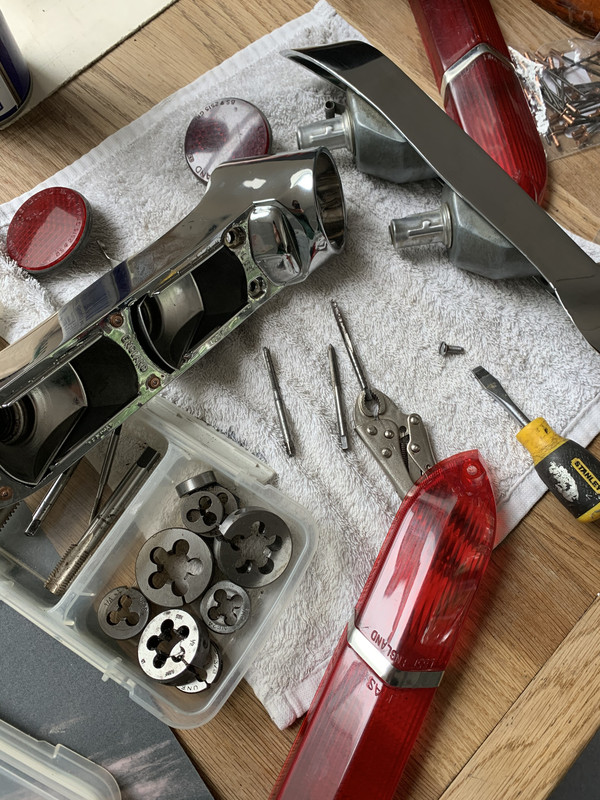
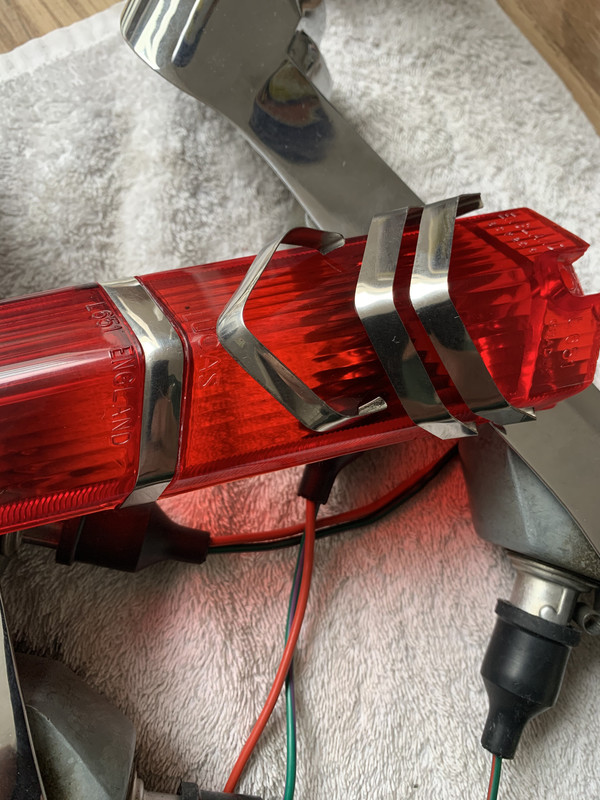
This was probably the low point of the project to be honest....as after all the anticipation of fitting new parts, yet again I had to contend with useless pattern reproduction part quality..but at least i found new solid copper rivets which i was very happy about....
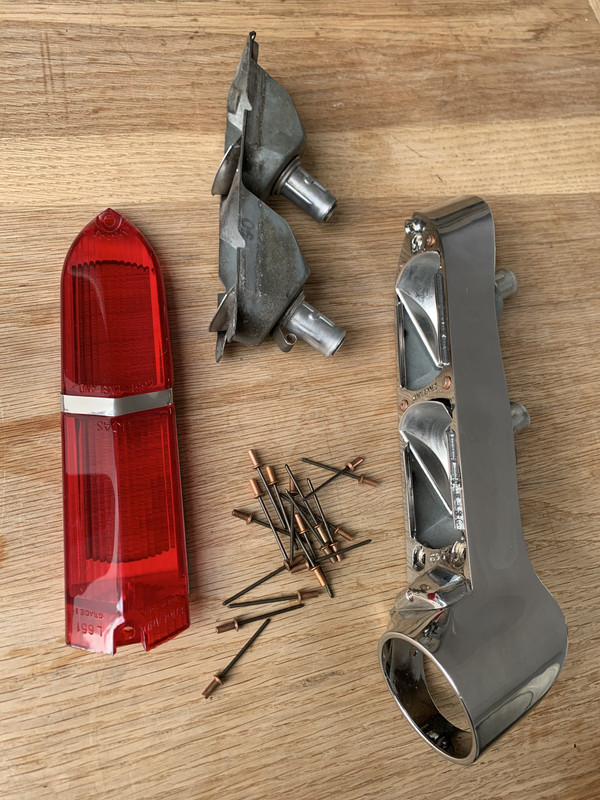
Consider the scenario.....
A hand built car body...
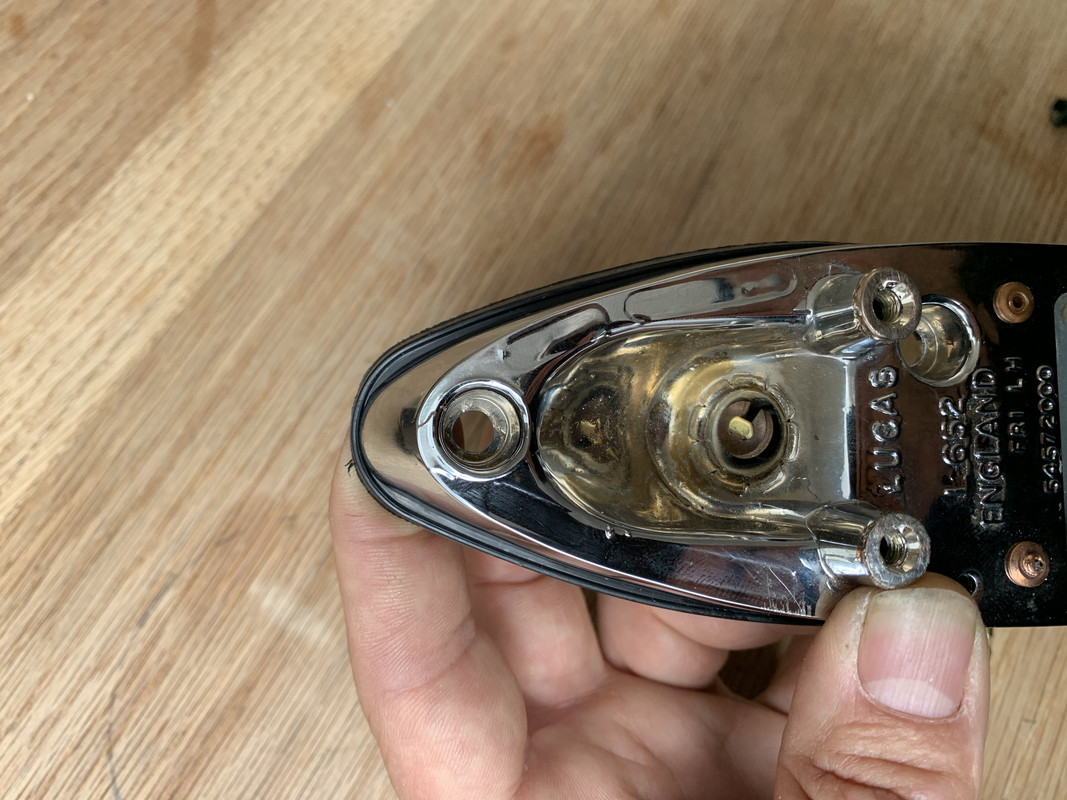
The cheapest from of die cast bodies to hold lights...made by Lucas
Reproduction gaskets to seal the junction between
Ground/polished and re-chromimg of the die castings
Reproduction plastic lenses that need to match original die cast housings
5 pieces...each with their own quality issues...fit issues..and alignment issues
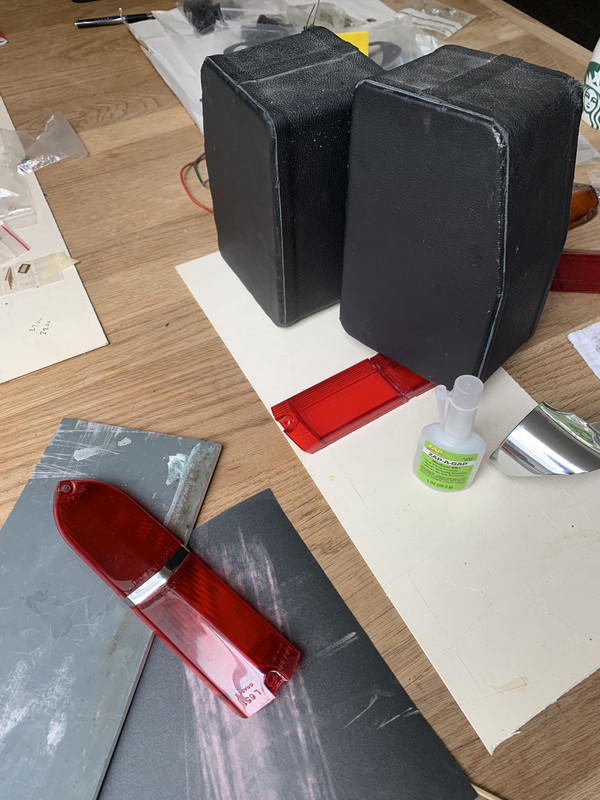
Even the decorative stainless bands on the reports were wrong..originals have a delicate curve in cross section...new are simply flat....
A complete shambles
DC coachworks did their best to match the profile of the castings when prepping their work...but then the cast bodies had to be cleaned and polished for chroming ...which changed subtle curves and added thickness with the triple chrome process....the plastic lenses I had to measure and sand to attempt to pair each side as they were wrong...the gaskets were just simply abominable....wrong shape..wrong compound of rubber ...just horrible...that aside from berating the 2 suppliers I had tried and demanding refunds even though I had butchered their products in a failed attempt to get them to fit...I ended up researching neoprene extrusions and made up my own perfectly fitting gaskets..(!)
This was the best....of the bad fitting issues....
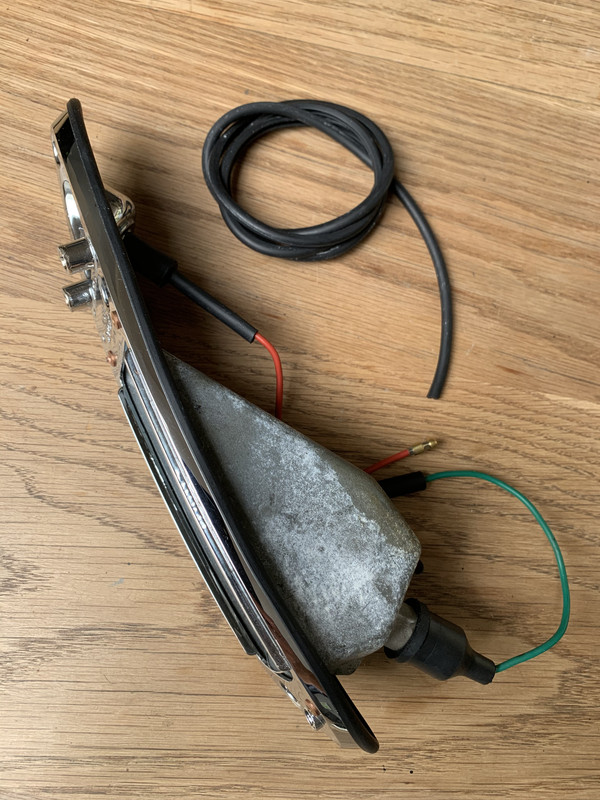
And lastly the lack of adjustment in fixing the die cast bodies to the printed shell...which meant I had to drill the finished chrome bodies to create oversized holes to claw back some kind of tolerance between pieces
Just horrible and so draining for me in enthusiasm
Sure...it’s lovely now...and in time it will he remembered with smiles...but without doubt a constant reminder of the challenge in seeking quality over and above what the car was originally..but also the fact that we are all i the hands so often of poor quality of parts in trying to enjoy our hobby
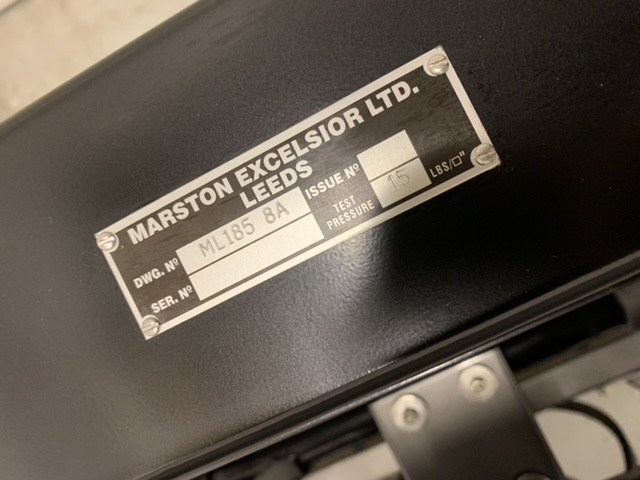
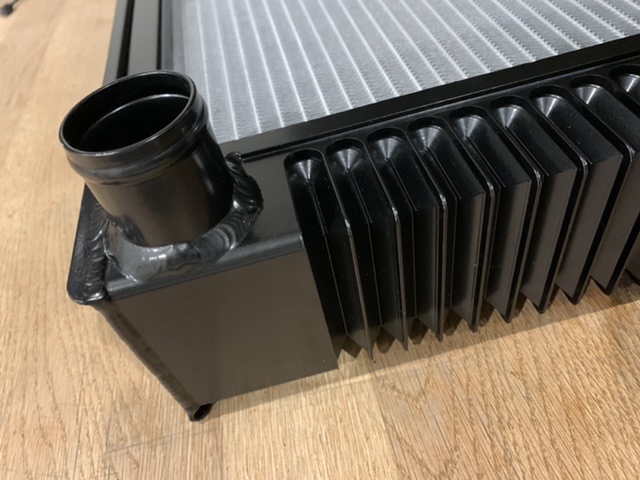
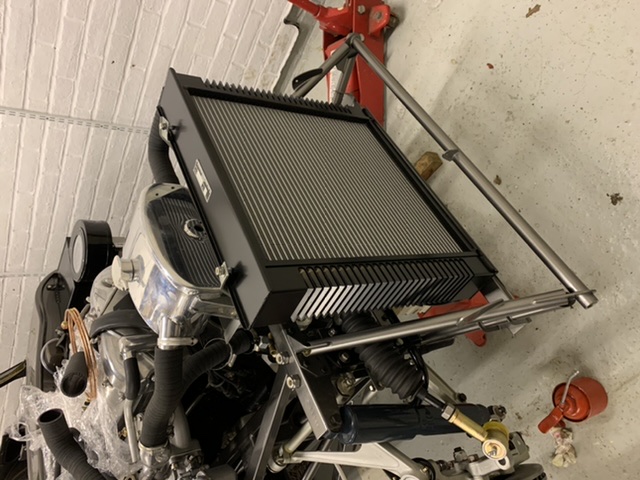
One item of endulgence however....which did fit correctly is the new reproductions of the original aluminium Marsten radiators, which the early cars came with...designed for the engine they were discontinued probably on cost grounds..but they are a thing of beauty..so I spent a great deal on this baby...
And yes....despite all that ..it is still a beautiful piece of automotive design .....
with amongst other things Barry’s unique bumpers....marvellous...time to break the routine and together with the indicator units put some shiny things on....
Err....no..
Firstly time to spend many more hours perfecting my self created solution to mounting the bumpers properly...level...symmetrical..and securely
And
Time to spend more incredibly frustrating days re-assembling the indicator units
Bumpers.....hymmm...where do I start...on the positive side an elegant way of hiding a joint between body panels and a rudimentary means to protect that same body
On the negative...a truly rudimentary approach to fixing a complex geometry of double curves in an unyielding chrome finish to another series of handmade elliptical forms...which happens to be hand made
What could possibly go wrong
Oh...and the fixing method is elementary galvanised steel brackets..3/8” and 5/16” bolts...and some crude cast steel wedges...and 2 or 3 hand made irregular spaced holes in the body per bumper
I guess back in 1963 the production line didnt have 20 to 30 hours to fettle. Test..fix...adjust..remove..fettle..fix..check..remove...multiple times..to get the bumpers to be level and symmetrical
....and properly stop water getting in through the holes...
Jaguars solution was effective enough and part of the build to a price regime...once you know this detail you can’t help but spot uneven bumpers on the cars....and as for the water ingress...well that was dealt with via a gasket clipped (...!...therefore scratched and instantly started rusting...) to the chrome bumpers...this tried to seal the gap but also disguised the uneven junction between bumper and body..crudely....
This is a pretty car....notice the front near side bumper how it seems to sag....
And look at the near side rear..drooping..
My solution was to spend time adjusting the location of the holes to ensure each pair of bumpers were level and symmetrical...the holes were oversized to allow for adjustment...but then once positioned I made a perfect alignment by bonding (sikaflex) 40mm stainless penny washers one at a time to the inside of the body..these effectively ensured the bolts were angled perfectly with the sikalfex becoming the perfect packing profile....then allowing this to harden...removing the bumpers to then fill and smooth the outer part of the hole with more sikalfex to keep water out and then once that had cured I placed a similar 40mm neoprene washer between body and bumper bracket before tightening my choice of stainless bolts
With more stainless washers acting as shims I could then space the bumpers evenly to provide a consistent 2mm gap all round....as Barry and I had painstakingly measured / scribed and ground the inner edges of the bumpers to match the profiles of the finished painted body ( try doing that and not scratching the paint.....)
And yes I did use a spirit level and steel rulers to complete the installation....
Indicators
This was probably the low point of the project to be honest....as after all the anticipation of fitting new parts, yet again I had to contend with useless pattern reproduction part quality..but at least i found new solid copper rivets which i was very happy about....
Consider the scenario.....
A hand built car body...
The cheapest from of die cast bodies to hold lights...made by Lucas
Reproduction gaskets to seal the junction between
Ground/polished and re-chromimg of the die castings
Reproduction plastic lenses that need to match original die cast housings
5 pieces...each with their own quality issues...fit issues..and alignment issues
Even the decorative stainless bands on the reports were wrong..originals have a delicate curve in cross section...new are simply flat....
A complete shambles
DC coachworks did their best to match the profile of the castings when prepping their work...but then the cast bodies had to be cleaned and polished for chroming ...which changed subtle curves and added thickness with the triple chrome process....the plastic lenses I had to measure and sand to attempt to pair each side as they were wrong...the gaskets were just simply abominable....wrong shape..wrong compound of rubber ...just horrible...that aside from berating the 2 suppliers I had tried and demanding refunds even though I had butchered their products in a failed attempt to get them to fit...I ended up researching neoprene extrusions and made up my own perfectly fitting gaskets..(!)
This was the best....of the bad fitting issues....
And lastly the lack of adjustment in fixing the die cast bodies to the printed shell...which meant I had to drill the finished chrome bodies to create oversized holes to claw back some kind of tolerance between pieces
Just horrible and so draining for me in enthusiasm
Sure...it’s lovely now...and in time it will he remembered with smiles...but without doubt a constant reminder of the challenge in seeking quality over and above what the car was originally..but also the fact that we are all i the hands so often of poor quality of parts in trying to enjoy our hobby
One item of endulgence however....which did fit correctly is the new reproductions of the original aluminium Marsten radiators, which the early cars came with...designed for the engine they were discontinued probably on cost grounds..but they are a thing of beauty..so I spent a great deal on this baby...
And yes....despite all that ..it is still a beautiful piece of automotive design .....
1974 2.7 Carrera
(full restoration. now as an RS Touring)
1963 3.8 E Type
( 11 years in the making…………………….)
1952. XK120…the next one ……….……..)
(full restoration. now as an RS Touring)
1963 3.8 E Type
( 11 years in the making…………………….)
1952. XK120…the next one ……….……..)
-
Nige
- Nurse, I think I need some assistance
- Posts: 6601
- Joined: Wed Nov 26, 2003 9:11 pm
- Location: Denby, Derbyshire
Re: E Type 888330
Loving the work and your strong OCD skills.
But one thing that bothers me is your lackadaisical approach to the orientation of your images onto the forum. A few rotate 90° left or right wouldn't go amiss. I'm constantly rocking my head from side to side. You must try harder!
But one thing that bothers me is your lackadaisical approach to the orientation of your images onto the forum. A few rotate 90° left or right wouldn't go amiss. I'm constantly rocking my head from side to side. You must try harder!
-
stretch
- Me and DDK sitting in a tree! KISSING
- Posts: 2689
- Joined: Thu May 21, 2009 2:54 pm
- Location: Kent
Re: E Type 888330
Yep, great attention to detail. Nearly there Jonathan.?
70T barn find...... to ST.
1998 C2 996 Kettle
1998 C2 996 Kettle
-
911hillclimber
- Nurse, I think I need some assistance
- Posts: 19000
- Joined: Mon Mar 10, 2008 6:26 pm
- Location: West Midlands
Re: E Type 888330
I now realise my approach to getting things 'right' is sooooo poor.
I really could not cope with this effort, 11/10 for your progress seeking perfection.
Going to be quite a machine when all done and dusted.
I really could not cope with this effort, 11/10 for your progress seeking perfection.
Going to be quite a machine when all done and dusted.
73T 911 Coupe, road/hillclimber 3.2L
Lola t 492 / 3.2 hillclimb racer
Boxster 987 Gen II 2.9
Lola t 492 / 3.2 hillclimb racer
Boxster 987 Gen II 2.9
-
jtparr
- DDK 1st, 2nd and 3rd for me!
- Posts: 2241
- Joined: Mon May 24, 2004 10:54 pm
- Location: london/surrey
Re: E Type 888330
Nige wrote:Loving the work and your strong OCD skills.
But one thing that bothers me is your lackadaisical approach to the orientation of your images onto the forum. A few rotate 90° left or right wouldn't go amiss. I'm constantly rocking my head from side to side. You must try harder!
Perfect Nige....I have to confess I did that partially to see if anyone would comment and also because after all that effort..I actually couldn’t be bothered...
Next time...perfect service will be resumed....
Cheers guys
1974 2.7 Carrera
(full restoration. now as an RS Touring)
1963 3.8 E Type
( 11 years in the making…………………….)
1952. XK120…the next one ……….……..)
(full restoration. now as an RS Touring)
1963 3.8 E Type
( 11 years in the making…………………….)
1952. XK120…the next one ……….……..)
-
jury
- I need to get out more!
- Posts: 3420
- Joined: Mon Apr 16, 2007 9:06 pm
- Location: Portland, Oregon, USA
Re: E Type 888330
'kin lovely stuff Mr Parr...Great to see !
Keep it up mate, hope all is well
Keep it up mate, hope all is well
# 465
1967 912 Polo Red
1968 912/11 RAL 7001 ' MOD ROD '
1990 964 C2 Velvet Red
1991 VW Vanagon GL (SOLD - Vanagone)
2017 Coleman CT200U
“It’s not where you’re from, it's where you’re at”
1967 912 Polo Red
1968 912/11 RAL 7001 ' MOD ROD '
1990 964 C2 Velvet Red
1991 VW Vanagon GL (SOLD - Vanagone)
2017 Coleman CT200U
“It’s not where you’re from, it's where you’re at”
Re: E Type 888330
Another level, JP, another level.
Wow.
Time well spent.
Wow.
Time well spent.
-
inaglasshouse

- DDK 1st, 2nd and 3rd for me!
- Posts: 2427
- Joined: Fri Mar 28, 2014 9:35 pm
- Location: Surrey, UK
Re: E Type 888330
That's generous, Jonathan. The rest of it just makes us mere mortals feel inadequatejtparr wrote:....I have to confess I did that partially to see if anyone would comment and also because after all that effort..I actually couldn’t be bothered...
Amazing work, amazing patience. Well done!