

Hi Jamie,
Not sure about the release lever. My 911 gearbox which I think has the same actuation as the 901 (could be wrong tho) has the lever the opposite way round. The inner cable is static and it's the outer cable sleeve that operates the lever. That would mean the inner cable needs to be secured on the outer bell housing. Mmm will have a look at pet.
Edit: just looked at PET and it looks correct. There isn't much movement needed to release the clutch.
Back in beige
Moderator: Bootsy
-
johnM
- I need to get out more!
- Posts: 3398
- Joined: Mon Apr 03, 2006 10:27 pm
- Location: Lake District
Re: Back in beige
John
1970 2.2E Coupe.
2004 996 GT3 mkII
2015 Skoda Octavia VRS TSI DSG.
2021 Toyota GR Yaris Circuit Pack
1970 2.2E Coupe.
2004 996 GT3 mkII
2015 Skoda Octavia VRS TSI DSG.
2021 Toyota GR Yaris Circuit Pack
-
jamie
- Me and DDK sitting in a tree! KISSING
- Posts: 2587
- Joined: Mon Sep 18, 2006 12:23 am
- Location: Palm Springs, California
- Contact:
-
jamie
- Me and DDK sitting in a tree! KISSING
- Posts: 2587
- Joined: Mon Sep 18, 2006 12:23 am
- Location: Palm Springs, California
- Contact:
Re: Back in beige
If someone had told me, back when I started this project, that I would one day be painting the black bit back around the edge of the doors (amongst many other mundane tasks fulfilled as a hat-tip to originality), I would have laughed and laughed and laughed and...

'68 912
-
Gary71
- Nurse, I think I need some assistance
- Posts: 10689
- Joined: Wed Mar 31, 2004 1:27 pm
- Location: Cheshire
- Contact:
Re: Back in beige
-
jamie
- Me and DDK sitting in a tree! KISSING
- Posts: 2587
- Joined: Mon Sep 18, 2006 12:23 am
- Location: Palm Springs, California
- Contact:
Re: Back in beige
Latest saga - my headlamps won't fit. I put a thread in another part of this forum to ask for advice, and was (correctly) informed that the headlamp bowl lips was probably thick with high-build. So last night I took a small screwdriver and chipped all the paint off the lip, leaving it in the base-coat of epoxy primer.
I'm amazed how sticky the epoxy primer is - it's very difficult to get back to bare metal. Either way, I repainted the lips again with more black epoxy primer, just to make sure they were protected. In addition to having cut-off the four mounting tabs for US-spec sugarbowl headlamps (I should have done this earlier as I had always planned to fit Euro-spec lamps, but didn't realise they were an issue), the insides of my headlamp bowls now look like a right dog's dinner.

Of course, one won't see any of this once the headlamp is on, but it's not fun to be buggering around with the shell at this stage.
The headlamp ring does now fit better, but with the rubber seal also in place it's still not good enough to stay put. It seems the lip of the bowl is too close to the wing and with the seal taking-up all of the space there's not enough room for the lamp ring to hook over the tabs at the top. In addition, the seal doesn't sit right down the sides of the ring.

I suspect the gap has either been closed-up by paint, or the wings weren't manufactured to the right tolerances. I can't work out which is more likely.
Either way, I wish I had dry-fitted the lights before it went for paint. I didn't even imagine this would be an issue. If you're doing similar work on your car in the future, MAKE SURE YOU DRY-FIT EVERYTHING BEFORE PAINT!
The Porsche seal is never going to fit, so I'm going to try one from an early Beetle (same shape headlamps). Failing that, I'll make my own from some 3mm rubber cord.
I've also been working on getting the engine bay ready for the engine. The YnZ wiring loom didn't come with the plastic protective sleeve that covers the loom on its run from the tunnel / firewall up to the engine, so I mail-ordered a roll of large-diameter heat shrink and used that instead. Looks nice and neat all clipped into place, plus it's adequately protected from elements.
Also arrived in the post was a coil of stainless wire. I made a new engine lid release cable drilling-out the handle and soldering the new one like I did with the fresh air vent up front. I used the rest to make new flapper box cables.
One thing I can't work out - stupidly, I threw-away the old aluminium fuel pipe (that runs from the tunnel / firewall, under the seats and up to the engine). I have copper pipe to make a new section, but I can't remember where the old one went. Is this correct? The bit that bothers me is where it runs through the chassis leg - it's metal-on-metal, and seems to be asking for wear.


I'm amazed how sticky the epoxy primer is - it's very difficult to get back to bare metal. Either way, I repainted the lips again with more black epoxy primer, just to make sure they were protected. In addition to having cut-off the four mounting tabs for US-spec sugarbowl headlamps (I should have done this earlier as I had always planned to fit Euro-spec lamps, but didn't realise they were an issue), the insides of my headlamp bowls now look like a right dog's dinner.
Of course, one won't see any of this once the headlamp is on, but it's not fun to be buggering around with the shell at this stage.
The headlamp ring does now fit better, but with the rubber seal also in place it's still not good enough to stay put. It seems the lip of the bowl is too close to the wing and with the seal taking-up all of the space there's not enough room for the lamp ring to hook over the tabs at the top. In addition, the seal doesn't sit right down the sides of the ring.
I suspect the gap has either been closed-up by paint, or the wings weren't manufactured to the right tolerances. I can't work out which is more likely.
Either way, I wish I had dry-fitted the lights before it went for paint. I didn't even imagine this would be an issue. If you're doing similar work on your car in the future, MAKE SURE YOU DRY-FIT EVERYTHING BEFORE PAINT!
The Porsche seal is never going to fit, so I'm going to try one from an early Beetle (same shape headlamps). Failing that, I'll make my own from some 3mm rubber cord.
I've also been working on getting the engine bay ready for the engine. The YnZ wiring loom didn't come with the plastic protective sleeve that covers the loom on its run from the tunnel / firewall up to the engine, so I mail-ordered a roll of large-diameter heat shrink and used that instead. Looks nice and neat all clipped into place, plus it's adequately protected from elements.
Also arrived in the post was a coil of stainless wire. I made a new engine lid release cable drilling-out the handle and soldering the new one like I did with the fresh air vent up front. I used the rest to make new flapper box cables.
One thing I can't work out - stupidly, I threw-away the old aluminium fuel pipe (that runs from the tunnel / firewall, under the seats and up to the engine). I have copper pipe to make a new section, but I can't remember where the old one went. Is this correct? The bit that bothers me is where it runs through the chassis leg - it's metal-on-metal, and seems to be asking for wear.
'68 912
-
MT
- DDK rules my life!
- Posts: 1247
- Joined: Wed Nov 10, 2010 5:42 pm
- Location: Gatwick
Re: Back in beige
Jamie, there are two rubber plugs/sleeves that go over the pipe - one for either end. They shove into the top/bottom of the hole to stop that nasty 'chaffing'
I probably have a photo showing them if you need one.
Mick
I probably have a photo showing them if you need one.
Mick
'Creativity is the product of time wasted' Albert Einstein
1972 RHD 2.4E (ex Bob Watson racer - now in original Tangerine)
1966 LHD swb (Doctors car - now with Mrs. Ferrari in Madrid)
1966 TR4A (now sold and replaced by 1990 944 turbo)
1966 S2a Landrover
1972 RHD 2.4E (ex Bob Watson racer - now in original Tangerine)
1966 LHD swb (Doctors car - now with Mrs. Ferrari in Madrid)
1966 TR4A (now sold and replaced by 1990 944 turbo)
1966 S2a Landrover
-
8bit-ash
- DDK slapper chatter
- Posts: 358
- Joined: Mon Jan 19, 2015 12:28 pm
- Location: Suffolk
Re: Back in beige
Don't know if these are of any use -


1970 911E Sportomatic
2002 Boxster S
2004 Audi A2 TDi 90
2002 Boxster S
2004 Audi A2 TDi 90
-
jamie
- Me and DDK sitting in a tree! KISSING
- Posts: 2587
- Joined: Mon Sep 18, 2006 12:23 am
- Location: Palm Springs, California
- Contact:
Re: Back in beige
Ah, brilliant - thanks guys. I have that plug! Just one though - I'll have to buy/make the other one.
I also used 10mm pipe, and it looks like I need 8mm. Easy to get 8mm copper microbore on eBay.
Should have taken more pictures at disassembly (the irony...).
I also used 10mm pipe, and it looks like I need 8mm. Easy to get 8mm copper microbore on eBay.
Should have taken more pictures at disassembly (the irony...).
'68 912
-
jamie
- Me and DDK sitting in a tree! KISSING
- Posts: 2587
- Joined: Mon Sep 18, 2006 12:23 am
- Location: Palm Springs, California
- Contact:
Re: Back in beige
I finally solved the headlamp seal problem.
Met up with my friend Colin...

Flew to Goodwood on a whim...

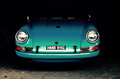
Went to the circuit to get some food and chanced upon a driving event, where we found this...

Which is owned by Chris (Colin on the left)...

The headlamp seals looked like this...

I think mine are exactly the same. Time to invest in some VW ones.
Met up with my friend Colin...
Flew to Goodwood on a whim...
Went to the circuit to get some food and chanced upon a driving event, where we found this...
Which is owned by Chris (Colin on the left)...
The headlamp seals looked like this...
I think mine are exactly the same. Time to invest in some VW ones.
'68 912
-
sladey
- Nurse, I think I need some assistance
- Posts: 9315
- Joined: Sat Apr 23, 2005 9:08 pm
- Location: Nottingham, UK
Re: Back in beige
Has chris bought it back then? (I'm presuming that's kermit/the green shitter)
The simple things you see are all complicated
I look pretty young but I'm just backdated yeah
I look pretty young but I'm just backdated yeah
-
jamie
- Me and DDK sitting in a tree! KISSING
- Posts: 2587
- Joined: Mon Sep 18, 2006 12:23 am
- Location: Palm Springs, California
- Contact:
Re: Back in beige
Yep - he (and I think Richard Tuthill) bought it back from the guy that bought it from him. Still a very nice car.
'68 912
-
Robind
- Married to the DDK
- Posts: 229
- Joined: Sat Aug 01, 2015 6:25 pm
- Location: Stamford, Lincs
Re: Back in beige
Like your style Jamie, "need to sort headlamp seal,step 1 get in plane and fly to race track, step 2 check out car, step 3 fly home to apply to own car!" 
1966 912 Slate Grey sunroof
1975 911 Blue Targa
2001 996 Blue Convertible
1981 Ferrari 308 GTB
1960 Mercedes 190SL
1983 Mercedes 500SL
1975 911 Blue Targa
2001 996 Blue Convertible
1981 Ferrari 308 GTB
1960 Mercedes 190SL
1983 Mercedes 500SL
-
jamie
- Me and DDK sitting in a tree! KISSING
- Posts: 2587
- Joined: Mon Sep 18, 2006 12:23 am
- Location: Palm Springs, California
- Contact:
Re: Back in beige
Recent purchases, with numbers:
Two rubber blocks. These hold the gearbox in place. There should be more of them holding the engine in place too, but I'm using a home-designed, laser-cut engine mount with no rubber blocks. I hope it works because these fuckers cost £60 each and there are another five of them on the original engine mount. I'm glad I did this though - they're much more supple than the tough old blocks I removed from the car, so hopefully should do their job better.

One dashboard. Once I'd seen the price for this, I really didn't want to spend - it felt totally obscene. The car's original dash was split in two, extremely brittle and beyond repair. For many weeks I considered my options - make do without, make one myself, or buy. In the end concluded that the car deserved a dashboard, and it was easier and quicker just to pony up. It's a piece of foam, and it cost £780, giving it about the same price-per-weight as ivory. In the grand scheme of life, humanity, the planet, the universe etc, it's about as pointless as ivory, too. On the upside, I didn't have to kill an elephant to get it.


I then attempted to make the top piece myself, but I wasn't 100% happy with the fit, so I'm going to try this bit again...

Two rubber blocks. These hold the gearbox in place. There should be more of them holding the engine in place too, but I'm using a home-designed, laser-cut engine mount with no rubber blocks. I hope it works because these fuckers cost £60 each and there are another five of them on the original engine mount. I'm glad I did this though - they're much more supple than the tough old blocks I removed from the car, so hopefully should do their job better.
One dashboard. Once I'd seen the price for this, I really didn't want to spend - it felt totally obscene. The car's original dash was split in two, extremely brittle and beyond repair. For many weeks I considered my options - make do without, make one myself, or buy. In the end concluded that the car deserved a dashboard, and it was easier and quicker just to pony up. It's a piece of foam, and it cost £780, giving it about the same price-per-weight as ivory. In the grand scheme of life, humanity, the planet, the universe etc, it's about as pointless as ivory, too. On the upside, I didn't have to kill an elephant to get it.
I then attempted to make the top piece myself, but I wasn't 100% happy with the fit, so I'm going to try this bit again...
Last edited by jamie on Sat Oct 17, 2015 8:16 am, edited 1 time in total.
'68 912
-
jamie
- Me and DDK sitting in a tree! KISSING
- Posts: 2587
- Joined: Mon Sep 18, 2006 12:23 am
- Location: Palm Springs, California
- Contact:
Re: Back in beige
To clarify - I hope no-one finds the number discussion crass. Its intended for anyone reading this, who is considering doing a restoration themselves, to see what things will cost. Hidden shockers like this put paid to any notion of budget (I don't have one as I felt it would only upset me when I would inevitably discover it was unachievable).
People seem to be staggered by the current values of 912s, but the truth is it's very unlikely one can restore one nicely for less. You definitely can't restore one properly for less.
Ouch.
People seem to be staggered by the current values of 912s, but the truth is it's very unlikely one can restore one nicely for less. You definitely can't restore one properly for less.
Ouch.
'68 912
-
inaglasshouse
- DDK 1st, 2nd and 3rd for me!
- Posts: 2450
- Joined: Fri Mar 28, 2014 9:35 pm
- Location: Surrey, UK
Re: Back in beige
Good point.jamie wrote:On the upside, I didn't have to kill an elephant to get it.
I shall apply the same logic to all NOS parts purchases. Although, having recently bought a few bits, the prices suggest they might have been carved from unicorn horn.
Cheers, Richard.