

Back in beige
Moderator: Bootsy
-
jb
- Me and DDK sitting in a tree! KISSING
- Posts: 2554
- Joined: Thu Jul 13, 2006 10:34 pm
- Location: London
Re: Back in beige
It looks fabulous Jamie and that shot looks very artistic almost like body sculpture.
#1370
-
jamie
- Me and DDK sitting in a tree! KISSING
- Posts: 2587
- Joined: Mon Sep 18, 2006 12:23 am
- Location: Palm Springs, California
- Contact:
Re: Back in beige
Might be. I haven't laid paint stripe-over-stripe with it, so can't tell you how coverage would look. The spray pattern is about 4-5 inches long.911hillclimber wrote:to that gun, would it give a good cover to (say) a 911 engine lid area?
To be honest, the £30 normal-sized guns that I used to paint the car are fine, I think I just had the pressure set a bit low and the paint wasn't fully atomising. After three coats it was looking a bit ripply. Certain bits, like the bumper, were OK.
The amazing thing is how good the cheap guns are. I bought the best of everything on this job, figuring that I was saving heaps of money anyway, and that I could use all the help I could get. However, everything I read said that cheap guns would be OK for home use, and I can't disagree. I should have just done more investigation into setting them up right!
'68 912
-
AndrewSlater

- I luv DDK!
- Posts: 995
- Joined: Wed Nov 30, 2011 3:35 pm
Re: Back in beige
It's looking fantastic Jamie, your perseverance is being richly rewarded.
Vaughan from Envirostrip had asked me how you were getting on the other day - so he will be interested to see the results.
As for the wing to scuttle 'rubbers' - I don't think they were originally rubber.
On my '66 car when the wings came off there appeared to be two thin sheets of material.
My body shop pointed out this would have originally been a single piece of material that was folded and that over years of polishing the car the fold had worn through.
My bodyshop has some fabricated from the local trimmers from vinyl I think.
I had bought the rubber ones but they looked so wrong compared with what was originally there.
Keep the updates coming - we're interested to hear about the visit to the Lakes!
1966 Porsche 912 Slate Grey, red interior - first owner owned for 41 years
1974 Porsche 911 2.7 (The Manhattan project) viewtopic.php?f=28&t=51455
1973 VW 914 1.7 Olympic Blue - ( gone to a good home )
1974 Porsche 911 2.7 (The Manhattan project) viewtopic.php?f=28&t=51455
1973 VW 914 1.7 Olympic Blue - ( gone to a good home )
-
hot66

- Moderator
- Posts: 19179
- Joined: Tue Nov 11, 2003 4:17 pm
- Location: North Yorkshire
Re: Back in beige
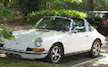
ive seen many 'professional' paint jobs that have pin holes etc. I think you're being too hard on yourself Jamie. From the photos it looks spot on ( although I do appreciate sometime the camera can be flatteringjamie wrote:Back into the garage - couldn't resist a quick go with some polish.
You can see things in it! There are also some things in the paint - little dents where flies once landed, some tiny pinholes. I'm not bothered - it was done in a garage, not a hermetically-sealed lab.
I'd call it a three-foot paint job. Three foot, for two grand.


James
1973 911 2.4S
1993 964 C2
2010 987 Spyder
1963 Honda C100 Supercub
Its not how fast you go, but how you go fast
1973 911 2.4S
1993 964 C2
2010 987 Spyder
1963 Honda C100 Supercub
Its not how fast you go, but how you go fast
-
Project 911
- DDK above all
- Posts: 165
- Joined: Mon Apr 07, 2008 5:57 pm
- Location: Finland
Re: Back in beige
+1hot66 wrote: ive seen many 'professional' paint jobs that have pin holes etc. I think you're being too hard on yourself Jamie. From the photos it looks spot on ( although I do appreciate sometime the camera can be flattering
And unlike many others (especially US based...) I would say that 50 years ago paint wasn't perfect even when they rolled out of factory.
Ville
*************
1967 911 resto-project
*************
1967 911 resto-project
-
Nick Moss
- Nurse, I think I need some assistance
- Posts: 9424
- Joined: Sat Nov 08, 2003 6:59 pm
- Location: East Sussex
- Contact:
Re: Back in beige
John is right, they were originally 4.3 mm but if you want the best fit you may need to use the 6.5 mm onesjohnM wrote:Hi Jamie they should be the 4.3mm ones.jamie wrote:And so, the first of many questions... can anyone help me with info on wing-to-scuttle-panel seals? Design 911 list two varieties - one at 6.5mm wide, and one at 4.3mm wide. Which ones should my car have?
-
Darren65

- Nurse, I think I need some assistance
- Posts: 8161
- Joined: Mon Dec 13, 2010 10:55 pm
- Location: North Wiltshire
- Contact:
Re: Back in beige
....never heard that before although my knowledge on early cars is limited - is this the same on your car Jason?AndrewSlater wrote: As for the wing to scuttle 'rubbers' - I don't think they were originally rubber.
On my '66 car when the wings came off there appeared to be two thin sheets of material.
My body shop pointed out this would have originally been a single piece of material that was folded and that over years of polishing the car the fold had worn through.
If fitting the rubber wing to scuttle rubbers I'd go with the narrow ones - seeing the wide ones on early cars smacks of a lack of attention to detail imo.
Darren
72T 2.5... http://ddk-online.com/phpBB2/viewtopic.php?f=10&t=56183
73 2.4E ... http://ddk-online.com/phpBB2/viewtopic.php?f=10&t=44242
77 Carrera 3.0...to 74 3.0RS ... http://ddk-online.com/phpBB2/viewtopic.php?f=28&t=63389
72T 2.5... http://ddk-online.com/phpBB2/viewtopic.php?f=10&t=56183
73 2.4E ... http://ddk-online.com/phpBB2/viewtopic.php?f=10&t=44242
77 Carrera 3.0...to 74 3.0RS ... http://ddk-online.com/phpBB2/viewtopic.php?f=28&t=63389
-
jamie
- Me and DDK sitting in a tree! KISSING
- Posts: 2587
- Joined: Mon Sep 18, 2006 12:23 am
- Location: Palm Springs, California
- Contact:
Re: Back in beige
I found one new 4.3mm strip (I had two stashed-away in a box, but the other is torn). It fits really nicely on the nearside. Does this mean Barry did a proper job?Darren65 wrote:If fitting the rubber wing to scuttle rubbers I'd go with the narrow ones - seeing the wide ones on early cars smacks of a lack of attention to detail imo.
Today I put the tinware back on the engine. That took ages. I dropped and chipped my powdercoated fan shroud, of course. It's quite a small mark, and on the back edge so I don't think you will see it once the engine is in.
I also discovered that the front bumper mounts and strut top mounts never made it to the powdercoaters. So I cleaned them up in a friend's sandblaster and brought them home to paint with epoxy.
I do wonder if epoxy might be even more resilient than powdercoat. Once this stuff is on, that's it - it will not shift. I love it.

And today's conundrum...
I'm trying to put my rear hubs back in. When I removed them, there was an O-ring, held in place with a plate. I'm pretty sure that the plate I have in my pile of powdercoated bits is not the same plate I removed. This one appears not to fit. I can see how it is supposed to, but it doesn't.

I think it's from a later car. The reason I suspect this is that the previous owner included a set of (not-fitted) SC calipers in the sale. I presume this back plate has to be used with the rear SC calipers in order to hold the handbrake cable or something. Or am I barking up the wrong tree?
Either way, if these plates are off another car, where the hell are my original plates?!
Last edited by jamie on Thu Jul 02, 2015 10:57 pm, edited 1 time in total.
'68 912
-
jamie
- Me and DDK sitting in a tree! KISSING
- Posts: 2587
- Joined: Mon Sep 18, 2006 12:23 am
- Location: Palm Springs, California
- Contact:
Re: Back in beige
... I just checked 911 rear axle parts diagrams all the way from 1964 to 1986, and I can't see that plate anywhere.
I then checked my disassembly photos (from Oct 2013!) and it was definitely on the car then. I reckon the powdercoat has filled up the gap.
All my powdercoated parts were done twice, since they did everything in gloss black by mistake, then went over it with satin black after. Not sure how thick it's on, but this plate really doesn't want to go on...
'68 912
-
Lightweight_911
- Nurse, I think I need some assistance
- Posts: 17942
- Joined: Wed Nov 12, 2003 10:48 pm
- Location: Worcs/W Mids border
Re: Back in beige
Here are the PET diagrams for '68 & the SC - it looks as though the one you show in your photo is the correct (earlier) version:


Andy
“Adding power makes you faster on the straights;
- subtracting weight makes you faster everywhere”
“Adding power makes you faster on the straights;
- subtracting weight makes you faster everywhere”
-
Max911
- DDK above all
- Posts: 154
- Joined: Sun Dec 16, 2012 11:21 am
Re: Back in beige
hot66 wrote:ive seen many 'professional' paint jobs that have pin holes etc. I think you're being too hard on yourself Jamie. From the photos it looks spot on ( although I do appreciate sometime the camera can be flatteringjamie wrote:Back into the garage - couldn't resist a quick go with some polish.
You can see things in it! There are also some things in the paint - little dents where flies once landed, some tiny pinholes. I'm not bothered - it was done in a garage, not a hermetically-sealed lab.
I'd call it a three-foot paint job. Three foot, for two grand.
Absolut great job!! Compliments!!
-
jamie
- Me and DDK sitting in a tree! KISSING
- Posts: 2587
- Joined: Mon Sep 18, 2006 12:23 am
- Location: Palm Springs, California
- Contact:
Re: Back in beige
Thanks for this Andy. I managed to persuade the part onto the banana arm using a rubber mallet. It was a tight fit - I think the powdercoat is very thick.Lightweight_911 wrote:Here are the PET diagrams for '68 & the SC - it looks as though the one you show in your photo is the correct (earlier) version
Here's how it went together:


Rebuilt these driveshafts ages ago. Nice to have them clean and ready to fit.

I couldn't find the washers for the driveshafts, but I had some in my collection that fitted. I couldn't deal with the castellated nut not sitting in line with the hole for the split pin, so I did what one does on an aircraft and fitted two. Bit anal, but the pin has to sit right!


Yesterday I fitted the rear bumpers and license plate panel. I was fed up of tripping over them, and kicking them around the garage, and I figured the best place to colour-sand them would be on the car.
This evening I decided to fit my front bumper. The original one was so battered that I decided not to try to save it, and instead buy a fibreglass one from EB Motorsport. When it arrived, I thought it was so beautifully made that I didn't for one second doubt that it would fit the car perfectly. Well, this evening I discovered that I was very wrong. With the front bumper mounts painted and ready to fit, I lined them up with the bumper to find that the mounting points on the new fibreglass bumper bore absolutely no resemblance to the ones on the original steel one.
After an hour or two of bending the original brackets to try to get them to line up with at least one of the (crappy rivnut) holes on the new bumper, I decided a much simpler, cleaner, stronger course of action:

The bumper is made from chopped-strand fibreglass, which is a dirty whore of a material. Time to adjusted my working practices accordingly. After clamping the bumper in place with some of those welding-type mole grips, I loaded up the bumper mounts with Tiger Seal at the point at which they would contact the rear of the bumper...

... then slid them in behind the clamped-up bumper and bolted them to the car.
(That 'whump' noise, heard in the general direction of South-West London, is Mike Moore's head exploding).
Hopefully, in the morning, the Tiger Seal will have set and the clamps can be removed to leave the brackets holding the bumper nicely in position.
For utmost precision, I used Sharpies to ensure the correct gap for the seal:


I also fitted my SC front hubs the SC struts. I can't find the washers and the locking nuts that fit over the end of the spindle and hold the whole thing together, and the ones from my 912 struts are too small. This is how this project seems to go - I make good progress, then get stuffed by one tiny missing piece and end up tearing the house apart looking for it. It inevitably turns up somewhere I never put it.
'68 912
-
jb
- Me and DDK sitting in a tree! KISSING
- Posts: 2554
- Joined: Thu Jul 13, 2006 10:34 pm
- Location: London
Re: Back in beige
I have just spent ages exploring Jamie's twitter feed.
There is lots of amazing stuff there.
https://twitter.com/jameslipman
There is lots of amazing stuff there.
https://twitter.com/jameslipman
#1370
-
jamie
- Me and DDK sitting in a tree! KISSING
- Posts: 2587
- Joined: Mon Sep 18, 2006 12:23 am
- Location: Palm Springs, California
- Contact:
Re: Back in beige
I enjoy Twitter, but I can't put much of my work on there because most of what I photograph is embargoed till a later date.
So the stuff I can put on there is mostly drivel
So the stuff I can put on there is mostly drivel
'68 912
-
Lightweight_911
- Nurse, I think I need some assistance
- Posts: 17942
- Joined: Wed Nov 12, 2003 10:48 pm
- Location: Worcs/W Mids border
Re: Back in beige
Maybe they supplied you with a LWB front bumper ...jamie wrote:With the front bumper mounts painted and ready to fit, I lined them up with the bumper to find that the mounting points on the new fibreglass bumper bore absolutely no resemblance to the ones on the original steel one.
Andy
“Adding power makes you faster on the straights;
- subtracting weight makes you faster everywhere”
“Adding power makes you faster on the straights;
- subtracting weight makes you faster everywhere”