Restoring my first 914

For all you Porsche 914 fanatics!

Moderators: drummerboytom, MdR

Darren C
DDK rules my life!
Posts: 1397
Joined: Sat Dec 27, 2014 9:43 am
Location: Chichester UK

Re: Restoring my first 914

Post by Darren C »

Thanks Stuart, much appreciated. I did have a look on line but it seems to be a common fault for the lamps to overheat in the centre and melt the rear housings, US ebay is full of secondhand lights with melted holes! :roll:
Anyway this morning I started on the sill kick plates before breakfast. As with most body fittings they had blue overspray on them and badly masked thick blue paint on the ends. I cleaned this off with a little cellulose thinners on a cloth before giving them a good scrubbing with Cif cream before leaving for work.
Today at lunchtime I took the pop up light frames and bezels down to the blasters to clean up.
When I got home this evening there was a parcel from Rosepassion Porsche. It was the two jack hole plug/caps, the captive square spring nuts for the number plates and the two new roll bar top short ali trims.
The sill plates had dried over the day but they had numerous scuffs and marks on them (that I knew were there) and were a little grey and faded. This was compounded with some limescale from years of washing the car and the water left sitting on the plates.
The two front ends closest the door hinges had curled up and when I got the car were sitting about 1/4" high? I gently heated them on the rear with my heat gun and clamped them flat while they cooled to get them flat.
I then set about polishing them up. About 1 ½ hours on each and they came up really well to a very high gloss shine.
Before and after

Image

I managed to get both done before nightfall, ready for the grand assembly when the car finally comes home in a couple of weeks time. :)
@classiccarguru1
Darren C
DDK rules my life!
Posts: 1397
Joined: Sat Dec 27, 2014 9:43 am
Location: Chichester UK

Re: Restoring my first 914

Post by Darren C »

This morning the polish on the sill kick plates had dried and with all best intentions to buff it off yesterday there was still some slight white residue in the tiny groves of the plates. An old toothbrush dry scrub fetched it out and I put them into my shed for safe storage before leaving for work.
During lunch I called Porsche Centre and rattled off a few numbers I’d tracked down last night from PET.
Tonight when I arrived home there was a parcel from Just Kampers, it was the little sill rivets. It made me laugh when I opened the parcel and found each of the 26 rivets packed individually. :roll: It took me half an hour to unpack them all and put them into one small bag!
I then took out another collection of parts in a small box that I’d marked up rear boot.
This contained all the black plastic sleeves from the wiring loom retaining tabs. Mostly painted blue and covered in dirt. I spent a good while cleaning them all up with cellulose thinners.
Next was the rear rubber clips that hold the Targa roof in storage. Again blue paint and dirt so they got the same treatment.
The two white nylon front roof clips were next. They were rivet on so I’d carefully drilled out and removed them before going in to the paintshop. One of the eyelets was split from presumably the force of an enormous pop rivet. I searched out a few dome headed stainless socket head bolts, ones with a security pin in the hex hole at a glance they look just like a large pop rivet. The plan is to refit the clips with a nylock nut and gently nip them up to hold them securely without splitting the eyelet in two. Hopefully they’ll pass for rivets and if ever I need to change the clips I wont need to get the drill out again.
Next out of the box was two opaque plastic plugs that had been painted blue. A thinners soak and toothbrush got them looking good again. They’re the ones with the knurl edge which got all the ridges brushed clean to look like new.
The two jack straps were next. The rubber was split and perished but I’d already ordered new straps from 914rubber that arrived a couple of weeks ago. All that was required was to brass wire brush then furry white oxidation off the wire hoops and fixing plate and a light waxoil to dry overnight. Hope to assemble the hoops onto the new rubber straps in the morning.
Finally there was a few nuts, screws, bolts and washers that needed a clean and waxoil and the box of bits for the boot was completed. :)
@classiccarguru1
Mr Pharmacist
Me and DDK sitting in a tree! KISSING
Posts: 2698
Joined: Wed Oct 17, 2007 6:56 pm
Location: Leeds

Re: Restoring my first 914

Post by Mr Pharmacist »

I have found my housings in the garden!

The left is melted! The right looks OK on initial inspection though I need to give a clean really.

It's yours for the price of postage if you want it. If you want pics I will pm them to you. It will need to titivating but you seem rather good at rejuvenating faded old plastic bits!!
Stuart

1970 914 2056cc
1979 924 n/a - RIP
1986 924S
1969 912 Targa - sold
Darren C
DDK rules my life!
Posts: 1397
Joined: Sat Dec 27, 2014 9:43 am
Location: Chichester UK

Re: Restoring my first 914

Post by Darren C »

Cheers Stuart, much appreciated, pm me a picture, don’t worry about cleaning it up I’ll do all that….unless you previously buried it in the garden of course. :wink:

This morning before work I assembled the jack straps and pinched the hoops in my vice so they were nice and square before bagging them up for storage with the other dry waxoiled bits.
During lunch I phoned the paintshop for an update and they asked if I could call in and see them.
I visited after work and all it was, was a request to take the seats out the car. The whole car is now in primer and flatted. It goes in for colour tomorrow. They had difficulty spraying the primer under the roll bar over the rear window so asked if I could take the seats out so that they can climb easily in the car and get the spray gun at a better angle for the colour and lacquer. Not such an issue with primer when it gets flatted but the colour needs to be applied smoothly.
Seats obviously come out in seconds and it was quite a joke amongst the workshop guy’s there who took the micky out of the chap who asked me to come in and take them out when they saw me remove them in 5 seconds. Anyhow no bother to me as I’d rather they’d ask than force them if they didn’t know how to take them out. :)
Besides this kinda geed me on to getting them off to the trimmers. The basket weave is perfect but the vinyl on the headrests is sunbaked and cracked so the plan is to retain the basket weave inserts and replace all the plain vinyl.
Tonight when I got home I decided to prep the rear bulkhead trim panel for re-upholstery. It’s the same sun baked brittle as the headrests, so I hope to get the whole thing redone.
When I took it out I noticed the bottom of the panel was a little soft, weak and out of shape. Especially around the engine lid pull.
Flipping it over I could see that the hardboard type backboard must have gotten damp at some point (water stain marks on it) and it’s obviously been in and out in the past but looks like the sides had been pulled rather than taking out the 4 screws and lifting it vertically. The hardboard fibre material was delaminated and fractured. To simply re trim over it would not give a solid base and be all floppy.
The solution is an old car restorers trick I learnt 30 years ago that I’ll share.
All you need is a tin of wood rot hardener and a brush. It’s a clear liquid made for applying on rotten wood that soaks into it and sets rock hard to form a solid base to fill and paint. When brushed on old hardboard it soaks in and sets rock hard putting the strength back in. Ideal for back panels, door panels and headliner back panels that are soft and crumbly.
I painted the first 8-10 inches of the backing panel (after carefully stripping off the vinyl wrap around to gain access). 10 minutes later it was solid.

Image

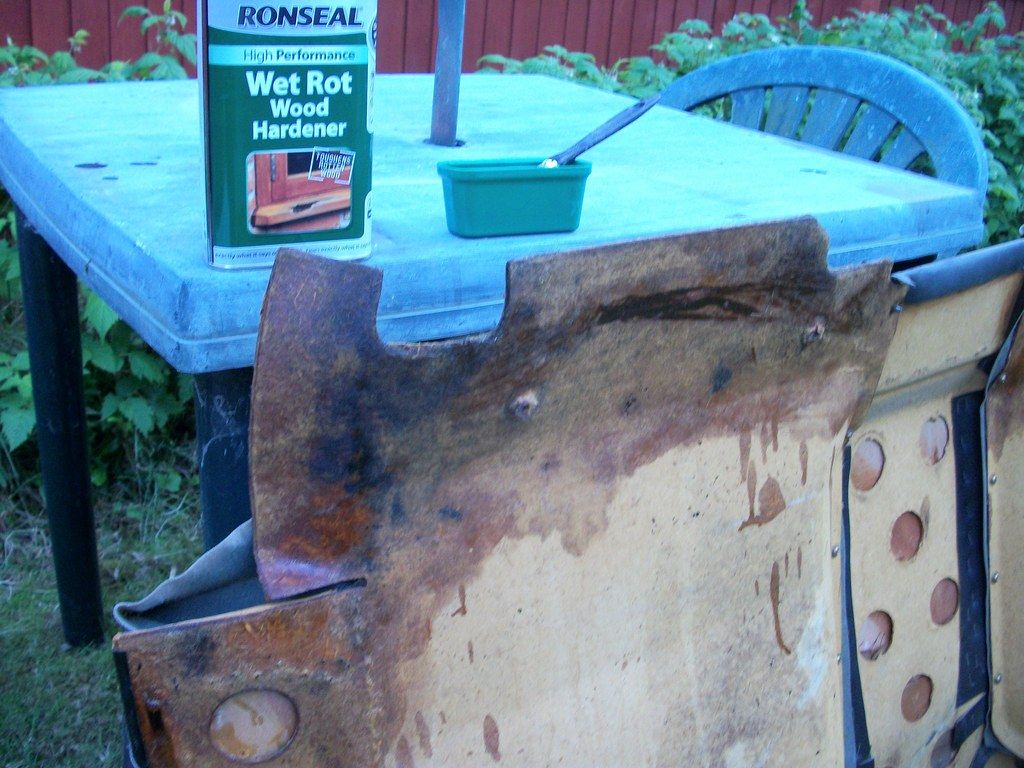
Next I concentrated on the area around the engine lid pull. It looks like someone in the past must have pulled the panel off without taking off the pull knob (un screws easily) and the escutcheon/sleeve which comes off the same way. The muppets had broken a large chunk out of the hardboard backing around the pull cable hole and bent and weakened the board in the area. :roll:
Despite the soak in wood hardener the backing board was not really in good shape to simply trim over.
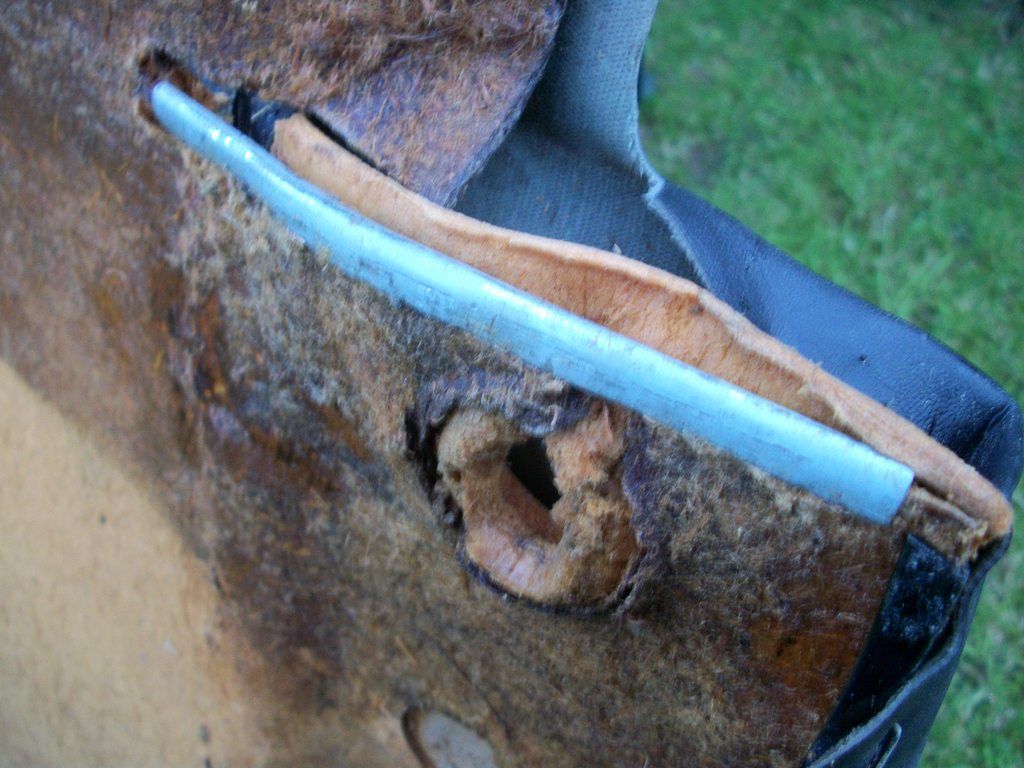
The panel has a factory “U”channel down the sides to strengthen the back board so I replicated it in some Zintec steel sheet I had in my workshop, made a”U” and because it was steel I could easily pinch it to nip up the metal over the hardboard to hold it on firmly. Finally there is a slight curvature in this edge so I carefully bent the new metal to the right shape.

Image

Tomorrow I plan to drop it off with the seats at my local trimmers, and when its recovered it should be nice and strong and the correct shape. :)
@classiccarguru1
Darren C
DDK rules my life!
Posts: 1397
Joined: Sat Dec 27, 2014 9:43 am
Location: Chichester UK

Re: Restoring my first 914

Post by Darren C »

This morning I loaded up the interior parts (bulkhead trim all nice and dried solid as a rock) and called in at the trimmers before work.
They had a good look over the seats and other parts and seem happy to do the things I asked (which is basically replace all vinyl except the basket weave which is still very good)
At lunchtime I had to nip out and pick some materials up for work from a supplier on the same estate as the paintshop so I stopped off for a good chat and watch them start to put the colour on the car.
This is the bit I really like with a restoration; it’s like reaching the summit of the whole job and gives a real feel good factor for the start of the grand assembly.
Stuart the painter put the very first base coat colour on and managed to take a couple of pictures from the end of the booth without contaminating the finish. This is the first of 3 planned coats and then a final lacquer top coat (all traditional metallic paint practice) I especially requested 2-pack paint which was specially ordered in. No namby-pamby water based rubbish here. :wink:

Image

Image

The bank holiday is good timing as the plan tomorrow is to leave it in the booth all weekend to dry, so it’ll get an extra day. :)
This also gives me time to sort the remaining removed parts out before it comes home next Friday. I plan to call in at the other bodyshop who are doing the bumpers, sills, valances and roof tomorrow morning to see how they’re getting on too. I hope to time it that they’ll be ready next Friday as well. In that way I can put them straight on the car (except roof) without them hanging around too long and risking getting marked.
Tonight when I got home I started on another bag of parts marked bonnet. This contained fixings for the headlight assemblies, chassis plates, cable clamp sleeves, various rubber bungs and screws. As per usual I spent a couple of hours cleaning it all up and substituting any parts for new that didn’t make the grade.
Finally I sorted out a few new little parts from the large 914rubber box and placed them in the right labelled bag for the area they fit.
Can’t resist wanting to call in the paintshop at some point tomorrow and check on the car with the lacquer on it before the weekend!!!
:) :) :)
@classiccarguru1
LMR
DDK slapper chatter
Posts: 456
Joined: Tue May 05, 2015 10:05 pm
Location: Solihull

Re: Restoring my first 914

Post by LMR »

superb momentum on this project. Mine will take a little longer, probably by a factor of 10!

Brilliant work!!
Porsche 964 1993
Porsche 944 1986 - sold
Porsche 914 1972
glovebox
DDK slapper chatter
Posts: 389
Joined: Tue Jul 06, 2010 10:38 pm
Location: Münster Germany

Re: Restoring my first 914

Post by glovebox »

Namby-pamby water based rubbish!?? [FACE SCREAMING IN FEAR][FACE SCREAMING IN FEAR][WINKING FACE]
Darren C
DDK rules my life!
Posts: 1397
Joined: Sat Dec 27, 2014 9:43 am
Location: Chichester UK

Re: Restoring my first 914

Post by Darren C »

Yep full carcinogenic, ozone depleting, Neuropsychiatric illnesses inducing Glasurit Beck 2 pack paint for me. :wink:
Waterbase is just pants, the finish is dull, the longevity is poor the chemical and chip resistance is weak and the durability is a joke. :roll:

Today was a typical black Friday at work, suffice to say I started at 7am and got home at 21:30, only because I made a conscious decision to get up and leave. We’re back in at 5am tomorrow so what wasn’t done after 9pm tonight will simply have to wait.
Besides there’s 914 bits to work on!

I did however manage to rush over to the blasters & powder coaters and picked up the pop up headlight frames, bowls and bezels during lunch. They look superb! The plan is tomorrow after work, to reassemble the parts and fit the new H4 headlights.

When I got home about half an hour ago there was a couple of parcels waiting by my shed.
The light adapters to fit side and indicator (white/amber lens euro conversion) bulb holders & housing/divider and in the second parcel was my rivet mimicking stainless bolts for the targa roof holding clamps in the boot.
I sorted a few parts out, into the correct Bonnet, Boot, bags while my dinner was cooking including some new bump stops and star washers. Half an hour today, but at least I found some time in my manic day today to do a little preparation. :)
@classiccarguru1
glovebox
DDK slapper chatter
Posts: 389
Joined: Tue Jul 06, 2010 10:38 pm
Location: Münster Germany

Re: Restoring my first 914

Post by glovebox »

Well glad it was Glasurit anyway ! [SMILING FACE WITH HEART-SHAPED EYES]
Darren C
DDK rules my life!
Posts: 1397
Joined: Sat Dec 27, 2014 9:43 am
Location: Chichester UK

Re: Restoring my first 914

Post by Darren C »

Today was a very early start at work, but I was out by early afternoon. I drove up to Guildford to look at an interesting potential new project for after the 914’s done for my son’s first car.
Back home late afternoon I started to assemble the pop up headlight parts. Tapping out all the threads and cleaning the holes for the bushes before assembly.
Copper grease on the fixed bolts and waterproof grease on the headlight adjusters I put them back together.

Image

Next the new RHD H4 headlights were added to complete the refurb.

Image

A wrap up in bubble wrap and boxed up into storage awaiting the car coming home next week.
I had a rummage in my shed and there’s enough bits left to keep me busy until next Friday so if it all works out then I just need to bolt everything that I’ve refurbished back on!
:) :) :)
@classiccarguru1
Darren C
DDK rules my life!
Posts: 1397
Joined: Sat Dec 27, 2014 9:43 am
Location: Chichester UK

Re: Restoring my first 914

Post by Darren C »

Today was an unusual day. This morning I got up early and cleaned one of my other classic cars and went across the village where I live to a grand opening of a automobilia distribution business and spent most of the day with Mike Brewer from Wheeler Dealers. I’d worked with him a couple of years ago on one of the shows and at a few PR events since, so it was nice to catch up on the gossip about the next series of shows planned and the cars they hope to feature. There’s a few nice pictures on Mike's Twitter page/website thingy and my car took pride of place behind Mike for his public address. (This was more by luck that planning) :wink:
I left mid afternoon and got a few hours in on the Front Fog lamps. The glass lenses are almost sand blasted to a frosted glass appearance by thousands of micro chips, I searched on line but have still to find a good new source of just the glass. I tried some jewelers rouge on them which seems to have started working, but after about 3 hours on one lens I’ve managed to clear only 10% of the chips. I suppose its 27 hours to go at this rate to clean up the first lens, or hopefully salvation if I can find a new supplier! :roll:
An old Armed Forces friend came around this evening with his new Audi S4, so work stopped while we went out for a rather nice test drive.
Funny old day, but at least somewhere in there I found 4 hours for the 914. :)
@classiccarguru1
chief
Married to the DDK
Posts: 281
Joined: Fri Jul 18, 2008 6:59 pm
Location: The Middle Lands

Re: Restoring my first 914

Post by chief »

More brilliant work Darren. Those lights look fantastic....
h'Project Blue Book' - 'The Red Baron' - Amber Alert!
Darren C
DDK rules my life!
Posts: 1397
Joined: Sat Dec 27, 2014 9:43 am
Location: Chichester UK

Re: Restoring my first 914

Post by Darren C »

Thanks Chief, much appreciated.

This morning I started getting “horny” :shock:

With the horns of course……..

Like everything else they were covered in sand and to make matters worse it looks like the garage that sprayed the bumpers with black stone guard just took off the grilles masked the spot light lens and sprayed away. The result was the front of the horns were covered in thick black stonechip paint overspray.
Suffice to say it took me ages to get it off with a combination of cellulose thinners and a plastic filler spreader as a scraper (so as not to scratch the horn face). Fortunately this was a blessing in disguise and the galvanised steel beneath was quite good. A brass bristle brush cleaned it up nicely.
The same process was repeated on the rear of the horns and care given to the spade terminals and mounting bracket to get them back to a presentable condition. :)

Image

Next I started on the fog/spot lamps. I’d started to take them apart yesterday and got side tracked trying to polish the glass free of stone chips.
The lamps themselves are a steel bowl with a single black epoxy spray coat. Even though my car is virtually rust free the lamps with no real decent primer or paint coat from new suffered worse. The bowls were very rusty on the rear. :(
The only thing for it was to strip them completely. I started on the Mazak mounting with a wire brush burnish and then on to the bowl to remove the paint and reveal the rust.

Image

Once clear of paint I spent a good hour with various grades of sandpaper to remove the rust. Finishing off with a 240 grit to key the surface for paint.
Before & after

Image

Repeating on the other lamp until they were both cleaned up, inside and out.
Lastly the bezels got the same treatment, but these are brass underneath so no rust. They did have flaky paint and like the bowls no primer, so the best way was just to strip them back to bare metal.

Image

Once all the parts were cleaned up I very carefully masked the Mazak mounting bracket inside and out and used my Swedish Punch set to cut perfect little circular bits of masking tape for the 4 rivet heads that hold the bracket to the bowl (as these aren’t supposed to be painted). OCD I know, you’ll never see them as they are tight against the car and behind a grille but the devil is in the detail and I know they’re right. :roll:
Lastly this evening I gave them a nice coat of etch primer all round and placed them in the oven at 50 Deg C for an hour.

Image

I’ve just taken them out and they will spend 24hrs in my conservatory until tomorrow evening when I get home from work and I can apply the satin black top coat.
:)
@classiccarguru1
jackstowers
DDK rules my life!
Posts: 1092
Joined: Sat Dec 08, 2007 4:25 pm
Location: Gillingham, Kent

Re: Restoring my first 914

Post by jackstowers »

Darren C wrote:Thanks Chief, much appreciated.

This morning I started getting “horny” :shock:

With the horns of course……..

Like everything else they were covered in sand and to make matters worse it looks like the garage that sprayed the bumpers with black stone guard just took off the grilles masked the spot light lens and sprayed away. The result was the front of the horns were covered in thick black stonechip paint overspray.
Suffice to say it took me ages to get it off with a combination of cellulose thinners and a plastic filler spreader as a scraper (so as not to scratch the horn face). Fortunately this was a blessing in disguise and the galvanised steel beneath was quite good. A brass bristle brush cleaned it up nicely.
The same process was repeated on the rear of the horns and care given to the spade terminals and mounting bracket to get them back to a presentable condition. :)

Image

Next I started on the fog/spot lamps. I’d started to take them apart yesterday and got side tracked trying to polish the glass free of stone chips.
The lamps themselves are a steel bowl with a single black epoxy spray coat. Even though my car is virtually rust free the lamps with no real decent primer or paint coat from new suffered worse. The bowls were very rusty on the rear. :(
The only thing for it was to strip them completely. I started on the Mazak mounting with a wire brush burnish and then on to the bowl to remove the paint and reveal the rust.

Image

Once clear of paint I spent a good hour with various grades of sandpaper to remove the rust. Finishing off with a 240 grit to key the surface for paint.
Before & after

Image

Repeating on the other lamp until they were both cleaned up, inside and out.
Lastly the bezels got the same treatment, but these are brass underneath so no rust. They did have flaky paint and like the bowls no primer, so the best way was just to strip them back to bare metal.

Image

Once all the parts were cleaned up I very carefully masked the Mazak mounting bracket inside and out and used my Swedish Punch set to cut perfect little circular bits of masking tape for the 4 rivet heads that hold the bracket to the bowl (as these aren’t supposed to be painted). OCD I know, you’ll never see them as they are tight against the car and behind a grille but the devil is in the detail and I know they’re right. :roll:
Lastly this evening I gave them a nice coat of etch primer all round and placed them in the oven at 50 Deg C for an hour.

Image

I’ve just taken them out and they will spend 24hrs in my conservatory until tomorrow evening when I get home from work and I can apply the satin black top coat.
:)
Mmmmmm! Primery dinner tonight then!
David

1973 914 zambezi green
1972 911T (lhd 71E engine)sadly sold
Darren C
DDK rules my life!
Posts: 1397
Joined: Sat Dec 27, 2014 9:43 am
Location: Chichester UK

Re: Restoring my first 914

Post by Darren C »

No, I just fancied something light. :lol:
@classiccarguru1
Post Reply